linux2.6内核的编译步骤及模块的动态加载-内核源码学习-linux论坛
编译Linux2.6内核并添加一个系统调用

1. 0 让新 内核和 旧内核 都可 以加载 的配置 的步骤 :
my. r h i 8 / o t z ma e/ o t / c /3 6 b o / l g b o a b mv. y t m. p/ o t / s e ma b o S
mv/ o t zma e/o t mln z 261 ..5 3 b / l g b b / i u - ..510 0 v
2 1 年第 4期 0 1
福
建 电
脑
19 4
编 译 iu26内 并 添 加 一 个 系统调 用 Ln x . 核
张 伟 华 .王 海 英 。高 静
(河南 财经政 法 大学成 功 学院 河 南 郑 州 4 10 5 2 0)
【 摘 要 】 本 文 以实例 来详 细描 述 了从 准备 一直 到使 用新 内核 的 Lnx 。 : iu 26内核 编译过 程 , 然后介 绍 了
轻 易地 对它进 行修 改 .使 我们 能够 根据 自己的要 求 度 身 定制 一个更 高效 、 更稳 定 的 内核 。
系统调 用【 用户 进程 与 系统之 间 的接 口, 们在 2 ] 是 它 内核 中实 现 .其 主要 目的是 使得 用户 可 以使 用操 作 系 统提 供 的操作底 层设 备 的功 能 用 户 程序 肯定 要 操作
mv/ o t y tm. p/ o ' y t m. p 2 6 1 .. 5 b / se ma b oJ s e ma - .. 5 10 03 S , S mk n td/ o g n td 2.. 5 10 0 . 6.5 1 ii b r i i - 6 1 . . 5 3 i 2. 1 r mg v / o t rbgu e n ib / u / r b.o f g
Linux设备驱动程序原理及框架-内核模块入门篇
Linux设备驱动程序原理及框架-内核模块入门篇内核模块介绍应用层加载模块操作过程内核如何支持可安装模块内核提供的接口及作用模块实例内核模块内核模块介绍Linux采用的是整体式的内核结构,这种结构采用的是整体式的内核结构,采用的是整体式的内核结构的内核一般不能动态的增加新的功能。
为此,的内核一般不能动态的增加新的功能。
为此,Linux提供了一种全新的机制,叫(可安装) 提供了一种全新的机制,可安装) 提供了一种全新的机制模块” )。
利用这个机制“模块”(module)。
利用这个机制,可以)。
利用这个机制,根据需要,根据需要,在不必对内核重新编译链接的条件将可安装模块动态的插入运行中的内核,下,将可安装模块动态的插入运行中的内核,成为内核的一个有机组成部分;成为内核的一个有机组成部分;或者从内核移走已经安装的模块。
正是这种机制,走已经安装的模块。
正是这种机制,使得内核的内存映像保持最小,的内存映像保持最小,但却具有很大的灵活性和可扩充性。
和可扩充性。
内核模块内核模块介绍可安装模块是可以在系统运行时动态地安装和卸载的内核软件。
严格来说,卸载的内核软件。
严格来说,这种软件的作用并不限于设备驱动,并不限于设备驱动,例如有些文件系统就是以可安装模块的形式实现的。
但是,另一方面,可安装模块的形式实现的。
但是,另一方面,它主要用来实现设备驱动程序或者与设备驱动密切相关的部分(如文件系统等)。
密切相关的部分(如文件系统等)。
课程内容内核模块介绍应用层加载模块操作过程内核如何支持可安装模块内核提供的接口及作用模块实例内核模块应用层加载模块操作过程内核引导的过程中,会识别出所有已经安装的硬件设备,内核引导的过程中,会识别出所有已经安装的硬件设备,并且创建好该系统中的硬件设备的列表树:文件系统。
且创建好该系统中的硬件设备的列表树:/sys 文件系统。
(udev 服务就是通过读取该文件系统内容来创建必要的设备文件的。
)。
linux编译方法

linux编译方法随着信息技术的发展,Linux操作系统在各个领域中得到了广泛应用。
为了能够更好地使用和开发Linux,对于Linux的编译方法有着深入的了解是十分必要的。
本文将介绍Linux的编译方法,包括准备工作、编译过程以及常见问题的处理。
一、准备工作在进行Linux编译之前,需要进行一些准备工作来保证编译的顺利进行。
1.1 环境搭建首先,需要确保你的系统已经安装了必要的软件和工具,比如gcc编译器、make工具等。
可以通过运行以下命令来检查软件是否已经安装:```shellgcc --versionmake --version```如果显示相应软件的版本号,则表示已经安装成功。
1.2 获取源代码在开始编译之前,需要先获取源代码。
通常情况下,你可以从开源项目的官方网站或者代码托管平台上下载源代码。
通过以下命令可以从远程仓库中克隆代码到本地:```shellgit clone <repository_url>```其中`<repository_url>`是代码仓库的URL地址。
二、编译过程在准备工作完成后,就可以进行Linux的编译了。
下面介绍一般的编译过程。
2.1 配置首先,在源代码所在的目录中运行以下命令来进行配置:```shell./configure```配置命令会检查系统环境,并生成一个Makefile文件,用于后续的编译。
2.2 编译配置完成后,运行以下命令进行编译:make```编译命令会根据Makefile文件中的规则,将源代码编译为可执行文件或者库文件。
2.3 安装编译完成后,可以运行以下命令来进行安装:```shellmake install```安装命令会将编译生成的文件复制到系统指定的目录中,使得这些文件可以被系统正常调用和使用。
三、常见问题处理在进行Linux编译的过程中,可能会遇到一些常见的问题。
下面列举一些常见问题及其解决方法。
3.1 缺少依赖库在编译过程中,可能会提示缺少某些依赖库。
Linux内核编译过程详解
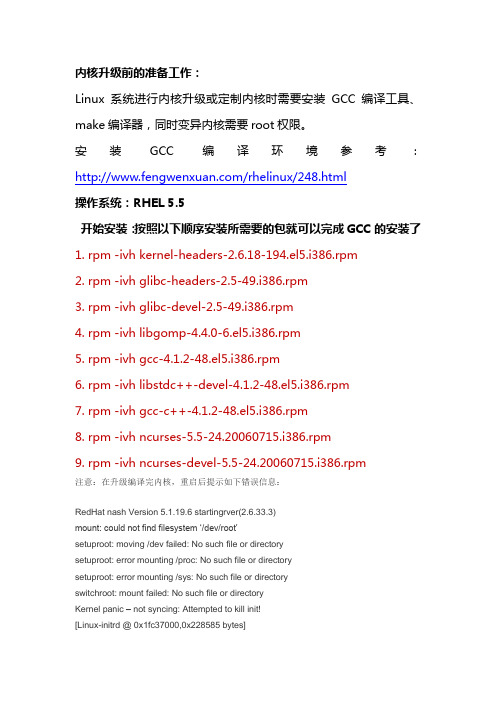
内核升级前的准备工作:Linux系统进行内核升级或定制内核时需要安装GCC编译工具、make编译器,同时变异内核需要root权限。
安装GCC编译环境参考:/rhelinux/248.html操作系统:RHEL 5.5开始安装:按照以下顺序安装所需要的包就可以完成GCC的安装了1. rpm -ivh kernel-headers-2.6.18-194.el5.i386.rpm2. rpm -ivh glibc-headers-2.5-49.i386.rpm3. rpm -ivh glibc-devel-2.5-49.i386.rpm4. rpm -ivh libgomp-4.4.0-6.el5.i386.rpm5. rpm -ivh gcc-4.1.2-48.el5.i386.rpm6. rpm -ivh libstdc++-devel-4.1.2-48.el5.i386.rpm7. rpm -ivh gcc-c++-4.1.2-48.el5.i386.rpm8. rpm -ivh ncurses-5.5-24.20060715.i386.rpm9. rpm -ivh ncurses-devel-5.5-24.20060715.i386.rpm注意:在升级编译完内核,重启后提示如下错误信息:RedHat nash Version 5.1.19.6 startingrver(2.6.33.3)mount: could not find filesystem …/dev/root‟setuproot: moving /dev failed: No such file or directorysetuproot: error mounting /proc: No such file or directorysetuproot: error mounting /sys: No such file or directoryswitchroot: mount failed: No such file or directoryKernel panic – not syncing: Attempted to kill init![Linux-initrd @ 0x1fc37000,0x228585 bytes]于是在网上找了很多,也尝试了很多加模块、重编译了N次、改fstab等方法,都不行。
linux 2.6 kernel移植到QEMU Mips的源代码文档.

Port Linux 2.6 Kernel to Qemu MipsAuthor: Joy Tang2009.1Version 1.02Overview•Use open source to study, no confidential information inside.•If we need deep view inside linux, we must understand what kernel do.•This doc is for build up mips for linux environment run on X86 emulator machine.I, Build Kernel•Target•Main CPU: QEMU emulate Mips•Cross Compile:mips-linux•Develop Environment: Red Hat•Notes, QEMU also support melta board, and MIPSsim. Reference web page: https:///mailarchive/git-commits-head/2008/1/29/636729/thread, from version linux 2.6.25, it remove qemu mips inside.Prepare Working•Prepare Working:•Download source code of Linux:•Annymos login •Go to the folder "/pub/linux/kernel/v2.6" inside FTP.•Get the source code:tar -jxvf linux-2.6.22.19.tar.bz2•2.6.21 will be another choice.Add Toolchain to Search Path•vi /etc/profile, add following lines•PATH="$PATH:/opt/hardhat/devkit/mips/lexra_fp_b e/bin"•PATH="$PATH:/opt/hardhat/devkit/mips/lexra_fp_b e/target/bin"•PATH="$PATH:/opt/build_mips_nofpu/mips-uClibc-linux/usr/bin“•…Change Makefile•vi Makefile, search SUBARCH•Change toSUBARCH := mips•Find CROSS_COMPILE, change toCROSS_COMPILE ?= mips-linux-•vi arch/mips/Makefile, search cflags-y:=, if it is cflags-y:= mips1, change it to cflags-y:=•The change base on user itself environment.Start to Build, Step1•Make config or make menuconfig or make xconfig •Change CPU to QEMU•Add support for “Initial RAM filesystem and RAM disk”. (Initial RAM filesystem and RAM disk (initramfs/initrd) support (BLK_DEV_INITRD) [N/y/?] n change to Y)•Change many other settings, such as MAP_RAM, MTD support, MTD_PLATRAM•Attach .config file for reference. (end of this doc)•File system analyses•In company file system, there are 4 mtds, •1, busybox=> mtd1•2, kernel=>mtd2•3, workdir=>mtd3•4, jffs etc folder=> mtd4•This step will mount all this 4 files.•Change source:go to drivers/mtd/maps.•Run cp cfi_flagadm.c qemuflash.c•Change linux/drivers/mtd/maps/Kconfig, find config MTD_CDB89712, after it, addconfig MTD_QEMU_EMUFLASHtristate"gggggg qemu emu flash”•Also change Makefile under linux/drivers/mtd/maps/ Find obj-$(CONFIG_MTD_CDB89712)+= cdb89712.o, after it, addobj-$(CONFIG_MTD_QEMU_EMUFLASH)+= qemuflash.o•See attach (makefile& kconfig, end of this doc)•For the file, qemuflash.c, there is some comments:•mtd0,mtd1, mtd2 is not used. Mtd3 is for workdir, mtd4 is for jffs etc folder.•Here is attach. (end of this doc)•Go to folder \fs\jffs2, open earse.c, line 350, function jffs2_block_check_erase, add a qemu patch#ifdef CONFIG_QEMU#elseprintk(KERN_WARNING"Newly-erased block ……#endif•Goto root folder, run make config, press enter until it quit. This is for correct errors in the file “.config”•Run build commandmake all•Run commandcp -f ./vmlinux/opt/emularor/qemu/mips/myimages2…After that, kernel elf file will be send to qemu folderII, Build Qemu•Download qemu packet on web/qemu/download.html•Get the file /qemu/qemu-0.9.1.tar.gz •Uncompress it. In order to save time, inside file config-host.mak: change TARGET_DIRS to mips-softmmu.•Open root folder\vl.c•Add following lineschar g_mtdFileName_etcSave[1024];char g_mtdFileName_workdir[1024];•At beginning of main function, addmemset(g_mtdFileName_etcSave, 0, 1024);memset(g_mtdFileName_workdir, 0, 1024);At the end of function drive_init, add following lines if (type == IF_PFLASH && g_mtdFileName_etcSave[0] == 0){//mtd will load to bios mem, save file name firstsprintf(g_mtdFileName_etcSave, "%s", file);}if (type == IF_MTD && g_mtdFileName_workdir[0] == 0){//mtd will load to bios mem, save file name firstsprintf(g_mtdFileName_workdir, "%s", file);}•Go to “hw”folder, open mips_r4k.c, add following lines •extern char g_mtdFileName_etcSave[1024]; //2M •extern char g_mtdFileName_workdir[1024]; //30M•#define START_ADDR_ETC_SAVE 0x1fc00000•#define SIZE_ETCSAVE 0x00200000•#define START_ADDR_WORKDIR 0x1fe00000•At the end of function, mips_r4k_init, add following lines, add processing of g_mtdFileName_etcSave andg_mtdFileName_workdir.Build QEMU Step 3(continue) if (g_mtdFileName_etcSave[0]){bios_offset= ram_size+ vga_ram_size;bios_size= load_image(g_mtdFileName_etcSave, phys_ram_base+ bios_offset);if ((bios_size> 0) && (bios_size<= BIOS_SIZE))cpu_register_physical_memory(START_ADDR_ETC_SAVE,BIOS_SIZE, bios_offset| IO_MEM_ROM);else/* not fatal */ fprintf(stderr, "qemu: Warning, could not load MIPS bios '%s'\n",buf);}if (g_mtdFileName_workdir[0]){bios_offset= ram_size+ vga_ram_size+ SIZE_ETCSAVE;bios_size= load_image(g_mtdFileName_workdir, phys_ram_base+ bios_offset);if ((bios_size> 0) && (bios_size<= BIOS_SIZE))cpu_register_physical_memory(START_ADDR_WORKDIR,BIOS_SIZE, bios_offset| IO_MEM_ROM);else/* not fatal */fprintf(stderr, "qemu: Warning, could not load MIPS bios '%s'\n",buf);}Attach mips_r4k.c, end of this doc•Open root folder sysemu.h, change 4m to 32m#define MAX_BIOS_SIZE (32 * 1024 * 1024)…#elif defined(TARGET_MIPS)#define BIOS_SIZE (32 * 1024 * 1024) //we want use bios ram to be mtd area #endif•Here is attach file for it. (end of this doc)•Run following command: ./configuremakemake installIII, Build busybox •Find web /downloads/, choose/downloads/busybox-1.6.1.tar.bz2•Uncompress it.•Change make file, like the build kernel,•vi Makefile, search SUBARCH•Change toSUBARCH := mips•Find CROSS_COMPILE, change toCROSS_COMPILE ?= mips-linux-Build busybox Step2•make xconfig•Change settings for it, make sure the mount & fdisk is inside.•make\n•make install\n•cd./_install\n•rm dev -rf\n•cp /opt/source/flashmaster_prxxx_fe-1.0.linux-2.6-2/res/1.0/rootfs.mips_nofpu/dev/ ./dev -rf\n•cd-\n•cp -f --reply=yes /opt/source/flashmaster_prxxx_fe-1.0.linux-2.6-2/res/1.0/rootfs.mips_nofpu/sbin/portmap ./_install/sbin\n•../flashmaster_prxxx_fe-1.0.linux-2.6-2/bin/mkcramfs -Nb_install/ a.mtd\n •cp -f --reply=yes a.mtd../emulator/qemu/mips/\nIV,MTD files, step 1•There are 4 MTD files in real system, now we design each to a file,•A, MTD1, it will be busy-box => -initrd“filename”•B, MTD2, it will be kernel=>-kernel “filename”•C, MTD3, it will be workdir=>-mtdblock“filename”•D, MTD4, it will jffs2 format etc/save=>-pflash“filename”•MTD files Step 2•For 1st, busybox, run following command to create it cd/opt/…/flashmaster_prxxx_fe-1.0.linux-2.6-2/res/1.0 mkdir rootfs.mips_nofpu/dev/netmknod rootfs.mips_nofpu/dev/net /tun c 10 200chmod0666 rootfs.mips_nofpu/dev/net /tun../../bin/mkcramfs -Nb rootfs.mips_nofpu a.mtd•or directly use exist one “mtd1.img”.•For 2nd, use build kernel file “vmlinux”•For 3rd, use workdir•For 4th, run following command../../bin/mkfs.jffs2 -o etcsave.mtd-d ./etc -e 65535 -p ff -bComments of MTD•For 1st, parameter –initrd use it as ram-disk. It will loaded to ram of qemu memory space.•For 2nd, parameter –kernel use same concept of 1st.•For 3rd, it emulate a flash, it start address will be 2M, 0x1fc00000 + 0x00200000, size 30M, 0x01E00000•For 4th, its start address will be 0M0x1fc00000 + 0x0000000, size 2MV, Create script fileto run kernel •Its contentsinitarg="init=/linuxrc root=/dev/hda root2=/dev/hd18" mtdparameter="-mtdblock./boot/workdir.mtd“pflashparameter="-pflash./boot/etcsave.mtd“time \${qemupath}qemu-system-mips\-kernel ./myimages2/vmlinux \-initrd a.mtd\-append "console=ttyS0 $initarg" \-nographic\-m 128 \$pflashparameter\$mtdparameter\-net nic,vlan=1 -net user,vlan=1Comments for the script file•-nographic can be removed. If it is exist, qemu emulator will not show command console, we can use secure-crt’s SSH2 account to do this.•If it is not exist, we must run under x window in linuxAdd function for readphysical memory in QEMU •Add a function in monitor.c, do_phymemory_save •Detail is in attachment monitor.cFor run qemu command•Use graphic, ctrl+alt+2•Run command•Here is help:•help|? [cmd] --show the help•commit device|all--commit changes to the disk images (if -snapshot is used) or backing files •info subcommand --show various information about the system state•q|quit--quit the emulator•eject [-f] device --eject a removable medium (use -f to force it)•change device filename --change a removable medium•screendump filename --save screen into PPM image 'filename'•logfile filename --output logs to 'filename'•log item1[,...] --activate logging of the specified items to '/tmp/qemu.log'•savevm tag|id--save a VM snapshot. If no tag or id are provided, a new snapshot is created •loadvm tag|id--restore a VM snapshot from its tag or id•delvm tag|id--delete a VM snapshot from its tag or id•stop --stop emulation•c|cont--resume emulation•gdbserver[port] --start gdbserver session (default port=1234)•x /fmt addr--virtual memory dump starting at 'addr'•xp/fmt addr--physical memory dump starting at 'addr'•p|print/fmt expr--print expression value (use $reg for CPU register access)•i /fmt addr--I/O port read•sendkey keys --send keys to the VM (e.g. 'sendkey ctrl-alt-f1')•system_reset--reset the system•system_powerdown--send system power down event•sum addr size --compute the checksum of a memory region•usb_add device --add USB device (e.g. 'host:bus.addr' or 'host:vendor_id:product_id')•usb_del device --remove USB device 'bus.addr'•cpu index --set the default CPU•mouse_move dx dy[dz] --send mouse move events•mouse_button state --change mouse button state (1=L, 2=M, 4=R)•mouse_set index --set which mouse device receives events •wavcapture path [frequency bits channels] --capture audio to a wave file (default frequency=44100 bits=16 channels=2)•stopcapture capture index --stop capture•memsave addr size file --save to disk virtual memory dump starting at 'addr' of size 'size'•pmemsave addr size file --save to physical memory memory dump starting at 'addr' of size 'size'VI,Study on mount cd iso,harddiskand share files•1)For mount hda and cdrom correctly, we need open following kernel options:•A, ATA IDE support option.•B, VFS support•C, CDROM ISO9660 file system support•(“make xconfig”to find&open it. Recompile and build kernel again)•2)Go to /dev folder inside root file system prepare folder, run following command:•mknod hdc b 22 0•3)inside run-qemu script file, add•-cdrom./cd.ISO-hda linux.img.•(cd.ISO can be any cdrom iso file, linux.img copy fromhttp://lassauge.free.fr/qemu/release/Qemu-0.9.1-windows.zip. ./share is a folder for share between qemu and host x86 linux system)•4)After all file prepared, in qemu kernel, test this:•mount /dev/hda/tmp3 => hda will be linux.img’s data•mount /dev/hdc/tmp4 => hdc will be cdrom’s dataMount(continued)Now I want to share data with vmware. Here is steps to share data with vmware:1, inside vmware, create a IDE harddisk disk, select persistent and independent. Minimum size is 0.1GB, (100MB). Suppose it use hdd inside vmware, its file name is “vmware-qemu-flat.vmdk”. When generate it, choose a special folder for it. It is for share purpose.2, let the share folder inside a folder /mnt/hgfs. (The other topic, vmware tools.)3, inside vmware, run command: fdisk/dev/hdd. Use “n”command to create a new partition.4, inside vmware, run mkfs/dev/hdd. Then vmdk file is formatted. Copy new vmdk file to qemu’s folder, suppose it is “./share”. Make sure don’t format other partition inside vmware. ☺5, add parameter in run qemu-mips-system script: -hda/mnt/hgfs/share-qemu/vmware-qemu-flat.vmdk. Start the qemu-mips-system. Use this command in vm: mount /dev/hda/tmp3.6, With upper steps, the vmdk file can be share between qemu and vmware. It will be useful to share files.7, Before transfer the vmdk files between vmware and qemu, pls run “sync”. It is for write buffer’s data. “sync”may not enough. Maybe need “poweroff”VII. GDB for debug kernel•Step1, need re-build kernel. Run “make xconfig”, open many options in “kernel hacking”, such as “compile kernel with debug info”etc.After compile, we can find kernel image size change from about 4m to about 20m. This is normal.•Step2,use X window linux, in command script, remove –nographic, add a paramter–S, it is for stop kernel and wait for gdb command.•Step3, after qemu window start, you will see black screen but press Ctrl-Alt-3 to see bash prompt. Press Ctrl-Alt-2, go to qemu command window, press “gdbserver”, at this time, qemu will start to listen port 1234.•Step4, start another linux terminal, run “mips-linux-gdb vmlinux”, in gdb, run command “(gdb)target remote localhost:1234”, you will find gdb can trace kernel now.VIII network1, host preparation in linux •From /progDownload/tunctl-Download-41592.html download tunctl-1.5.tar.gz•Comment 2 lines,•#docbook2man $(PACKAGE).sgml•#install $(MAN) $(DESTDIR)$(MAN_DIR)•make•make install•Find if host linux kernel have “tun.ko”•[root@...~]# find /lib -name "tun.ko"•/lib/modules/2.6.9-22.EL/kernel/drivers/net/tun.konetwork•Goto guest kernel folder, run “make xconfig”•Find “network device support”=> “other ISA cards”=>”ne2000/ne1000 support”, open it.•Re-compile your guest kernel after the change.network•-----------------------------------------"create /usr/local/sbin/tap.sh file (e1000g0 is network card label, this file is at host) -----------------------------------------#!/bin/sh•IF=e1000g0•TAP=tap0•case "$1" in•"start")•sudo tunctl-t $TAP•ifconfig$TAP plumb•brdgadm-a $IF•brdgadm-a $TAP•;;•"stop")•#brdgadm-d $IF•#brdgadm-d $TAP•ifconfig$TAP unplumb•sudo tunctl-d $TAP•;;•esac•exit 0•------------------------------------# /usr/local/sbin/tap.sh start## /usr/local/sbin/tap.sh stop------------------------------------network•After run “tap.sh start”on host of linux, we check if tun.ko is probed: “lsmod | grep tun“,•tun 9153 0•And also we check if tap0 device is power up,•ifconfig –a, we can find a new device tap0 is power on.•We can run following command in host linux:“ifconfig tap0 192.168.200.1“.•Create a file, vi /etc/qemu-ifup#!/bin/shifconfig$1 192.168.200.10Network2, guest•Add following string to qemu-run script:•-net nic,vlan=1,macaddr=00:aa:00:00:01:01 -net tap,vlan=1,ifname=tap0•Startup qemu-system-mips by the added script file.•In guest linux shell, run:•ifconfig eth0 192.168.200.11•ping -c 4 192.168.200.1 to check if network is ok.Network error•I meet this error:•# ping -c 3 192.168.200.10•PING 192.168.200.10 (192.168.200.10): 56 data bytes•NETDEV WATCHDOG: eth0: transmit timed out•NETDEV WATCHDOG: eth0: transmit timed out•---192.168.200.10 ping statistics ---• 4 packets transmitted, 0 packets received, 100% packet loss•After I change this file, arch/mips/kernel/i8259.c , I solve the issue on guest linux2.6.21.•add .disable = disable_8259A_irq,on line 39•[root@localhost linux-2.6.21.7]#diff ./arch/mips/kernel/i8259.c ./arch/mips/kernel/i8259_test.c•39d38•< .disable = disable_8259A_irq•Reference web for the patch:•/mm-commits@/msg24505.html or •/Mailing-Lists/Kernel/2007-07/msg12733.html3, Network prepare inhost Windows XP host system•1, go to /BBS/thread-3209-1-1.html, download tapnic.rar.•After click “addtap.bat”, a new driver for virtual XP network is generated. Please rename it to tap0.•Reference web http://www.h7.dion.ne.jp/~qemu-win/TapWin32-en.html.XP windows hostprepare for network •Force IP address of tap0:Windows XPprepare•Run this command for windows XP:•qemu-system-mips.exe-L . -m 192 -kernel .\myimages2\vmlinux -initrd a.mtd-append "console=ttyS0 init=/linuxrc root=/dev/hda pci=noapicisa=noapic" -M mips-cdrom./cd.ISO-hda./share/vmware-qemu-flat.vmdk-net nic,vlan=1,macaddr=00:aa:00:00:01:01 -net tap,vlan=1,ifname=tap0,vlan=1,ifname=tap0•Guest OS preparation same as upper mentioned hostlinux+guest linux.Rootfs changefor the network•In order to mount nfs server on host linux or windows host, I add nfs support in guest kernel option, but still cannot mount nfs folder.•Later I add follow lines in rc.sysinit and solve the unable mount issue.ifconfig lo 127.0.0.1netmask255.0.0.0 broadcast 127.255.255.255 portmapmount -t ramfs ramfs/tmp-o maxsize=4000More Host Preparationfor Network•1, windows, for NFS work, need install cygwin, make sure NFS module is installed. We need edit “C:\cygwin\etc\hosts”and “C:\cygwin\etc\exports”for NFS setting•2, Linux, make sure NFS work. It is at “start menu”=>”system setting”=> “server setting”=> “nfs setting”Malta board(Mips24k)& Graphics study•MTD_PHYSMAP need to be closed.•Because Malta board has graphics card support, now I start to study malta board.•1) get svn code from internet:•svn co svn:///qemu/trunk•2)don’t change anything on qemu code like before because there is a crash on change code and I find workdir also can be mounted on /dev/hdc. Also don’t need to change guest kernel code, it can be optional.•3)copy malta/.config to guest kernel folder. Build guest kernel with 2 commands: make config, make allMalta (continue)•4, create a script file, my-run-qemu without graphic support(in attachment, /malta/script) and another script file, graphics-qemu with graphic support. •run the graphic script file. For malta board, we don’t need change arch/mips/kernel/i8259.c like the fake qemu board.•Under guest linux, run “mount /dev/hdc/tmp3”to check if workdir is mounted on /tmp3.Some capture imageon malta platform•Graphic display after press “ctrl+alt+1”•After run some command, network mount is working.Futher topic & summerize•There are still 1 important topics Emulate every device inside Mips chip.•That’s all•Because pdf file don’t support *.rar file asas attachment, pls rename the txt to rar.。
Linux2.6内核移植系列教程
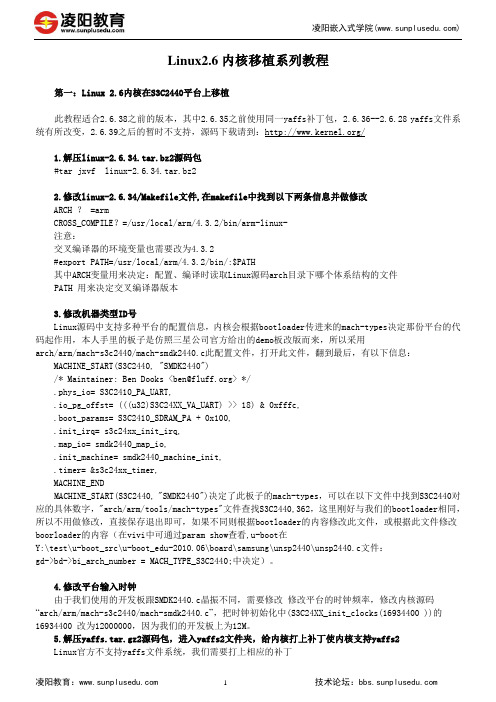
Linux2.6内核移植系列教程第一:Linux 2.6内核在S3C2440平台上移植此教程适合2.6.38之前的版本,其中2.6.35之前使用同一yaffs补丁包,2.6.36--2.6.28 yaffs文件系统有所改变,2.6.39之后的暂时不支持,源码下载请到:/1.解压linux-2.6.34.tar.bz2源码包#tar jxvf linux-2.6.34.tar.bz22.修改linux-2.6.34/Makefile文件,在makefile中找到以下两条信息并做修改ARCH ? =armCROSS_COMPILE?=/usr/local/arm/4.3.2/bin/arm-linux-注意:交叉编译器的环境变量也需要改为4.3.2#export PATH=/usr/local/arm/4.3.2/bin/:$PATH其中ARCH变量用来决定:配置、编译时读取Linux源码arch目录下哪个体系结构的文件PATH 用来决定交叉编译器版本3.修改机器类型ID号Linux源码中支持多种平台的配置信息,内核会根据bootloader传进来的mach-types决定那份平台的代码起作用,本人手里的板子是仿照三星公司官方给出的demo板改版而来,所以采用arch/arm/mach-s3c2440/mach-smdk2440.c此配置文件,打开此文件,翻到最后,有以下信息:MACHINE_START(S3C2440, "SMDK2440")/* Maintainer: Ben Dooks <ben@> */.phys_io= S3C2410_PA_UART,.io_pg_offst= (((u32)S3C24XX_VA_UART) >> 18) & 0xfffc,.boot_params= S3C2410_SDRAM_PA + 0x100,.init_irq= s3c24xx_init_irq,.map_io= smdk2440_map_io,.init_machine= smdk2440_machine_init,.timer= &s3c24xx_timer,MACHINE_ENDMACHINE_START(S3C2440, "SMDK2440")决定了此板子的mach-types,可以在以下文件中找到S3C2440对应的具体数字,"arch/arm/tools/mach-types"文件查找S3C2440,362,这里刚好与我们的bootloader相同,所以不用做修改,直接保存退出即可,如果不同则根据bootloader的内容修改此文件,或根据此文件修改boorloader的内容(在vivi中可通过param show查看,u-boot在Y:\test\u-boot_src\u-boot_edu-2010.06\board\samsung\unsp2440\unsp2440.c文件:gd->bd->bi_arch_number = MACH_TYPE_S3C2440;中决定)。
内核编译的步骤
内核编译的步骤以内核编译的步骤为标题,写一篇文章。
一、概述内核编译是将操作系统内核的源代码转换为可以在特定硬件平台上运行的机器代码的过程。
通过编译内核,可以定制操作系统,优化性能,添加新的功能等。
二、准备工作1. 获取内核源代码:可以从官方网站或版本控制系统中获取内核源代码。
2. 安装编译工具链:需要安装交叉编译工具链,以便在主机上编译生成目标平台上的可执行文件。
3. 配置编译环境:设置编译选项,选择适合的配置文件,配置内核参数。
三、配置内核1. 进入内核源代码目录:在命令行中切换到内核源代码目录。
2. 启动配置界面:运行命令“make menuconfig”或“make config”启动配置界面。
3. 配置选项:在配置界面中,可以选择内核所支持的功能和驱动程序,根据需求进行配置。
例如,选择硬件平台、文件系统、网络协议等。
4. 保存配置:保存配置并退出配置界面。
四、编译内核1. 清理编译环境:运行命令“make clean”清理编译环境,删除之前的编译结果。
2. 开始编译:运行命令“make”开始编译内核。
编译过程可能需要一段时间,取决于硬件性能和代码规模。
3. 生成内核镜像:编译完成后,将生成内核镜像文件,通常为“vmlinuz”或“bzImage”。
4. 安装内核模块:运行命令“make modules_install”安装内核模块到指定目录。
五、安装内核1. 备份原始内核:在安装新内核之前,建议备份原始内核以防止意外情况发生。
2. 安装内核镜像:将生成的内核镜像文件复制到引导目录,通常为“/boot”。
3. 配置引导程序:根据使用的引导程序(如GRUB或LILO),更新引导配置文件,添加新内核的启动项。
4. 重启系统:重启计算机,并选择新内核启动。
六、验证内核1. 登录系统:使用新内核启动系统后,使用合法的用户凭证登录系统。
2. 检查内核版本:运行命令“uname -r”可查看当前正在运行的内核版本。
Linux操作系统的编译和安装
Linux操作系统的编译和安装在正文规定的字数限制下,为了准确满足标题描述的内容需求,并确保内容排版整洁美观、语句通顺、全文表达流畅且无影响阅读体验的问题,本文将按照以下格式进行写作:一、简介Linux操作系统是一种开源的、自由的Unix-like操作系统,它广泛应用于各种领域,包括服务器、嵌入式设备等。
本文将重点介绍Linux 操作系统的编译和安装过程。
二、编译准备1. 下载源代码在编译Linux操作系统之前,首先需要从官方网站下载Linux内核的源代码包。
2. 安装必要的依赖软件在编译过程中,需要安装一些必要的软件和工具,如编译器、构建工具等。
三、编译步骤1. 解压源代码包使用解压命令将下载的源代码包解压到指定目录。
2. 配置编译选项进入源代码目录,并运行配置命令,根据需要选择不同的编译选项。
3. 执行编译命令运行编译命令开始编译操作系统内核,这个过程可能需要一段时间。
四、安装步骤1. 安装编译生成的内核镜像文件将编译生成的内核镜像文件复制到合适的位置,并修改相关配置文件以引导新编译的内核。
2. 安装相关系统文件运行安装命令,将其他必要的系统文件复制到适当的位置。
五、系统配置1. 修改引导加载程序根据系统的引导加载程序,如GRUB、LILO等,修改引导配置文件以支持新安装的内核。
2. 配置网络和驱动程序根据具体需求,配置网络设置和硬件驱动程序。
六、测试与验证1. 重新启动系统重新启动计算机,并选择新编译的内核进行引导。
2. 验证系统版本和功能运行相应的命令,验证新安装的Linux操作系统版本和功能是否正确。
七、常见问题解决1. 编译错误分析编译过程中出现的错误信息,根据错误提示进行逐步修复。
2. 硬件兼容性问题部分硬件设备可能需要额外的驱动程序或补丁文件才能正常运行,根据具体情况进行相应的处理。
八、总结通过本文的介绍,读者可以了解到Linux操作系统的编译和安装过程,同时了解到在实际操作中会遇到的一些常见问题及解决方法。
Linux内核编译及常见错误实验报告
***学生实验报告一、实验目的(1)学习重新编译Linux内核的方法(2)理解Linux标准内核和发行版本内核的区别。
二、实验内容在Linux系统中下载同一发行版本的版本号较高的内核,编译之后运行自己编译的内核,并使用uname-r命令查看是否运行成功。
由于不同版本的内核在编译过程中可能出现不同的问题,本书推荐的内核版本为4.16.10。
从第7章开始的进阶实验篇,都可以选用该版本的内核。
三、实验设备Vmware上运行的linux ubuntu 5.11.0-43-generic实验成功:linux ubuntu 4.18.0-generic(Ubuntu18.04均可)实验成功的方法在最后四、实验过程和原理分析一、实验(一)准备工作:在这里我建议用一个全新的虚拟机,避免编译错误对原来常使用的虚拟机造成不可逆的影响,安装好后就先安装gcc、make等工具首先下载好Linux***内核文件解压至/usr/src 目录下,如下:确认安装好gcc、make等工具,后可直接运行命令sudo make menuconfig进行查看内核功能是否需要编译,如果遇到如下错误可以运行命令sudo apt bison 或sudo apt-get install fiex bison命令解决错误:解决:(不建议)(强烈建议)除此之外还可以直接运行,上一条命令解决不了就用下面这个:sudo apt-get install --reinstall bison libbison-dev flex libfl-dev解决上述错误(强烈建议)运行完上述命令后再次输入sudo make menuconfig便正常进入如下:见到这个界面后无需任何多余操作,使用键盘方向键选择<Save>回车再回车即可此时.config文件生成成功.config文件是隐藏文件记得加参数-a此外还有一个方法就是用cp 命令从原有系统的内核复制.config文件过来也可以命令:sudo cp /boot/config- 5.11.0-43-generic ./.config(二)编译内核为了避免多线程编译时同时出现过多错误,我们这里一开始只使用单线程编译在这里除了用make编译还可以用make-kpkg等工具,个人比较喜欢用make-kpkg但课本用make所以我接下来的实验也先用make完成。
Gentoo-linux-2.6.34内核-手动编译详细教程
编译内核详解(linux-2.6.34)2010-06-20by李阳mail:kmalloc@ 1.下载源代码1.1下载到内核源码官方网站/下载或,$wget /pub/linux/kernel/v2.6/linux-2.6.34.tar.bz21.2解压源码$cd~/src$tar xjvf linux-2.6.34.tar.bz22.编译软件准备(ubuntu)2.1在ubuntu系统安装编译内核需要的软件包$sudo apt-get install build-essential kernel-packagelibncurses5-dev2.2清理以前编译时留下的临时文件如果是刚刚解开的包,不需要执行这步。
如果是第二次或者是第n次编译,那么一定要执行。
$cd linux-2.6.34$make mrproper2.3拷贝已有的配置文件$cp/boot/config-`uname-r`./.config2.4自动精简内核配置(将你需要用的所用硬件都插在电脑上,这样会根据现在电脑链接的硬件进行自动配置一下,也可以省略此步)make localmodconfig3.配置内核3.1配置内核的工具方法一:$make menuconfig方法二:xconfig.安装xconfig$sudo apt-get install libqt3-headers libqt3-mt-dev libqt3-compat-headers libqt3-mt.使用xconfig配置内核$sudo make xconfig.xconfig选项意义:圆中点是编译成可以随时加人的模块(以下简称M),方块中一勾是编译进入内核(以下简称Y),空就是不要(简称N)3.2内核配置及优化General setup--->[*]Prompt for development and/or incomplete code/drivers<===显示尚在开发中或尚未完成的代码和驱动.我不是内核或驱动开发人员。
- 1、下载文档前请自行甄别文档内容的完整性,平台不提供额外的编辑、内容补充、找答案等附加服务。
- 2、"仅部分预览"的文档,不可在线预览部分如存在完整性等问题,可反馈申请退款(可完整预览的文档不适用该条件!)。
- 3、如文档侵犯您的权益,请联系客服反馈,我们会尽快为您处理(人工客服工作时间:9:00-18:30)。
[原创]linux2.6内核的编译步骤及模块的动态加载-内核源码学习-linux论坛05年本科毕业设计做的是Linux下驱动的剖析,当时就买了一本《Linux设备驱动程序(第二版)》,但是没有实现将最简单的helloworld程序编译成模块,加载到kernel里。
不过,现在自己确实打算做一款芯片的Linux的驱动,因此,又开始看了《Linux设备驱动程序》这本书,不过已经是第三版了。
第二版讲的是2.4的内核,第三版讲的是2.6的内核。
两个内核版本之间关于编译内核以及加载模块的方法都有所变化。
本文是基于2.6的内核,也建议各位可以先看一下《Linux内核设计与实现(第二版)》作为一个基础知识的铺垫。
当然,从实践角度来看,只要按着以下的步骤去做也应该可以实现成功编译内核及加载模块。
个人用的Linux版本为:Debian GNU/Linux,内核版本为:2.6.20-1-686.第一步,下载Linux内核的源代码,即构建LDD3(Linux Device Drivers 3rd)上面所说的内核树。
如过安装的Linux系统中已经自带了源代码的话,应该在/usr/src目录下。
如果该目录为空的话,则需要自己手动下载源代码。
下载代码的方法和链接很多,也可以在CU上通过/search/?key=&;q=kernel&a mp;frmid=53去下载。
不过,下载的内核版本最好和所运行的Linux系统的内核版本一致。
当然,也可以比Linux系统内核的版本低,但高的话应该不行(个人尚未实践)。
Debian下可以很方便的通过Debian源下载:首先查找一下可下载的内核源代码:# apt-cache search linux-source其中显示的有:linux-source-2.6.20,没有和我的内核版本完全匹配,不过也没关系,直接下载就可以了:# apt-get install linux-source-2.6.20下载完成后,安装在/usr/src下,文件名为:linux-source-2.6.20.tar.bz2,是一个压缩包,解压缩既可以得到整个内核的源代码:# tar jxvf linux-source-2.6.20.tar.bz2解压后生成一个新的目录/usr/src/linux--source-2.6.20,所有的源代码都在该目录下。
注:该目录会因内核版本的不同而不同,各位动手实践的朋友只需知道自己的源代码所在的具体位置即可。
第二步:配置及编译内核。
进入/usr/src/linux--source-2.6.20目录下,可以看到Makefile 文件,它包含了整个内核树编译信息。
该文件最上面四行是关于内核版本的信息。
对于整个Makefile可以不用做修改,采用默认的就可以了。
一般情况下,需要先用命令诸如"make menuconfig", "make xconfig"或者"make oldcofig"对内核进行配置,这几个都是对内核进行配置的命令,只是它们运行的环境不一样,执行一下这几个命令中的任何一个即可对内核进行配置:make menuconfig是基于界面的内核配置方法,make xconfig 应该是基于QT库的,还有make gcofig也是基于图形的配置方法,应该是需要GTK的环境,make oldcofig就是对内核树原有的.config文件进行配置一下即可。
其实内核的配置部分,主要是保证内核启动模块可动态加载的配置,默认配置里面应该已经包含了这样的内容,因此,我用的是make oldconfig.内核的详细配置请见另外一位网友的帖子,这里给出链接:/bbs/viewthread.php?tid=885597& ;extra=page%3D1%26amp%3Bfilter%3Ddigest在内核源码的目录下执行:# make# make bzImage其中,第一个make也可以不执行,直接make bzImage。
这个过程可能要持续一个小时左右,因此是对整个内核重新编译了。
执行结束后,可以看到在当前目录下生成了一个新的文件: vmlinux, 其属性为-rwxr-xr-x。
然后执行:# make modules# make modules_install对内核的所有模块进行编译和安装。
执行结束之后,会在/lib/modules下生成新的目录/lib/modules/2.6.20/。
在随后的编译模块文件时,要用到这个路径下的build目录。
至此,内核编译完成。
可以重启一下系统。
第三步:编写模块文件及Makefile以LDD3上的hello.c为例://hello.c#include <linux/init.h>#include <linux/module.h>MODULE_LICENSE("Dual BSD/GPL");static inthello_init(void){printk(KERN_ALERT "Hello, world\n");return 0;}static void hello_exit(void){printk(KERN_ALERT"Goodbye, cruel world\n");}module_init(hello_init);module_exit(hello_exit);Makefile文件的内容为:obj-m := hello.oKERNELDIR := /lib/modules/2.6.20/buildPWD := $(shell pwd)modules:$(MAKE) -C $(KERNELDIR) M=$(PWD) modulesmodules_install:$(MAKE) -C $(KERNELDIR) M=$(PWD)modules_installclean:rm -rf *.o *~ core .depend .*.cmd *.ko*.mod.c .tmp_versions其中,hello.c和Makefile文件应该位于同一个目录下,可以放在/home下,我的两个文件都位于/home/david/.第四步:编译和装载模块在文件所处的目录下,执行:debian:/home/david # make然后查看该目录下有哪些文件生成:debian:/home/david # ls -l总计28drwxr-xr-x 2 david david 4096 2007-02-07 17:49 Desktop-rw-r--r-- 1 david david 462 2007-07-20 13:42 hello.c-rw-r--r-- 1 root root 2432 2007-07-20 13:55 hello.ko-rw-r--r-- 1 root root 607 2007-07-20 13:55 hello.mod.c-rw-r--r-- 1 root root 1968 2007-07-20 13:55 hello.mod.o-rw-r--r-- 1 root root 1140 2007-07-20 13:55 hello.o-rw-r--r-- 1 david david 267 2007-07-20 13:48 Makefile-rw-r--r-- 1 root root 0 2007-07-05 14:11Module.symvers可见,已经生成模块文件hello.ko.然后,就可以加载该模块:debian:/home/david # insmod hello.ko查看模块是否加载进内核:debian:/home/david # lsmodModule Size Used byhello 1344 0nfs 219468 0nfsd 202224 17... ...其中Module名为hello的即为我们所加载的模块.卸载模块:debian:/home/david # rmmod hello同样可以通过lsmod来查看该模块是否被卸载.这里有两个问题,其一就是printk()输出的问题.LDD3上也说,在加载和卸载模块的时候都会有信息输出在屏幕上,如果通过终端仿真器(,则在屏幕上看不到任何输出.我同时在虚拟机和和物理机都运行了该模块,均未看到有"Hello,world"(加载模块时printk的输出)或"Goodby, cruel world"(卸载模块时printk的输出).这个不知道是我操作系统发行版的原因还是系统配置的问题,请了解这个问题的朋友指点一下.其二,书上讲到如果屏幕上看不到信息,可能输出在某个日志文件里面了,并说可能在/var/log/messages文件中.并且看到网上很多网友也说是输出到这个文件里面.我不知道有没有发现输出在其他日志文件里的,不过我的这个信息输出在/var/log/syslog里面.在加载和卸载完该模块后,执行命令:debian:/home/david # cat /var/log/syslog | grep world可以看到有两行内容.当然,也可以不用grep world, 应该会出现在最后两行.Jul 20 14:15:29 localhost kernel: Hello, worldJul 20 14:15:34 localhost kernel: Goodbye, cruel world这就是printk应该输出的信息.这里有另外一个方法,可以实现printk 的信息输出在屏幕上,即更改printk输出的优先级.例子中的优先级为:KERN_ALERT,优先级为<1>,如果将优先级改为KERN_EMERG即<0>,则可以看到屏幕的输出信息.修改的方法只是修改一下hello.c中两句printk()的内容,修改后的hello.c如下:#include <linux/init.h>#include <linux/module.h>MODULE_LICENSE("Dual BSD/GPL");static inthello_init(void){printk(KERN_EMERG "Hello, world\n"); /*改动部分*/return 0;}static void hello_exit(void){printk(KERN_EMERG"Goodbye, cruel world\n"); /*改动部分*/}module_init(hello_init);module_exit(hello_exit);同样的方法编译生成模块,再次用insmod和rmmod,则在屏幕上看到的输出信息为:debian:/home/david# insmod hello.kodebian:/home/david#Message from syslogd@localhost at Fri Jul 20 14:27:32 2007 ...localhost kernel: Hello, worlddebian:/home/david# rmmod hellodebian:/home/david#Message from syslogd@localhost at Fri Jul 20 14:27:42 2007 ...localhost kernel: Goodbye, cruel worlddebian:/home/david但是,是否能够将printk()的优先级改为KERN_EMERG值得商榷.因为在Linux KernelDevelopment中,对该优先级的描述为: An emergency condition; the system is probablydead. 以上就是整个2.6内核编译步骤以及模块动态加载的方法.理解和解释有误的地方,也请各位浏览本文的朋友指点,也希望能和对内核和驱动感兴趣的朋友交流.本文也参考了一位网友博客上一篇关于编译2.6内核的文章,这里给出链接:/wooin/archive/2007/05/21/1619141.aspx 【08-10】补充:本文最后所提到的模块加载和卸载时没有看到屏幕的输出信息,即printk输出的问题。