31012966_Liebert CRV+风冷系列精密空调用户手册_V1.2
EC200WF 水冷式空气冷却器和冷塔风扇用户手册说明书
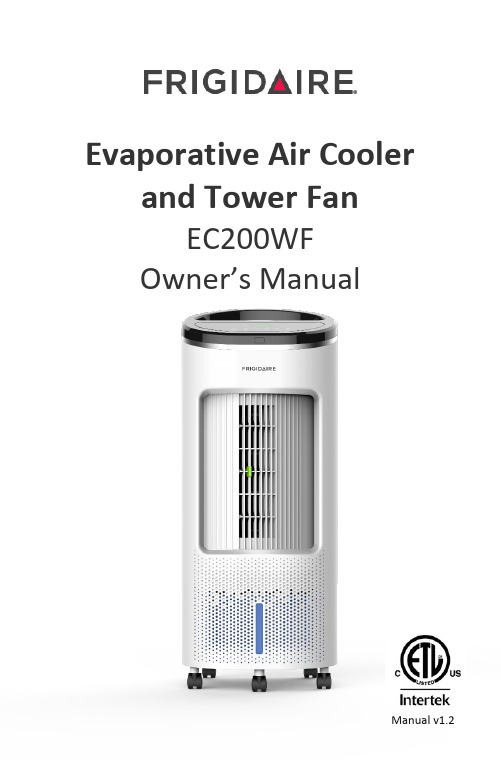
Evaporative Air Cooler and Tower FanEC200WFOwner’s ManualManual v1.22R.Register Your Product Online (3)Safety Information & Warnings (4)Parts List (5)Features (6)Operating Instructions (7)Cleaning And Maintenance (11)Limited Manufacturer’s Warranty (12)MODEL NO EC200WFRATED VOLTAGE 120VRATED FREQUENCY 60 HzRATED POWER 65WNOISE ≤55dBAIRFLOW 350 CFMCOVERAGE 250 square feetDIMENSIONS Depth: 12.7 inWidth: 12.8 inHeight: 31.4 inFrigidaire is a registered trademark of Electrolux Home Products, Inc.All rights reserved.Manufactured under license by:NewAir, LLC6600 Katella Ave, Cypress, CA 90630Comments/questions:******************|855-963-9247Register Your Frigidaire Product Online Today!Take advantage of all the benefits product registration has to offer:Service and SupportDiagnose troubleshooting and service issues faster and moreaccuratelyRecall NotificationsStay up to date on safety notices, system updates, and recallnotificationsSpecial PromotionsOpt-in for NewAir promotions and offers.Registering your product information online is safe & secure and takes less than 2 minutes to complete:Alternatively, we recommend you attach a copy of your sales receipt below and record the following information, which can be found on the manufacturer’s nameplate on the back of the unit. You will need this information if it becomes necessary to contact the manufacturer for service inquiries. Date of Purchase: ___________________________________________ Serial Number: ____________________________________________ Model Number: ____________________________________________In order to use the product safely and to avoid any danger caused by incorrect operation, please pay close attention to the warnings and instructions in this manual.•Please read all instructions carefully before using this product. •Before use, please check whether the operating voltage matches the voltage on the label of the unit. •Cleaning and user maintenance should not be done by children without adult supervision. •WARNING: Unplug or disconnect the appliance from the power supply before servicing or cleaning. •The appliance is exclusively for household and indoor use. • This appliance has a polarized plug with one blade that is wider than theother. To reduce the risk of electric shock, this plug is intended to fit in a polarized outlet only one way. If the plug does not fit fully in the outlet, reverse the plug. If it still does not fit, contact a qualified electrician. Do not attempt to override this safety feature.• WARNING: To reduce the risk of fire or electric shock, do not use this fan with any solid-state speed control device.• WARNING:Chemical Burn Hazard. Keep ba tteries away from children. •This product contains a lithium button/coin cell battery. If a new or used lithium button/coin cell battery is swallowed or enters the body, it can cause severe internal burns and can lead to death in as little as 2 hours. Always completely secure the battery compartment. If the batterycompartment does not close securely, stop using the product, remove the batteries, and store it away from children. If you think batteries might have been swallowed or placed inside any part of the body, seek immediate medical attention.1. Top Cover 8. Remote Control Storage2. Display Panel 9. Rear Case3. Remote Control Sensor 10. Air Intake/Filter4. Decorative Ring 11. Cord Storage B rackets5. Fan Outlet 12. Water Tank6. Front Shell 13. Power Cord7. Casters1.Four fan speeds: quiet, low, medium, high2.Three fan modes: normal, nature, and sleep mode3.Four timer settings: 1h, 2h, 4h, 8h4.Low water protection function5.Wide angle fan oscillation6.Remote control (maximum range 6m, left/right 60° from sensor)7.Fan-only mode8.Power failure memory function9.Touch screen controls10.Automatic shutoff after 15 hours of continuous operationRemove the product from the packaging and review the instructions and other included accessories. The unit can be used immediately after being removed and unpacked.We recommend filling your water tank first before operating the unit, so that the evaporative cooling will be functional right away. The water tank can be pulled out of the bottom of the back of the unit, and filled up to the max fill line. Your unit comes with ice packs, which can be placed inside the tank on the left side (there should be an icon indicating this location). These will help the cooler put out even colder air.Once the water tank is full, press the On/Off button. Then, press theCooler/Humidifer button to turn on the water pump. The water pump will enable evaporative cooling, as it draws water up and runs it through the cooling pad.One battery (CR2032 3V) is used in the remote control. Please insert the battery into the remote control tightly based on the direction of the polarity. If the remote will not be used for a long time, please remove the battery and store safely.Used batteries should be disposed of properly, and kept away from children. Please note that even used batteries could be hazardous.1On/Off 2Timer setting: 1, 2, 4, 8 hours 3Humidification, or evaporative cooling 4Fan oscillation 5Mode selection: Normal, nature ( ), sleep ( ) 6speed control: High, medium, low, silentWhen the unit is first turned on with the On/Off button, it will beep twice, the air outlet will rotate from the current angle to 0°, and the system enters the standby state. If there is no button operation within 1 minute, the indicator light will darken. If the button is pressed again, the indicator light will turn back to full brightness.The unit can be operated by pressing the button on the control panel. The instructions are as follows:ON/OFF CONTROLPress the “On/Off” button for the first time to enter the normal fan speed—this will cause the air outlet to automatically rotate outtoward the front. Press the “On/Off” button again to shut down—this will cause the fan to stop running and hide the air outlet. At this point, the fan is in standby mode. To completely turn off the fan, press the On/Off button. Note: In order to extend the life of the product, it is recommended to completely power off the product after each useTIMERPress the “Timer” button to select 1 hour, 2 hours, 4 hours or 8hours. If the LED is off, it means that the timer function is not set.After selecting the time, the LED indicator will display the set timeand will automatically shut down after the selected time has elapsed.COOLER/HUMIDIFIERPress the “Cooler/Humidifier” button to enable the water pump. If the water pump is running, water will flow down through the cooling pad and offer cooler air than the fan-only setting.SWING FUNCTION Press the “Swing” button to make the fan oscillate at a range of 50 degrees, and then press it again to stop the oscillation.MODE SELECTIONPress the “Mode” button to select normal mode, nature mode orsleep mode, and the LED indicator will light up accordingly: Nature mode ( ), sleep mode ( ).Nature mode: The fan is automatically set to match the air conditioner, and will occasionally change speeds, mimicking a natural breeze.Sleep mode: The fan speed changes at regular intervals to provide acomfortable sleeping environment. In sleep mode, the high, medium, and low speeds will all be cycled through.Note: In nature mode, the fan speed button is not available, so the speed indicator will not light up on the top control panel.FAN SPEED SELECTIONAfter the power is turned on, the fan will begin in normal mode.You can press the “Speed” button to change the fan speed to high, medium, low, and silent. The LED indicator will light up accordingly: High → Medium → Low → QuietNote:If you select the low speed, the motor will start at medium speed for afew seconds and then switch to low speed. When the fan is turned on in standby state, all functions except timer andsleep mode have memory settings.1.When cleaning, use ordinary detergent and a soft brush. Do not use chemicalagents for cleaning.2.Always unplug the power cord before cleaning the device to prevent possibleelectrocution.3.If dust accumulates on the outer surface of the unit, please wipe with a dampsoft cloth. Use a water and a soap mixture to clean the exterior.4.Remove the cooling pad from the unit and check to make sure the cooling padis in good condition. If the pad is cracked, it will need to be replaced. Wipe the interior clean with a damp soft cloth.5.Rinse the cooling pad completely with clean water. Use a soft cloth to dry.6.For a more thorough cleaning, use a mixture of water with a couple teaspoonsof distilled white vinegar or lemon juice.7.Do not use gasoline, thinner, or any substance that may damage the unit8.Change water in the water tank regularly. Wipe the tank clean and use yourdiluted vinegar solution to remove any hard water stains in the tank.9.Make sure the tank is completely dry and free of any leftover vinegar residuebefore using the unit again.10.Be careful handling the appliance while cleaning, as working around theappliance with wet hands may cause electric shock.11.After cleaning, ensure the outer dust filter, cooling pad and water tank arecorrectly installed before use.1.To clean the surface of the machine, wipe with a damp cloth. It is strictlyprohibited to rinse directly with water. Never submerge the unit in water.2.Do not use corrosive detergent or solvent.3.When cleaning the body, be sure to turn off the power switch and unplug thepower cord, or else it may cause electric shock.1.When the product is not going to be used for an extended period, unplug thepower cord, package the product, and store in a way that prevents dustbuildup.2.After packaging, store in a dry and well-ventilated location.This appliance is covered by a limited manufacturer’s warranty. For one year from the original date of purchase, the manufacturer will repair or replace any parts of this appliance that prove to be defective in materials and workmanship, provided the appliance has been used under normal operating conditions as intended by the manufacturer.Warranty Terms: During the first year, any components of this appliance found to be defective due to materials or workmanship will be repaired or replaced, at the manufacturer’s discretion, at no charge to the original purchaser. The purchaser will be responsible for any removal or transportation costs. Warranty Exclusions: The warranty will not apply if damage is caused by any of the following: •Power failure•Damage in transit or when moving the appliance•Improper power supply such as low voltage, defective household wiring or inadequate fuses•Accident, alteration, misuse or abuse of the appliance such as using non-approved accessories, inadequate air circulation in the room or abnormal operating conditions (extreme temperatures)•Use in commercial or industrial applications•Fire, water damage, theft, war, riot, hostility or acts of God such as hurricanes, floods, etc.•Use of force or damage caused by external influences•Adjustments to temperature by removal of stickers and/or screws •Partially or completely dismantled appliancesObtaining Service: When making a warranty claim, please have the original bill of purchase with purchase date available. The purchaser will be responsible for any removal or transportation costs. Replacement parts and/or units will be new, remanufactured or refurbished and are subject to the manufacturer’s discretion.Fortechnicalsupportandwarrantyservice,*****************************。
LIEBERT空调维护使用手册
LIEBERT空调操作及维修说明书目录第一章LIBERT空调概述第二章标准微处理器(SM)控制操作2.1 基本部分2.2 控制设定值2.3 4步/多步制冷系统性能2.4 报警系统2.5 控制特性第三章高级微处理器(AM)控制系统的操作3.1 基本情况3.2 状态显示3.3 主菜单3.4 运行状态/报警记录3.5 设定点/设置3.6 日期和时间3.7 状态显示3.8 控制电路板第四章高级图文显示微处理器(AG)控制系统的操作4.1 基本情况4.2 状态显示4.3 主菜单【主菜单/退出】〈MENU/ESC〉4.4 检查/设定报警4.5 运行状态4.6 检查/控制设定点4.7 设置系统4.8 执行自诊断4.9 日期和时间4.10 图型显示4.11 模拟/数字量输入4.12 检查运行时间记录4.13 微处理控制电路板第六章报警说明6.1 标准报警6.2 选购的用户报警第七章部件的运作与日常维护7.1 系统的测试1LIEBERT空调操作及维修说明书7.2 过滤网7.3 风机组件7.4 制冷系统7.5 加湿器7.6 远红处加湿器自动清洗系统第八章系统检查与故障排除8.1 症状\可能原因与排除8.2 月维护检查项目附录1 DELUXE SYSTEM3 (AM,AG)电气控制线路图附录2 DELUXE SYSTEM3 (SM)电气控制线路图附录2-1 AM、AG电路图说明附录2-2 SM电路图说明附录2-3 用语解释2LIEBERT空调操作及维修说明书第一章LIBERT空调概述Liebert空调系统简述1.1.2 空调系统简述Liebert豪华型环境控制系统,含有多种类型与系列,其控制可以采用标准微处理器控制(SM级),高级微处理器控制(AM级)或采用带图型显示的高级微处理器控制(AG 级)。
这些系统可以是风冷型,水冷型或乙二醇冷却型,主要是根据其选择的排热方法而定,例如,目前绝大多数用户皆选用冷型,即利用温度较低的室外新风来冷却冷凝器的工作介质。
风冷冷水机技术手册20130102(DOC)
风冷(热泵)螺杆式冷水机组技术手册目录风冷(热泵)螺杆式冷水机组1. 产品概要 (1)1.1机型意义 (1)1.2 机组特点 (1)1.3外形结构图 (5)1.4产品规格 (6)1.5外形尺寸图 (10)2.产品特性资料 (12)2.1 性能曲线 (12)2.2冷媒系统原理图 (14)3. 控制器功能说明 (15)3.1 初始界面 (15)3.2 运行界面 (16)3.3 机器设置界面 (16)3.4 用户设置界面 (22)3.5 状态查询界面 (26)3.6 历史记录界面 (27)3.7 使用说明界面 (28)3.8 故障查询界面 (28)3.9数据复位 (29)3.10密码管理 (29)3.11除霜逻辑--除霜的参数: (29)3.12防冻逻辑 (30)3.13故障编号及说明 (31)4.电气特性 (32)4.1机组热继设定值 (32)4.2 配线规格表 (33)4.3配线图 (34)5.机组安装 (35)5.1安装场所选定 (35)5.2安装基础 (35)5.3机组吊运注意事项 (36)1.产品概要1.1机型意义LS B LG R F 160 T S ALS:冷水机组基本代号B:压缩机型号 B表示半封闭;Q表示全封闭LG:压缩机类型 LG 表示双螺杆;DG表示单螺杆R:表示冷暖型,单冷型则不表示F:表示风冷型,水冷型则不表示160:表示名义制冷量(单位KW)T:表示生产工厂S:表示单压缩机,2表示双压缩机,3表示……A:表示开发序号1.2 机组特点1.2.1压缩机高效率多国专利螺旋转子及加工机群✧新型5:6多国专利非对称转子齿型✧CNC高精度转子研磨机✧CNC自动刀具研磨机✧ZEISS转子三次元量测✧高精度度加工检验设备及严格制程管控超长寿命轴承设计,全方位应用配件✧采用11只轴承及α型轴向推力平衡鼓组合设计,大幅度提升轴承寿命2.5~3.5倍✧马达及压缩机双级液喷保护✧电源及PTC温度保护模块✧油冷却外接回路✧油位及油差保护运用,使用安全无虞高效能✧电机采用高效率硅钢片及特殊设计槽型设计✧配备内、外全向式设计冷却流道✧进出口压降最小化设计四个容量调节电磁阀可满足✧25%-50%-75%-100%四级能量调节✧25%-100%无级能量调节齐全内容积比(Vi)的配制✧螺杆压缩机的进气、压缩和排气过程发生在同一个方向。
日立牌风冷热泵式冷水机组
如发觉此情况,请联络您的维修人员。
日常检查: 1.检查是否有异常声音和振动。 2.检查机组电流。 3.检查运行压力。
故障排除: 主机不能启动 1.电源是否接上? 2.保险丝是否烧掉? 3.冷(热)水是否运行? 4.温控器对制冷(制热)是否响应?
●此说明书为风冷热泵式冷水机组的永久部件,应保留在冷水机组内。
目录
使用说明
1. 准备工作
1
初步检查
1
机组放置
1
机组重心
3
重量平衡
3
推荐.安装工作
9
电线连接
9
水管接驳
12
系统内部最小水量
13
水质控制
14
安装后检查
14
3. 试运转
15
准备工作
15
试运转
15
试运转后说明
15
4.控制器设定
侧热交换器。 2.将主机表面清洁。 3.清洗水侧热交换器的管路。(此工作应找有专业经
验的人员进行)
操作说明
空气出口
空气侧 热交换器
电控箱
螺杆压缩机 接地端子M10
冷水入口法兰(内径φ115) 风扇
冷水出口法兰(内径φ115)
螺杆压缩机 接地端子M10
冷水入口法兰(内径φ115)
冷水出口法兰(内径φ115)
验的人员进行)
操作说明
怎样启动主机(从远程控制开关): 1.打开进出口水阀。 2.在确保所有控制开关“OFF”,且印刷电路板上的“现场远 程”开关位于“远程”位置后,打开电源开关。 3.确认R、S、T相是否被正确接线,正确接线能被一个相序
艾默生PEX系列精密空调技术手册

先进的微处理器使PEX系列空调能准确地处理计算机房的温度和湿度。其特点如下:
用户界面操作简洁,多级密码保护,能有效防止非法操作。
控制器具有掉电自恢复和高、低电压保护功能。
通过菜单操作可以准确了解各主要部件运行时间。
专家级故障诊断系统,可以自动显示当前故障内容,方便维护人员进行设备维护。
可存储400条历史事件记录,记录MESSAGE(消息)、WARNING(警告)、ALARM(报警)三种事件。
4.方便耐用
经久耐用的机件,结构紧凑,整体尺寸小;独特的碳钢铆钉铆接的骨架机身,既稳定坚固又容易拆分,可以实现极限条件下搬运;内外两层、中间采用防火隔热棉,机身内的保温性能良好;单门、双门、三门结构件通用性较高,大大减少了易消耗件(如滤网等)的规格。
5.红外加湿
PEX系列空调采用先进的红外加湿技术,有效地减少了加湿器对水质的依赖性,湿度控制更快捷准确。
6.兼容环保冷媒
为适应国际上对环保冷媒的要求,可兼容R407C环保制冷剂。
7.多重保护
完善的自动报警和诊断功能,全方位地保护空调机组,并且能更有效地防止故障发生及更快速地寻找故障位置,有效地延长了空调机组的使用寿命。
8.便于维护
整机采用完全的前开门,所有部件的维护都可在正面进行,节省了使用空间。而且压缩机、板式换热器、过滤器等部件均采用Rotalock连接方式,方便维护。
二.1
二.2
精密的环境控制对计算机的运行非常重要,因此计算机对机房的环境要求非常严格,这是为舒适性而设计的民用空调无法达到的,主要表现在以下四个方面:
温度控制:计算机及交换机工作时产生大量热量,其密度是普通办公室的6~10倍。为了保证计算机设备能够发挥最佳功效,机房温度最佳控制范围为22℃±1℃。这就要求空调机组一定要有足够的制冷能力和及时的反应调控能力,以应对温度急剧变化。这是民用空调无法处理的。
风冷热泵机组操作手册操作手册客户版定稿版

风冷热泵机组操作手册操作手册客户版HUA system office room 【HUA16H-TTMS2A-HUAS8Q8-HUAH1688】(风冷热泵机组)适用于FTA-US-80W-1HB富田空调冷冻设备有限公司地址:上海市光中路488号电话:传真:水冷机组操作说明一、 按键定义说明:1. 按键布局:2.人机画面分类:人机画面可分成四类。
第一类画面:起始欢迎画面,即开机时显示的画面。
第二类画面:主监视画面。
主要参数的监视。
以及开、关机的操作。
第三类画面:主菜单画面。
在该页可选择进入相应的参数画面。
第四类画面:参数设定、显示画面。
用于作参数的设定或显示机组的运行信息。
SET 键用于进入输方向键:用于切换指示灯:电源指ENT :确认键。
ESC :退出所设定的数启停键:用于启二、操作说明:步骤A:画面切换操作点击上下方向键来切换上下画面。
步骤B:参数(密码)调整步骤1.首先进入欲调整之参数画面。
2.点击SET键。
3.点击〔ENT〕输入键跳转至需要设定的参数。
4.使用数字键或者上下键输入数值,按左右方向键切换输入位置。
5.按〔ENT〕确认输入参数。
6.若输入错误按(ESC)键退出即可。
步骤C:开关机操作1.在任意画面按启动按钮即可进行开机操作2.在任意画面按停机按钮即可进行开机操作注:以下界面部分若有改动,恕不另行通知!以控制器上的实际界面为准!三、重要人机画面说明:控制器启动后,首先显示以下欢迎画面。
1、欢迎画面首页——欢迎画面。
显示上海富田空调电话信息。
在欢迎画面按向下键即可进入主显示选择画面2、主显示画面-1主显示画面(目录画面):显示操作画面提示,按向右键进入用户设定画面;按向左键进入系统设定画面;按向下键进入主显示画面内容。
3、主显示画面-2主显示画面(参数显示画面):显示机组各类模式设定内容,开机模式,是指自动开关机还是手动开关机;工作模式显示;控制模式显示,遥控或远控;开机间隔时间用于显示开机间隔是否已到。
麦克维尔风冷热泵机组操作手册

麦克维尔风冷热泵机组操作手册(总7页)本页仅作为文档封面,使用时可以删除This document is for reference only-rar21year.March适用于麦克维尔模块式风冷冷水/热泵机组MAC210/MAC230D /DS/DM/DR/DRS/DRMC302l控制器使用手册一、操作1、开关机按ON/OFF键,机组在开机(RUN灯亮)、关机(RUN灯灭)之间切换。
2、模式选择按“模式”键可在制冷/制热模式之间切换,须注意的是,模式却换必须在关机状态下进行。
3、参数查询使用本控制器能查询它所联网的任意一台机组的工作状态及参数(有哪几台压缩机在工作、进水设置温度、进水温度、出水设置温度、出水温度、机组的定时设置、制冷防冻温度、冬季防冻温度、除霜温度等)。
按“机组”键后机组号码闪烁,此时按“▲”或“▼”键改变机组号,查看到的是不同机组的当前参数,若要查询某个机组的工作参数,找到欲查询的机组号时按“确定”键即可查询该机组的工作参数了,按“▲”或“▼”键查看该机组的不同的参数。
4、参数设置①按“密码”键显示器左下框内显示“密码输入”和“00”,按“▲”或“▼”键改变数值,当选择到正确的用户密码后按“确定”键(出厂密码为“00”),显示框内显示时间,则表示已经输入正确的用户密码,可以进行以下设置:A、运行参数修改:在输入正确密码后,按照步骤②→③→④就能够完成运行参数的修改设置。
B、用户密码修改:在输入正确密码后,按“密码”键显示框内只显示“00”,则表示进入用户密码修改设置,按“▲”或“▼”键改变数值后,按“确定”键修改拥护密码完成,同时跳出参数设置状态。
②按“机组”键后机组号码闪烁,此时按“▲”或“▼”键改变机组号,找到欲设置参数的机组号时按“确定”键即可设置该机组的工作参数了(可设置的参数有:制冷进水温度、制热进水温度)。
③按“▲”或“▼”键选择要设置的参数,按“确定”键后就可以按“▲”或“▼”键设置参数值,设置完成后按“确定”键保存设置结果。
风冷及热泵机组控制器说明书

1、 按键操作Biblioteka (红色) (蓝色)按此键返回上一级菜单或返回主界面; 显示版本信息,系统资讯,与设备维修相关的数值(累计 工作时间或设备计数器的复位),历史报警,版本信息; 按此键显示机组输入/输出的状态信息(包括模拟量的和 开关量的);
按此键显示和设置时钟时间;
按此键显示及设置温度设定点; 按此键设定各种运行参数(安全参数及阈值等),进用户 菜单。 同时按下二键可访问与机组配置有关的参数,如pCO3控 制的设备的数量、大小以及传感器、轮值等;
●如果光标在数字区域,按此按钮能增加相应的数 值。
4. ▼键:
1
2、 主界面/开关机组
●当光标停在显示屏上的左上角时,按此键可以翻 滚下一屏。
●如果光标在数字区域,按此按钮能减少相应的数 值。
5. Enter键:用于移动光标及确认所设定的数据。
15j40 26/05/09 进水温度 出水温度
C1��������������������������������������������������������������������������������������������������������������������������������������������������������������������������������������������������������������������������������������������������������������������������������������������������������������������������������������������������������������������������������������������
- 1、下载文档前请自行甄别文档内容的完整性,平台不提供额外的编辑、内容补充、找答案等附加服务。
- 2、"仅部分预览"的文档,不可在线预览部分如存在完整性等问题,可反馈申请退款(可完整预览的文档不适用该条件!)。
- 3、如文档侵犯您的权益,请联系客服反馈,我们会尽快为您处理(人工客服工作时间:9:00-18:30)。
艾默生网络能源有限公司 地址:深圳市南山区学苑大道 1001 号南山智园 B2 栋 邮编:518055 公司网址: 客户服务热线:4008876510 E-mail: enpc.service@
目录
第一章 概述 ........................................................................................................................................................................ 1
2.3.1 运行环境.....................................................................................................................................................................5 2.3.2 储藏环境.....................................................................................................................................................................5 2.4 制冷剂要求.............................................................................................................................................................................5 2.5 设备搬运、开箱、检验 .........................................................................................................................................................5 2.5.1 运输和搬运.................................................................................................................................................................5 2.5.2 开箱 ............................................................................................................................................................................6 2.5.3 检验 ............................................................................................................................................................................7 第三章 机械安装 ................................................................................................................................................................. 8
1.1 产品简介.................................................................................................................................................................................1 1.2 型号说明.................................................................................................................................................................................1 1.3 产品外观.................................................................................................................................................................................2 1.4 室内机主要部件 .....................................................................................................................................................................2 第二章 安装前指导.............................................................................................................................................................. 4
3.2.1 系统总体布局.............................................................................................................................................................8 3.2.2 系统安装示意图.........................................................................................................................................................9 3.2.3 机械参数...................................................................................................................................................................10 3.3 安装室内机...........................................................................................................................................................................12 3.3.1 调平机柜...................................................................................................................................................................12 3.3.2 拆卸地脚并固定.......................................................................................................................................................12 3.3.3 并柜 ..........................................................................................................................................................................13 3.4 安装机组管路.......................................................................................................................................................................14 3.4.1 拆除过滤网...............................................................................................................................................................14 3.4.2 接室内机的冷凝水排水管.......................................................................................................................................14 3.4.3 连接电极加湿器进水管...........................................................................................................................................15 3.4.4 连接室内机与室外机之间的连接铜管(气管与液管)........................................................................................16 3.4.5 加装延长组件(适用现场安装) ...........................................................................................................................17 3.4.6 充注制冷剂、添加冷冻油.......................................................................................................................................18