松下空调遥控器中文说明书
万能空调(电视)遥控器的使用(设置代码)
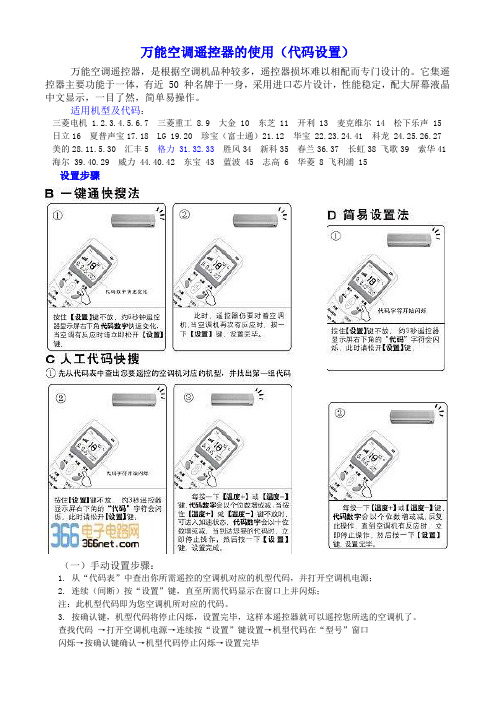
万能空调遥控器的使用(代码设置)万能空调遥控器,是根据空调机品种较多,遥控器损坏难以相配而专门设计的。
它集遥控器主要功能于一体,有近 50 种名牌于一身,采用进口芯片设计,性能稳定,配大屏幕液晶中文显示,一目了然,简单易操作。
适用机型及代码:三菱电机 1.2.3.4.5.6.7 三菱重工 8.9 大金 10 东芝 11 开利 13 麦克维尔 14 松下乐声 15 日立16 夏普声宝17.18 LG 19.20 珍宝(富士通)21.12 华宝 22.23.24.41 科龙 24.25.26.27 美的28.11.5.30 汇丰5 格力 31.32.33 胜风34 新科35 春兰36.37 长虹38 飞歌39 索华41 海尔 39.40.29 威力 44.40.42 东宝 43 蓝波 45 志高 6 华菱 8 飞利浦 15设置步骤(一)手动设置步骤:1. 从“代码表”中查出你所需遥控的空调机对应的机型代码,并打开空调机电源;2. 连续(间断)按“设置”键,直至所需代码显示在窗口上并闪烁;注:此机型代码即为您空调机所对应的代码。
3. 按确认键,机型代码将停止闪烁,设置完毕,这样本遥控器就可以遥控您所选的空调机了。
查找代码→打开空调机电源→连续按“设置”键设置→机型代码在“型号”窗口闪烁→按确认键确认→机型代码停止闪烁→设置完毕(二)数字式自动搜索适用机型:1. 打开空调机电源;2. 将遥控器正对着空调机接收头,循环按“设置”键,直到空调机自动开启/关闭,按“确认”键;注:此机型代码即为您空调所对应的代码。
3. 设置完毕。
打开空调机电源→将遥控器对向空调机→循环按“设置”键否空调机自动开启/关是按“确认”键→自动查找代码设置完成。
四、使用注意1. 本遥控器不能增加您空调上的功能。
如果您的空调机上无风向功能,则遥控器的风向键无效。
2. 本遥控器为低耗产品,正常情况下,电池寿命为6 个月,若使用不当电池寿命缩短,更换电池要两节一起换,不要新旧电池或不同型号电池混用。
松下液晶电视TH-85LX780C TH-85LX600CP使用说明书

感谢您购买Panasonic的产品。
请在使用本机之前,仔细阅读使用说明书,并保存以供参考。
本说明书中的图示仅为示意图。
松下智能电视松下服务目录重要提示2安全注意事项3附件5电视机控制面板6遥控器7连接8首次开机11常见问题解答12保养12规格13特别声明:说明书中的图片和说明仅供参考,可能和实际产品不同,请以实物为准。
(此声明贯穿整本说明书)品质升级,产品设计和规格如有变更,恕不另行通知。
本产品适用的软件内容服务取决于第三方提供商,部分软件可能因网络、地区、服务周期等问题不能使用,与本产品质量无关,请与第三方提供商联系了解相关细节。
此标志标识产品的环保使用期限为10年,在环保使用期限内,产品中含有的有害物质或元素在正常使用下不会发生外泄或突变,用户使用该产品不会对环境造成严重污染或对其人身、财产造成严重损害。
产品过了环保使用期要废弃时,必须按国家相关法律法规进行合理处理。
《废弃电器电子产品回收处理管理条例》提示性说明:为了更好地关爱及保护地球,当用户不再需要此产品或产品寿命终止时请遵守国家废弃电器电子产品回收处理相关法律法规,将其交给当地具有国家认可的回收处理资质的厂商进行回收处理。
警告:本机为I类设备,请确保将产品连接到带保护接地连接的电网电源输出插座上。
本设备包含型号核准代码为:CMIIT ID: 2021AP8776的无线电发射模块。
Dolby、杜比、Dolby Vision、Dolby Atmos、和双 D符号是杜比实验室特许公司的注册商标。
本产品经过杜比实验室的许可而制造。
未公布的机密作品。
版权所有 2012-2022杜比实验室。
保留所有权利。
HDMI、HDMI高清晰度多媒体接口以及HDMI标志是HDMI Licensing Administrator,Inc.在美国和其他国家的商标或注册商标。
For DTS patents, see . Manufac-tured under license from DTS Licensing Limited. DTS, DTS-HD Master Audio, DTS-HD, Virtual:X, and the DTS-HD logo are registered trademarks or trademarks of DTS, Inc. in the United States and other countries. © 2021 DTS, Inc. ALL RIGHTS RESERVED.括对产品特定用途的担保,任何数据丢失,和任何Panasonic 的USB 设备和USB 端口间的协议及通信有效性的担保。
Panasonic AG-UX90和AG-UX180无线遥控设置指南说明书

Using a wi-fi Adapter for Remote Control of the AG-UX90 and AG-UX180The new AG-UX90 and AG-UX180 camcorders offer the capability of utilizing an optional wi-fi adapter to provide remote control from an Apple iPad. This paper will describe the setup procedures for getting the camera to work with the AG ROP app, the free Panasonic app for the iPad that controls the AG-UX90 and AG-UX180 (and also the AG-DVX200).In this paper I will outline the simplest procedure for setting up the camera and the iPad for remote control operation. The necessary equipment and software include: 1. The camera (either a UX90, UX180, or DVX200)2. The wireless adapter (I’m using an AJ-WM50P)3. The Panasonic AG ROP App, available from the Apple App Store.4. An Apple iPad to run the AG ROP App software. Note, this app works only on the iPad, not on an iPhone.The Wireless Adapter Before considering wireless remote control, you’ll first need to secure a wireless wi-fi adapter. The cameras themselves do not have any inherent wi-fi capability, but they can work with a wi-fi adapter through their USB Host ports.Panasonic has certified three wireless adapters for use with the cameras as of the time of this writing (January 2017). Those adapters are the Panasonic AJ-WM30, the AJ-WM50, and the ASUS USB-N53 (hardware version A1). It is possible that other adapters may work, but is not guaranteed. Check the website for any updated announcements about certified net-work adapters.Simple Network Setup The networking capability built into the cameras is substantial and you can get as complex as you want, but the process of connecting to the network can be extremely easy as well.First: install the network adapter in the camera’s USB Host port. The USB Host port is located on the right side of the viewfinder, on top of the camera, under a door that says “USB HOST”.Second: go into the camera’s Other Function menu, and set the USB MODE menu item to “ON”, and the USB MODE SELECTmenu item to “HOST”. Within a few seconds, you should see asmall “wi-fi” icon appear at the top of the screen, indicating that the wi-fi adapter is active.Panasonic AJ-WM50PThird: go into the camera’s Network Setup menu and choose Net-work Initial Setting->YES. That will restore the camera’s settings totheir factory-original defaults.Fourth, go into the camera’s Network Setup menu and chooseWireless LAN setup, and set DHCP to “SERVER”.Finally, exit all the menus. This is an important step - you need to exit entirely from the menu system, or the camera may not be able to receive and respond to the networking requests from the iPad.That’s it. Y our camera is now broadcasting a wireless network and is ready to receive commands from the app.Configuring the iPadThe only device that can work with the camera’s wireless capability is an Apple iPad, and the only software that works on an iPad to control the camera is the Panasonic AG ROP app. Go to the App store and search for “Panasonic AG ROP”. Install that app. Note: do notinstall the Panasonic P2 ROP app; that’s a different app meant for use with a differ-ent line of cameras. For the AG-UX90, AG-UX180, or AG-DVX200, you need the“Panasonic AG ROP” app.After the app is installed, you need to connect your iPad to the wi-fi network that the camera is creating. From the iPad’s home screen, choose “Settings”, then “Wi-Fi”. In the “Choose A Net-work” window, it will show all the available wi-fi networks.One of them will be from your camera. If you’re usingan AG-UX90 camera, the wi-fi network will be named“UX90”. If you were instead using an AG-UX180 camera,the wi-fi network will be named “UX180.” And, logically,if you were using an AG-DVX200 camera, the wi-fi net-work will be named “DVX200”.Select the network that your camera is creating. The iPadwill attempt to connect, but it will need a password. Thedefault password is “01234567890123456789abcdef”.Enter that password, using lowercase letters, and the iPadshould connect to the wi-fi network.Y ou’re almost done. The camera is broadcasting a network, and the iPad has connected to that network. There’s one last step, which is configuring the application.Configuring The AG ROP App For A Direct ConnectionThere’s a little bit of setup you need to do to the AG ROP app before it can connect to the cam-era. Y ou have to supply a username and password to the app. This is very simple to do.Y ou should already be in the “Settings” section of the iPad, from having connected the network in the previous step. On the leftmost edge of the screen, there’s a panel labeled “Settings”, offer-ing items such as “General”, “Display & Brightness”, “Wallpaper”, etc. Scroll down through thelist of items until you find “AG ROP”. Selectit, and the right side of the iPad’s display willchange to show the available settings for theAG ROP app.For the IP Address, make sure that field isempty. Y ou do not have to set an IP Address,when the camera is set to DHCP->SERVER.Set the “User Account” to “guest” and set thepassword to “agguest”. Then, exit the Settingsby pressing the “home” button.At this point, you’re done. Y ou can now run the AG ROP app, and it should successfully con-nect to your camera; you can then use the AG ROP app’s capabilities to take control of your camera.Connecting Through An Existing NetworkThe procedures outlined previously will get the camera connected to the iPad and get the ap-plication working. However, there are many more advanced options you can use. One such example would be if you wanted to connect the camera and iPad to an existing wireless network, instead of making a direct connection between the camera and iPad as described previously. This section will describe the process of connecting to an existing wi-fi network. Configuring The Camera To Connect Through An Existing NetworkFirst: install the network adapter in the camera’s USB Host port.Second: go into the camera’s Other Function menu, and set the USBMODE menu item to “ON”, and the USB MODE SELECT menuitem to “HOST”. Within a few seconds, you should see a small“wi-fi” icon appear at the top of the screen, indicating that the wi-fiadapter is active.Third: go into the camera’s Network Setup menu and choose Net-work Initial Setting->YES. That will restore the camera’s settings totheir factory-original defaults.Fourth: go into the camera’s Network Setup menu and chooseWIRELESS SETUP->SSID (SELECT). The camera will scan foravailable networks and, after a few seconds, it will display a screenfull of the wireless networks it found. Y ou have to choose the net-work that you want to use for both thecamera and the iPad, and if it’s a securenetwork, you’ll have to enter the password. Choose your networkand press “ENTER”. Then enter the password (remember, it’s case-sensitive; if you need to toggle between upper and lowercase, use the“A-a” button in the lower left). The camera will then connect to thewireless network.At this point the camera is connected and ready to go, but we needone more piece of information. Go to the Network Setup menu’sWIRELESS LAN SETUP menu, and make note of the IP Address.Y ou won’t be changing it on the camera, but we need to know whatit is in order to enter it on the iPad. In this example, the camerachose IP Address 192.168.2.13, but your camera’s IP address will probably be different, so make note of what it is.Configuring The iPad To Connect Through An Existing NetworkThis process is similar to the direct connection; you need to tell the iPad which network to con-nect to. From the home screen, choose “Settings”, and then select Wi-Fi. The iPad will bring up a list of the available networks to choose from. Choose the same network that you chose for the camera, and join that network.Configuring The AG ROP App To Connect Through An Existing NetworkThe process here is similar to the direct connection. From the iPad’s Settings screen, scroll through the choices on the left until you find the AG ROP entry, and select it. The right side of the display will change to “AG ROP” and show the same fields: IP Address, User Account, and Password.Set the IP Address to the same address that the camera isdisplaying. Copy the IP address from the Camera’s WIRE-LESS LAN SETUP->IP ADDRESS field, and enter it herein the iPad’s “IP Address” field. In this example, the cam-era was showing its current IP Address as 192.168.2.13,so I’ve entered “192.168.2.13” into the iPad’s “IP Address”field. Again, your camera’s IP Address will probably besomething different; just copy the numbers from yourcamera into this field.Just like before, set the “User Account” to “guest” and set the password to “agguest”. Then, exitNow, exit the menus on the camera. It’s important to exit the menus, and you want to see the wi-fi icon being displayed on the camera’s screen.At this point, you’re done. Y ou can now run the AG ROP app, and take control of your camera. Changing The UsernameThe default username is “guest”, with a default password of “agguest”, but you’re free to change the username and password to whatever you want. The camera provides the ability to store and retrieve up to 10 User Accounts. If you want to use a different User Account other than “guest”, follow these steps:First, go to the camera’s Network Setup menu and choose USERACCOUNT->SET.The camera will bring up 10 potential slots (which all probably read “Unregistered”).Choose one of the “Unregistered” slots, and press “REFRESH”.Then you can enter a User Account Name and a User Account Pass-word for this particular account. In this example I entered the name“JOHN SMITH”.Finally, select the name you want touse, and press the RETURN button. This will cause the camerato choose the account name and password that you have chosen,rather than the default “guest” account name and “agguest” accountpassword.Y ou then have to match this User Name and Password in the iPad’s AG ROP settings. It’s not enough to connect to the same network; the camera andthe AG ROP app have to both be connected to the same ac-count name and use the same password. If you choose touse an account name on the camera, you’ll have to use thesame account name and password on the iPad ROP Appsettings. And, note - once you’ve selected a User Accounton the camera, it will no longer respond to any other account name or password. “guest” and “agguest” won’t work anymore; the only way to connect to the camera is to use the User Account name and password that the camera is currently using. If you want to go back to using “guest” and “agguest”, you’ll have to go back into the camera’s User Account menu and set it to OFF.Changing The Network NameIf you’re planning on using the camera in the simple direct-connection settings, but you want more security and privacy than using the default network name, you can easily change it. Re-member, the default network name is “UX90”, “UX180”, or “DVX200” depending on which camera you have.Go to the Network Setup menu, and choose DIRECT. SelectingDIRECT instructs the camera that it will be generating its ownwireless network.After choosing the Direct option, it shows you the current settings.The first field is showing the network name (the SSID) that thecamera will be broadcasting. Selecting that field brings up a menuthat gives you the chance to change the SSID.Next, enter a new name for the network. If, for example, you’reworking a show where there are multiple UX180 cameras, youmight change one to be “UX180-A”, another to be “UX180-B”,another to be “UX180-C”, etc. That way you avoid the conflict ofthere being multiple devices trying to broadcast the same networkname, and you’ll know exactly which camera is which when you go to connect to it with the iPad. In this example, I’ve changed the network SSID to “JOHN’S UX90”. Y ou can also choose to change the password, or leave it as the existing password. Either way, remember the password, as you’ll need to enter it on the iPad to connect to the camera.Finally, you’ll need to change the wi-fi settings on youriPad to connect to the correct camera. Go to the Settings,and choose Wi-Fi. In the “CHOOSE A NETWORK”window, look for the new network name that your cam-era is broadcasting. Select that network, and enter thepassword, and the iPad should connect to the camera.SummaryThe networking capabilities of these cameras provide for comprehensive remote control through the AG-ROP app. Because there are so many settings and options, it can be a bit complicated for someone attempting to connect for the first time. Hopefully this step-by-step guide will enable you to get your camera connected to your iPad and the AG ROP app quickly and easily.。
Panasonic空調器操作說明書说明书
Model No.Indoor UnitOutdoor UnitCS-V7RWA CS-V9RWA CS-V12RWA CU-V7RWA CU-V9RWA CU-V12RWAOperating InstructionsAir Conditioner操作說明書空調器感謝您購買Panasonic 空調器。
附帶安裝說明。
在操作空調器前,請細讀此操作說明,並保存此書以備日後參考。
Operating Instructions Air ConditionerThank you for purchasing Panasonic Air Conditioner.Installation instructions attached.Before operating the unit, read these operating instructions thoroughly and keep them for futurereference.安全措施 ....................................................4-5如何使用 ....................................................6-7清洗說明 .......................................................8故障檢修 .......................................................9信息 .........................................................封底附件• 遙控器• AAA 或 R03 電池 × 2• 遙控器托架• 用於遙控器托架的螺釘 × 2Table of contentsSafety precautions .................................10-11How to use.............................................12-13Cleaning instructions ..................................14Troubleshooting .........................................15Information...................................Back coverAccessories• Remote control• AAA or R03 batteries × 2• Remote control holder• Screws for remote control holder × 2安全措施為了防止個人傷害,危害其他人或財物的損失,請遵守以下指示:因不遵守以下指示導致的錯誤操作將引起傷害或損壞,其嚴重程度分類如下:要遵守的指示按下列符號分類:室内機及室外機此裝置不適合殘疾、感應欠佳或智障,經驗與知識不足的人士(包括兒童)使用。
松下 空调产品说明文件说明书

PACi HIGH STATIC PRESSURE HIDE AWAY·High ESP (external static pressure) up to 150Pa · A utomatic learning function for the required static pressure on site during commissioning*·DC FAN for better efficiency and control ·Built in drain pump ·Twin split options · E asy connection and control of external fan or ERV using the connector PAW-FDC on the indoor unit PCB. The external device can be controlled by the remote control of the indoor unit ·New Comfort Cloud control* A standard wired remote controller is required.Refrigerant gas R32 that shows a drastic reduction in the value of Global Warming Potential (GWP). — Exceptional Seasonal cooling efficiency based on the ErP regulation. — Exceptional Seasonal heating efficiency based on the ErP regulation. — Inverter Plus System classification highlights the highest performing Panasonic systems. — The air conditioner works in cooling mode with an outdoor temperature of -15°C. — The air conditioner works in heating mode even when outdoor temperatures are as low as -20°C. — DC Fan. Safe and precise.Filter Included — R410A/R22 renewal. — Internet Control. A next generation system providing a user-friendly remote controller of air conditioning or heat pump units from everywhere, using a simple Android or iOS smartphone, tablet or PC via internet. — Datanavi, a new way to connect. Simple and easy support tool with your smartphone. — BMS connectivity. The communication port can be integrated into the indoor unit and provides easy connection to, and control of, your Panasonic heat pump to your home or building management system.6,50 SEER/4,60 SCOPA++COOLING MODEOPTIONAL WLANFILTER INCLUDEDR32R22/R410A RENEWAL R22R410AR32HEATING MODEDC FANDATANAVIBMS CONNECTIVITYR32NEW REFRIGERANT GASPlenumsAir Outlet Plenum (without regulation adaptor)Diameters Model36, 45 & 50 2 xØ200CZ-56DAF260 & 71 3 xØ200CZ-90DAF2 100, 125 & 140 4 xØ200CZ-160DAF2Air Inlet PlenumDiameters Model60 & 71 3 xØ200CZ-DUMPA90MF2 100, 125 & 140 4 xØ200CZ-DUMPA160MF2The ducted system is the ideal solution for flexible concealed air conditioning. Optional 200mmspigots ensure simple and hassle-free connection to spiral ductwork. Using a high-lift drainpump, drain piping can be elevated up to 785mm from the base of the unit.environmentally friendly. Compared to R22 and R410A, R32 has a very lowpotential impact on global warming. Panasonic is leading the switch to R32.The static pressure outside the unit can be increased up to 150 PaType3645506071100125140Standard Pa7070707070100100100Maximum available setting Pa150150150150150150150150Built-in Drain pump(DC motor pump)- Built-in filter- Side removablefilterStandardized height of 290mm for all models.Height standardization enables easy and uniforminstallation for models with different capacities.equipment box makesmaintenance easy. P-Link PCBAccessoriesCZ-RTC5B Wired remote controller with Econavi function anddatanaviCZ-RWS3+CZ-RWRC3Infrared remote controllerCZ-RE2C2Simplified remote controllerPAW-WTRAY Tray for condenser water compatible with baseground supportPAW-GRDBSE20Outdoor base ground support for noise and vibration absorptionPAW-GRDSTD40Outdoor elevation platform 400 x 900 x 400mmCZ-56DAF2Air Outlet Plenum S . .PF1E5B 36, 45 & 50CZ-90DAF2Air Outlet Plenum S . .PF1E5B 60 & 71CZ-160DAF2Air Outlet Plenum S . .PF1E5B 100, 125 & 140CZ-DUMPA90MF2Air Inlet Plenum S . .PF1E5B 60 & 71CZ-DUMPA160MF2Air Inlet Plenum S . .PF1E5B 100, 125 & 140CZ-CAPWFC1NEW Commercial WLAN Adaptor1) For models below 12kW, the SEER and SCOP is calculated based on values of EU/626/2011. For models above 12kW, the SEER and SCOP is calculated based on values of EU/2281/2016. 2) Medium External static pressure setting from factory. 3) The sound pressure of the units shows the value measured of the position 1,5 below the unit. The sound pressure is measuredin accordance with Eurovent 6/C/006-97 specification. 4) Outdoor unit operation range : PZH : Cooling -15 ~ +46°C, Heating -20 ~ +24°C, PZ : Cooling -10 ~ +43°C, Heating -15 ~ +24°C. 5) When installing the outdoor unit at a higher position than the indoor unit. * Recommended fuse for the indoor 3A.Just holding up your smartphone to the LED display on a remote controller(CZ-RTC5B) to receive useful AC system information super fast by PanasonicLight ID Technology.· S can & Save AC system info· E asy access to manual database· Commissioning, F gas check data historyCZ-RE2C2Optional Controller.Simplified remote controller.CZ-CENSC1Optional EconaviSensor.CZ-RTC5BWired remote controllerCompatible with EconaviCZ-RWS3 + CZ-RWRC3Optional Controller.Infrared remote controller.New Commercial WLAN AdaptorNew CZ-CAPWFC1 interfaceadaptor, allows connection of oneor a group of indoor units to bemanaged by the Panasonic ComfortCloud App, which provides control,monitoring, scheduling and erroralerts.Panasonic Cloud ServerPanasonic unique LightID technologyDuetotheongoinginnovationofourproducts,thespecificationsofthiscataloguearevalidbarringtypographicerrors,andmaybesubjecttominormodificationsbythemanufacturerwithoutpriorwarninginordertoimprovetheproduct.ThetotalorpartialreproductionofthiscatalogueisprohibitedwithouttheexpressauthorisationofPanasonicMarketingEuropeGmbH.To find out how Panasonic cares for you, log on to www.aircon.panasonic.eu/IE_en/+353 (0)1 4195313+353 (0) 876005031Heating & Cooling SolutionsPanasonic Ireland. A branch of Panasonic Marketing Europe GmbH Unit 1, The Courtyard, Kilcarbery Business ParkNangor Road, Dublin 22。
DAS-100说明书(新款)

DAS-100安装易快速指引一、按键功能1、显示屏:显示温度和各参数。
2、Reset:重启键,重新启动控制器。
3、SET:设置,可以设置为遥控输入模式、开机温度调节模式、告警温度调节模式和关机温度调节模式等。
具体代码如下表:遥控输入模式开机温度调节告警温度调节关机温度调节00 01 02 03 04 05 08 09 0B A机开A机关空空空空24 28 1008:开机温度调节模式,set键连续按九次会显示08,显示屏显示24,此时可以设置空调开机温度,格力、美的等12大品牌空调可以直接设置开机温度,其他品牌空调的温度设置则需要通过输入遥控信号的办法来设置(具体的12大品牌见下文LOCK品牌状态)。
09:告警温度调节模式,set键连续按十次会显示09,显示屏显示28,此时可以通过按后面“+”和“-”可以调节高温告警温度(即双机同开温度)。
0B:关机温度调节模式,set键按十二次会显示0B,显示屏显示10,此时可以通过按后面“+”和“-”可以调节低温关机温度。
3、LOCK::品牌状态,用于选定品牌种类:00 普通信号学习代码,02全品牌,03格力04美的,05海尔,06大金,07三菱海尔,08志高,09奥克斯,10松下,11 日立,12三洋,13 海信,14 长虹,15 科龙操作方法如下:(1)按LOCK键一次,会显示0A,两秒后显示02,02是A机默认的发射代码,即全代码,用户可根据空调品牌,按“+”或“-”选择合适代码4、TEST:测试键,按该键可以人为控制空调的开启,测试设备是否能正常控制空调机。
按该键会显示“A1”、“A0”、等字符,每个字符会自动显示三次。
A1:代表开A口(对应红灯亮);A0:代表关A口(对应红灯灭)。
二、调试、学习、安装。
1、接线:将红外发射头连接到DAS上,A发射头插在DAS2红色端口,B发射头插在DAS2白色端口,对准空调接收口(距离太远可以将数据线加长,但必须注意数据线分正负极)。
遥控器
万能空调遥控器K100A使用说明(说明书)(一)手动设置步骤:1. 从“代码表”中查出你所需遥控的空调机对应的机型代码,并打开空调机电源;2. 连续(间断)按“设置”键,直至所需代码显示在窗口上并闪烁;注:此机型代码即为您空调机所对应的代码。
3. 按确认键,机型代码将停止闪烁,设置完毕,这样本遥控器就可以遥控您所选的空调机了。
查找代码→打开空调机电源→连续按“设置”键设置→机型代码在“型号”窗口闪烁→按确认键确认→机型代码停止闪烁→设置完毕(二)数字式自动搜索适用机型:1. 打开空调机电源;2. 将遥控器正对着空调机接收头,循环按“设置”键,直到空调机自动开启/关闭,按“确认”键;注:此机型代码即为您空调所对应的代码。
3. 设置完毕。
打开空调机电源→将遥控器对向空调机→循环按“设置”键否空调机自动开启/关是按“确认”键→自动查找代码设置完成(三)、使用注意1. 本遥控器不能增加您空调上的功能。
如果您的空调机上无风向功能,则遥控器的风向键无效。
2. 本遥控器为低耗产品,正常情况下,电池寿命为6 个月,若使用不当电池寿命缩短,更换电池要两节一起换,不要新旧电池或不同型号电池混用。
3. 要确保您的空调机接收器正常,本遥控器才有效。
4. 如果出现电池漏液,必须将电池仓清洁干净后换上新电池。
为防漏液,请您在备长期不使用时,最好将电池取出。
(四)、适用品牌及代码一览表万能控遥控器代码表众合chunghop,大众合万能电视遥控器代码表及使用说明书万能遥控器使用方法代码自定义搜索万能遥控器的代码自定义搜索的方法:1、左手先按住“设置”键不松手,再用右手按一下“电源”键,指示灯变成长亮。
2、输入三个“0”,使指示灯熄灭,这时遥控器的代码为“000”3、再重复第一条所说,使指示灯长亮4、将遥控器对准电视机的接收窗,开始按遥控器的“音量+”键,按一下数一下写数字,“1、2、3、4、5、6、.......300”,耐心点,直接接某一个数字后,电视机出现了“音量指示线”,就松开遥控器按钮,并记下该数字,这个数字就是你的电视机的“代码”。
松下 R410A型室外机 CU-ME36BX6N CU-ME45BX6N 安装说明书
不能使用排气室
*使用排气室时:1000mm以上
(10)如果连续安装多台室外机,在第三台机器之间提供 500mm以上的空间作为维护空间。
500mm 以上
(6)障碍物位于左侧、右侧和后侧(前侧和机器上方处于开放 状态)。
250mm 以上
150mm 以上
250mm 以上
250mm 以上
250mm 以上
■分支接头的尺寸
CZ-H2H16AX 用途:分支接头后的室内机总容量不到22.4kW
示例:
气管
液管
隔热材
分支接头
隔热材
分支接头
表1-12各部连接点的尺寸
尺寸
A
BC
D
E
单位:mm
CZ-H2H68AX 用途:分支接头后的室内机总容量超过22.4kW
气管
液管
六角扳手宽度开启 4
六角扳手宽度 5 6
液管
气管
150mm以上
(2)障碍物位于左侧、右侧和后侧(前侧和机器上方处于 开放状态)。
200mm 以上
150mm 以上
16
250mm 以上
(3)碍物位于前侧(后侧、左侧、右侧和机器上方处于开放状 态)。
(8)障碍物位于前侧和后侧(左侧、右侧和机器上方处于开 放状态)。其中一个障碍物的高度不得超过2000mm
2 18
KX7(B),KS7,KX8B
BX7(B),BX8B,LMX,LX, B2X,BX5,BX5H,D1EX5, D1EX5H,D0AX7(B),D0AS7(B), D0AX8(B),D0AS8(B),D0AX10B, D0AS10B,D0AX11B,D0AS11B,
D3EX,D4EX
松下空调校准点及维修流程
松下空调校准点及维修流程下载温馨提示:该文档是我店铺精心编制而成,希望大家下载以后,能够帮助大家解决实际的问题。
文档下载后可定制随意修改,请根据实际需要进行相应的调整和使用,谢谢!并且,本店铺为大家提供各种各样类型的实用资料,如教育随笔、日记赏析、句子摘抄、古诗大全、经典美文、话题作文、工作总结、词语解析、文案摘录、其他资料等等,如想了解不同资料格式和写法,敬请关注!Download tips: This document is carefully compiled by theeditor. I hope that after you download them,they can help yousolve practical problems. The document can be customized andmodified after downloading,please adjust and use it according toactual needs, thank you!In addition, our shop provides you with various types ofpractical materials,such as educational essays, diaryappreciation,sentence excerpts,ancient poems,classic articles,topic composition,work summary,word parsing,copy excerpts,other materials and so on,want to know different data formats andwriting methods,please pay attention!松下空调校准点。
1. 温度传感器,室温传感器通常位于蒸发器附近,负责检测室内温度并将其发送至空调控制器。
松下KX-FL513CN说明书
重拨/暂停 J 话筒闭音 K 挂断 L 监听 M 帮助 N 电话簿设定 O 目录 P 音量 Q 导航键 Q
R ST U V W
来电显示打印 R 来电显示检索 S 下一组 T 名字/电话号码转换 T 停止 U 设定 V 传真开始 V 复印开始 W
II
感谢您购买Panasonic传真机。
您应保存记录的事项 请在此附上您的收据。
- 请勿将墨盒长时间放在保护袋外面。 因为 这样会缩短墨粉寿命。
- 如果您误吞了墨粉, 请喝几杯水以冲淡 胃中浓度, 并立即接受治疗。
- 如果墨粉进入了眼睛, 请用水彻底清 洗, 并接受治疗。
- 如果皮肤接触了墨粉, 请用肥皂和水彻 底清洗。
- 如果您误吸了碳粉, 请前往有新鲜空气 的地方并咨询当地的医疗人员。
安全说明
保管好此说明书
安装:
L 将本机从寒冷的地方移至较暖的地方后, 让 本机适应较暖的温度, 不要连接本机约30分 钟。 如果在温度突然改变后太快连接本机, 本机内部可能发生冷凝并导致故障。
L 切勿在有雷电的时候安装电话线。 L 切勿将电话插口安装在潮湿的位置, 除非该
插口是专门为潮湿位置而设计的。 L 切勿触摸非绝缘的电话线或终端, 除非电话
KX-FL513CN控件位置如Fra bibliotek利用使用说明书
当参考使用说明书时, 请始终打开封面页 (下一页), 以便您能方便地看到各个按钮。
I
控件位置
当参考使用说明书时, 请始终打开此页。 有关每个按钮的描述, 请参阅页 7。
A
B
CD
EF G H I
JKL M NO P Q
键
音频 A 组键B 多站点发送 C 手动站点 D 垃圾传真过滤器 E 分页 F 清晰度 G 自动接收 H 快速扫描开始 I
- 1、下载文档前请自行甄别文档内容的完整性,平台不提供额外的编辑、内容补充、找答案等附加服务。
- 2、"仅部分预览"的文档,不可在线预览部分如存在完整性等问题,可反馈申请退款(可完整预览的文档不适用该条件!)。
- 3、如文档侵犯您的权益,请联系客服反馈,我们会尽快为您处理(人工客服工作时间:9:00-18:30)。
松下空调遥控器中文说明书
P?a?n?a?s?o?n?i?c???松?下?空?
调?C?S?-?P?C?1?2?M?K?F?/?C?S?-?P?C?1?8?M?K?F?/?C?S?-?P?C?2?4?M?K?F?通?用? 显示屏区域:
AIRCONDITIONER:空调遥控器。
AUTO:自动模式,空调会检测环境温湿度,自动调节适宜的运作模式。
COOL:制冷。
DRY:除湿。
FANSPEED:风速调节。
AIRSWING:风向选择。
功能区域:
ECONAVI:节能导航功能,空调会自动感应室内人体活动量、活动方位,智能调节风向、风量、温度和角度。
OFF/ON:开关,运行/停止。
AUTOCOMFORT:舒适性(空气)自动调节。
MODE:模式,功能选择。
TEMP:温度设置,上升/下降。
FANSPEED:风速。
AIRSWING:风向调节。
定时区域:
TIMER:定时。
ON:定时开机。
OFF:定时关机。
▲:增加10分钟。
▼:减少10分钟。
SET:(开关机)双定时功能。
CANCEL:取消。
调试区域:
SET:设置。
CLOCK:时间设置。
RESET:遥控复位。