大华网络视频服务器使用手册(S、E系列)
大华播放器操作用户手册说明书
Dahua Player Operation User’s ManualVersion 1.0.0Table of Contents1General Introduction (1)1.1Overview (1)1.2Features (1)2Installation (2)2.1Open Player (5)3Operation (6)3.1Main Interface (6)3.2Setting (6)3.2.1Add files (7)3.2.2Group Preview (7)3.2.3Export File (7)3.2.4Digital Zoom (8)3.2.5Drag/Child-window Switch (8)3.2.6Full Screen (8)3.2.7Watermark (9)3.2.8Config (9)3.3Playback Interface (9)3.3.1File List (9)3.3.2Window Layout (10)3.3.3Playback Window (11)3.3.4Playback Control Bar (12)3.3.5Time Line (13)3.4Group Preview (14)3.4.1File List (14)3.4.2Video Preview (15)3.5Export File (16)3.5.1File List (17)3.5.2Setup (18)3.5.3Video Preview (18)3.6Watermark (19)3.7Config (20)4Compatible OS (22)WelcomeThank you for using our Dahua player!This user’s manual is designed to be a reference tool for the installation and operation of your system!1General Introduction1.1OverviewThis player is excellent player software for the security field. It has various functions such as play, search, watermark, intelligent track display. It supports multiple-window synchronization play or asynchronous play. It supports multiple-channel display mode and customized setup. It adopts the time line design instead of the traditional process bar. Supports customized time line accuracy setup. It calls the play module to realize play operation and adopts framework design of plug-in matching mode. It reduces the risk of bug occurrence when you are implementing maintenance work and can meet flexible customized requirements.1.2FeaturesFrame by frame backward play function, support various speeds.Multiple-channel playback at the same time.Local zoom in and drag function (So called electronic PTZ function.)Support preview by periods to quickly find the scene you needed.Support intelligent device bit stream playback, can display intelligent event information on the video.Support watermark function to avoid vicious bit stream modification and support bit stream format switch function.Optimized player plan.Optimized audio/video synchronization plan.Optimized fast play plan, support various fast play speeds.2InstallationPlease follow the steps listed below to complete installation.Click .exe file, system begins installation. See Figure 2-1.Check the box to select English and then click next button to continue.Figure 2-1The Welcome interface is shown as in Figure 2-2. Here you can see software version and installation suggestions. Click the Next button to continue.Figure 2-2Now you can see an interface is shown as in Figure 2-3.You can click Change button to modify installation directory.Please click Next button to continue.Figure 2-3Now you can see shortcut folder interface. Here is going to create a new shortcut for Player folder. You can change according to your actual requirements. You can see the following interface. See Figure 2-4.Please click Next button to continue.Figure 2-4Now you go to the following interface. System becomes ready to install. The interface is shown as in Figure 2-5.Here you can see the installation path, shortcut folder information and etc. Please click Next button to continue.Figure 2-5Now you can see the installation process. You can click the Cancel button to terminate current installation process. See Figure 2-6.Figure 2-6After installation, the interface is shown as below. See Figure 3-6.Click Finish button to complete the installation.Figure 2-72.1Open PlayerThere are two ways for you to open the player.You can see the shortcut icon on the desktop after the installation. Double click the icon torun the software. See Figure 2-8.Figure 2-8After installation, you can see the Player folder from the Start->All programs->DahuaSmart Player->Smart Player. Here you can uninstall software, run software, view user’smanual and installation environments.3Operation3.1Main InterfaceYou can click the icon in the installation path or the desk to open the player interface.Player main interface is shown as in Figure 3-1.Figure 3-1Please refer to the following sheet for detailed information.SN Namemenu1 System2 Interfacename3 File list display/hide buttonlayout4 Window5 Video play window6 Play control column7 Timeline3.2SettingSystem menu is shown as below. See Figure 3-2.Figure 3-23.2.1 Add filesClick Add files button in Figure 3-2, you can see system pops up Open dialogue box. The interface is shown as in Figure 3-3. Select the DAV file and then click the OK button, system can automatically add the DAV file on the same directory or the sub-level and add to the corresponding file list. If the DAV file name conforms to the record file name rule, system can relate it to file list of the corresponding channel. Otherwise system creates new list to display current file.Tips: For your convenience, you can drag the DAV file or file directly to the play window. It has the same effect as the Add files button. The preview file is removed once you open another file.Figure 3-33.2.2 Group PreviewClick Preview button, you can open or go to group preview interface. It is mainly for the multiple-group preview of one file. See chapter 3.3 for detailed information.3.2.3 Export FileClick Export File, you can open or go to export file interface. It is mainly for the exporting the specified record footages or pictures.See chapter 3.5 for detailed information.3.2.4 Digital ZoomOn the playback interface, click the Digital Zoom button and then left click mouse you can draw a red rectangle, release left button, system can zoom in the specified red rectangle. See Figure 3-4.Note:System supports some specified zoon in speeds and can not zoom in as much as you click. You can right click mouse to restore the play window.Tips:Use the middle button of the mouse to zoon in the video as the middle button as the centre.Figure 3-43.2.5 Drag/Child-window SwitchOn the play interface, click Drag button, you can control the play window in these two modes. When system is in drag mode, the mouse indicator becomes palm size. You can use drag operation to view other hidden zones if you have realized digital zoom function. If the system is in child-window switch mode, you can drag one window to another window to realize window switch operation.3.2.6 Full ScreenOn play interface, click Full screen button, you can see the play window occupies the whole window. This function is suitable for the video monitor or playback record for a long time. You can click the “Esc” button on the keyboard to restore player main interface.3.2.7 WatermarkClick the Watermark button, you can open or go to Watermark interface. It is mainly for one or several record file watermark operation. See chapter 3.6 for detailed information.3.2.8 ConfigClick Config button, you can open or go to configuration interface. In this interface, you can set player snap saved path, format, footage clip saved path and format, play window rate, intelligent track enable/disable, and player language. See chapter 3.7 for detailed information.3.3Playback InterfaceThe playback interface is shown as in Figure 3-5.Figure 3-53.3.1 File ListThe file list interface is shown as in Figure 3-6.The group file list is to display the added file folder, file and the record file on the same directory. Current playback file is shown as green. Check the group name or double-click the group name; you can select a record group.Figure 3-63.3.2 Window LayoutHere is to define playback window size and position. Usually there are nine types. You can also customize some special window layouts. You can click the layout button to select the window display mode. See Figure 3-7.Figure 3-7Once you click Custom layout, you can see the following interface. See Figure 3-8.Figure 3-8Click Edit button, you can edit layout line, row and pane size. See Figure 3-9.Figure 3-93.3.3 Playback WindowThe playback window is to display record file corresponding information such as file name, time and etc. See Figure 3-10.Figure 3-10Move your mouse to any window; you can see the following control bar at the top right corner. See Figure 3-11.Figure 3-11z Clip: It is to edit a record. Please play a file first and then click this button to begin clip.Click this button again, click operation is complete. Now you get a new file. You cango to chapter 3.7 to set save path.z Snap: Click it to snap one picture. You can go to chapter 3.7 to set save path.z Close: Click it to close current video window.3.3.4 Playback Control BarThe playback control bar is shown as in Figure 3-12.Figure 3-12Please refer to the following sheet for detailed information.Button Notez System is in single repeated process when the button is highlighted. z System is in sequence play process when the button is grey.z System is in synchronization playback process when the button ishighlighted.z System is in asynchronous process when the button is grey.Note: it is for group playback mode.z System is in backward playback process when the button ishighlighted.z System is in normal playback process when the button is grey.Note: It is for all-window when system is in group playback mode. It is forcurrent window only when system is not in group playback mode.Play and stop button can realize multiple-window pause, playback.Stop: Stop all playback windows.z In pause mode, it is the previous frame, next frame playback.z In play mode, it is the preview group, next group playback.Note: It is for the whole group when system is in group playback. It is forcurrent window only when system is not in group playback mode.Speed setup:z1/2, 1/4, 1/8, 1/16z1×, 2×, 4×, 8×, 16×z-1/2, -1/4, -1/8, -1/16, -1, -2, -4, -8, -16Volume setup: You can set volume value and mute. System can play audiowhen in normal playback process.3.3.5 Time LineAfter you double click to playback a file, system cam automatcailly add time line. Anddisplay the real-time playback time of each window. See Figure 3-13.Once you check syncronization playback for the whole record group, there is only onetime line.Figure 3-133.4Group PreviewClick the Preview button, you can go to the following interface. Here you can view the video by periods and quick find out the video you want. Doubel clcik the file or folder you want to implement group preview, system can divide record to N (N= interface amount you set)sections by time. You can preview each period respectively. See Figure 3-14.Figure 3-143.4.1 File ListYou can view the file list of current selected folder. It is the same as in the playback interface. See Figure 3-15.Note:Group preview is for single record only. For record list, there is no record groupFigure 3-153.4.2 Video PreviewDouble click a file in the list, system can divide the record period according to the section amount and then display corresponding picture. See Figure 3-16. For example, record is from 2:00 to 3:00, the selected section amount is 4, the system displays 2: 00, 2:15, 2:30, and 2:45.Note:System may take time to create index. Please be patient. .Figure 3-16After system crated sections, you can select the corresponding time to play.Select corresponding play time window.Click Play button, the corresponding window begin play at the displayed time. You can implement pause, frame by frame playback, fast play, slow play and etc.Slices: System needs to slice again if there is record in the group preview. See Figure3-17.Figure 3-173.5Export FileClick Export button, you can see export file interface is shown as in Figure 3-18.Select the file(s) you want to export and use the preview to set period, file(s). The export format supports JPG, BMP, DAV, and AVI.Figure 3-183.5.1 File ListThe file list on the right side is to display all records of current selected folder. It is the same as the records on the playback interface. There are group record and general record. You can batch export record of the same group of the same day. See Figure 3-19. You need to check to select the record you want to export.z Check a date of one group to select records of all channels of one day.z Check some channels of one group of one day.z Check one file; you can see current preview channel is highlighted.Figure 3-193.5.2 SetupThe Setup interface is shown as in Figure 3-20.Figure 3-20 Please refer to the following sheet for detailed information.Item NoteExport format Export modes support JPG, BMP, DAV and AVI.The former two are picture modes and the later two are record modes.Start time It is to set file start time; it is corresponding to the left value of the time line.End time It is to set file end time; it is corresponding to the right value of the time line.Interval It is to set picture export interface. It is for picture export only.3.5.3 Video PreviewPlayback: Check a file, video preview interface will play the file from the playback list or the record or picture of the highlighted channel. At the same time, you can implement pause, frame by frame playback, slow playback, fast playback and etc. See Figure 3-21.Figure 3-21Export: After you set parameters, click the Begin export button to set save path and then begin. You can view export process bar or you can click the Stop export button to terminate. You can see export succeeded dialogue box after the export operation. See Figure 3-22.Figure 3-223.6WatermarkClick the Watermark button of the system menu; you can go to the watermark interface. See Figure 3-23.Watermark function is to check the selected record file has been tampered with or not. Select a record file first and then click the Start Check button to begin the process. You can view record path, percentage, check result and etc. You can click the Stop Check button to terminate current process. You can click the corresponding record column of watermark information to view the tamper information. See Figure 3-24.Figure 3-23Figure 3-243.7ConfigClick Config button on the system menu, you can see an interface shown as in Figure3-25.Figure 3-25Please refer to the following sheet for detailed information.Item NoteSnap path/format On the playback interface, you click the snap button,system can save picture to the specified path as your set format.Video path/format On the playback interface, you click the record button, system can save record file to the specified path as your set format.Video proportion It is to set video window proportion. There are three options: 4:3、16:9 and 100%.Show trace It is to set display intelligent track or not. Please note it is for intelligent device only.Language You can select English/Chinese.Please note system needs to reboot to activate current setup.Note:System can save current setup even after you close the player.4 Compatible OS CPU Intel P4 1.8GHz1G memory50MB freee HDD space Resolution16bit 800x600Mouse, keyboard,USBMiniRequirement Microsoft Windows 95/98/ME/NT4.X/2000/XPCPU Intel Core 2 Duo E6600Dual-channel 2G memory or higher ,256M independentdisplay card512MB free HDD space or higherResolution 16bit 1024x768Mouse, keyboard,USBRecommended RequirementMicrosoft Windows 2000-SP4/2003/XP-SP2Compatible OS z Windows Server 2003z Windows Server 2008 z Windows XPz WIN7Note:z This manual is for reference only. Slight difference may be found in the user interface.z All the designs and software here are subject to change without prior written notice.z All trademarks and registered trademarks mentioned are the properties of their respective owners.z If there is any uncertainty or controversy, please refer to the final explanation of us.z Please visit our website or contact your local retailer for more information.。
大华终端设备说明书

“手机看店”终端设备说明书(浙江大华)中国电信浙江公司政企客户部2013年9月目录第一章DH-IPC-K100W ......................................................................................................... - 1 -1.1 产品概述 .......................................................................................................................- 1 -1.2 功能特性 .......................................................................................................................- 1 -1.3 外观介绍 .......................................................................................................................- 3 -1.4 技术参数 .......................................................................................................................- 4 -1.5 安装说明 .......................................................................................................................- 5 -1.6 参数设置 .......................................................................................................................- 6 - 第二章DH-IPC-K105W ..................................................................................................... - 10 -2.1 功能特性 .................................................................................................................... - 10 -2.2 技术参数 .................................................................................................................... - 11 -第一章DH-IPC-K100W1.1 产品概述本系列网络摄像机结合传统摄像机和网络视频的技术,集音视频数据采集、传输于一体,无需其他辅助设备,接入互联网即可使用。
智能视频监控系统Smart PSS使用说明书1.0.0

大华硬盘录像机说明书
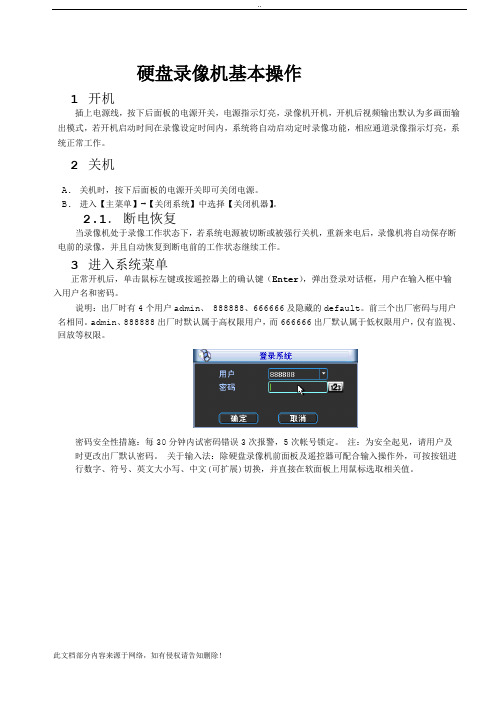
硬盘录像机基本操作1 开机插上电源线,按下后面板的电源开关,电源指示灯亮,录像机开机,开机后视频输出默认为多画面输出模式,若开机启动时间在录像设定时间内,系统将自动启动定时录像功能,相应通道录像指示灯亮,系统正常工作。
2 关机A. 关机时,按下后面板的电源开关即可关闭电源。
B. 进入【主菜单】→【关闭系统】中选择【关闭机器】。
2.1.断电恢复当录像机处于录像工作状态下,若系统电源被切断或被强行关机,重新来电后,录像机将自动保存断电前的录像,并且自动恢复到断电前的工作状态继续工作。
3 进入系统菜单正常开机后,单击鼠标左键或按遥控器上的确认键(Enter),弹出登录对话框,用户在输入框中输入用户名和密码。
说明:出厂时有4 个用户admin、888888、666666 及隐藏的default。
前三个出厂密码与用户名相同。
admin、888888 出厂时默认属于高权限用户,而666666 出厂默认属于低权限用户,仅有监视、回放等权限。
密码安全性措施:每30 分钟内试密码错误3 次报警,5 次帐号锁定。
注:为安全起见,请用户及时更改出厂默认密码。
关于输入法:除硬盘录像机前面板及遥控器可配合输入操作外,可按按钮进行数字、符号、英文大小写、中文(可扩展)切换,并直接在软面板上用鼠标选取相关值。
4 预览设备正常登录后,直接进入预览画面。
在每个预览画面上有叠加的日期、时间、通道名称,屏幕下方有一行表示每个通道的录像及报警状态图标(各种图标的含义见下表)。
通道画面提示:5 录像时间的设置硬盘录像机在第一次启动后的默认录像模式是24 小时连续录像。
进入菜单,可进行定时时间内的连续录像,即对录像在定时的时间段内录像,详细设置在【菜单】>【系统设置】>【录像设置】。
【通道】选择相应的通道号进行通道设置,统一对所有通道设置可选择【全】;【星期】设置普通录像的时间段,在设置的时间范围内才会启动录像;选择相应的星期X 进行设置,每天有六个时间段供设置;统一设置请选择【全】;【预录】可录动作状态发生前1-30 秒录像(时间视码流大小状态);【冗余】1U 机器取消冗余功能,【冗余】使能框为灰显,实际不能操作;【抓图】开启定时抓图。
大华硬盘录像机简易用户使用手册

大华硬盘录像机用户使用手册安全注意事项下面是关于产品的正确使用方法以及预防危险、防止财产受到损失等内容,使用时请务必遵守。
1.安装环境1.1请在0℃-40℃的温度下放置和使用本产品,请不要将本产品置于潮湿的环境下。
1.2请不要放置在阳光直射的地方或发热设备附近。
1.3不要安装在潮湿、有灰尘或煤烟的场所。
1.4请保持本产品的水平安装;1.5请安装在稳定的场所,注意防止本产品坠落。
1.6勿将其他设备放置于本产品上面。
1.7请安装在通风良好的场所,切勿堵塞本产品的通风口。
1.8仅可在额定输入输出范围内使用。
1.9请不要随意拆卸本产品。
1前面板按键介绍1.1进入系统菜单正常开机后,单击鼠标左键或按遥控器上的确认键(Enter)弹出登录对话框,用户在输入框中输入用户名和密码。
说明:出厂时有4个用户admin 、 888888、666666及隐藏的default 。
前三个出厂密码与用户名相同。
admin 、888888出厂时默认属于高权限用户,而666666出厂默认属于低权限用户,仅有监视、回放、备份等权限。
图1密码安全性措施:每30分钟内试密码错误3次报警,5次帐号锁定。
注:为安全起见,请用户及时更改出厂默认密码。
添加用户组、用户及修改用户操作请参见——用户帐号。
关于输入法:除硬盘录像机前面板及遥控器可配合输入操作外,可按按钮进行数字、符号、英文大小写、中文 (可扩展)切换,并直接在软面板上用鼠标选取相关值。
1.2 录像查询视频显示窗口查询条件设置区 (时间类型通道备份复选框文件列表文件信息可将此局域画面进行放大播放,单击鼠标右键退出局部放大画面。
在文件列表框中选择用户需要备份的文件,在列表框中打“✍”可复选(可在两个通道同时选择需要备份的文件),再点击备份按钮,出现备份操作菜单,单击备份按钮即可,用户也可在备份操作菜单中取消不想备份的文件,在要取消的文件列表框前取消“✍”(单通道显示列表数为128)。
点击日历图标会显示用户录像的记录(蓝色填充的表示当天有录像,无填充表示那天没有录像,再点击其中要查看的日期,文件列表会自动更新成该天的文件列表。
大华视频监控操说明书培训手册

.某某大厦视频监控系统操作培训手册施工单位:某某公司日期:2019.03.21目录1.1 视频监控 (3)1.1.1 实时监控 (3)1.1.2 录像回放 (14)1.1.3 视频上墙 (20)1.1.4 语音对讲 (24)1.1.5 鱼球布控 (27)1.1.6 视频配置 (30)1.1.7 报警管理 (32)1.1.8 报警预案 (33)1.2 智能应用 (37)1.2.1 智能跟踪 (37)1.2.2 人脸识别 (38)1.2.3 人数统计 (38)1.2.4 主从跟踪 (39)1.2.5 行为分析 (40)1.3 地图应用 (41)某某大厦视频监控操说明书1.1视频监控1.1.1 实时监控用户开启实时监控的操作步骤如下:步骤1选择“业务导航> 视频监控> 实时监控”。
系统显示“实时监控”界面。
步骤2在界面右侧的设备列表中,选择通道并拖至视频窗口。
视频窗口中显示实时监控界面,如图1-1所示。
如果双击设备,则打开该设备的所有通道。
图1-1实时视频序号 参数 说明1 码流信息显示该通道的码流信息。
序号 参数 说明2 快捷操作快捷操作说明如下:●:开启或关闭音频。
●:开启或关闭语音对讲。
●:开启或关闭录像。
●:抓拍图片。
●:关闭该视频窗口。
3 视频窗口实时预览视频。
4 组织树查看视频设备及通道。
5 任务窗口选择轮巡任务,单击“开始”,即可执行轮巡任务。
如果需要暂停轮巡任务,则单击“停止”。
您也可以单击窗口下方的,将当前的窗口布局与打开的视频源保存为一个视频任务。
6 画面分割模式用于设置画面的分割模式。
您可以拖动进度条或者单击,选择画面1到36之间10种模式的分割。
7 实时上墙单击将当前视频画面在电视墙上显示。
右键单击预览窗口,可以配置当前视频画面,如图1-2所示。
图1-2右键菜单参数 说明关闭视频关闭该视频窗口。
关闭全部视频关闭所有视频窗口。
视频分享将指定通道的视频分享给一个或者多个在线用户。
网络视频存储服务器(EVS50、70系列)快速操作手册V1.4.0150625
表示高压危险。
表示强激光辐射。
表示能帮助您解决某个问题或节省您的时间。 表示是正文的附加信息,是对正文的强调和补充。
前言 I
ห้องสมุดไป่ตู้
重要安全须知
下面是关于产品的正确使用方法、为预防危险、防止财产受到损失等内容,使用设备前请仔细阅 读本说明书并在使用时严格遵守,阅读后请妥善保存说明书。
请在设备布控后及时修改用户的默认密码,以免被人盗用。 请勿将设备放置和安装在阳光直射的地方或发热设备附近。 请勿将设备安装在潮湿、有灰尘或煤烟的场所。 请保持设备的水平安装,或将设备安装在稳定场所,注意防止本产品坠落。 请勿将液体滴到或溅到设备上,并确保设备上没有放置装满液体的物品,防止液体流入设备。 请将设备安装在通风良好的场所,切勿堵塞设备的通风口。 仅可在额定输入输出范围内使用设备。 请勿随意拆卸设备。 请在允许的湿度和温度范围内运输、使用和存储设备。
1.2.1 EVS5024S-R/EVS5036S-R/EVS7024S-R/EVS7024D-R/EVS7036S-R/EVS7036D-R ................. 1 1.2.2 EVS7048S-R..................................................................................................................................... 2 1.2.3 EVS5048S-R/EVS7048D-R/EVS7072S-R/EVS7072D-R ............................................................... 3 1.3 后面板 .......................
视频云平台运维管理系统使用说明书
目录
使用说明书
全部服务 集群 新增 集群 修改资源 升级 集群
管理 服务用户 备份管理 网络 新增服务多网映射 新增接入多网映射 新增运维多网映射 资源 资源纳管
纳管资源 修改
单个修改 批量修改 安装代理 资源监控 资源管理 新增资源 修改资源 管理磁盘 管理本地磁盘 挂载网络磁盘 查看资源清单 检测网络 诊断网络
常见图标
图标 、
说明 刷新图标。 单击该图标,刷新当前界面、列表等。 下拉框。 单击该图标,可显示下拉菜单。 文本框。 可输入数字、字母等。
图标 、、
、
、
使用说明书
说明
搜索框。
输入关键字,单击 或者按【 】键,可快速搜索到所需的信息。
支持模糊搜索。
折叠图标。
单击该图标,可展示隐藏的信息、配置项等,此时图标变为
使用说明书
第 章 系统简介
使用说明书
系统概述
视频云平台运维管理系统(以下简称“运维系统”)为满足大华视频云基线产品的统一安装部 署、升级、扩容和运行管理需求,提供了 层硬件服务、 层开源云计算框架服务、 层 业务服务的状态监控和管理,同时支持半自动修复异常服务。 运维系统致力于成为一个智能化运维平台,主要具备以下产品亮点: ● 通过视频云平台运维管理系统,开发人员能够方便地管理基础设备的网络与存储,并对其进
表示已使能。
选择框。
单击该图标,可选择对应的配置项。 表示已选中。
关闭图标 按钮。 单击该图标,可关闭窗口。
确定按钮。 单击该图标,保存当前页面所做的修改。
取消按钮。
单击该图标,取消保存当前页面所做的修改,并返回上级菜单。
使用安全须知
使用说明书
下面是关于产品的正确使用方法、为预防危险、防止财产受到损失等内容,使用设备前请仔细 阅读本说明书并在使用时严格遵守,阅读后请妥善保存说明书。
大华客户端使用手册
常用界面按钮 ................................................................................................................................. 12
3.4
锁定软件 ......................................................................................................................................... 13
3.7.3 录像回放 ................................................................................................................................. 15
3.7.4 电子地图 ................................................................................................................................. 18
3.8.3 云台高级控制 ......................................................................................................................... 28
3.8.4 工具 ......................................................................................................................................... 29
智能视频监控系统SmartPSS使用指导书
3.1 登录SmartPSS............................................................................................................................................ - 9 3.2 介绍主界面 ............................................................................................................................................. - 10 3.3 系统配置 ..................................................................................................................................................- 11 3.4 用户配置 ................................................................................................................................................. - 13 -
- 1、下载文档前请自行甄别文档内容的完整性,平台不提供额外的编辑、内容补充、找答案等附加服务。
- 2、"仅部分预览"的文档,不可在线预览部分如存在完整性等问题,可反馈申请退款(可完整预览的文档不适用该条件!)。
- 3、如文档侵犯您的权益,请联系客服反馈,我们会尽快为您处理(人工客服工作时间:9:00-18:30)。
目录注意事项 (11)1.安装环境 (11)2.附件包检查 (11)第一章技术指标及主要功能特性 (22)1.1技术指标 (22)1.2产品主要功能特性 (33)第二章网络视频服务器使用注意事项 (44)2.1绝缘电阻 (44)2.2抗电强度 (44)2.3泄漏电流 (44)2.4防过热 (44)2.5温升 (44)2.6阻燃 (44)第三章设备安装图解及操作 (55)3.1经济型单路视频服务器 (55)3.2增强型视频服务器 (55)3.3带IDE存贮视频服务器 (66)第四章客户端系统安装与操作................................. 错误!未定义书签。
错误!未定义书签。
4.1网络视频服务器客户端的安装 ............................. 错误!未定义书签。
错误!未定义书签。
4.2登录 ................................................... 错误!未定义书签。
错误!未定义书签。
4.3右键菜单................................................ 错误!未定义书签。
错误!未定义书签。
4.4系统设置................................................ 错误!未定义书签。
错误!未定义书签。
4.5辅助设置 ............................................... 错误!未定义书签。
错误!未定义书签。
4.6云台控制................................................ 错误!未定义书签。
错误!未定义书签。
4.7录像查询 ............................................... 错误!未定义书签。
错误!未定义书签。
4.8注销系统 ............................................... 错误!未定义书签。
错误!未定义书签。
4.9系统信息................................................ 错误!未定义书签。
错误!未定义书签。
第五章网络WEB端操作....................................... 错误!未定义书签。
错误!未定义书签。
5.1网络连接操作............................................ 错误!未定义书签。
错误!未定义书签。
5.2登录及注销.............................................. 错误!未定义书签。
错误!未定义书签。
5.3视频.................................................... 错误!未定义书签。
错误!未定义书签。
5.4配置.................................................... 错误!未定义书签。
错误!未定义书签。
5.5查询 ................................................... 错误!未定义书签。
错误!未定义书签。
5.6辅助设置 ............................................... 错误!未定义书签。
错误!未定义书签。
第六章其它功能介绍. (2525)6.1恢复出厂默认设置 (2525)6.2音频线控和麦克风输入的选择 (2525)6.3设备上电后程序运行完毕的提示 (2525)注意 (2626)注意事项1.安装环境1.1远离高温的热源和场所;1.2避免阳光直接照射;1.3勿放在潮湿的场所;1.4服务器应水平安装或壁挂;1.5避免安装在剧烈震动的场所;1.6勿将其他设备放置于服务器上面;1.7服务器应安装在通风良好的场所,切勿堵塞设备的通风口。
2.附件包检查开箱拆封服务器包装后,请及时检查以下附件: *以箱内的装箱清单为准* 2.1操作说明书1本2.2安装光盘1份2.3产品合格证1份第一章技术指标及主要功能特性1.1 技术指标产品型号S系列经济型NVS0104E(S)E系列增强型NVS0104ENVS0204ENVS0404E嵌入式网络解码器系列NVS0104E(J)NVS0204E(J)S系列IDE前端存贮经济型NVS0104E(SY)NVS0204E(SY)NVS0404E(SY)E系列IDE前端存贮增强型NVS0104E(Y)NVS0204E(Y)NVS0404E(Y)参数指标图像分辨率D1、VGA、HD1、CIF、QVGA、QCIF D1、HD1、CIF、QCIF 图像压缩MPEG-4固定码流/可变码流H264,MPEG4可选电源功耗外置电源: 输入AC100-240V 50/60hz输出DC12V/1000mA 内置电源: 输入AC100-240V 50/60hz无存贮<3W带IDE存贮<12W无存贮< 6W带IDE存贮<16W尺寸132x136.8x30 350x237x40(无存贮)/375x286x52(带存贮) 重量 1.2KG 1.5KG操作系统嵌入式linux实时操作系统操作界面WEB方式或者客户端视频输入1/2/4路复合视频(NTSC/PAL) BNC(1.0V P-P ,75Ω) (注:根据不同产品型号而异)视频显示1/2/4画面显示(注:根据不同产品型号而异)音频输入LINE模式:输入峰值<2.5V p-p,输入阻抗>10KΩMIC模式:Vbias=2.5V p-p , 输入阻抗>8KΩ音频输出1路音频输出输出峰值<2.5V p-p,当RL=32欧姆时功率输出30mW; 当RL=16欧姆时,功率输出40mW 负载>8Ω单声道插头视频标准PAL(625线,50场/秒),NTSC(525线,60场/秒)移动侦测区域设置:每画面最大可设置16x12个检测区域;检测灵敏度设置:每区域可设置6级灵敏度音频压缩ADPCM/PCM/G711视频记录速度PAL每路1帧/秒-25帧/秒可调NTSC每路1帧/秒-30帧/秒可调;画质6档可调报警输入4路接地报警输入报警输出2路继电器输出(注:NVS0104E(S)一路报警输出)报警继电器30VDC 1A ,125V0.5ARS232接口用于普通串口(调试)、键盘接口及透明串口(网络将转发串口的输入输出)RS485接口支持通过RS485总线接报警解码器,云台控制接口,支持多种协议,并可无限扩展网络接口RJ45 10M/100M自适应以太网口IDE接口根据型号中带Y参数,表示可以接一个IDE接口硬盘使用工作温度5-50℃使用湿度20℅-80℅大气压86kpa-106kpa安装方式机架安装/台式安装/壁挂安装1.2 产品主要功能特性用户管理·每个组有不同的管理权限并可以任意编辑,每个用户隶属于一个组·在无用户登录状态下,监视权限可以被任意设定存贮功能·NVS(Y版本)如果支持并安装硬盘,可以将需要的图像存贮在设备中的硬盘上·根据用户的配置和策略,比如通过报警和定时设置将相应的视频数据集中存贮到中心服务器上·用户可以根据需要通过本地客户端进行录像,录像文件存放在客户端运行的电脑上报警功能·实时响应外部报警输入(200MS以内),根据用户预先定义的联动设置进行正确处理并能给出相应的屏幕及语音提示(允许用户预先录制语音)·提供一个中心报警受理服务器的设置选项,使报警信息能够主动远程通知,报警输入可以来自连接的各种外设·对视频丢失可以根据用户的预先设置进行提示或报警·报警信息通过邮件通知用户网络监视·通过网络,将NVS经过压缩的1路或者4路音视频数据传输到网络终端解压后呈现·在带宽允许的情况下,延时在一秒以内·同时建立连接个数最大为10个·音视频数据的传输采用HTTP、TCP、UDP、MULTICAST、RTP/RTCP等,·对于一些报警数据或信息使用SMTP传输·支持WEB方式访问系统,应用于广域网环境网络管理·通过Ethernet网络实现对NVS配置的管理及控制权限管理·支持WEB方式和客户端方式外设控制·支持外设的控制功能,对每种外设的控制协议及联接接口可自由设定·支持各种接口(RS232、RS485)的透明数据传输。
辅助功能·支持视频NTSC与PAL制的切换·支持系统资源信息及运行状态实时显示·支持日志功能第二章网络视频服务器使用注意事项请您注意网络视频服务器的外壳接地处理。
2.1 绝缘电阻电源(AC)引入端子与外壳裸露金属部件之间的绝缘电阻在正常大气条件下不小于100MΩ,湿热条件下不小于10M Ω。
2.2 抗电强度电源插头或电源引入端与外壳裸露金属部件之间能承受AC50Hz/1500V的抗电强度试验,历时1min无击穿和飞弧现象。
2.3 泄漏电流不大于5mA(AC峰值)。
2.4 防过热设备在正常工作条件下能安全工作,不起火;操作人员接触到可触及件时无烫伤的危险。
2.5 温升设备在正常工作条件下,其外壳温度不超过65℃,机内发热部件连续工作4小时后,其温升不超过该部件的规定值。
2.6 阻燃非金属外壳的设备,其机壳经火焰燃烧5次,每次5s,不助燃和自燃。
第三章设备安装图解及操作3.1经济型单路视频服务器产品型号:NVS0104E(S)3.1.1前面板介绍图3-1 NVS0104E(S)前面板示意图1、电源指示灯2、状态指示灯3、网络指示灯4、音频输出接口5、音频输入接口6、音频输入选择(线控/麦克风)7、视频输入接口(BNC)8、恢复出厂默认9、扩展输出口3.1.2后面板介绍图3-2 NVS0104E(S)后面板示意图1、电源接口DC12V2、RS232接口3、接地接口4、电源输出接口5、报警输出6、RS485接口7、报警输入接口8、10M/100M自适应以太网3.2增强型视频服务器产品型号:NVS0104E/NVS0204E/NVS0404E3.2.1 前面板介绍图3-3 NVS0404E前面板示意图1、TX/RX-网络收发指示灯2、LINK-网络连接状态指示灯3、RUN-系统运行状态指示灯4、PWR-电源指示灯5、DEFAULT-恢复出厂默认孔图3-4 NVS0404E后面板示意图1~4、视频输入接口5~8、音频输入接口9、音频LINE输入10、音频输出11、RS232接口12、报警输入输出和RS485接口13、USB接口14、网络接口15、电源接口16、电源开关(AC 220V/50HZ)3.2.3 接口12具体接口详细介绍图3-5 NVS0404E后面板局部放大图C1 :报警输出1公共端NO1 :报警输出1常开输出NC1 :保留C2 :报警输出2公共端NO2 :报警输出2常开输出NC2 :保留A~B:RS85接口1~4:报警输入接口G :接地3.3带IDE存贮视频服务器经济型:NVS0104E(SY)/NVS0204E(SY)/NVS0404E(SY)增强型:NVS0104E(Y)/NVS0204E(Y)/NVS0404E(Y)3.3.1前面板介绍图3-6 NVS0104E(SY)前面板示意图1、TX/RX-网络收发指示灯2、LINK-网络连接状态指示灯3、RUN-系统运行状态指示灯4、PWR-电源指示灯5、DEFAULT-恢复出厂默认孔图3-7 NVS0104E(SY)后面板示意图1、RS232接口 6、RJ45网络接口2、报警输入输出和RS485接口(具体介绍见图3-5) 7、电源风扇3、视频输出1和音频输出1(暂时不提供,但解码卡支持此功能) 8、电源接口(AC 100V~240V/50HZ~60HZ)4、视频输入1和音频输入1 9、电源开关5、LINE-音频线输入、 SPK-耳机输出、 MIC-音频麦克风输入第四章网络WEB端操作4.1网络连接操作·按照设备连接与使用章节中的介绍确认网络视频服务器正确接入网络·给电脑主机设置IP地址、子网掩码和网关(如网络中没有路由设备请分配同网段的IP地址,若网络中有路由设备,则需设置好相应的网关和子网掩码),网络视频服务器出厂默认的IP地址为192.168.1.108。