LabWindows简易教程
lab windows 激活 NI万能注册机使用方法
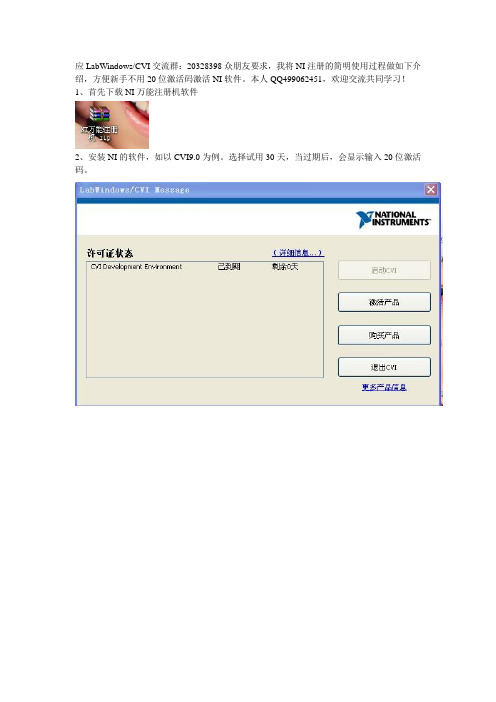
应LabWindows/CVI交流群:20328398众朋友要求,我将NI注册的简明使用过程做如下介绍,方便新手不用20位激活码激活NI软件。
本人QQ499062451,欢迎交流共同学习!1、首先下载NI万能注册机软件
2、安装NI的软件,如以CVI9.0为例。
选择试用30天,当过期后,会显示输入20位激活码。
3、解压NI万能注册机,打开。
点击options,选择licence文件
4、找到你安装的NI软件的目录,找到下面的shared 文件夹
点开后,找到licence manager文件夹
选中licences文件夹,点击确定。
NI万能注册机显示如下
若装有其他NI软件,比如Labwiew什么的,都会显示出来,比如
5、将对应软件下面的列表的方块逐个选中,右键,active,变绿,OK。
你的软件已经激活了,关闭注册机,打开你的NI软件吧。
另外,有高手指出,Full Development System(Debug Only)这个方块最好别激活,不然功
能受限。
[labwindows cvi教程]LabWindows试用版入门指南
![[labwindows cvi教程]LabWindows试用版入门指南](https://img.taocdn.com/s3/m/9294a4f3910ef12d2af9e721.png)
[labwindows cvi教程]LabWindows™/CVI™试用版入门指南最低系统要求想运行LabWindows/CVI,须具备以下配置:∙采用Pentium 1 GHz或更高性能微处理器的个人计算∙Microsoft操作系统:o Windows 7 (32位和64位)o Windows Vista (32位和64位)o Windows XP (32位)o Windows Server 2008 R2 (64位)o Windows Server 2003 R2 (32位)注:LabWindows/CVI仅支持Windows Server R2版本。
∙1024 × 768分辨率(或者更高) 视频适配器∙至少128 MB RAM, 推荐采用512 MB∙ 1.1 GB可用硬盘空间适合完整安装∙兼容Microsoft的鼠标安装指南完成下列步骤,从而安装LabWindows/CVI试用版软件包:1. 下载源自 的LabWindows/CVI试用版软件包并依照屏幕指南解压缩文件2. 解压缩文件后,安装自动开始,同时NI LabWindows/CVI窗口出现。
单击安装LabWindows/CVI 版本,其中的版本是您在试用的LabWindows/CVI版本3. 单击下一步4. 在用户信息面板上,选择安装NI LabWindows/CVI 版本试用版-不需要序列号5. 根据屏幕上的指示操作6. 安装LabWindows/CVI后,LabWindows/CVI安装程序提示您插入NI设备驱动盘。
评估LabWindows/CVI,无需通过安装设备驱动程序。
单击稍后安装(Later),完成LabWindows/CVI的安装。
LabWindows/CVI试用版在下载后,可安装LabWindows/CVI试用版软件包;该试用版软件包能在之后作为具有许可证的LabWindows/CVI版本被激活。
当您在试用期内启用LabWindows/CVI或是您购买合法许可证前,LabWindows/CVI会展现下图中出现的对话框。
LabWindowsCVI教程(1)PPT课件

LabWindows/CVI
19.08.2020
4/18
2. LabWindows/CVI的历史
19.08.2020
5/18
3. LabWindows/CVI的特点
(1)针对测试测量领域的ANSI C语言开发环境
C compiler for Virtual Instruments (CVI)
变量命名 程序的格式和注释 复杂的程序要事先规划设计
19.08.2020
7/18
4. 程序结构
测控软件一般包括:用户界面、程序控制、数 据采集和数据分析4部分
19.08.2020
8/18
5. 开发环境
(1)主要窗口
LabWindows/CVI开发环境的三个主要窗口是工程窗口 (.prj)、源代码窗口(.c)和用户界面编辑器窗口(.uir)。
19.08.2020
15/18
LabWindows/CVI的函数库
19.08.2020
16/18
(4)交互式代码生成 C文件中生成程序结构:Main, Switch, If, For Loop… … UIR文件中生成代码框架: Main Function, Callback Functions (panel, control, menu) 函数面板中函数的自动插入
20/18
C源代码文件
.uir 用户界面资源文件
.h
用户界面资源头文件
.lib 外部静态库模块文件
.obj 目标文件
.h
外部模块头文件
.dll 动态链接库文件
.lib 动态链接库导入库文件
.fp 函数库(函数数和函数面板)文件
19.08.2020
LabWindows CVI实时模块入门指南说明书
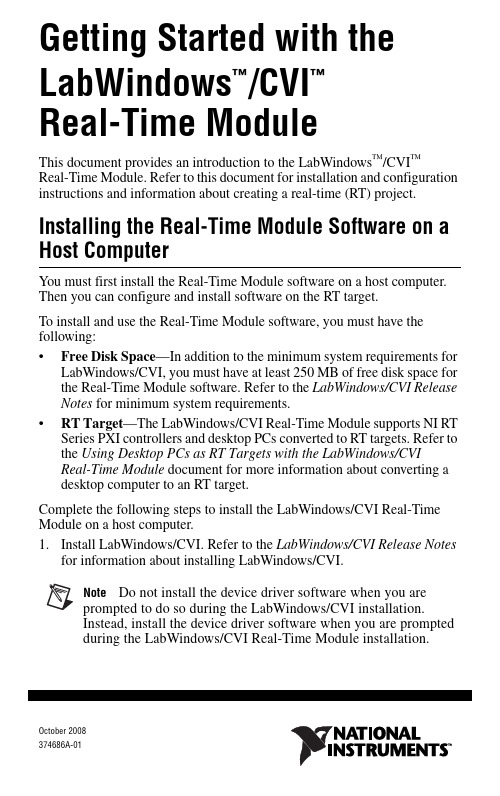
October 2008374686A-01Getting Started with theLabWindows /CVIReal-Time ModuleThis document provides an introduction to the LabWindows ™/CVI ™ Real-Time Module. Refer to this document for installation and configuration instructions and information about creating a real-time (RT) project.Installing the Real-Time Module Software on a Host ComputerYou must first install the Real-Time Module software on a host computer. Then you can configure and install software on the RT target.To install and use the Real-Time Module software, you must have the following:•Free Disk Space —In addition to the minimum system requirements for LabWindows/CVI, you must have at least 250 MB of free disk space for the Real-Time Module software. Refer to the LabWindows/CVI Release Notes for minimum system requirements.•RT Target —The LabWindows/CVI Real-Time Module supports NI RT Series PXI controllers and desktop PCs converted to RT targets. Refer to the Using Desktop PCs as RT Targets with the LabWindows/CVI Real-Time Module document for more information about converting a desktop computer to an RT target.Complete the following steps to install the LabWindows/CVI Real-Time Module on a host computer.1.Install LabWindows/CVI. Refer to the LabWindows/CVI Release Notes for information about installing LabWindows/CVI.Note Do not install the device driver software when you are prompted to do so during the LabWindows/CVI installation. Instead, install the device driver software when you are prompted during the LabWindows/CVI Real-Time Module installation.™™2.Insert the LabWindows/CVI Real-Time Module CD into the CD drive. Ifthe CD does not run automatically, open Windows Explorer, right-click the CD drive icon, and select AutoPlay.3.Select Install LabWindows/CVI Real-Time Module on the NationalInstruments LabWindows/CVI screen.4.Follow the instructions on the screen.5.During the installation, use the NI Device Drivers media to install thedevice drivers that you need.Configuring the RT TargetAfter you install LabWindows/CVI and the RT module, you must useNI Measurement & Automation Explorer (MAX) to configure the RT target and to install software and drivers on the RT target. MAX provides access to NI devices and systems and can communicate with networked RT targets, or remote systems, located on the same subnet as the computer running MAX. Complete the following steps to configure the RT target. The following sections describe these steps in more detail.1.Boot the RT target into LabVIEW RT.2.Configure network settings.3.Install software on the RT target.4.Configure system settings.5.Configure I/O.Refer to the Measurement & Automation Explorer Help for a complete tutorial about configuring the RT target. Select Help»MAX Help to access this help file, and then refer to the MAX Remote Systems Help section.LabVIEW Real-Time Module. However, you can apply the sameconcepts when you use the LabWindows/CVI Real-Time Module. Booting the RT Target into LabVIEW RTIf the RT target has only LabVIEW RT installed on its hard drive, the system is already set up to boot into LabVIEW RT, and you can continue to the Installing Software on the RT Target section of this document. If the RT target has LabVIEW RT and Windows installed on its hard drive, your system may have DIP switches or BIOS settings for booting into LabVIEW RT.If the RT target is a PXI system that does not have LabVIEW RT installedand has a floppy disk drive, you can create a boot disk to boot the system intoLabVIEW RT.Getting Started with LabWindows/CVI © National Instruments Corporation 3Getting Started with LabWindows/CVI Real-Time 1.Select Tools»RT Disk Utilities»Create PXI Boot Disk in MAX tocreate a boot disk from the host computer.2.Click Yes in the Measurement & Automation Explorer dialog box andfollow the instructions on the screen to create the boot disk.3.When you finish creating the boot disk, remove the floppy disk from thehost computer and insert it into the floppy drive of the PXI controller you are using as an RT target.4.Power on or reset the controller to boot it into LabVIEW RT.If you are converting a desktop computer to an RT target, refer to the Using Desktop PCs as RT Targets with the LabWindows/CVI Real-Time Module document for information about booting into LabVIEW RT.Configuring Network SettingsNoteTo perform the initial configuration, you must connectunconfigured RT targets to the same network subnet as the host computer from which you launch MAX. Unconfigured targets outside of the subnet do not appear under the Remote Systems item in the MAX configuration tree.1.Connect the RT target to the network and power on the target.unch MAX and expand the Remote Systems item in the MAXconfiguration tree.3.Select the RT target from the Remote Systems item and click theNetwork Settings tab. The RT target appears as 0.0.0.0 under the Remote Systems item.4.Assign an IP address in the Network Settings tab using one of thefollowing options:•Select the Edit the IP settings option and specify an IP address.You also can click Suggest Values to select an IP address suggested by MAX.•Select Obtain IP address from DHCP server to obtain an addressautomatically.5.Click Apply to commit the changes.6.Click Yes to reboot the RT target.If your previously configured RT target is on another subnet and does not appear under the Remote Systems item, you must add the target manually. Complete the following steps to add the RT target:1.Right-click the Remote Systems item and select Create New .2.Select the target type and click Next.Getting Started with LabWindows/CVI Real-Time 3.Enter the host name or IP address of the device. You can obtain the hostname or IP address of the RT target by running MAX from a computer on the same subnet as the target or by connecting a monitor to the target and viewing the information displayed when the target boots.4.Click Finish . MAX adds the device to the Remote Systems list.Installing Software on the RT TargetUse the LabVIEW Real-Time Software Wizard to install software on the RT target. With the LabVIEW Real-Time Software Wizard, you can view the software that is already installed on the target, view the software that is available to install on the target, and change the software that is installed on the target. Click Help in the wizard for more information about installing and uninstalling software on the RT target.1.Expand the RT target under the Remote Systems item in the MAXconfiguration tree, right-click Software , and select Add/Remove Software .2.Select the software you want to install on the RT target.Note If you have multiple software versions installed on the host computer, the most recent version is selected by default. You can choose to install another version.•Ethernet Drivers —MAX automatically selects the appropriate Ethernet driver(s) for the RT target when you install theLabWindows/CVI Run-Time Engine for RT component.•LabVIEW Real Time —MAX selects this item automatically when you install the LabWindows/CVI Run-Time Engine for RTcomponent.•NI RT Extensions for SMP (MultiCore Support)—Install this item to take advantage of parallel processing on a multiple-CPU system.Note Single-CPU systems perform best without the NI RTExtensions for SMP . Also, some applications, such as those that consist mainly of single-point I/O, can achieve lower latency on a multicore system by using a single CPU without the NI RTExtensions for SMP .•LabWindows/CVI Network Variable for RT —Install this item only if your application uses functions from the Network VariableLibrary.•LabWindows/CVI Run-Time Engine for RT—Install this item to add support for LabWindows/CVI RT applications on the RT target.This component is required for all LabWindows/CVI RTapplications.•Language Support for LabVIEW RT—Install this item if you are using strings in your RT application containing ASCII charactersabove 127 or multibyte characters. After installing this item on theRT target, you can configure the locale in MAX by selecting thetarget in the Remote Systems item in the MAX configuration tree,selecting the System Settings tab, and modifying the Locale option.•NI Hardware Drivers—Install the appropriate drivers for any other hardware libraries that you use in your application. For example,install the NI-DAQmx component if your application uses functionsfrom the NI-DAQmx Library.•Network Variable Engine—MAX automatically selects this item when you install the LabWindows/CVI Network Variable for RTcomponent.•USB Support—Install this item to enable support for accessing USB thumbdrives.•Variable Client Support for LabVIEW RT—MAX automatically selects this item when you install the LabWindows/CVI NetworkVariable for RT component.Configuring System Settings1.Select the System Settings tab to configure system-level settings for theRT target.e the Timezone option to configure time zone and daylight savingsettings for the RT target. You can use this setting with time and date functions to provide accurate time information, relative to the time zone setting.3.Configure the Locale option to match the language you use for strings inyour RT application. This option is available only when you install the Language Support for LabVIEW RT component on the RT target.This option determines the code page that LabWindows/CVI uses when processing strings containing ASCII characters above 127 or multibyte characters.Configuring I/OYou must configure any National Instruments I/O devices before you can target them from a LabWindows/CVI RT application. For information about how to correctly configure I/O devices, refer to the documentation for that hardware.© National Instruments Corporation5Getting Started with LabWindows/CVI Real-TimeConfiguring an RT ProjectAfter you configure the RT target, you can create an RT application on the host computer and then run the application on an RT target. The applications that you create with the LabWindows/CVI Real-Time Module are DLLs. Complete the following steps to create a DLL and specify an RT target directly from LabWindows/CVI.1.Create a project in LabWindows/CVI using RTmain instead of main asthe entry point function for the program. Select Edit»Insert Construct»RTmain to insert the RTmain code into the program source.2.Select Build»Configuration»Debug or Build»Configuration»Releaseto specify the active configuration for the project.3.Select Build»Target Type»Dynamic Link Library to configure theproject to generate a DLL.4.Select Build»Target Settings to open the Target Settings dialog box.Select Real-time only in the Run-time support option. If you specify this option, LabWindows/CVI does not link to the entire set ofLabWindows/CVI libraries but instead links to only those librariessupported on an RT system.5.Configure other options in the Target Settings dialog box and click OKto exit the dialog box.6.Select Build»Create Debuggable Dynamic Link Library or Build»Create Release Dynamic Link Library to create the DLL.You also can use a project template to create an RT DLL. The project template includes basic settings for RT projects described in the preceding section. To select a project template, select File»New»Project from Template. In the New Project from Template dialog box, select Real-Time Target Application.Specifying an RT TargetComplete the following steps to select the RT target on which to run your RT application.1.Select Run»Select Execution Target for Debugging to view a list ofpreviously configured RT targets. Select the RT target you want to use from the list, if it is available.2.To configure a new RT target, select Run»Select Execution Target forDebugging»New Execution Target.3.In the New Real-Time Execution Target dialog box, enter the computername or IP address of the RT target in the Hostname/IP Address option and click OK to exit the dialog box.Getting Started with LabWindows/CVI © National Instruments Corporation 7Getting Started with LabWindows/CVI Real-Time Running an RT ApplicationSelect Run»Debug Project to run your RT application.NoteIf you select Run»Configuration»Release ,LabWindows/CVI displays a warning message. Click Continue to download and run the release DLL on the RT target. LabWindows/CVI automatically builds the DLL and downloads the DLL and any DLLs that are statically linked to it onto the specified RT target. LabWindows/CVI places the files that it automatically downloads in the NI-RT\CVI\temp folder. LabWindows/CVI empties the folder when you reset the RT device.While you run your RT application, LabWindows/CVI displays a <<Running on target >> menu in the upper left corner of theLabWindows/CVI environment. The menu contains the following options, which you can use for debugging and for shutting down the RT application:•Toggle Breakpoint —Turn on or turn off a breakpoint on the selected line.•Break Execution —Suspend execution of the program.•Simulate RT Shutting Down —End program execution. This option causes the RTIsShuttingDown function to return 1, giving the RT application an opportunity to run any necessary cleanup code and exit. The RT target does not reboot.•Abort Execution and Reboot Target —End program execution and reboot the RT target. The application cleanup code is not guaranteed to finish running before the RT target reboots.•Disconnect from RT target —Disconnect LabWindows/CVI from the RT target while the RT application continues running on the target. Once you disconnect from the RT target, you cannot reconnect LabWindows/CVI to the RT application that is running.Debugging an RT ApplicationIf you select Build»Configuration»Debug , you can debug the DLL from the LabWindows/CVI environment as you would debug any other application. For example, you can set breakpoints and watch expressions, step through code, view and edit variable values, and so on. For more information about debugging in LabWindows/CVI, refer to the Using LabWindows/CVI»Debugging Tools section of the LabWindows/CVI Help.Using the Real-Time Execution Trace ToolkitThis version of the LabWindows/CVI Real-Time Module includes a 30-day full-featured evaluation of the Real-Time Execution Trace Toolkit.Use the Real-Time Execution Trace Toolkit to analyze the timing and execution of an RT application. Use the Execution Trace functions in the Real-Time Utility Library to capture the timing and execution data of functions and threads in applications running on an RT target. The Real-Time Execution Trace Tool displays the timing and event data, or trace session, on the host computer.In LabWindows/CVI, select Tools»Real-Time Execution Trace Tool to launch the Real-Time Execution Trace Tool. Refer to the LabWindows/CVI Help for more information about using the Real-Time Execution Trace Toolkit to analyze RT applications.Deploying an RT ApplicationWhen you finish developing your RT application, you can deploy it to an RT target. After you deploy the RT application, the RT application runs automatically every time the RT target reboots.Select Run»Install Program to Real-Time Execution Target to deploy your RT application. This option performs the following actions:•Checks that the release configuration of the DLL has been built; if not, LabWindows/CVI prompts you to build the DLL or cancel.•Deploys the release DLL and any statically linked DLLs to the NI-RT\CVI folder on the RT target.•Sets the release DLL as a startup DLL.•Displays a dialog box indicating that the DLL was copied and prompting you to reboot the RT target.If you have additional support files that you need to deploy, complete the following steps:1.Select Run»Manage Files on Real-Time Execution Target to launchthe LabWindows/CVI Real-Time File Copy Utility.2.Click Add Files and browse to any support files that your applicationrequires. The utility immediately copies the files to the NI-RT\CVIfolder on the RT target.3.Click Done when you finish adding support files.Getting Started with LabWindows/CVI Where to Go from HereRefer to the following resources for more information about the LabWindows/CVI Real-Time Module:•The LabWindows/CVI Real-Time Module Help section of the LabWindows/CVI Help includes conceptual information about real-time programming techniques, application architectures, and Real-TimeModule software features you can use to create real-time applications.Select Help»Contents in LabWindows/CVI to access theLabWindows/CVI Help.•Use the NI Example Finder, available by selecting Help»Find Examples in LabWindows/CVI, to browse or search for example programs. You also can access the example programs from the samples\CVIsamples\realtime directory.© National Instruments Corporation9Getting Started with LabWindows/CVI Real-TimeNational Instruments, NI, , and LabVIEW are trademarks of National Instruments Corporation. Refer to the Terms of Use section on /legal for more information about National Instruments trademarks. The mark LabWindows is used under a license from Microsoft Corporation. Windows is a registered trademark of Microsoft Corporation in the United States and other countries. Reliance™ is a trademark of Datalight, Inc. Copyright 1989-2008 Datalight, Inc., All Rights Reserved. Datalight® is a registered trademark of Datalight, Inc. Other product and company names mentioned herein are trademarks or trade names of their respective companies. For patents covering National Instruments products/technology, refer to the appropriate location: Help»Patents in your software, the patents.txt file on your media, or the National Instruments Patent Notice at /patents.© 2007–2008 National Instruments Corp. All rights reserved.374686B-01Oct08。
LabwindowsCVI8.5安装步骤详解
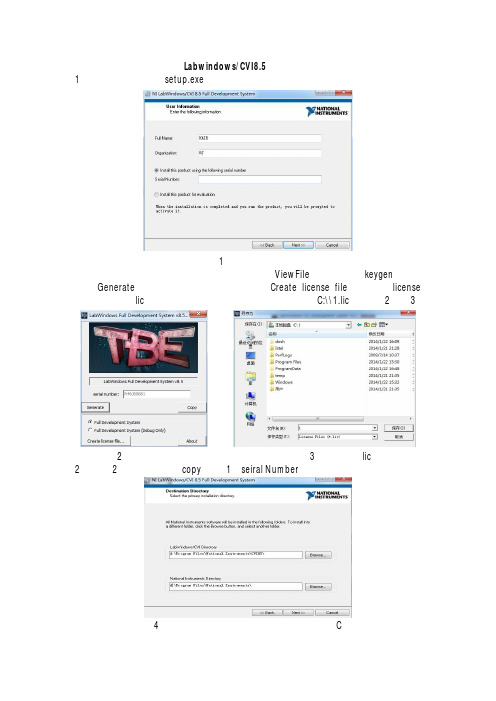
Labwindows/CVI8.5 安装详解
1、双击安装文件中setup.exe文件,填写基本信息。
图1 填写基本信息
安装过程中需填写一个序列号,此时运行ViewFile文件夹下的keygen文件,点击Generate产生一个序列号,同时需点击Create license file创建一个license 文件(注意该lic文件必须保存在英文路径下,如保存在C:\\1.lic),如图2、图3。
图2 产生一个序列号图3 产生一个lic文件
2、将图2产生的序列号copy到图1 seiral Number处,点击下一步。
图4 修改安装路径,也可不修改,默认安装C盘
继续点下一步,选择接受条款,即可安装
图5 接受,一直点下一步
图6 安装进行中,等待下一步提示3、安装过程中,有以下提示,选择Later
图7
图8 将Activate 前面的勾去掉,稍后用lic激活
4、接下来重启计算机,运行license manager-即NI许可证管理器(位置在:开始->程序->national instruments->NI license manager)。
按提示使用由图3生成的.lic 文件即可。
图9
进入管理界面,选项-安装许可证文件,选择刚刚生成的1.lic文件,即可。
图10
5、安装完毕,打开NI CVI软件,如下:
图11
至此,若不提示剩余试用天数,表示Labwindows/CVI8.5 已成功安装至计算机,接下来请尽情享受该款强大软件带给你的开发快感吧。
LabWindows简易教程
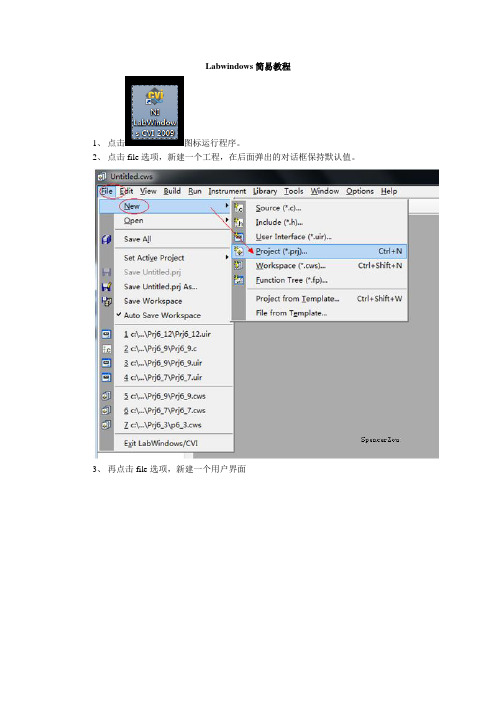
Labwindows简易教程1、点击图标运行程序。
2、点击file选项,新建一个工程,在后面弹出的对话框保持默认值。
3、再点击file选项,新建一个用户界面4、生成的用户界面如下图。
双击用户界面,将会弹出一个设置界面的窗口。
5、在用户面板单击右键将会弹出一个菜单,可以创建需要的控件6、在本教程中,先创建一个按钮控件。
将按钮控件拖到用户面板上。
双击刚刚拖出的按钮控件,将会弹出一个按钮的设置窗口。
7、点击选项Code/Generate/All Code,生成需要的程序。
在出现的对话框中保持默认值8、回到用户面板上,选择OK按钮,单击右键将会弹出一个菜单选项,选择GenerateControl Callback后,将会在程序自动生成点击OK按钮的回调函数。
点击View Control Callback后,会自动跳转到生成的程序处。
Labwindows中的一些简单的函数库使用:1、panelHandle = LoadPanel (0, "p6_3.uir", PANEL)//加载面板名称为PANEL,用户面板存储名称为p6_3.uir的面板。
2、DisplayPanel (panelHandle);//显示面板标识为panelHandle的面板3、SetTableCellVal (panelHandle, PANEL_TABLE, MakePoint (1,2),100);//在面板标识为panelHandle程序表示为PANEL的面板上的名称为TABLE的表格的(1,2)显示100 4、SetCtrlVal (panelHandle,PANEL_NUMERICB0,100);//在面板标识为panelHandle程序表示为PANEL的面板上的名称为NUMERICB0的数据控件中显示1005、GetCtrlVal (panelHandle,PANEL_NUMERICB0,&t);//获取在面板标识为panelHandle程序表示为PANEL的面板上的名称为NUMERICB0的数据控件中的数据存储在变量t中。
LabWindows CVI教程
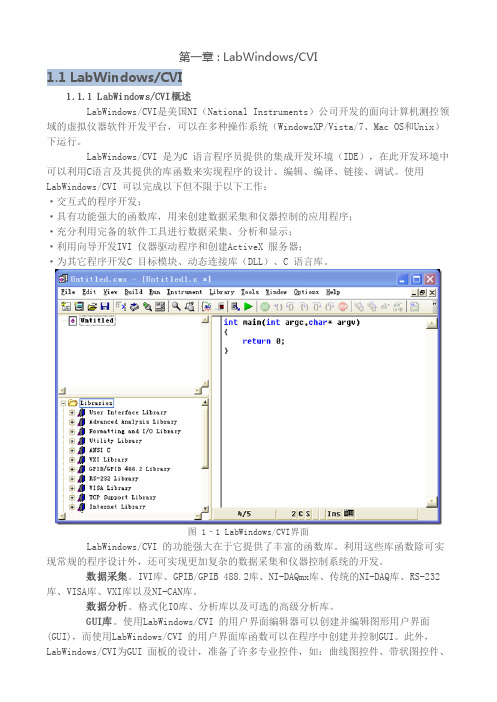
第一章 : LabWindows/CVI1.1 LabWindows/CVI1.1.1 LabWindows/CVI概述LabWindows/CVI是美国NI(National Instruments)公司开发的面向计算机测控领域的虚拟仪器软件开发平台,可以在多种操作系统(WindowsXP/Vista/7、Mac OS和Unix)下运行。
LabWindows/CVI 是为C 语言程序员提供的集成开发环境(IDE),在此开发环境中可以利用C语言及其提供的库函数来实现程序的设计、编辑、编译、链接、调试。
使用LabWindows/CVI 可以完成以下但不限于以下工作:·交互式的程序开发;·具有功能强大的函数库,用来创建数据采集和仪器控制的应用程序;·充分利用完备的软件工具进行数据采集、分析和显示;·利用向导开发IVI 仪器驱动程序和创建ActiveX 服务器;·为其它程序开发C 目标模块、动态连接库(DLL)、C 语言库。
图 1‐1 LabWindows/CVI界面LabWindows/CVI 的功能强大在于它提供了丰富的函数库。
利用这些库函数除可实现常规的程序设计外,还可实现更加复杂的数据采集和仪器控制系统的开发。
数据采集。
IVI库、GPIB/GPIB 488.2库、NI-DAQmx库、传统的NI-DAQ库、RS-232库、VISA库、VXI库以及NI-CAN库。
数据分析。
格式化IO库、分析库以及可选的高级分析库。
GUI库。
使用LabWindows/CVI 的用户界面编辑器可以创建并编辑图形用户界面(GUI),而使用LabWindows/CVI 的用户界面库函数可以在程序中创建并控制GUI。
此外,LabWindows/CVI为GUI 面板的设计,准备了许多专业控件,如:曲线图控件、带状图控件、表头、旋钮和指示灯等,以适应测控系统软件开发的需求,利用这些控件可以设计出专业的测控程序界面。
Labwindows CVI2013安装教程
Labwindows/CVI 2013详细安装图文教程1.下载安装包,如下图共3个文件。
2.安装软件,按以下步骤进行。
注:如果提示需要.net framework 4.0按提示下载安装即可,如果你的电脑有安装有就不会出现这个提示。
大部分软件的安装路径都不支持中文路径,请尽量避免软件安装在中文路径下。
耐心等待,根据个人电脑配置不同需要的时间也不同,我的要半小时。
3.下面进入最重要的一步,就是软件激活了!
找到NI License Activator v1.1.exe激活工具打开并按下面的步骤进行激活。
在需要激活的版本和模块上依次点鼠标右键,出现Activate再点鼠标左键确认,直到出现绿色图标,表示已经激活。
请选择自已需要的版本进行激活,我只是举例说明激活步骤一般Base Package和Full Development System(Debug only)版本不需要激活,
这两个版本功能要弱一些,Full Development Systems要激活。
在开始---程序处点击NI License Manager,确认激活情况
到此激活完成,慢慢享用吧!
注:模块的安装激活在此不再讲述,因为模块很多,每个人需求的也不同。
安装激活方法同上(先安装后用激活工具激活)。
- 1、下载文档前请自行甄别文档内容的完整性,平台不提供额外的编辑、内容补充、找答案等附加服务。
- 2、"仅部分预览"的文档,不可在线预览部分如存在完整性等问题,可反馈申请退款(可完整预览的文档不适用该条件!)。
- 3、如文档侵犯您的权益,请联系客服反馈,我们会尽快为您处理(人工客服工作时间:9:00-18:30)。
Labwindows简易教程
1、点击图标运行程序。
2、点击file选项,新建一个工程,在后面弹出的对话框保持默认值。
3、再点击file选项,新建一个用户界面
4、生成的用户界面如下图。
双击用户界面,将会弹出一个设置界面的窗口。
5、在用户面板单击右键将会弹出一个菜单,可以创建需要的控件
6、在本教程中,先创建一个按钮控件。
将按钮控件拖到用户面板上。
双击刚刚拖出的
按钮控件,将会弹出一个按钮的设置窗口。
7、点击选项Code/Generate/All Code,生成需要的程序。
在出现的对话框中保持默认值
8、回到用户面板上,选择OK按钮,单击右键将会弹出一个菜单选项,选择Generate
Control Callback后,将会在程序自动生成点击OK按钮的回调函数。
点击View Control Callback后,会自动跳转到生成的程序处。
Labwindows中的一些简单的函数库使用:
1、panelHandle = LoadPanel (0, "p6_3.uir", PANEL)//加载面板名称为PANEL,用户面板存储
名称为p6_3.uir的面板。
2、DisplayPanel (panelHandle);//显示面板标识为panelHandle的面板
3、SetTableCellVal (panelHandle, PANEL_TABLE, MakePoint (1,2),100);//在面板标识为
panelHandle程序表示为PANEL的面板上的名称为TABLE的表格的(1,2)显示100 4、SetCtrlVal (panelHandle,PANEL_NUMERICB0,100);//在面板标识为panelHandle程序表示
为PANEL的面板上的名称为NUMERICB0的数据控件中显示100
5、GetCtrlVal (panelHandle,PANEL_NUMERICB0,&t);//获取在面板标识为panelHandle程序
表示为PANEL的面板上的名称为NUMERICB0的数据控件中的数据存储在变量t中。
6、QuitUserInterface(0);//关闭主面板
7、PlotPoint (panelHandle,PANEL_GRAPH,1,2, V AL_SOLID_SQUARE, V AL_RED);// 在面
板标识为panelHandle程序表示为PANEL的面板上的名称为GRAPH的示波器上坐标(1,2)处描点。
8、HidePanel(child1);//隐藏程序表示为child1的面板。