Sommer+RQ-RG30+非接触式雷达测流系统原版培训教材翻译
德卡托手持电波流速仪中文操作手册(简称SVR雷达枪)

美国德卡托电子公司手持电波流速仪用户手册德卡托电子公司版权所有德卡托电子公司欢迎你感谢您选择德卡托电子产品—手持电波流速仪(简称SVR雷达枪),它是一种先进的测速雷达,专用于测量水面流速。
测量洪水和急流时,使用入水式测量仪器非常危险,此时,这种电波流速仪测量流速最合适。
电波流速仪集成了许多领先技术特性。
例如,余弦错误修正。
余弦是指枪到所测目标的垂直角和水平角的余弦。
电波流速仪有一个倾斜感应系统,它会自动补偿垂直余弦错误。
垂直余弦错误是当雷达枪和目标的位置不同而形成一个垂直角度时(空间连线与垂直线角度大于10度)而形成的。
软件可补偿水平方向的余弦误差。
雷达枪与目标水平方向的夹角大于10度就产生一个余弦误差。
我们非常希望用户在使用电波流速仪之前学习本手册,这样就会更好的使用这台高级雷达设备。
如果,您对本仪器非常满意,您还可以向德卡托卖方代表询问我们其它的产品。
--------国家资格最老的雷达公司——德卡托电子公司的全体管理人员和员工目录电波流速仪特点 (2)关于这本手册 (2)1、快速开机 (3)1.1、开机设置 (3)1.1.1、插入电池 (3)1.2、开机 (3)1.3、菜单选择项 (4)1.4、测量水面流速 (5)1.5角度补偿 (7)1.5.1、垂直角度补偿 (7)1.5.2、水平角度补偿 (8)2、组件 (9)2.1、电池 (9)2.1.1、卸下电池 (10)2.1.2、电池充电 (10)2.2、显示面板 (10)2.3串行通讯口 (10)3、操作提示 (11)3.1、雷达如何工作 (11)3.2、干扰源和矫正 (11)3.2.1、角度影响(余弦错误效应) (11)3.2.2、电磁干扰(EMI) (13)3.2.3、反馈干扰 (13)3.2.4、无线电频率干扰(RFI) (13)3.2.5、扫描 (13)3.2.6、环境因素:风,雨和雪 (13)4. 注意,清洁和储存 (14)5. 合法资格 (15)6、常见问题的问答(FAQ) (16)电波流速仪特点手持电波流速仪(简称SVR雷达枪)是唯一专用于测量水面流速的仪器,主要测量河流、溪水。
雷达中文说明书
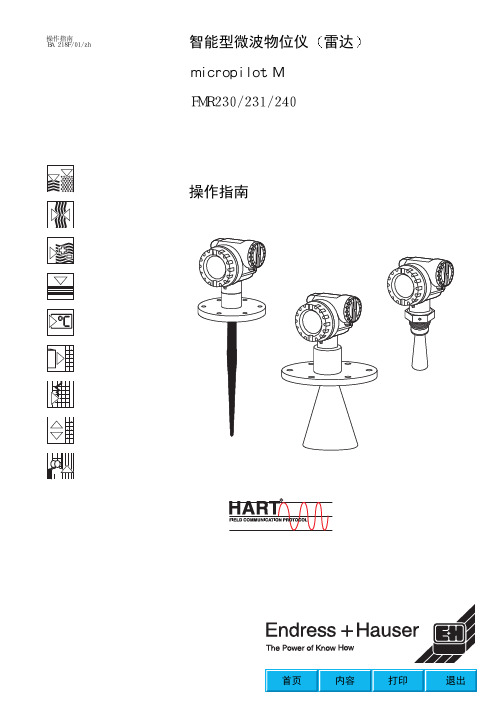
操作指南BA218F/01/zh智能型微波物位仪micropilotM操作指南FMR230/231/240主要操作指南安装罐内安装导波管安装旁通管内安装接线投运通过VU331的基本设定通过ToFTool的基本设定见53页见62页故障诊断见70页目录1安全指南..........................42标识5操作.............................39...................6..............................7...................381.1指定使用.............................41.2安装运输...................841.1指定使用MicropilotMFMR230/231/240是一种一体化的雷达物位变送器浆料及颗粒的连续该设备可安装在密闭的金属容器外而其最大辐射脉冲能量为1mW1.2安装安全性和欧共体标准那么例如产品外溢此仪表的安装操作和维护必须完全依照本安装操作手册进行经过阅读和理解后仪表的修改及修理必须在操作手册允许的情况下进行此文件是操作手册的一部分遵守证书中的规范及当地的相关法规该设备符合FCC第15部的规定12包括可能引起误操作的干扰在将仪表送回Endress+Hauser进行维修前防爆物品数据表附上特别处理指南符合EN91/155/EEC.的安全数据表去除所有的残余物当此液体对健康有害毒性时提示本操作手册后附有"防爆物品数据表"仪表在返修前必须将有害材料清洗干净会导致人身伤害或需要对其进行处理1.5安全规范和标记为了突出强调手册上的安全要求和操作规范安全标记符号意义提示注意可能导致人身伤亡或仪表误动作强调警告此过程或动作如果不正确危险防护允许在爆炸危险场合使用的设备如果设备盘上有这个标记危险爆炸场所此标记用于表明该区域为爆炸危险区域爆炸危险区域必须遵守规定的保护措施非爆炸危险场所在安全场所的设备如果其输出要送到危险场所直流电压接线端接进或接出直流电流或者电压正弦波接地端对操作人员来说保护型接地端此端点应先和大地连接等势连接连接到通过实距得出的可能为工厂接地系统的中性点或等势线2标识2.1设备名称2.1.1 铭牌下列技术数据在仪表铭牌上给出定购码最大工作压力天线最高允许温度安全信息WHG注册MicropilotMFMR230定购信息认证A1234F678STUVKY非防爆区ATEXII1/2GxiaIICT6EEATEXII1/2GxiaIICT6见安全标准ATEXII1/2Gxem[ia]IICT6ATEXII1/2Gxd[ia]IICT6非防爆区+WHGATEXII1/2GxiaIICT6+WHG见安全标准ATEXII1/2GxiaIICT6+WHGFMIS-ClassI,Divison1,GroupA-DFMXP-ClassI,Divison1,GroupA-DCSAIS-ClassI,Divison1,GroupA-DCSAIS-ClassI,Divison1,GroupA-DTIISEExiaIICT4EEEEEEEEEEEE天线尺寸2345680mm/3100mm/4150mm/6200mm/8250mm/10第一部分型号标准标准标准标准高温涂釉天线特殊型号密封氟橡胶/FKMEPDMKalrezPTFE石墨PTFE温度范围-20...200/-4F...+392F-40...150/-40F...+302F0...200/32F...+392F-20...200/-4F...+392F-60...400/-76F...+752F-40...200/-40F...+392F天线型号温度过程连接/1501bs/1501bs4/1501bs8/1501bs6/1501bs6/1501bs101.5缆塞G/电缆入口/NPT电缆入口PROFIBUS-PAM12插头基金会现场总线7/8可接触介质部件SS316Ti依据规格52005759FMR230-完整的产品名称304050607080EKDGHY4...20mAHART显示单元VU331(4行字符显示)4...20mAHARTPROFIBUS-PA带显示单元VU331(4行字符显示)PROFIBUSPA基金会现场总线带显示单元VU331(4行字符显示)基金会现场总线特殊型号VATEXATEXATEXATEXATEXATEXATEXATEX第一部分20A360mm/14"PPS,Viton100mm/4"B510mm/20"PPS,Viton250mm/10"E360mm/14"PTFE,100mm/4"F510mm/20"PTFE,250mm/10"H360mm/14"PTFE,100mm/4"J510mm/20"PTFE,250mm/10"Y30GGJ1/121/121/121/121/121/12"BSPT(R",DIN2999)SS316LGGS"BSPT(R",DIN2999)PVDFGNJNPT"SS316LGNSNPT"PVDFBFJDN50PN16DIN2526FormBSS316LBMJDN80PN16DIN2526FormBSS316LBNJDN80PN40DIN2526FormBSS316LBQJDN100PN16DIN2526FormBSS316LBWJDN150PN16DIN2526FormBSS316LCFJDN50PN16DIN2526FormCSS316LCMJDN80PN16DIN2526FormCSS316LCNJDN80PN40DIN2526FormCSS316LCQJDN100PN16DIN2526FormCSS316LCWJDN150PN16DIN2526FormCSS316LCFKDN50PN16DIN2526FormCSS316L,PTFE-cladCMKDN80PN16DIN2526FormCSS316L,PTFE-cladCQKDN100PN16DIN2526FormCSS316L,PTFE-cladCWKDN150PN16DIN2526FormCSS316L,PTFE-cladAEJ2"/150lbsANSIB16.5SS316LALJ3"/150lbsANSIB16.5SS316LAMJ3"/300lbsANSIB16.5SS316LAPJ4"/150lbsANSIB16.5SS316LAQJ4"/300lbsANSIB16.5SS316LAVJ6"/150lbsANSIB16.5SS316LAEK2"/150lbsANSIB16.5SS316L,PTFE-cladALK3"/150lbsANSIB16.5SS316L,PTFE-cladAPK4"/150lbsANSIB16.5SS316L,PTFE-cladAVK6"/150lbsANSIB16.5SS316L,PTFE-cladKEJ10K50AJISB2210SS316LKLJ10K80AJISB2210SS316LKPJ10K100AJISB2210SS316LKVJ10K150AJISB2210SS316LKEK10K50AJISB2210SS316L,PTFE-cladKLK10K80AJISB2210SS316L,PTFE-cladKPK10K100AJISB2210SS316L,PTFE-cladKVK10K150AJISB2210SS316L,PTFE-cladMFJDN50DIN11851SS316LHFJDN50DIN11864-1SS316LTEJ2"ISO2852SS316LTLJ3"ISO2852SS316LYY94050FMR产品名称231-天线型号屏蔽段长度过程连接4行字符显示4行字符显示4行字符显示6070AC80FMR231-1234NPT569特殊型号无气密连接有气密连接完整的产品名称电缆入口气密连接Pg13.5缆塞M20插头AB其它无3.1.B材料,可接触介质部分SS316Ti,审查认证EN10204,依据规格5200575910A1ATEXII1/2GEExiaIICT63ATEXII1/2GEExem[ia]IICT64ATEXII1/2GEExd[ia]IICT6F+WHG6ATEXII1/2GEExiaIICT6+WHG8ATEXII1/2GEExem[ia]IICT6+WHGSFMIS-ClassI,Division1,GroupA-DTFMXP-ClassI,Division1,GroupA-DUCSAIS-ClassI,Division1,GroupA-DVCSAXP-ClassI,Division1,GroupA-DKTIISEExiaIICT4Y20240mm/1/12"350mm/2"480mm/3"5100mm/4"721mm830VViton/FKMEVitonGLTKKalrezFMR240-认证天线尺寸天线型号温度产品名称非防爆区非防爆区特殊型号mm导波天线内径型号密封温度标准标准标准MicropilotMFMR240定购信息-20℃...150℃ /-4°...+302°-40℃...150℃/-40°...+302°FFFF0℃...150℃/32°...+302°FF4012950GNJNPTSS316LGGJBSPT(R,DIN2999)SS316LCFJDN50PN16DIN2526FormCSS316LCGJDN50PN40DIN2526FormCSS316LCMJDN80PN16DIN2526FormCSS316LCNJDN80PN40DIN2526FormCSS316LCQJDN100PN16DIN2526FormCSS316LCRJDN100PN40DIN2526FormCSS316LCWJDN150PN16DIN2526FormCSS316LAEJ2"/150lbsANSIB16.5SS316LAFJ2"/300lbsANSIB16.5SS316LALJ3"/150lbsANSIB16.5SS316LAMJ3"/300lbsANSIB16.5SS316LAPJ4"/150lbsANSIB16.5SS316LAQJ4"/300lbsANSIB16.5SS316LAWJ6"/150lbsANSIB16.5SS316LKEJ10K50AJISB2210SS316LKLJ10K80AJISB2210SS316LKPJ10K100AJISB2210SS316LKWJ10K150AJISB2210SS316LYY960708090FMR240-输出与基于菜单的操作天线延伸无100mm/4材质螺纹连接材质1/"121/"121/"12法兰直径/压力标准材质特殊型号A20mAHARTB20mAHARTCPROFIBUS-PADROFIBUSPAEFY特殊型号带显示单元VU331带显示单元VU331基金会现场总线带显示单元VU331基金会现场总线P4...4...ACY特殊型号外壳铝外壳F-12,涂层IP65带分离线腔1234NPT569特殊型号电缆入口Pg13.5缆塞M202.2 交货范围注意运输及储存的有关规定组装好的仪表ToFTool(操作软件)附件(见第8章)随机文档若未包括在操作手册内在出厂前已经过测试本仪表亦符合EG指令所规定的要求2.4注册商标,,TEFLONE.I.DuPontdeNemours&Co.,Wilmington,USA的注册商标Ladish&Co.,Inc.,Kenosha,USA的注册商标HARTCommunicationFoundation,Austin,USA的注册商标ToFEndress+HauserGmbH+Co.,Maulburg,Germany的注册商标3安装3.1交货检查包装及货物有否损坏遵守18Kg以上仪表的安全指南及运输条件在储存及运输过程中应将仪表进行包装以防冲击储存的允许温度为-4016F12外壳用于非导电性介质用于导电介质天线延伸管涂釉天线高温型T12外壳喇叭天线DIN 2526的法兰ANSIB16.5的法兰JISB221的法兰涂釉天线天线尺寸法兰法兰法兰天线尺寸PN16150ibs10K天线延伸管129150689465781628540dA4078DB140212219200mm/87476323.9(31.8)228.6(254)628.4342.91011996150mm/6289191250mm/10F12外壳T12外壳螺纹连接BSP1/or11/2NPT12法兰DN50...150或等效DN50防腐连接牛奶连接三夹DIN11864带O型环与FDA-listedTFM1600DN50防腐用于PN40/33325L2L2L243aaaDN50DIN118512ISO2852ab129150686594788565ca.8678附图3 Micropilot M FMR 23118F12外壳螺纹连接BSP1/或1/NPT1122带天线延伸管L1=100mm法兰DN50...150或等效T12外壳喇叭天线DIN2526的法兰ANSIB16.5的法兰JISB2210的法兰天线尺寸PN16300ibs法兰法兰法兰10K内径1291628585标准300...280026.9dDd40338486334018.5LLLLL1b18.518.518.5b8684280280b18018043L[mm]d[mm]b[mm]D[mm]b[mm]D[mm]40mm/1/11548DN5020(24)200DN8020(24)200DN10020(24)220(235)DN1502228580mm/319.1(22.4)152.4(165.1)323.9(31.8)228.6(254)628295b[mm]D[mm]附图4 Micropilot M FMR 240安装最佳选择应避免安装任何装置温度传感器等请参阅波束角,见20页如真空环挡板等天线越大干扰回波也越弱抑制图请参阅最优安装位置导波管请联系获取更多的信息建议距离最小为15cm3干扰会导致信号丢失不可安装于料口的上方建议安装保护盖以防直接的日照或雨淋见第68页附件最小为30cm对提示在有严重蒸气的场合温度及成分的而不同有所降低请使用FMR230或FMR231请使用FMR230配合导波管测量氨水但在特殊情况下组A及B当其处于低液位时此时为保证测量精度但是测量范围的终值应距离天线的尖端至少50mm(2最小测量范围B与天线有关罐体直径应大于D泡沫既可以吸收微波在某些条件下是可以进行测量的3dB微波也可以散射到波束外部并被干扰源所反射天线尺寸波束角DN1506DN2008DN502DN803DN10041/402315FMR240测量条件FMR230/231FMR240B[m/inch]208C[mm/inch]150...300/6...1250...150/2...6D[m/inch]408H[m/ft]51测量范围可用的测量范围取决于天线尺寸安装位置及最终的干扰反射若介质的介电常数未知分类ABCD如液化气非导电液体石油浓缩的酸酯酒精等等导电液体水溶液1)稀释的酸DN1506DN200/2508DN200/2508DN200/2508DN200/2503DN80/1503杆式天线杆式天线杆式天线_____ABCDDK()=1.9...4DK()=4...10DK()MicropilotMFMR240的测量范围ABCDDK()=4...10DK(DK(40mm121/40mm12DN502DN502DN803DN1004DN10041/40mm...DN1001...411/...4)=1.4...1.9DK()=4...10DK(20m/67ft20m/67ft20m/67ft20m/67ft见管状天线20m/67ft20m/67ft取决于管长度3.3安装除了安装法兰的工具外,你还需要以下工具:用于旋转外壳及安装FAR10天线延伸管3.3.2在罐内安装天线尺寸D[mm/inch]H[mm/inch]150mm/6146/5.8205/8.111250mm/10241/9.5/380参见第19页的安装指南标记应指向罐壁外壳可旋转350否则应使用天线延长管FAR10涂釉天线安装指南注意以免涂层损坏200mm/8158/6.2269/.6当安装天线延伸管时若喇叭口直径大于接管宽度天线及其延伸管应从容器的内部进行安装然后将其抬起螺栓从外侧紧固应选择延伸管以使仪表能够抬起至少100mm(4若喇叭与安装短管匹配1插入延伸管的固定螺钉3圈然后顺时针旋转伸管拧紧法兰喇叭比安装短管直径大的情况按下列步骤进行将延伸管与喇叭拧在一起拧2将雷达放在安装短管上然后顺时针旋转延伸管用4mm内角拧紧固定螺钉从外部穿过塑料罐壁进行测量距离H应大于100mm在室外安装的情况下...20不得使用导电塑料若有可能在罐外的波束范围内不要安装任何可能引起干扰的部件特殊延伸管可使用的延伸管弯管的最小曲率半径为4590300mm12ENDRESS+HAUSER3E34mm(1.3451mm(2.01rPE2.317.0/0.673)3)PTFE2.118.0/0.713)3)PP2.317.0/1.673)3)Perspex3.114.4/0.573)3)26在罐中安装FMR231最佳安装位置标准安装外壳可旋转350以便于操作显示与端子接线杆式天线的屏蔽段必须伸出接管杆式天线必须调整至垂直250253.3.3导波管内的安装最佳安装位置标准安装标记应位于法兰的两个螺栓孔的正中间安装后以便于操作显示与端子接线可以穿过打开的球阀进行测量对导波管的建议)直径均匀焊缝尽量在导波槽的轴线上夹角180不是90去毛刺选择尽量大尺寸的喇叭天线即180mm并用机械方式调整在任何过渡段平均粗糙度Rz≤30使用无缝或平行焊不锈钢管法兰与管应在内部精确调整不要在管辟上进行焊接若无意中对其进行了焊接否则会引起强烈的干扰并引起介质粘附特别地法兰与管是焊接在一起的即标记对准导波槽2919导波管结构的实例MicropilotMFMR240标记螺纹连接R1/"或1/NPT1122100%<1/10管径孔<1/10管径单侧或钻透内孔去毛刺内孔去毛刺0%MicropilotMFMR230/FMR240例标准安装标记应垂直(90)于罐壁外壳可旋转350可以穿过打开的球罐进行测量直径均匀选择尽量大尺寸的喇叭口天线选择大一型号的天线不得产生任何大于0.1mm的缝隙当使用FMR230时精度受限DN50ANSL2标准安装可安装在罐内或旁通管内外壳可旋转350不会在导波天线上产生粘附安装后以方便操作显示及端子接线腔室将外壳(2)旋转至所需位置拧紧固定螺钉(1)请进行如下检查仪表与工况环境温度法兰上的标记方向正确吗仪表是否安装了防雨防晒的保护盖4接线4.1快速接线指南F12外壳中的接线指南(XA文件)中的规范对带有防爆认证的设备ExiaE在连接前请注意以下事项电源必须与铭牌数据(1)一致在连接设备前先将等势线连接至变送器的接线端子它将天线与外壳地连接在一起取下显示模块(3)用拉环将端子模块轻轻拉出将电缆穿过缆塞(5)拧紧缆塞(6)插入显示模块打开电源注意EXEXT12外壳中的接线在连接前请注意以下事项电源必须与铭牌数据(1)一致在连接设备前先将等势线连接至变送器的接线端子它将天线与外壳地连接在一起必须使用指定的缆塞在拧下分离接线腔室的外壳(2)之前必须切断电源将电缆穿过缆塞(5)拧紧缆塞(46)打开电源注意EXEX4.2连接测量单元端子腔室可提供两种端子腔室外壳用于标准或带有分离的端子腔室外壳的向方与接线有关转动外壳通信的最小负载缆塞或13电缆入口电缆入口电源电压HART M20 1.5Pg .5G1/2NPTHART 功率消耗正常工作min.60mW max.900mWHART负载4.2.1用E+HRMA422/RN221N进行HART连续电流消耗注意则必须在两根线之间接入2504.2.2用其他电源的HART连接4.3等电势连接将等电势线连接至变送器的外部接地端子上注意仪表只能在传感器侧接地4.4保护级别天线4.5接线后的检查缆塞是否拧紧若有辅助电源液晶显示器是否有显示5.1快速操作指南5操作1200236""5.1.1操作菜单的基本结构5.1.2功能的识别操作菜单分为两级可供选择的功能组包括每个功能组包括一个或多个功能在功能中可进行参数的选择与存储功能组可供选择的功能包括等等需进行如下设置选择功能组对每个功能在上都显示其位置0003...0D"基本设定""输出"0010030D800002"介质特性"004"空罐标定"00002第三位数字表示功能组中的功能以下将在所描述功能之后的括号内给出其位置安全设置01基本设定"罐体形状"介质特性0035.2显示与操作附图3显示与操作单元5.2.1显示LCD共4行显示对比度可调节5.2.2显示符号下表描述了上所出现的符号HART PROFIBUS-PA在选择列表中向下移动硬件上锁之后5.3现场操作5.3.1设置模式加锁Micropilot 10099+-E +-E 可用两种方式加锁数字值及出厂设定的修改例如锁定后在显示器上会出现符号同时按下锁定后在显示器上会出现符号再一次同时按下通过通信对其进行解锁所有参数都可进行显示0A40A0A45.3.2设置模式解锁当仪表处于锁定状态时系统会自动要求用户进行解锁通过显示模块或通信100 被解锁-和键后100"解锁参数"硬件解锁HARTMicropilot E HART注意如传感器特性会对整个测量系统的许多功能产生影响通常情况下无须对这些参数进行修改Endress+Hauser同时按下+、-和E请输入解锁码并按键确认E ⇒⇓⇓5.3.3出厂设定注意这可能会导致测量的误差在复位后应重新进行基本设定仪表必须更换测量位置存储及安装之后建议进行复位 被复位至缺省值当线性化被切换到时此表可在线性化功能组中被再次激活002空罐标定006管直径010报警输出012按时的014安全距离016液位/ 空罐041当使用一台以前在其他场合使用过或使用了错的固定目标抑制的仪表时必须重新做固定目标抑制"复位"05055用户单位047抑制图范围054偏移量062固定电流064模拟066显示方式0下载方式C5C8当前抑制距离5.4 显示与错误信息错误类型错误信息在调试及使用过程中所发处的错误将立即在操作模块上显示将显示优先级别最高的错误仪表会进入一个预先定义的状态最大22请参见71页表9显示错误信息请参见71页表9例如液位进入安全距离请参见71页表另外故障码的描述若同时发生多个错误最后发生的错误可在功能中用功能删除报警W报警/警告0A)"诊断""清除最后的错误"mA.2.29.2⇒5.5 HART通信除了现场操作可以有两种操作方式通过通用用操器利用操作软件或HART DXR275ToFTool Commuwin IIDXR2755.5.1手操器DXR275图用手操器进行菜单操作是基于时间行程原理的仪表的图形化操作软件数据加密支持以下功能变送器的在线组态加载保存仪表数据5.DXR275HARTToFTool Endress+Hauser Win95Win98WinNT4.0Win2000ToFTool CD-ROM提示菜单引导下的组态通过包络线进行信号分析连接选项见第37页HART协议通过FXA1915.5.3 Commuwin是用于智能变送器的具有图形支持的操作软件它与及兼容包络线可通过显示的更多信息在下列文档中给出系统信息连接提示若操作已在现场锁定FXA191HARTRS-232C FXN672MODBUS PROFIBUS FIP INTERBUSRS-232C PROFIBUS硬件至带有接口的计算机接口,用于6.1功能检查在开始测量前必须确认所有的最终检查己完成安装后的检查见第38页6.2调试显示如下信息。
FSL Ultrabeam Remote System Suregrip Range 操作手册说明书

Wiring Instructions and OperatingManualFSL ULTRABEAM REMOTE SYSTEMSuregrip RangeSafety PrecautionsThese instructions MUST be read carefully before installation and by every operator in order to maintain working condition and minimise risk of misuse. These precautions are in addition to any existing regulations.What you must do• Strictly adhere to all instructions as outlined in this manual• Ensure installation is carried out by professional and competent personnel• Ensure all applicable site safety regulations are fully respected• Make this manual permanently available to operators and maintenance personnel • Keep the transmitter in a secure place when not in use• Ensure that you have a clear view of any machinery to be operated and the surrounding area before beginning operation• Keep a record of all remotes used on site and mark transmitters clearly for use with different equipment• Service the equipment periodically (see preventive maintenance)What you must not do• Never modify any part of the equipment unless FSL Electronics has approved these modifications.• Never apply any voltage exceeding the maximum supply voltage• Never exceed current rating of the relays• Never allow unauthorised personnel to operate the equipment• Avoid knocking or dropping the handset• Do not attempt to inspect or repair the unit unless you are suitably qualified• Do not use this equipment for lifting of persons, as part of a life support machine or ina potentially explosive atmosphere• Do not use the equipment if any failure is suspected• Never regard any remote control function as an emergency stop.Ultrabeam Radio Transmitter Technical DataSuregrip RangeUltrabeam Radio Receiver Technical DataUBSY RangeThis information relates to the unit, with which it was supplied, specifications for other units may vary.Serial No.Customer Farnell in OneCode Code Set to ZeroMatching TransmittersWorking Frequency 433MHzRange Typical 100mSupply Voltage 12 – 24V DC or 110 / 240V ACFuse Internal 100mA fuse on 110 / 240V LiveRelay Type K4BC12Relay Contacts rated at 10A 240V AC / 30V DCSupply Current Standby (12-24V) <40mASupply Current Active (12-24V) 100mA (Max)Supply Current Standby (110-240V) <40mASupply Current Standby (110-240V) 50mA (Max)Code Selection 128 Codes available, selected by dipswitchOperating temperature -10 to 60 degrees CelsiusStorage temperature -20 to 60 degrees CelsiusCoax Length Whip antennae suppliedEnclosure Type EVAT16512575Software Version “CPC RX V1.0”The user can customise Button labels. Use “12mm Black on Clear” printing tape from the Brother P-Touch range (Note- Brother P-Touch printer required) or contact FSL Electronics to have pre-printed labels supplied. FSL can also provide customised software if timed or interlocked outputs are required. Please phone if you have any enquiries regarding your application or would like more information regarding FSL products.Record your function names and corresponding relay outputs here.Configuration FunctionRelayNo.1 C/O2 C/O3 C/O4 C/O5 C/O6 C/OFSL Electronics ULTRABEAMCode settingsTo set the transmitter code to match the receiver unit carry out the following steps.1) Open the transmitter unit to reveal the code Dipswitches on the left-hand side of the circuit board.2) Open the receiver unit, you will see a dipswitch above the relay. (The dipswitch will be blue)3) On the receiver unit there will be a dipswitch set to the code that the receiver is currently working on4) The transmitter Dipswitches are set, using binary code values, to have the same numerical value as thereceiver code.5) Refer to the table and examples overleaf to determine the proper switch setting.6) As a general guide the same switches must be set identically on both receiver and transmitter.7) Always keep a record of all settings used on the same site. Check before installing any radio controlledequipment for possible interference from other transmitters. Be aware that similar equipment may already be in operation within range of any new equipment to be installed. This can include any plant equipment such as mobile screeners/crushers, conveyors, bins, gates etc. Always check with site manager regarding existing radio controls.8) Do not attempt to adjust the transmitter or receiver in any other way.ALWAYS DISCONNECT MAINS POWER AND ISOLATE ALL ELECTRICAL LOADS BEINGSWITCHED BEFORE OPENING UNIT.FSL Electronics ULTRABEAM Code SettingTransmitter InstructionsCodeDipswitchO N2 3 4 5 6 7 8DIP SWITCH No. 1 2 3 4 5 6 7 8 Code Value 1 2 4 8 16 32 64 128ALWAYS DISCONNECT MAINS POWER AND ISOLATE ALL ELECTRICAL LOADS BEINGSWITCHED BEFORE OPENING UNIT.FSL Electronics Ultrabeam Code SettingReceiver InstructionsProgram LogicRadio Module (Note - Non adjustable) Aerial RelaysAC Power connectorDIP switch Value tableEach Dipswitch corresponds to a different value. The switches are set ON to add values together to make a particular code. E.g. 003 = DIP SWITCH 1 & 2 ON (1 +2 = 3) E.g. 020 = DIP SWITCH 5 & 3 ON (16+4 = 20) E.g. 070 = DIP SWITCH 7, 3 & 2 ON (64+4+2 = 70) E.g. 013= DIP SWITCH 4, 3 & 1 ON (8+4+1 = 13ALWAYS DISCONNECT MAINS POWER AND ISOLATE ALL ELECTRICAL LOADS BEINGSWITCHED BEFORE OPENING UNIT.Preventative MaintenanceCarry out the following routines regularly to ensure prolonged and reliable operation• Clean the handset and receiver with only a damp cloth• Store handset in a dry place when not in use• Avoid knocking or dropping handset• Ensure that all screws on receiver and transmitter are secure• Ensure that all wiring to the PCB connector on the receiver are secure• Check the aerial connections on the receiver• Check mounting screws on receiverUse of Ultrabeam Radio EquipmentUBSY RangeBefore using any of the equipment read the safety instructions at the start of this manual. Ensure stop functions are working before carrying out any operations.• Ensure you have the correct transmitter and the code is correct (see “Code setting”)• Ensure you are familiar with the operation of the equipment; do the functions latch or time? Etc. If in doubt check• Ensure that the operating position is in line of site of the aerial of the receiver and you are within range (usually 20m upwards depending on conditions)• Ensure that the area surrounding the machinery concerned is clear• Hold the transmitter vertically and press the relevant button, the red LED indicator should light. When appropriate release the button, the red LED should remain on for0.5 to 1sec.TroubleshootingBefore inspecting any of the equipment read the safety instructions at the start of this manual. Qualified personnel should only carry out inspection.If the unit does not work correctly carryout the following checks• If the red LED on the handset is not lighting or is flashing then the problem is most likely the transmitter. Change the battery, if the problem persists, contact FSL for assistance.• If the LED on the transmitter is working correctly, check the receiver for relay operation. You should hear the relays pull in with a sharp click. If the relays areworking correctly then the problem is probably in the wiring of the receiver to any other equipment or in another part of the machine. Ensure that all output wires are connected securely to the PCB screw terminal block.• If the LED on the transmitter is working correctly but the relays are not pulling in then check the code set-up (see “Code Setting”), check the supply voltage to the receiver.• If the fault is that the output “chatters” intermittently, check for electro-mechanical interference from contactors, solenoids, motors etc. Fit suppressers to the source of interference to solve this problem• If the range is poor check the receiver aerial and connections for signs of wear and tear, also check for sources of interference in the local area.If the fault is not found with the above checks, contact FSL Electronics for assistance. Have the following details to hand: -- Serial numbers for all transmitters and receivers (these can be found on the units) - The name of the company who originally bought the equipment and the address of the site where it is now installed- Details of the nature of the fault and any checks already made- Details of what equipment / machinery the unit is installed on, in particular what the output relays of the Ultrabeam receiver are controlling.Make the basic checks and then contact FSL before returning any equipmentEU DECLARATION OF CONFORMITYManufacturer of the UBSY series, remote control system is:FSL Electronics Ltd.Sandholes RoadCookstownBT80 9ARDescription of equipmentThe UBSY20 series is a 6-channel remote control system.Manufacturer’s DeclarationWe hereby declare, under our sole responsibility, that the above equipment complies with the provisions of the Electro Magnetic Compatibility Directive 89/336/EEC, amended by 92/31/EEC on the approximation of the laws of the Member States relating to electromagnetic compatibility.Basis on which conformity is declaredThe above equipment complies with the protection requirements of the EMC Directive.Standards appliedBS EN 50081-2 Electromagnetic compatibility generic emission standard.Part 2 Industrial environment 1994BS EN 50082-2 Electromagnetic compatibility generic immunity standardPart 2 Industrial environment 1995February,292000 AuthorisedDate:signatory:John MeenanPosition: Technical DirectorGuaranteeFSL Electronics Ltd. provides a 1-year guarantee with all products. This covers repairs and replacements due to faulty parts or workmanship. A full fault report and order number must accompany any returns. FSL Electronics will be pleased to provide technical assistance on any matter relating to our products.The guarantee does not cover damage resulting from the following:- Damage in transit- Incorrect installation- Repairs or alterations made without the approval of FSL Electronics- Misuse or neglect of equipment- Flat batteries- Inspection charge may be applied if equipment is returned but has no defect.FSL Electronics reserves the right to evaluate breakdowns and damage.Under no circumstances will FSL Electronics be responsible for hold-ups, accidents or expenses incurred as a result of equipment malfunctioning.FSL Electronics LimitedSandholes Rd,Cookstown, Co. TyroneN.Ireland, BT80 9ARTel +44 (028) 867 66131 Fax +44 (028) 867 62414E-Mail ****************************。
测量系统培训教材(1)

差只能是由于普通原因而不是由于特殊原因造成的。这可 称为统计稳定性; n 测量系统的变异必须比制造过程的变异小; n 变异应小于公差带;
n 测量精密应高于过程变差和公差带两者中精度较高者,一 般来说,测量精度是过程变异和公差带两者中精度较高者 的十分之一;
n 测量系统统计特性可能随被被测项目的改变而变化。若真 的如此,则测量系统的最大的变差应小于过程变差和公差 带两者中的较小者。
因此,要保证测量结果的准确性和可信度。
测量系统培训教材(1)
测量误差
Y = x +ε
n
測量值 = 真值(True Value)+測量誤差
戴明說沒有真 值的存在
一致
测量系统培训教材(1)
测量系统分析的目的
n 运用统计分析方法,确定测量系统测量结果的变差 (测量误差),了解变差的来源。 从而确定一个测量系统的质量,并且为测量系统的改 进提供信息。
计量型测量系统的分析方法 1)偏倚 2)稳定性 3)线性 4)重复性和再现性(R&R
) 计数型测量系统的分析方法
1)小样法 2)大样法
测量系统培训教材(1)
人 测机 量法 的环 重测量要性
合格
原料
PROCESS
测量 结果
测量
不合格
测量的重要性:
如果测量出现问题,那么合格的产品可能被判为不合 格,不合格的产品可能被判为合格,此时便不能得到 真正的产品或过程特据变差的来源
称菜的过程
测量到的过程变差
不同的人用 同一个秤对 同一个土豆 称重的差异
没有两个土豆 过程实际的 的重量是一样 变差
的
测量的变差
海默培训教材

海默多相流量计培训材料
能适应每一种流型。 流型对多相流测量有很大的影响。不对流动进行混合的在线仪表需要知道是什么流 型以便能解释测量结果。这对互相关法尤其重要,因为互相关法是确定气体和液体的速度 来测量混合物的速度和含气率。如果流型和模型不一致,输出结果就不正确。互相关对于 相对稳定的条件不太可靠(泡状流,一些条件的环状流) 。而文丘里测量方法较适用于这 种条件。 介电测量可能会受流型的影响,对于给定的气液混合物,分布不同,其结果不同。 伽玛射线衰减不受流型的影响,但却是高度非线性,与相分数的指数有关。间歇流型对伽玛 相分仪表的结果有很大的影响, 因此除了选用合适源强度以外, 还需要进行正确的平均计算。 一些流型影响,尤其是由高黏度临时乳化引起,可能会导致错误的计量。两种重要 的影响是粘性膜的沉积物和翻腾流的影响。在三相环状流、分层/环状流和塞状流中已经 观察到高黏度的油水乳化厚膜。这在计量系统中有几方面的影响。一个影响是在相成分测 量点会留下实际上静止但可测量的膜。这就会使油水分数增加,再乘上速度后会得出太大 的油水流量。水平管中的情况会比竖直管中的情况更严重。 翻腾流出现在竖直管中, 会尤其影响使用互相关的计量。 实际流动速度可能是相当慢, 但由于大的波动向上速度和大的波动向下速度,其结果却完全不同。因此可能其误差会比 速度自身的差还要大。 流型变化还对仪表取样带来了要求。 流型变化快, 而仪表取样速度不适应将影响测量。 1.4.2 相分布对多相流测量的影响 1)连续相 三相流的计量常常受油水相分布的影响,水为连续相或者油为连续相。相转换点指油为 连续相转换为水为连续相时液相中的含水率,通常相转换时的含水率在 40%到 60%之间,液 体不同相转换点不同。使用低频介电测量的仪表中,连续相非常重要。在油为连续相的条件 下,可用电容传感器区分油和水,因此测出含水率。这是最准确的测量含水率的技术之一, 含气率对其影响很小,但在相转换点处无法应用,因为在高传导的液体水中,电容传感器不 起作用。 在水为连续相的条件下, 必须使用电感和电导传感器, 虽然不象电容测量那样敏感, 但仍能给出较准确的结果, 尤其在较高含气率的情况下如此。 因此一些仪表会需要两种类型 的传感器和能很好响应的探测手段。 在相转换区域, 流动可能会在油为连续相和水为连续相 间切换,这种仪表不适合这一区域的测量。 连续相同样会影响高频介电测量(即微波) ,但相同的传感器可用于油为连续相或水为
UAVP 汉语手册

手册用於建造與操作專業的悬停平台特征这项发展的目标是要建造一个普遍的悬停平台包括以下特征:单一电子板,额外的元件有馬達,馬達控制器,遥控系统和机身/框架电缆布线容易防干扰设计,不需要特别错综复杂的技能可編程信號更新(到250 hz)自定义设置为不同的马达/控制器/螺旋桨组合另外2个遥控渠道为控制伺服机(照相机角度)7组LED驱动渠道,每一组可驱动500mA!音响信号作为低电池,无线信号中断警告和寻找指引陀螺仪:3陀螺模块adxrs300/150(推荐)或1x adxrs300/150和1xidg300可通過RS232 或遥控-发射机更改編程參量失去控制时自动降落伞系统触发器可选数码加速度传感器lis3lv02dq可选数字指南针传感器hmc6352可选数字气压传感器smd500可选全球衛星定位(在开发中:GPS (ublox)选择项允许某种程度的个人宁愿,一些选项可以选择或省略。
在所有情况下,这些选项可以在以后添加或删除。
但是一些选项会对其它的选择宁愿有影响。
所需的部分元件会在建造程序中的每个选项中分别提及零件名单基本远程控制模型设备4 X 无刷马达2 X 顺时针方向转螺旋桨(即epp1045或其他,与使用的马达相合适)2 X 逆时针方向转螺旋桨(即epp1045或其他,与使用的马达相合适)4 X 无刷控制器(PWM 或TWI/i2c),与马达的电力要求相同,yge I系列或Holger’s i2c 控制器。
这些无刷控制器给予很好的表现,但其他模式也可以使用。
1 x 简单的5渠道无线电发射,接收器(推荐7渠道)或者也可以用有PPM复合输出的接收器电子零件为了节省空间和重量,大部分的电子元件是SMD封装。
用铅笔型烙铁和稳定的手,贴片零件是很容易焊接的. 全部电子元件都是标准零件及包装.1 X 印刷电路板,在www.lipoly.de 或 购买1 × U1 pic16f876或876a (dil28 ,165117 )与目前的Hex文件编程,预先编程的芯片可以由作者或www.lipoly.de 或 购买1 x U2 TPIC6B595N (DIL20)1 × U3 tl431稳压器(TO92)1 X 石英16 MHz (hc49u )6 x R1,R2,R3,R18,R19,R23 SMD 电阻器10k 5% (0805)15 x R6,R7,R8,R10,R11,R12,R13,R14,R15,R21,R17,R24,R25,R26,R27 SMD 电阻器4,7k 5% (0805)3 x R4,R9,R20 SMD 电阻器1k 5% (0805)1 x R5 SMD 电阻器2,2k (0805)1 x R22 SMD 电阻器68 5% (0805)4 x R28,R29,R30,R31 SMD 电阻器180 5% (0805)1 x R16 SMD 电阻器100 5% (0805)4 x D1,D2,D3,D4 SMD-二极管LL4148 (SOD80) 注意PCB的方向!1 x D5 SMD LED 蓝色30mA, PLCC21 x D6 SMD LED 红色30mA, PLCC21 x D7 SMD LED 绿色30mA, PLCC21 x D8 SMD LED 黄色30mA, PLCC23 x Q1, Q2, Q3 NPN 晶体管BC548B 或相似的(TO92)4 x C1, C2, C6, C7 SMD 电容器100nF (0805)2 x C4, C5 SMD 电容器22pF (0805)2 x C8, C9 SMD 钽电容器1μF1 x C3两极电容器100μF 10V, 辐形包装, 注意PCB 的方向!1 × L1的电感线圈100至220 μ h ,0,1A ,轴向包装1x 所有K 36pin 插针式连接器RM2,54 平直,被金镀锌, 可拆2x 所有K 12pin 插座连接器RM2,54 平直, 可拆2X U1 IC 插座dil14 (2个安装一排做成dil28 )选择"LEDs"大家都希望有所不同照明效果任何类型的LED 都可以。
曰尔伦机器人目标检测器说明书
©2019 Whelen Engineering Company Inc.Form No.14C96 (102819)A u t o m o t i v e : S i r e n s /S w i t c h e sFor warranty information regarding this product, visit /warrantyDANGER! Sirens produce extremely loud emergency warning tones! Exposure to these tones without proper and adequate hearing protection, could cause ear damage and/or hearing loss! The Occupational Safety & Health Administration () provides information necessary to determine safe exposure times in Occupational Noise Exposure Section 1910.95. Until you have determined the safe exposure times for your specific application,operators and anyone else in the immediate vicinity should be required to wear an approved hearing protection device. Failure to follow this recommendation could cause hearing loss!•Proper installation of this product requires the installer to have a good understanding of automotive electronics, systems and procedures.•Whelen Engineering requires the use of waterproof butt splices and/or connectors if that connector could be exposed to moisture.•Any holes, either created or utilized by this product, should be made both air- and watertight using a sealant recommended by your vehicle manufacturer.•Failure to use specified installation parts and/or hardware will void the product warranty.•If mounting this product requires drilling holes, the installer MUST be sure that no vehicle components or other vital parts could be damaged by the drilling process. Check both sides of the mounting surface before drilling begins. Also de-burr the holes and remove any metal shards or remnants. Install grommets into all wire passage holes.•If this manual states that this product may be mounted with suction cups, magnets, tape or Velcro®, clean the mounting surface with a 50/50 mix of isopropyl alcohol and water and dry thoroughly.•Do not install this product or route any wires in the deployment area of your air bag. Equipment mounted or located in the air bag deployment area will damage or reduce the effectiveness of the air bag, or become a projectile that could cause serious personal injury or death. Refer to your vehicle owner’s manual for the air bag deployment area. The User/Installer assumes full responsibility to determine proper mounting location, based on providing ultimate safety to all passengers inside the vehicle.•For this product to operate at optimum efficiency, a good electrical connection to chassis ground must be made. The recommended procedure requires the product ground wire to be connected directly to the NEGATIVE (-) battery post (this does not include products that use cigar power cords).•If this product uses a remote device for activation or control, make sure that this device is located in an area that allows both the vehicle and the device to be operated safely in any driving condition.•It is recommended that these instructions be stored in a safe place and referred to when performing maintenance and/or reinstallation of this product.•FAILURE TO FOLLOW THESE SAFETY PRECAUTIONS AND INSTRUCTIONS COULD RESULT IN DAMAGE TO THE PRODUCT OR VEHICLE AND/OR SERIOUS INJURY TO YOU AND YOUR PASSENGERS!CAUTIONLoud siren noise can cause hearing damage and/or loss.Refer to OSHA Section 1910.95prior to putting ANY siren into service!Wear Protection!ACTIVATION OF THIS SIREN MAY DAMAGE UNPROTECTED EARS!Warnings to InstallersWhelen’s emergency vehicle warning devices must be properly mounted and wired in order to be effective and safe. Read and follow all of Whelen’s written instructions when installing or using this device. Emergency vehicles are often operated under high speed stressful conditions which must be accounted for when installing all emergency warning devices. Controls should be placed within convenient reach of the operator so that they can operate the system without taking their eyes off the roadway. Emergency warning devices can require high electrical voltages and/or currents. Properly protect and use caution around live electrical connections.Grounding or shorting of electrical connections can cause high current arcing, which can cause personal injury and/or vehicle damage, including fire. Many electronic devices used in emergency vehicles can create or be affected by electromagnetic interference. Therefore, after installation of any electronic device it is necessary to test all electronic equipment simultaneously to insure that they operate free of interference from other components within the vehicle. Never power emergency warning equipment from the same circuit or share the same grounding circuit with radio communication equipment. All devices should be mounted in accordance with the manufacturer’s instructions and securely fastened to vehicle elements of sufficient strength to withstand the forces applied to the device. Driver and/or passenger air bags (SRS) will affect the way equipment should be mounted. This device should be mounted by permanent installation and within the zones specified by the vehicle manufacturer, if any. Any device mounted in the deployment area of an air bag will damage or reduce the effectiveness of the air bag and may damage or dislodge the device. Installer must be sure that this device, its mounting hardware and electrical supply wiring does not interfere with the air bag or the SRS wiring or sensors. Mounting the unit inside the vehicle by a method other than permanent installation is not recommended as unit may become dislodged during swerving; sudden braking or collision. Failure to follow instructions can result in personal injury. Whelen assumes no liability for any loss resulting from the use of this warning device. PROPER INSTALLATION COMBINED WITH OPERATOR TRAINING IN THE PROPER USE OF EMERGENCY WARNING DEVICES IS ESSENTIAL TO INSURE THE SAFETY OF EMERGENCY PERSONNEL AND THE PUBLIC.Warnings to UsersWhelen’s emergency vehicle warning devices are intended to alert other operators and pedestrians to the presence and operation of emergency vehicles and personnel. However, the use of this or any other Whelen emergency warning device does not guarantee that you will have the right-of-way or that other drivers and pedestrians will properly heed an emergency warning signal. Never assume you have the right-of-way. It is your responsibility to proceed safely before entering an intersection, driving against traffic, responding at a high rate of speed, or walking on or around traffic lanes. Emergency vehicle warning devices should be tested on a daily basis to ensure that they operate properly. When in actual use, the operator must ensure that both visual and audible warnings are not blocked by vehicle components (i.e.: open trunks or compartment doors), people, vehicles, or other obstructions. It is the user’s responsibility to understand and obey all laws regarding emergency warning devices. The user should be familiar with all applicable laws and regulations prior to the use of any emergency vehicle warning device. Whelen’s audible warning devices are designed to project sound in a forward direction away from the vehicle occupants. However, because sustained periodic exposure to loud sounds can cause hearing loss, all audible warning devices should be installed and operated in accordance with the standards established by the National Fire Protection Association.Safety FirstThis document provides all the necessary information to allow your Whelen product to be properly and safely installed. Before beginning the installation and/or operation of your new product, the installation technician and operator must read this manual completely. Important information is contained herein that could prevent serious injury or damage.WARNING: This product can expose you to chemicals including Lead which is known to the State of California to cause cancer and birth defects or other reproductive harm. For more information go to .Installation Guide:Cantrol™/Carbide™ CAN Interface Harness(2020 Ford Interceptor Utility)51 Winthrop RoadChester, Connecticut 06412-0684Phone: (860) 526-9504Internet: Sales e-mail: autosale@Customer Service e-mail: custserv@®ENGINEERING COMPANY INC.2.Locate the CAN port Interface Cable (included). This cable allows the Cantrol™ or Carbide™ system to communicate with your vehicle’s CAN network.The interface cable is comprised of the following connectors:•One 6-position YES 2.8 Series Connector male•One 3 position connectorThe Canport communication board consists of the following components:•USB Port - This port is used exclusively for programming the CANport Communication Board. All other system programming uses the standard USB port found on the CanTrol / Carbide module.•USB Status LED (Blue) - This LED,located adjacent to the 8-positionconnector, indicates one of threepotential USB states:Off - No connection detected.Slow Flash - For factory purposesonly.Fast Flash - Connection detected,not ready.Steady - Connection detected,ready for use.•8-position Connector - Thisconnector is used to connect theCANport Interface Cable to theCanTrol / Carbide module.connector into the CAN2 port onand diagnostic data may now beconnector installed earlier in thissystem to interact with thelaptop computer. Thisand is only needed during theColorBLUGRY8 Position ConnectorPin DescriptionColor1. . . . . . . . Signal - High (CAN 1).........................BLU2. . . . . . . . Signal - Shield (CAN 1)...................Shield3. . . . . . . . Signal - Low (CAN 1)........................GRY4. . . . . . . . Speed Output......................................VIO5. . . . . . . . No Connection6. . . . . . . . No Connection7. . . . . . . . No Connection8. . . . . . . . Speed Ground....................................BLK。
施迈德 MPI-R10 MPI-R10-RF 磁性测量系统 操作说明说明书
Magnetic measuring systemOPERATING INSTRUCTIONS MPI-R10MPI-R10-RFModels all rights reserved in accordance with the law. Always mention the source when reproducing our drawings.2ENContents1. Safety Instructions 32. Description32.1 V ersion - MPI-R10-RF43. Installation43.1 Display installation 43.2 Sensor installation 43.3 Magnetic band installation54. Display 55. Key functions 56. System Switching on/off66.1 Switching on the system 66.2 Switching off the system67. Operating mode 67.1 Absolute/incremental measuring mode selection 67.2 Unit of measure selection 67.3 Origin setting67.4 Absolute reference setting 67.5 Direct programming of the absolute reference value and compensation value 77.6 Targets7 7.6.1Reaching the target position 7 7.6.2 Target display mode 7 7.6.3 Target tolerance 87.7 Angular Measurement87.8 Version - MPI-R10-RF 87.8.1 Programming of the network parameter (nEt id) and thechannel parameter (nEt ch) 8 7.8.2 Targets88. Programming mode 8 8.1 Programming of parameters with numeric values8 8.2 Device parameters (in alphabetical order) 8 8.3 Main menu tree 9 8.4 Target menu tree9 8.5 Additional features10 8.5.1 Reset 10 8.5.2 Calibration 10 8.5.3 LCD test10 8.5.4 Correction coefficients10 8.5.5 Revision109. Battery replacement 1010. Display messages and troubleshooting 10Models all rights reserved in accordance with the law. Always mention the source when reproducing our drawings.3EN1. Safety InstructionsThe product has been designed and manufactured in ac-cordance with the current regulations. The product leaves the factory ready for use and complies with the safety stand-ards. To maintain the product in this state, it is necessary that it is assembled and used properly , in the closest compliance with this instructions manual and with the following specific safety precautions.Before installing and using the MPI-R10, read carefully this manual, which is intended as an indispensable supplement to the existing documentation (catalogues, data sheets).Morever , all the rules of law must be observed, in regard to accident prevention and environmental protection.The use, without complying with the descriptions / specific parameters, (in combination with systems / machines / processes to be controlled), can lead to a malfunction of the product, causing:- health hazards,- environmental hazards,- damage to the product and to its proper functionality .The device must not be used : - in explosion hazard areas;- in medical/life support areas and equipment.Do not open the equipment and do not tamper with it! Any tampering might have a negative impact on reliability of the device and might be dangerous. Do not attempt any repair . Return any defective equipment to the manufacturer! Any violation of the integrity of the device as delivered will cause the warranty loss.Changes or modifications, not expressly approved by the party responsible for compliance, could void the user’s authority to operate the equipment.Setup/CommissioningIn case of any malfunction (even in case of change in operating conditions), the device must be switched off immediately . Switch off power supply during any installation work on the equipment. Installation and commissioning are allowed by trained and authorised staff only . After correct setup and commissioning, the device is ready for operation. Maintenance/repairSwitch off the power supply of the equipment before any action. Maintenance should be performed by trained and authorised staff only .NOTE: This equipment has been tested and found to comply with the limits for a Class A digital device, pursuant to part 15 of the FCC Rules. These limits are designed to provide reasonable protection against harmful interference when the equipment is operating in a commercial environment. This equipment generates, uses, and can radiate radio frequency energy: if not installed and used in accordance with the instructions manual, it may cause harmful interference to radio communications. Operation of this equipment in a residential area is likely to causeharmful interference in which case the user will be required to correct the interference at his own expense.2. DescriptionConnected to the dedicated sensor FC-MPI, and combined with the Elesa magnetic band M-BAND-10, the MPI-R10 is a complete system for the measurement of linear and angular displacement. Characterised by extremely easy assembly , it allows precise alignment and positioning, reducing time and machining procedures to a minimum.MPI-R10 main features are:- Multifunction LCD with 4 function keys.- Absolute/ incremental mode.- Programmable offset and targets function.- Lithium battery powered.- Protection against accidental polarity inversion.The sensor cable F C-MPI is made of a metallic enclosure containing the electronic sensor , a multipolar flexible cable and a connector to be plugged into the MPI-R10.The sensor cable is available in different lengths.The magnetic band M-BAND-10 is made of two separate parts: the magnetic band and the cover strip. The magnetic band is made of a magnetic tape, a carrier strip and an adhesive tape (Fig. 2).The cover strip is made of a protection strip and an adhesivetape (Fig. 1).(1) The reading speed influences the battery life.(2) Resolution: the smallest change in length that the system is capable ofdisplaying.(3) Precision: the maximum deviation of the value measured by thesystem from the actual one.(4) Repeat accuracy: the degree of closeness among a series of meas-MPI-R10FC-MPI2.1. Version – MPI-R10-RFThe MPI-R10-RF is compatible with Elesa wireless networkthat allows magnetic measuring system and indicators tocommunicate via radio with a PLC.Elesa wireless network is made by the following components:- One control unit UC-RF- Max 36 electronic position indicators or magnetic measuring.The control unit UC-RF is provided with a standard interfacefor the most common industrial busses to be connectedto the PLC and allows the transmission of the informationbetween the PLC and the MPI-R10-RF magnetic measuringsystem. The UC-RF exchanges information with the MPI-R10-RF via radio frequency and allows the setting of the targetposition and the control of the current position of eachindicator, directly from the PLC.2. Remove all drilling burrs before fitting the MPI-R10.3. Fit the lower part of the case into the housing.4. Press onto the upper part until the case is completelysnapped in.3.2. Sensor installationFix the magnetic sensor by using M3 screws (not included inthe supply). During the installation, use a spacer (max 1 mmis suggested) to grant the parallelism between the sensorand the magnetic band.Models all rights reserved in accordance with the law. Always mention the source when reproducing our drawings.5EN4. Display1. Absolute or relative mode indicator2. Low battery level indicator3. mm, INCH or degree unit of measure4. Target position indication5. RF connection indicator5. Key functionsThe function of the key changes depending on the mode of the device.12354The maximum distance between the sensor and the magnetic band, to ensure a correct reading of the displacement, is 1mm.3.3. Magnetic band installationTo mount the magnetic band follow the instructions below: - Clean the mounting surface carefully .- Remove the protective film from the adhesive tape of the magnetic band.- Stick the magnetic band on the mounting surface. - Clean the surface of the magnetic band carefully .- Remove the protective film from the adhesive tape of the cover strip.- Stick the cover strip on the magnetic band. The cover strip must be put on the magnetic band to protect it from possible mechanical damages.- In case of absence of a seat for the housing of M-BAND-10, secure the ends of the cover strip to prevent unintentional peeling.The mounting surface must be flat. Buckles or bumps will lead to measuring inaccuracies. To guarantee an optimal adhesion of the adhesive tapes, the mounting surfaces must be perfectly cleaned, dry and smooth. The following surface roughness is recommended: Ra <= 3,2 N8 (Rz <= 25). To maximize the adhesion install the strip applying pressure. Gluing should preferably be carried out at temperatures between 20 °C to 30 °C and in dry atmosphere.WARNINGOnce the installation is completed, the calibration procedure must be carried out as shown in cap. 8.5.2.Models all rights reserved in accordance with the law. Always mention the source when reproducing our drawings.6EN7. Operating mode7.1. Absolute/incremental measuring mode selectionto select the absolute or incremental measuring mode.The measuring mode selected is shown on the display by the symbols:- ABS: absolute measuring mode.- REL function by the menu voice __0____ (see chap.8.3).The available options are:- ArCLr (default): when relative measurement is selected, the value is always reset to zero.- Ar : passing fromABS to REL , the relative measurement is not reset to zero.- OFFTo program the parameters listed above, see chap. 8.3.7.2.The options available are millimeters, inches and degrees.The measuring mode selected is shown on the display by the symbols: mm for millimeters, inch for inches and with the ° suffix for degrees.function by the menu voice 0______.The available options are:- ALL (default): units of measure that can be selected: mm, inch, degree.- nodEG : units of measure that can be selected: mm, inch.- OFF : the key is disabled and does not allow changing the selected measuring mode.To program the parameters listed above, see chap. 8.37.3. for three seconds to set the origin of the Keeping pressed the ORG to confirm or another key to cancel.Confirming the setting of the origin, the display will be reset to zero: this position of the sensor must be considered as the origin of the following measurements.7.4. Setting the absolute referenceAfter having selected the absolute measuring mode and to the sum of the values of the parameters Origin (absolute value of reference) and the selected OFFS (compensation value).The value of compensation (OFFSET ) allows you to adjust the value shown on the display in such a way that takes into account,6. System Switching on/off6.1. Switching on the systemAfter you have read the section “Safety Instructions”, proceed by switching on the indicator .- - The display will light up and the indicator is ready to be used.6.2. Switching off the system To switch the system off :- enter the programming mode, - (see chap. 8.3)- - - The display will turn off and the indicator will go into low power mode.Models all rights reserved in accordance with the law. Always mention the source when reproducing our drawings.7ENfor example, wear or tool change. The system allows you to store up to 10 values of compensation.+display the last compensation value used (eg OFS 0).to confirm.The screen will display the absolute value equal to the sum of the values of the parameters Origin and OFFSet .To program the offset values, see parameterOFFSetof cap. 8.3.in the menu voice __0___0 The available options are:LOAd_OrG : the key combinations allow to choose an offset OFFFor programming the parameters listed above see paragraph 8.37.5. Direct programming of the absolute reference value +can be programmed to allow direct access to the programming of the OrIGIn or OFFSEt parameters.It is possible to change the function of the keys combination choosing one of the available options in the menu voice 0_____0.The available options are:- PrOGOrG : direct programming of the absolute reference value (OrIGIn parameter).- PrOGOFS : direct programming of the compensation value (OFFSEt parameter).- OFF : the keys combination is not associated to any function in the operating mode.7.6 TargetsMPI-R10 allows to set up to 32 target positions to store relevant machine configuration setting.To program the targets:- select tArGEtS in the main menu (see cap 8.3).- select PrOG_TG (see chap. 8.4).- select the required memory location (PtrG 01 to PtrG 32).- - Follow the instructions in cap. 8.1 to set the required value.To load a target:- select tArGEtS in the main menu (see cap 8.3).- select LOAd_TG (see chap. 8.4).-LtrG 01 to LtrG 32)-- The value of the selected target is shown.programming or loading of targets depending on the value assigned to parameter___0_0.If enabled, the key combination allows to choose between the two following operations:- LOAd_tG - PrOG_tGIt is possible to change the function of the keys combination choosing one of the available options in the menu voice ___0_0.The available options are:- tArGet : enable the direct load or program targets functions.- OFF 7.6.1. Reaching the target positionWhen a target is selected by the PLC (RF version MPI-R10-sensor to reach the target by means of the symbols It is possible to set the FLIP_tG parameter (see chap. 8.2) to adapt the target position indication to the actual sensor configuration.It is possible to set the tolerance of the target as absolute difference from the set value by means of the P_tOLL parameter (see chap. 8.2).The target position indicators will work, depending from the FLIP_tG and P_tOLL parameters, as in the following table.T = set target M = measured valueToll = tolerance (see P_toll )S t O P_t G depending on the settings of the device.Models all rights reserved in accordance with the law. Always mention the source when reproducing our drawings.8ENIt is possible to change the function of the key and the target mode choosing one of the available options in the menu voice ____0__.The available options are:- d_tArG (default): when a target is loaded, the display shows the actual absolute position and the indication to- : when a target is loaded, the display showsthe distance to the set target and the indication to reach thedisplay shows the actual absolute position.7.6.3. Target toleranceSet the value of P_toll parameter to define the tollerance allowed for target (see chap. 8.2 for details).7.7. A ngular measurementMPI-R10 allows to measure angular displacements. To obtain the correct measurement, it is needed to set the parameter “Radius” with the measure of the radius of the arc where the magnetic band is placed.7.8. Version - MPI-R10-RF7.8.1. Programming the network parameter (nEt id) and the channel parameter (nEt ch)The system radio network is defined by the following two parameters:- nEt id: id 00/99- nEt ch: ch 01/36These parameters can be configured in the Radio menu of the indicator (see chap. 8.3) and must be set according to the PLC recipe to guarantee a perfect communication between UC-RF and MPI-R10-RF .WarningFor MPI-R10-RF with firmware release equal to 5.1 or higher , channel 1 is equivalent to channel 4 of the previous version. Consider it when used in old system with UC-RF with firmware release lower than 5.1.7.8.2 TargetsUsing MPI-R10-RF , target positions can be sent from the PLCto the indicators through the control unit. When a target is set, the behaviour is the same as decribed in cap 7.6.for 3 seconds to enter the programming mode. Depending on the setting of PASS parameter (seeandto exit the programming mode. The programming mode is automatically dropped after 30 seconds of inactivity .of parameters.When a parameter is changed from its stored value, by confirming it, the display will show the message CHAnGEd .When exiting from the programming mode, the parameter are stored in the internal memory . If a parameter was changed, the display will show the message StorEd .8.2. Device parameters (in alphabetical order)Models all rights reserved in accordance with the law. Always mention the source when reproducing our drawings.9EN8.3. M ain menu treeSPEEd 1 ÷ SPEEd 5If mm: 1, 0.1,0.01If inch 1, 0.1, 0.01, 0.0010.000001÷9.9999990.000001÷9.999999Radius dEG_rES0.01÷9999.991, 0.1, 0.018.4. T arget menu treePtrG 01…PtrG 32LtrG 01LtrG 32…I f m m -9999.99÷9999.99I f i n c h -9999.99÷9999.99I f D e g -99999÷99999The parameter value depends on the unit of measure and resolution set .The symbols on the display related to the target feature are used .See chap. 5Models all rights reserved in accordance with the law. Always mention the source when reproducing our drawings.10EN8.5. Additional features8.5.1. ResetTo reset the device to its factory setup:- select the voice RESEt- select YES- 8.5.2. Calibration The Calibration voice in the main menu activates the CALIBRATION MODE and the display shows GO .At this point, the user must slowly move the sensor in one direction along the magnetic band.After the GO , a progress bar is displayed that will grow as long the sensor is moved. The procedure is completed when the measurement position is shown again by the display .This operation allows the sensor to be accurately bound to the magnetic tape and has to be done every time after the installation of the sensor .8.5.3. Test LCDThe LcdtESt voice in the main menu allows to switch on all the display segments.8.5.4. Correction coefficients To improve the correctness of the measurement, MPI-R10 allows to set two correction factors that take into accountthe differencies between ideal and actual installation of the magnetic band:- LinCorr : is the ratio between the actual measurement and the value measured by the device in linear measurement.- AngCorr : is the ratio between the actual measurement and the value measured by the device in angular measurement.To calculate the correction factor , set it to 1 then read the value measured (M) in a reference point (K). The correction factor will be equal to K/M.Verify that the measurement done in the reference point and/or other known points is correct.8.5.5. RevisionThe release data of the device are shown, starting with the r letter case of support needed.9. Battery replacementThe internal lithium 1/2 AA - 3.6 V battery ensures over 3 years battery life (RF version - 2 years).The symbol is shown on the display when the battery replacement is required.The replacement is made by simply removing the cover onthe back.By replacing the battery in less than 5 seconds, all the measurements and settings wil not be lost. If more time is required and the display turns off, the settings of the device have to be set or verified again.10. Display messages and troubleshotingModels all rights reserved in accordance with the law. Always mention the source when reproducing our drawings.11ENEU DECLARATION OF CONFORMITY (DoC)COMPANY NAME: Elesa S.p.a.POSTAL ADDRESS: Via Pompei 29POSTCODE AND CITY: 20900 Monza TELEPHONE NUMBER: +39 039 28111E-MAIL ADDRESS: **************Declare that the DoC is issued under our sole responsibility and belongs to the following product:PRODUCT: Magnetic measuring system APPARATUS MODEL: MPI-R10TRADE MARK: Elesa The object of the Declaration described above is in conformity with the relevant Union harmonization legislation:2014/30/EU (EMC): Electromagnetic Compatibility Directive 2011/65/UE (RoHS): Restriction of the use of certain Hazardous Substances in electrical and electronic equipment The following harmonized standards and technical specifications have been applied:EN 61326-1:2013Notified Body:Not Involved (Annex II - Conformity Assessment Module A)Additional information:Software Version: 5.1 or higherPLACE, DATE OF ISSUE: CARLO BERTANI Monza – Italy MANAGING DIRECTOR 17/05/2021 GENERAL MANAGEREU DECLARATION OF CONFORMITY (DoC)COMPANY NAME: Elesa S.p.a.POSTAL ADDRESS: Via Pompei 29POSTCODE AND CITY: 20900 Monza TELEPHONE NUMBER: +39 039 28111E-MAIL ADDRESS: **************Declare that the DoC is issued under our sole responsibility and belongs to the following product:PRODUCT: Magnetic measuring system APPARATUS MODEL: MPI-R10-RF TRADE MARK: Elesa The object of the Declaration described above is in conformity with the relevant Union harmonization legislation:2014/53/EU (RED) Radio Equipment Directive2011/65/UE (RoHS): Restriction of the use of certain Hazardous Substances in electrical and electronic equipment The following harmonized standards and technical specifications have been applied:EN 62311:2008EN 61010-1:2010ETSI EN 301 489-1 V2.1.1ETSI EN 301 489-1 V2.2.3ETSI EN 301 489-17 V3.1.1Draft ETSI EN 301 489-17 v3.2.2EN 61326-1:2013ETSI EN 300 328 V2.2.2Notified Body:Not Involved (Annex II - Conformity Assessment Module A)Additional information:Software Version: 5.1 or higherPLACE, DATE OF ISSUE: CARLO BERTANI Monza – Italy MANAGING DIRECTOR 17/05/2021 GENERAL MANAGERModels all rights reserved in accordance with the law. Always mention the source when reproducing our drawings.12ENELESA S.p.A.Via Pompei, 2920900 Monza (MB) Italy phone +39 039 28111**************Elesa S.p.A., Monza, May 2021The texts and examples have been written with great care, nonetheless, mistakes can always happen.The Company Elesa S.p.A. can neither be held legally responsible nor liable for lacking or incorrect information and the ensuing consequences.The Company Elesa S.p.A. reserves the right to alter or improve the magnetic measuring system or parts of them without prior notice.© C O P Y R I G H T E L E S A 2021A r t . N r . Z D O I U -M P I R 10-E N -R。
缆道雷达波测流系统软件使用说明书
缆道雷达波测流系统软件使用说明书缆道雷达波测流管理系统用户操作手册河南黄河水文科技有限公司一软件主要功能1)设置测流断面和测流垂线,并能自动绘制河道断面图2)设置左右岸边系数和浮标系数及水位流速系数及报表参数3)计算流速平均历时4)设置测量点测量时长,自动计算平均流速5)接收流速数据和输入水位数据,计算流量并生成流量计算表6)输入水尺读数自动计算水位,水位比降,糙率7)自动计算左水边岸边距与右水边岸边距8)报表以标准Excel格式显示,方便用户打印,传递9)往期报表查询及流速查询10)能够根据测量点自动定位浮标位置并显示当前测量点的起点距11)能提示并自动跳到下一个起点距大一点的测量点,也可以反方向自动跳到下一个起点距小一点的测量点12)具有数据库备份与恢复功能13)具有自动测量模式与人工测量模式14)自动从现有水位系统中提取水位,并计算出流量二软件主要特点1)软件美观大方,具有较强的扩展性2)开发需求来源于一线水文站,符合实际使用的操作习惯,具有人性化的操作界面3)报表小数位数,有效数字及各种数据符合国标要求,有效数字在计算时符合四舍六入五留双原则4)软件符合冗余度,时间复杂度与空间复杂度的算法原理,具有较高的质量三硬件3.1计算机及配件计算机:Intel及其兼容设备,主频500MHz以上;内存:64MB以上;硬盘空间:10G以上;串行通讯接口:一个;Microsoft Mouse 或与其兼容的鼠标器;显示卡:分辨率最低为1024*768,VGA显示器;A3激光打印机。
3.2硬件设备SOMMER RG-30非接触式雷达测流系统无线电台四支持软件操作系统名称及版本号:window2000,window xp,windows2003;数据库管理系统的名称及版本号:Microsoft SQL Server2000标准版;办公系统的名称及版本号:Microsoft Office2003中文版、Microsoft Excel2003中文版。
magnetrol导波雷达调试中文说明书
1快速安装指南本部分列出对Eclipse 仪表进行快速安装,接线和设定的关键步骤.供有经验的电气安装人员参考.注意 7XD, 7XR 或7XT型探头仅用于安全切断/溢出工况.所有其他型号的导波雷达的安装,都应该保证被测介质的最高液面应低于雷达天线过程连接150毫米.此情况包括使用立管等人为抬高探头高度的工况.1.1A必备工具.扳手 (同轴探头38毫米,双杆探头47毫米,传感器部分 38毫米).一字螺丝刀.斜口钳 2.5毫米内六角扳手.万用表.24 V 电源B设定必备信息开始设定前,请确认以下必备信息Level Units 测量中使用的工程单位( 英寸或厘米)?Probe model 仪表型号信息中列出的型号是什么?(探头型号的头4位内容) Measurement type 测量的方式.(液位,体积,界面等)Probe mount 探头的安装形式(NPT,BSP还是法兰?)Probe length 探头长度Level Offset 从探头底端到0%参考点的距离Dielectric 被测介质的介电常数Loop Control 通过液位或者体积来控制电流输出Set 4 m A 对应4毫安输出时的0%参考点位置Set20 m A 对应20毫安输出时的100%参考点位置 (7XB双杆探头从顶部起100毫米范围为信号死区;7XF,7X1单杆探头从顶部起178毫米为信号死区)1.2开始安装安装时注意. 保护探头顶部连接的塑料帽在最后安装传感器之前不要取走. 在传感器的过程连接上不要使用任何的密封黏合剂或TFE胶带,该连接处是使用 Viton 环密封.. 注意保护探头顶部的高频连接干燥清洁,必要时可用酒精擦拭,用棉签擦干.. 传感器和探头部分的连接,随手上紧后,再用扳手上紧1/4到1/2圈.1.3接线注意连接电源的正负极性;注意在电源和仪表两端分别接地.1.4快速设定A仪表键使用方法.仪表上电后,显示将每5秒钟交替显示液位,%输出,和环路电流..使用↑和↓键来在设定菜单中移动..当按下输入键时,显示中第一行的走后一个字母将变为感叹号,此时可用↑和↓键来改变参数的大小,再用输入键来确定即可.注意,每次改变参数后,如果需要断电,须给仪表10秒钟的时间来刷新内部设置.如左图所示,是对仪表进行设定所需要的最少参数.Probe module 选择探杆的型号 (探杆型号的头4位内容)② PrbMount 探头的安装形式(NPT,BSP还是法兰?)③MeasType 选择测量的类型(液位,体积,界面或者体积和界面).④Lvl Units 测量中使用的工程单位( 英寸或厘米)?⑤Probe Ln 探杆长度(探杆型号的最后3位数字)⑥Lvofst 从探头底端到0%参考点的距离⑦Dielctrc 被测介质的介电常数范围⑧Set 4 m A 对应4毫安输出时的0%参考点位置⑨Set20 m A 对应20毫安输出时的100%参考点位置 (7XB双杆探头从顶部起100毫米范围为信号死区;7XF,7X1单杆探头从顶部起178毫米为信号死区)2.完全安装.本部分内容为安装的详细内容..Eclispse传感器可以通过一系列的过程连接装到被测储罐上.通常是通过螺纹或是法兰连接实现.注意:切勿在传感器周围堆放绝热材料,以免引起额外的热量堆积.仪表工作带压时,切勿拆卸仪表探头.2.17XB,7X5,7X7型双杆探头对距离探头很近的物体敏感,容易影响测量精度. 安装时应该遵守以下各注意事项.1 安装立管的管径不小于80毫米.2当安装立管的直径无法大于80毫米,则仪表探头顶部的信号死区应该与安装立管的根部齐平或是伸入被测容器内一部分.37XB,7X5,7X7型的双杆探头的探杆与金属物体(如金属管道,金属梯架)的距离最小应该为25毫米.2.2安装7X7型探头时注意:该缆式探头可以在现场截断.方法如下:A 提起配重(1),可以看到锁紧装置(2).B 松掉锁紧装置上的2个紧固螺丝(3),拿掉两个锁紧装置.C 从缆上拿掉配重(1)D 截断所需的缆绳长度.E 照相反程序装好配重,装好锁紧装置.F 在仪表配置中重新设定缆绳长度.2.3安装单杆探头(7X1,7X2,7XF)的注意事项:如需使用安装立管,应遵循以下要求:A 立管管径不小于50毫米.B 立管管径和立管高度的比(A/B)不小于1,由于该立管制作不当引起的测量误差,需要在信号死区(Block Dis)和仪表灵敏度(SENSITIVITY)中调整改善.C 立管不得有缩径..仪表应尽量远离导电物体.当周围有导电物体存在时应适当降低仪表灵敏度.到探杆距离容许存在的物体《150毫米与探杆平行的连续光滑的平面,比如金属罐壁.》150毫直径小于25毫米的金属管,金属格栅,金属梯架等.米》300毫米直径小于75毫米的金属管,金属格栅,混凝土墙壁等.》450毫米其他安装测量固体专用双缆探杆1. 确保钢缆周围最少有25mm以上的间距没有碰到障碍物.2. 小心的把钢缆放入容器中.拧紧安装法兰上的垫片.3. 拧紧探杆与容器连接的法兰或螺丝.4. 探杆可以在现场切短.a. 松开并移走固定在钢缆上的2个卡夹.b. 把配重物从钢缆上移开.c. 切断钢缆到需要的长度.d. 重新穿好配重物,并重新固定好.e. 在软件中重新设定新的长度2.4安装测量固体专用单缆探杆1. 确保钢缆周围最少有25mm以上的间距没有碰到障碍物.2. 小心的把钢缆放入容器中.拧紧安装法兰上的垫片.3. 拧紧探杆与容器连接的法兰或螺丝.4. 探杆可以在现场切短.a. 松开并移走固定在钢缆上的2个卡夹.b. 把配重物从钢缆上移开.c. 切断钢缆到需要的长度加上16cm.d. 重新穿好配重物,并重新固定好.e. 在软件中重新设定新的长度.33.1参数设定表格 :测量液位 Level Only(Loop Control=Level)显示内容 操作内容备注1 *Status**Level* *% Out* *Loop*仪表显示仪表的默认显示内容为 液位%输出和环路电流,每隔5秒交替 显示.2LevelXXX.Xcm仪表显示 显示测量的液位值.3 %OutputXX.X%仪表显示 仪表显示的按量程换算的%比输出.4 LoopXX.X mA仪表显示仪表显示的回路电流值. 5 PrbModel (Select)选择所选用探杆的型号仪表铭牌上注明的探杆的型号的前4位6 PrbMount (select )选择探杆安装形式选择NPT ,BSP 或FLANGE 7 MeasType (select)选择液位测量的类型选择Lvl Only8 Lvl Units(select )选择液位单位从cm,inches,feet,meters 中选择(厘米,英寸,英尺,米)9 Probe Ln XXX.X输入探头的准确长度该信息列在仪表铭牌和定货信息上. 是探头型号的最后三位数字.10 Lvl Ofst XXX.X输入OFFSET 的值该值是从探头底端到0%参考点的距离 (-61—762 厘米)11 Dielctrc (select )选择介质的介电常数范围选择1.4—1.7;1.7—3.0;3.0—10;10—10012 SenstvtyXXX输入探杆的灵敏度允许细调13 LoopCtrl (select)选择控制回路电流的变量选择Level14 Set 4mA XXX.X输入4毫安电流输出对应的液位设定时注意,在仪表探头的顶部,底部存在一个信号发送区(0—15cm),设定时要注意避开.15 SET 20 m A XXX.X输入20毫安电流输出对应的液位设定时注意,在仪表探头的顶部,底部存在一个信号发送区(0—15cm),设定时要注意避开.16 DampingXX S输入阻尼时间 当被测信号有很强烈噪声或过程变化剧烈时,为稳定输出,可以在0—10秒的范围内,选取一个适当的值来设定.17 Fault (select )选择出现故障时回路电流需要保持输出的值可以在 3.6毫安,22毫安和HOLD 中选择一种.18 BlockDis XX.X cm输入探杆的不灵敏距离允许用户忽视探杆顶部的液位测量值 19 Sz Fault (select)选择回路电流在进入安全区域后的工作情况“安全区域”为用户设置的B lockDis 距离,当液位到达探杆顶端的BlockDis 距离后,选择回路电流的输出值.可以选择:None,3.6mA,22mA,Latch 3.6,Latch22.20 Sz Height XX cm输入BlockDis 下面的一段距离默认为0.21 Sz Alarm Reset 按”回车”键清楚报警信息如果Sz Fault 选择了Latch3.6或者Latch22,可以通过按”回车”键来清除Sz Fault 的报警信息22 Threshld(select )选择阀值类型 仪表默认 CFD.当介质中分层且低介电常数的介质在高介电常数介质上面时,或液位测量不准确时选择FIXED.23 Poll AdrXX输入HART 地址 可在0—15之间选择一个数字作为仪表的地址.当不把仪表进行网路连接时,输入0. 24 Trim Lvl XX.X输入需要修正的液位读数值调整范围为:-25.4cm<Lvl Trim<+25.4cm25Trim 4 m A XXXX对4毫安的输出电流进行校正.在输出中串入电流表,调整该值可以对4毫安的输出进行修正.26 Trim 20mA XXXX对20 毫安的输出电流进校正. 在输出中串入电流表,调整该值可以对20毫安的输出进行修正. 27 Loop TstXX.X mA模拟输出可以对电流输出进行模拟28 LvlTicksXxxxx勿动 工厂诊断用29 New PassXXX输入新密码 0—255之间;使用箭头键可以选择一个合适的数字作为密码,按回车键保存 30 Language (select)选择LCD 上显示的语言 可从:English(英语),Spanish(西班牙语),French(法语),German(德语)中选择31 Mdl705HTVer3.0a0勿动 显示软件版本32 DispFact (select)选择YES 来显示工厂参数菜单 里面共有24项参数,大都为工厂诊断用,且不能更改.故不一一列出.详细内容请参阅英文操作手册.3.2参数设定表格 :测量界面 Level Only(Loop Control=Interface Level) 显示内容操作内容备注1 *Status**IfcLvl**% Out**Loop*仪表显示仪表的默认显示内容为界面值,%输出和环路电流,每隔5秒交替显示.2 IfcLvlXXX.Xcm仪表显示显示测量的界面值.3 %OutputXX.X%仪表显示仪表显示的按量程换算的%比输出.4 LoopXX.X mA仪表显示仪表显示的回路电流值.5 Level6 PrbModel(Select)选择所选用探杆的型号仪表铭牌上注明的探杆的型号的前4位7 PrbMount(select)选择探杆安装形式选择NPT,BSP或FLANGE8 MeasType(select)选择液位测量的类型选择Intrface9 LvlUnits(select)选择液位单位从cm,inches,feet,meters中选择(厘米,英寸,英尺,米)10 ProbeLnXXX.X 输入探头的准确长度该信息列在仪表铭牌和定货信息上.是探头型号的最后三位数字.11 LvlOfstXXX.X 输入OFFSET 的值该值是从探头底端到0%参考点的距离(-61—762 厘米)12 UprDiel(select)输入上层介质的介电常数13 Dielctrc(select)选择下层介质的介电常数范围选择3.0—10;10—10014 SenstvtyXXX输入探杆的灵敏度允许细调15 LoopCtrl(select)选择控制回路电流的变量选择IfcLvl16 Set4mAXXX.X 输入4毫安电流输出对应的液位设定时注意,在仪表探头的顶部,底部存在一个信号发送区(0—15cm),设定时要注意避开.17 SET 20 m AXXX.X 输入20毫安电流输出对应的液位设定时注意,在仪表探头的顶部,底部存在一个信号发送区(0—15cm),设定时要注意避开.18 DampingXX S 输入阻尼时间当被测信号有很强烈噪声或过程变化剧烈时,为稳定输出,可以在0—10秒的范围内,选取一个适当的值来设定.19 Fault(select)选择出现故障时回路电流需要保持输出的值可以在 3.6毫安,22毫安和HOLD中选择一种.20 BlockDisXX.X cm输入探杆的不灵敏距离允许用户忽视探杆顶部的液位测量值21 SzFault(select) 选择回路电流在进入安全区域后的工作情况“安全区域”为用户设置的B lockDis距离,当液位到达探杆顶端的BlockDis距离后,选择回路电流的输出值.可以选择:None,3.6mA,22mA,Latch3.6,Latch22.22 SzHeightXX cm 输入BlockDis下面的一段距离默认为0.23 SzAlarmReset 按”回车”键清楚报警信息如果Sz Fault选择了Latch3.6或者Latch22,可以通过按”回车”键来清除Sz Fault的报警信息24 Threshld(select)选择阀值类型仪表默认 CFD.当介质中分层且低介电常数的介质在高介电常数介质上面时,或液位测量不准确时选择FIXED.25 IfcThrsh(select)选择阀值类型界面测量时专用.通常工况情况下选CFD26 Poll AdrXX输入HART 地址 可在0—15之间选择一个数字作为仪表的地址.当不把仪表进行网路连接时,输入0. 27 Trim Lvl XX.X输入需要修正的液位读数值调整范围为:-25.4cm<Lvl Trim<+25.4cm 28Trim 4 m A XXXX对4毫安的输出电流进行校正.在输出中串入电流表,调整该值可以对4毫安的输出进行修正.29 Trim 20mA XXXX对20 毫安的输出电流进校正. 在输出中串入电流表,调整该值可以对20毫安的输出进行修正. 30 Loop TstXX.X mA 模拟输出可以对电流输出进行模拟31 LvlTicksxxxx勿动 工厂诊断用32 IfcTicksXXXX勿动 界面测量时专有显示,工厂诊断用 33 Medium 勿动 界面测量时专有显示,工厂诊断用34 New PassXXX输入新密码 0—255之间;使用箭头键可以选择一个合适的数字作为密码,按回车键保存35 Language (select)选择LCD 上显示的语言可从:English(英语),Spanish(西班牙语),French(法语),German(德语)中选择36 Mdl705HTVer3.0a0勿动 显示软件版本37 DispFact (select) 选择YES 来显示工厂参数菜单 里面共有24项参数,大都为工厂诊断用,且不能更改.工厂参数菜单38 History 按”回车”键进入历史记录菜单用于检查记录报错信息以及信息维持时间39 Run Time 运行时间显示自通电了的使用时间40 History Reset 历史记录复位清除历史记录的内容41 FidTicks 诊断用工厂诊断用42 Fid Sprd 诊断用工厂诊断用43 Fid Type 诊断用工厂诊断用44 Fid Gain 增益和灵敏度功能类似45 Window 诊断用工厂诊断用46 Conv Fct 诊断用工厂诊断用47 Scl Ofst 诊断用工厂诊断用48 Neg Ampl 诊断用工厂诊断用49 Ifc Ampl 诊断用工厂诊断用50 Pos Ampl 诊断用工厂诊断用51 Signal 诊断用工厂诊断用52 Compsate 诊断用蒸汽补偿专用.如果是7MS探杆请选择”auto”,如果是其他探杆请选择”None”.53 7xKCorr 诊断用工厂诊断用54 ElecTemp 显示表头现在的周围温度55 Max Temp 显示表头记录的最高环境温度56 Min Temp 显示表头记录的最低环境温度57 Sz Hyst 诊断用工厂诊断用4.OFFSET 详述注意,传感器从工厂发货时,默认的OFFSET 设定为0.如例1,当OFFSET 为0时,所有的测量都是以天线的底端为参考点.所有的参数值都以天线底端做0点.例2.该例子中,OFFSET 的值为10.则所有的测量和参数设定时的参考点即为容器的底部.如图所示.例3,在该图中,OFFSET 的值为负值,则,所有测量和参数设置的参考点都为天线上距离天线底端为OFFSET 值的点.5. 故障诊断指南现象问题解决方法液位,%输出和电流都不准确;1)基本设定有问题.对探头型号安装方式和探头长度以及OFFSET 等设定重新确认.1) 确认实际的液位值2) 校验4mA和20mA的电流值2 .界面液位有严重的乳化,泡末的现象检查工艺情况,消除或减轻乳化 ,泡末等情况.液位输出总是比实际值高或低一个固定的数值. 设定值与实际的探头长度罐高等值差别较大.重新确认探头长度罐高等设定.测量输出波动 1液面状态有波动增大DAMPING值.2 有高频干扰接入仪表检查FID Spread (应该稳定在+/— 10以内)测量输出比实际液位要低1 存在液体分层,而且下面的液体介电常数比上层的大,比如,油水分层.选择FIXED THRESHOLD功能.在探杆上有挂料介质覆盖等情况存在.有浓厚的泡末.显示读书正确但是电流输出固定在4毫安. 基本设定有问题. 如果没有用MULTIDROP工作模式,将HART POLL 地址改为0.手操器只能读出通用命令(对HART 选项仪表)没有安装仪表的DD文件.与当地HART设备提供商联系,下载最新的DD文件.液位读数固定在满量程,电流输出固定在20.5 毫安. 探头浸入液面. 检查实际液面.如果探头没有被液面浸没,则要检查挂料等情况.选择更大的介电常数范围.加大Blocking 距离.液位,%输出和电流值都在最大值单杆探杆的设置参数有问题1)增加Blocking距离2)选择更大的介电常数液位,%输出和电流值比实际液位高容器内的障碍物影响了单杆探杆的测量.1)选择更大的介电常数2)重新安装探杆远离障碍物的影响当液面实际高度为0时,仪表有读数输出. 传感器与探头之间松动或脱开.紧固连接部分.6.报错信息显示的故障信息功能解释Initial 无初始的操作信息DryProbe 无干燥的探杆的标准信息,探杆底部的信号已检测到(实际罐内液位为空时会显示该信息)EOP <PL(probelength) 探杆没有接触到液位的时候,探杆尾部的信号超过探杆的量程1)确认探杆长度是否设置正确.2)选择低一点的介电常数范围.3)增加灵敏度4)咨询工厂.5)确认Block Distance设置是否正确.EOP Low 当探杆没有接触到液位时的显示信息(实际液位为空) 1)液位上升后,该信息会自动消除,如果没消除,按以下步骤解决.2)确认探杆长度是否设置正确3)选择低一点的介电常数范围4)咨询工厂EOP High 当探杆没有接触到液位时的显示信息(实际液位为空) 1) 液位上升后,该信息会自动消除,如果没消除,按以下步骤解决.2) 确认探杆长度是否设置正确3) 联系工厂WeakSgnl 信号的幅度低于预想值1) 选择低一点的介电常数范围2) 增加Sensitivity(灵敏度)Flooded? 由于探杆顶部被液位浸没而造成信号丢失(只有双杆探杆才有该故障信息) 1) 降低容器内的液位.2) 选择低一点的介电常数范围3) 更换7xR型号的探杆(适用于液位满灌的场合)Nosignal 没有检测到液位信号1) 确认介电常数范围设置是否正确2) 增加Sensitivity(灵敏度)3) 确认探杆型号符合实际的工况条件4) 咨询工厂No Fid 基准点的信号没有检测到1) 检查所有的连接处2) 检查探杆的顶部是否受潮3) 检查探杆的探针是否损坏4) 咨询工厂FidShift 基准点的信号改变1) 检查所有的连接处2) 检查探杆的顶部是否受潮3) 检查探杆的探针是否损坏4) 咨询工厂No Probe 表头没有检测到探杆1) 检查所有的连接处2) 检查探杆的探针是否损坏Sz Alarm 液位到达安全区域输出保持在Sz Fault内设置值降低液位,该信息会消失Hi Temp 现场的环境温度已超过80℃1) 仪表表头必须移走,确保周围的环境温度符合工作的要求2) 更换为带远传功能的表头Lo Temp 现场的环境温度已超过-40℃1) 仪表表头必须移走,确保周围的环境温度符合工作的要求2) 更换为带远传功能的表头HiVolAlm 液位超过容量计量表的高点的5%校验容量计量表是否正确. Sys Warm 无法预料的软件故障咨询工厂TrimReqd 回路输出可能不正确咨询工厂Cal Reqd 工厂默认的出厂参数导致实际使用的液位读数不正确重新设置相应的参数. 咨询工厂.SlopeErr Ramp电路产生不正确的电压咨询工厂LoopFail 回路电流与预期值有误差咨询工厂No Ramp Ramp电路没检测到信号咨询工厂DfltParm 内部参数不稳定咨询工厂LVL<probe length 上层的脉冲信号强度已经超出探杆尾部的信号. 1)检查探杆长度是否正确.2)把CFD改为Fixed.EE Fail EEPROM故障咨询工厂CPU Fail 芯片故障咨询工厂SfwrFail 软件故障咨询工厂7.工况条件的故障排除有很多原因可以导致工况出现问题.这里只涉及探头上的介质挂料和分层方面.探头上的介质挂料大部分情况下不会有问题——Eclipse电路典型非常有效,典型的工作方式.介质挂料一般可以分成两种类型——薄膜被覆和搭桥.当有小型薄膜被覆时,可使用双杆探头.对于极端的介质挂料,可考虑使用7XF或7X1单杆探头.薄膜被覆 7.1 705型号(液位工况)*连续型薄膜被覆最典型的被覆问题是介质在探头何处形成连续的被覆。
- 1、下载文档前请自行甄别文档内容的完整性,平台不提供额外的编辑、内容补充、找答案等附加服务。
- 2、"仅部分预览"的文档,不可在线预览部分如存在完整性等问题,可反馈申请退款(可完整预览的文档不适用该条件!)。
- 3、如文档侵犯您的权益,请联系客服反馈,我们会尽快为您处理(人工客服工作时间:9:00-18:30)。
»
» » »
»
非接触式测量 » 测量可靠即使在洪水期间也是 » 在河面上 – 无损害 » 免维护 流速 » >0.3 m/s 并且 <8 m/s » 洪水:总能在水面测量 vmax 无最小水深限制 设置简单 » 安装简单且节约成本 » 在河面上安装- 无需在河上施工 限制 » 非常缓慢的流速 » 平静的水面
超声波同气温、介质有关
流量计算
用公式 Q = A(h) ∙ Vm 计算流量Q 。 式中:A是截面面积; Vm 是通过截面的平均流速. 上述公式也是流体 连续方程的一部分。
从测量位置及其实际水位测出截面面积。雷达测出测点位置的局部流 速 Vl。 用公式 Vm = Vl ∙ k(h) 算出平均流速。式中 k 是无量纲因子 , 由水位 h决定。 Sommer程序 RQ Commander可算出k(h) 。 综上所述, 流量计算公式为 Q = A(h) ∙ vl ∙ k(h)
适用范围 大体范围
水政/配水 简单管理 蓄水/泄水 洪水预警/监测 水坝安全 重建/保险装置 环境监测 最小流量
确认最终流量记录 水文模型 用水权分析, 交易, 水权转换 诉讼 野生动植物和渔场 水质
具体范围 »河流,山洪:航道测量、水电站,… »明渠,运河,排水沟:水电站、污水、工业、…
» 测量间隔参数可设定 » 发送命令唤醒 RQ/RG 30 使其发送测量值
非接触式雷达系统与其他系统比较
测量
参数
连续水位 人工流速 水位流量曲线需求 Q (h) 密集型测量活动的时间和成本 洪水情况下测量频次不得不减少 在大流量情况下只能估算Q (h) 曲线 洪水期测量风险很高 洪水期的损害 推移质 / 树木 / 漂浮物 无河床变化的直接检测 测点建设费用高昂 在河中有构造设施 设备成本
接口
» 流量数据 4-20 mA 模拟信号输出 » 用DM-EA设备模拟输出可选项有 : » 4-20 mA 流速 » 4-20 mA 水位 » 4-20 mA 流量 » 数字输出: RS485/SDI12串口协议 » 流速 » 水位 » 流量 » 质量参数 » RQ/RG 30 系统在测量间隔下工作
水位和流速的连续测量
洪水
»水力模型决定从低水位(图中 LW)到高水位(图中 HHW)的平均
流速条件 »确定包括冲击平原在内的流量
河床变化:在同一水平面上流速的变化
» 截面改变,但水工模型不变 (k – 无量纲因子)! » 截面面积调整为以“ m²”为单位
非接触式雷达系统的优势 安装简便经济
»无需水下安装 »无需在河上土建 »一年四季皆可安装 »安装高度为 0.5 – 30 m(探头于水面之间) »取决于水流流向 »移动和固定安装 »无需钻孔? »不易损坏
适用范围
非接触式雷达测流的限制条件
» 流速 < 0,12m/s and > 20m/s » 传感器距水面距离 < 0,5m and > 30m » 河面宽阔且水流慢的河流,如湖泊 » 监测波高 > 3mm » 在测流点不能有 石子,涡流,驻波…… » 测量时间间隔 < 1-2 min. (取决于传感器) » 水面波动干扰
安装
易于安装。 可以很好的利用既有桥梁。 而且河边安装可 利用延伸的臂梁。 直行河流段,以及不变的河宽和层流特性状况下可得到最 好的测验结果。为了获得良好结果,测量区域要避免石子 、岩石或人工建筑等的干扰。 涡流会造成测面流速精确度 不高,对测量有很大的影响。 河流的突然缩窄和放宽例如 分支, 汇流 或者弯曲等河流形态 也不利于获得良好测量结 果。
非接触式雷达测流 参数 » 连续水位 » 连续流速 » 无需流量相关曲线 Q (h) » 水力模型校准 » 建成后即可有效测流 » 在洪水期都是有效的 » 非接触式 – 故障安全 – 低维护 » 传感器在河上/河外 » 河床变化检测 » 安装简单经济 » 在河中无构造设施 » 设备成本低
超声波多普勒 – 转接时 间
代表性测验系统
细节: 河流和运河部分的地表水测站的SIMK- 校准模 型
非接触式雷达测流的优势
非接触式测量
平时情况
洪水情况
安装在河流的外部/上方 洪水期的高可靠性/故障安全 无需维护 (传感器无需清洁) 传感器不会被废料、树木、碎片、河床负载损坏… 水面最大流速的连续测量
测点建设
测点计算
回顾: » 水面波动 » 水力情况 » 弯曲 » 桥梁结构 / 支柱 » 死水 » 奔流 » 水坝 » 电源 » 在桥上或者悬臂上安装 对测点计算有帮助的文档: » 测点的几张照片 » 上游 » 下游 » 水面-整个河流的细节图 » 桥梁侧面和支柱的图片 » 测点地图 (例如高分辨率的 Google 地图) » 估算最小流速 / 最大流速 » 测点的侧面和纵面
传感器的信号处理 初始化 扫描相关测点流速范围内水位 初始化测量需要更多的时间
多次扫描测量使得精确度高 几次扫描得出一个测量结果 (0 到 40 次扫描, 建议4次) 使得单次测量误差最小化
速率跳跃 限制两次测量之间速率变化 Damping 可调滤波器: 所有扫描过滤极值 过滤 消除降水干扰 最小化阵风对波图的影响 最小化船行的影响
Sommer RQ/RG 30 非接触式雷达测流系统2012
» » » » » » »
传统测流
非接触式雷达系统特点 非接触式雷达测量原理 调校RQ Commander(软件) 非接触式雷达系统优势 适用范围 测点选择
»
非接触式雷达系统与其他系统比较
传统测流方法
传统测流方法
传统测流方法的局限性
洪水 – 和 H-ADCP / 传送时间比较
» 非接触式雷达系统在每个水位处都可测出最大流速 (stage) » 用最大流速可算出最大流量 » 从最大流速转换到平均流速更加准确
结语
» 非接触式 = 安全 = 无维护 (无损坏, 传感器无需清洗) » 安装后精确测量尤其是在发生洪水(包括河漫滩)时 » 连续测量流速 » 不受水中悬浮沉淀影响 » 无需水位流量曲线 Q (h) » 检测河床改变 » 无最小水深限制
非接触式雷达测流方法
»
流速的连续测量 » 图表: (蓝色圆圈处) » 时间: 2 个月
点 没有流量曲线时流量的测定 Q (h) 较好的流量测定 » 水位流量关系 » 水位流速关系Biblioteka » 在洪水流量峰值时也是许多测
» »
非接触式雷达测流特点
功能 » 流量计算 » 流速和水位的连续测量 » 安装后流量值立即有效 » 无需水位流量曲线 (Q/h) » 非接触式测量 » 安全可靠 » 无需维护 » 免于洪水灾害 » 易于室外安装(如河流桥梁等) » 识别河床变化 » 在线水位流量曲线 Q (h) 计算流量 » 用水位流量关系计算流量 » 现存系统容易集成
» 河外安装经济简便
数据收集概述
webHMS :8081/lcrq/
SOMMER RG-30技术指标
产品类型:平板雷达(最新一代)
2、测量原理:多普勒 3、适应水流方向:顺流、逆流可选 4、河流/渠道类型可选: 1) 极平缓一致水面 2)一般平缓河流/渠道 3)一般性河流/渠道 4)湍急性河流/渠道 5)极湍急性河流/渠道 5、适应气候条件:全天候工作,适合在暴雨和暴雪天气工作,无雨衰 6)飞溅性水流 6、控制方式:硬件触发、软件协议并行控制,自由开始、停止测量动作 7、雷达波段和频率:Ka波段;24.160 GHz 8、数据采集时间:5 到240 s可调 9、测量间隔时间设定范围:工作方式1:8 s 到5 h 可调; 工作方式2:外部设备硬件触发 工作方式3:RS484、SDI-12口命令 10.一次测量中流速数据输出方式:1)移动平均 2)去除大数平均 3)最小值平均 4)中值平均
供电和能耗
» 电源 220/230 V 交流 或自主的 (例如太阳能板 + 电池) » 电源电压 10-15V 直流 » 测量最大能耗 170 mA » 每次测量之间的睡眠模式 能耗 <1 mA » 能耗示例: » 测量时间: 1-2 min (取决于水面波动) » 测量间隔: 每 5 min 和每 15 min 输出测量平均值. » 电源: 60-80 W 太阳能电池板 (取决于测点)
截面面积
因为截面面积取决于水位,所以编写了水
位和截面面积的对照表并放入雷达装置的流量表 里.这个表能用 RQCommander程序生成。
k-factor
K系数用于计算测点的表面平均流量。 可用两种方法 确定K系数值。1. 当截面面积 A(h) 已知 : o 不同水位测量 的k系数可用参考例如Sommer示踪系统其中一部分适当的流 量测量值决定。 通过测量流速, k系数也可由k(h) = Q / ( A(h) ∙ vlo 算出。2. K系数也可用由the Sommer RQ Commander或者the SimK model模型模拟测点算出。 K系数 保存在流量表的RQ-30 设备里。
10
非接触式雷达测流原理
非接触式雷达测流系统
测量系统和流量计算 水文模型
雷达传感器
RQ Commander
水位 非接触式 雷达信号连续测量 高准确度 与气温和介质无关性
流速 非接触式 »多普勒频移的测量 »24 GHz – 可探测最小 3 mm 波动 »高准确度: 速率 > 30 cm/s 与气温和介质无关性
»
接触式测量 » 洪水:河床负载的困难 » 测量系统的损坏 » 气溶和 O² 流速 » 直至 0 m/s » 洪水:测量相对的靠近河床 最小水深 昂贵的设置 » 水下设置 » 水中建设 » 设备的几个操作时间设定 » 加强维护 限制 » 河床负载、悬移质、浊度 » 最小水深