太阳能充电宝品规格书
深圳市映红山光学有限公司-多功能充电宝说明书
太阳能充电器说明书一、产品结构:内置高容量储蓄锂电池(18650),IC智能过流过载保护,单晶硅光伏电池板2W,220V,50HZ单相交流,LED镇流驱动显示,整机由交流,USP直流,单晶硅光伏充电等多功能储藏电荷。
部份产品带LED灯手电照明,收音机功能,铝合金外壳。
二、产品特点:容电量大,华贵大方,携带方便,时尚高雅,节能环保,充电1小时搞定,特别适合出差,旅游,长途乘车,找工作,野外施工,商务会议等手机充电。
只要接入手机就能使用,并适用于数码照相机,DV,PDA,MP3,MP4,GPS,平板电脑及部份笔记本电脑电源充电,产品用途广泛。
三、技术参数:输入交流AC220V,50HZ,储存电能充电时间:1~3小时,直流DC3V接USB电脑接口,储存电能充电时间:2~5小时,光伏储存电能:6V,2W,60一150MAX,转换效率25%以上,储存电能时间:6~8小时,指示灯显示100%,表示储存电能充满,输出电压:4.5V,5V,6V,9V,12V等多个供电选择,充满电后自动恒压3.7~4.2V。
不会损坏手机,电流:2600MAH一5000MAH,最大10000MA。
手机充电时间1小时搞定。
四、使用方法:1、使用本产品前要交流充电,以提高内存电池的使用效率。
2、接口IN为输入储存电能充电,接口OUT为输出给手机充电或其它产品充电。
3、手机充电前要选好与手机相符合的电压档,一般选4.5V,视手机能量而定。
4、看手机屏信号是否处于充电状态。
五、注意事项:1、光伏充电时,要光伏正面向光直射,确保效果。
2、注意防潮,防高温,防划伤光伏表面。
3、请用厂家提供的专用数据充电适配线和转接头。
4、不可用短路或损坏的电池接入充电,否则会损坏充电宝。
5.没有显示充电,可能内存电能不足或接触不良。
太阳能充电器使用说明

太阳能充电器使用说明太阳能移动电源系列产品,拥有智能调压专利技术,可以调节不同的输出电压及电流。
可以在太阳光下对各类手机或USB 接口数码产品直接充电,也可以在太阳光较弱或无阳光条件下通过内置蓄电池放电对手机或USB接口数码产品充电。
适用于出差、旅游、长途乘车船、野外作业等环境的备用电源,具有安全保护、兼容性好,大容量、体积小、使用寿命长、性价比高。
产品规格:1、太阳能硅板峰值功率:1.54W2、工作电压:5.5V(最大)3、充电电流:280mA4、蓄电池容量:2000mAh5、输出电压:4.5~9V(可调)6、输出电流:1A(最大)7、充电时间:8-10hrs(幅照度:100mW/C㎡) 3-4hrs(室内电源:5V/500mA)充电说明:1、在阳光下充电充电时,放电开关应置于OFF位置,以免充电缓慢,展开太阳能板放置阳光下,并正射太阳能板.太阳能充电器的Light1灯变为红色,此时光能转化为电能对太阳能充电器电池蓄存电.红色表明内置锂电池蓄存电能不多,如果Light1灯变为橙色,表明锂电池中蓄存电能较高,且电压在3.8V~4.1V.如果Light1灯变为绿色,证明充电器内置电池蓄存电已经饱和.当您合上太阳能面板时Light1灯将熄灭,太阳能面板停止充电.注:如果展开太阳能板,在日光下Light1灯变为红色或橙色时,只是表明太阳能面板电压达到Light1灯亮,而不能证明太阳能板在充电.2、使用AC充电由于没有太阳光或阴天情况下,该用AC充电器的DC头连接太阳能充电器的DC接口.再将AC充电器插入110V或220V 交流电,Light1灯将变为红色再由红色变为橙色再到绿色的过程.Light1灯变为绿色.表明内置电池已充满,并断开AC充电器的连接.放电说明:放电时,并将输出电压档位调到适当的电压对充电产品充电,然后根据你需要移动设备选择合适的转接头,也可以用USB 插头对数码产品连接一起.并将开关切换到"ON"Light1与Light2同时亮时,Light2亮时表示开始放电,(此时内置电池已充满Light1出现红绿交替闪烁属正常现象,具体参考Light1显示说明),当你外接移动设备充电时,Light2亮时,表明正在对你的移动设备或手机充电,移动设备或手机充满后,请将开关切换到OFF位置,以免电量流失.应用领域:适用于充电电压在4.5~9V移动通讯、数码注意事项:1、强光下不能间段充电(直射太阳能面板)约8小时,可充满内置电池.2、在夏季时请勿将充电器置于车内(车内温度过高).影响电池使用寿命3、请勿隔着玻璃对本充电器进行充电.充电效果差.4、必须在强光下充电,在弱光下(Light1)亮灯,只能代表检测到有光,并非代表已在充电(如在室内照明灯下).所以请勿在弱光下进行充电.5、由于出厂时,每个充电器内所含电量不一致,所以,初次使用充电或放电的时间会不同.6、请勿使用有腐蚀性溶液擦拭本机,以免损害本产品.7、严禁将此产品投入火中,以免引起爆炸。
太阳能移动电源
太阳能移动电源
一:该产品可为手机、数码相机、MP3、MP4等产品供电或充电使用。
此产品由于采用了锂聚合物电池,所以具有循环寿命高于一般电池,重量轻,安全性能高等优点。
另外此产品除了采用市电充电方式之外还采用太阳能充电方式,可以在有太阳光的地方随时随地充电。
1、适用于手机、数码相机、MP3、MP4等产品。
2、精巧细致,时尚美观。
3、体积小,重量轻,携带方便。
4、该产品的输入输出端孔不同,避免了使用中产生的插头插错问题。
5、智能保护芯片:过充电,过放电,过载,短路和剩余容量指标
二、产品参数
1、容量:1450mAh(锂聚合物电池)
2、太阳能板功率:0.4W/5.5V
3输入电流:500mA
输入电压:5.0V直流
4 输出电压:5.5V的直流
输出电流:500mA
5、循环寿命:500次
6、重量:80g
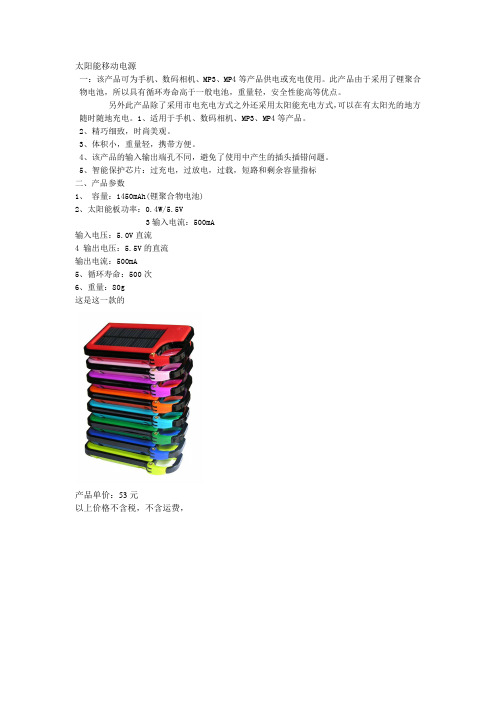
这是这一款的
产品单价:53元
以上价格不含税,不含运费,。
太阳能充电器说明书

太阳能充电器说明书规格参数太阳能输出: 5V/2400mA(阳光充足下)输入:5V/2A 输出:5V/3A(max)功能指示1 外接太阳能充电器并接输入端口2 太阳能充电指示灯3 USB输出端口4 大功率单晶硅太阳能板5 挂绳孔批准:审核:编制:产品简介· 本产品为户外便携式太阳能充电包,小巧玲珑,方便携带。
配备6片大功率的单晶硅太阳能板,高达 20% 的转换率,输出电流高达2400mA, 为您的手机、IPAD或其他小设备充电。
在享受大自然阳光的同时为您提供源源不断的绿色能源,是您外出旅游出行的必备佳品。
为设备充电1、在有阳光的地方打开太阳能产品,使太阳能板接受太阳的45°照射,太阳能指示灯绿灯亮,这时USB输出可以输出高达5V/2.4A的电流为您的电子产品进行充电。
2、为获得更大的电流,此产品可以两个并联使用,并联后可以获得最大5V/3A的电流,实现快速充电。
温馨提示:本产品需要在阳光下使用。
本太阳能面板不能直接存储电源,如果您想存储电源,您可以使用它为移动电源充电。
如果产品不能工作,请检查 USB 接口是否正确插入太阳能面板。
工作后请记住,卸下USB插头。
12345User manualSpecification parameterSolar charging :5V/2400mA(In full sunshine)Input :5V/2AOutput :5V/3A (max )批准:审核:编制:·Product introduction·The product is an outdoor portable solar chager, small and exquisite, easy to carry. Equipped with 6 high-power mono-crystalline silicon solar panels, high transmit efficiency 20%, up to 2400mA max charging current, It can charge mobile phone ,IPAD or other small mobile devices. It willprovide you with green energy while enjoying the natural sunshine ,which will be your travelnecessity.Charger the device1、Open the solar energy product in a place with sunlight, so that the solar panel receives 45° illumina-tion from the sun, the solar indicator is green, and the USB output can up to 5V/2.4A to charge your electronic products.2、For more current , It can be used in parallel for two or three products. After parallel ,the maximum current output : 5V/3A can be obtained to achieve fast charging.Tips: This product needs to be used in the sun. This solar panel cannot store power directly. If you want to store power, you can use it to charge mobile power. If the product does not work, check that the USB connector is properly inserted into the solar panel. Remember to remove the USB plug after work.Function indication1.External solar charger connected to the input port2.Solar charging indicatorB output port4.High power mono-crystalline silicone solar panelnyard hole12345。
泰康移动太阳能可移动电源系统说明书
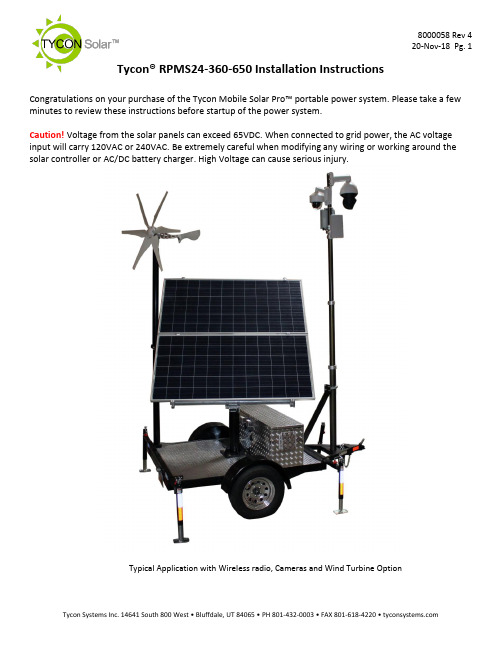
Tycon® RPMS24-360-650 Installation Instructions Congratulations on your purchase of the Tycon Mobile Solar Pro™ portable power system. Please take a few minutes to review these instructions before startup of the power system.Caution! Voltage from the solar panels can exceed 65VDC. When connected to grid power, the AC voltage input will carry 120VAC or 240VAC. Be extremely careful when modifying any wiring or working around the solar controller or AC/DC battery charger. High Voltage can cause serious injury.Typical Application with Wireless radio, Cameras and Wind Turbine OptionNotes:1.The basic trailer systemcomes complete with abattery control box outfittedwith eight 6V 180Ahbatteries, a 40A MPPT solarcontroller with 20A loadoutput, a 900W AC/DCBattery Charger, a 24VDC to56VDC 5A converter, aTPDIN-Monitor-WEB2 remotepower monitor, a 18’pneumatic extension mastwith 12V air-pump, a junctionbox at top of pole with a 5Port Gigabit versatile PoEswitch, and 650W of solarpanels with travel cover.2.When travelling, werecommend to always usethe solar panel cover to helpprotect the solar panels fromflying road debris. Make sureall bolts and nuts are tight.Also, the solar panels need tobe set for 10° position (nearlyhorizontal) and secured withthe included ratchet straps.3.When parked, even forstorage, we recommend toalways extend the 4stabilizers to prevent trailer damage from high winds.4.There are multiple components included in the trailer system. Each component has its ownuser guide; therefore, this user guide will just touch on the system basics.Procedures:1) Trailer Startupa) Park the trailer in such a way that when deployed, the solar panels won’t be shaded by theextension mast during peak sun. This usually means that the front of the trailer will be facing North. Solar panels need to be facing due South in the northern hemisphere.b) There are 4 outrigger stabilizers thatca n be extended 15” or 30”. Extendthese outriggers and use them to levelthe trailer.c) Make sure both red disconnectswitches are set to the OFF position.d) Set solar panels to face South and setthe tilt angle. Tighten all the adjustmentbolts. Optimum Solar panel tilt dependson latitude and time of year. There is ahandy calculator on to help you determine the best tilt anglefor your area.2) Powering up the systema) Note: The solar controller should always be connected to the batteries before being suppliedwith solar power.b) The system ships with two 30A fuses removed from the batterycables. Install both fuses to power up the system. The fusemay spark when inserted. This is normal.c) Turn the red battery disconnect switch to ON, then turn on thered solar disconnect switch to ON. The MPPT solar controllerwill powerup. The MPPT solar controller has a load outputwhich supplies power to the TPDIN-Monitor and the 24VDC to56VDC converter. Press the red SET button on the MPPT solarcontroller to turn the load on and off.d) The TPDIN-Monitor-WEB2 controls the power going to the topof the extension pole through two of the on-board relays. RelayCH1 controls the 56V supply. Relay CH2 controls the 24V supply. By default, these relays are closed. The TPDIN-Monitor-WEB2 allows control of the relays using manual control or based on measured parameters or ping. To find out more about the TPDIN-Monitor-WEB2 features and use, refer to the individual product user guide. The unit ships with DHCP client enabled and fallback IP is 192.168.1.63) Pneumatic Extension Mast - Raisinga) The pneumatic extension mast is raised using a 12V automotive air pump. The 12V for thepump is supplied from the 24V batteries using a 24V to 12V DCDC converter. There is apressure regulator with air valve used to raise or lower the mast. The mast has mechanical locks at 9’,12’,15’ and 18’ positions so the mast can be raised to any of these pre-definedheights. It takes about 1 minute to fully extend the mast using the air pump.b) Near the top of the mast, there is a die cast aluminum enclosurehousing a TP-SW5G-VERSA PoE gigabit switch. The input tothe switch is 56VDC and the outputs are as follows: Port 1 60WHigh PoE(4 pair); Port 2-4 802.3at 30W; Port 5 24V 12WPassive PoE. If it is necessary to connect a laptop orcomputer to the switch, connect to port 2,3 or 4 only.Connecting to port 1 or 5 could cause damage to yourcomputer Ethernet port.c) A wire terminal is included inside the housing to supply 24VDC15A unregulated and 56VDC 5A regulated.d) Turn off the voltage output from the MPPT solar controller by pressing the SET button. Mountequipment and connect the equipment to either the PoE switch or the wire terminal, asrequired. Power up the load by pressing the SET button on the MPPT solar controller. Once the equipment is connected and tested, the mast can be raised.e) Raise the mast by turning the air flow valve to the “UP” position. Turnon the 12V air-pump using the toggle switch. Note: The pressureregulator at the airflow valve should be set to 30PSI.f) You will hear the mechanical locks click into position as the mast israised. You can turn off the 12V air-pump at an intermediate height orafter the mast is fully extended. Once the mast is extended turn theairflow valve to the center position.4) Pneumatic Extension Mast - LoweringNote: If mast has been extended for a long time it may become depressurized and will need to firstbe pressurized using the air pump before attempting to lower it.a) Lowering the mast is a little tricky. Don’t relieve all the pressure then pull themechanical lock rings. This will cause the mast to fall and bang against thelower section. This could damage equipment mounted on the mast.b) To lower the mast slowly:i) Turn the air flow valve to the “DOWN” position. Immediately pull the bottom lock ring. Themast will begin to collapse.ii) When the mast section is about half way down, pull the next lock ring. Repeat till all the lock rings are pulled and the mast has collapsed fully.5) Charging the batteries from AC powera) The batteries can be charged using 115VAC or 230VAC grid power. This is useful if you wantto fully charge the batteries before each deployment.b) CAUTION: Make sure to set the voltage switch on the TP-BC48-900 battery charger to the correct AC voltage. Default is115VAC. Failure to set the correct voltage will damage thebattery charger.c) Connect an extension cord to the weatherproof AC receptacleon the back of the battery/equipment box. Connect theextension cord to the proper 10A AC voltage outlet. The battery charging process will startwithin a few minutes. It should take about 5hrs minimum to fully charge the dischargedbatteries.6) MPPT Solar Controllera) The advanced MPPT solar controller measures solar voltage andcurrent, battery voltage, load current and temperature. You can scrollthrough the various readings on the display by pressing the up anddown arrow keys on the controller. Please refer to the solar controlleruser guide for detailed info.b) There is a Bluetooth interface included so you can check status of thesystem using your smartphone without having to open the equipmentenclosure. The range is about 15’. Please refer to the TP-SC-BT1user guide for more info.7) Misc. Informationa) The enclosure includes a thermostatically controlled fan. The fan will turn on automatically ifthe temperature inside the enclosure exceeds 45C.b) The batteries used in the system are GEL type sealed lead acid batteries. They aremaintenance free and should last at least 5 years. Caution: Never store the batteries in adischarged state, especially in cold temperatures or else the battery life will be reduced.Always store the batteries fully charged.c) A second locking enclosure can be added to the trailer platform in order to store userequipment.d) A wind turbine option is available to add a second source of power to the system. The windturbine mounts to a separate foldable mast system which is included in the optional kit.e) Replacement fuses:i) Battery Cables: ATC/ATO (.75”) Automotive Fuse 30Aii) AC/DC Battery Charger: 6x30mm 25A glass fuseSchematic:。
各式太阳能移动电源介绍
近段时间采用太阳能电源的产品似乎成为了人们关注的热点,尤其是一些号称永不断电的太阳能充电产品被央视曝光后,人们几乎已经把太阳能电源当作骗人的伎俩。
其实太阳能充电从理论上完全可行,不过效果绝没有广告吹嘘的那么神奇,只可作为辅助功能来用。
本次我们介绍的就是一款可以依靠太阳能充电的移动电源-Em@x温倍尔TYN-003,此款移动电源是否能给我们带来惊喜,下面就是对其进行的详细评测。
Em@x温倍尔TYN-003太阳能移动电源外观和移动硬盘十分相似,携带起来很方便。
机身为鲜红色,十分醒目,左下角有Em@x的logo。
内置3400mAh锂电池。
Em@x温倍尔TYN-003太阳能移动电源是折叠式,翻开后就是太阳能接收板,放在阳光充足的地方可以给电源充电,需要注意的是太阳光照强度需要达到1000w/m2。
Em@x温倍尔TYN-003太阳能移动电源的按键、接口全都集中在机身一侧,最左边为USB 接口,旁边为电源接口,接下来是输入电压切换按钮,旁边是电量指示灯,然后是电源开关/照明灯控制按钮,最右边是LED照明灯。
上下两个机身的连接处为电压指示灯,长按即可调节电压输出,分为4.8v、5.8v、8.4v、9.0v,建议用户从低向高调节,如果不清楚产品适用哪种电压的话,建议用5.8v进行充电,此款电源具有过流保护功能,电压设置不当时会自动关机。
产品配件:丰富的接头Em@x温倍尔TYN-003太阳能移动电源在适用范围上可以为大多数数码产品,如手机、MP3、MP4、PDA、数码相机等,而随机附带的8个接头主要为手机所用,想要给更多的产品充电,需要单独购买接头。
配件还有USB线和电源接头。
适用范围:主流手机皆可使用上文提到Em@x温倍尔TYN-003太阳能移动电源的接头主要为手机所用,笔者适用了一下,可以支持目前市面上大部分主流的手机,诺基亚、摩托罗拉、索尼爱立信、三星等,下图为诺基亚N73。
一些冷门的手机也可以适应,比如夏普的手机。
锡南太阳能系列产品技术规格说明书
S O L A R.H U A W E I.C O MTechnical SpecificationSUN2000-450W-P2SUN2000-600W-PInputRated Input DC Power 1450 W600 WAbsolute maximum input voltage 80 V MPPT operating voltage range10 -80 V Maximum Short Circuit Current (Isc)14.5 A Max. efficiency99.5 % Weighted efficiency 99.0 % Overvoltage categoryIIOutputMax.output voltage 80 V Max. output current 15 A Output bypass 2Yes Shutdown output voltage per optimizer 30VShutdown output impedance per optimizer1k ohm ±10 %CommunicationCommunication MethodMBUSStandard ComplianceSafety IEC62109-1 (class II safety)RoHSYesGeneral DataDimension (W x H x D)75 x 140 x 28 mm (3.0 x 5.5 x 1.1 inch)Weight (including cables)0.6 kg (1.3 lb.)Installation part (optional)Frame Mounting Bracket / T-shaped Bolt 4Input connector MC4Input wire length 0.15m Output connector MC4Output wire length1.3 m (4.3 ft.) 5Operating temperature / humidity range -40 ℃~85℃5/ 0 %RH ~100 %RHDegree of protection IP68Compatible productSUN2000-2/3/3.68/4/4.6/5/6KTL-L1, SUN2000-3/4/5/6/8/10KTL-M1,SUN2000-12/15/17/20KTL-M2,SUN2000-30/36/40KTL-M3Smart PV Optimizer*1 In the STC environment, The rated power of the module shall not exceed 1.05 times of the optimizer rated input power.*2 Power optimizer is bypassed in the string connected to an operating inverter when it fails to work *3 Power optimizer output 0Vdc when disconnecting to the inverter or inverter is shutdown.*4 Allow PV module frame installation / extruded aluminum profile installation *5 Fits PV module in landscape and portrait installation.*6. Require standard 60 cells module to meet the inverter minimum startup voltage *7 Full power capability refers to online smart design tool. One-Fits-All OptimizerEasier Business<5s Module Auto-MappingArc Fault Pinpoint Positioning Along PV CableLong String Design (Full Optimizer)SUN2000-2-6KTL-L1SUN2000-3-10KTL-M1SUN2000-12-20KTL-M2SUN2000-30-40KTL-M3Minimum optimizer number per string 64666Maximum optimizer number per string 25353525Maximum DC power per string6,000 W10,000 W12,000 W12,000 W。
充电宝 综合说明书
概述:超威便携式移动电源是一种集供电和充电功能于一体的便携式充电装置的电能存储器,由高能量集合物锂离子电芯作为储电载体。
具有大容量、多用途、体积小、寿命长和安全可靠等特点。
使用说明:适用于MN0510MH、MN0510MA/8G、MN0505MB、MN0505MD、MN0505MF、MN0502MC型号:照明功能长按按键3S以上,LED照明开启,再轻按按钮则关闭LED照明(MN0502MC 除外);对数码产品充电:将充电线接入USB口,轻按按键,即可给DC5V输入的电子产品充电,充电过程中电量指示灯长量,提示剩余电量。
(MN0502MC:无需按按键,充电过程中无电量显示);对移动电源充电:选择适配器(输出直流电压5V)或电脑USB口,将充电头插入移动电源充电口,即可给移动电源进行充电;电量查询:短按按键,即可查询移动电源剩余电量(MN0502MC不可查询剩余电量,在缺电的情况下会亮红灯,表示需要充电);休眠状态:在无充、放电(既待机状态),无照明时,5分钟后自动进入休眠状态;适用于MN1910ME型号:对移动电源充电:请用输出直流电压15~19V,电流≧2A的适配器对移动电源进行充电,充电时LCD显示充电状态(电量格成流水状跳动)和输出口输出电压。
当适配器电压不符合要求时,电量格整体闪动。
开机和关机:在关机状态下,短按按键开机,开机显示当前电池电量、输出口输出电压、USB符号。
关机:输出口未接入负载并不在输出锁定状态时,可以短按按键关机;输出口未接入负载并不在输出锁定状态时,电源在无负载时10分钟后自动关机;输出口接入负载后,须长按按键关机;显示锁定符号时电源不会自动关闭,将保持长期开机状态。
对数码产品进行充电:对数码产品充电时,USB口可以对5V的数码产品如手机,IPAD等进行充电,USB口输出不随手动调整电压而变动,恒定输出5V;DC输出口输出电压可以在5V/7.4V/9V/12V/16V/19V之间循环调整,在未接入负载时,长按按键即可调整电压,持续长按,电压连续调整。
便携式太阳能充电宝8000mAh说明书
INSTRUCTION MANUAL PORTABLE SOLAR POWER BANK 8.000MAHCOMPONENTS•Solar power bank•USB cable•Buckle•Compass•User manualTECHNICAL SPECIFICATIONS•Capacity: 8.000mAh•Case material: ABS + PC + Silicone•Battery type: A grade Li-polymer battery •Net weight: 280g•Product size: 139 x 75 x 20mm•Input: 5V/1.0A•Output: 5V/1A, 5V/2.1A•Color: orange, blue, green, red, black, yellow•Solar panel: polycrystalline• 1.2m drop testing passed•Waterproof and dustproof IPX5 certified. HOW TO USE1.Light2.Power button3.Outlet 14.Outlet 25.Inlet6.Solar panelO FIRST TIME USEWe recommend you charge the battery fully beforeusing it for the first time. The capacity should befully optimized after 2–3 times of fully charging anddischarging the unit.O CHARGINGYou can charge the power bank with the includedUSB connector, or the one that comes with yourphone or other rechargeable device. If you do nothave a USB adapter, you can plug your connectorinto your compute r’s USB port. The solar panel isfor emergencies, since it is slower to charge thatway. The stronger the sun, the quicker is its charge.O POWER CONTROL SWITCHFirmly press the power button one time. This willturn on blue light indicators that show you how fullis the power bank.• 1 blue light = the charger needs to berecharged.• 2 blue lights = <25% remaining charge• 3 blue lights = 25–50%• 4 blue lights = 50–75%•5 blue lights = the device is at 75–100% charge(Green lights mean t’s being sun-charged))Firmly press the power button for 2 seconds, andthe LED flashlight will go on. Press once again tocycle through modes (bright light, emergency SOSsignal).Firmly press the power button for 2 seconds again to turn the flashlight off.COMPATIBLE DEVICESMost digital products with 5V 1A or 2A power rating can be charged easily.•wireless earphones•tablets•digital cameras•any USB chargeable phones•mp3/mp4 players•any USB device with the same power rating of 5V 1A or 2A. TROUBLESHOOTINGProblem: my USB chargeable device does not seem to be charging when connected to the solar charger.Solution: please try to use the same connector you would normally charge your USB device with. If that works, it is likely that due to wear and tear of the connector that comes with the solar charger, which is not lining up with your USB device’s port.Problem:the flashlight won’t turn on or off. / The flashlight is stuck on either bright or SOS mode.Solution: To turn the flashlight on you will need to firmly hold the power button for 2 seconds. Once the flashlight is on, simply click the power buttonagain to cycle through different modes. Hold thepower button for 2 seconds again to turn off thelight.Problem: the solar charger does not indicate thegreen light when in the sun or seems to be chargingslowly.Solution: please make sure the charger is underdirect, strong sunlight. Depending on the strengthof the sunlight, green lights will indicate the chargepower.Note: due to the conveniently compact size of thecharger, the size of the solar panel will enable onlya very slow charge time. It only serves as anemergency feature that will allow you to getenough power for that critical phone call.SAFETY PRECAUTIONS1.Keep the battery away from heat sources (likea fire or heater).2.Do not throw the battery into fire or heat thebattery.3.Do not hammer or trample the battery.4.Do not try disassembling the battery in anyway.5.This product is waterproof, but with limits. Itshould not be used under water. It is a safetyfeature that protects internal electronics,when briefly submerged.6.Please note that the charger clip is meant forcarrying on a key chain and is not intended as abelt clip.7.The battery is made from a high grade lithiumpolymer.8.Keep out of reach of small children.e this product in a well-ventilated area; it isnot recommended to place on your car’sdashboard when the windows are up as thiscould damage the product.10.Do not tamper with the internal componentsas this will void the 1-year warranty of yourdevice and could furthermore result in othermalfunctions of the unit.WARRANTYThe warranty is valid for 12 months, and you cansend your claim to the seller (us), through thecontact details listed in the bottom right corner. Tosubmit a warranty claim, send the order numberand date of your purchase.WEEE disposal and recycling symbol. The WEEE symbol is attached to the product in compliance with the EU directive 2012/19/EU on Waste Electrical and Electronic Equipment (WEEE). It is intended to deter the improper disposal of this product and topromote reuse and recycling.。
太阳能充电宝品规格书
太阳能充电宝产品规格书型号:JN950编制:_________审核:_________核准:_________客户承认:_________目录1.产品概述 (2)2.产品规格 (2)3.电性参数 (2)4.带载能力及效率图表示意 (4)5.功能描述 (5)6.工作原理 (5)7.安全系统要求 (6)8.环境适应及安全保护 (6)9.包装要求 (7)1.产品概述1.1 本产品是专为移动数码产品设计的智能备用电源。
1.2 本产品适用智能手机、平板电脑、便携影音播放设备、掌上游戏机设备等5V直流输入设备,直流12V 的3W-5W 灯泡照明。
1.3 本产品输入部分采用了锂电池专用充电管理IC ,锂电池使用专用保护电路,实现精确控制电压过充、电压过放、电流过载及短路保护,安全性能高;输出采用高效率DC-DC 升压转换电路;同时采用MCU 微电脑控制管理, 实现负载插入自动开机、充满自停、过流保护、电量检测与显示、超低功耗待机等功能。
采用绿光指示,外观圆润细腻,手感舒适。
2. 产品主要规格型 号 JN950输入(V/A/W) 12.6V/1.5A/18.9W 输入端口 DC¢6.5充电端口 总输出(V/A/W) 5V/2.4A/12W 输出端口 单个USB 输出端口 产品容量(mAh) 6000mAh能量(Wh) 66.6Wh (3并3串) 按 键 按键开启输出 显 示 4绿色电量显示LED 尺寸(mm ) 205*200*68mm重量(g )900g实物图:(需要标注长宽高尺寸,LED 顺序说明)电性参数3.1 保护参数项目详细内容最小值 典型值最大值单位备注拔动按键LED 电量指示灯灯USB 输出口DC ¢6.5mm 或太阳能板输入口DC ¢3.8mm 输出口保护参数配置过充单节过充保护 4.25 4.275 4.30 V单节过充保护延迟时间150 340 500 ms VDD=3.6Vto4.4v 单节过充保护恢复 4.15 4.20 4.25 V过放单节过放保护 2.9 3.05 3.1 V单节过放保护延迟时间80 200 300 ms单节过放保护恢复 3.0 3.10 3.15 V过流放电硬件过流保护4510 A放电软件过流保护 2.2 2.6 2.8 A放电过流保护延迟时间9 12 15 ms短路短路保护有短路恢复方式按键激活短路保护延迟时间200 300 400 μs3.2 输出参数项目详细内容最小值典型值最大值单位备注输出参数配置工作参数持续放电电流 2.0 2.1 2.4 A OUT1 电池3.3V -4.2V放电截止电流10 60 80 mA空载电压4.95.1 5.2 V OUT1 电池3.3V -4.2V带载电压4.755.15 5.2 V OUT1 CC1A电池3.3V-4.2VD+/D-电压短路接法OUT1 空载输出纹波85 100 mV OUT1 CC1.0A 电池3.78V升压转化效率90 92 %OUT1 CC 1A 电池3.78V空载关机延时时间25 30 35 S整机静态电流50 100 uA3.3 充电管理项目详细内容最小值典型值最大值单位备注充电参数配置充电电压12.6 13.0 13.5 V 涓流充电阈值8.7 9.0 9.3 V 恒定充电电流 1.0 1.2 1.5 A 恒定充电电压12.48 12.66 12.75 V充电截止电流150 180 mA3. 效率及动态负载电压示意图效率图70.00%75.00%80.00%85.00%90.00%95.00%100.00%0.51 1.52 2.33.13.33.84OUT1 效率图动态负载电压图4.34.454.64.754.95.055.20.51 1.52 2.33.13.33.84OUT1电压4. 产品基本操作及功能说明5.1 产品基本操作:a) 手动开机:太阳能充电宝不接外设时,拔动开关“ON ”启动输出、绿灯电量指示灯一直显示当前电量。
- 1、下载文档前请自行甄别文档内容的完整性,平台不提供额外的编辑、内容补充、找答案等附加服务。
- 2、"仅部分预览"的文档,不可在线预览部分如存在完整性等问题,可反馈申请退款(可完整预览的文档不适用该条件!)。
- 3、如文档侵犯您的权益,请联系客服反馈,我们会尽快为您处理(人工客服工作时间:9:00-18:30)。
1. 产品概述
1.1 本产品是专为移动数码产品设计的智能备用电源。
1.2 本产品适用智能手机、平板电脑、便携影音播放设备、掌上游戏机设备等5V 直流输入设备,直流 12V 的3W-5W 灯泡照明。
1.3 本产品输入部分采用了锂电池专用充电管理IC ,锂电池使用专用保护电路,实现精确控制电压过
充、电压过放、电流过载及短路保护,安全性能高;输出采用高效率DC-DC 升压转换电路;同时采用MCU 微电脑控制管理, 实现负载插入自动开机、充满自停、过流保护、电量检测与显示、超低功耗待机等功能。
采用绿光指示,外观圆润细腻,手感舒适。
2. 产品主要规格
型 号 JN950
输入(V/A/W) 12.6V/1.5A/18.9W 输入端口 DC¢6.5充电端口 总输出(V/A/W) 5V/2.4A/12W 输出端口 单个USB 输出端口 产品容量(mAh) 6000mAh
能量(Wh) 66.6Wh (3并3串) 按 键 按键开启输出 显 示 4绿色电量显示LED 尺寸(mm ) 205*200*68mm
重量(g )
900g
实物图:(需要标注长宽高尺寸,LED 顺序说明)
拔动按键
LED 电量指示灯灯
USB 输出口
DC ¢6.5mm 或太阳
能板输入口
DC ¢3.8mm 输出口。