Expression_Blend实例中文教程
Blend创建或修改模板
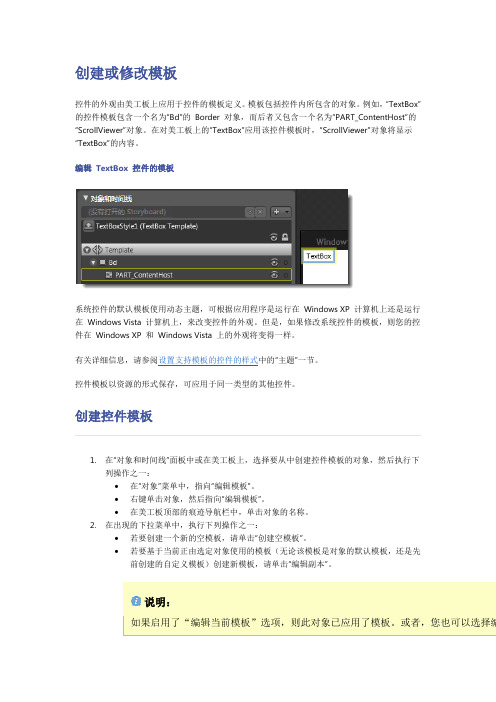
创建或修改模板控件的外观由美工板上应用于控件的模板定义。
模板包括控件内所包含的对象。
例如,“TextBox”的控件模板包含一个名为“Bd”的Border 对象,而后者又包含一个名为“PART_ContentHost”的“ScrollViewer”对象。
在对美工板上的“TextBox”应用该控件模板时,“ScrollViewer”对象将显示“TextBox”的内容。
编辑TextBox 控件的模板系统控件的默认模板使用动态主题,可根据应用程序是运行在Windows XP 计算机上还是运行在Windows Vista 计算机上,来改变控件的外观。
但是,如果修改系统控件的模板,则您的控件在Windows XP 和Windows Vista 上的外观将变得一样。
有关详细信息,请参阅设置支持模板的控件的样式中的“主题”一节。
控件模板以资源的形式保存,可应用于同一类型的其他控件。
创建控件模板1.在“对象和时间线”面板中或在美工板上,选择要从中创建控件模板的对象,然后执行下列操作之一:∙在“对象”菜单中,指向“编辑模板”。
∙右键单击对象,然后指向“编辑模板”。
∙在美工板顶部的痕迹导航栏中,单击对象的名称。
2.在出现的下拉菜单中,执行下列操作之一:∙若要创建一个新的空模板,请单击“创建空模板”。
∙若要基于当前正由选定对象使用的模板(无论该模板是对象的默认模板,还是先前创建的自定义模板)创建新模板,请单击“编辑副本”。
说明:3.此时,将显示“创建样式”对话框。
这是因为控件模板存储在样式资源中。
4.在“名称(关键字)”下,执行下列操作之一:∙若要为该对象创建新的命名样式,请键入关键字名称。
其他对象可通过此名称引用该样式,从而应用该模板。
∙若要创建将由此类型的所有对象使用的样式,请选择“全部应用”。
提示:5.在“定义位置”下,选择选项以确定要定义样式的位置:∙若要使应用程序中的任何文档都能使用该样式,请选择“应用程序”。
Expression blend 4

•
3.右击左侧工具箱里的 Rectangle(如下图2红色圈起的部分),选择Ellipse,然后按住Shift 键的同时,鼠标在画布上拖动,画出两个圆(小圆在上,大圆在下),如图3,两个圆均放在 Grid面板内。
7
•
4.选择某一个圆,点击属性Properties,选择Brushes,点击Fill,选择图4中红线圈出的部 分(Gradient Brush),然后在颜色板里更改椭圆的填充颜色,两个椭圆填充颜色的方法相同。 最后配出的椭圆颜色如下图
•
10.现在一个圆形的按钮已经做好了,按F5运行程序,鼠标放上去的时候,按钮有放大的 效果,鼠标点击的时候有被按下去的效果,其实还可以更改背景颜色。
13
•
11.按钮做好后,还可以进一步给该按钮添加事件,双击Click事件
•
12.可以在下图中添加事件触发代码。
14
•
12.代码添加好后,编译通过后,按F5进行测试,效果如下:
2
这种协作是通过共享文件格式 (XAML) 以及共享解决方案和项目格式来实现的。 这表示使用 Expression Blend 的专业设计人员可以打开并编辑在 Visual Studio 2008/2010 中创建的 WPF 项目,开发人员可以打开并编辑在 Expression Blend 中创建的 WPF 项目。
主要用于设计桌面应用程序和 Web 应用程序以及制作这些应用程序的原型的可视 化工具。通过绘制形状、绘制诸如按钮和列表框之类的控件、使应用程序部件对 鼠标单击和其他用户输入做出响应,以及将所有内容的样式设置为自己独一无二 的风格,可以生成应用程序。
应用程序功能由以下两项功能强大的技术在幕后提供:Microsoft Silverlight 和 Windows Presentation Foundation (WPF)。使用 Expression Blend,您可以 创建基于 Silverlight 的网站和应用程序以及基于 WPF 的桌面应用程序。 。
微软Expression Web教程说明书
About the T utorialMicrosoft Expression Web is a full-featured professional tool for designing, developing, and publishing feature-rich websites that conform to web standards. Expression Web uses its own standard rendering engine, which is different from Internet Explorer's Trident engine. In the following chapters of this tutorial, we will look closely at Microsoft Expression Web and learn how it works.AudienceThis tutorial has been prepared for aspiring web designers to familiarize them with the interface and features of Microsoft Expression Web.After completing this tutorial, you will gain sufficient knowledge on Microsoft Expression Web from where you can take yourself to the next level.PrerequisitesIt is quite a simple tutorial written in a very user-friendly manner. You can make the most of it with a very basic knowledge of web designing and web development. Disclaimer & CopyrightCopyright 2018 by Tutorials Point (I) Pvt. Ltd.All the content and graphics published in this e-book are the property of Tutorials Point (I) Pvt. Ltd. The user of this e-book is prohibited to reuse, retain, copy, distribute or republish any contents or a part of contents of this e-book in any manner without written consent of the publisher.We strive to update the contents of our website and tutorials as timely and as precisely as possible, however, the contents may contain inaccuracies or errors. Tutorials Point (I) Pvt. Ltd. provides no guarantee regarding the accuracy, timeliness or completeness of our website or its contents including this tutorial. If you discover any errors on our website or inthistutorial,******************************************.T able of ContentsAbout the Tutorial (i)Audience (i)Prerequisites (i)Disclaimer & Copyright (i)Table of Contents .................................................................................................................................. i i 1.EXPRESSION WEB − OVE RVIEW (1)Microsoft Expression Web − History (1)System Requirements (2)2.EXPRESSION WEB − ENV IRONMENT SETUP (3)Installation (3)3.EXPRESSION WE B − NEW WEBSITE (6)Create a Website (6)4.EXPRESSION WEB − BLA NK WEB PAGE (14)Create a Blank Page (14)Create a CSS Page (17)5.EXPRESSION WEB − WEB PAGE LAYOUT (24)<div> tag (24)Example (25)6.EXPRESSION WEB − HTM L LAYOUT (37)7.EXPRESSION WEB − HOR IZONTAL NAVIGATION (42)8.EXPRESSION WEB − VER TICAL NAVIGATION (60)9.EXPRESSION WEB − VAL IDATE PAGES (74)Status Bar (76)Compatibility Report (78)10.EXPR ESSION WEB − DYNAMIC WEB TEMPLATE (80)The Need for Dynamic Web Templates (80)Create a Dynamic Web Template (80)11.EXPRESSION WEB − SEA RCH PAGE (86)Windows Live Search (86)12.EXPRESSION WEB − IMA GES (92)13.EXPRESSION WEB − HYP ERLINKS (99)Anchor Tag (99)14.EXPRESSION WEB − VID EO (109)15.EXPRESSION WEB − SQL DATASOURCE (114)16.EXPRESSION WEB − MIC ROSOFT WORD (135)17.EXPRESSION WEB − GRI DVIEW (141)18.EXPRESSION WEB − MAS TER PAGES (150)19.EXPRESSION WEB − DAT A TABLE (158)20.EXPRESSION WEB − PUB LISH (169)21.EXPRESSION WEB − BAC KUP WEBSITE (176)22.EXPRESSION WEB − ADD-INS (182)1.Microsoft Expression WebMicrosoft Expression Web is a full-featured professional tool for designing, developing, and publishing feature-rich websites that conform to web standards. You can use Expression Web to create web pages and sites that let you transfer files between your computer and your hosting account.Expression Web can design and develop web pages using HTML5, CSS 3, , PHP, JavaScript, XML+XSLT and XHTML.Expression Web 4 requires .NET Framework 4.0 and Silverlight 4.0 to install and run. Microsoft Expression Web − HistoryMicrosoft released the first Community Technology Preview (CTP) version of Expression Web on May 14, 2006.Microsoft Expression Web 4 was released on June 7, 2010.∙It added the option of HTML add-ins and access to a web-based functionality for testing pages on browsers that cannot be installed on the user's system, such as Mac OS X or Linux browsers.∙It also provides an SEO Checker using which you can analyze already created websites against the best practices for getting the highest possible search engine rankings.Expression Web Service PacksExpression Web 4 Service Pack 1 was released in March 2011 and added support for IntelliSense for HTML5 and CSS.Expression Web 4 Service Pack 2 was released in July 2011. It fixed a number of issues and introduced new features such as∙jQuery IntelliSense support∙ a panel for managing snippets∙Interactive Snapshot Panel∙comment/uncomment functionality in Code View, and∙workspace and toolbar customization.In December 2012, Microsoft announced that Expression Studio will no longer be a stand-alone product. Expression Blend is being integrated into Visual Studio, while Expression Web and Expression Design will now be free products.Microsoft Expression WebSystem RequirementsTo create a website using Microsoft Expression Web, your computer should meet the following requirements:∙You should have at least Windows XP with Service Pack 3 or the latest operating systems.∙You should have a PC with 1 GHz or faster processor.∙Your PC should have 1 GB of RAM or more.∙Your PC should have 2 GB or more of available hard disk space.∙You should have .NET Framework 4.0 and Silverlight 4.0.∙Your PC should support Microsoft DirectX® 9.0 graphics.∙You should have DVD compatible drive.∙You should have 1024 x 768 or higher resolution monitor with 24-bit color.∙Some product features require Firefox 3.0 or later, Internet Explorer 8. So you should have the same version.Actual requirements and product functionality may vary based on your system configuration and operating system.2.Microsoft Expression WebMicrosoft provides a free version of Microsoft Expression Web which can be downloaded from https:///en-pk/download/details.aspx?id=36179.InstallationStep 1: Before you can install Expression Web, you will need to have .NET Framework 4.0 installed.Step 2: Once downloading is complete, run the installer. The following dialog will be displayed.Step 3: Click the Accept button.Step 4: Select the Yes radio button and then click Next.Step 5: You can choose other location as well for installation. Select the location and click the Install button.The installation process starts.Once the installation is complete, you will see the following dialog. Step 6: Click Finish to continue.3.Microsoft Expression WebIn the previous chapter, we have installed Microsoft Expression Web and now we are ready to start working on it. In this chapter, we will learn how to create a new website from scratch.Create a WebsiteTo create a new website, let’s open Microsoft Expression Web.Next, you need to follow the steps given below.Step 1: Select Site -> New Site… menu option.Step 2: It will open the following dialog from which you can create or import different types of website.Step 3: For simplicity let’s select General -> One Page Site.∙Specify the location or you can browse to the location where you want the new website to be created.∙Type in the name of your web in the name field and click OK.Step 4: The new web will be created with one page named default.htm. L et’s rename it to index.html with a right-click on the file and clicking on the Rename option.Step 5: The default doctype used in Expression Web is:You can see it by just switching to the code view.You can change the doctype from Tools-> Page Editor Options -> Authoring.Step 6: Now, let’s add <h1> tag inside the body tag and some text as shown in the following code.Step 7: To see our web in a browser, let’s go to the File menu and select the Preview in Browser -> Any browser, let’s say, Internet Explorer.It will open our web in Internet Explorer.4.Microsoft Expression WebAs we have already created our website, now we will need to create our Home Page. In the previous chapter, we have created a one-page website, and our Home Page was created at that time automatically by Expression Web. So, if you have created a blank website, then you will need to create a Home Page for your site.Microsoft Expression Web can create the following types of pages:∙HTML∙ASPX∙ASP∙PHP∙CSS∙Master Page∙Dynamic Web Template∙JavaScript∙XML∙Text FileIn this chapter, we will create an HTML page and its corresponding style sheet. Create a Blank PageTo create a blank page, you can simply go to File menu and select New -> Page…menu option.From the new dialog, you can create different types of blank pages such as HTML page, ASPX page, CSS page, etc. and click OK.As you can see here, the default code is already added by Microsoft Expression Web.As you can see, your newly created page has the file name Untitled_1.html or Untitled_1.htm. You will need to save the page by pressing Ctrl + S and specify the name.As our website already contains an index.html page, we don’t need another one. However, if you have created an Empty website, then name this page index.html.To see your web in a browser, let’s go to the File menu and select the Preview in Browser -> Any browser, let’s say Internet Explorer.Create a CSS PageLet’s take you through the step-by-step process of creating a CSS page.Step 1: To create a CSS page, go to the File menu and select New -> Page… menu option.Step 2: Select General -> CSS and click OK.Step 3: Save the page and type a name for the style-sheet.Step 4: Click the Save button.Step 5: Now, l et’s go to the index.html page.Step 6: In the Manage Styles Panel, click Attach Style Sheet.Step 7: Browse to your style-sheet and select the Current page from “Attach to” and Link from “Attach as” and click O K.Step 8: Now, you will see that a new line is added automatically in the index.html page.Step 9: The body element defines the document's body. To style the <body> tag, we need to create a new style. First, select the body tag in Design View and then click on the New Style… in Apply Styles panel or Manage Styles panel, which will open the New Style dialog.Here, you can define the different options for your style. The first step is to select the body from the Selector dropdown list and then select the Existing style sheet from “Define in” dropdown list.Step 10: From the URL, select the sample.css file. On the left side, there is a Category list like font, background, etc. and currently the Font is highlighted. Set the Font related information as per your requirements as shown in the above screenshot and click Ok. Step 11: Now you can see in the design view that the background color and the font has changed to what we have selected. Now, if you open the sample.css file, you will see that all the information is automatically stored in the CSS file.Let’s preview our web page in a browser. You will observe that the style is applied from the CSS file.End of ebook previewIf you liked what you saw…Buy it from our store @ https://。
基于Expression Blend的WPF程序调用swf文件与word文档的方法

文章 编 号 : 044 5 (0 1 0—3 10 1 0—3 32 1 )40 7—4
基 于 E p eso ln x rsinB e d的 WP F程 序 调 用 s 文 件 与 wod文 档 的方 法 wf r
董 德 森
(延 边 大 学 师 范 学 院 教 育 技 术 学 系 ,吉林 延 吉 13 0 3 0 2)
文 档 的方 法 , 便 能 够 充 分 地 利 用 现 有 s f 件 、 od文 档 等 优 秀 的教 学 资 源进 行 课 件制 作 . 践 表 明 , 方 以 w文 wr 实 该 法 简 单 、 效 、 活且 易 于 实 现 . 有 灵
关 键 词 :E p es nB e d s f 件 ; r x rs i l ; w 文 o n wo d文 档 中 图分 类 号 : P 1 . T 311 文献 标 识 码 : A
t k h o r e r .Th r c ie s o h tt e me h d i i l ,e f c ie lx b e a d e s o r a ie o ma e t e c u s wa e e p a t h wst a h t o s smp e fe t ,f i l n a y t e l . c v e z
Ke r s Ex e son Blnd;s i y wo d : pr s i e wffl wor oc m e s e; d d u nt
0 引 言
随着 教育 信 息化 进 程 的不 断 推 进 , 息 技 术 信 在教 育领 域 的应 用 不 断 推 广 和深 化 , 种 多 媒 体 各
DONG — e De s n (De rme t f u a in lTeh oo y,C le eo Te c e s a ba ie st Ya j 3 0 2 h n ) pa t n Ed c to a c n lg o o lg f a h r ,Y n in Un v riy, n i1 3 0 ,C ia
expression

expression.invoke用法
expression.invoke是在Python中调用表达式的功能。
具体用法如下:
```python
expression.invoke(target, *arguments, **named_arguments)
```
其中,target表示要调用的函数或方法名;arguments表示要传递给函数或方法的位置参数;named_arguments表示要传递给函数或方法的命名参数。
下面是一个简单的示例:
```python
def add(a, b):
return a + b
expression = Add(2, 3) # 创建表示2 + 3的表达式
result = expression.invoke(add) # 调用add函数并传递位置参数
print(result) # 输出:5
result = expression.invoke(add, b=5) # 调用add函数并传递命名参数
print(result) # 输出:7
```
在上面的示例中,首先定义了一个add函数用于求两个数的和。
然后创建了一个Add表达式来表示2 + 3。
通过
expression.invoke方法调用了add函数,并传递了位置参数或
命名参数,得到了正确的结果。
UG表达式应用说明
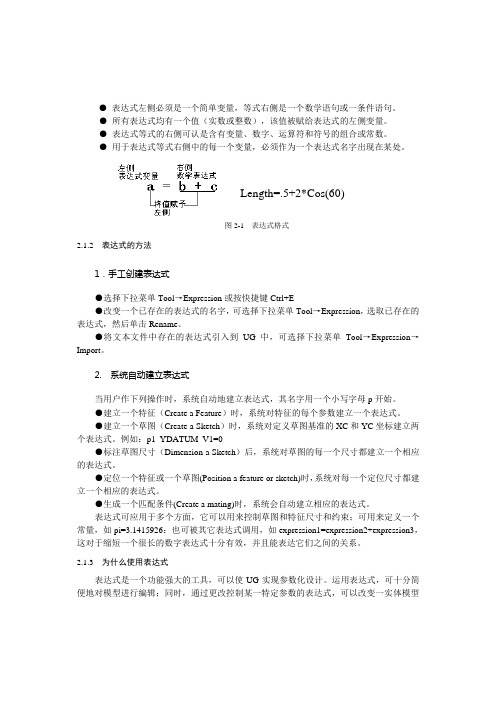
●表达式左侧必须是一个简单变量,等式右侧是一个数学语句或一条件语句。
●所有表达式均有一个值(实数或整数),该值被赋给表达式的左侧变量。
●表达式等式的右侧可认是含有变量、数字、运算符和符号的组合或常数。
●用于表达式等式右侧中的每一个变量,必须作为一个表达式名字出现在某处。
Length=.5+2*Cos(60)图2-1 表达式格式2.1.2 表达式的方法1.手工创建表达式●选择下拉菜单Tool→Expression或按快捷键Ctrl+E●改变一个已存在的表达式的名字,可选择下拉菜单Tool→Expression,选取已存在的表达式,然后单击Rename。
●将文本文件中存在的表达式引入到UG中,可选择下拉菜单Tool→Expression→Import。
2. 系统自动建立表达式当用户作下列操作时,系统自动地建立表达式,其名字用一个小写字母p开始。
●建立一个特征(Create a Feature)时,系统对特征的每个参数建立一个表达式。
●建立一个草图(Create a Sketch)时,系统对定义草图基准的XC和YC坐标建立两个表达式。
例如:p1_YDATUM_V1=0●标注草图尺寸(Dimension a Sketch)后,系统对草图的每一个尺寸都建立一个相应的表达式。
●定位一个特征或一个草图(Position a feature or sketch)时,系统对每一个定位尺寸都建立一个相应的表达式。
●生成一个匹配条件(Create a mating)时,系统会自动建立相应的表达式。
表达式可应用于多个方面,它可以用来控制草图和特征尺寸和约束;可用来定义一个常量,如pi=3.1415926;也可被其它表达式调用,如expression1=expression2+expression3,这对于缩短一个很长的数字表达式十分有效,并且能表达它们之间的关系。
2.1.3 为什么使用表达式表达式是一个功能强大的工具,可以使UG实现参数化设计。
expression 运算表达式 条件表达式

expression 运算表达式条件表达式
在编程和数学中,"expression"(表达式)通常指的是由操作数、运算符和括号组成的数学或逻辑公式。
这些公式可以是算术表达式(例如 2 + 3)、代数表达式(例如 x + 5)、或更复杂的函数或方程。
在编程语言中,表达式用于表示计算或值,而条件表达式(也称为条件语句)用于基于特定条件执行不同的操作。
例如,在许多编程语言中,你可以使用条件表达式来决定程序的流程。
以下是一个简单的例子,使用Python语言:
python
x = 10
# 条件表达式
if x > 5:
print("x 大于 5")
else:
print("x 小于或等于 5")
在这个例子中,if x > 5: 是一个条件表达式,它检查变量 x 是否大于5。
如果条件为真(即 x 大于5),程序将执行接下来的语句,打印出 "x 大于 5"。
否则,如果条件为假(即x 不大于5),程序将执行 else 后面的语句,打印出 "x 小于或等于 5"。
需要注意的是,具体的语法和规则可能会根据你使用的编程语言有所不同。
上述例子是基于Python语言的,其他语言(如C、Java、JavaScript等)可能有不同的语法和规则。
EXT_中文手册

前言本手册所有内容均粘贴自互联网,如有错误,请多见谅。
EXT 中文手册 (1)EXT简介 (5)目錄 (5)下载Ext (6)开始! (6)Element:Ext的核心 (6)获取多个DOM的节点 (7)响应事件 (7)使用Widgets (9)使用Ajax (11)EXT源码概述 (13)揭示源代码 (13)发布Ext源码时的一些细节 (14)我应该从哪里开始? (15)适配器Adapters (15)核心Core (15)Javascript中的作用域(scope) (15)事前准备 (15)定义 (15)正式开始 (16)window对象 (16)理解作用域 (17)变量的可见度 (17)EXT程序规划入门 (18)事前准备 (18)需要些什么? (18)applayout.html (18)applayout.js (19)公开Public、私有Private、特权的Privileged? (21)重写公共变量 (23)重写(Overriding)公共函数 (23)DomQuery基础 (24)DomQuery基础 (24)扩展EXT组件 (31)文件的创建 (31)Let's go (35)完成 (37)EXT的布局(Layout) (39)简单的例子 (40)加入内容 (43)开始使用Grid (53)G r i d数据 (55)怎么做一个分页的G r i d (56)分页栏T o o l b a r (56)EXT Menu组件 (57)创建简易菜单 (57)各种I t e m的类型 (59)I t e m属性 (59)在U I中摆放菜单 (59)M e n u的分配方式: (60)练一练 (62)动态添加菜单按钮到T o o l b a r (62)更方便的是 (63)下一步是 (63)模板(Templates)起步 (63)第一步您的HTML模板 (63)第二步,将数据加入到模板中 (64)下一步 (64)学习利用模板(Templates)的格式化功能 (64)正式开始 (64)下一步 (66)事件处理 (66)非常基础的例子 (66)处理函数的作用域 (66)传递参数 (67)类设计 (67)对象创建 (67)使用构造器函数 (68)方法共享 (68)表单组件入门 (69)表单体 (69)创建表单字段 (69)完成表单 (70)下一步 (71)为一个表单填充或提交数据 (71)让我们开始吧 (71)读取我们的数据 (72)EXT中的继承 (73)补充资料 (74)Ext 2 概述 (74)组件模型Component Model (76)容器模型Container Model (80)DataView (85)其它新组件 (85)EXT2简介 (86)下载Ext (86)开始! (87)Element:Ext的核心 (87)获取多个DOM的节点 (88)响应事件 (88)使用Widgets (90)編輯使用Ajax (93)TabPanel基础 (96)Step 1: 创建HTML 骨架 (96)Step 2: Ext结构的构建 (97)Step 3: 创建Tab控制逻辑 (99)EXT简介无论你是Ext库的新手,抑或是想了解Ext的人,本篇文章的内容都适合你。
- 1、下载文档前请自行甄别文档内容的完整性,平台不提供额外的编辑、内容补充、找答案等附加服务。
- 2、"仅部分预览"的文档,不可在线预览部分如存在完整性等问题,可反馈申请退款(可完整预览的文档不适用该条件!)。
- 3、如文档侵犯您的权益,请联系客服反馈,我们会尽快为您处理(人工客服工作时间:9:00-18:30)。
Expression Blend实例中文教程开篇随着计算机软件开发分工细节化,微软对已有的产品线进行了调整,在保持原有经典开发工具Visual Studio基础上,又推出了一套新的设计开发工具系列,Expression Studio。
Expression Studio设计工具系列包含四项主要产品:•Expression BlendExpression Blend(下称Blend),是一款用于设计桌面和Web应用用户界面的可视化工具。
用户可以通过拖拉控件方式创建用户交互界面;另外Blend中,包含一款软件原型建模工具SketchFlow,该工具允许用户快速开发出专业的项目原型,创建设计原型后,以丰富的界面效果展示给客户,该工具将在后文详细讲述。
•Expression DesignExpression Design(下称Design),是一款专业的图形图像设计编辑工具,主要是为项目美工设计人员准备,如果你对Photoshop,Fireworks或者Illustrator熟悉,可以把Design看做同类产品,其中使用原理大部分都是相同的,而Design的优势是可以和Blend完美无缝结合,创建图形后,可以直接转换成为XAML,供Blend调用,由于本系列教程是讲述 Blend,这里就不再对Design过多描述,在后文用到时,我们将详细讲述。
•Expression EncoderExpression Encoder(下称Encoder)是一款专业的视频编辑工具,开发人员可以使用该工具编辑视频项目,并发布到Web服务器,Silverlight项目可以在应用中进行高质量播放调用。
由于本系列教程是讲述 Blend,这里就不再对Encoder过多描述,在后文用到时,我们将详细讲述。
•Expression WebExpression Web(下称Web),是一款专业的Web页面设计工具。
如果您对Dreamweaver熟悉,可以把Web看做同类产品。
Web允许开发人员通过即见即所得的模式,设计和开发符合Web标准的网站。
由于本系列教程是讲述 Blend,这里就不再对Web过多描述,在后文用到时,我们将详细讲述。
既然本系列文章讲述Blend,我想我们应该多了解一些Blend方面的知识。
我们一直在说Blend强大,具体它强大在哪里呢?首先作为交互性设计工具,Blend解决了传统开发中开发人员和设计人员配合不容易协调的瓶颈。
无论是桌面应用还是Web应用,越来越注重用户体验性,而程序代码设计和美工设计也逐渐被细分化,而两者在项目中的配合是至关重要的,相信有不少开发人员都有过相同的经历和感触,程序开发人员和美工设计人员一遍又一遍的修改框架希望能够达到完美匹配。
Blend正是针对该问题推出了一系列的解决方案,例如,在Blend中编辑Silverlight或WPF项目UI代码的同时,也会直接绑定到Visual Studio中,实现双向修改代码功能;在Blend 中,可以快速导入PhotoShop图形和Illustrator矢量图,方便项目UI设计。
其次,Blend是一款通用的设计工具,支持设计跨平台跨浏览器的Silverlight和WPF应用项目,为了简化设计人员的工作量,Blend支持一个简单的可重复利用的元素叫做行为(Behaviors),设计人员可以直接应用不同的行为到项目中,无需编写任何代码,例如,可以直接应用拖拉行为到项目,让项目支持拖拽控件。
在微软Expression官方网站,有大量的行为(Behaviors)代码下载,免费使用。
最后是快捷方便的设计方式,以及软件项目原型设计工具SketchFlow。
在Silverlight中, VisualStateManager的编辑是很复杂的,如果仅靠Visual Studio进行代码编辑,是非常浪费时间和精力的事情,如果使用Blend进行编辑,会大大的提高效率。
另外,使用Blend进行控件的样式和模板设计也是非常方便的,我们将在后文详细描述。
值得一提的是SketchFlow,该项目是现在为数不多的优秀建模工具之一。
使用该工具,开发人员可以快速的建立项目原型,以Silverlight的方式展示给客户或者项目团队成员,我们将在后文详细描述。
通过以上的描述,我们可以清楚明白,从事Silverlight和WPF项目开发,Blend 是必不可少的设计工具,学会了Blend会在开发过程中达到事半功倍的效果。
也正式以上的原因,才会有了本系列文章教程,本系列教程旨在为了让更多的开发人员了解和学习Expression Blend的使用,希望能够让更多的开发人员加入到Silverlight和WPF开发行列。
界面快速入门上一篇主要介绍Expression系列产品,另外概述了Blend的强大功能,本篇将用Blend 3创建一个新Silverlight项目,通过创建的过程,对Blend进行快速入门学习。
在开始使用Blend前,首先需要进行Silverlight的开发环境搭建,在银光中国网()有篇“轻松建立Silverlight开发环境”,其中列出了建立Silverlight开发环境的几个步骤,另外,我在过去发布过一篇“Silverlight开发工具集合”文章,也列出了Silverlight项目开发必装工具软件,这里对于开发环境的搭建,我就不再赘述。
Silverlight开发环境搭建成功后,我们将通过实例介绍Blend入门操作,我使用的Blend是英文版本,我将对照翻译成中文。
首先使用Blend按照以下步骤创建一个新的Silverlight项目,1. 点击左上角的“File - New Project”,这时会弹出一个新建项目窗口,如下图在上图可以看到Blend支持创建两个类型的项目,一个是Silverlight,另一个是WPF,本系列主要讨论Silverlight,所以,我们选择“Project Type-Silverlight”,在选中Silverlight类型后,在弹出窗口右边会出现四个项目模板,(1) Silverlight 3 Application + Website该选项是“创建Silverlight 3客户端应用其中包含Website项目”,选择该选项后,Blend会自动创建Web项目在同一个解决方案下,编译后运行,会在Web 项目中产生测试页面,在客户端显示Silverlight客户端。
(2) Silverlight 3 Application该选项是“创建Silverlight 3客户端应用”,选择该选项后,Blend仅创建Silverlight客户端,编译后,自动生成一个测试页面。
(3) Silverlight 3 Control Library该选项是“创建Silverlight控件类库”,选择该选项后,Blend会创建Silverlight空白类库,主要用于创建Silverlight自定义控件。
(4) Silverlight 3 SketchFlow Application该选项是“创建Silverlight 3 SketchFlow应用”,选择该选项后,Blend会创建Silverlight 3 SketchFlow应用。
在项目模板窗口下,是创建项目的名称,项目路径和项目后台语言支持。
本文将创建一个Silverlight 3 Application + Website + C#完整项目,方便以后解释项目细节。
创建新项目后,可以在Blend看到当前工作去,我将重要的几个部分添加了标识,下面详细描述各个部分的作用:A部分: 是菜单选项;B部分:是DockPanel菜单,鼠标点击后,会弹出对应的窗口,例如“对象和时间线”或者“项目管理”等;C部分:是工具面板菜单D部分:项目面板上图可以看出在SilverlightBlendDemo解决方案下,有两个项目:1. SilverlightBlendDemo: 该项目是Silverlight客户端项目,主要承载Silverlight客户端页面和控件;2. SilverlightBlendDemoSite: 该项目是Silverlight服务器端项目,主要承载服务器端代码,例如WCF Service或者DAL数据层代码;E部分:文档切换栏, 该栏目显示所有打开的项目文件,可以自由切换;F部分:主要工作区,叫做美工板,所有页面和控件设计都在该区域;G部分:视图和代码切换栏,该栏目提供三个选项,第一个是视图选项,第二个是代码选项,第三个是视图和代码同时显示选项;H部分:属性和资源选项栏,从这里可以设置控件属性和对应项目资源;I部分:使用该部分缩放F部分美工板,启动动画效果,设置控件对齐选项以及查看文件注释内容;以上窗口部件是创建项目后,默认显示的几个窗口,另外还有几个常见的窗口部件,也介绍一下:1. 首先介绍一下菜单扩展部分,当你把鼠标选中C部分菜单按钮,会弹出扩展菜单按钮,功能如下:2. 在扩展菜单中,最后一项是Silverlight资源工具按钮,点击选中后,会弹出以下窗口,其中包含所有控件,样式集合,行为代码集合以及动画效果和媒体文件集合。
在设计的时候,如果添加新控件,可以从这个选项进行选择。
3. Object and Timeline - 对象和时间线面板,可以使用该面板对页面控件对象进行分层管理,另外也可以对当前对象进行动画设计,详细动画设计,将在下文描述。
4. 属性设置面板,在上文H部分,我们介绍了属性和资源选项框,这里我把属性框单独列出来,在美工面板创建一个按钮控件后,选中该按钮,在属性面板中显示各种属性,例如背景,笔刷等等,从这个面板可以不用输入代码,直接设计控件属性。
5. 控件模板样式资源面板。
从该面板,选择设计控件样式。
6. 调试结果面板,在该面板显示调试错误信息和输出信息;今天写到这里了,下次继续写,下面是网友经常问的几个Blend问题,我做了统一回答,希望能帮到更多朋友。
常见的几个问题:为什么Blend中没有相对应的Silverlight控件?答:在Blend中没有Silverlight控件,需要确认是否安装Silverlight Tools for Visual Studio 2008 Sp1 和 Silverlight Toolkit控件扩展包,在Silverlight Tools中包含了基础控件包,而Silverlight Toolkit是扩展控件。
为什么Blend中没有智能提示功能?答:确认Blend的版本,在Blend2.5之前的版本,Blend不支持IntelliSense。
为什么Visual Studio 2008 Sp1没有Silverlight项目视图设计界面?答:从Silverlight 3开始,微软屏蔽了Visual Studio 2008 Sp1的Silverlight 项目视图设计功能,推荐使用Blend 3进行Silverlight项目视图设计。