MeasureMindPlus用户使用手册
用户手册

PLM软件使用手册第一部分项目 (3)1.添加项目 (3)2.为项目创建储存仓库 (3)3.修改项目属性 (4)4.删除项目 (4)5.浏览项目所有文档 (5)6.设置项目树显示内容和排序 (5)第二部分文档 (6)1.进入文档界面 (6)2.添加文件夹 (6)3.重命名文件夹 (7)4.删除文件夹 (7)5.更新本地缓存 (8)6.加文件到文件夹 (8)7.生命周期操作检出 (9)8.生命周期操作发布 (10)9.生命周期操作修订版本 (10)10.打开文件 (11)11.打开文件为修改 (11)12.浏览版本 (12)13.查看文档结构 (13)14.查看使用处 (13)15.查看文档审批记录 (14)16.查看文档的评语 (14)17.打开视图 (14)18.浏览文档内容 (15)19.BOM从文档 (15)第三部分产品 (16)1.进入产品界面 (16)2.添加顶层产品项 (16)3.添加产品子项 (17)4.修改产品项 (17)5.提升生命周期状态 (18)6.修订产品项 (18)7.产品项作废 (19)8.查看版本 (19)9.查看使用处 (20)10.查看文档 (20)第四部分材料 (21)1.进入材料库 (21)2.添加材料分类目录 (21)3.添加材质 (22)4.添加型材 (22)5.修改属性 (23)5.删除材料 (23)5.提升生命周期状态 (24)第五部分标准件 (25)1.进入标准件 (25)2.添加标准件分类 (25)3.添加标准件项 (26)4.修改标准件属性 (26)5.删除标准件 (27)6.为标准件项关联文档 (27)7.提升生命周期状态 (28)第六部分流程 (29)1.从文档启动审批流程 (29)2.改变流程图模板 (29)2.指定流程节点用户 (30)3.进入流程邮箱 (30)4.查看新收到的流程 (31)5.打开流程 (31)5.查看流程历史 (32)7.查看流程讨论 (32)8.添加讨论 (33)9.发送流程 (33)10.启动ECR流程 (34)11.添加文档到流程 (34)12.启动ECO流程 (35)第七部分其它 (35)1.修改用户口令 (36)2.查看日志 (36)第一部分项目1.添加项目2.为项目创建储存仓库每个项目拥有独立的储存空间,且必须唯一。
Measure-X Chinese 用户使用手册

用户使用手册目录第一章 简介1-1 相关文件 (3)1-2 技术支持和客户服务 (3)第二章 用户界面2-1 鼠标…………………………………………………………………………4Flash和Flare系统操纵杆 (4)2-2Smartscope5 2-3 软件界面.............................................................................. 2-4 影像视窗 (6)影像视窗工具栏 (6)2-5 模型视窗……………………………………………………………………7 模型视窗工具栏 (7)2-6 程序清单视窗 (8)程序清单工具栏 (8)2-7 数据打印输出视窗 (9)数据打印工具栏 (9)2-8 工具箱 (10)2-9 坐标和角度显示窗口 (11)2-10 光标和影像控制窗口 (11)第三章准备开始3-1 选择单位和坐标 (12)3-2 安置零件 (13)第四章应用测量光标4-1 特征寻找器的用法 (16)4-2 弱边缘器的用法 (18)4-3 强边缘器的用法 (19)4-4 聚焦光标的用法 (21)4-5 手动光标的用法 (22)第五章工件定位5-1Z轴零位设置 (25)XY轴零位设置和坐标轴对准 (26)5-25-3 工件设置提示 (27)第六章基准功能6-1 怎样定义Z轴基准零位 (29)6-2 怎样定义XY轴基准原点 (30)6-3 怎样定义基准坐标轴 (31)第七章创建测量程序7-1 创建新程序 (32)7-2 理解测量结果 (33)7-3 输入标准值和几何公差 (34)7-4 保存测量程序 (35)7-5 打开测量程序 (35)目录第八章测量功能8-1 测量点 (37)8-2 测量直线 (38)8-3 测量圆 (39)8-4 测量平面 (40)第九章构造功能9-1 构造直线 (41)9-2 构造圆 (42)9-3 构造宽度 (43)举例:两个圆之间的宽度9-4 构造交点 (44)举例:两个元素的交点9-5 构造距离 (45)举例:距离测量的三个例子第十章 运行测量程序10-1 程序运行选项 (48)测量选项 (48)步骤和重复选项 (49)运行情况 (49)10-2 运行超越选项 (50)打印超越选项 (50)10-3 中断测量程序 (52)第十一章 测量结果输出11-1 测量结果输出选项和存储路径 (53)11-2 怎样输出测量结果 (54)11-3 打印测量结果 (55)第十二章 编辑程序12-1删除最后一个步骤 (56)12-2 插入测量步骤 (57)12-3 删除测量步骤 (58)12-4 更改测量步骤 (59)12-5 复制测量步骤 (60)第一章简介本手册目的在于使用和创建Measure-X程序,它包括:z用户界面和软件工具使用的详细描述z基本的使用指导,怎样开始使用Measure-X, 怎样设置测量零件,怎样测量/构造元素,怎样创建/编辑/运行程序,和怎样输出测量结果1-1 相关文件除本手册外, OGP提供了下列与Measure-X相关的文件:z Measure-X Reference Guide (P/N 790230)z Standard Part for Measurements (P/N 790012), 用于测试和自学z Measure-X应用培训1-2 技术支持和客户服务OGP为您提供特定的服务和支援:z硬件的服务合约,包括一般的检查,维护和校准z软件的服务合约,包括产品软件的更新,协助应用上海技术支援和客户服务:Optical Gaging (S) Pte Ltd奥智品光学仪器(上海)有限公司地址:外高桥富特北路358号702室电话:(21)5868 0872传真:(21)5868 1431网址:ogpsg@.sg或访问新加坡技术支援和客户服务:Optical Gaging (S) Pte Ltd奥智品光学仪器(新加坡)有限公司地址:21Tannery Road Singapore 347733电话:(65)6741 8880传真:(65)6741 8998网址:ogpsg@.sg或访问美国技术支援和客户服务:Optical Gaging (S) Pte Ltd地址:850 Hudson Avenue Rochester, NY 14621-4896 USA电话:(585)544 0400传真:(585)544 8092网址:sales@或service@第二章 用户界面2-2 SmartScope Flash 和Flare 系统操纵杆旋转操纵杆顶部的旋钮可移动Z 轴可更改聚焦 -顺时针旋转旋钮升高Z 轴 -逆时针旋转旋钮降低Z 轴按Start/Stop[开始/停止]按钮: -停止系统并切断全部马达的电源 (紧急停止)-将系统带出紧急停止状态并重新开始操作按Enter 按钮接受测量的点用操纵杆移动平台的XY 方向:移动操纵杆左 右移动X 轴移动操纵杆上,下移动Y 轴正光 环光 背光可通过按住操纵杆顶部的按钮同时旋转旋钮来放大或缩小倍数第二章 用户界面2-3 用户界面界面如下所示分成不同的区域和窗口, 运用鼠标移动光标。
MeasureMax手册
双击MeasureMax图标
1、 Servo PWR ON
马达开启键
2、 E- stop
紧急停止键
3、 Joystick
方向操纵杆
4、 Record
记录数据
5、 Drive
记录路径
6、 X LOCK
X 轴锁定
7、 Y LOCK
Y轴锁定
8、 Z LOCK
Z轴锁定
9、 SLOW
慢速运行
10、PART
灯亮后, CMM按照工作座标系移动
MeasureMax软件 操作手册
Coordinate Measurement Machines
-------------------------------GIDDINGS & LEWIS®
目录
• 第一部分:硬件介绍及控制器的使用------------------------------- 3
使用者名称
输入密码
第一部分、MeasureMax控制中心
控制中心的菜单介绍
New和File下面的红苹果按钮一样,单击进入Quick Teach Edit是编辑现有的程序 Run运行已有的测量程序 Maintenance是对工件测量程序进行管理维护 List All Part Programs是打印所有的测量程序的名称 Exit是退出程序
单击Maintenance, 出现文件管理界面
博世rational combimaster
CombiMaster ® Plus / CombiMaster ®操作说明书原件2 / 107与品牌相符的全方位服务包。
我们希望您能从一开始就从您的投资中获取最大的收益。
持续整个产品生命周期,不增加额外的成本。
免费!- 现场指导我们在您自己的厨房向您的厨师展示我们的设备的工作原理,以及如何以最佳方式使用设备,满足您的全部特殊需求。
免费!- RATIONAL莱欣诺 ®遥控功能如果您的 SelfCookingCenter 膳酷盛 ®已与一个网络相连,则可使用iPhone 轻松控制并监控它。
由此可了解一切,始终知道设备中正在执行的步骤。
只需简单登录免费!- Chef✆Line®只要您对设备的使用或者菜谱有任何问题,我们都乐于在电话中为您提供咨询。
快速、简捷,厨师对讲,365 天全年无休。
Chef✆Line 联系方式电话 +49 (0) 81 91/327 561。
3 / 107RATIONAL SERVICE-PARTNER我们的设备可靠且耐用。
然而,即便出现了技术难题,RATIONAL SERVICE-PARTNER 也会快速提供帮助。
包括得到保证的备件供应和周末紧急服务: 电话 +49 (0) 81 91/327 666.2 年保修我们提供 24 个月保修,从设备初次安装之日开始计算。
前提是:您在我们这里正确且完整地登记了您的设备。
可以在 /warranty 下简单地在线登记或通过随附的邮寄卡登记。
玻璃、灯泡和密封材料的损坏以及由不当安装、使用、养护、维修和除钙而导致的损坏不在保修范围之内。
只需简单登录/warrantyCombiMaster – 超强动力设备尊敬的用户:购买CombiMaster ® Plus是您的明智之选!全新的CombiMaster ® Plus 代表着成熟的技术、卓越的食品加工质量并展现令人惊叹的、能随时实现绝佳食品品质的强大功能: 松脆的脆皮烤,多汁的烤肉,浓郁的香味和色泽。
ChineseMeasureMind 操作手册

Optical Gaging Products Inc. MeasureMind三维多重传感器用户使用手册目录_____________________________________________________________________第一章MeasureMind三维多重传感器1-1什么是 MeasureMind三维多重传感器? ----------------------------------1 1-2技术支援和客户服务 --------------------------------------------------------1第二章用户界面2-1鼠标器 --------------------------------------------------------------------------2 2-2控制板 --------------------------------------------------------------------------2 2-3操纵杆 --------------------------------------------------------------------------3 2-4影像窗口 -----------------------------------------------------------------------4 2-5模型窗口 -----------------------------------------------------------------------4 2-6工具箱 --------------------------------------------------------------------------5 2-7光标和影像控制窗口 --------------------------------------------------------5 2-8坐标和角度显示窗口 --------------------------------------------------------6第三章准备开始3-1选择单位和坐标 --------------------------------------------------------------7 3-2安置零件 -----------------------------------------------------------------------8第四章应用测量光标4-1对准光标 -----------------------------------------------------------------------9 4-2边缘分析光标 ----------------------------------------------------------------10 4-3聚焦光标 ----------------------------------------------------------------------14第五章零件设置----------------------------------------------------------------------16第六章基准功能6-1怎样定义基准平面 ----------------------------------------------------------18 6-2怎样定义基准原点 ----------------------------------------------------------19 6-3怎样定义基准对准 ----------------------------------------------------------20第七章创造程序7-1创造新程序 -------------------------------------------------------------------21 7-2了解测量结果 ----------------------------------------------------------------21 7-3输入公称值和公差 ----------------------------------------------------------22 7-4存盘测量程序 ----------------------------------------------------------------22 7-5打开已存盘的测量程序 ----------------------------------------------------23第八章测量功能8-1测量点 -------------------------------------------------------------------------24 8-2测量直线 ----------------------------------------------------------------------25 8-3测量圆或圆弧 ----------------------------------------------------------------26 8-4测量平面 ----------------------------------------------------------------------27目录_____________________________________________________________________第九章构造功能9-1构造直线 ----------------------------------------------------------------------28 9-2构造圆 -------------------------------------------------------------------------29 9-3构造宽度 ----------------------------------------------------------------------30 9-4构造距离 ----------------------------------------------------------------------31 9-5构造交点 ----------------------------------------------------------------------32第十章运行测量程序10-1运行当前的测量程序 -------------------------------------------------------33 10-2停止测量程序 ----------------------------------------------------------------33 10-3运行选项 ----------------------------------------------------------------------34 10-4运行超越选项 ----------------------------------------------------------------35 10-5打印超越选项 ----------------------------------------------------------------35第十一章测量结果11-1测量输出选项和目的地 ----------------------------------------------------36 11-2怎样输出测量结果到打印机 ----------------------------------------------36 11-3懂得送去打印机的测量结果 ----------------------------------------------37第十二章编辑功能12-1删除最后一个步骤 ----------------------------------------------------------38 12-2插入步骤 ----------------------------------------------------------------------39 12-3删除步骤 ----------------------------------------------------------------------40 12-4更改步骤 ----------------------------------------------------------------------41 12-5复制步骤 ----------------------------------------------------------------------42第十三章测量提示13-1快速测量和运行测量程序的提示 ----------------------------------------43 13-2更准确和好的重复性的测量的提示 -------------------------------------43第一章MeasureMind三维多重传感器____________________________________________________________________ 1-1什么是MeasureMind三维多重传感器 ?MeasureMind三维多重传感器是OGP的第一流的32位测量软件,它包括:¾测量三维特征的功能,例如圆柱体,圆锥,球体和平面。
平板实时成像软件使用手册

平板实时成像系统软件使用手册丹东奥龙射线仪器有限公司目录第一章 PerkinElmer安装步骤 (3)1.1 采集卡驱动安装 (3)1.2 图像采集软件安装 (6)第二章软件安装 (11)2.1 平板实时成像软件安装 (11)2.2 产品认证硬件狗驱动安装 (13)第三章软件功能介绍 (15)3.1 软件启动 (15)3.2 图像处理模块 (15)3.2.1 编辑模块 (16)3.2.2 工具模块 (16)3.2.3 视图模块 (22)3.2.4 图像处理模块 (26)3.2.5 查看模块 (28)3.2.6 窗口模块 (29)3.3 图像采集模块 (30)3.3.1 采集模式 (31)3.3.2 偏置建模 (31)3.3.3 增益建模 (31)3.3.4 图像采集 (32)第一章PerkinElmer安装步骤1.1 采集卡驱动安装1、把计算机所有电源断开,打开主机箱侧盖,检查是否有空的PCI插槽,如果没有请采取措施,如更换计算机主机或是拔掉占用PCI插槽的其他不重要板卡。
2、将硬件——图像采集卡安装到计算机主机的空PCI插槽内,并用螺钉紧固,以防松动,关闭主机箱侧盖。
3、安装完硬件,接通计算机所有电源,按动主机箱开机按钮,计算机上电启动,进入操作系统,以Windows XP为例。
4、打开计算机“设备管理器”会看到如图1.1所示,说明“图像采集卡”计算机已经检测到。
电脑随后会弹出找到新硬件向导,如图1.2所示。
图1.1 设备管理器图1.2 新硬件驱动安装向导5、安装“图像采集卡”驱动程序,将Digital X-Ray Imaging Technology光盘《X-Ray Imaging Software XIS》放入光驱中,选择上图中的“自动安装软件(推荐)(I)”选项,单击“下一步”。
如图1.3所示。
图1.3 新硬件驱动安装向导7、出现图1.4画面,点击“完成”。
图1.4 新硬件驱动安装向导12、再次进入“设备管理器”,硬件及软件安装都正确无误,会看到图1.5画面,驱动程序安装完毕。
PowerINSPECT4.0--使用手册(中文)

曲面
23
曲面:综述 ...................................................................................... 23 单击鼠标选择曲面 ....................................................................... 23 突出显示背面曲面 ....................................................................... 24 反转曲面的方向 ........................................................................... 26
显示标注
18
显示标注: 综述 ............................................................................. 18 显示环绕标注 ............................................................................... 18 操作 CAD 查看时查看环绕标注................................................. 20 显示定位标注 ............................................................................... 21
马克特 Easy 1-2-3 安装Measure 使用指南说明书
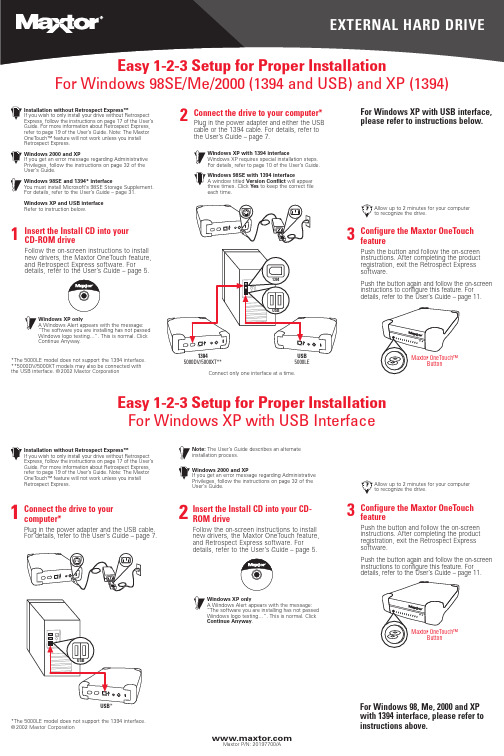
For Windows 98SE/Me/2000 (1394 and USB) and XP (1394)13945000DV/5000XT**USB 5000LE1394USBMaxtor OneTouch™Button*The 5000LE model does not support the 1394 interface.**5000DV/5000XT models may also be connected with the USB interface. ©2002 Maxtor Corporation3Configure the Maxtor OneTouch featurePush the button and follow the on-screen instructions. After completing the product registration, exit the Retrospect Express software.Push the button again and follow the on-screen instructions to configure this feature. For details, refer to the User’s Guide – page 11.2Connect the drive to your computer*Plug in the power adapter and either the USB cable or the 1394 cable. For details, refer to the User’s Guide – page 7.1Insert the Install CD into your CD-ROM driveFollow the on-screen instructions to install new drivers, the Maxtor OneTouch feature,and Retrospect Express software. Fordetails, refer to the User’s Guide – page 5.Windows XP with 1394 interfaceWindows XP requires special installation steps.For details, refer to page 10 of the User’s Guide.Windows 98SE with 1394 interfaceA window titled Version Conflict will appear three times. Click Yes to keep the correct fileeach time.Installation without Retrospect Express™If you wish to only install your drive without Retrospect Express, follow the instructions on page 17 of the User’s Guide. For more information about Retrospect Express,refer to page 19 of the User’s Guide. Note: The MaxtorOneTouch™ feature will not work unless you install Retrospect Express.Windows 2000 and XPIf you get an error message regarding AdministrativePrivileges, follow the instructions on page 32 of the User’s Guide.Windows 98SE and 1394* interfaceYou must install Microsoft’s 98SE Storage Supplement.For details, refer to the User’s Guide – page 31.Windows XP and USB interfaceRefer to instruction below.Windows XP onlyA Windows Alert appears with the message:“The software you are installing has not passed Windows logo testing…”. This is normal. Click Continue Anyway.For Windows XP with USB interface,please refer to instructions below.Connect only one interface at a time.Allow up to 2 minutes for your computer to recognize the drive.USB*USB*The 5000LE model does not support the 1394 interface.©2002 Maxtor Corporation2Insert the Install CD into your CD-ROM driveFollow the on-screen instructions to install new drivers, the Maxtor OneTouch feature,and Retrospect Express software. Fordetails, refer to the User’s Guide – page 5.1Connect the drive to your computer*Plug in the power adapter and the USB cable.For details, refer to the User’s Guide – page 7.Installation without Retrospect Express™If you wish to only install your drive without Retrospect Express, follow the instructions on page 17 of the User’s Guide. For more information about Retrospect Express,refer to page 19 of the User’s Guide. Note: The Maxtor OneTouch™ feature will not work unless you install Retrospect Express.Windows XP onlyA Windows Alert appears with the message:“The software you are installing has not passed Windows logo testing…”. This is normal. Click Continue Anyway.For Windows 98, Me, 2000 and XP with 1394 interface, please refer to instructions above.Windows 2000 and XPIf you get an error message regarding Administrative Privileges, follow the instructions on page 32 of the User’s Guide.Note:The User’s Guide describes an alternate installation process.Easy 1-2-3 Setup for Proper Installation For Windows XP with USB InterfaceMaxtor OneTouch™Button3Configure the Maxtor OneTouch featurePush the button and follow the on-screen instructions. After completing the product registration, exit the Retrospect Express software.Push the button again and follow the on-screen instructions to configure this feature. For details, refer to the User’s Guide – page 11.Allow up to 2 minutes for your computer to recognize the drive.FireWire 5000DV/5000XT**USB 5000LEFireWireUSBFor Macintosh (FireWire ®and USB)3Configure the Maxtor OneTouch featurePush the button and follow the on-screen instructions to configure this feature. For details, refer to the User’s Guide – page 11.2Connect the drive to your computer*Plug in the power adapter and either the USB cable or the FireWire cable. For details, refer to the User’s Guide – page 7.1Insert the Install CD into your CD-ROM driveTo install new drivers, the Maxtor OneTouch feature, and Retrospect Express software,insert the Install CD, open the CDs icon and double-click the Install Retrospect Express icon. For details, refer to the User’s Guide –page 6.Installation without Retrospect Express™If you wish to only install your drive without Retrospect Express, follow the instructions on page 17 of the User’s Guide. For more information about Retrospect Express,refer to page 19 of the User’s Guide. Note: The Maxtor OneTouch feature will not work unless you install Retrospect Express.MaxtorOneTouch ™ButtonThe following Software License Agreement (“License”) for one licensed copy of the Maxtor Personal Storage Software (the “Software”) applies to you. By opening the sealed packet containing the Software, you indicate your acceptance of this License.This is a legal agreement between you (“You”) and Maxtor Corporation (“Maxtor”). By open-ing the sealed package and/or by using the Software you agree to be bound by the terms of this License. If you do not agree to the terms of this License, promptly return the Software,together with the unused Maxtor Personal Storage disk drive product (“Maxtor Personal Storage Disk Drive”) packaged with the Software, in their original sealed packaging, to the place you acquired the Software for a full refund.1.License . The Software is licensed and not sold. Maxtor grants to you a personal, nonexclusive license to Use the Software only on a computer that is directly or indirectly coupled to, and only for operation in conjunction with, one or more Maxtor Personal Storage Disk Drives. “Use” means storing, loading,installing, executing or displaying the Software. You may not modify the Software or disable any licensing or control features of the Software. You are obtaining no rights in the Software except those given in this limited license.2.Ownership . The Software, together with all intellectual property rights embodied therein, is owned by Maxtor and/or its third party suppliers and the Software is protected by United States copyright laws and international treaties. Your license confers no title or ownership in the Software. Maxtor’s third party suppliers may protect their rights in the event of any violation of this License.3.Copies . You may make one copy of the Software for backup or archival purposes, or when copying is an essential step in the authorized Use of the Software. You must reproduce all copyright notices in the orig-inal Software on all copies. You may not copy the Software onto any bulletin board or similar system, nor can you copy the user documentation provided with the Software except for your own authorized use. 4.Restrictions on Use . The Software contains copyrighted material, trade secrets, and other proprietary material of Maxtor and its suppliers. You are not permitted to (i) modify, adapt, translate, decompile, dis-assemble or otherwise reverse engineer the Software or reduce the Software to human-readable form by any means whatsoever; (ii) remove any identification, copyright or other notices from the Software; (iii)create a derivative work of any part of the Software; or (iv) rent, lease, loan or distribute the Software in whole or in part.5.Transfer . Your license will automatically terminate upon any transfer of the Software. Upon transfer, you must cease all use and deliver the Software, including any copies and related documentation, to the transferee. The transferee must accept and be bound by this License as a condition of the transfer. 6.Third Party Software . The media containing the Software includes third software products (“Third Party Software”) which require that you enter into a separate license agreement with the publisher of such software in conjunction with your original installation. You understand that your use of the Third Party Software is governed by the terms of that end user license agreement and not by this License, and you agree to abide by that third party license agreement.7.Termination . Maxtor may terminate your license upon notice of failure to comply with any of the terms of this License. Upon termination, you must immediately destroy the Software, together with all copies thereof. The disclaimers in Sections 8 and 9 and the provisions of Sections 6, 10, 11 and 12 shall survive any termination.8.Limited Warranty . Maxtor warrants that the media on which the Software is distributed will be free from damage or physical defects at the time of first distribution to you. If the damaged or defective media is returned to Maxtor (postage prepaid) within ninety (90) days from the date of delivery of the Software to you, then Maxtor will provide you with a replacement copy at no cost. Your sole and exclusive remedy in the event of breach of this warranty will be that Maxtor will, at its option, replace any defective media returned to Maxtor within the warranty period or refund the money you paid attributable to the Software.Except for the foregoing, Maxtor is licensing the Software to you “as is.” Neither Maxtor nor its suppliers warrant that the Software will meet your requirements or that the operation of the Software will be unin-terrupted or that the Software will be error-free. THE ABOVE WARRANTY IS EXCLUSIVE AND IN LIEU OF ALL OTHER WARRANTIES OR CONDITIONS, WHETHER EXPRESS, IMPLIED OR STATUTORY , INCLUD-ING, WITHOUT LIMITATION, ANY IMPLIED WARRANTY OR CONDITION OF MERCHANTABILITY , FIT-NESS FOR A PARTICULAR PURPOSE OR NONINFRINGEMENT OF THIRD PARTY RIGHTS. Some juris-dictions do not allow the exclusion of implied warranties or limitations on how long an implied warranty may last, so the above limitations may not be applicable to you. This limited warranty provides specific legal rights. Other rights may vary from jurisdiction to jurisdiction.9.Limitation of Liability . EXCEPT TO THE EXTENT PROHIBITED BY LOCAL LAW OR FOR BODILYINJURY , IN NO EVENT SHALL MAXTOR OR ITS SUBSIDIARIES, AFFILIATES OR SUPPLIERS, BE LIABLE FOR ANY DIRECT, CONSEQUENTIAL, SPECIAL, INCIDENTAL, OR INDIRECT DAMAGES OF ANY KIND (INCLUDING, WITHOUT LIMITATION, ANY LOSS OF DATA, LOSS OF PROFITS OR DOWNTIME COSTS)ARISING OUT OF THE USE OF , INABILITY TO USE, OR THE RESULTS OF USE OF , THE SOFTWARE,WHETHER BASED IN WARRANTY , CONTRACT, TORT OR OTHER LEGAL THEORY , AND WHETHER OR NOT ADVISED OF THE POSSIBILITY OF SUCH DAMAGES. IN NO EVENT SHALL THE TOTAL LIABILITY OF MAXTOR OR ITS SUPPLIERS FOR ALL DAMAGES, LOSSES, AND CAUSES OF ACTION EXCEED THE AMOUNT PAID BY YOU FOR THE SPECIFIC MAXTOR PRODUCT TO WHICH THE LIABILITY IS RELATED. Some jurisdictions do not allow the exclusion or limitation of liability for incidental or conse-quential damages, so the above limitation may not apply to you.10.Export Restrictions . Y ou agree and certify that neither the Software nor any technical data received from Maxtor, nor the direct product thereof, will be exported outside the United States except as authorized and as permitted by the laws and regulations of the United States. If the Software has been rightfully obtained byyou outside the United States, you agree that you will not re-export the Software nor any other technical data received from Maxtor, nor the direct product thereof, except as permitted by the laws and regulations of the United States and the laws and regulations of the jurisdiction in which you obtained the Software.11.Government Restricted Rights . The Software is provided with RESTRICTED RIGHTS. The Software is a commercial software product, licensed on the open market, and was developed entirely at private expense and without government funds. Any use, modification, reproduction, release, performance, display, or dis-closure of the Software by any government entity shall be governed solely by the terms of this License and shall be prohibited except to the extent expressly provided under this License. No license to theSoftware is granted to any government entity requiring different terms. Use, duplication, or disclosure by the U.S. Government is subject to restrictions as set forth in subparagraph (c)(1)(ii) of the Rights inTechnical Data and Computer Software clause at DFARS 252.227-7013 or subparagraphs (c)(1) and (2) of the Commercial Computer Software – Restricted Rights clause at 48 CFR 52.227-19, as applicable.Manufacturer is Maxtor Corporation, 500 McCarthy Blvd., Milpitas, CA 95035.12.General . This License will be governed by the laws of the State of California, as applied to agreementsentered into and to be performed entirely within California between California residents, without regard to principles of conflicts of laws. Application of the United Nations Convention on Contracts for theInternational Sale of Goods is expressly disclaimed. This License may only be modified by a written docu-ment which has been signed by both you and Maxtor. Should any provisions of this License be declared invalid by any court of competent jurisdiction, the balance of the License will remain in full force and effect.This is the entire agreement between you and Maxtor, and supersedes any prior agreement, whether writ-ten or oral, relating to the subject matter of this License.Software License Agreement Maxtor Personal Storage ™SoftwareIMPORTANT – READ CAREFULLY BEFORE OPENING SOFTWARE PACKETMacintosh OS 9 and OS XMaxtor requires that you re-format your drive with the Mac OS Extended format for proper operation. For details, refer to the User’s Guide – page 14.Macintosh OS XOS X will not recognize the original format of the drive. After you connect the drive, an alert box appears. Select Initialize to begin the OS X Disk Utility . Select the Erase tab in Disk Utility . Format the drive for Mac OS Extended . For details, refer to the User’s Guide – page 16.*The 5000LE model does not support the FireWire interface.**5000DV/5000XT models may also be connected with the USB interface. ©2002 Maxtor Corporation。
- 1、下载文档前请自行甄别文档内容的完整性,平台不提供额外的编辑、内容补充、找答案等附加服务。
- 2、"仅部分预览"的文档,不可在线预览部分如存在完整性等问题,可反馈申请退款(可完整预览的文档不适用该条件!)。
- 3、如文档侵犯您的权益,请联系客服反馈,我们会尽快为您处理(人工客服工作时间:9:00-18:30)。
Optical Gaging Products Inc. MeasureMind三维多重传感器用户使用手册目录_____________________________________________________________________第一章MeasureMind三维多重传感器1-1什么是 MeasureMind三维多重传感器? ----------------------------------1 1-2技术支援和客户服务 --------------------------------------------------------1第二章用户界面2-1鼠标器 --------------------------------------------------------------------------2 2-2控制板 --------------------------------------------------------------------------2 2-3操纵杆 --------------------------------------------------------------------------3 2-4影像窗口 -----------------------------------------------------------------------4 2-5模型窗口 -----------------------------------------------------------------------4 2-6工具箱 --------------------------------------------------------------------------5 2-7光标和影像控制窗口 --------------------------------------------------------5 2-8坐标和角度显示窗口 --------------------------------------------------------6第三章准备开始3-1选择单位和坐标 --------------------------------------------------------------7 3-2安置零件 -----------------------------------------------------------------------8第四章应用测量光标4-1对准光标 -----------------------------------------------------------------------9 4-2边缘分析光标 ----------------------------------------------------------------10 4-3聚焦光标 ----------------------------------------------------------------------14第五章零件设置----------------------------------------------------------------------16第六章基准功能6-1怎样定义基准平面 ----------------------------------------------------------18 6-2怎样定义基准原点 ----------------------------------------------------------19 6-3怎样定义基准对准 ----------------------------------------------------------20第七章创造程序7-1创造新程序 -------------------------------------------------------------------21 7-2了解测量结果 ----------------------------------------------------------------21 7-3输入公称值和公差 ----------------------------------------------------------22 7-4存盘测量程序 ----------------------------------------------------------------22 7-5打开已存盘的测量程序 ----------------------------------------------------23第八章测量功能8-1测量点 -------------------------------------------------------------------------24 8-2测量直线 ----------------------------------------------------------------------25 8-3测量圆或圆弧 ----------------------------------------------------------------26 8-4测量平面 ----------------------------------------------------------------------27目录_____________________________________________________________________第九章构造功能9-1构造直线 ----------------------------------------------------------------------28 9-2构造圆 -------------------------------------------------------------------------29 9-3构造宽度 ----------------------------------------------------------------------30 9-4构造距离 ----------------------------------------------------------------------31 9-5构造交点 ----------------------------------------------------------------------32第十章运行测量程序10-1运行当前的测量程序 -------------------------------------------------------33 10-2停止测量程序 ----------------------------------------------------------------33 10-3运行选项 ----------------------------------------------------------------------34 10-4运行超越选项 ----------------------------------------------------------------35 10-5打印超越选项 ----------------------------------------------------------------35第十一章测量结果11-1测量输出选项和目的地 ----------------------------------------------------36 11-2怎样输出测量结果到打印机 ----------------------------------------------36 11-3懂得送去打印机的测量结果 ----------------------------------------------37第十二章编辑功能12-1删除最后一个步骤 ----------------------------------------------------------38 12-2插入步骤 ----------------------------------------------------------------------39 12-3删除步骤 ----------------------------------------------------------------------40 12-4更改步骤 ----------------------------------------------------------------------41 12-5复制步骤 ----------------------------------------------------------------------42第十三章测量提示13-1快速测量和运行测量程序的提示 ----------------------------------------43 13-2更准确和好的重复性的测量的提示 -------------------------------------43第一章MeasureMind三维多重传感器____________________________________________________________________ 1-1什么是MeasureMind三维多重传感器 ?MeasureMind三维多重传感器是OGP的第一流的32位测量软件,它包括:¾测量三维特征的功能,例如圆柱体,圆锥,球体和平面。
¾三维线框模式,它有选择地显示测量特征,公称特征或原始数据点,三维模式也包括了正视和斜视图,互动旋转和放大。
¾三维基准的定义是按照工业标准 3-2-1方向,它包括基准(由任何平面),次基准(旋转)和第三基准(原点)。
MeasureMind三维多重传感器设计为使用多重传感器系统并支援多种采取数据传感器,你可用光学系统,或影像接触探针,或激光的附件来测量二维和三维特征。
1-2技术支援和客户服务OGP提供为你特定的服务和支援:¾硬件的服务合约,包括一般检查,维护和校准。