可编程键盘用户手册
6160键盘调试手册

6160键盘简易编程操作手册一、设置6139编程键盘地址为01开机同时按1 3键5秒,键盘显示Addr=31或Addr=xx,输入01按*键盘绿灯亮,显示***DISARMED***READT TO ARM键盘地址不为01时,不能编程,6148键盘不能编程二、设置每个防区(一)设置电路板上接线(Hardwire)防区,以001防区为例,先将随机配的2K电阻按接线图接在VISTA—120的端子上进入编程模式输入4140 8000 (4140为出厂设置的安装员密码)在加电的30秒内同时按*和#进入编程模式键盘显示:Program Mode*Fill #View按*93 键盘显示:ZONE PROG1=TES 0=NO按1进入防区编程键盘显示:ENTER ZONE NO.000=QUIT 001输入001(以001防区为例)按*键盘显示:001 ZT P RC IN :L09 1 ——-—目前显示的是001防区的信息按*键盘显示:001 ZONE RESPONSEFire 09目前001防区为火警防区,请根据具体情况输入防区类型的编号编号00-无用防区。
编号01—出入口防区1型,布防时有延时,进入时有延时,延时时间由*09和*10定;编号02-出入口防区2型,布防时有延时,进入时有延时,延时时间由*11和*12定;编号03-周边防区,布防时有效,撤防时无效;(无延时)编号04—内部防区,留守布防时无效,外出布防时有效,撤防时无效;编号06—24小时无声防区;编号07-24小时有声防区;编号09—火警防区;其他防区类型的编号请参照英文手册。
输入03 键盘显示:001 ZONE RESPONSEPERIMETER 03001 定为设定周边防区按* 键盘显示:001 PARTITION1001 所属第一子系统(划分多个子系统时,输入该防区的子系统号)按*键盘显示:001 REPORT CODE1st00 2nd 00 00此项设定001防区通讯码,1st输入11向第一报警中心发送报警信息2nd输入11向第二报警中心发送报警信息按*键盘显示:001 INPUT TYPEHardwire 01此项设定001防区的接入类型,请输入防区接入类型的编号:按*键盘显示:001 ZT P RC IN :L03 1 -- HW 1目前显示的是001防区的信息按* 键盘显示:ENTER ZONE NO .000=QUIT 002输入下一个防区的信息,如果不输入下一个防区的信息,(002—009防区不用时应防区类型输入00)输入000*返回键盘显示: QUIT MENU MODE ?1=YES 0=NO 0输入1返回键盘显示:Program Mode*Fill #View-00输入*99返回键盘绿灯亮,显示:***DISARMED***READY TO ARM主机开始自检,约两分钟后,键盘绿灯亮的情况下,可以布防,试验001防区输入4140 2 进入外出延时布防,键盘蜂鸣器响,将联接001防区的端子上的2K电阻拆下,主机将报警,键盘显示:ALARM 001 表示001防区报警。
KB77 可编程键盘 用户手册

KB77可编程键盘用户手册中科英泰商用系统股份有限公司2014.8一、产品概述本产品为黑色薄膜式可编程键盘,提供77个可编程按键,包含12个数字按键和六段电子锁功能。
默认选配置磁卡阅读器(可不选配)。
通过电缆线键盘可支持PS2和USB接口切换。
1. 物理特性●重量:键盘1045g电缆线83g配件包(钥匙组件+透明键帽玻璃罩)12g●主体材质: ABS●尺寸(L*W*H):键盘364*155*50mm●行程:总行程---- 4.0-0.4mm,预行程----2±0.6mm2. 电气特性●电压: 5V(DC)±5%●电流:≤100mA●绝缘电阻:>50MΩ●接触电阻:<1KΩ3.键盘特性●按键压力:55±25cN (从键帽中央部分按下)●按键寿命: 1000万次●任意键均可进行编程设计。
●提供多层键功能,可将不同的字符串定义到同一键上。
●每个键最多可编程255个字符。
●提供延时码功能,最多能延时255秒。
●无需电池,数据保存不少于100年。
●PS2接口有扩充接口,可接入标准键盘。
●USB接口,支持DOS, Win9X, Me, Win2K,XP操作系统。
4. 磁卡阅读器特性:●符合ISO7811标准●刷卡速度——10~120cm/s●寿命≥500000次●磁条矫顽力范围:300~4000 Oe●磁条密度:第1轨210BPI;第2轨75BPI;第3轨210BPI●可用配置:1轨或2轨或3轨;1、2轨;2、3轨;1、2、3轨●电源:5VDC5. 电子锁特性:●6段电子锁●寿命:≥30000次,●扭力:1.5 kgf●三种钥匙权限。
(钥匙“S”控制3个档位;“Z”控制5个档位;“P”控制6个档位)6. 环境特性:●工作环境温度:0℃— +40℃●保存温度: -40℃— +55℃●工作湿度: 40%-90%●气压: 86—106kpa二、键盘设置程序的安装键盘设置程序适用系统:Windows98/2000/XP/71. 打开安装程序所在的文件夹。
WINTEC-KB66U可编程键盘用户手册

KB66U可编程键盘用户手册一.程序安装⒈先运行setup.exe程序,然后出现以下对话框。
按“Next”键继续⒉同意协议与否选择对话框,“Yes”键继续。
⒊用户信息确认对话框,按“Next”键继续⒋安装路径对话框,选择目标文件夹,然后按“Next”键继续。
⒌拷贝文件对话框,按“Next”键继续。
⒍提示重启计算机对话框,按”Finish”重启后设置生效。
二.键盘的编程软件1.选择键盘当运行程序时会出现以下对话框:选择所想编程的产品类型,然后按“确定”键确定。
2. 编辑键码拖动鼠标,使鼠标指在键盘的某一个按钮上,当按钮颜色变成灰黑色时就可以对此按钮编程了。
在可编程的按键上点击鼠标左键,会弹出一个滑行菜单。
这时可以用“Key Code”的方式给按键赋值,或者“ASCII CODE”的方式给按键赋值。
,你还可以点击滑行菜单条中“Clear”来清除已赋的码值,给一个按键赋值后,点击“Layer Index”来指定这个按键的键层。
Ⅰ.Key code在这种方式下,你能用任意扫描码给一个按键赋值在以上对话框的“键盘”画面上显示了最常用的键码,并在“Special Codes”区域列出了一些特殊码。
从“键盘”画面上选择一个键或双击“Special Codes”区域的某一项,则将其键码添加到“Mapping Sequence”目录中。
通过以上操作可以把8个码写入某一个键里面。
在这个画面上并不是任何键码(扫描码)都是可选的,但可以在“0x”下的方格内输入一个十六进制码,然后按“Insert”确定。
例如:如果在“键盘”区域按“Shift”、“H”、“E”、“Shift”、“L”、“L”以及“O”键,在上面对话框中的“Mapping Sequence”目录中就会显示这些键值。
如果在上面的“Mapping Sequence”目录中删除“O”项,你可以用鼠标右键单击“O”项,将弹出一个包含2 个选项的滑行菜单。
选择其中的“Delete”选项就可以删除“O”项内容;如果选择“Clear All”选项,就会把该目录中的所有内容删除。
远程键盘(RKD500-T RKD500)用户手册说明书
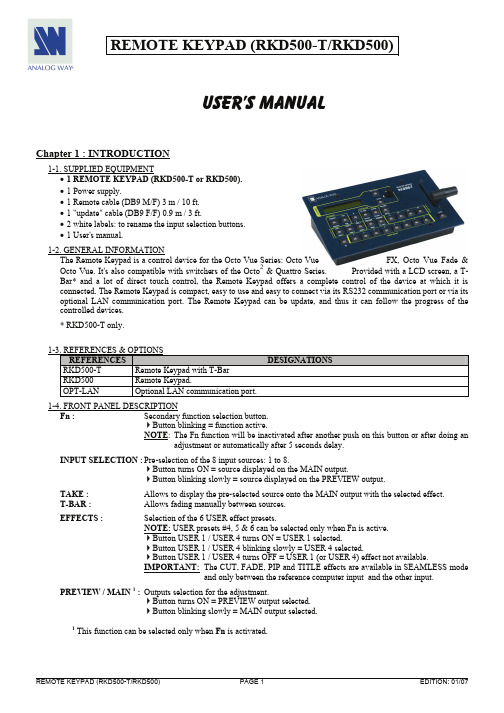
REMOTE KEYPAD (RKD500-T/RKD500)User’s ManualChapter 1 : INTRODUCTION1-1. SUPPLIED EQUIPMENT•1 REMOTE KEYPAD (RKD500-T or RKD500).• 1 Power supply.• 1 Remote cable (DB9 M/F) 3 m / 10 ft.• 1 "update" cable (DB9 F/F) 0.9 m / 3 ft.• 2 white labels: to rename the input selection buttons.• 1 User's manual.1-2. GENERAL INFORMATIONThe Remote Keypad is a control device for the Octo Vue Series: Octo Vue FX, Octo Vue Fade & Octo Vue. It's also compatible with switchers of the Octo2 & Quattro Series. Provided with a LCD screen, a T-Bar* and a lot of direct touch control, the Remote Keypad offers a complete control of the device at which it is connected. The Remote Keypad is compact, easy to use and easy to connect via its RS232 communication port or via its optional LAN communication port. The Remote Keypad can be update, and thus it can follow the progress of the controlled devices.* RKD500-T only.1-3. REFERENCES & OPTIONSREFERENCES DESIGNATIONSRKD500-T Remote Keypad with T-BarKeypad.RKD500 RemoteOPT-LAN Optional LAN communication port.1-4. FRONT PANEL DESCRIPTIONFn : Secondary function selection button.Button blinking = function active.NOTE: The Fn function will be inactivated after another push on this button or after doing anadjustment or automatically after 5 seconds delay.INPUT SELECTION : Pre-selection of the 8 input sources: 1 to 8.Button turns ON = source displayed on the MAIN output.Button blinking slowly = source displayed on the PREVIEW output.TAKE : Allows to display the pre-selected source onto the MAIN output with the selected effect.T-BAR : Allows fading manually between sources.EFFECTS :Selection of the 6 USER effect presets.NOTE: USER presets #4, 5 & 6 can be selected only when Fn is active.Button USER 1 / USER 4 turns ON = USER 1 selected.Button USER 1 / USER 4 blinking slowly = USER 4 selected.Button USER 1 / USER 4 turns OFF = USER 1 (or USER 4) effect not available.IMPORTANT:The CUT, FADE, PIP and TITLE effects are available in SEAMLESS modeand only between the reference computer input and the other input.PREVIEW / MAIN 1 :Outputs selection for the adjustment.Button turns ON = PREVIEW output selected.Button blinking slowly = MAIN output selected.1 This function can be selected only when Fn is activated.1-4. FRONT PANEL DESCRIPTION (continued)FREEZE : Freezes the MAIN or PREVIEW output (depending on the PREVIEW / MAIN button). BLACK 1 : Display a black screen on the MAIN or PREVIEW output (depending on the PREVIEW /MAIN button).Button turns ON = FREEZE activated.Button blinking quickly = BACK activated. NOTE : -The FREEZE will be inactivated after another push on the FREEZE button.-THE BLACK will be inactivated after another push on the BLACK button or afteranother pre-selection (PREVIEW).FRAME : Frames selection.Button turns ON = FRAME displayed on the MAIN output.Button blinking slowly = FRAME displayed on the PREVIEW output.PIP ADJUST.WINDOW :PIP window adjustment (Button turns ON). SOURCE 1 :PIP source adjustment (Button blinking quickly). POS :Position adjustment of the PIP window or PIP source (Button turns ON). SIZE 1 :Size adjustment of the PIP window or PIP source (Button blinking quickly). H :Horizontal adjustment of the PIP or logo : Adjust with the knob (Button turns ON). V 1 :Vertical adjustment of the PIP or logo : (Adjust with the knob ) (Button blinking quickly). LOGO ADJUST.#1 :Logo #1 selection for adjusting the position on the MAIN or PREVIEW output (depending on the PREVIEW / MAIN button). #2 :Logo #2 selection for adjusting the position on the MAIN or PREVIEW output (depending on the PREVIEW / MAIN button). ON/OFF 1 :Displays ON or displays OFF the logos # 1 & 2 on the MAIN or PREVIEW output (depending on the PREVIEW / MAIN button). VOLUME :Volume adjustment of the MAIN output (Adjust with the knob ).Button turns ON = Volume adjustment in progress. MUTE 1 : Audio mute of the MAIN output (Adjust with the knob).Button blinking slowly = Mute activated.Button turns OFF = Mute inactivated.CONTROLAllows to scroll thru the different menus (in Control mode).EXIT - MENU: Switches between Status and Control mode.ENTER: Validates a selected item.1 This function can be selected only when Fn is activated. 1-5. REAR PANEL DESCRIPTIONDC-IN : DC power connector.RS-232: RS-232 communication port.LAN : Optional LAN communication port.Chapter 2 : CONNECTING 2-1. CONNECTING THE RKD500 WITH THE RS-232 PORTc Turn OFF the controlled device (rear panel switch of the Octo / Quattro).d Connect the RS-232 connector (DB9 female) of the controlled device to the DB9 male connector of the REMOTE KEYPAD with the supplied DB9 M/F cable.e Turn ON the controlled device (rear panel switch). NOTE: The REMOTE KEYPAD is powered by the contolled device via its DB9 (RS-232) connector.- Speed transmission: 9600 bauds, 8 data bits, 1 stop bit, no parity bit, no flow control. - Pin-out: PIN # FUNCTIONS 2TRANSMIT DATA (Tx)3 RECEIVE DATA (Rx)5 GROUND (Gnd)2-2. CONNECTING THE RKD500 TO A NETWORK (LAN)c Connect the power supply to a power outlet and to the DC-IN connector (rear panel).d Connect the REMOTE KEYPAD to your network according to your installation.DB9 female (Rear panel of the controlled device)Chapter 3 : UPDATING THE REMOTE KEYPADThe REMOTE KEYPAD can be updated thanks a COMPUTER (PC) via its RS-232 communication port only.3-1. CONNECTIONSc Connect the "RS-232" connector of the REMOTE KEYPAD to the SERIAL port of your COMPUTER with theupdate cable (DB9 M/M crossed cable).d Connect the power supply of the REMOTE KEYPAD to a power outlet.3-2. UPDATE INSTRUCTIONSc Open the file "RKD500 Updater" (in Start > Program > ANALOGWAY > RKD500).d In the Port menu select the COM port connected to the device.e Click on "START" on the SOFTWARE.f Press the ENTER button of the RKD500, and connect simultaneously the DC plug of the power supply to theREMOTE KEYPAD DC-IN connector. The LCD screen displays Downloading, and the upgrade will start. Then you can release the ENTER button.g When the software displays "Program operation completed", disconnect the update cable and the DC plug. Thenconnect again the DC plug to the RKD500.h Click on the "Quit" button to close the update SOFTWARE.NOTE:The updater files are available on our web site: Chapter 4 : TECHNICAL SPECIFICATIONSPower Supply: Storage Temperature:+9Vdc.- 40 °C to + 70 °C (- 40 °F to + 158 °F).Maximum ambient operating temperature: < 50 °C (< 122 °F).Hygrometry:10% to 80% (without condensation).Dimensions:RKD500-T: W 220 x D 130 x H 102 mm.W 8.9" x D 5.1" x H 4".Rackmount compatible (3U height, ½U width).RKD500: W 220 x D 130 x H 67 mm.W 8.9" x D 5.1" x H 2.6".Rackmount compatible (3U height, ½U width).Weight: 1 kg / 2.2 lbs.Chapter 5 : WARRANTYAnalog Way warrants the product against any defects in material and workmanship for a period of three years from the date of purchase (back to the factory).In the event of any malfunction during the warranty period, Analog Way will, at its discretion, repair or replace the defective unit, including free material and labor.This warranty does not apply if the product has been :- improperly installed or abused,- handled with improper care,- used or stocked in abnormal conditions,- modified, opened,- damaged by fire, war, or Natural disasters (Acts of God).In no way shall Analog Way be responsible for direct or indirect loss of profit or consequential damages resulting from any defect in this product.In case of any problem, get the serial number of the unit, a description of the problem, and then call your authorized dealer.。
Kernel RGB 机械键盘用户手册说明书

KERNEL RGB MechanicalKeyboardUSER GUIDEKernelUser ManualTechnical SpecificationsINDEXTechnical SpecificationLEDs display modesMacro settings1. Multimedia keys2. Light cycle effect3. Windows key lock4. WASD / arrow keys5. Function button6. Anti-ghosting mode Type mechanicalPolling rate 1000HzOperation force 60 ± 10GInternal memory 64KbConnection gold plated USBCable lenght 1,8m ± 10cmDimensions 444 x 133 x 41 mmWeight 1,230Kg ± 5GCompatibility Windows XP / Vista / 7 / 8 / 10 | Mac | Linux | AndroidShortcut keys on keyboard Anti-ghosting keysExtra shortcutsLighting mode keyLEDs display modes Macro settingsReset default settings Lighting presetsKernelUser ManualINDEXShortcut keys on keyboard Anti-ghosting keys Extra shortcuts Lighting mode keyLEDs display modesMacro settings Shortcut keys on keyboardsAnti-Ghosting keysLighting mode keyExtra shortcutsMy Computer 6-Key Rollover Exchange between light modesWindows key function lock / unlock Previous Track Volume Off Volume —Volume +Browser N-Key RolloverWASD / Arrows keys exchangeNext Track Calculator Play / Pause Media playerStopThe light mode is cyclical.Every time you press the key combination, the light mode changes cyclicallyTechnical Specification LEDs display modes Macro settings Reset default settings Lighting presetsKernelUser ManualLEDs display modes∆Common lighting settings∆Light modes1. WAVE TRANSITION2. GRADUAL TRANSITION3. BREATHING EFFECT4. FULL COLOR5. REACTIVE LIGHT6. EXPLOSION EFFECT7. RADIATION EFFECT INDEXLEDs display modes ∆ Common lighting settings ∆ Light modes∆ Custom lighting: presets your own presets right side lightingMacro settings * The configuration of the backlight color direction, intensity and speed are available in almost all lightning modesBacklight color by wave effect. You can configure it to see the effect on one color or choose the RGB spectrum.Keycaps backlight intensity changes by alternate gradual effect.Keycaps backlight is breathing. Keycaps show a fixed backlight color. Keycaps illumination is reactive to your pulsation. Keycaps illumination reacts to your pulsation with a expansive effect.Keycaps illumination reacts to your pulsation with an expansive lineal effect.continues in next page »Changes backlit color Increasesbacklit intensity Changestransition directionReducesbacklit intensityIncreases backlit speed Reduces backlit speedTechnical Specification Shortcut keys on keyboard Anti-ghosting keys Extra shortcuts Lighting mode key Macro settings Reset default settings Lighting presets∆ Custom lighting: presets ∆ Custom lighting: create your own presets ∆ Custom lighting: create your own colors∆ Custom lighting: keyboard right side lightingKernelUser Manual∆Custom lighting: presetsINDEXLEDs display modes∆ Common lighting settings∆ Light modes∆ Custom lighting: presetsyour own presetsright side lightingMacro settingsTo alternate between custom lightingpresets, use the keycaps numbers onthe main position of the keyboard(don´t use the numeric pad on theright side of the keyboard)8. CYCLONE EFFECT9. SCAN EFFECT10. LED OFF11. CUSTOM LIGHTING Keycaps illumination shows a cyclone effect and reacts to your pulsation. Keycap illumination reacts to your pulsation. To change backlit color, click again on this key.Turn off the leds.This mode offers 10 backlighting modes.The first five modes are presets. The other five backlight illumination modes can be individually personalized.« comes from previous page∆MOBA Press FN + 1∆FPS-5vs5 Press FN + 2∆MMO Press FN + 3∆FPS-6vs6 Press FN + 4∆SANDBOX Press FN + 5∆CUSTOM Press FN + 6 - 0Technical SpecificationMacro settingsReset default settingsLighting presets∆ Common lighting settingsShortcut keys on keyboardAnti-ghosting keysExtra shortcutsLighting mode key∆ Custom lighting: createyour own presets∆ Custom lighting: createyour own colors∆ Custom lighting: keyboardright side lightingKernelUser Manual∆Custom lighting: create your own presetsYou can individually personalize backlight illumination on five presets. You can turn off all lights keeping illuminated the keys that you want and choose a different color for each key.1. Choose the key where you want to insert your own preset (FN+6-0)2. Press FN + to start the configuration (PRINT SCREEN button will start flicking)3. Press FN + RIGHT ARROW button to change its color. This color define the color of the key you want to activate for your preset.4. Press the keys you want to be illuminated. You can combine different colors on the same preset (use step 3 to change the color before activate a new keycap)5. Press FN + to end the configuration.∆Custom lighting: create your own colorsYou can create your own colors palette. The swatches thus created are static: they don’t flow with any preset nor custom lighting effects.1. Press FN + for five seconds.2. Keys will start flicking.continues in next page »INDEXLEDs display modes∆ Common lighting settings∆ Custom lighting: presets ∆ Custom lighting: create your own presets∆ Custom lighting: create your own colorsright side lighting Macro settings Technical Specification Shortcut keys on keyboard Anti-ghosting keysExtra shortcutsLighting mode keyMacro settingsReset default settings Lighting presets∆ Custom lighting: presets∆ Custom lighting: keyboard right side lighting∆ Common lighting settings ∆ Light modesKernelUser Manual« comes from previous page3. Regarding that =Red color=Green color=Blue colorIn order to create your own personal color, click the flicking R, G or B key and move through the color spectrum using:move upwards the chosen color spectrummove downwards the chosen color spectrum4. To save your custom chosen color and exit this mode, press FN + for five seconds.5. Press FN + anytime to launch your custom color INDEXLEDs display modes∆ Common lighting settings∆ Custom lighting: presetsyour own presets∆ Custom lighting: create your own colors∆ Custom lighting: keyboard right side lighting Macro settings Technical Specification Shortcut keys on keyboard Anti-ghosting keysExtra shortcutsLighting mode keyMacro settingsReset default settings Lighting presets∆ Common lighting settings ∆ Light modes∆ Custom lighting: create your own presets∆ Custom lighting: presetsKernelUser ManualINDEXLEDs display modes Macro settings Reset default settingsMacro settingsYou can configure any keyboard key to be a macro:1. Press FN + WIN to enter gaming mode2. Press FN + ESC : WIN key and ESC key will start to flick. All previous macros will light up3. Press FN + the key you want to assign a macro (its LED will start to flick)4. Type the keys combination you want to transform into a macro5. Press FN + the key you have chosen for this macro to end the configuration process6. Press FN + ESC to exit Macro modeReset default settingsYou can reset Kernel to its default factory settings by pressing:ThenOne after anotherTechnical Specification Shortcut keys on keyboard Anti-ghosting keys Extra shortcuts Lighting mode key LEDs display modes Lighting presetsKernelUser ManualINDEXLEDs display modes Macro settings Lighting presets · MOBA (FN+1)· FPS 5vs5 (FN+2) · MMO (FN+3)· FPS 6vs6 (FN+4) Lighting presets∆MOBA (FN+1)· SANDBOX (FN+5)· FPS 6vs6 (FN+4)· MMO (FN+3)· FPS 5vs5 (FN+2)Reset default settings Macro settings LEDs display modes Lighting mode key Extra shortcuts Anti-ghosting keys Shortcut keys on keyboard Technical SpecificationKernelUser ManualINDEXLEDs display modes Macro settings Lighting presets· FPS 5vs5 (FN+2)· MMO (FN+3)· FPS 6vs6 (FN+4) Lighting presets∆FPS 5vs5 (FN+2)Technical Specification Shortcut keys on keyboard Anti-ghosting keys Extra shortcuts Lighting mode key LEDs display modes Reset default settings Macro settings · MOBA (FN+1)· MMO (FN+3)· FPS 6vs6 (FN+4)· SANDBOX (FN+5)Kernel User ManualINDEXLEDs display modesMacro settingsLighting presets· MOBA (FN+1)· MMO (FN+3)· FPS 6vs6 (FN+4)Lighting presets∆MMO (FN+3)· SANDBOX (FN+5)· FPS 6vs6 (FN+4)· FPS 5vs5 (FN+2)· MOBA (FN+1)Reset default settingsMacro settings LEDs display modes Lighting mode keyExtra shortcutsAnti-ghosting keysShortcut keys on keyboardTechnical SpecificationKernel User ManualINDEXLEDs display modesMacro settingsLighting presets· MOBA (FN+1)· FPS 5vs5 (FN+2)· FPS 6vs6 (FN+4)Lighting presets∆FPS 6vs6 (FN+4)· SANDBOX (FN+5)· MMO (FN+3)· FPS 5vs5 (FN+2)· MOBA (FN+1)Reset default settingsMacro settings LEDs display modes Lighting mode keyExtra shortcutsAnti-ghosting keysShortcut keys on keyboardTechnical SpecificationKernel User ManualINDEXLEDs display modesMacro settingsLighting presets· MOBA (FN+1)· FPS 5vs5 (FN+2)· MMO (FN+3)· SANDBOX (FN+5)Lighting presets∆SANDBOX (FN+5)Technical SpecificationShortcut keys on keyboardAnti-ghosting keysExtra shortcutsLighting mode keyLEDs display modes Macro settings Reset default settings· MOBA (FN+1)· FPS 5vs5 (FN+2)· FPS 6vs6 (FN+4)· MMO (FN+3)Warranty∆Who the warranty Protects:This warranty is valid to the original purchaser only.∆What the warranty protects:For your warranty claims, please contact Krom gaming overseas distribution partners in your country. Find the distribution partner list at Warranty: 2 years from purchasing date. (Depending on the laws of each country)URL: E-mail: **********************∆What the warranty does not cover:1. Any product, on which the serial number has been defaced, modified or removed.2. Accident, misuse, neglect, fire, water, lightning, or other acts of nature, unauthorized product modification, or failure to follow instructions supplied with the product.3. Repair or attempted repair by anyone not authorized by Krom gaming.4. Damage to or loss of any programs, data or removable storage media.5. Software or data loss occurring during repair or replacement.6. Any damage of the product due to shipment.7. Removal or installation of the product.8. External causes, such as electric power fluctuations or failure.9. Use of supplies or parts not meeting kromgaming´s specifications.10. Normal wear and tear.11. Any other cause which does not relate to a product defect.If you have any questions regarding technical problems please contact us via our website:KROM reserves the right for any modifications in text and/or images.。
WINTEC-KB66U可编程键盘用户手册
KB66U可编程键盘用户手册一.程序安装⒈先运行setup.exe程序,然后出现以下对话框。
按“Next”键继续⒉同意协议与否选择对话框,“Yes”键继续。
⒊用户信息确认对话框,按“Next”键继续⒋安装路径对话框,选择目标文件夹,然后按“Next”键继续。
⒌拷贝文件对话框,按“Next”键继续。
⒍提示重启计算机对话框,按”Finish”重启后设置生效。
二.键盘的编程软件1.选择键盘当运行程序时会出现以下对话框:选择所想编程的产品类型,然后按“确定”键确定。
2. 编辑键码拖动鼠标,使鼠标指在键盘的某一个按钮上,当按钮颜色变成灰黑色时就可以对此按钮编程了。
在可编程的按键上点击鼠标左键,会弹出一个滑行菜单。
这时可以用“Key Code”的方式给按键赋值,或者“ASCII CODE”的方式给按键赋值。
,你还可以点击滑行菜单条中“Clear”来清除已赋的码值,给一个按键赋值后,点击“Layer Index”来指定这个按键的键层。
Ⅰ.Key code在这种方式下,你能用任意扫描码给一个按键赋值在以上对话框的“键盘”画面上显示了最常用的键码,并在“Special Codes”区域列出了一些特殊码。
从“键盘”画面上选择一个键或双击“Special Codes”区域的某一项,则将其键码添加到“Mapping Sequence”目录中。
通过以上操作可以把8个码写入某一个键里面。
在这个画面上并不是任何键码(扫描码)都是可选的,但可以在“0x”下的方格内输入一个十六进制码,然后按“Insert”确定。
例如:如果在“键盘”区域按“Shift”、“H”、“E”、“Shift”、“L”、“L”以及“O”键,在上面对话框中的“Mapping Sequence”目录中就会显示这些键值。
如果在上面的“Mapping Sequence”目录中删除“O”项,你可以用鼠标右键单击“O”项,将弹出一个包含2 个选项的滑行菜单。
选择其中的“Delete”选项就可以删除“O”项内容;如果选择“Clear All”选项,就会把该目录中的所有内容删除。
51CTO下载-KB66MFBMF可编程键盘用户手册-WIN
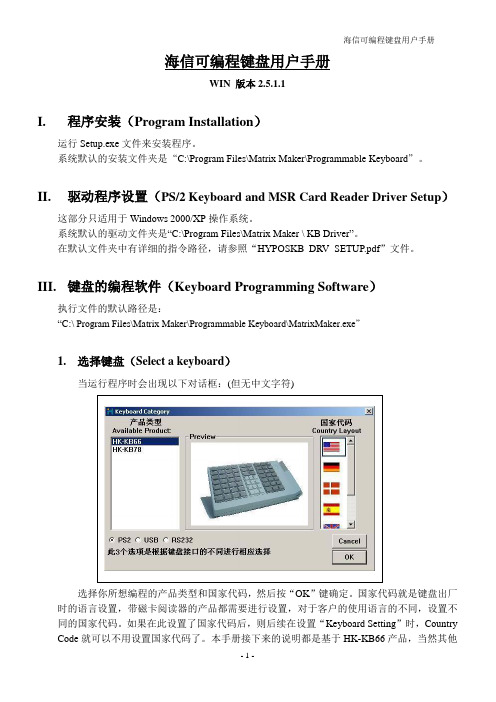
海信可编程键盘用户手册WIN 版本2.5.1.1I. 程序安装(Program Installation )运行Setup.exe 文件来安装程序。
系统默认的安装文件夹是“C:\Program Files\Matrix Maker\Programmable Keyboard ”。
II. 驱动程序设置(PS/2 Keyboard and MSR Card Reader Driver Setup )这部分只适用于Windows 2000/XP 操作系统。
系统默认的驱动文件夹是“C:\Program Files\Matrix Maker \ KB Driver ”。
在默认文件夹中有详细的指令路径,请参照“HYPOSKB_DRV_SETUP.pdf ”文件。
III. 键盘的编程软件(Keyboard Programming Software )执行文件的默认路径是:“C:\ Program Files\Matrix Maker\Programmable Keyboard\MatrixMaker.exe ”1. 选择键盘(Select a keyboard )当运行程序时会出现以下对话框:(但无中文字符)选择你所想编程的产品类型和国家代码,然后按“OK ”键确定。
国家代码就是键盘出厂时的语言设置,带磁卡阅读器的产品都需要进行设置,对于客户的使用语言的不同,设置不同的国家代码。
如果在此设置了国家代码后,则后续在设置“Keyboard Setting ”时,Country Code 就可以不用设置国家代码了。
本手册接下来的说明都是基于HK-KB66产品,当然其他产品也适用。
2.编辑键码(Edit Key Map)拖动鼠标,使鼠标指在键盘的某一个按钮上,当按钮颜色变成灰黑色时就可以对此按钮编程了。
在可编程的按键上点击鼠标左键,会弹出一个滑行菜单。
这时可以用三种方法来给按键赋值。
一种是“Key Code”,另一种是“ASCII Code”,最后一种“Customize Code”。
- 1、下载文档前请自行甄别文档内容的完整性,平台不提供额外的编辑、内容补充、找答案等附加服务。
- 2、"仅部分预览"的文档,不可在线预览部分如存在完整性等问题,可反馈申请退款(可完整预览的文档不适用该条件!)。
- 3、如文档侵犯您的权益,请联系客服反馈,我们会尽快为您处理(人工客服工作时间:9:00-18:30)。
可编程键盘用户手册
版本3.2
I.程序安装
运行Setup.exe文件来安装程序。
系统默认的安装文件夹是“C:\Program Files\Matrix Maker Chinese\Programmable Keyboard”。
II.驱动程序设置
这部分只适用于Windows 2000/XP操作系统。
系统默认的驱动文件夹是“C:\Program Files\Matrix Maker Chinese\ KB Driver”。
在默认文件夹中有详细的指令路径,请参照“POSKB_DRV_SETUP.pdf”文件。
III.键盘的编程软件
执行文件的默认路径是:
“C:\ Program Files\Matrix Maker\Programmable Keyboard Chinese\MatrixMakerChinese.exe”
1.选择键盘
当运行程序时会出现以下对话框:
选择你所想编程的产品类型和国家代码,然后按“确定”键确定。
国家代码就是键盘出厂时的语言设置,带磁卡阅读器的产品都需要进行设置,对于客户的使用语言的不同,设置不同的国家代码。
如果在此设置了国家代码后,则后续在设置“键盘设置”时,国家代码中就可以不用设置国家代码了。
本手册接下来的说明都是基于S78A产品,当然其他产品也适用。
2.编辑键码
拖动鼠标,使鼠标指在键盘的某一个按钮上,当按钮颜色变成灰黑色时就可以对此按钮编程了。
在可编程的按键上点击鼠标左键,会弹出一个滑行菜单。
这时可以用“扫描码”的方式给按键赋值。
给一个按键赋值后,你还可以点击滑行菜单条中“清除”来清除已赋的码值,点击“层次索引”来指定这个按键的键层。
i.扫描码
在这种方式下,你能用任意扫描码给一个按键赋值
在以上对话框的“键盘”画面上显示了最常用的键码,并在“特别编码”区域列出了一些特
殊码。
从“键盘”画面上选择一个键或双击“特别编码”区域的某一项,则将其键码添加到“键码排列”目录中。
通过以上操作可以把8个码写入某一个键里面。
在这个画面上并不是任何键码(扫描码)都是可选的,但可以在“0x”下的方格内输入一个十六进制码,然后按“加入”确定。
例如
如果你在“键盘”区域按“Shift”、“H”、“E”、“Shift”、“L”、“L”以及“O”键,在上面对话框中的“键码排列”目录中就会显示这些键值。
如果你想在上面的“键码排列”目录中删除“O”项,你可以用鼠标右键单击“O”项,将弹出一个包含2个选项的滑行菜单。
选择其中的“删除”选项就可以删除“O”项内容;如果选择“删除全部”选项,就会把该目录中的所有内容删除。
如果你想在上面的“键码排列”目录中的“H”项前增加“S”项,只要在该目录中先用鼠标选中“H”项,然后再在“键盘”区域中按“S”就可以了。
但是,如果你想在这个目录后面增加一个码的话,你还要记得点击一个空项。
在给这个键编程后,如果在记事本状态下按此键,且Caps Lock不工作,将显示为“HEllo”;如果Caps Lock工作,就显示为“heLLO”。
警告:
1.比如,你想赋一个左Shift码(而不是其它码),你只要在“键盘”画面上按一下左Shift按钮就可以了。
在“键码排列”目录中将显示Left Shift Down,对应的键值为12。
但是,如果需要设置“左Ctrl+c”组合键,你只要在“键码排列”画面上按一下“左Ctrl”,再按一下“C”键,最后在按一下“左Ctrl”,就可以设置完成,则对话框的“键码排列”目录中显示如下:
以上情形同样也可以应用在右Shift码、左Alt码、右Alt码、左Ctrl码以及右Ctrl码上;所以,在给这些码赋值时必须非常的注意,组合键必须要有“Up”这项。
2.对于PS2产品来说,如果某一按键被赋<Pause>值,那么将不能再赋其它码的值。
相反的,如果已经赋其它码的值,那么将不能再赋<Pause>值。
3.对于USB产品来说,下面这些码不能被赋值于其它码:
<Wake>,<Sleep>,<Power>,<V ol Up>,<V ol Down>,<Media elect>,<Mail>,<Calculator>,<My Computer>,<WWW Search>。
相反的,如果已经赋其它码的值,上面的这些码将不能被赋值。
ii. 层次索引
在键盘上最多允许编写2层键码,你可以在指定层上给任何键赋值。
比如,若想在第一层给按键编码,可以在条型工具栏上先择“Layer1”选项,通过扫描码模式给按键赋值,待赋值完成后,还需使用层次索引指定一个层切换键,如上图所示。
3.键盘设置
在菜单栏上点击“键盘”,然后再点击“键盘设置”,将出现以下对话框:
如果你想在键盘上按一个键时发出响声,请点击“按键发声”选项,然后你可以选择“所有键”和“已编码键”选项。
如果你按下某一个按键不放时,也希望这个键的键码会连续的显示,请点击“按键连发”选项。
完成你的设置后,你可以按“更新”按钮把你所设置的内容发送到键盘,接着对话框会自动关闭;或者按“确定”按钮把设定的内容发送到程序存储器中,接着对话框也将自动关闭。
4. 磁卡阅读器设置
用鼠标点击条型菜单栏上的“键盘”,然后再点击“磁卡阅读器设置”;或点击横栏菜单上的
图标,将出现以下对话框:
通过点击开始码、间隔码或结束码中的“扫描码”,将会打开下图中的窗口,开始码、间隔码、结束码可以通过上面提到的扫描码的编辑方法进行编码。
完成你的设置后,你可以按“更新”按钮把你所设置的内容发送到键盘,接着对话框会自动关闭;或者按“确定”按钮把设定的内容发送到程序存储器中,接着对话框也将自动关闭。
按照以上对话框的设置,刷卡后屏幕上将显示如下内容:开始码,第1轨起始符,第1轨数据,第1轨结束符,间隔码,开始码,第2轨起始符,第2轨数据,第2轨结束符,间隔码,开始码,第3轨起始符,第3轨数据,第3轨结束符,结束码。
5.监控程序更新
在菜单栏中点击“键盘”,然后再点击“监控程序更新”;或点击横栏菜单中的
图标,
来选择你所需要的监控程序文件路径。
在下载过程中请不要动按键盘上的任何键和鼠标。
6.诊断
i.进入测试模式
进入测试模式成功后,按下某个键将显示该按键的位置。
(仅针对于测试中的键盘。
)
如果你的键盘上带有电子锁,并且支持连发功能,键盘将连续不断的发送电子锁
的位置码。
这时你按下其他键就可以阻止上述情况的发生。
ii.退出测试模式
退出测试模式成功后,按下某个键将显示该键所编的键码。
iii.出厂设置
恢复到该键盘的出厂默认设置。
当键码表中的QUERTY部分遗失时,你可以使用该
功能恢复。
但是对于USB键盘,在您成功执行完此功能后请重插键盘并选择相应
软件。
iv. 复位
把键盘复位到初始状态(仅针对于测试中的键盘)。
iii.忽略中间的驱动(针对PS/2驱动程序)
如果同时使用到两个PS/2可编程键盘,你可以直接编写与你电脑上PS/2端口相
连的可编程键盘。
但如你想编写的是另外那个可编程键盘,则需先忽略与PS/2
端口直接相连的可编程键盘的驱动(既中间驱动程序)。
注意:一旦中间驱动程序被忽略,则被忽略的驱动无效。
vi. 恢复中间的驱动(针对PS/2驱动程序)
为了使PS/2端口直接相连的可编程键盘(即中间的驱动)能用,你必须先恢复它。
vii. 监控程序版本
点击后能读出当前监控程序使用的版本。
viii.主控芯片类型(本软件版本不支持)
点击后能读出主控芯片的类型。
7.下载键码设置
当你为所有的或某一些按键赋值以后,你可以按照下面的方式开始给键盘下载键码表:
点击条型菜单栏中的“键盘”菜单键,然后再按“键码更新”;或点击横栏菜单中的
图标。
(此项只针对按键的键码)
在下载过程中请不要动按键盘上的任何键和鼠标。
8.下载键盘设置
当你设定好键盘设置、磁卡阅读器设置和条码阅读器的设置以及给所有或一些按钮赋值以后,你可以通过点击条型菜单栏中的“键盘”菜单键,再按“全部更新”来完成此项操作。
在下载过程中请不要动按键盘上的任何键和鼠标。
9.读取键盘设置
如果你想获得每个键的编程键码、键盘设置或磁卡阅读器的设置,你可以点击条型菜
单栏中的“键盘”菜单键,然后再点击“读入”,或点击横栏菜单中的图标。
在读取键盘的过程中请不要动按键盘上的任何键和鼠标。
10.全部清除
如果你想清除所有的键码表设定、键盘设置或磁卡阅读器的设置,请点击条型菜单栏中
的“键盘”菜单键,然后再点击“全部清除”;或点击横栏菜单中的图标。
这步操作只能清除程序存储器中内容,而不能清除键盘上的所有设置。
11.保存
如果你想把所有的键码表设置、键盘设置或磁卡阅读器的设置保存到一个文件中,请点击条型菜单栏中的“文件”菜单键,然后再点击“保存”;或点击横栏菜单中
的图标。
12.打开
你可以通过点击条型菜单栏中的“文件”菜单键,然后再点击“打开”;或点
击横栏菜单中的图标选定文件类型来编辑键码表、设置键盘或设置磁卡阅读器要是你选择的键码表文件格式错误,系统将显示一个错误信息,默认格式为.dat文件。