AIX环境下磁带备份操作
AIX系统备份方式总结
hxghan@
关于 AIX 系统备份,这里主要讨论不同介质下的系统备份方式,总结有以 下几种,并对这几种介质的属性进行比较,详见下文。 1、系统备份到磁带 2、系统备份到磁盘 3、 系统备份到光盘
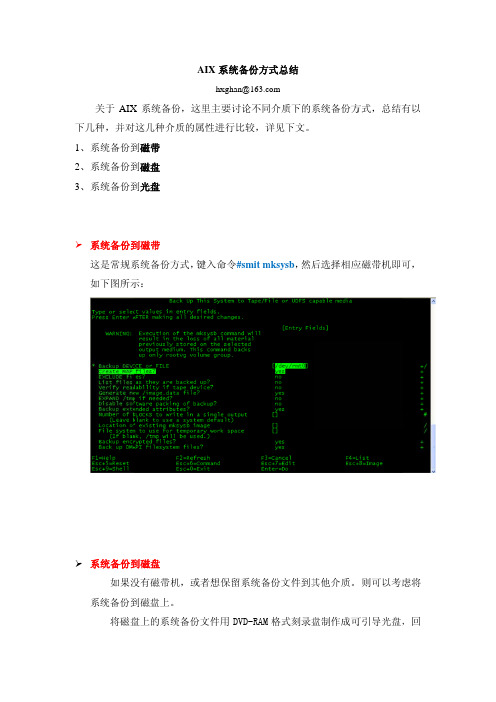
系统备份到磁带 这是常规系统备份方式,键入命令#smit mksysb,然后选择相应磁带机即可, 如下图所示:
系统备份到磁盘 如果没有磁带机,或者想保留系统备份文件到其他介质。则可以考虑将
系统备份到磁盘上。 将磁盘上的系统备份文件用 DVD-RAM 格式刻录盘制作成可引导光盘,回
பைடு நூலகம்
头便可以光盘备份恢复系统了。 系统备份到磁盘,具体操作方式有如下两种方式: a) 可以直接键入命令#mksysb -i /dirname/filename 将系统备份到指 定的磁盘目录上。注意用来存放文件的目录文件系统和/tmp 空间 要足够大。 b) 键入命令#smit mksysb 并指定备份目录(backupdir/sys_bk_data_1), 如下图所示:
DDS5:Up to 3.0 MBps native back-up rate, and up
to 6.0 MBps in compressed mode SCSI:< 320MB/s SATA: 150MB/s SATAⅡ: 300MB/s SAS: 3.0Gbit/s
DVD 光盘
DVD-RAM 4.3GB / 8.7GB DVD-RW 4.3GB
36GB / 73GB / 146GB / 300GB
速率
LTO4:120 MBps native back-up rate and up to 240
MBps in compressed mode
AIX环境下的SAN存储及磁带备份方案、规划、实施与配置的经验分享
IBM Systems Group
光纤存储网-内容
▪ 产品介绍 ▪ 硬件安装 ▪ 操作界面 ▪ 集联组网 ▪ 划分zone
| |IBM Internal and IBM Business Partner Use Only
© 2004 IBM Corporation
IBM Systems Group
D关S羽家族
业内性能最 好、功能最 完善、性价 比最佳磁盘
存储系统
张N飞AS 家族
业界领先的网 络存储解决方
案
黄磁忠带家族
数据存档, 备 份和灾难恢复
解决方案
开赵放云式软件系
列
虚拟和管理软 件
解决存储管理 问题的综合性
软件
马存储超网络家族
存储区域网络 解决方案
| |IBM Internal and IBM Business Partner Use Only
© 2004 IBM Corporation
IBM Systems Group
存储产品线简介-磁盘产品DS
系列存储产品简介
第四代鲨
鱼
新的入门级产品
统一的产品系列
价格和封装 方面的新标准
闪亮登场
功能、性能、TCO 方面的新标准
DS3000
DS4000
DS6000
DS8000
通用管理平台 通用拷贝服务
4 Gbps
DS4800
DS4500
DS4700
DS4300 DS4200 DS4100
Entry-level
Midrange
High-end
| |IBM Internal and IBM Business Partner Use Only
AIX备份

AIX备份AIX备份使用 #smit mksysb 备份AIX系统1. 一次完整的备份日志#tail /smit.log[Jul 07 2009, 18:27:59]Command_to_Execute follows below:>> /usr/bin/mksysb '-i' /dev/rmt0Output from Command_to_Execute follows below:---- start ----Creating information file (/image.data) for rootvg. Creating tape boot image......bosboot: Boot image is 37774 512 byte blocks..Creating list of files to back up..Backing up 253800 files..............................24 of 253800 files (0%)..............................34 of 253800 files (0%)..............................954 of 253800 files (0%)..............................1783 of 253800 files (0%)..............................4164 of 253800 files (1%).............................. ...................17451 of 253800 files (6%)..............................19630 of 253800 files (7%)..............................20501 of 253800 files (8%)..............................21455 of 253800 files (8%)..............................41969 of 253800 files (16%)......................cannotaccess ./usr/IBM/WebSphere/PortalServer/log/SystemOut_09.07 .07_16.52.51.log: A file or directory in the path name does not exist.179375 of 253800 files (70%)..............................197964 of 253800 files (78%)..............................239358 of 253800 files (94%)....cannot access ./usr/IBM/WebSphere/AppServer/profiles/AppSrv01/logs /exoa1/SystemOut_09.07.07_17.52.50.log: A file or directory in the path name does not exist...........................243252 of 253800 files (95%)..............................245365 of 253800 files (96%)..............................245365 of 253800 files (96%)..............................252065 of 253800 files (99%).....................0512-003 mksysb may not have been able to archive some files.The messages displayed on the Standard Error contained additionalinformation.bosboot: Boot image is 37774 512 byte blocks.---- end ----[Jul 07 2009, 21:50:29]2. 备份的命令# smit mksysb# /usr/bin/mksysb -i /dev/rmt0不想备份的目录写在 /etc/exclude.rootvgbash-3.2# more /etc/exclude.rootvg (内容如下)/IMIS_SOFT/3. 显示备份内容A. 要列出位于缺省设备 /dev/rmt0 下的系统备份内容,请输入:# lsmksysbB. 显示备份的内容# lsmksysb -f /dev/rmt0.1C. 显示指定目录的内容# lsmksysb -l -f /tmp/mybackupD. 要验证 /dev/rmt0 中的卷组备份磁带的每个头的可读性,请输入:# lsmksysb -V -f /dev/rmt01. 磁带能否重复利用?答:不能,重新备份会覆盖以前的内容。
Aix备份及恢复

Aix备份流程图BOS Boot Image:bosboot命令创建,包含启动系统需要的系统的内核和设备驱动mkinsttape image:包含./tapeblksz, ./bosinst.data, and ./image.data三个文件./tapeblksz包含mksysb创建的磁带机的block size./bosinst.data 恢复时,用户交互信息存储在这里(相当于安装程序)./image.data包含rootvg里面的fs和lv的sizes, names, maps, mount points等信息。
备份时,可以用mksysb -i来产生一个新的image.datadummy .toc:The dummy Table Of Contents (TOC) is used to have the mksysb tape contain the same number of images as a BOS install tape.rootvg data :包含所有rootvg上会被mksysb备份的数据image.data的组成:image.data由几个部分组成1。
SHRINK:如果这部分为YES,恢复时会收缩所有文件系统。
2。
BOSINST_FILE:BOS INSTALL结束后,要执行的文件或命令的全路径3。
EXACT_FIT:YES:表示根据mksysb -m 产生的pp map来确的lv在不同pv上的分布mksysb -e 会根据/etc/exclude.rootvg的设置,排除一些文件,目录,文件系统等备份过程中需要8-12MB。
mksysb -X会自动扩展/tmpUse the -p flag (disable software packing of backup) only if you know that your tape drive does not do compression.使用smitty mksysb进行备份,会留下日志。
AIX+TSM+磁带库+oracle非lanfree(全)

AIX+TSM+磁带库+oracle非lanfree(全)***TSM备份系统安装步骤1软件安装1.1T S M服务器(192.192.0.245)需要安装软件◆安装isc6011◆安装AC532◆安装TSMserver5.4◆安装Client1.2A I X客户端需要安装软件◆安装Client for AIX5.4◆安装Data Protection for Oracle5.4.1◆安装tsm for san –aix存储代理(若要做lanfree就需要安装)1.3安装过程1.3.1服务器端1.3.1.1 安装ISC6011◆Iscadmin口令:安装时,会提示需要进行iscadmin用户口令设置:此处设置为:zenith◆安装路径选择安装在D盘。
◆管理端口使用默认8421、8422,保持不变。
1.3.1.2 安装AC5.4注意ISC的安装信息,因为我们修改了安装路径,所以这里要修改,不能使用默认设置:其余设置按需要选择即可。
安装完成后即可以:http://serverip:8421/ibm/consoleweb方式进行访问了。
1.3.1.3 安装TSM server运行安装程序,分别进行安装即可。
在安装Tsmserver时我们选择“自定义安装”,安装在D盘。
1.3.2安装客户端1.3.2.1 使用光盘安装AIX clients5.4。
1.3.2.2 安装Data Protection for oracle AIX安装如下几个软件包即可:●Tivoli.tsm.client.ora cle.32bit●Tivoli.tsm.client.oracle.tools.32bit●Tivoli.tsm.client.api.32bit●Tivoli.tsm.client.oracle.msg.32bit.**_**●Tivoli.tsm.loc.client.oracle.aix51.64bit.ela安装完成后将oracle 9i rman与data protection for oracle重新链接:●LD_LIBRARY_PA TH=$ORACLE_HOEM/lib●ln–s /usr/lib/libobk64.a $ORACLE_HOME/lib/libobk.a1.4T S M服务器配置1.4.1T S M服务器初始化配置启动配置向导:在配置过程中,需要注意几个地方:◆备份服务器文件存放位置:系统会默认建立,也可以自行修改:◆登录帐号:默认使用系统帐号:◆备份服务器名:这里设置为server1,不设置密码。
AIX的备份和恢复

AIX的备份和恢复1.mksysb命令1.1概述mksysb命令针对rootvg上已经mount的file system建立一个bootable image,该文件是backup-file格式,用户定义的paging space、未mount的file system、raw device不包含在备份集中。
1.2备份文件的格式BOS boot image + mkinsttape image + dummy.toc + rootvg data...~~~~~~~~~~~~~~~~~~~~~~~~~~~~~~~~~~~~~~~~~~~~~~~~ ~~~~~~~~~~~~~~BOS boot image :包含从mksysb 磁带引导所需的系统内核和设备驱动的副本。
由bosboot 命令创建。
mkinsttape image :有三个重要的文件./tapeblksz 文件包含mksysb 命令运行时设定磁带驱动器的块大小。
./bosinst.data 文件包含自定义的BOS 安装过程和指示BOS 安装程序如何运行。
执行mksysb 命令前可自定义该文件,或映像备份完成后使用程序自定义该文件。
./image.data 文件包含描述BOS 安装过程中安装的映像的信息。
这些信息包括逻辑卷的大小、名称、映射以及在rootvg 的安装点。
可在使用mksysb 命令之前自定义该文件,或在备份期间运行mksysb -i 命令在磁带上生成一个新的 ./image.data 文件。
mkszfile 命令生成 ./image.data 文件。
./image.data 文件以stanza 格式安排。
table of contents:使mksysb 磁带包含和BOS安装磁带同样数目的映像。
rootvg data :包含mksysb 命令备份的rootvg 卷组上的所有数据。
mksysb 命令使用backup 命令保存rootvg 上安装JFS 数据内容,除了raw 数据。
AIX 备份性能最佳实践和指南说明书

AIX Backup Performance Best Practices and Guidelines on IBM Power Systems Virtual ServerIBM Power Systems Performance TeamAuthorsSaritha VinodGayathri M04 March 2022Table of Contents1.Introduction (2)1.1File level Backup for AIX VMs in PowerVS Using Spectrum Protect (2)2.IBM Spectrum Protect Configuration and Tunings for Backup (3)2.1Spectrum Protect Configuration (3)2.2Spectrum Protect Server Tunings (3)3.Backup Performance Guidelines (4)3.1Backup Performance Measurements with 1Gbps DL 2.0 Link (4)3.1.1Performance Guidelines for Spectrum Protect Server-side Deduplication andCompression with 1Gbs DL 2.0 Link (4)3.1.2Performance Guidelines for Spectrum Protect Client-side Deduplication andCompression with 1Gbs DL 2.0 Link (5)3.1.3Settings and Best Practices for Spectrum Protect Client-side Deduplication andCompression (5)3.2Backup Performance Measurements with 10Gbps DL 2.0 Link (6)3.2.1Performance Guidelines for Spectrum Protect Server-side Deduplication andCompression with 10Gbs DL 2.0 Link (7)3.2.2Performance Guidelines for Spectrum Protect Client-side Deduplication andCompression with 10Gbs DL 2.0 Link (7)4.Acknowledgements (8)1.IntroductionThis document specifies the best practices, guidelines, and tunings for optimum performance of file level backup for AIX virtual machines on Power Systems Virtual Server (PowerVS) using IBM Spectrum Protect. Based on benchmarking results with the best practices and tunings discussed in this document, below table provides a summarized view of the guidelines for backup rates that are achievable on different network link bandwidths. The sections below detail each of these different configs and some of the trade-offs to be considered while using these backup settings.1.1File level Backup for AIX VMs in PowerVS Using Spectrum ProtectFor file level backup, IBM Spectrum Protect Server is installed and configured on an x86 Linux VSI located in the IBM Cloud Classic Infrastructure area of IBM Cloud. PowerVS AIX Virtual Server Instance connects to the Spectrum protect Server using the Direct Link 2.0 (DL 2.0) for backup-restore operations and can access Cloud Object Storage using an internal endpoint for data storage/retrieval as depicted in Figure 1 below. The installation details of Spectrum protect is outside the scope of this document. Refer to this link for a tutorial on the details of installation of Spectrum Protect for PowerVS AIX backup.https:///media/docs/downloads/power-iaas-tutorials/PowerVS_AIX_Backups_Tutorial_v1.pdfFigure 1: Backup environment using Spectrum Protect for AIX Virtual Machines on PowerVS2.IBM Spectrum Protect Configuration and Tunings for BackupThis section provides the configurations and tunings applied for IBM Spectrum Protect Server and Client.2.1Spectrum Protect ConfigurationAll guidelines and tunings mentioned in this document is using the Spectrum Protect Direct-to-Cloud Configuration, where backup data is stored directly to cost-effective IBM Cloud Object Storage (hosted within IBM Cloud).For the direct-to-cloud architectures, backup data is ingested directly into a cloud-container storage pool with a performant cloud ac celerator cache disk location tuned for a system’s ingestion workload as the initial “landing spot”. Data is then immediately, asynchronously transferred to cloud object storage while further data is also ingested into the disk staging area.Below provided configuration is used to deploy an extra-small system for IBM Spectrum Protect Server as defined in the IBM Spectrum Protect Cloud Blueprints for IBM Cloud.•Spectrum Protect Server Version 8.1.12• 4 cores Intel Xeon CPU (M1.4x32 Virtual Server Instance in IBM Cloud Classic Infrastructure) •32 GB RAM•Operating System – RHEL 8.3•Block Storage (SAN Storage Volumes)o100GB Volume (boot volume)o300GB Volume (database and active log disk)o500GB Volume (database backup and archive log disk)o1TB Volume (Cloud accelerator cache disk)•Networko1Gbps public and private network•Private IBM Cloud Object Storage endpoint (Regional)Spectrum Protect Client (Version 8.1.11) is installed on an AIX 7.2 virtual machine in PowerVS in the same Cloud region as the virtual server instance for Spectrum Protect Server. PowerVS AIX VM used for performance measurements is allocated 4 cores and 64GB memory and the CPU, memory, disk and network resources on AIX VM was mainly consumed by Spectrum protect during the backup operation. The required CPU/memory allocations on AIX VM can vary based on the workload running on VM. Backup measurements used Oracle Database type data from a workload generator on the AIX VM.PowerVS AIX VM can use either 1Gbps or 10Gbps Direct Link Connect 2.0 (DL 2.0). The Direct Link Connect 2.0 service creates a seamless connection that allows access to Spectrum Protect Server virtual instance on IBM Cloud from Power Systems Virtual Server instance.2.2Spectrum Protect Server TuningsBelow provided are the recommended tunings in general on the Spectrum Protect Server. It is recommended that below settings should be applied as soon as possible after a node is defined and before initial backups take place.•Kernel tuningso kernel.randomize_va_space = 0o vm.swappiness = 5•OS ulimit tuningso nofile = 65536•Network Settingso TCPWINDOWSIZE of 0 which is the default.•Spectrum Protect server tuningso Tune MINIMUMExtentsize parameter value from 50KB (default) to 250KB (recommended for Oracle database type workloads)o Note that, when there is a change to the extent size parameter, the subsequent first backup (irrespective of incremental or not) can take slightly longer, as further backupswould not dedup well against older backups.3.Backup Performance GuidelinesThe following sections outline the guidelines, tunings and best practices based on the backup throughput results that were measured in the IBM Cloud and PowerVS environments with the configurations described above.In some of the scenarios, multiple instances of IBM Spectrum Protect client backup sessions were initiated in parallel as mentioned in respective sections. In such case, the results presented here for backup represent the aggregate throughput experienced with the largest number of sessions tested against the system. Data sizes used for measurements varied between 250GB to 750GB.All throughput values are obtained for the actual data size specified for backup. These are the data rates reported by Spectrum Protect Client as the average aggregate throughput when backing up data to the IBM Spectrum Protect server. On ingestion, the actual quantity of data that makes it to accelerator cache disk and onwards to cloud object storage will be less, depending on the data deduplication and compression rates.3.1Backup Performance Measurements with 1Gbps DL 2.0 LinkThis section in particular talks about backup performance guidelines when using the 1Gbps DL 2.0 link between Spectrum Protect Client in PowerVS and Spectrum Protect Server in IBM Cloud. This includes two configurations – (1) with default Spectrum Protect Server-side Deduplication and Compression,(2) enabling Spectrum Protect Client-side Deduplication and Compression3.1.1Performance Guidelines for Spectrum Protect Server-side Deduplication andCompression with 1Gbs DL 2.0 LinkBy default, inline data deduplication, compression and encryption are enabled on the Spectrum Protect server. This occurs during client backup operations, data is automatically deduplicated and compressed as it is ingested into the cloud-container storage pool at the server. However, the actualbackup data size gets transferred over the network (through DL 2.0 link) from the AIX virtual machine to Spectrum Protect server on IBM Cloud.With the settings discussed above, for a full backup operation peak network utilization of ~80% and aggregate network utilization of ~72% was measured on a 1Gbps DL 2.0 link. With these settings, full backup data transfer rate of up to ~300-310 GB/hour can be attained considering 50% deduplication rates for the data being backed up using a 1Gbps DL 2.0 link. If the data deduplication rates for backed up data is higher, the backup data transfer rate per hour also can increase. The above rate is achieved with “MINIMUMExtentsize” parameter value of 250KB (mentioned as tunings in Section 2.3).3.1.2Performance Guidelines for Spectrum Protect Client-side Deduplication andCompression with 1Gbs DL 2.0 LinkClient-side data deduplication and compression can be enabled to work together with server-side de-duplication. In this case deduplication and compression of data happens at the client before the data gets transferred to the server over the network (via the DL 2.0 link). This can reduce the size of actual data transferred over network, depending on the deduplication and compression rates achieved. The steps to enable client-side deduplication and compression and best practices to be followed while doing so are discussed in Section 3.1.3 below. Following those best practices, for a full backup operation peak network utilization up to ~76% was measured on a 1Gbps DL 2.0 link with multiple parallel instances (up to 4 instances), with 50% data deduplication rate and dedup cache turned off. With these settings, full backup data transfer rate of up to ~330-530 GB/hour can be attained considering 50% deduplication rates for the data being backed up using a 1Gbps DL 2.0 link. The above rate is achieved with “MINIMUMExtentsize” parameter value of 250KB (mentioned as tunings in Section 2.3).3.1.3Settings and Best Practices for Spectrum Protect Client-side Deduplication andCompressionEnable client-side de-duplication to work together with server-side de-duplication as below:– On the Server: use below commands (replace nodename with name of the client node) update node <nodename> compression=yesupdate node <nodename> deduplication=clientorserver– On the Client: update the dsm.sys file to add these linescompression yesdeduplication yesFor a detailed description of these commands refer to Spectrum Protect documentation links below.https:///docs/en/spectrum-protect/8.1.12?topic=commands-update-node-update-node-attributeshttps:///docs/en/spectrum-protect/8.1.12?topic=reference-compressionhttps:///docs/en/spectrum-protect/8.1.12?topic=reference-deduplicationBelow provided are some best practices to use client-side data deduplication•Use compression along with deduplication at client side.•On the Client: update the dsm.sys file to add these lines•compression yes•deduplication yes•Use multiple parallel sessions to improve backup time and network utilization. This can be done by initiating multiple dsmc incr command and splitting the subdirectories between these commands. Eg :•dsmc incr /dir/subdir1/ -subdir=yes•dsmc incr /dir/subdir2/ -subdir=yes•Use the default resource utilization (RU = 2)•Use de-dup cache turned off with lower data deduplication rates.To turn off the deduplication cache from the client, edit the dsm.sys file to add this line enablededupcache no•Turn on de-dup cache when the data deduplication is higher (de-dup close to 100%) To turn on the dedupe cache from the client, edit the dsm.sys file to add this lineenablededupcache yesNOTE on client-side deduplication cache:•For applications that use the IBM Spectrum Protect API, do not use the client data deduplication cache (enablededupcache option). The dedup cache can be used with backup-archive clients. This is a restriction in IBM spectrum Protect. Please refer to this Spectrum Protect documentation link for more details on this:https:///docs/en/spectrum-protect/8.1.12?topic=throughput-tuning-client-side-data-deduplication3.2Backup Performance Measurements with 10Gbps DL 2.0 LinkThis section in particular talks about backup performance guidelines when using the 10Gbps DL 2.0 link between Spectrum Protect Client in PowerVS and Spectrum Protect Server in IBM Cloud. This includes two configurations –(1) with default Spectrum Protect Server-side Deduplication and Compression, (2) enabling Spectrum Protect Client-side Deduplication and CompressionAlso note that the extra-small configuration used for Spectrum Protect Server (described in Section 2.2) uses a x86 Virtual Server Instance in IBM Cloud Classic Infrastructure that has a 1Gbps non-rate limited link for public and private network. Hence the 10Gbps DL 2.0 link connectivity from PowerVS AIX VM to Spectrum Protect server cannot be fully utilized.With that limitation, the best practices used for backup with 10Gbps DL 2.0 link are as follows:•For server-side as well as client-side deduplication, use multiple parallel instances (below guidelines are with 4 instances) to maximize utilization of the 10Gbps link with jumbo frames enabled at client and server•To enable jumbo frames at Spectrum Protect Server (RHEL OS):•Check the current setting by running the command: “ip link show dev eth0”•Change the current setting to support 9000 MTU by running the command: “ip link set mtu 9000 dev eth0”•Change the setting so that it persists after the system is restarted. Edit the file “/etc/sysconfig/network-scripts/ifcfg-eth0”, and add “MTU=9000”•To enable jumbo frames at Spectrum Protect Client (AIX OS): (Note: change interface name below based on the actual interface used)•chdev -Pl ent2 -a jumbo_frames=yes•chdev -Pl en2 -a mtu=9000•Client-side deduplication and compression:•Use client-side deduplication and compression for data that has higher deduplication rates (50% and above).3.2.1Performance Guidelines for Spectrum Protect Server-side Deduplication andCompression with 10Gbs DL 2.0 LinkWith server-side deduplication and compression and the above settings, full back up data transfer rate of up to ~560-615 GB/hour can be attained considering 50% deduplication rates for the data being backed up using a 10Gbps DL 2.0 link. The above rate is achieved with “MINIMUMExtentsize” parameter value of 250KB (mentioned as tunings in Section 2.3).If the “MINIMUMExtentsize” parameter value is increased to 750KB, full back up data transfer rate can increase up to ~680-725 GB/hour considering 50% deduplication rates for the data being backed up using a 10Gbps DL 2.0 link.Note that using 750KB extent size could increase the network bandwidth utilization, thereby reducing the backup time taken. However, it may have other trade-offs and may not suite all types of workloads (one implication could be that de-dup rates achieved might decrease). Hence setting 250KB extent size is recommended for workloads like Oracle databases, where higher de-duplication is expected.3.2.2Performance Guidelines for Spectrum Protect Client-side Deduplication andCompression with 10Gbs DL 2.0 LinkWith client-side deduplication and compression, with de-dup cache turned off, and with “MINIMUMExtentsize” parameter value of 750KB, full back up data transfer rate of up to ~780-880 GB/hour can be attained considering 50% deduplication rates for the data being backed up using a 10Gbps DL 2.0 link.4.AcknowledgementsWe hereby acknowledge the following people for their review feedback, suggestions and support while creating these best practices guide.•Rakesh Sharma, Power Systems Virtual Server Networking•James Damgar, Spectrum Protect Systems•Jeff Tenner, Power Systems Performance•Kokil Deuri, Power Systems Performance。
AIX环境下用磁带进行备份与恢复工作的一点总结
AIX环境下用磁带进行备份与恢复工作的一点总结AIX操作系统下的用磁带进行备份操作步骤:将一盘新磁带或无用磁带插入磁带机#tctl -f /dev/rmt0 rewind (重绕磁带设备)1,系统备份#smit mksysbBackup DEVICE or FILE [ /dev/rmt0]Create MAP files? noEXCLUDE files? noList files as they are backed up? noGenerate new /image.data file? yesEXPAND /tmp if needed? noDisable software packing of backup? noNumber of BLOCKS to write in a single output []# (Leave blank to use a system default)在Backup DEVICE or FILE项中,按F4或Esc+4 选择系统给出的提示值,一般磁带机设备名为/dev/rmt0,其余参数默认。
然后回车,开始系统备份在"备份设备或文件"中添入"/dev/rmt0"后回车. 系统会运行很长时间, 等到屏幕显示OK后拿出磁带. 这时候, 系统备份完成.注意: mksysb仅备份rootvg中已安装的文件系统.2. 用户数据备份常用磁带机选项/dev/rmt0: 若选择/dev/rmt0, 在插入磁带和写完一次磁带时, 磁带机都将磁带反绕到头. 因此, 下一次备份文件将覆盖本次备份./dev/rmt0.1: 若选择/dev/rmt0.1, 则插入磁带和写完一次磁带时, 磁带机均不反绕磁带. 因此, 一盘磁带可以连续备份几个文件或文件系统.#smit fs会列出以下选项:List All File SystemsList All Mounted File SysteAdd / Change / Show / DeletMount a File SystemMount a Group of File SysteUnmount a File SystemUnmount a Group of File SysVerify a File SystemBackup a File SystemRestore a File SystemList Contents of a Backup选择Backup a File SystemThis option will perform a backup by inode.* FILESYSTEM to backup [/home] +/(Esc+4 会列出系统中所有的文件系统,通过列表选择要备份的文件系统,例如/home)* Backup DEVICE [/dev/rmt0.1] +/(Esc+4 会列出系统中所有的用于备份的所有设备,通过列表选择或添加要进行备份的设备(/dev/rmt0,/dev/fd0),例如/dev/rmt0.1,) Backup LEVEL (0 for a full backup) [0] #RECORD backup in /etc/dumpdates? no +重复上述操作即可在同一盘磁带上备份多个文件系统.附: /dev/rmt0 和/dev/rmt0.* 区别Rmtx.x详解低密度打开时不倒带保持磁带原位置关闭后倒带/dev/rmtx no no yes/dev/rmtx.1 no no no/dev/rmtx.2 no yes yes/dev/rmtx.3 no yes no/dev/rmtx.4 yes no yes/dev/rmtx.5 yes no no/dev/rmtx.6 yes yes yes/dev/rmtx.7 yes yes no/dev/rmtx.N N=A+B+CA=Density B=Retension C=Rewind on close4=QIC120=120MB 2=yes 1=Do Not rewind0=QIC150=150MB 0=no 0=Rewind3. rootvg的恢复启动机器进入维护模式(参见安装手册), 当出现"Welcome to Base Operating System Installation and Maintanence"时,选3 "Start Maintenance Mode for System Recovery"恢复系统继续选4 "Install from a System Backup"出现"Choose mksysb Device"画面, 选"/dev/rmt0"并插入磁带后回车.这时候, 系统自动恢复操作系统.4. 用户数据恢复#tctl -f /dev/rmt0 rewind#smit fs会列出以下选项List All File SystemsList All Mounted File SysteAdd / Change / Show / DeletMount a File SystemMount a Group of File SysteUnmount a File SystemUnmount a Group of File SysVerify a File SystemBackup a File SystemRestore a File SystemList Contents of a Backup选择Restore a File System输出结果如下:Restore a File System* Restore DEVICE [/dev/rmt0] +/(Esc+4 会列出系统中所有的用于恢复的所有设备,通过列表选择或添加要进行恢复的设备(/dev/rmt0,/dev/fd0),例如/dev/rmt0)* Target DIRECTORY [/] /(输入要进行系统恢复的文件系统的目标目录)VERBOSE output? yes +Number of BLOCKS to read in a single input [] #operation系统会自动找到相应目录恢复.5.用tar命令进行文件的备份及其恢复tar是unix中的一个常用的命令,也是一个很重要的命令。
- 1、下载文档前请自行甄别文档内容的完整性,平台不提供额外的编辑、内容补充、找答案等附加服务。
- 2、"仅部分预览"的文档,不可在线预览部分如存在完整性等问题,可反馈申请退款(可完整预览的文档不适用该条件!)。
- 3、如文档侵犯您的权益,请联系客服反馈,我们会尽快为您处理(人工客服工作时间:9:00-18:30)。
AIX环境下磁带备份操作将一盘新磁带或无用磁带插入磁带机#tctl -f /dev/rmt0 rewind (重绕磁带设备)注:Tctl 用途;把子命令提供给一个流磁带设备。
1.系统备份# smit mksysbBackup DEVICE or FILE [ /dev/rmt0]Create MAP files? noEXCLUDE files? noList files as they are backed up? noGenerate new /image.data file? yesEXPAND /tmp if needed? noDisable software packing of backup? noNumber of BLOCKS to write in a single output []# (Leave blank to use a system default)在Backup DEVICE or FILE项中,按F4或Esc+4 选择系统给出的提示值,一般磁带机设备名为/dev/rmt0,其余参数默认。
然后回车,开始系统备份在"备份设备或文件"中添入"/dev/rmt0"后回车. 系统会运行很长时间, 等到屏幕显示OK后拿出磁带. 这时候, 系统备份完成.注意: mksysb仅备份rootvg中已安装的文件系统.2. 用户数据备份常用磁带机选项/dev/rmt0: 若选择/dev/rmt0, 在插入磁带和写完一次磁带时, 磁带机都将磁带反绕到头. 因此, 下一次备份文件将覆盖本次备份./dev/rmt0.1: 若选择/dev/rmt0.1, 则插入磁带和写完一次磁带时, 磁带机均不反绕磁带. 因此, 一盘磁带可以连续备份几个文件或文件系统.# smit fs会列出以下选项:List All File SystemsList All Mounted File SysteAdd / Change / Show / DeletMount a File SystemMount a Group of File SysteUnmount a File SystemUnmount a Group of File SysVerify a File SystemBackup a File SystemRestore a File SystemList Contents of a Backup选择Backup a File System ,得到如下菜单:This option will perform a backup by inode.* FILESYSTEM to backup [/home] +/(Esc+4 会列出系统中所有的文件系统,通过列表选择要备份的文件系统,例如/home)* Backup DEVICE [/dev/rmt0.1] +/(Esc+4 会列出系统中所有的用于备份的所有设备,通过列表选择或添加要进行备份的设备(/dev/rmt0,/dev/fd0),例如/dev/rmt0.1,) Backup LEVEL (0 for a full backup) [0] #RECORD backup in /etc/dumpdates? no +重复上述操作即可在同一盘磁带上备份多个文件系统.附: /dev/rmt0 和/dev/rmt0.* 区别Rmtx.x详解低密度 打开时不倒带保持磁带原位置 关闭后倒带/dev/rmtx no no yes/dev/rmtx.1 no no no/dev/rmtx.2 no yes yes/dev/rmtx.3 no yes no/dev/rmtx.4 yes no yes/dev/rmtx.5 yes no no/dev/rmtx.6 yes yes yes/dev/rmtx.7 yes yes no/dev/rmtx.N N=A+B+CA=Density B=Retension C=Rewind on close4=QIC120=120MB 2=yes 1=Do Not rewind0=QIC150=150MB 0=no 0=Rewind3. rootvg的恢复启动机器进入维护模式, 当出现"Welcome to Base Operating System Installation and Maintanence"时,选3 "Start Maintenance Mode for System Recovery"恢复系统继续选4 "Install from a System Backup"出现"Choose mksysb Device"画面, 选"/dev/rmt0"并插入磁带后回车.这时 候, 系统自动恢复操作系统.4. 用户数据恢复#tctl -f /dev/rmt0 rewind# smit fs会列出以下选项List All File SystemsList All Mounted File SysteAdd / Change / Show / DeletMount a File SystemMount a Group of File SysteUnmount a File SystemUnmount a Group of File SysVerify a File SystemBackup a File SystemRestore a File SystemList Contents of a Backup选择Restore a File System输出结果如下:Restore a File System* Restore DEVICE [/dev/rmt0] +/(Esc+4 会列出系统中所有的用于恢复的所有设备,通过列表选择或添加要进行恢复的设备(/dev/rmt0,/dev/fd0),例如/dev/rmt0)* Target DIRECTORY [/] /(输入要进行系统恢复的文件系统的目标目录)VERBOSE output? yes +Number of BLOCKS to read in a single input [] #operation系统会自动找到相应目录恢复.5.用tar命令进行文件的备份及其恢复tar是unix中的一个常用的命令,也是一个很重要的命令。
tar命令将磁盘上的文件拷贝到档案媒体上(比如:软盘到硬盘,也可以是硬盘到软盘),或把档案媒体上记录的数据恢复成磁盘上的文件。
遇到错误时,t ar命令不提供任何恢复操作。
tar cvf /dev/rmt0 file1 file2 file3(文件名) 将磁盘中的文件备份到磁带tar rvf /dev/rmt0 file1 file2 file3(文件名) 将磁盘中的文件追加到以前备份的文件后面tar uvf /dev/rmt0 file1 file2 file3 dir(文件名) 将磁盘上的文件追加到以前备份的文件后面,tar tvf /dev/rmt0 查看备份到磁带中的文件tar tvf /dev/rmt0 > stlist 查看备份磁带内容并输出到文件tar xvf /dev/rmt0 将磁带上的备份文件恢复到当前目录注:tar cvf 是从头写 tar rvf 是接着写(硬写) tar uvf是不覆盖追加6.用cpio向软盘或磁带转存文件使用cpio命令可将硬盘文件拷贝到磁带或软盘上。
例如,将当前目录下所有以C为后缀的文件拷贝到软盘上:ls *.C | cpio -ov > /dev/rfd0例如,将当前目录的所有文件和子目录拷贝到软盘上:find . -print | cpio -ov > /dev/rfd0使用cpio命令可将文件从软盘或磁带拷贝恢复到硬盘上。
例如,将软盘的文件拷贝到硬盘:cpio -iv < /dev/rfd0例如,列出fd0的文件:cpio -itr < /dev/rfd0例如,将软盘的文件拷贝到当前目录:cpio -idmv < /dev/rfd0IBM AIX 系统备份与恢复专题FAQ1. Q:我以前用smitty mksysb 备份了aix到磁带里,现在想清空这盒磁带备份新的aix,请问该用什么命令才能清空磁带?A:1.用tar cvf /dev/rmt0 ( 测试过)2.#tctl -f /dev/rmt0 erase2. Q:如何备份裸设备AIX中mksysb和savevg都只备份mount的文件系统,如果想备份裸设备,可选择用dd 命令,将裸设备中的内容硬拷贝成文件。
较完善的方法是选择成熟软件,如IBM的SYSBACK或Storix Backup Administrator for AIX(该软件可从 上下载)3. Q:如何实现两台UNIX之间的磁带拷贝A:执行下列命令,利用网络实现磁带拷贝tar cvfbX - . | compress | rsh AIXMACHINE "uncompress | dd of=/dev/rmt0 obs=20b"注意:两台UNIX网络设置应允许rsh工作正常4. Q:如何格式化软盘A:format -d /dev/rfd0注意:在UNIX系统中格式化的软盘不能在DOS中使用。
5. Q:如何软盘拷贝A:flcopy命令用于将一个软盘中的内容拷贝到另一张软盘上。