奥迪收音机使用说明书
迪奥利高级小型收音机MC108C用户指南说明书

Micro Hi-Fi System MC108CImportant notes for users inthe U.K.Mains plugThis apparatus is fitted with an approved 13Amp plug. T o change a fuse in this type ofplug proceed as follows:1Remove fuse cover and fuse.2Fix new fuse which should be a BS1362 3Amp, A.S.T.A. or BSI approved type.3Refit the fuse cover.If the fitted plug is not suitable for yoursocket outlets, it should be cut off and anappropriate plug fitted in its place.If the mains plug contains a fuse, this shouldhave a value of 3 Amp.If a plug without afuse is used,the fuse at the distribution boardshould not be greater than 3 Amp.Note:The severed plug must be disposed of toavoid a possible shock hazard should it beinserted into a 13 Amp socket elsewhere.How to connect a plugThe wires in the mains lead are colouredwith the following code: blue = neutral (N),brown = live (L).¶As these colours may not correspond withthe colour markings identifying the terminalsin your plug, proceed as follows:–Connect the blue wire to the terminalmarked N or coloured black.–Connect the brown wire to the terminalmarked L or coloured red.–Do not connect either wire to the earthterminal in the plug,marked E (or e) orcoloured green (or green and yellow).Before replacing the plug cover,make certainthat the cord grip is clamped over the sheathof the lead - not simply over the two wires.Copyright in the U.K.Recording and playback of material mayrequire consent. See Copyright Act 1956 andThe Performer’s Protection Acts 1958 to1972.CAUTIONUse of controls or adjustments orperformance of procedures otherthan herein may result in hazardousradiation exposure or other unsafeoperation.ContentsGeneral InformationEnvironmental information (5)Supplied accessories (5)Safety information (5)PreparationRear connections.............................................6–7Before using the remote control (7)Replacing battery (lithium CR2032)into the remote control (7)ControlsControls on the system and remotecontrol (8)Basic FunctionsSwitching the system on (9)Power-saving automatic standby (9)Adjusting volume and sound (9)CD OperationPlaying a disc (10)Selecting a different track (10)Finding a passage within a track (10)Different play modes: Shuffle and Repeat (11)Programming track numbers (11)Erasing the programme (11)Radio ReceptionT uning to radio stations (12)Maintenance (12)Clock/TimerSetting the clock (13)Setting the timer (13)Activating and deactivating TIMER (13)Activating and deactivating SLEEP (14)Specifications (14)Troubleshooting (15)l iGeneral InformationThis product complies with the radiointerference requirements of the European Community.Supplied accessories– 2 speaker boxes–remote control with battery –AM loop antennaEnvironmental InformationAll unnecessary packaging has been omitted. We have tried to make the packaging easy toseparate into three materials: cardboard (box),polystyrene foam (buffer) and polyethylene (bags,protective foam sheet).Y our system consists of materials which can be recycled and reused if disassembled by a specialized company. Please observe the local regulations regarding the disposal of packaging materials, exhausted batteries and old equipment.Disposal of your old product Y our product is designed and manufactured with high quality materials and components,which can be recycled and reused.When this crossed-out wheeled bin symbol is attached to a product it means the product is covered by the European Directive 2002/96/EC Please inform yourself about the local separate collection system for electrical and electronic products.Please act according to your local rules and do not dispose of your old products with yournormal household waste. The correct disposal of your old product will help prevent potential negative consequences for the environment and human health.Safety Information●Before operating the system, check that theoperating voltage indicated on the typeplate (or the voltage indication beside the voltage selector) of your system is identical with the voltage of your local power supply. If not, please consult your dealer.●Place the system on a flat, hard and stablesurface.●Place the system in a location with adequateventilation to prevent internal heat build-up in your system. Allow at least 10 cm (4 inches)clearance from the rear and the top of the unit and 5 cm (2 inches) from each side.●The ventilation should not be impeded bycovering the ventilation openings with items,such as newspapers, table-cloths, curtains, etc.●Do not expose the system, batteries or discs toexcessive moisture, rain, sand or heat sources caused by heating equipment or direct sunlight.●No naked flame sources, such as lighted candles,should be placed on the apparatus.●No objects filled with liquids, such as vases, shallbe placed on the apparatus.●If the system is brought directly from a cold to awarm location, or is placed in a very damp room,moisture may condense on the lens of the disc unit inside the system. Should this occur, the CD player would not operate normally. Leave the power on for about one hour with no disc in the system until normal playback is possible.●The mechanical parts of the set contain self-lubricating bearings and must not be oiled or lubricated.●When the system is switched to Standbymode, it is still consuming some power.T o disconnect the system from thepower supply completely, remove the AC power plug from the wall socket.PreparationsRear connectionsThe type plate is located at the rear of the system.For users in the U.K.: please follow the instructions on page 2.A Power–Before connecting the AC power cord to the wall outlet, ensure that all other connections have been made.WARNING!–For optimal performance, use only the original power cable.–Never make or change any connections with the power switched on.B Antennas Connection AM (MW) antenna1Unfold the loop antenna and if necessary, use screws (not supplied)to fix it to a flat, hard and stable place:2ANTENNA as shown above.3Adjust the antenna for optimal reception●Position the antenna as far as possible from a TV,VCR or other radiation source.l iPreparationsC Speakers ConnectionFront SpeakersConnect the speaker wires to the SPEAKERS terminals, right speaker to "RIGHT " and left speaker to "LEFT ", coloured (marked) wire to ●wire into the terminal as shown.Notes:–For optimal sound performance, use the supplied speakers.–Do not connect more than one speaker to any one pair of +/- speaker terminals.–Do not connect speakers with an impedance Before using the remote control1Pull out the plastic protective sheet.2Select the source you wish to control by pressing one of the source select keys on the remote control (for example CD, TUNER).Replacing battery (lithiumCR2032) into the remote control 1Pull out the knob A slightly to the left.2Pull out the battery compartment B .3Replace a new battery and fully insert thebattery compartment back to the original CAUTION!Batteries contain chemical substances, so they should be disposed off properly.Controls (illustrations on page 3)Controls on the system andremote control1BAND–for T uner (on the set only) selects waveband.2SOURCE (CD/ TUNER/ AUX)–switches on the system.–selects the respective sound source for CD/ FM/MW/ AUX.3POWER / y–switches the system to standby/on.4PROG/CLOCKfor CD.................programs tracks and reviews theprogram.for clock..............sets the clock function.5OPEN•CLOSE–opens/closes the CD door.6VOLUME – / +–adjusts volume level.7TUNING 0–tunes to radio stations.8iR SENSOR–infrared sensor for remote control.9n–connect headphones.0ÉÅfor CD.................starts or pauses CD playback.!¡1 / 2™–skips to the beginning of a current track/previous/ next track.–fast searches back and forward within a track/CD.@STOP 9–stops CD playback or erase a CD program.#AUX IN–connects to external audio source.$REPEAT–repeats a track/CD program/ entire CD.%SHUFF (SHUFFLE)–plays CD tracks in random order.^SLEEP–activates/deactivates or selects the sleeper time.&TIMER–activates/deactivates or sets the timer function..*DBB–(Dynamic Bass Boost) enhances the bass.$MUTE–switches playback sound off and on.Notes for remote control:–First select the source you wish to controlby pressing one of the source select keys onthe remote control (for example CD ,TUNER).–Then select the desired function (forexampleÉ,í,ë).E n g l i s hIMPORTANT:Before you operate the system, complete the preparation procedures.Switching the system on●Press POWER (y on the remote control).➜The system will switch to the last selected source.●Press SOURCE (CD , TUNER or AUX onthe remote control).➜The system will switch to the selected source.T o switch the system to standby mode ●Press POWER (y on the remote control).➜The volume level (up to maximum volume level of 20), interactive sound settings, last selected source will be retained in the player's memory.Power-saving automatic standbyThe power-saving feature automatically switches to standby 15 minutes after a CD playback has ended and no control is operated.➜Playback will continue without sound and the display shows MUTE .●T o start sound playback you can:–press MUTE again;–adjust the volume controls;–change source.CD Operation5T o pause playback press 2;. Press 2; again toresume play.➜The display freezes and the current tracknumber flashes when playback is paused.6T o stop disc playback,press 9.Note: CD play will also stop when;– the CD door is opened.– the disc has reached the end.– you select another source: AUX,TUNER.– you select standby.Selecting a different track●Press ¡1 or 2™ once or repeatedly until thedesired track number appears in the display.●If you have selected a track number shortly afterloading a disc, or in the PAUSE position, you willneed to press 2; to start playback.Finding a passage within a track1Press and hold down ¡1 or 2™ .➜The disc is played at high speed and lowvolume.2When you find the passage you want,release¡1 or 2™ .➜Normal playback continues.IMPORTANT:The lens of the CD player should never be¶123Insert a disc with the printed side facing up andpress down on OPEN•CLOSE to close theCD door.➜is displayed as the CD player scansthe contents of a disc.The total number oftracks and time are also shown.4Press 2; to start playback.➜Current track number followed by elapsedplaying time of the track are displayed during discplayback.l iCD OperationDifferent play modes: SHUFFLE and REPEATY ou can select and change the various playmodes before or during playback.REPEAT............plays the current trackcontinuouslyREPEAT ALL...repeats the entire disc/programmeSHUFFLE.........tracks of the entire disc areplayed in random order1T o select your play mode,press SHUFF or REPEAT on the remote control before orduring playback until the display shows thedesired function.2Press 2; to start playback if in the STOP position.➜If you have selected SHUFFLE, playback starts automatically.3T o return to normal playback,press SHUFF or REPEAT on the remote control until thevarious SHUFFLE/ REPEAT modes are no longer displayed.●Y ou can also press STOP9 to cancel your playmode..Programming track numbersProgramme in the STOP position to select and store your disc tracks in the desired sequence. If you like,store any track more than once. Up to20 tracks can be stored in the memory.1Press ¡1 or 2™ to select your desired track number.2Press PROG.➜Display shows:the selected track number.PROG flashes and appears briefly.3Repeat steps 1-2 to select and store all desired tracks.➜ is displayed if you attempt toprogramme more than 20 tracks.4T o start playback of your disc programme,press 2;.Notes:–If you wish,you can add further tracks to yourcurrent program.Make sure you are in the STOPposition, and that you have not exceeded 20tracks.–Display shows if there is no trackselected.Erasing the programmeY ou can erase the programme by:●pressing 9 once in the STOP mode;●pressing 9 twice during playback;●opening the CD compartment;●Select another sound source➜PROG disappears from the display.T uning to radio stations 1Select TUNER source.➜is displayed.2Press BAND (TUNER on the remotecontrol ) once or more to select your waveband.Cleaning the Cabinet●Use a soft cloth slightly moistened with a milddetergent solution. Do not use a solutioncontaining alcohol, spirits, ammonia or abrasives.Cleaning Discs●When a disc becomes dirty,clean it with a cleaning cloth.Wipe the disc from the centre out.●Do not use solvents such asbenzene, thinner, commerciallyavailable cleaners, or antistatic spray intended for analogue records.MaintenanceCleaning the disc lens●After prolonged use, dirt or dust mayaccumulate at the disc lens. T o ensure good playback quality, clean the disc lens with Philips CD Lens Cleaner or any commercially available cleaner. Follow the instructions supplied with cleaner.E n g l i sClock/TimerSetting the timer●The system can be used as an alarm clock. CDor TUNER can be set to switch on at a preset time. The clock time needs to be set first before the timer can be used.●If no button is pressed within 90 seconds duringtimer setup, the system will exit timer setting mode automatically.1In any mode, press TIMER (on the remote control) for more than 2 seconds.2Press ¡1 / 2™ (or CD / TUNER on the remote control) to select sound source.3Press TIMER to confirm your desired source.➜ The clock digits for the hours flash.4Press ¡1 / 2™ to set the hours.5Press TIMER again.➜The clock digits for the minutes flash.6Press ¡1 / 2™ to set the minutes.7Press TIMER to confirm the time.➜The timer is now set and actiated.Notes:- If source CD is selected and no disc is in the CD tray or the disc has an error, TUNER will be selected automatically.- The volume level will be increased from min. to 20within 2 minutes after alarm wake up.Activating and deactivating TIMER●In standby or during playback, pressTIMER once.➜ if activated, and disappears if deactivated.Setting the clock 1In Standby mode, press PROG/CLOCK button.➜The clock digits for the hours flash.2Press ¡1 / 2™ to set the hours.3Press PROG/CLOCK again.➜The clock digits for the minutes flash.4Press ¡1 / 2™ to set the minutes.5Press PROG/CLOCK to confirm the time.Note:– If the clock has not been set, --:-- will be displayed.Clock/TimerSpecificationsAMPLIFIEROutput power..........................................2 x 2 W RMS.................................................................4 W + 4 W MPOSignal-to-noise ratio..........................≥ 62 dBA (IEC)Frequency response.........60 – 16000 Hz, ± 3 dBImpedance loudspeakers.........................................8 ΩImpedance headphones.................32 Ω – 1000 ΩCD PLAYERFrequency range..................................20 – 20000 HzSignal-to-noise ratio............................................75 dBATUNERFM wave range...................................87.5 – 108 MHzMW wave range................................531 – 1602 kHzSensitivity at 75 Ω– mono,26 dB signal-to-noise ratio............2.8 µV– stereo,46 dB signal-to-noise ratio........61.4 µVSelectivity.................................................................≥ 28 dBT otal harmonic distortion.....................................≤ 5%Frequency response.....63 – 12500 Hz (± 3 dB)Signal-to-noise-ratio..........................................≥ 50 dBSPEAKERSBass reflex systemDimensions (w x h x d).150 x 150 x 200 (mm)GENERAL INFORMATIONAC Power.....................................220 – 230 V / 50 HzDimensions (w x h x d)..150 x 150 x 220 (mm)Weight (with/without speakers).................................................................................................approx.4.9 / 2.3 kgStandby power consumption..........................< 3 WSubject to modificationl iTroubleshooting WARNINGUnder no circumstances should you try to repair the system yourself, as this will invalidate the warranty. Do not open the system as there is a risk of electric shock.If a fault occurs, first check the points listed below before taking the system for repair. If you are unable to remedy a problem by following these hints, consult your dealer or service centre. Problem SolutionCD OPERATION“no cd” is displayed.–Insert a disc.–Check if the disc is inserted upside down.–Wait until the moisture condensation at the lenshas cleared.–Replace or clean the disc,see “Maintenance”.–Use a finalised CD-RW or CD-R.RADIO RECEPTIONRadio reception is poor.–If the signal is too weak,adjust the antenna orconnect an external antenna for better reception.–Increase the distance between the Micro HiFiSystem and your TV or VCR.GENERALThe system does not react when buttons–Remove and reconnect the AC power plug and are pressed.switch on the system again.Sound cannot be heard or is of poor–Adjust the volume.quality.–Disconnect the headphones.–Check that the speakers are connected correctly.–Check if the stripped speaker wire is clamped. The left and right sound outputs are–Check the speaker connections and location. reversed.The remote control does not function–Select the source (CD or TUNER,for example) properly.before pressing the function button (É,í,ë).–Reduce the distance between the remote controland the system.–Insert the batteries with their polarities(+/– signs) aligned as indicated.–Replace the batteries.–Point the remote control directly towardIR sensor on the front of the system.The timer is not working.–Set the clock correctly.–Press TIMER to switch on the timer.–If a recording is in progress, stop the recording. The Clock/Timer setting is erased.–Power has been interrupted or the power cordhas been disconnected.Reset the clock/timer.MC108Meet Philips at the Internet 。
奥迪自学手册中文版:SSP395_奥迪A5车载电器CN

湿度传感器 G355
舒适系统中央控制单元 J393
警报器 H12
Climatronic全自动 空调系统控制单元
J255
新鲜空气鼓 风机控制单元
J126
翻板控制 伺服电机
14
倒车影像 系统 J772
拖车识别装置 控制单元 J345
转向柱电子装置 控制单元 J527
座椅和转向柱 调整控制单元 (带有记忆功能)
数字音响 控制单元
J525 电话发送和 接收装置
R36
395_027 15
概述
分布或功能配有 MOST 总线车辆
空气质量传感器 G238
制冷剂压力/ 温度传感器
G395
车库门操作 控制单元
J530
车灯开关 E1
刮水器电机 控制单元 J400
雨星天线 G397
车载供电控制单元 J519
电子转向柱锁止装置 控制单元 J764
车灯开关 . . . . . .. . . . . . .. . . . . . .. . . . . . .. . . . . . .. . . . . . .. . .33
刮水器电机控制单元 . . .. . . . .. . . . . . .. . . . . . .. . . . . . .. . . . . . .. . 33
J136
副驾驶员侧座椅 调节装置控制单元 (带有记忆功能)
J521
驾驶员车门 控制单元
J386
副驾驶员侧 车门控制单元
J387
多功能方向盘 控制单元 J453
大灯(右) 功率输出模块
J667
大灯(右) 功率输出模块
J668
驱动 CAN 总线 舒适 CAN 总线 组合仪表 / 底盘 CAN 总线 扩展 CAN 总线
收音机、导航系统快速操作指南4.16
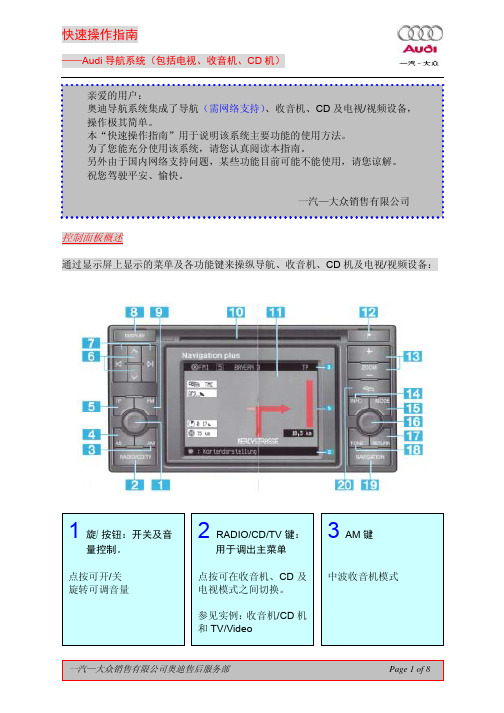
5 TP 键
TP-交通节目(交通台新 闻) :点按 TP 键系统会 自动搜索它可接收到的 第一个 TP 信号(如果收 音机尚未调至 TP 台) 。 TP 字样会出现在信息区 的电台名称旁。
说明:当收音机处于静音状 态或正在使用 CD 机时,可 自动接通交通播报。 若您不想收听此播报,点按 TP 键即可。如想关闭 TP 键 功能, 可按住 TP 键并保持 2 秒钟即可。
TV/Video 模式 选择预置的频道: 反复点按带有箭头的键 即可按顺序选择已存储 的频道。
7 搜索键
收音机模式 自动搜索电台: 点按带有箭头的键即可 搜索电台, 收音机会调至 第一个收音效果良好的 电台。 手动搜索电台: 按住带有箭头的键。 CD 模式 选择 CD 曲目: 反复点按带有箭头的键 直至找到所需曲目。 快进及快退: 按住带箭头的键不放即 可。 TV/Video 模式 选 择 频 道: 点 按 带 有箭 头的键即可切换频道。
中波收音机模式
一汽—大众销售有限公司奥迪售后服务部
Page 1 of 8
快速操作指南
——Audi 导航系统(包括电视、收音机、CD 机)
4 AS 键
收音机(Radio)模式 自动存储功能: 使用该键, 您可将当前区 域收听效果最好的几个 电台自动存储起来(FM 及 AM 台 已 手 动 存 储 了) 。在您长途行车且您 经常收听的电台已不在 接收区域时, 本功能尤其 有用。 如何存储电台: 点按 3 或 9 键选择波段, 然后按住 AS 键,直至收 音机静音且发出“嘟嘟” 声,这时信息区会显示 AS,且(AUTOSTORE) 在显示屏上闪动。 如何检索已存储的电台: 点按 6 键选择一个已存 储的电台,点按 AS 键在 自动存储(AUTOSTORE) 的电台 “和手动存储的电 台之间进行切换。 CD 模式 CD 工作: 点按该键, 可按随机顺序 播放 CD 上的曲目。 TV/Video 模式 自动存储功能: 点按此键, 可将接收区内 接收效果最好的 8 个频 道预置在键内。 选择预置频道: 点按 6 键既可选择某一 预置频道。
Audi手机车载导航设备用户手册说明书
User’s ManualAndroid car stereo For AudiWe are very glad that you have chosen this car audio navigation.This device is the Android platform product that supports wifi,you instantly have a fast and convenient internet experience,and it features with simple figure, cool interface and rich multimedia entertainment functions.,Let you have a complete different user experience. This article describes the multiple functions of the equipment,technical and precautions comprehensively,Please read this manual carefully in order to guide you to use the unit easily.The user of certain features of these devices depends on your network service provider’s network settings and performance.In addition,due to the different network service providers,some certain functions of this device may not be able to apply or restrict to apply.And please contact your network provider for consulting the network functions and availability of this device.Our company will retain the right to edit and correct this user manual,without notice and does not bear any responsibility.1.This machine is used in a car with a negative battery system of12V voltage.DON’T install this machine directly on a24V battery track or bus.2.DON’T install this machine in a place which obstructs the driver’s horizon or affect the driving operation.To avoid the traffic accident and distracting,the driver should not operate the machine or watch the video while driving。
汽车收音机操作方法
汽车收音机操作方法
汽车收音机的操作方法通常如下:
1. 打开收音机电源:在车辆电源开关打开的情况下,按下收音机的电源按钮或旋钮,将收音机置为开启状态。
2. 调节频道:使用收音机上的频道选择按钮或旋钮,逐步调节到所需的无线电频道。
3. 搜索频道:如果你不确定要调频到哪个频道,可以使用收音机上的搜索功能。
按下搜索按钮或旋钮,收音机将自动搜寻并保存可收听的无线电频道。
4. 调节音量:使用收音机上的音量按钮或旋钮,逐步调节收听音量。
注意控制音量不要太大,以免影响驾驶安全。
5. 保存频道:一旦调频到了想要保存的频道,按下收音机上的预置频道按钮或旋钮,将频道保存在预置存储位置。
6. 切换源:一些汽车收音机还可以切换到其他音频源,如CD、MP3、蓝牙等。
按下收音机上对应的源按钮或旋钮,即可切换到选定的音频源。
7. 其他功能:不同的汽车收音机可能具有不同的功能,例如调节音调、平衡控
制、声场模式等。
按照收音机的说明书了解具体的操作方法。
请注意,以上是一般汽车收音机的操作方法,具体操作可能因收音机品牌、型号和车辆不同而有所差异。
建议阅读收音机的使用说明书,了解更详细的操作方法和注意事项。
DUAL 车载FM AM收音机操作指南说明书

AM/FM Tuner OperationTo download the complete Owner’s Manual for your radio,please visit /support/manuals.php.Seek TuningManual TuningBandStoring PresetsRecalling PresetsPress TUNE nn or TUNE ll for more than onesecond to seek to the next strong station.Press TUNE nn or TUNE ll momentarily to moveradio frequency up or down one step at a time. Pressand hold to advance quickly.Press BAND to select between FM1, FM2, FM3, AM1and AM2 bands. Up to six presets can be programmedfor each band, enabling up to 18 FM stations and 12 AMstations to be stored in memory.Select the desired band and station. Hold the P button,turn the volume up/down key until the desired presetnumber is highlighted, then press SELECTto store thepreset.Press the P buttons to cycle through the 1-6 presets inthe current band.Limited One-Year WarrantyThis warranty gives you specific legal rights. You may also have other rights whichvary from state to state. Dual Electronics Corp. warrants this product to the originalpurchaser to be free from defects in material and workmanship for a period ofone year from the date of the original purchase. (Note that select marine productscarry a 2-year warranty. Please visit for details.) Dual ElectronicsCorp. agrees, at our option, during the warranty period, to repair any defect inmaterial or workmanship or to furnish an equal new, renewed or comparableproduct (whichever is deemed necessary) in exchange without charges, subjectto verification of the defect or malfunction and proof of the date of purchase.Subsequent replacement products are warranted for the balance of the originalwarranty period.Who is covered? This warranty is extended to the original retail purchaser forproducts purchased and used in the U.S.A.What is covered? This warranty covers all defects in material and workmanshipin this product. The following are not covered: installation/removal costs, damageresulting from accident, misuse, abuse, neglect, product modification, improperinstallation, incorrect line voltage, unauthorized repair or failure to followinstructions supplied with the product, or damage occurring during return shipmentof the product.What to do?1. Before you call for service, check the troubleshooting guide in your owner’smanual. A slight adjustment of any custom controls may save you a service call.2. If you require service during the warranty period, you must carefully pack theproduct (preferably in the original package) and ship it by prepaid transportationwith a copy of the original receipt from the retailer to an authorized servicecenter.3. Please describe your problem in writing and include your name, a return UPSshipping address (P.O. Box not acceptable), and a daytime phone number withyour shipment.4. For more information and for the location of the nearest authorized service center****************************************************************.Exclusion of Certain Damages: This warranty is exclusive and in lieu of anyand all other warranties, expressed or implied, including without limitation theimplied warranties of merchantability and fitness for a particular purpose and anyobligation, liability, right, claim or remedy in contract or tort, whether or not arisingfrom the company’s negligence, actual or imputed. No person or representative isauthorized to assume for the company any other liability in connection with the saleof this product. In no event shall the company be liable for indirect, incidental orconsequential damages.FCC ComplianceThis device complies with Part 15 of the FCC Rules. Operation is subject to thefollowing two conditions:(1) this device may not cause harmful interference, and(2) this device must accept any interference received, including interference that maycause undesired operation.Warning: Changes or modifications to this unit not expressly approved by the partyresponsible for compliance could void the user’s authority to operate the equipment.Note: This equipment has been tested and found to comply with the limits for a ClassB digital device, pursuant to Part 15 of the FCC Rules. These limits are designedto provide reasonable protection against harmful interference in a residentialinstallation. This equipment generates, uses and can radiate radio frequencyenergy and, if not installed and used in accordance with the instructions, may causeharmful interference to radio communications. However, there is no guarantee thatinterference will not occur in a particular installation. If this equipment does causeharmful interference to radio or television reception, which can be determinedby turning the equipment off and on, the user is encouraged to try to correct theinterference by one or more of the following measures:• Reorient or relocate the receiving antenna.• Increase the separation between the equipment and receiver.• Connect the equipment into an outlet on a circuit different from that to whichthe receiver is connected.• Consult the dealer or an experienced radio/TV technician for help.Bluetooth® Operation*PreparationPairing a NewDevicePairingAdditionalDevicesDisconnecting aDeviceBluetooth ResetStreaming AudioTroubleshootingBefore using a Bluetooth device, it must be paired andconnected. Ensure that Bluetooth is activated on yourdevice before beginning the pairing process.The head unit broadcasts the pairing signal constantlywhen no devices are connected. Complete the pairingsequence from your Bluetooth device. Refer to theowner’s manual for your device for more details.Note: The head unit can be in any mode of operationwhen pairing is performed.If a device is currently connected, press and holdBAND to disconnect the current device before a newdevice can be paired. Then begin the pairing sequencefrom the new Bluetooth device.Press and hold BAND for 3 seconds to disconnect aconnected device. The device will remain paired andappear in the SEARCH menu, but not be connected.Resetting the Bluetooth module will remove the list ofpaired phones. Reset Bluetooth as follows:1) Press MODE until the head unit is in Bluetooth mode.2) Press and hold MENU for 3 seconds to reset theBluetooth settings back to the factory default.The head unit supports A2DP wireless streaming audiofrom a Bluetooth mobile device directly to your head unit.The following functions can be used to control the music:•Press ll to skip to the next available audio track.•Press nn to skip to the previous audio track.•Press l/II to toggle between play and pause duringplayback.Dual Electronics Corp.Toll Free: 1-866-382-5476Monday-Friday, 9AM-5PM©2017 Dual Electronics Corp. All rights reserved.iPhone, iPod, iPod classic, iPod nano, and iPod touch are trademarks of Apple Inc., registered in the U.S. and other countries.“Made for iPod” and “Made for iPhone” mean that an electronic accessory has been designed to connect specifically to iPod or iPhone,respectively, and has been certified by the developer to meet Apple performance standards. Apple is not responsible for the operation ofthis device or its compliance with safety and regulatory standards. Please note that the use of this accessory with iPod or iPhone may affectwireless performance.The Bluetooth® word mark and logos are owned by the Bluetooth SIG, Inc. and any use of such marks by Namsung is under license.Pandora, the Pandora logo, and the Pandora trade dress are trademarks of Pandora Media, Inc., used with permission.Other trademarks and trade names are those of their respective owners.NSC0517-V02Mounting & WiringFuse:When replacing the fuse, makesure new fuse is the correct typeand amperage. Using an incorrectfuse could damage the radio.Tip:When a suitable ground wire isnot present in the vehicle wiringharness, connect the black groundwire to the vehicle chassis.To download the complete Owner’s Manual for your radio,please visit /support/manuals.php.Power On/OffChanging ModesVolumeMuteAuxiliary InputsDisplayMenuResetPress the button to turn the unit on. Press and holdto turn unit off.Press MODE to select between AM/FM, auxiliary, USB andoperation of iPod/iPhone. Modes of operation are shownin the display.Adjust volume using volume up/down key.Press to silence the audio. Press again to resumelistening at the previously selected volume.Insert RCA cables into the rear AUX-IN connectors.Press DISP to toggle display between various displayedinformation.Press MENU to access the audio and setup menu options.If abnormal operation occurs, press and hold MENU andTUNE nn for 3 seconds to reset the unit to the defaultfactory settings.Operation of iPod/iPhone*Connect an iPod/iPhone Device (soldseparately)Song SelectForward/ReversePauseRepeatRandomIntroMusic SearchManual Controlfor iPodTo play music from an iPod/iPhone device, connect the USBcable (included with your iPod/iPhone device) to the unit’s USBport. Playback will begin automatically.Press ll to skip to the next song. Press nn to return tothe beginning of the current song. Pressing nn again skipsto the beginning of the previous song.Press and hold ll or nn to fast forward or reverse.Press l/ II to temporarily stop playback.Press l/ II again to resume playback.Press BAND to enter the Repeat menu, then turn the volumeup/down key to select one of the following options:• Off - Repeats all tracks.• Current Song - Repeats selected track.Press BAND to enter the Random menu, then turn the volumeup/down key to select one of the following options:• Off - Cancels the RDM function.• All Songs - Plays all tracks in random order.• Current Album - Plays all tracks in the selected albumin random order.Press BAND to enter the Intro menu, then turn the volume up/down key to select one of the following options:• OFF - Cancels the INT function.• ON - Plays first 10 seconds of each track.Turn the volume up/down key to select between artists,albums, songs, playlists, podcasts and audiobooks. PressSELECT to select the desired search category. Most searchcategories have subcategories to navigate through.When “MANUAL” control is selected from the Setup Menu,the iPod or iPhone device can be controlled directly from thedevice’s interface. All functions except for volume can beused from the iPod or i Phone device. Note: The firmware ofthe iPod/iPhone must be up dated to the latest version to becompatible with manual control model. Not all devices arecompatible with manual control mode.MP3 Operation*Playing MP3 FilesTrack SelectFast Forward andReversePauseFolder AccessRepeatRandomIntroTo play MP3 files, insert a USB device containing MP3 files.Press TUNE ll to skip to the beginning of the next song.Press TUNE nn to return to the beginning of the currentsong. Pressing TUNE nn again skips to the beginning ofthe previous song.Press and hold TUNE ll or TUNE nn to fast forwardor reverse a track.Press l/ II to temporarily stop playback.Press l/ II again to resume playback.Press to select the next folder. Press to select thewith more than one folder.Press BAND to enter the Repeat menu, then turn thevolume up/down key to select one of the following options:• Current Song - Continuously repeats selected track.• Current Folder - Continuously repeats all files in folder.Press BAND to enter the Random menu, then turn thevolume up/down key to select one of the following options:• Off - Cancels RDM function.• All Songs - Plays all tracks in random order.• Current Folder - Plays all tracks in folder in random orderPress BAND to enter the Intro menu, then turn the volumeup/down key to select one of the following options:• Off - Cancels the INT function.• All Songs - Plays first 10 seconds of each track.• Current Folder - Plays first 10 seconds of each track inthe selected folder.To download the complete,model-specific manual, please visit/support/manuals.phpor call 1-866-382-5476,9AM-5PM EST (Monday-Friday).1. Choose a mounting location on the dash board or instrument panel that willallow room behind to run radio cables to the power source. Consider how youwill use the AUX IN, LINE OUT and USB connectors and route the appropriateextension cables to an accessible area.2. Cut a hole in the dash board using the template provided in the back of thismanual. At least 3 3/4” depth is needed to mount the radio.IMPORTANT! Do not mount this unit where it can be submerged in water.3. Slide the included spring washers (B) over the screw posts (A) and attach thescrew posts to the back of the radio.4. Place the radio in front of the dashboard opening so the wiring can be broughtthrough the opening.5. After completing the wiring connections, turn the radio on to confirm operation(vehicle accessory switch must be on). If the radio does not operate, recheckall wiring until the problem is corrected. Once proper operation is achieved,turn the accessory switch off and proceed with final mounting of the radio.Refer to the “Wiring Diagram” on page 5.NOTE: Before final installation, test the wiring connections to make sure the unitis connected properly and the system works.6. Insert the radio into the mounting hole.7. Place the “U” bracket (C) over the screw posts and secure the radio to thedash using the included hex nuts (D). If necessary, cut the score marks (E) oneither side of the mounting bracket to custom fit the bracket length for yourapplication. See Figure A.Once a suitable location has been determined, drill the hole and secure thestereo using the metal mounting bracket. If the bracket needs to be shortened,remove the appropriate number of breakaway segments using a pair of pliers.Break LinesWeather Band Operation*Manual TuningBandPress TUNE nn or TUNE ll momentarily to seekthe next weather band station.Press BAND to select weather band(WB).Quick Start GuideFor Gauge Hole Receivers* Not available on all models.To download the complete Owner’s Manual for your radio,please visit /support/manuals.php.* Not available on all models.To download the complete Owner’s Manual for your radio,please visit /support/manuals.php.* Not available on all models.To download the complete Owner’s Manual for your radio,please visit /support/manuals.php.* Not available on all models.To download the complete Owner’s Manual for your radio,please visit /support/manuals.php.MGH17BTThe device name is “MGH17BT”The Bluetooth passcode is "1234”。
T9使用说明书

D E S I G N B Y I R I V E R T9U S E R G U I D E目录 入门组件定位控件电源管理连接设备使用 iriver plus 4 03 03 05 06 080103 02使用 T9主屏幕 音乐运动收音机录音浏览器设置11121415171819其他信息重要安全信息故障排除版权认证注册商标豁免212223242424组件组件如有变更,恕不另行通知,组件可能与所示图片存在差异。
部件的外表及所印刷或刻印的内容可随型号或各部件的名称而异。
定位控件及设备保修耳机:您可以将耳机连接到设备以输出声音。
快速入门指南:本手册将帮助您了解如何使用我们的设备。
设备质量保证书:请将其妥善保管,您可能在保修时使用它。
耳机插孔:在此处插入耳机以收听音乐。
麦克风:通过麦克风录制声音。
电源:按住此处可关闭电源。
快速按下可切换成待机模式。
吊带孔:连接吊带绳。
重置:重置设备。
LCD:显示屏幕。
上:播放时移动上一曲和快退。
收听FM广播时切换上一个频点。
下:播放时移动下一曲和快进。
收听FM广播时切换下一个频点。
左:切换到上级菜单/上-页右:确认和执行选定的项目。
USB 端口:您可以使用此端口连接计算机或为电池充电。
音量:控制声音大小。
USB 端口滑盖:推动滑盖可拉出或插入 USB 端口。
1.如使用该设备时按下 [ ] 按钮,该设备将被锁定。
2.您可以再次按 [ ] 按钮以解锁设备。
电源管理 1.按住 [ ] 打开电源。
2.当设备打开时,按住 [ ] 可关闭电源。
开机/关机该型号支持自动省电功能,减少电池消耗。
根据 [设置-定时器-自动关机],若在规定时间内没有任何按键操作,设备将自动关闭。
(请参考第 20 页)即使您使用了重置功能,仍将保留当前的时间和记忆数据。
设备正在播放时,请不要使用重置功能。
可能会对内存造成严重破坏。
使用锁定功能1.若使用设备时按钮不工作,请按 [重置]。
使用重置功能1.打开计算机。
奥迪Audi MMI系统说明书

Phone LinkEnter disc play mode, automatically Enter radio mode,listen to FM/AM play the disc in the machine Only.connected to the phone can be Enter the system setup interface used Enter USB play mode (only valid when Enter in the rear view (only valid if a a usb device is connected backup camera is connected )Enter AUX play mode (only valid when Enter SD card play mode (only valid an AUX device is connected)when an SD card is connected)Choose form 12 preset background Turn off the screen display ,touch theimages screen to turn it back onEnter Bluetooth interface,achieve Display date and time Handsfree talk functionIn radio mode-change frequencyIn song mode-switch,play,pauseThe unit is designed for 10V-16V DC negative ground operation system only. Before installingthe unit, make sure your vehicle is connected to DC10V-16V negative ground electrical system.The negative battery terminal must be disconnected before making connections, which canreduce damaging the unit due to short circuit.Be sure to connect the color coded leads correctly according to the diagram. Incorrectcon-nections may cause the unit malfunction or damage the vehicle's electrical system .Be sure the connect the speaker (- ) leads to the speaker (-) terminal. Never connectthe left and right channel speaker cables each other or to the vehicle body.Do not block vents or radiator panel. Blocking them will cause heat tobuild up inside and may result in fire.After the completion of the installation and begin to play the unit (including replacingthe battery), please press the RESET button on the front panel with pointed objects (Such as ball-point pen) to set the un.3. WIRING DIAGRAM4REMOTE CONTROL OPERATION.234Basic OperationsInstalling the lithium coin battery (CR2025)Aim the remote control directly at the remote sensor on the unitDO NOT expose the remote sensor to strong lightWARNING: To prevent accidents and damageDO NOT install any battery other than CR2025 or its equivalentStore the battery in a safe place where children cannot reachDO NOT charge, decompose, heat up,the battery or dispose it in a re.DO NOT poke or pierce the battery with tweezers or similar tools.Wrap the battery with tape for insulation when throwing it awaykeeping it for future use.①(power switch)14 0-10+ (numbers)② MODE & Answer 15 SUB-T (subtitle)③(play/pause)16 Title④(mute)17 Setup⑤ BND/SYS (band/system) & Hang up18 Slow1.Brown: KEY1 A.Brown & Black: KEY22.Orange: Illumination + B.Blue & Black: IR⑥ up/down/left/right/ENTER19 Angle3.Red: Ignition 12V ACC C.Can-Bus Only⑦(stop)20 Zoom4.White & Black: Front Left Speaker - D.Can-Bus Only⑧ AMS/RPT (auto scan memory/repeat)21 VOL+ (volume up)5.White: Front Left Speaker + E.Black: Ground⑨ ST/PROG (stereo/program)22 SEEK+/(scan+/next track)6.Pink: Parking F.Yellow: Battery +⑩ LOC/RDM (long/short range switch/random)23 SEL(acoustic characteristic)7.Grey & Black: Front Right Speaker -G.Blue: Auto Antenna11 SEEK- /(scan-/last track)24 Audio (dialogue)8.Grey: Front Right Speaker +H.Orange & Black: Reverse12 PBC (menu)25 VOL- (volume down)9.Purple: Rear Right Speaker +I.Green & Black: Rear Left Speaker -10.Purple & Black: Rear Right Speaker -J.Green: Rear Left Speaker +13 OSD (on screen display)26 GOTO (play time setup)34display.to pop up the video setting box.connected to the audio and video input port.to turn off screen display,touch the screen for returning to displayto exit the AUX mode to the system main interface.PHONE LINKCorresponding to the role of the iconExit the phone link quitVolume adjustmentReturn to the mobile home bageReturn to the prvious operationSreensaveForce landscapeEnter the dial up interface BT name:CAR-BT(Mute when reversing vehicles.Touch panel calibrationRadio regional settingsWallpaperSteps for setting:ijNorth AmericaNorth Americato clear the functions set,and follow the above stepsk。
- 1、下载文档前请自行甄别文档内容的完整性,平台不提供额外的编辑、内容补充、找答案等附加服务。
- 2、"仅部分预览"的文档,不可在线预览部分如存在完整性等问题,可反馈申请退款(可完整预览的文档不适用该条件!)。
- 3、如文档侵犯您的权益,请联系客服反馈,我们会尽快为您处理(人工客服工作时间:9:00-18:30)。
表示方向的说明“左”、“右”、“前”、“后”都是指车辆的行驶 方向。
* 选装装备。
® ® 注册商标使用符号 ® 标出。
没有这个符号并不等于允许随意使用商标所用的文字和符号。
⇒
提示参阅本段中的“注意!”。如果这个提示带有页数,相应
的“注意”则不在本段中。
注意! 带有此符号的文本包含与您的安全相关的信息,并提醒您可能有 事故及受伤的危险。
引言 .......................................................... 39 调试 ......................................................... 40 启动电话运行模式 ..................................... 43 输入 PIN/PUK ........................................... 43 拨号 .......................................................... 44 接听 / 拒接通话 ......................................... 46 结束通话 .................................................... 46 其它设置 ................................................... 46
一般操作 ...............................................17
开启和关闭 ................................................ 17 操作原理 ................................................... 17 显示屏 ....................................................... 17 音量设置 ................................................... 21 音质设置 ................................................... 22 时钟设置 ................................................... 23
– 开启和关闭....................................................................... 17 – 音量调节 .......................................................................... 21 – 静音切换(静音) ............................................................ 21 ⑤ CD 播放器 ............................................................................... 8 ⑥ 收音机的操作元件 ................................................................... 17 ⑦ 读卡器 ..................................................................................... 10
我们建议您认真阅读本使用说明书,尽快全面地了解收音机的功能和 用途,这样才能在驾驶过程中全面予以应用。
请注意,本使用说明书是对车辆操作手册的一个补充,因此只能与车 辆的最新版操作手册共同使用。
如果您对奥迪的收音机还有其它问题,请咨询奥迪汽车经销商。
希望您驾车愉快!
奥迪汽车公司
2
目录
目录
关于本使用说明书 ............................ 3 概述 ......................................................... 5
操作单元 ................................................... 5 交通安全提示 ............................................ 5 保养提示 ................................................... 5
关键词索引 ............................................. 55
关于本使用说明书
3
关于本使用说明书
本使用说明书介绍了如何使用车辆的重要信息、提示、建议和警告。 请确保本使用说明书随时都存放在车内。尤其是在车辆出借或者出售 时需特别注意此点。 本使用说明书描述的是到截稿日期为止时本车的装备范围。本文所描 述的某些装备在不久以后才会投入使用,或者仅供应某些市场。
小心! 带有这个符号的文字提醒您注意可能会损坏车辆。
环保提示 带有这个符号的文字包含了有关环境保护的提示。
提示 带有这个符号的文字包含了有关的附加信息。
4
概述
图 1 奥迪 concert 收音机
概述ቤተ መጻሕፍቲ ባይዱ
5
概述
操作单元
此一览图能够帮助您迅速熟悉操作单元及其功能。
① 多功能方向盘* ......................................................................... 49 ② 驾驶员信息系统 ....................................................................... 49 ③ 显示屏 ..................................................................................... 18 ④ 开启 / 关闭按钮
引言 .......................................................... 27 启动收音机运行模式 ................................. 27 从电台列表中选择电台 .............................. 27 电台设置 ................................................... 28 电台试播 ................................................... 28 存储电台 ................................................... 29 选择已存储的电台...................................... 30 移动已存储的电台 ..................................... 30 其它设置 ................................................... 30
驱动器 .................................................... 7
关于使用 CD 的一般提示 .......................... 7 关于使用存储卡的一般提示 ...................... 8 CD 播放器 ................................................. 8 读卡器 ....................................................... 10 Audi music interface(奥迪音乐接口)12 Aux-in 接口(辅助设备接口) ....................16
本使用说明书某些段落的内容不是对所有汽车都适用。在这种情况 下,将会在段落开头对适用范围进行说明,例如“适用于:配备移动 电话准备系统的车辆。”另外,选装装备用“*”标出。 插图只是用作描述基本原理,在细节方面可能与您的车辆略有不同。 在本使用说明书开头有一个目录,按照顺序列出了本说明书描述的所有 主题。在本使用说明书的结尾处有一个按照字母排列的关键词索引。
播放存储介质 ...........................................32
引言 .......................................................... 32 启动存储介质运行模式 .............................. 32 选择播放源 ................................................ 32 选择文件夹 ................................................ 33 选择曲目 ................................................... 33 前进 / 后退和前一个 / 后一个曲目 ........... 34 重复范围 ................................................... 34 随机播放 ................................................... 35 试播曲目 ................................................... 36 曲目信息 ................................................... 36