
DMDX使用操作说明
This tells DMDX how long to display each stimulus word or picture for
d
Delay from end of one item to the start of the next
item, again measured in ticks
TimeDX的测试步骤
Basic tests:
Select Video Mode Test
测试目的:确认显示卡正常驱动
测试目的:确认Millisecond Timer是否处于正常运作状态之下
Millisecond Timer Test
The High Performance Counter (HPC for short) is accurate to the displayed frequency and should be 1,192,180 Hz, it might be higher under Windows 2000
DMDX下载、安装、测试
假如你的机器没有Directx 5.0或更高的版本, 下载Directx 7.0并保存在Program files\dierectx\setup\; 双击该文件,程序会自 动安装; 下载dmdx软件包; 在Program files下创建一 个dmdx文件夹, 把dmdx解压在这个文件夹 中; 运行Timedx; 运行demos文件夹中的“features.rtf”文件, 测试和学习DMDX的功能。
Basic tests完毕后,在工作列上选择 Advanced tests
TimeDX的测试步骤
Advanced tests:
Time video mode (the Vertical Retrace SyncTest) 点选 Time video mode,等到出现对话窗后,先点选 Use Automatic Values,将 Step 3 Refresh Rate所测试出来的数 值应用在这个测试中,再点右下方的 Do test。做完以上动作 后,屏幕会出现很多跳动的数值,等到其中一个 msecs/retrace 的数值稳定 (变化小)后,按一下滑鼠就可 以回到对话窗,然后点 save last used values in registry储存 测试所得到的数值。这些数值表示的是这部电脑内部的性质, 而 TimeDX 能将这些数值储存下来,提供 DMDX 使用;所 以如果你要更换新的 Video mode 或你的电脑更换了新的显 示卡时,你就需要重新做上述的测试。 Tachistoscopic Acid Test 该测试的目的是确认电脑是否具有足够的记忆容量来执行 DMDX。
编程练习
用WordPad (Start -- Program Files -- Accessories -WordPad)为词汇判断实验写一个item file
实验开始前有个练习,4个练习项目(2 words, 2 nonwords) 实验有12个测试项目(6 words, 6 nonwords)。 每个项目呈现 前,屏幕中央都呈现一个注视点(fixation point) * ,呈现 500ms。靶子刺激呈现1000 ms。测试项目随机呈现。 练习开始前呈现指导语,而且在练习和正式实验之间要加以 文字提醒。 被试判断真词时按右Shift键,假词时按左Shift键。 实验结束后,呈现结束语"End of Experiment. Thank you for participating.“ 记录被试的反应时和错误率
DMASTR used to use completely nightmarish data files. Now everything is a lot simpler and the output files are a lot easier to work with. DMDX data files all have the suffix .azk
TimeDX的测试步骤
回到Basic test
Basic tests:
input test
ቤተ መጻሕፍቲ ባይዱ
做输入反应键等项目的测试,这个 test 有两个功能 确定实验所使用的「反应键」是可运作的 找出这些反应键在电脑里的定义码;编写DMDX的实验程 式时,你需要用这些定义码来设定程式的参数。
运行DMDX程序
DMDX的使用与操作
DMDX
DMDX
由Arizona大学的Jonathan和Ken Forster等人开发 是基于Win 32平台的刺激呈现软件系统 是Dmastr软件家族的一个成员,由基于DOS环境 的编成软件(DM and DMTG)扩展而来 主要用于言语、注意、记忆领域的实验程序的编制, 目前为世界上许多心理学实验中广泛使用的,使用 者涵盖了来自美国、英国、加拿大、中国等国高校 的心理学研究人员
启动DMDX 找到Item Files 开始实验 保存数据 (每运行一个被试,程序所采集的 数据都会累积地自动保存入相同的 .azk 文件 中)
How does DMDX work?
Item Files
Stimulus Files
These are simple files that contain a sequence of instructions telling the software (amongst other things)
把该item file以rich text format (.rtf)格式保存在一个文 件夹中,记住该文件的文件名。
Basic Elements of an Item File
Basic Elements of an Item File
Basic Elements of an Item File
Basic Elements of an Item File
<azk> <cr> <fd 17> <d 169> <t 2500> <vm 1024, 768, 768, 16, 0> <id PIO12> <id keyboard> <nfb> <dbc 255255255> <dwc 0>
cr
DMDX组成部分
DMDX
TimeDX(设定和检测实验运行环境的软硬件特征) 图形分辨率 刷新频率 声卡类型 PIO卡 …… DMDX(呈现刺激、记录反应) utility program 数据分析准备 包括unloadAZK、Analyze、concatenate等
TimeDX 测试
使用DMDX之前,使用者必须先在电脑中进行 TimeDX 的测试;这样 DMDX 才知道你所使用之 电脑的特性。 执行TimeDX测试前,请先关闭其它的应用程式。 在DMDX资料夹内含有一个TimeDX的捷径;点选 进入TimeDX后,在萤幕左上方的工作列上,点选 Basic Test,然后随着下面的步骤进行检测。
<azk> <cr> <fd 17> <d 169> <t 2500> <vm 1024, 768, 768, 16, 0> <id PIO12> <id keyboard> <nfb> <dbc 255255255> <dwc 0>
azk
Output data to an Ascii text file
TimeDX的测试步骤
做完声音测试后,再回到Advanced tests
Tachistoscopic Acid Test
其目的是看看当声音材料数值设定后,电脑是否仍然运 作无误。 做声音时间值设定,程式会自动抓取可读的声音档案进 行(左右)喇叭的测试。
sound latency test
So what the heck is a tick? Simple answer:
Continuous Running
Without this, DMDX will pause after each item and wait for the subject to request the next item. This may be useful for working with patients, but most experiments tend to be continuous running with each item being played after the other
Refresh Rate test
测试目的:确认电脑屏幕刷新率。当你电脑的 video mode有更改 时,就该重做一次 refresh rate test。
注:TimeDX提供了多种 video mode,你不需要测试每一种 Video Mode; 你只需要选择其中一种,进行设定的 工作就可以了 。
其它信息
下载地址 :/~jforster/dmdx/DMDX.ZIP 在线教程: /%7Ekforster/dmdx/tutorials_for_dmdx.htm 数据处理教程:/personal/matt.davis/dmdx.html 邮件讨论组地址:DMDX-request@ 程序实例下载地址:/~ma ... l/dmdxtutorial.zip 用DMDX运行fMRI实验地址:/people/matt.davis/fmri_dmdx.html 先前邮件档案地址:/cgibin/DMDX/thread
Dmdx介绍及使用

Dmdx介绍及使用 - Presentation Transcript1.DMDX 介绍及使用主讲:耿柳娜2.提纲o一、 DMDX 简介o二、 DMDX 安装o三、运行 DMDX 文件o四、控制文件的编写o五、案例解析o六、数据处理3.一、 DMDX 简介o( 一 )DMDX 是什么o( 二 )DMDX 的主要特点o( 三 )DMDX 软件的获得4. ( 一 )DMDX 是什么o DMDX 是由 Arizona 大学的 Jonathan Forster 和 Ken Forster 等人开发出来的基于 Win32 平台的刺激呈现软件系统,是 DMASTR 软件家族的一个成员,由基于 DOS 环境的编程软件 (DM and DMTG) 扩展而来。
o DMDX 已经推出了多个版本,其中 DMDX2.0 可在 Windows95/98 操作系统上运行, DMDX3.0 可以在 Windows98/2000/XP 上运行,但一般在 Windows XP 上运行更加稳定。
o现在, DMDX 的最新版本( 2006 年)为 3.2.2.3 ,可适用于Windows2000/Me/XP5.( 二 )DMDX 的主要特点o( 1 )简单易学,稳定性好;o( 2 )适用于不会编程的非专业程序人员;o( 3 )目前可以呈现文字、图片、声音、视频片断等实验材料;o( 4 )时间精度高,对被试反应的记录精确度可达到毫秒级。
o( 5 )是完全免费使用的,从而给很多心理学教学与研究人员提供了方便。
6.( 三 )DMDX 软件的获得o Jonathan Forster 教授的/~kforster/dmdx/dmdx.htm , 可以下载最新的 DMDX 版本Department of Psychology University of Arizona Department of PsychologyPsycholinguistics Laboratory University of Arizona7.二、 DMDX 安装o( 一 )DirectXo( 二 ) 下载 DMDXo( 三 ) 解压缩安装o( 四 )TimeDX 测试8.( 一 )DirectXo使用者的电脑里最好已经安装了 DirectX( 于安装前先下载最新版的DirectX) DirectX 能让使用者在 Windows 下使用 DMDX 时 , 更能驾驭电脑 , 所以要先下载 DirectX(DirectX graphics software, 可以从 Microsoft DirectX site 取得 )9.( 二 ) 下载 DMDXo DMDX 到目前为止已有好几个版本了 , 使用者可以从 DMDX UpdatesPage: /~Kforster/dmdx/dmdx.htm 下载最新的 DMDX 版本 . 10.( 三 ) 解压缩安装o所下载的 DMDX 程式是一个压缩档( DMDX .zip ) , 所以使用者首先要做的工作是,使用 winzip 等将其解压缩.解压缩后再执行 setup 安装.安装完后在所安装的资料夹(通常是 C:Program FilesDMDX )会有下列档案 :▪DMDX.exe: DMDX 的系统程式▪DMDX.chm: DMDX 的系统说明 ; 及各种实验程式中会用到参数说明等 .▪TimeDX.exe: DMDX 的电脑硬件测试及系统参数值侦测设定程式 .▪Monitor.exe: 一个伴随 DMDX 使用的系统程式▪Diagnostics.txt: DMDX 的执行记录档11.( 四 )TimeDX 测试o使用 DMDX 之前,必须先在电脑上进行 TimeDX 的测试,使 DMDX 获得所使用电脑的硬件性能,并自动记录到程序中,以便在运行 DMDX 的时候使用。
先定概率

对于先定概率对回忆的影响的验证摘要:本实验是验证先定概率对回忆的影响的改进实验,实验的操作程序是基于杨志良先生的实验。
通过杨志良先生的实验得到如下结果,虽然实验结果以及绘图均与杨先生的实验结果存在差异,但本实验基本可以验证杨先生的实验,从而验证了先定概率对于记忆的影响,得出β值的改变独立于d’的改变,随着β越来越接近0,击中率越来越接近1,随着β越来越大,虚惊率越来越接近0。
ROC曲线里对角线越远,d’的值越大。
关键词:先定概率辨别力似然比信号噪音1引言信号检测论是信息论的一个分支,研究对象是信号传输系统中的信号接收部分。
在心理学领域中,由于人的感官以及分析综合的过程可以看做一个信系处理系统,这样我们就可以用新号检测论中的一些概念和方法来进行研究。
信号检测论有两个重要的指标:一个表示辨别的水平,不受情绪﹑期望﹑动机等因素的影响,通常用辨别力d’=Z虚惊-Z击中;另一个是表示反应偏向的指标,有两种计算方法,一种是似然比β,β=O击中-O虚惊,一种是报告标准C=[(I2-I1)/d’]﹡Z正确拒斥+I1。
信号检测论可以用于再认的记忆研究。
在应用信号检测论的再认实验中,将新(未见过的)、旧(已见过的)刺激分别视为噪音和信号,则d’的值低表是被试对新、旧不易鉴别;β或C值高表示被试对新、旧刺激判断标准松,反之,表示判断标准严。
本实验的目的在于(1)通过对杨志良先生的实验的验证,掌握信号检测论的基本理论,学会计算信号检测论指标d’、C、β;(2)学习绘制接受者操作特性曲线,了解信号检测论的用途;(3)了解信号的先定概率对再认回忆的影响。
2 方法2.1 被试被试十名2.2 仪器计算机2.3 材料西方,中国建筑图片共200张,分成4组,每组50张。
2.4 实验设计将四组图片的先定概率分别定出为不同的概率(成等差数列),对于每组图片,主视按定一种信号的先定概率给被试呈现一定的数目的图片,要求被试把他们当做“信号”记住。
DMD402_DMD402A使用手册

⑥ ⑤ ④ ③
4 线电机
⑥ ⑤ ④ ③
8 线电机(并联)
控 制 器
VCC
Com R Pul
270Ω
15mA±20%
驱 动 器
脉冲信号
270Ω
R
方向信号
Dir
330Ω
⑥ ⑤ ④ ③
8 线电机(串联)
⑥ ⑤ ④ ③
6 线电机(高扭矩)
使能信号
R
Ena
VCC值为5V时,R短路; VCC值为12V时,R=1KΩ(≥1/8W); VCC值为24V时,R=2KΩ(≥1/8W)。
DMD402/DMD402A 使用手册
DMD402/DMD402A 使用手册
1、简
介
DMD402、DMD402A 是我公司自主研发的步进电机细分驱动器,它 们具有高性能、 低价格的特点, 适合驱动两相或四相混合式步进电机。 由于采用新型的双极性恒流斩波驱动技术, 使用同样的电机时可以比 其它驱动方式输出更大的功率。其细分功能使步进电机低频振动减 小,噪声降低,同时有助于运转精度提高。
8
9
DMD402/DMD402A 使用手册
DMD402/DMD402A 使用手册
6.2 设定输出电流
7、 电 源 供 给
电源电压在 DC14V ~DC40V 之间都可以正常工作,本驱动器 最好采用非稳压型直流电源供电,也可以自己采用变压器降压+ 桥式整流+电容滤波,电容可取 6800μ F或 10000μ F。但注意应使 整流后电压纹波峰值不超过 40V,避免电网波动超过驱动器电压
A向
95
保存温度
24
重量
10 11.5
4—Φ4
33
5
DLP大屏幕系统操作手册解读
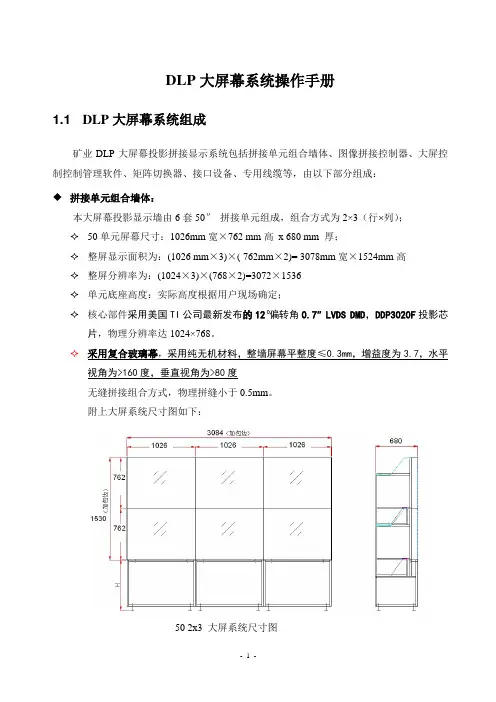
DLP大屏幕系统操作手册1.1 DLP大屏幕系统组成矿业DLP大屏幕投影拼接显示系统包括拼接单元组合墙体、图像拼接控制器、大屏控制控制管理软件、矩阵切换器、接口设备、专用线缆等,由以下部分组成:◆拼接单元组合墙体:本大屏幕投影显示墙由6套50″拼接单元组成,组合方式为2×3(行 列);✧50单元屏幕尺寸:1026mm宽×762 mm高x 680 mm 厚;✧整屏显示面积为:(1026 mm×3)×( 762mm×2)= 3078mm宽×1524mm高✧整屏分辨率为:(1024×3)×(768×2)=3072×1536✧单元底座高度:实际高度根据用户现场确定;✧核心部件采用美国TI公司最新发布的12°偏转角0.7″ LVDS DMD,DDP3020F投影芯片,物理分辨率达1024×768。
✧采用复合玻璃幕,采用纯无机材料,整墙屏幕平整度≤0.3mm,增益度为3.7,水平视角为>160度,垂直视角为>80度无缝拼接组合方式,物理拼缝小于0.5mm。
附上大屏系统尺寸图如下:50 2x3 大屏系统尺寸图◆多屏全硬件拼接图像处理器-拼接控制器是一款性能强大的高端图像处理设备,能够在多个显示终端上同时显示多个动态画面,主要用于大屏幕拼接显示系统,是系统的核心显示控制设备。
拼接控制器采用目前最新的计算机集成技术、网络技术,并具有特有的独立PCI64/66总线传输技术,系统资源占用少,稳定可靠。
控制器集超宽带视频信号采集、实时高分辨率数字图像处理、二维高阶数字滤波等高端图像处理技术于一身,具有强大的处理能力。
控制器采用多总线并行处理机制,能从根本上保证对所有输入视频进行全实时处理,图像没有延迟,无丢桢现象。
拼接控制器支持多种视频输入模式,包括复合视频(DVD 或摄像头信号),计算机视频(电脑信号VGA 或DVI )等。
DMDX使用操作说明

DMDX使用操作说明DMDX是一个用于实践心理学和认知科学研究的实验控制软件。
本篇文章将提供DMDX的使用操作说明,包括软件安装、实验设计与设置、刺激材料准备、实验运行和数据分析等方面。
一、软件安装二、实验设计与设置1.打开DMDX软件并新建一个实验文件。
2. 在“Experiment”菜单中,可以设置实验标题、屏幕分辨率、刷新率等实验参数。
3. 在“Procedure”菜单中,可以添加实验程序和刺激序列。
实验程序可以是基于文本文件或图像文件的,可以自定义刺激的呈现方式和条件等。
4. 在“Timing”菜单中,可以设置刺激呈现的时长、刺激间的间隔、实验的持续时间等时间参数。
5. 在“Keyboard”菜单中,可以设置实验过程中键盘的响应方式和键位设置。
三、刺激材料准备1.在DMDX中,可以使用文本文件或图像文件作为刺激材料。
四、实验运行1. 在DMDX中,点击“Run”按钮或按下“Ctrl+Enter”来开始实验。
2.根据实验设计,DMDX会自动呈现刺激,并记录被试的反应。
3.实验过程中,被试需要根据实验要求进行键盘反应。
DMDX会记录键盘的按键和反应时长。
4.实验结束后,DMDX会生成一个数据文件,以供后续分析使用。
五、数据分析1. 使用统计软件(如SPSS、Excel等)打开DMDX生成的数据文件。
2.进行数据清洗和处理,例如去除无效反应、计算反应时长平均值等。
3.根据实验设计和研究问题,选择合适的统计方法进行数据分析,例如t检验、方差分析等。
4.根据分析结果,对实验结果进行解释和讨论,并撰写相应的研究报告。
总结:DMDX是一个功能强大的实验控制软件,可用于实践心理学和认知科学研究中的实验设计、刺激呈现、反应记录和数据分析等。
通过正确安装和设置DMDX,合理准备刺激材料,并正确运行实验和分析数据,可以帮助研究人员更好地进行实验和获得准确可靠的结果。
希望本文对使用DMDX的研究人员提供一些帮助和指导。
DMD15-13 操作手册说明书
DMD15-13 Operating ManualContents1 General Information (1)1.1 Precaution (1)1.2 Warranty and Service (1)1.2.1 Warranty Service (1)1.2.2 Maintenance Service (2)1.2.3 Service Commitment (2)1.2.4 Dispute Settlement (2)1.3 Repair Notes (2)1.4 Contacts Information (2)2 Product Introduction (3)2.1 Main Function and Features (3)2.2 Technical Specification (3)2.3 Unpacking (4)2.4 System Structure (4)2.4.1 Outline Drawing (4)2.4.2 Pump Head Structure (5)2.5 Working Condition (5)3 System Mounting (5)3.1 Single Pump Head Mounting (6)3.2 Two Pump Heads Stacking (6)3.3 Tubing Loading (7)4 Transportation and Storage (8)Please read this operating manual carefully before using the product.The contents of this publication are presented for informational purposes only, and while every effort has been made to ensure their accuracy. Longer accepts no liability for errors or omissions.Longer reserves the right to modify or improve the designs or specifications of such products at any time without notice. Please contact with Longer or certified distributor for up-to-date manuals.1 General Information1.1 PrecautionIf tubing leaks or bursts, fluid may spray from the tubing and pump head. Take reasonable practicable measures to ensure the operators’ safety. Check the tubing frequently and replace the tubing if necessary to protect the operators and device.Make sure fluid in the tubing has been drained out, no pressure in the pipeline and disconnect pump from mains power, while removing or replacing the tubing.Do not open the pump head while the pump is running.Remove the tubing when pump stop running for a long time to avoid tubing deformation caused by squeezing.Keep the rotor clean and dry to avoid tubing excessive wear and premature failure of pump head or drive.The pump head housing surface can be scratched easily because of the plastic material.Please clean the pump head by water flushing or a soft cotton cloth wiping.Do not disassemble, change or repair the pump head by yourself. Please contact Longer Pump or the distributor if the repair is necessary.1.2 Warranty and Service1.2.1 Warranty Service(1) Longer, obligation under this warranty is limited to a period of one (1) year from the date of original purchase. Within the 1 year of warranty period, Longer will replace or repair any defective parts free of charge. This warranty doesn’t cover consumable part (tubing).(2) Warranty does not cover:The repair or exchange of the entire unit after the warranty period.Any damage or failure caused by improper installation, storage, maintenance or usage, not in compliance with operating manual.Beyond or violate the conditions listed in contract or technical agreement.Any damage or failure caused by attempts by personnel other than authorized Longer representatives to install, repair, modify or remove the product.Any damage or failure caused by non-Longer parts, or user-replaceable parts purchased from unauthorized distributors.Any damage or failure caused by accidents or human errors (including wrong power supply voltage, corrosion, fall-off, etc.)Any damage or failure caused by natural disaster or other irresistible force (earthquake, fire, etc.).Other product damage or failure not caused by defects in design, material and workmanship.1.2.2 Maintenance ServiceCustomer will be charged for the repair or replacement of the parts or accessories after warranty period.Parts can be replaced within 3 working days. Longer will inform customer of the date in advance if out of 3 working days.1.2.3 Service CommitmentLonger commits to provide customer solutions to any quality complaint within 2 working days.Longer commits to reply to customer’s requirement of on-site technical supports or training within 2 working days.1.2.4 Dispute SettlementDispute over product quality or service will be handled according to contract or agreement.If there is no related contract or agreement, it shall be resolved by the disputing parties through consultation. Otherwise, it will be resolved according to relevant national laws and regulations.1.3 Repair NotesPlease contact Longer or its distributor, and provide the product serial number before returning the product. Products which has been contaminated with, or exposed to, toxic chemicals or any other substance hazardous to health must be decontaminated before returning to Longer or its distributor. You must ship the product in its original packaging or better, to insure it against possible damage or loss during the transport.1.4 Contacts InformationBaoding Longer Precision Pump Co., LtdBuilding A, Chuangye Center, Baoding NationalHigh-Tech Industry Development ZoneBaoding, Hebei, China 071051Email: *********************Tel: 86-312-3110087Fax: 86-312-31685532 Product IntroductionDMD15-13 pump head has two groups of rotor with phase compensation structure to achieve low pulse performance. Two levers are used to remove the compression block from the pump head easily, which is convenient for tubing loading and replacing. The separating block on the compression block can clamp multiple sizes of tubing with fittings or stops. Roller is made of 304 stainless steel with good corrosion resistance. Housing is made of PESU, which has good corrosion resistance, rigid and stable performance.Table 1:Product ListProduct Model Description Product CodeDMD15-13-A Short shaft, low pulse pump head only for FB16-1dispensing & filling system05.01.04ADMD15-13-B Long shaft, low pulse pump head for Longer pumpdrive with standard pump head mounting bracket05.01.04B2.1 Main Function and FeaturesThe compression block can be removed from pump head by two levers, which is convenient for tubing loading.Pump head housing and compression block are made by PESU, the structure strength is reliable.Pump head has two groups of rotors (3 rollers/group) with phase compensation structure to achieve low pulse performance.Two pump heads can be stacked together.Roller is made of 304 stainless steel, housing is made of PESU. The pump head has good corrosion resistance.2.2 Technical SpecificationFlow Rate Reference (Speed Range: 1-600 rpm) Tubing Fitting Assembly Silicone PharMed 2*13# tubing 0.1-76.6ml/min 0.1-80.0 ml/min 2*14# tubing 0.5-300.3ml/min 0.4-290.2 ml/min 2*19# tubing 0.8-509.5ml/min 1.0-619.9 ml/min 2*16# tubing 1.5-854.4ml/min 1.7-963.4 ml/min 2*25# tubing 3.4-2071.1ml/min 3.3-2058.7 ml/minMaterial Rotor 304 stainless steel (group number:2;rollernumber:3/group)Housing PESU (white color)Compression Block PESU (white color)Tubing Fitting PP2.3 UnpackingTo unpack the pump head, follow below steps:1)Take out the pump head and accessories from the shipping carton.2)Check the packing list to make sure all components are present.3)Contact Longer Pump or distributor for any question.2.4 System Structure2.4.1 Outline DrawingFigure 1 Outline Drawing2.4.2 Pump Head StructureCompression BlockSeparating BlockLeverRotorPump Head ScrewScrew Cap HousingFigure 2 System Structure2.5 Working ConditionWorking Temperature: 0℃-40℃Relative Humidity: ≤85%3 System MountingDMD15-13-A: Pump head only for FB16-1 dispensing &filling system, please refer to <FB16-1 Operating Manual> for DMD15-13-A mounting instruction.DMD15-13-B: Pump head for Longer pump drive with standard pump head mounting bracket. Below mounting instruction is only for DMD15-13-B.3.1 Single Pump Head MountingCross Recess Head ScrewHexagon Socket Head Cap ScrewsMounting steps:a) Mount the mounting plate: Mount the mounting plate on the pump drive by using 4cross recess head screws M4X10.b) Mount single pump head: release the two levers to open the pump head and removethe compression block. Insert the tang of the pump head shaft into the slot of the motor shaft. Press the pump head firmly against the mounting plate. Turn the pump head toalign the mounting holes on the pump head with the mounting holes on the mountingplate. Insert the two mounting screws (hexagon socket head cap screw M3X10) intothe mounting holes, then tighten them.Note:Please disconnect pump from the mains power before replacing the pump head.3.2 Two Pump Heads StackingMounting steps:a) Mount the mounting plate: Mount the mounting plate on the pump drive by using 4cross recess head screws M4X10.b) Mount pump head 1: release the two levers of pump head 1 to open the pump headand remove the compression block. Insert the tang of the pump head shaft into the slot of the motor shaft. Press the pump head firmly against the mounting plate. Turn the pump head to align the mounting holes on the pump head with the mounting holes on the mounting plate. Insert the two mounting screws (hexagon socket head cap screw M3X10) into the mounting holes, then tighten them.c) Mount the adapter: Mount the adapter on the pump head 1 by using 2 hexagon sockethead cap screws M3X10.d) Mount pump head 2: release the two levers of pump head 2 to open the pump headand remove the compression block. Insert the tang of the pump head 2 shaft into the slot of the pump head 1 shaft. Press the pump head 2 firmly against the adapters. Turn the pump head 2 to align the mounting holes of pump head 2 with the mounting holes on the adapter. Insert the two mounting screws (hexagon socket head cap screw M3X10) into the mounting holes, then tighten them.Note:Please disconnect pump from the mains power before replacing the pump head.3.3 Tubing LoadingLoad the tubing according to below steps:1) Release the levers to remove the compression block.2) Insert the tubing fitting assembly into the compression block.3) Put the compression block with tubing fitting assembly back to the pump head, andlock the levers.4 Transportation and StorageIn the process of transportation, prevent water, moisture, insect, corrosion, and strong mechanical vibration.The pump head should be stored in shipping carton. The environment should keep aircirculation. The environment temperature should be -10℃~40℃and relative humidityBaoding Longer Precision Pump Co.,Ltd.should be ≤85%. Warehouses are not allowed to have all kinds of poisonous, harmful, flammable, explosive and corrosive chemicals.2015-2 9。
DLP背投显示单元说明书
目
目
录
录 ............................................................................................................................................................. 2
北京彩讯科技股份有限公司 地址:北京海淀区上地三街 9 号嘉华大厦 C 座 1009 室 电话:010-82783626 传真:010-82783988 售后服务热线:021-37775730 网址:
北京彩讯科技股份有限公司
第1页
DLP Display Unit User Manual V1.2
屏幕菜单介绍dlpdisplayunitusermanualv12北京彩讯科技股份有限公司第11色彩均匀度调整项目数值选项调节说明中心均匀度128127调整中心及边缘亮度均匀度水平均匀度128127调整水平亮度均匀度垂直均匀度128127调整垂直亮度均匀度水平色彩128127调整水平色彩均匀度垂直色彩128127调整垂直色彩均匀度左上角色彩128127调整左上角的色差右上角色彩128127调整右上角的色差左下角色彩128127调整左下角的色差右下角色彩128127调整右下角的色差色彩色彩调整项目数值选项调节说明1023增加纯红色中的绿色成份1023增加纯红色中的蓝色成份1023降低纯绿色的亮度1023增加纯绿色中的蓝色成份1023增加纯蓝色中的红色成份1023增加纯蓝色中的绿色成份1023调整黄色及洋红色中的红色成1023调整黄色及青绿色中的绿色成1023调整青绿色及青绿色中的蓝色
北京彩讯科技股份有限公司
第2页
DLP Display Unit User Manual V1.2
X9 平板微型投影说明书
使用说明书重要声明非常感谢您购买天时MDI-X99平板平板电脑*微型投影。
我们衷心希望您能从中获得长久的享受卓越的使用体验。
祝愿您从该产品中获得最好的视听享受!本手册中包含的所有信息在出版时都是正确的。
但由于我们不断对产品进行更新,因此您的设备可能与本手册中所描述的内容略有差别。
在使用产品之前,请认真阅读本说明书。
当您开始使用该产品时,本公司认为您已经认真阅读了本说明书。
本产品在出厂前已经过严格质量测试,在使用过程中出现机身发热现象,属于正常情况,请您放心使用。
✠ 禁止自行拆卸产品,需要帮助请联系专业维修人员。
不要使用酒精、稀释剂或苯类来擦洗产品表面。
✠禁止用湿手操作产品及插拔电源,以防触电。
✠ 禁止将产品放置在潮湿或粉尘多的地方。
✠禁止将产品放置在高温的地方,为确保本机的散热性能与使用寿命,请尽量保持机身与空气的接触面积。
◆ 请使用随机配置的电源适配器,切勿接入其他供电设备,否则可能造成数据和硬件损坏等不可挽回的后果。
◆ 本产品为精密光电产品,切勿让本产品摔落或与硬物碰击。
◆ 产品在格式化内存或正在进行上传和下载时请不要突然断开连接,否则可能导致程序出错。
◆ 对于违规操作导致产品损环,本公司概不负责。
※本公司保留改进产品的权利,产品规格及设计如有变更,恕不另行通知!目录1、产品介绍 (5)2、产品参数 (6)1.1、光学参数 (6)1.2、软件参数 (7)3.投影机各部件名称 (9)4.使用与连接 (11)4.1、音频连接 (11)4.2 Mini USB接口连接 (12)4.3 USB接口连接.................. 错误!未定义书签。
4.4 TF卡接口. (12)4.5 HDMI接口 (16)5.按键说明 (13)6.桌面与壁纸设置 (15)6.1 桌面 (15)6.2 壁纸设置 (16)7.设置 (18)7.1wi-fi设置 (20)7.2系统设置 ......................... 错误!未定义书签。
DMDX及行为实验简介
控制文件核心部分的参数
4、举例
例一 +1<wav 2>"piao3m"/*<wav 2>"meng3m"/; -2<wav 2>"piao4m"/*<wav 2>"meng3m"/; 两个声音文件连续播放,第一个声音文件播放完的同时,第二个声音文件开始播放。 例二 +3<wav 2>"piao4m"/<fd 100>/*<wav 2>"meng3m"/; -4<wav 2>"piao4m"/<fd 100>/*<wav 2>"meng3m"/; 第一个声音文件播放完后,间隔1000毫秒,立即播放第二个声音文件。
DMDX应用简介
运行
• “TimeDX”
– 检查PIO卡输入/键盘/鼠标 – 设定显示模式 – 设定刷新频率
• “DMDX”
– 运行实验、记录数据
运行“TimeDX”——选择显示模式
1.选择一种显示模式
2.点击Do Test测试
3.屏幕出现“TimeDX”
4.等待,或用鼠标点击一 下,或按键盘上任意健 ,结束测试。
项目组成
• • • • • • • • • +1<fd 20>* "痛苦" /; -101<fd 20>* "悲伤" /; -102<fd 20>* "书本" /; +2<fd 20>* "流泪" /; 幁持续时间(fd N or ms% n )(n=N*refresh interval)
– Standard Frame Duration measured in ticks
•
8.<mr +g> <mnr +f> <mpr +h>
– Map button to Request(g):启动键 – Map button to Negative Response(f):负反应键 – Map button to Positive Re“鼠标”> <mr “+按钮 1”>
主要内容
• • • • 介绍 运行 控制文件的写法 例子
控制文件的写法
• 参数部分
• 设定基本参数,数据输出文件、显示模式、显示颜色、输入/ 输出装置、项目数等
• 实验主体部分
• • • • 指导语 呈现项目(单词、声音、视频) 项目顺序 反应记录