博世新之星说明书
博世洗衣机说明书
D
AF/I
Experience of providing good customer service
D
AF/I
Experience of using ICT
E
AF/I
Knowledge/skills/abilities
Ability to deliver good customer service
E
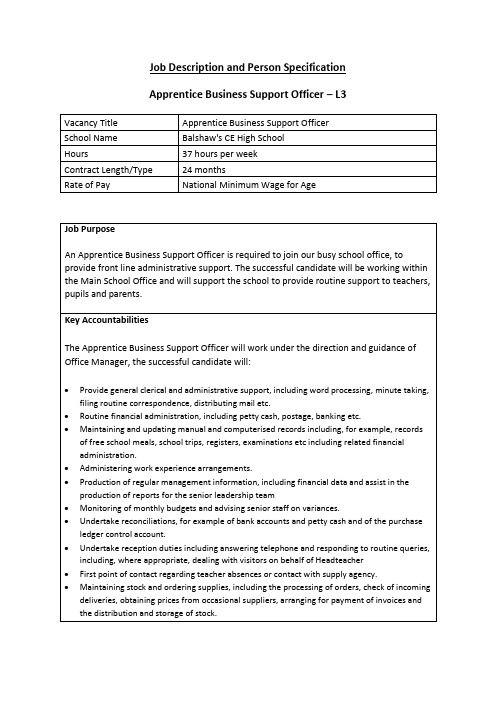
• Routine financial administration, including petty cash, postage, banking etc. • Maintaining and updating manual and computerised records including, for example, records
Key Accountabilities
The Apprentice Business Support Officer will work under the direction and guidance of Office Manager, the successful candidate will:
The successful candidate will be able to demonstrate the following attributes:
• Friendly and approachable, • Motivated, • Good customer service skills, • Attention to detail, • Good communication skills, • Enthusiasm for the role and drive to succeed, • Effectively use ICT, • Ability to work well independently as well as in a team.
Bosch 家用电器产品说明书.pdf_1702020855.8916733

Accessories: To purchase Bosch accessories, cleaners & parts please visit /us/store or call 1-800-944-2904 (Mon to Fri 5 am to 6 pm PST, Sat 6 am to 3 pm PST).SHX5AEM2NWhiteAlso available in:Black Stainless SteelSHX5AEM4N Stainless Steel SHX5AEM5N Black SHX5AEM6N A 3rd rack provides 30% more loading space 1 for your utensils, giving the other racks more space for dishes.With Bosch PrecisionWash ®, just scrape and load. No pre-rinsing required for a beautiful clean.46 dBA: Quietestdishwasher brand in North America.2RackMatic ® adjusts the upper rack to 9 different positions, allowing for taller items like stemware or leaving room for pots and pans below.Home Connect ® lets you monitor and control your appliance remotely, via the Home Connect ® app.24/7 Overflow Protection System ® helps prevent water leaks, even when your dishwasher is off.1Compared to Bosch dishwasher with two racks.2Based on an average of sound ratings of 24" Full Size Stainless Steel Tub dishwashers contained in major brands US & Canadian websites. Major brands defined as TraQline Top 5 Market Share (US & Canada) December 2021.3Certification to NSF/ANSI Standard 184 for residential dishwashers.Accessories: To purchase Bosch accessories, cleaners & parts please visit /us/store or call 1-800-944-2904 (Mon to Fri 5 am to 6 pm PST, Sat 6 am to 3 pm PST).Installation DetailsJunction box accessoryInstallation DetailsAccessories: To purchase Bosch accessories, cleaners & parts please visit /us/store or call 1-800-944-2904 (Mon to Fri 5 am to 6 pm PST, Sat 6 am to 3 pm PST).。
博世壁挂炉使用说明书

博世壁挂炉使用说明书这两天寒风突起,仿佛进入了冬季最寒冷的时期,如此怎能少了博世壁挂炉的陪伴?作为御寒“神器”,博世壁挂炉虽然可以让家更温暖,但是很多用户在购买了博世壁挂炉之后却不太会使用,这里北京壁挂炉专卖店小编就为您介绍博世壁挂炉使用说明书,提供广大用户参考;博世新欧洲之星壁挂炉使用说明书;博世新欧洲之星壁挂炉补水的方法:在博世新欧洲之星壁挂炉底部有一个黑色(进口的是蓝色)的旋钮,这个就是补水阀;将补水阀向左拧就是补水,补水的同时要注意压力表,压力达到1.5即可,要确保指针在绿色区域,如果不小心超压了,可以通过暖气或地暖放一些水。
博世新欧洲之星采暖模式切换:按- 键选中暖气片的标志(下图中的3号图标),然后按 OK 键将温度调到40度以下即是非采暖模式(此时会自动选中下图中5号图标),40度以上就是采暖模式,选择自己舒适的温度后按 OK 键。
温馨提示:设置地暖温度不要超过60度。
建议40-50度比较适中!博世新欧洲之星壁挂炉生活热水温度设置:按- 键选择水龙头的标志(如上图的4号图标),然后按OK 键进入调温度的界面,最后选择适合自己的温度按 OK 键就可以了博世盖世7000壁挂炉使用说明书;插上博世盖世7000壁挂炉插头通电,再按下面板上的待机键开机。
夏季模式下只供应热水不供应暖气,按“V”键选择水龙头标志,按ok键进入调节温度界面,选择合适温度,按''^'键加温度,按'v'键减温度,最后按ok键确认选择的温度。
将水龙头转到热水方向打开,壁挂炉显示屏出现火苗标志开始工作,水龙头会放出热水,关闭水龙头,壁挂炉会自动停止工作。
冬季模式下既供应热水又供应暖气,按“v”键选中暖气片标志,按OK键再按''^'键将温度调到40度以上,选择合适温度再按ok键确认。
如果要关闭博世盖世7000壁挂炉,选择只供热水的夏季模式,按'v'键选中暖气片标志,按ok键,再按'v'键将温度调到40度以下,出现两个“●●“标志,按ok键确认。
博世新之星壁挂炉调试步骤!(超详细图文版)

博世新之星壁挂炉调试步骤!(超详细图文版)博世新之星(新版)壁挂炉如何调试?壁挂炉安装完成之后,最重要的一步就是调试。
下面我们以博世(新版)新之星为例,来为大家讲讲壁挂炉的调试方法。
调试步骤三通:通气,通电,通水。
加减键同时按直到显示“L1”按加键调到'L2'按“确认键”出现“2.1A”,在按加键调到“2bd”按“确认键”出现“0”,在按加键调到“2”长按“确认键”出现'[ ]',松开就好了,按“返回键”至主界面。
设置烟筒1:“+-”键同时按2:出现L1,按“+”加到L3,按“确认键”3:301A,在按“确认键”,“0”按“+”加到30,最后“确认键”长按,把这个参数输进去就可以了4:最后调L2,调2bd,设置烟囱就OK了。
冬/夏季模式/水温设置夏季水温设定:先按“夏季模式键”,再按“+”,将温度加到45℃(或45℃以下),显示屏闪烁3秒后,自动确认,即夏季模式水温设置成功。
冬季水温设定:先按“冬季模式键”,再按“+”,将温度加到55℃(或55℃以上),显示屏闪烁3秒后,自动确认,即冬季模式水温设置成功。
“冬夏季模式切换冬季调冬季模式先按“冬季模式键”,再按“+”,将温度加到55℃(或55℃以上),显示屏闪烁3秒后,自动确认,即冬季模式设置成功。
夏季调夏季模式先按“冬季模式键”,再按“-”,将温度加到--(即下图图(2)所示),显示屏闪烁3秒后,自动确认,即夏季模式设置成功。
切换成功后,显示屏上会显示如下图图(1)所示图标。
提示:壁挂炉在调试的过程中,要确保压力表的数值为1.5bar。
Bosch 家用电器说明书.pdf_1702013586.987219
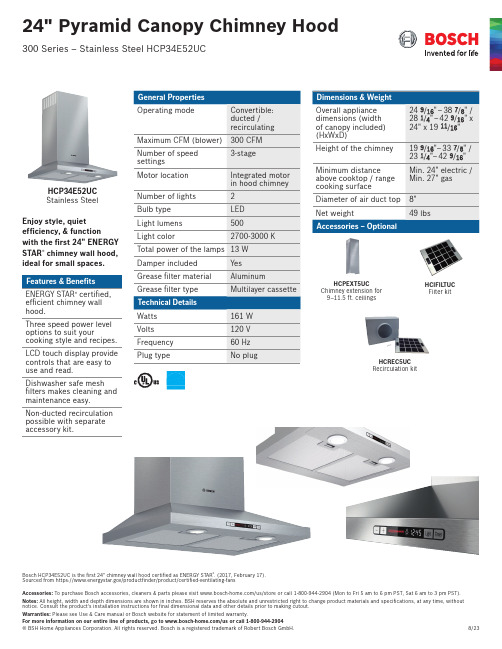
HVI Performance Values
Exhaust Vertical
Duct Size 8"
Pressure (in. H2O)
High Speed
Working Speed
0.1
0.1
Power (W)
High Speed
Working Speed
161
33
CFM
High Speed
Working Speed
Notes: All height, width and depth dimensions are shown in inches. BSH reserves the absolute and unrestricted right to change product materials and specifications, at any time, without notice. Consult the product’s installation instructions for final dimensional data and other details prior to making cutout.
Dishwasher safe mesh filters makes cleaning and maintenance easy.
Non-ducted recirculation possible with separate accessory kit.
General Properties
Operating mode
2
Bulb type
LED
Light lumens
500
Light color
2700-3000 K
Bosch 电器用品说明书

R e g i s t e ry o u rn e w d e v i c eo nM y B o s c h no w a n dg e t f r e e b en e f i t s:b o sc h-h o me.c o m/w e l c o m e HobPKE6..CA.,PKF6..CA1.[en]User manualPKF6..CA..PKE6..CA.2Ø = cmSafety en 3Table of contents1Safety (3)2Preventing material damage (4)3Environmental protection and saving en-ergy (5)4Familiarising yourself with your appliance (6)5Basic operation (6)6Cleaning and servicing (7)7Disposal (8)8Customer Service.................................................81 SafetyObserve the following safety instructions.1.1 General information¡Read this instruction manual carefully.¡Keep the instructions, the appliance passand the product information safe for futurereference or for the next owner.¡Do not connect the appliance if it has beendamaged in transit.1.2 Intended useOnly a licensed professional may connect ap-pliances without plugs. Damage caused by in-correct connection is not covered under thewarranty.Only use this appliance:¡To prepare meals and drinks.¡Under supervision. Never leave the appli-ance unattended when cooking for shortperiods.¡In private households and in enclosedspaces in a domestic environment.¡Up to an altitude of max. 2000 m abovesea level.Do not use the appliance:¡With an external timer or a separate remotecontrol. This does not apply if operationwith appliances included in EN 50615 isswitched off.1.3 Restriction on user groupThis appliance may be used by children aged8 or over and by people who have reducedphysical, sensory or mental abilities or inad-equate experience and/or knowledge,provided that they are supervised or have been instructed on how to use the appliance safely and have understood the resulting dangers.Children must not play with the appliance.Children must not perform cleaning or user maintenance unless they are at least 15 years old and are being supervised.Keep children under the age of 8 years away from the appliance and power cable.1.4 Safe use WARNING ‒ Risk of fire!Hot oils and fats ignite very quickly.▶Never leave hot oil or fat unattended.▶Never use water to put out burning oil or fat.▶Switching off the hotplate.▶Extinguish flames carefully using a lid, fire blanket or something similar.The hotplates become very hot.▶Never place combustible items on the hob.▶Do not store any objects on the hob.The appliance will become hot.▶Do not keep combustible objects or aero-sol cans in drawers directly underneath the hob.The hob switches off automatically and can no longer be operated. It may switch on unin-tentionally at a later point.▶Switch off the circuit breaker in the fuse box.▶Call the after-sales service.Hob covers can cause accidents, for example due to overheating, catching fire or materials shattering.▶Do not use hob covers.WARNING ‒ Risk of burns!The hotplates and surrounding area (particu-larly the hob surround, if fitted) become very hot.▶Never touch the hot surfaces.▶Keep children at a safe distance.The hotplate heats up but the display does not work.▶Switch off the circuit breaker in the fuse box.▶Call the after-sales service.Unsuitable safety devices or child hob guards may result in accidents.▶Only use safety devices, such as child hobguards, which have been approved by us.en Preventing material damage4The appliance becomes hot during operation.▶Allow the appliance to cool down beforecleaning.WARNING ‒ Risk of electric shock!Incorrect repairs are dangerous.▶Repairs to the appliance should only becarried out by trained specialist staff.▶Only use genuine spare parts when repair-ing the appliance.▶If the power cord of this appliance is dam-aged, it must be replaced with a specialconnection cable, which is available fromthe manufacturer or his Customer Service.If the appliance or the power cord is dam-aged, this is dangerous.▶Never operate a damaged appliance.▶Never operate an appliance with a crackedor fractured surface.▶Call customer services. → Page 8An ingress of moisture can cause an electricshock.▶Do not use steam- or high-pressure clean-ers to clean the appliance.The insulation on cables of electrical appli-ances may melt if it touches hot parts of the appliance.▶Never bring electrical appliance cables intocontact with hot parts of the appliance.WARNING ‒ Risk of injury!Saucepans may suddenly jump due to liquid between the saucepan base and the hotplate.▶Always keep hotplates and saucepanbases dry.WARNING ‒ Risk of suffocation!Children may put packaging material over their heads or wrap themselves up in it and suffocate.▶Keep packaging material away from chil-dren.▶Do not let children play with packaging ma-terial.Children may breathe in or swallow small parts, causing them to suffocate.▶Keep small parts away from children.▶Do not let children play with small parts.2 Preventing material damageATTENTION!Rough pot and pan bases will scratch the ceramic.▶Check your cookware.Boiling pans dry may damage cookware or the appli-ance.▶Never place empty pans on a heated hotplate or al-low to boil dry.Incorrectly positioned cookware can cause the appli-ance to overheat.▶Never place hot pots or pans on the controls or thehob surround.Damage can occur if hard or pointed objects fall ontothe hob.▶Do not let hard or pointed objects fall onto the hob.Non heat-resistant materials will melt on heated hot-plates.▶Do not use oven protective foil.▶Do not use aluminium foil or plastic containers. 2.1 Overview of the most common damage Here you can find the most common types of damage and tips on how to avoid them.Damage Cause Measure Stains Food boiling over Remove boiled-over food immediately with a glass scraper.Stains Unsuitable cleaning products Only use cleaning products that are suitable for glass ceramic.Scratch es Salt, sugar or sand Do not use the hob as a work surface or storage space.Scratch es Rough pot or pan bases Check your cookware.Discol-ouration Unsuitable cleaning products Only use cleaningproducts that are suitablefor glass ceramic.Discol-ouration Pan abrasion,e.g. aluminium Lift pots and pans tomove on the hob.Blisters Sugar or food with a high sugar contentRemove boiled-over foodimmediately with a glassscraper.Environmental protection and saving energy en 53 Environmental protection and saving energy3.1 Disposing of packagingThe packaging materials are environmentally compat-ible and can be recycled.▶Sort the individual components by type and disposeof them separately.3.2 Saving energyIf you follow these instructions, your appliance will useless energy.Select the cooking zone to match the size of yourpan. Centre the cookware on the hob.Use cookware whose base diameter is the same dia-meter as the hotplate.Tip: Cookware manufacturers often give the upperdiameter of the saucepan. It is often larger than thebase diameter.¡Unsuitable cookware or incompletely covered cook-ing zones consume a lot of energy.Cover saucepans with suitable lids.¡Cooking without a lid consumes far more energy.Lift lids as infrequently as possible.¡When you lift a lid, a lot of energy escapes.Using a glass lid¡You can see into the pan through a glass lid without having to lift it.Use pots and pans with flat bases.¡Uneven bases increase energy consumption.Use cookware suited to the quantity of food.¡Large items of cookware containing little food need more energy to heat up.Cook with little water.¡The more water contained in cookware, the more energy is required to heat it up.Turn down to a lower heat setting early on. Use a suit-able ongoing cooking setting to continue cooking.¡If you continue cooking with an ongoing cooking setting that is too high, you'll waste energyTake advantage of the hob's residual heat. Withlonger cooking times switch off the hotplate5-10 minutes before the end of cooking.¡Unused residual heat increases energy consump-tion.en Familiarising yourself with your appliance 64 Familiarising yourself with your appliance4.1 Control panelYou can use the control panel to configure all functionsof your appliance and to obtain information about theoperating status.Hotplate controls The hotplate controls are permanently fixed in place.They must not be removed. Forcibly removing the hot-plate controls leads to them being destroyed.4.2 HotplatesYou can find an overview of the different activations ofthe hotplates here.If you operate the activations, the relevant displays lightup.Switching off: Turn the hot-plate switch to 0 and reset.Never turn the hotplateswitch past the symbol to0.Notes¡Dark areas in the glow pattern of the hotplate arepart of the technical design. They do not affect thefunctionality of the hotplate.¡The hotplate regulates the temperature by switchingthe heat on and off. The heat may also switch onand off when on the highest setting.–This protects easily damaged components fromoverheating.–The appliance is protected from electrical over-load.–Better cooking results are achieved.¡With multi-circuit hotplates, the heating of the innerfilament circuits and the heating of the activations may switch on and off at different times.4.3 Hotplate display and residual heatindicatorThe hob has a hotplate display and a residual heat in-dicator. The display lights up when a hotplate is warm.DisplayMeaning Hotplatedisplay Lights up during operation, shortly after switching on.Residualheat indic-ator Lit up after cooking when the hotplate is still warm.Note: You can keep small dishes warmor melt cooking chocolate.5 Basic operation5.1 Switching the hob on or off You can switch the hob on and off with the hotplateswitch.5.2 Setting the hotplatesYou can use the hotplate control to adjust the heat out-put of the hotplate.Heat setting1Lowest setting Heat setting 9Highest setting The symbol in the display panel indicates the hotplatewhich the display refers to, e.g. for the right rear hot-plate.Cleaning and servicing en75.3 Recommended cooking settingsYou can find an overview of different foods with appro-priate heat settings here.The cooking time will vary depending on the type,weight, thickness and quality of the food. The ongoingcooking setting depends on the cookware used.Cooking tips¡To bring food to the boil, use heat setting 9.¡Stir thick liquids occasionally.¡Food that needs to be seared quickly or that initiallyloses a lot of liquid during frying should be fried insmall portions.¡Tips for saving energy when cooking. → Page 5MeltingFood Ongoing cooking setting Ongoingcookingtime inminutesButter, gelatine 1-Heating or keeping warm Stew, e.g. lentil stew 1-Milk 11-2-1Prepare the dish without the lid.Poaching or simmering Dumplings 1, 23-420-30Fish 1, 2310-15White sauce, e.g. béchamel 13-61Bring the water to the boil with the lid on.2Continue to cook the dish without a lid.Boiling, steaming or braising Rice with double the volume of water 315-30Potatoes boiled in their skin 3-425-30Boiled potatoes 3-415-20Pasta, noodles 1, 256-10Stew, soup 3-415-60Vegetables, fresh or frozen 3-410-20Food in a pressure cooker 3-4-1Bring the water to the boil with the lid on.2Continue to cook the dish without a lid.Stewing Beef olives 3-450-60Pot roast 3-460-100Goulash 3-450-60Frying with little oilFry food without a lid.Escalope, plain or breaded 6-76-10Chops, plain or breaded 16-78-12Steak, 3 cm thick 7-88-12Fish or fish fillet, plain orbreaded 4-58-20Fish or fish fillet, breaded andfrozen, e.g. fish fingers 6-78-12Stir fry, frozen 6-76-10Pancakes 5-6-1Turn the dish several times.6 Cleaning and servicingTo keep your appliance working efficiently for a longtime, it is important to clean and maintain it carefully.6.1 Cleaning products You can obtain suitable cleaning products and glass scrapers from customer service, the online shop or a retailer.ATTENTION!Unsuitable cleaning products may damage the sur-faces of the appliance.▶Never use unsuitable cleaning products.Unsuitable cleaning products ¡Undiluted detergent¡Detergent intended for dishwashers¡Abrasive cleaners¡Aggressive cleaning products such as oven sprayor stain remover¡Abrasive sponges¡High-pressure or steam jet cleaners 6.2 Cleaning the glass ceramic Clean the hob after every use to stop cooking residuesfrom getting burnt on.Note: Note the information on unsuitable cleaningproducts. → Page 7Requirement: The hob has cooled down.1.Remove heavy dirt using a glass scraper.2.Clean the hob with a cleaning product for glassceramic.Follow the cleaning instructions on the productpackaging.Tip: You can achieve good cleaning results if youuse a special sponge for glass ceramic.6.3 Cleaning the hob surround Clean the hob frame after use if dirty or stained.Notes ¡Note the information on unsuitable cleaningproducts. → Page 7¡Do not use the glass scraper.1.Clean the hob frame with hot soapy water and a softcloth.en Disposal8Wash new sponge cloths thoroughly before use. 2.Dry with a soft cloth.7 DisposalFind out here how to dispose of old appliances cor-rectly.7.1 Disposing of old applianceValuable raw materials can be reused by recycling.▶Dispose of the appliance in an environmentallyfriendly manner.Information about current disposal methods areavailable from your specialist dealer or local author-ity.(waste electrical and electronic equip-ment - WEEE).The guideline determines the frame-work for the return and recycling of used appliances as applicable throughout the EU.8 Customer ServiceIf you have any queries on use, are unable to rectifyfaults on the appliance yourself or if your applianceneeds to be repaired, contact Customer Service.Function-relevant genuine spare parts according to thecorresponding Ecodesign Order can be obtained fromCustomer Service for a period of at least 10 years fromthe date on which your appliance was placed on themarket within the European Economic Area.Note: Under the terms of the manufacturer's warrantythe use of Customer Service is free of charge.Detailed information on the warranty period and termsof warranty in your country is available from our after-sales service, your retailer or on our website.If you contact Customer Service, you will require theproduct number (E-Nr.) and the production number(FD) of your appliance.The contact details for Customer Service can be foundin the enclosed Customer Service directory or on ourwebsite.8.1 Product number (E-Nr.) and productionnumber (FD)You can find the product number (E-Nr.) and the pro-duction number (FD) on the appliance's rating plate.The rating plate is located on the appliance certificate.Make a note of your appliance's details and the Cus-tomer Service telephone number to find them againquickly.Thank you for buying a Bosch Home Appliance!Register your new device on MyBosch now and profit directly from:•Expert tips & tricks for your appliance •Warranty extension options •Discounts for accessories & spare-parts •Digital manual and all appliance data at hand •Easy access to Bosch Home Appliances Service Free and easy registration – also on mobile phones:/welcomeLooking for help? You'll find it here.Expert advice for your Bosch home appliances, help with problems or a repair from Bosch experts.Find out everything about the many ways Bosch can support you: /serviceContact data of all countries are listed in the attached service directory.*9001596004*9001596004 (001215)en Robert Bosch Hausgeräte GmbH Carl-Wery-Straße 3481739 München GERMANY Valid within Great Britain:Imported to Great Britain by BSH Home Appliances Ltd.Grand Union House Old Wolverton Road Wolverton, Milton Keynes MK12 5PT United Kingdom。
Bosch 电器产品说明书.pdf_1702006553.4429183
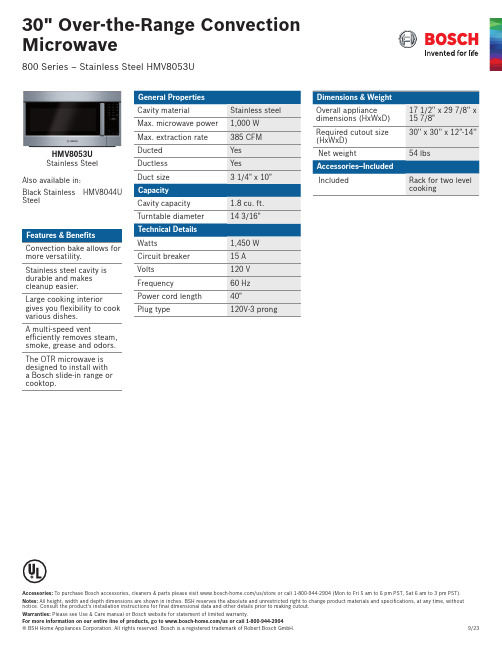
Warranties: Please see Use & Care manual or Bosch website for statement of limited warranty.
For more information on our entire line of products, go to /us or call 1-800-944-2904
800 Series – Stainless Steel HMV8053U
Installation Details
Venting Options
Accessories: To purchase Bosch accessories, cleaners & parts please visit /us/store or call 1-800-944-2904 (Mon to Fri 5 am to 6 pm PST, Sat 6 am to 3 pm PST).
Required cutout size (HxWxD)
Net weight
Accessories—Included
Included
17 1/2'' x 29 7/8'' x 15 7/8" 30'' x 30'' x 12"-14''
54 lbs
Rack for two level cooking
Warranties: Please see Use & Care manual or Bosch website for statement of limited warranty.
For more information on our entire line of products, go to /us or call 1-800-944-2904
Bosch 产品说明书.pdf_1702004503.758833

For help and assistance with Bosch accessories please visit: /eshop/bosch/us or call 1-800-944-2904 Mon-Fri 5am to 6pm PST Sat 6am to 3pm PSTNotes: All height, width and depth dimensions are shown in inches. BSH reserves the absolute and unrestricted right to change product materials and specifications, at any time, without notice. Consult the product’s installation instructions for final dimensional data and other details prior to making cutout. Applicable product warranty can be found in accompanying product literature or you may contact your account manager for further details.Warranties: Bosch warrants that the Product is free from defects in materials and workmanship for a period of three hundred and sixty-five (365) days from the date of purchase. The foregoingHEZ39023010" AutoChef® panHEZ3902108" AutoChef® pan Benchmark® Series – Black NITP066UC30" Induction CooktopNITP066UCBlackIntroducing the newly designed and engineered induction cooktop,featuring the flexibility of FlexInduction® cooking zones.FlexInduction® can combine two cookingzones into one larger zone.A 11" heating elementoffers 3600W of power for quick results.Induction cooktops offer faster cooking results than gas or electric.SpeedBoost® boils water 2x as fast as conventional electric cooktops.HEZ390512TeppanyakiHEZ390522Grill Also available in:Black withStainless Steel Frame NITP066SUC* F or 30" model Boost function may be used simultaneously in 2 zones only. See User Manual.For help and assistance with Bosch accessories please visit: /eshop/bosch/us or call 1-800-944-2904 Mon-Fri 5am to 6pm PST Sat 6am to 3pm PSTNotes: All height, width and depth dimensions are shown in inches. BSH reserves the absolute and unrestricted right to change product materials and specifications, at any time, without notice. Consult the product’s installation instructions for final dimensional data and other details prior to making cutout. Applicable product warranty can be found in accompanying product literature or you may contact your account manager for further details.Warranties: Bosch warrants that the Product is free from defects in materials and workmanship for a period of three hundred and sixty-five (365) days from the date of purchase. The foregoingInstallation Detailsair clearance 36" (~900)" (79) + fitting/conduit 1" (23)Benchmark® Series – Black NITP066UC30" Induction Cooktop。
- 1、下载文档前请自行甄别文档内容的完整性,平台不提供额外的编辑、内容补充、找答案等附加服务。
- 2、"仅部分预览"的文档,不可在线预览部分如存在完整性等问题,可反馈申请退款(可完整预览的文档不适用该条件!)。
- 3、如文档侵犯您的权益,请联系客服反馈,我们会尽快为您处理(人工客服工作时间:9:00-18:30)。
博世新之星说明书篇一:博世欧洲精英使用手册博世欧洲精英使用手册一、设备打开1.按下锅炉控制面板左上角的电源开关,运行设备;2.控制面板下方的运行指示灯亮,温度指示灯显示采暖或生活热水温度。
燃烧过程中,燃烧器指示灯亮。
二、打开集中供热功能1.旋转采暖温度控制按钮(控制面板左边一个按钮),调节采暖温度:——地板采暖:位置2(约50℃)。
注:初次使用温度不宜调的太高,一般在20至30℃即可。
最高温度不得超过60℃。
——散热片系统:位置6(约80℃).利用热水温度调节按钮,,调节生活热水温度。
温度指示不显示热水温度,加热过程中,温度显示灭,当燃烧器点燃后,燃烧器指示灯亮起。
热水温度可设置在40℃-60℃之间,单实际温度取决于热水量,热水量越大,温度越低。
四、夏季模式(集中供热关闭,仅热水打开) 1.保持设备打开状态。
2.逆时针旋转采暖温度控制按钮,至最左端。
采暖泵关闭。
3.夏季模式下,温度指示关闭。
注:当压力表水压低于正常水压时,应打开补水阀补水,直到水压压力处于正常范围内。
然后一定要关闭补水阀,否则会造成锅炉泄水。
五、故障代码博世欧洲之星操作手册一、设备打开1.首先确认燃气阀门已经打开,锅炉电源插头已插上;2.按下锅炉控制面板左上角的电源开关,运行设备; 3.显示屏上显示采暖的出水温度二、试运行:1.打开系统散热片的所有阀门;2.打开补水阀,生活冷水阀,注水至1到2巴的压力,然后关闭冷水阀 3.散热片排气;4.打开冷水阀,将系统压力重新充注到1-2巴 5.打开燃气阀三、打开集中供热功能1.热水温度可设置在45℃至82℃之间;2.若为地板采暖系统,采暖温度不得高于60℃;3.旋转控制面板左下角的采暖控制旋钮,调节采暖温度;(初次使用时不宜调太高) 4.采暖类型不同,最大采暖出水温度设置不同:——地板采暖系统:2档(约50℃)四、生活热水温度设置1.调节锅炉控制面板右下角的生活热水温度调节旋钮来设置生活热水温度; 2.显示屏上显示的仍是采暖出水温度 3.生活热水温度可在40℃和60℃之间设置。
但水龙头的世界出水温度取决于进水量的大小,五、故障代码威能锅炉使用手册一、设备打开1、用手扣住前盖板凹槽将其下拉,然后就会看到控制面板,控制面板上有以下功能部件:(1)液晶显示屏,显示当前攻难供水的温度,供暖系统的注水压力或其他信息。
(2)指示灯,指示当前操作模式。
(3)“i”按钮用于调取信息。
(4)控制器(5)电源开关,用于启动或关闭壁挂炉。
(6)“+”按钮,用于滚动显示屏上的信息和切换到显示当前供暖供水温度。
(7)“—”按钮,用于后退显示屏的显示信息。
(8)“复位”按钮,用于复位特定故障。
(9)供暖温度旋钮,用于设置供暖供水温度。
(10)生活热水温度旋钮:用于设置热水出水温度。
2、指示灯信息(1)绿色指示灯熄灭:无生活热水取用;灯亮:生活热水取用中。
(2)黄色指示灯灯亮:燃烧器工作中。
(3)红色指示灯灯亮:壁挂炉出现故障,现实错误代码。
3、调试使用(1)完全打开燃气管路和壁挂炉上的燃气阀;(2)确保供暖系统的供水及回水保养阀室打开的;(3)壁挂炉运行前先检查显示屏上的系统注水压力。
要保证供暖系统的稳定运行,在系统冷却时时,显示屏上现实的注水压力必须在1.0至2.0bar的范围内。
如果注水压力小于0.8bai,迮调试前必须进行补水。
二、生活热水模式运行1、使用电源开关启动壁挂炉:“1”=开“0”=关。
当启动壁挂炉时,显示屏上显示供暖系统的当前注水压力 2、将用于设置生活热水温度的旋钮设置到所需的温度—左旋停止位置约35℃—右旋停止位置(最高温度)65℃当调整温度时,设置值显示在显示屏上,五秒钟后,显示返回标准模式(显示供暖系统的当前注水压力)。
三、设置供暖供水温度根据外界温度调节供暖按钮设置供暖热水温度,建议进行下列温度设置:—左位置(但不拧到底),适用于春天和秋天:外界温度为10—20℃。
—中间位置适用于较寒冷的天气:外界温度为0至10℃。
篇二:博世86中文说明书使用说明—————————————沙楷——————————————感谢您对博世产品的购买。
你所选购的是一个现代化的优质家用设备。
您可以在我们的网站上找到关于我们产品的更进一步的信息。
该产品可用于在家中加工适量的食物或用于加工非工业方面的类似数量的食物。
非工业方面的应用包括以下几种,例如:在店铺的职工厨房、办公室、农业或其他商务场所中,也包括在寄宿家庭、小旅馆和类似的住宅中。
该产品用于在家中加工适量的食物。
所放入食物不要超过最大额定数量。
请认真阅读说明书并将其妥善保管。
若用户未按照说明书中的正确使用方法操作该产品,生产商拒绝对其产生的不良后果负责。
如果将该产品转让给第三方,请务必将说明书一同转交。
该产品免费保修。
该说明书介绍了产品的多种模式。
安全说明!小心电击请按照铭牌上的详细信息接通电源。
仅能在室内使用该设备。
如果连接线或者器械损坏,请勿使用。
避免儿童接触该设备。
除非在监护人的监护或指导下,否则禁止身体感官或精神受限的以及缺乏操作经验的人使用该设备。
在清理设备或离开房间时,务必要切断将设备的电源,否则会出现问题。
在设备运行时,不要走开。
不要将电源线放在锋利的边缘或很热的表面。
为了避免受伤,用户必须请生产商、售后人员或类似的有资格的人更换损坏的电源线。
只有我们的售后中心可以修理该设备。
手不要靠近设备中旋转的部分。
安全起见,该设备只能在安装好安全设施之后使用(11,12,13)设备运行时,请勿调整旋转臂。
只有设备停止转动后,方可调整。
在设备停止运行之前,请勿更换工具——切断电源后,该设备仍会继续旋转一段时间。
不要把底座浸在水中或用流动的水清洗。
只能用原装配件操作该设备。
当用原装配件时,请遵守附上的操作说明。
Included in standard delivery见表格fig.16概述请翻到标明的页码1 开关2配件/工具3 旋钮4 盖子5 有盖的进料管6 不锈钢搅拌碗7 搅棒8 搅拌器9 揉面钩与倒流板10 用于混合的容器11 工具的盖子12 电机的盖子13 混合器的盖子工具的驱动装置fig.22a 混合器和多叶混合器的电机2b 搅棒、搅拌器、揉面钩的驱动,碎肉机2c 磨面机、连续粉碎机和榨汁机的电机操作的位置!注意在操作该设备之前,将工具和相应的驱动按正确的方式连接在一起,并根据桌子的情况将其放在合适的位置。
安全起见,只有当在设备上安装好安全设施(11,12,13)后方可使用。
旋转臂必须可从任何可操作档位旋转。
-安装/移除搅拌器,搅棒或揉捏钩-添加大量原料安全系统开始锁定见“操作位置”表在以下情况时可调到1~4位置:-当把碗安装好,并且尽可能的拧紧-或者工具驱动器盖子(11)已经安装完毕只有当绞肉机和插座安装好之后才能开到位置5(见绞肉机操作说明书)只有在工具插好之后才能开到位置6。
重启锁定电源被意外中断之后,开关仍然开着,但恢复电力时,电机不会重新工作。
过载保护装置如果设备运行过程中,电机自动关机了,这说明过载保护装置被激活了,原因可能如下:-加入了过多的原料-设备持续开启时间过长如果安全系统被激活了,请见“故障处理”—————————————————————————————操作设备时请注意!在操作档位没有工具或配件时,不要操作该设备安全起见,只有当在设备上安装好安全设施(11,12,13)后方可使用。
不要空转此设备。
不要将此设备或配件暴露在热源下。
●在第一次操作设备之前,请彻底清理;见“清理与维护”准备●把基本的原件放在一个平坦干净的表面●拉出电源线(fig.3)●如果该设备有一个自动绕线机:●拉出规定长度的电源线(最多110cm)然后慢慢的松开;电源线会被卡住。
●减少电源线的长度:轻轻的拉出电源线,并卷出规定的长度。
之后再轻轻的拉电源线,并慢慢松开。
The cable 会被卡住。
●插上总电源。
注意!在插电的时候不要扭曲电源线。
如果该设备有自动绕线机,请不要人工绕线。
如果电源线打结了,就一直拉着电源线然后慢慢缠好。
设置操作档位 fig 4注意!当按着按钮时,要一直用一只手抓着旋转臂。
●按下弹簧钮(1)然后移动旋转臂。
与此同时,用一只手抓紧旋转臂。
篇三:博世同传操作说明书博世操作说明1、数字会议系统操作说明系统简介会议发言系统采用DCN系统模块化的设计,根据不同的需求配备相应的功能模块,设计、实施与使用灵活。
可以达到发言的效果。
中央控制器(CCU)系统上电在中央控制器上设定话筒工作状态为“OPEN”——“OPEN”:话筒键控制,申请发言。
——“OVERRIED”:话筒键控制,越权发言。
——“VOICE”:声控启动话筒。
在中央控制器上设定话筒同时启动用数量为“1”——“1”:同时启动用1个话筒。
——“2”:同时启动用2个话筒。
——“4”:同时启动用4个话筒。
打开第一个话筒讲话。
此时该代表机扬声器关闭。
调节中央控制器音量控制旋钮。
调节中央控制器高、低音音调旋钮。
持续按下主席机优先控制键(蓝色键),可暂时关闭所有话筒,此时只有主席机可以发言。
松开此键,恢复原先的话筒状态。
在“OPEN”状态下(申请状态)●最多可同时打开的代表机数量为设定的话筒同时启用数量。
●已打开的话筒红色“光环”指示器亮,话筒键LED指示器为红色。
●后按键的代表机处于等待申请状态,话筒键LED指示器为绿色。
●当关闭一个打开的话筒时,首先处于申请状态的代表机自动打开。
以申请的时间先后顺序为准。
*建议:使用该状态,可靠且方便。
在“OVERRIDE”状态下(越权状态)●最多可同时打开的代表机数量为设定的话筒同时启用数量。
●已打开的话筒红色“光环”指示器亮,话筒键LED 指示器为红色。
●后按键的代表机将直接打开,同时关闭第一个打开的话筒,以话筒打开的时间先后顺序为准。
在“VOICE”状态下(声控状态)●最多可同时打开的代表机数量为设定的话筒同时启用数量。
●所有话筒处于等待状态,各类指示器不起作用。
●当有发言时,自动打开当前话筒。
当发言结束,话筒自动恢复成等待状态。
*建议:不要使用该状态,以免产生不必要的麻烦。
2、同声传译设备操作说明(1)红外发射机打开设备电源(注意:此电源在设备的后面)。
把所有的通道全部打开(此时的四个小液晶显示屏上自上而下分别显示——0,1,2,3)。
拨位开关状态设置成“NORMAL”(如下图)。
(2)红外发射板确保该设备通电。
通电时,发射板左上角的指示灯亮。
设备安装在会场里(如下图)。
(3)红外接收机首先插上耳机,调整到需要的通道,若无信号,则按一下接收机的开关“ON”(如下图)。
(4)译员台设置:用户先行安排译员机所需翻译出的语种。
例:第一台译员机------将其它语言翻译成汉语确认设备连接完毕,打开中央控制器电源,等待数秒,译员机液晶屏显示然后开始进行安装。