Nginx与PHP(FastCGI)的安装、配置与优化
Windows下Nginx的安装与配置

Windows下Nginx的安装与配置Windows下Nginx的安装与配置Nginx ("engine x") 是一款高性能的,轻量级的HTTP Web服务器和反向代理服务器及电子邮件IMAP/POP3/SMTP代理服务器。
Nginx是由俄罗斯的程序设计师Igor Sysoev 所开发,为俄罗斯访问量第二的Rambler.ru 站点开发的,它已经在该站点运行超过四年多时间了,Igor 将源代码以类BSD许可证的形式发布。
自Nginx 发布四年来,Nginx 已经因它的稳定性、丰富的功能集、示例配置文件和低系统资源的消耗而闻名了。
Nginx 超越Apache的高性能和稳定性,使得国内使用Nginx 作为Web 服务器的网站也越来越多。
目前国内各大门户网站已经部署了Nginx,如新浪、网易、腾讯等;新近发现Nginx 技术在国内日趋火热,越来越多的网站开始应用部署Nginx。
一、首先去官网下载nginx1.0.11的Windows版本,官网下载:/download/nginx-1.0.11.zip下载到软件包后,解压nginx-nginx1.0.11.zip 包到你喜欢的根目录,并将目录名改为nginx。
然后,执行下列操作:cd nginxstart nginx这样,nginx 服务就启动了。
打开任务管理器,查看nginx.exe 进程,有二个进程会显示,占用系统资源,那是相当的少。
然后再打开浏览器,输入http://127.0.0.1/就可以看到nginx的欢迎页面了,非常友好nginx -s stop // 停止nginxnginx -s reload // 重新加载配置文件nginx -s quit // 退出nginx二、接下来就是配置nginx的conf文件了。
下面是我的配置:#user nobody;worker_processes 1;#error_log logs/error.log;#error_log logs/error.log notice;#error_log logs/error.log info;#pid logs/nginx.pid;events {worker_connections 1024;}http {include mime.types;default_type application/octet-stream;log_format main '$remote_addr - $remote_user [$time_local] "$request" ' '$status $body_bytes_sent "$http_referer" ''"$http_user_agent" "$http_x_forwarded_for"';access_log logs/access.log main;sendfile on;#tcp_nopush on;#keepalive_timeout 0;keepalive_timeout 65;#gzip on;server {listen 80;server_name localhost;#charset koi8-r;#access_log logs/host.access.log main;location ~* software/(.*).*\.(jpg|rar){expires 21d;root d:/temp/;access_log d:/temp/_nginx_s3gd-205.log;proxy_store on;proxy_store_access user:rw group:rw all:rw;proxy_temp_path d:/temp/;proxy_redirect off;proxy_set_header Host 112.25.10.140;proxy_set_header X-Real-IP $remote_addr;proxy_set_header X-Forwarded-For $proxy_add_x_forwarded_for; client_max_body_size 10m;client_body_buffer_size 1280k;proxy_connect_timeout 900;proxy_send_timeout 900;proxy_read_timeout 900;proxy_buffer_size 40k;proxy_buffers 40 320k;proxy_busy_buffers_size 640k;proxy_temp_file_write_size 640k;if ( !-e $request_filename){proxy_pass http://112.25.10.140:80;}}location / {root html;index index.html index.htm;}#error_page 404 /404.html;# redirect server error pages to the static page /50x.html#error_page 500 502 503 504 /50x.html;location = /50x.html {root html;}# proxy the PHP scripts to Apache listening on 127.0.0.1:80##location ~ \.php$ {# proxy_pass http://127.0.0.1;#}# pass the PHP scripts to FastCGI server listening on 127.0.0.1:9000 ##location ~ \.php$ {# root html;# fastcgi_pass 127.0.0.1:9000;# fastcgi_index index.php;# fastcgi_param SCRIPT_FILENAME /scripts$fastcgi_script_name;# include fastcgi_params;#}# deny access to .htaccess files, if Apache's document root# concurs with nginx's one##location ~ /\.ht {# deny all;#}}# another virtual host using mix of IP-, name-, and port-based configuration ##server {# listen 8000;# listen somename:8080;# server_name somename alias another.alias;# location / {# root html;# index index.html index.htm;# }#}# HTTPS server##server {# listen 443;# server_name localhost;# ssl on;# ssl_certificate cert.pem;# ssl_certificate_key cert.key;# ssl_session_timeout 5m;# ssl_protocols SSLv2 SSLv3 TLSv1;# ssl_ciphers HIGH:!aNULL:!MD5;# ssl_prefer_server_ciphers on;# location / {# root html;# index index.html index.htm; # }#}}Windows下Nginx+PHP5的安装与配置方法Nginx 是一个轻量级的高性能Http WebServer,以事件驱动方式编写,因此相比Apache 而言,Nginx 更加稳定、性能更好,而且配置简单,资源占用较低。
004-nginx简介、安装配置【源码安装和mac安装】、基本使用

004-nginx简介、安装配置【源码安装和mac安装】、基本使⽤⼀、概述1.1、Nginx是什么 Nginx是⼀款轻量级的Web服务器,也是⼀款轻量级的反向代理服务器【常⽤】。
1.2、Nginx能⼲什么Nginx能⼲的事情很多,这⾥简要罗列⼀些: 1:直接⽀持Rails和PHP的程序 2:作为HTTP反向代理服务器 3:作为负载均衡服务器 4:作为邮件代理服务器 5:帮助实现前端动静分离1.3、Nginx特点 ⾼稳定、⾼性能、资源占⽤少、功能丰富、模块化结构、⽀持热部署⼆、安装配置2.1、源码安装环境:CentOS 安装function nginx_install() {echo"nginx init start ######"if [ -e nginx-1.15.12.tar.gz ]; thenecho"exist nginx-1.15.12.tar.gz"elseecho"nginx download start ……"wget /download/nginx-1.15.12.tar.gzecho"nginx download end ……"fiecho"nginx install start ……"yum -y install gcc-c++yum -y install pcre*yum -y install openssl*tar -zvxf nginx-1.15.12.tar.gzrm -rf $1mkdir -p $1mkdir -p $1/runcd nginx-1.15.12# 指定⽬录安装./configure --prefix=$1 --conf-path=$1/conf/nginx.confmake && make install# 拷贝配置mv $1/conf/nginx.conf $1/conf/nginx.conf.defaultcp ${project_path}/nginx.conf $1/conf/nginx.confmkdir -p $1/runrm -rf nginx-1.15.12echo"nginx install end ……"echo"nginx init end ######"}使⽤nginx_install '/export/servers/nginx'安装注意cp: "conf/koi-win" 与"/application/nginx-1.6.3/conf/koi-win" 为同⼀⽂件错误原因:安装⽬录和解压后的安装包为同⼀个⽬录。
Nginx性能优化有这篇就够了!

Nginx性能优化有这篇就够了!⽬录:1、Nginx运⾏⼯作进程数量Nginx运⾏⼯作进程个数⼀般设置CPU的核⼼或者核⼼数x2。
如果不了解cpu的核数,可以top命令之后按1看出来,也可以查看/proc/cpuinfo ⽂件 grep ^processor /proc/cpuinfo | wc -l[root@lx~]# vi/usr/local/nginx1.10/conf/nginx.confworker_processes 4;[root@lx~]# /usr/local/nginx1.10/sbin/nginx-s reload[root@lx~]# ps -aux | grep nginx |grep -v greproot 9834 0.0 0.0 47556 1948 ? Ss 22:36 0:00 nginx: master processnginxwww 10135 0.0 0.0 50088 2004 ? S 22:58 0:00 nginx: worker processwww 10136 0.0 0.0 50088 2004 ? S 22:58 0:00 nginx: worker processwww 10137 0.0 0.0 50088 2004 ? S 22:58 0:00 nginx: worker processwww 10138 0.0 0.0 50088 2004 ? S 22:58 0:00 nginx: worker process2、Nginx运⾏CPU亲和⼒⽐如4核配置:worker_processes 4;worker_cpu_affinity 0001 0010 0100 1000⽐如8核配置:worker_processes 8;worker_cpu_affinity 00000001 00000010 00000100 0000100000010000 00100000 01000000 10000000;worker_processes最多开启8个,8个以上性能提升不会再提升了,⽽且稳定性变得更低,所以8个进程够⽤了。
Nginx-1.18.0的安装配置与使用【转】

Nginx-1.18.0的安装配置与使⽤【转】⼀、安装1.1 yum安装(1) 配置好yum源与epel源#本地光盘yum源[development]name=dvdbase repobaseurl=file:///mnt/cdrom/enabled=1gpgcheck=1gpgkey=file:///mnt/cdrom/RPM-GPG-KEY-CentOS-7#在线阿⾥云yum源[aliyun]name=aliyun repobaseurl=https:///centos/$releasever/os/$basearch/enabled=1gpgchedk=1gpgkey=https:///centos/$releasever/os/$basearch/RPM-GPG-KEY-CentOS-$releasever#在线阿⾥云EPEL源[aliyunEpel]name=aliyun epelbaseurl=https:///epel/$releasever/$basearchenabled=1gpgcheck=1gpgkey=https:///epel/RPM-GPG-KEY-EPEL-$releasever(2) 安装[root@localhost ~]# yum install -y nginx1.2 编译安装(1) 下载安装包[root@localhost ~]# wget https:///download/nginx-1.18.0.tar.gz(2) 安装相关依赖包[root@localhost ~]# yum install -y gcc pcre-devel openssl-devel zlib-devel(3) 创建nginx⽤户,解压源码包,开始编译安装[root@localhost ~]# useradd -r -s /sbin/nologin nginx[root@localhost ~]# tar -xf nginx-1.18.0.tar.gz[root@localhost ~]# cd nginx-1.18.0/[root@localhost nginx-1.18.0]# ./configure --prefix=/usr/local/nginx \> --user=nginx \> --group=nginx \> --with-http_ssl_module \> --with-http_v2_module \> --with-http_realip_module \> --with-http_stub_status_module \> --with-http_gzip_static_module \> --with-pcre \> --with-stream \> --with-stream_ssl_module \> --with-stream_realip_module[root@localhost nginx-1.18.0]# make && make install编译代码(4) 启动nginx#直接启动[root@localhost ~]# /usr/local/nginx/sbin/nginx#或创建软链接启动[root@localhost ~]# ln -s /usr/local/nginx/sbin/nginx /usr/sbin/[root@localhost ~]# ll /usr/sbin/nginxlrwxrwxrwx 1 root root 27 Jun 17 11:42 /usr/sbin/nginx -> /usr/local/nginx/sbin/nginx[root@localhost ~]# nginx⼆、配置⽂件详解#全局配置端user nginx nginx; #启动Ngnix⼯作进程的⽤户和组worker_processes [number | auto]; #启动的⼯作进程数worker_cpu_affinity 0001 0010 0100 1000 #将Nginx⼯作进程绑定到指定的CPU核⼼,默认Nginx是不进⾏进程绑定的error_log file [debug | info | notice | warn | error | crit | alert | emerg] #错误⽇志配置#error_log logs/error.log;#error_log logs/error.log notice;pid logs/nginx.pid; #pid⽂件保存路径work_priority 0; #⼯作进程的优先级 -20~19work_rlimit_nofile 65536; #⼯作进程最⼤打开⽂件数daemon off|on; #前台运⾏nginx⽤于测试,docker等环境,默认为onmaster_process off|on; #是否开启Nginx的master-woker⼯作模式,关闭后 nginx就不会fork出worker⼦进程来处理请求,⽽是以master进程⾃⾝来处理请求events { #events设置块worker_connections 1024; #设置单个nginx⼯作进程可以接爱的最⼤并发连接数据; ##在nginx作为http服务器的时候,最⼤连接数为worker_processes * worker_connctions;在nginx作为反向代理服务器的时候,最⼤连接数为worker_processes * worker_connections / 2 use epoll; #使⽤epoll事件驱动,Nginx⽀持众多的事件驱动,⽐如select、poll、epoll,只能设置在events模块中设置accept_mutex on; #优化同⼀时刻只有⼀个请求⽽避免多个睡眠进程被唤醒的设置,on为防⽌被同时唤醒默认为off,全部唤醒的过程也成为"惊群",因此nginx刚安装完以后要进⾏适当的优化multi_accept on; #Nginx服务器的每个⼯作进程可以同时接受多个新的⽹络连接,但是需要在配置⽂件中配置,此指令默认为关闭,即默认为⼀个⼯作进程只能⼀次接受⼀个新的⽹络连接,打开后⼏个同时接受多个}http { #http设置块include mime.types; #导⼊⽀持的⽂件类型default_type application/octet-stream; #设置默认的类型,会提⽰下载不匹配的类型⽂件#⽇志配置部分#log_format main '$remote_addr - $remote_user [$time_local] "$request" '# '$status $body_bytes_sent "$http_referer" '# '"$http_user_agent" "$http_x_forwarded_for"';#access_log logs/access.log main;#⾃定义优化参数sendfile on; #指定是否使⽤sendfile系统调⽤来传输⽂件#tcp_nopush on; #在开启了sendfile的情况下,合并请求后统⼀发送给客户端#tcp_nodelay off; #在开启了keepalived模式下的连接是否启⽤TCP_NODELAY选项,当为off时,延迟0.2s发送,默认为on,不延迟发送,⽴即发送⽤户相应报⽂ keepalive_timeout 65; #设置会话保持时间,单位是秒#gzip on; #开启⽂件压缩server {listen 80; #设置监听地址和端⼝server_name localhost; #设置server name,可以以空格隔开写多个,⽀持正则表达式,如 *,www.aaa.* ~^www\d+\.aaa\.com$ default_server#charset koi8-r; #设置编码格式,默认是俄语格式,可以改为utf-8#access_log logs/host.access.log main; #设备访问⽇志location / {root html; #指定⽹站⽬录index index.html index.htm; #指定默认⽹页⽂件,此指令由ngx_http_index_module模块提供}#error_page 404 /404.html;# redirect server error pages to the static page /50x.html#error_page 500 502 503 504 /50x.html;location = /50x.html {root html;}# proxy the PHP scripts to Apache listening on 127.0.0.1:80##location ~ \.php$ { #以http的⽅式转发php请求到指定web服务器# proxy_pass http://127.0.0.1;#}# pass the PHP scripts to FastCGI server listening on 127.0.0.1:9000##location ~ \.php$ { #以fastcgi的⽅式转发php请求到php处理# root html;# fastcgi_pass 127.0.0.1:9000;# fastcgi_index index.php;# fastcgi_param SCRIPT_FILENAME /scripts$fastcgi_script_name;# include fastcgi_params;#}# deny access to .htaccess files, if Apache's document root# concurs with nginx's one##location ~ /\.ht { #拒绝web形式访问指定⽂件,如很多的⽹站都是通过.htaccess⽂件来改变⾃⼰的重定向等功能。
实战Nginx与PHP(FastCGI)的作用、安装、配置与优化
实战Nginx与PHP(FastCGI)的作用、安装、配置与优化一、什么是 FastCGIFastCGI是一个可伸缩地、高速地在HTTP server和动态脚本语言间通信的接口。
多数流行的HTTP server都支持FastCGI,包括Apache、Nginx和lighttpd等,同时,FastCGI也被许多脚本语言所支持,其中就有PHP。
FastCGI是从CGI发展改进而来的。
传统CGI接口方式的主要缺点是性能很差,因为每次HTTP服务器遇到动态程序时都需要重新启动脚本解析器来执行解析,然后结果被返回给HTTP服务器。
这在处理高并发访问时,几乎是不可用的。
另外传统的CGI接口方式安全性也很差,现在已经很少被使用了。
FastCGI接口方式采用C/S结构,可以将HTTP服务器和脚本解析服务器分开,同时在脚本解析服务器上启动一个或者多个脚本解析守护进程。
当HTTP服务器每次遇到动态程序时,可以将其直接交付给FastCGI进程来执行,然后将得到的结果返回给浏览器。
这种方式可以让HTTP服务器专一地处理静态请求或者将动态脚本服务器的结果返回给客户端,这在很大程度上提高了整个应用系统的性能。
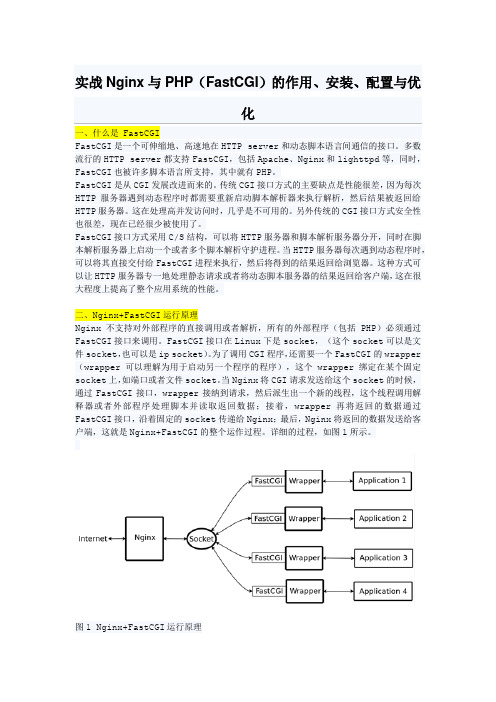
二、Nginx+FastCGI运行原理Nginx不支持对外部程序的直接调用或者解析,所有的外部程序(包括PHP)必须通过FastCGI接口来调用。
FastCGI接口在Linux下是socket,(这个socket可以是文件socket,也可以是ip socket)。
为了调用CGI程序,还需要一个FastCGI的wrapper (wrapper可以理解为用于启动另一个程序的程序),这个wrapper绑定在某个固定socket上,如端口或者文件socket。
当Nginx将CGI请求发送给这个socket的时候,通过FastCGI接口,wrapper接纳到请求,然后派生出一个新的线程,这个线程调用解释器或者外部程序处理脚本并读取返回数据;接着,wrapper再将返回的数据通过FastCGI接口,沿着固定的socket传递给Nginx;最后,Nginx将返回的数据发送给客户端,这就是Nginx+FastCGI的整个运作过程。
关于配置FastCGI中的一些错误

internet information services (iis)
这个错误是由于在解压php之后,没有对iis启动帐户赋予该目录的读取和运行权限.修改文件夹安全属性,问题解决.
错误3,
FastCGI Error
The FastCGI Handler was unable to process the request.
顺便说一句,微软Web平台安装FastCGI时,会自动选择合适的PHP版本(32位或64位),不需要人工去区别了
-我按以上问题处理流程处理,问题依旧,因此我将 ExePath=C:\Program Files\PHP\php-cgi.exe 这句(我的是d:/php53/php-cgi.exe) 将 ” / “ 改成 ” \ “ 即可
1、在页头使用date_default_timezone_set()设置我的默认时区为北京时间,即
< ?php
date_default_timezone_set("PRC");
?>就可以了。
2、在php.ini中设置date.timezone的值为PRC,设置好以后的为:date.timezone=PRC,同时取消这一行代码的注释,即去掉前面的分号就可以了。
InstanceMaxRequests=10000
ActivityTimeout=300
RequestTimeout=600
EnvironmentVars=PHP_FCGI_MAX_REQUESTS:10000,PHPRC:C:\ProgramFiles\PHP\
这样配置之后,PHP程序就可以正常运作啦!
[lnmp(centos6.2+nginx+mysql+php)环境搭建系统教程--之第五步php安装]
![[lnmp(centos6.2+nginx+mysql+php)环境搭建系统教程--之第五步php安装]](https://img.taocdn.com/s3/m/64402401e87101f69e319509.png)
php安装将libiconv-1.13.1.tar.gz上传至/software#tar zxf libiconv-1.13.1.tar.gz#cd libiconv-1.13.1#./configure --prefix=/usr/local/#make && make install#cd ..将libmcrypt-2.5.8.tar.gz 上传至/software#tar zxf libmcrypt-2.5.8.tar.gz#cd libmcrypt-2.5.8#./configure#make && make install#/sbin/ldconfig#cd libltdl#./configure --enable-ltdl-install#make && make install#cd ../../将mhash-0.9.9.9.tar.gz上传至/software#tar zxf mhash-0.9.9.9.tar.gz#cd mhash-0.9.9.9/#./configure#make && make install#cd ../#ln -s /usr/local/lib/ /usr/lib/#ln -s /usr/local/lib/libmcrypt.so /usr/lib/libmcrypt.so#ln -s /usr/local/lib/libmcrypt.so.4 /usr/lib/libmcrypt.so.4#ln -s /usr/local/lib/libmcrypt.so.4.4.8 /usr/lib/libmcrypt.so.4.4.8 #ln -s /usr/local/lib/libmhash.a /usr/lib/libmhash.a#ln -s /usr/local/lib/ /usr/lib/#ln -s /usr/local/lib/libmhash.so /usr/lib/libmhash.so#ln -s /usr/local/lib/libmhash.so.2 /usr/lib/libmhash.so.2#ln -s /usr/local/lib/libmhash.so.2.0.1 /usr/lib/libmhash.so.2.0.1 #ln -s /usr/local/bin/libmcrypt-config /usr/bin/libmcrypt-config将mcrypt-2.6.8.tar.gz上传至/software#tar zxvf mcrypt-2.6.8.tar.gz#cd mcrypt-2.6.8/#/sbin/ldconfig#./configure#make && make install#cd ../将php-5.4.3.tar.gz上传至/softwarephp5.3.3以后的版本源码不需要再打php-fpm补丁,该补丁已集成进php5.3.3, 在编译时,不需再–enable-fastcgi了,在php5.3.3中强制启用fastcgi了。
nginx安装升级及配置详解
nginx安装升级及配置详解1.简介2.安装配置3.配置⽂件介绍4.启动、停⽌、平滑重启、升级⼀、Nginx简介Nginx(engine x)是俄罗斯⼈Igor Sysoev编写的⼀款⾼性能的http和反向代理服务器。
在连接⾼并发的情况下,nginx是apache服务器不错的替代品,它能够⽀持50000个并发连接数的响应,⽽内存、cpu等系统资源资源消耗却⾮常低,运⾏⾮常稳定。
性能优势:作为web服务器,处理静态⽂件、索引⽂件及⾃动索引效率⾼作为代理服务器,快速⾼效反向代理作为负载均衡服务器性能,⽀持多并发的连接,占⽤低内存稳定,采⽤分段资源分配技术⾼可⽤,⽀持热部署,启动迅速其它特点:成本低廉;配置⽂件⾮常简单;⽀持Rewrite重写规则,能够根据域名、URL的不同,将http请求分到不同的后端服务器群组;内置健康检查功能,如果nginx proxy后端的某台web服务器宕机了,不会影响到前端的访问;节省带宽,⽀持gzip压缩;⼆、Nginx安装与配置编译安装1.⾸先下载gcc编译器以及nginx⼀些模块的依赖库,通常有pcre库(⽀持rewrite模块),zlib(⽀持gzip模块)库,openssl(⽀持ssl模块)库等。
这些库可以编译安装,也可以yum安装,这⾥选择yum安装。
# yum install -y gcc gcc-c++ pcre pcre-devel zlib zlib-devel openssl openssl-devel2.然后选择nginx版本下载源码并解压# tar –zxvf nginx-1.12.2.tar.gz –C /PATH3.使⽤configure脚本⾃动⽣成Makefile⽂件,nginx的configure脚本⽀持常⽤选项如下,但⾸先给出⼀个例⼦:./configure --prefix=/usr/local/nginx \--conf-path=/etc/nginx/nginx.conf \--error-log-path=/datadisk/data/log/nginx/error.log \--http-log-path=/datadisk/data/log/nginx/access.log \--pid-path=/var/run/nginx.pid \--lock-path=/var/run/nginx.lock \--http-client-body-temp-path=/var/cache/nginx/client_temp \--http-proxy-temp-path=/var/cache/nginx/proxy_temp \--http-fastcgi-temp-path=/var/cache/nginx/fastcgi_temp \--http-uwsgi-temp-path=/var/cache/nginx/uwsgi_temp \--http-scgi-temp-path=/var/cache/nginx/scgi_temp \--user=nginx \--group=nginx \--with-http_ssl_module \--with-http_realip_module \--with-http_addition_module \--with-http_sub_module \--with-http_dav_module \--with-http_flv_module \--with-http_mp4_module \--with-http_gunzip_module \--with-http_gzip_static_module \--with-http_random_index_module \--with-http_secure_link_module \--with-http_stub_status_module \--with-http_auth_request_module \--with-threads --with-stream \--with-stream_ssl_module \--with-http_slice_module \--with-file-aio \--with-http_v2_module \--with-ipv6然后make && make install即可。
- 1、下载文档前请自行甄别文档内容的完整性,平台不提供额外的编辑、内容补充、找答案等附加服务。
- 2、"仅部分预览"的文档,不可在线预览部分如存在完整性等问题,可反馈申请退款(可完整预览的文档不适用该条件!)。
- 3、如文档侵犯您的权益,请联系客服反馈,我们会尽快为您处理(人工客服工作时间:9:00-18:30)。
Nginx与PHP(FastCGI)的安装、配置与优化
FastCGI的介绍和工作原理
首先简单的介绍下FastCGI:
FastCGI是语言无关的、可伸缩结构的CGI开放扩展,其主要行为是将CGI解释器进行保持在内存中并因此获得较高的性能。
众所周知,CGI解释器的反复加载是CGI性能低下的主要原因,如果CGI解释器保持在内存中并接受FastCGI进程管理器调度,则可以提供良好的性能、伸缩性、Fail-Over特性等。
FastCGI的工作原理是:
(1)FastCGI进程管理器自身初始化,启动多个CGI解释器进程(多个php-cgi进程)并等待来自Web Server的连接。
在文本中,采用PHP-FPM进程管理器启动多个php-cgi FastCGI进程。
启动php-cgi FastCGI进程时,可以配置以TCP和UNIX套接字两种方式启动。
(2)当客户端请求达到Web服务器(Nginx)时,Web服务器将请求采用TCP协议或UNIX 套接字方式转发到FastCGI主进程,FastCGI主进程选择并连接到一个CGI解释器(子进程)。
Web服务器将CGI环境变量和标准输入发送到FastCGI子进程php-cgi。
(3)FastCGI子进程完成处理后将标准输出和错误信息从同一连接返回Web服务器(Nginx)。
当FastCGI子进程关闭连接时,请求便告知处理完成。
FastCGI子进程接着等待并处理来自FastCGI进程管理的下一个连接。
而在一般的普通CGI模式中,php-cgi在此便退出了。
PHP-FPM
PHP-FPM是一个PHP FastCGI管理器,是只用于PHP的,可以在
/downloads.php下载得到.PHP-FPM其实是PHP源代码的一个补丁,旨在将FastCGI进程管理整合进PHP包中。
必须将它patch到你的PHP源代码中,在编译安装PHP后才可以使用。
新版PHP已经集成php-fpm了,不再是第三方的包了,推荐使用。
PHP-FPM提供了更好的PHP进程管理方式,可以有效控制内存和进程、可以平滑重载PHP配置,比spawn-fcgi 具有更多优点,所以被PHP官方收录了。
在./configure的时候带–enable-fpm参数即可开启PHP-FPM,其它参数都是配置php的,具体选项含义可以查看这里。
安装前准备:
yum -y install gcc automake autoconf libtool make
yum -y install gcc gcc-c++ glibc
yum -y install libmcrypt-devel mhash-devel libxslt-devel \
libjpeg libjpeg-devel libpng libpng-devel freetype freetype-devel libxml2 libxml2-devel \
zlib zlib-devel glibc glibc-devel glib2 glib2-devel bzip2 bzip2-devel \ ncurses ncurses-devel curl curl-devel e2fsprogs e2fsprogs-devel \
krb5 krb5-devel libidn libidn-devel openssl openssl-devel
新版php-fpm安装(推荐安装方式)
wget /get/php-5.5.10.tar.gz/from/this/mirror
tar zvxf php-5.5.10.tar.gz
cd php-5.5.10
./configure --prefix=/usr/local/php --enable-fpm --with-mcrypt \
--enable-mbstring --disable-pdo --with-curl --disable-debug --disable-rpath \ --enable-inline-optimization --with-bz2 --with-zlib --enable-sockets \
--enable-sysvsem --enable-sysvshm --enable-pcntl --enable-mbregex \
--with-mhash --enable-zip --with-pcre-regex --with-mysql --with-mysqli \
--with-gd --with-jpeg-dir
make all install
完成php-fpm后,对其运行用户进行配置:
cd /usr/local/php
cp etc/php-fpm.conf.default etc/php-fpm.conf
vi etc/php-fpm.conf
修改:
user = nginx
group = nginx
如果nginx用户不存在,那么先添加nginx用户
groupadd nginx
useradd -g nginx nginx
修改nginx配置文件以支持php-fpm
# pass the PHP scripts to FastCGI server listening on 127.0.0.1:9000 location ~ \.php$ {
root html;
fastcgi_pass 127.0.0.1:9000;
fastcgi_index index.php;
fastcgi_param SCRIPT_FILENAME $document_root$fastcgi_script_name; include fastcgi_params;
}
创建测试php文件
在/usr/local/nginx/html下创建index.php文件,输入如下内容
<?php
echo phpinfo();
?>
启动php-fpm和nginx
2
/usr/local/php/sbin/php-fpm /usr/local/nginx/nginx。