stopt简单应用教程
安全训练观察程序(STOP)培训

安全训练观察程序(STOP)培训读本第一部分了解STOP一、了解STOP1.什么是STOP杜邦安全训练观察程序(Safety Training Observation Program),简称为STOP,是一种以行为为基准的观察程序.通过STOP训练,帮助员工改变不安全行为,以达到安全目的.2.STOP适用的范围是专为各级管理人员设计的,包括各级管理层,乃至第一线班组长及维修负责人。
3.STOP和员工五步工作法的区别(1)针对的对象不同。
STOP是管理人员对员工行为的观察分析方法。
五步工作法是针对员工全方位危险源辨识的方法。
(2)观察的范围不同。
STOP是以管理者的角度对员工不安全行为进行的监管方法(包括员工行为、员工所处工作环境和员工使用工具、设备的安全性)。
五步工作法是以员工自身的角度从场所的全方位进行安全辨识和自我防范的方法。
(3)处置方法不同。
STOP通过常态化的观察和统计分析,摸索员工不安全行为的特点,采取现场询问指正和集中培训的方法帮助员工改变不安全行为。
员工五步工作法是员工现场危险辨识和自行处置的方法。
4.遵照STOP可以取得的效果(1)伤害及意外事件减少50-60%(2)事故赔偿或损失成本的降低(3)员工安全意识的提升(4)沟通技巧的改善(5)督导及管理技巧的改善5.STOP所根据的安全理念(1)所有的工作伤害和职业疾病都可以预防(2)安全是每一个人的责任(3)管理阶层要直接为预防工作伤害和职业疾病负责(4)安全是受雇的条件之一(5)训练是作业区安全的要素(6)安全稽核不可或缺(7)要加强工作安全实务,所有不安全的行为及环境必须立即改正(8)工作伤害和职业疾病,以及可能造成伤害的事故,都要加以查明(9)非工作时间的安全是整体安全工作的重要一环(10)伤害和职业疾病的预防是值得做事(11)安全及健康计划要成功,人是最关键的因素6.STOP安全观察的非惩罚性STOP的目标之一就是藉由员工探讨自己的行为,知道他们终于了解为何某个行为应做改善,使他们能工作得更加安全.7.安全观察巡回对于安全所用的各种方法,其组合起来的一个重要技术即是安全观察巡回。
STOP卡(安全、培训、观察程序)
STOP卡(安全、培训、观察程序)STOP卡是美国杜邦公司在HSE管理中提出新的管理方式。
STOP是由以下四个单词所组成(SAFETY, TRAINING,OBSERVATION,PROGRAMME。
既安全、培训、观察程序),已经被世界大部分石油公司和钻井承包商所采用。
鼓励并倡导现场全体作业人员使用STOP卡,运用STOP卡纠正不安全行为,肯定和加强安全行为,以达到防止不安全行为的再发生和强化安全行为的目的。
一、关于STOP卡的主要理论:1.所有事故都是可以预防的,安全是每一个人的责任。
2.STOP是一种观察程序,通过观察人的行为,并且和雇员交谈关于如何安全工作的方法,以达到防止不安全行为的再发生和强化安全行为的目的。
3.因为安全或不安全行为总是由人引起的,而不是机器,所以STOP卡将注意力集中在观察人和人的行为上。
4.STOP是基于对以往事故发生原因的统计分析结果,其中:人的反应(RECATION OF PEOPLE)占14%;劳保用品(PPE)占12%;人的位置(POSITION OF PEOPLE)占30% ;设备和工具(TOOLS ANDEQUIPMENTS)占28% ;程序和整洁(PROCEDURE AND ORDERLINESS)占12%5.几乎所有不安全状态都可以追溯到不安全行为上。
6.一种错误的观点是提高安全管理成绩的唯一方法是纠正不安全行为。
但是,肯定、加强安全行为和指出不安全行为一样重要。
7.STOP安全观察程序是非惩罚性的,必须和你的组织纪律分开来,或者说它不应当和组织纪律相联系。
8.当雇员知道其行为会威胁到他人生命安全时,或明知工作程序或制度规定,却故意违反和不遵守时,就必须立即停止STOP观察程序,而采取纪律惩罚手段。
9.不要当着被观察人写观察报告(STOP卡),不要把被观察人的名字写在报告里,因为你的目的是纠正不安全行为、鼓励安全行为进而预防伤害,而不是记录下你所观察的人;不要让雇员感觉到观察卡意味着要找他们的麻烦,在远离他们的地方填写STOP卡,不要让他们感觉到他们正在被记录下来,让他们知道卡里不会包括他们的名字,告诉他们可以看全部的报告。
stOpt使用手册
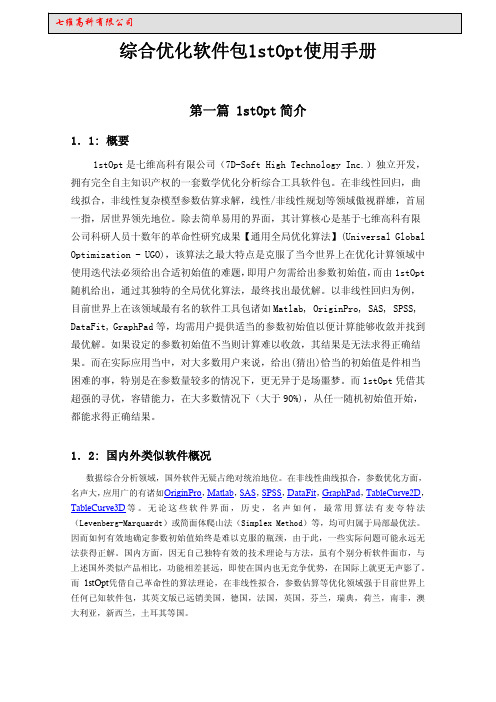
1.7.1:主界面
文件游览窗口
电子表格 代码页
关键词快捷窗口
图.1 1stOpt 主画面
关键词快捷窗口由组合键“Ctrl + K”弹出,可帮助用户准确快速输入关键词。在同一代 码本中可写多个不同问题的代码,由关键词“NewDivision”来区分。可同时开启多个代码编 辑本。同一代码文件中还可加入富文本如图,表,公式等,也可把不同格式的文件添付进来。
例:两变量函数优化: Function (x+((2-x)*(2+y))^2)*sin(x*y);
定义常量
Constant
例:两变量曲线拟合: Function y = a + b*exp(c – x);
例:两变量函数优化: Function (x+((2-x)*(2+y))^2)*sin(x*y);
1
七维高科有限公司
1.3: 1stOpt 应用的优化算法
最优化算法包括: 1) Levenberg-Marquardt 法 (LM) + 通 用 全 局 优 化 算 法 (Universal Global Optimization - UGO) 2) Quasi-Newton 法 (BFGS) + 通用全局优化算法(Universal Global Optimization - UGO) 3) 遗传算法 (Genetic Algorithms - GA) 4) 摸拟退火 (Simulated Annealing - SA) 5) 下山単体法 (Simplex Method - SM) + 通用全局优化算法(Universal Global Optimization - UGO) 6) 离子群法 (Particle Swarm Optimization - PSO) 7) 最大继承法 (Max Inherit Optimization - MIO) 8) 差分进化法 (Differential Evolution - DE) 9) 自组织群移法 (Self-Organizing Migrating Algorithms - SOMA) 10) 共 扼 梯 度 法 (Conjugate-Gradient Method - CGM) + 通 用 全 局 优 化 算 法 (Universal Global Optimization - UGO) 11) 包维尔法 (Powell Optimization - PO) + 通用全局优化算法(Universal Global Optimization - UGO) 12) 禁忌搜索法 (Tabu Search - TS) 13) 单纯线性规划法 (Simplex Linear Program)
simulink stop用法
simulink stop用法引言Simulink是一种流行的建模和仿真工具,被广泛应用于工程和科学领域。
Simulink提供了丰富的功能和工具,用于构建和模拟复杂的系统模型。
其中一个常用的功能是”simulink stop”,本文将探讨simulink stop的用法和功能。
什么是simulink stopSimulink stop是Simulink提供的一个工具,在仿真过程中用于停止模型的运行。
它可以在模型运行过程中暂停仿真,同时提供了一些附加功能,方便用户对模型进行分析和调试。
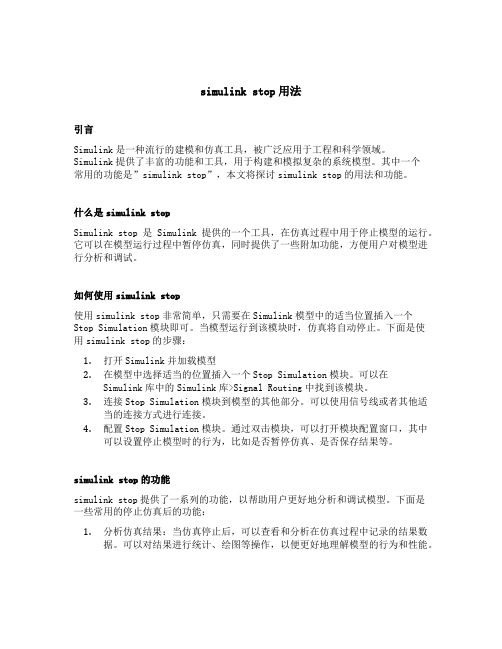
如何使用simulink stop使用simulink stop非常简单,只需要在Simulink模型中的适当位置插入一个Stop Simulation模块即可。
当模型运行到该模块时,仿真将自动停止。
下面是使用simulink stop的步骤:1.打开Simulink并加载模型2.在模型中选择适当的位置插入一个Stop Simulation模块。
可以在Simulink库中的Simulink库>Signal Routing中找到该模块。
3.连接Stop Simulation模块到模型的其他部分。
可以使用信号线或者其他适当的连接方式进行连接。
4.配置Stop Simulation模块。
通过双击模块,可以打开模块配置窗口,其中可以设置停止模型时的行为,比如是否暂停仿真、是否保存结果等。
simulink stop的功能simulink stop提供了一系列的功能,以帮助用户更好地分析和调试模型。
下面是一些常用的停止仿真后的功能:1.分析仿真结果:当仿真停止后,可以查看和分析在仿真过程中记录的结果数据。
可以对结果进行统计、绘图等操作,以便更好地理解模型的行为和性能。
2.调试模型:使用simulink stop可以方便地进行模型调试。
当模型运行到Stop Simulation模块时,可以检查模型的状态、变量的值等信息,以帮助定位和修正模型中的错误。
wincoot简易教程
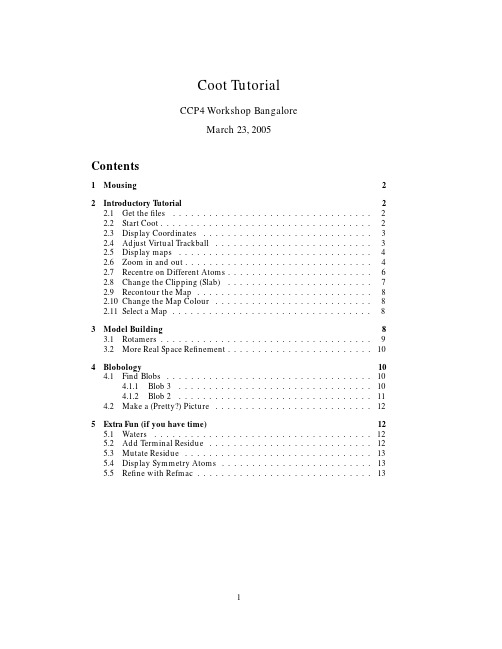
Coot TutorialCCP4Workshop BangaloreMarch23,2005Contents1Mousing2 2Introductory T utorial22.1Get thefiles (2)2.2Start Coot (2)2.3Display Coordinates (3)2.4Adjust Virtual Trackball (3)2.5Display maps (4)2.6Zoom in and out (4)2.7Recentre on Different Atoms (6)2.8Change the Clipping(Slab) (7)2.9Recontour the Map (8)2.10Change the Map Colour (8)2.11Select a Map (8)3Model Building83.1Rotamers (9)3.2More Real Space Refinement (10)4Blobology104.1Find Blobs (10)4.1.1Blob3 (10)4.1.2Blob2 (11)4.2Make a(Pretty?)Picture (12)5Extra Fun(if you have time)125.1Waters (12)5.2Add Terminal Residue (12)5.3Mutate Residue (13)5.4Display Symmetry Atoms (13)5.5Refine with Refmac (13)1MousingFirst,how do we move around and select things?Left-mouse Drag Rotate viewCtrl Left-Mouse Drag Translates viewShift Left-Mouse Label AtomRight-Mouse Drag Zoom in and outMiddle-mouse Centre on atomScroll-wheel Forward Increase map contour levelScroll-wheel Backward Decrease map contour level2Introductory T utorialIn this tutorial,we will learn how to do the following:1.Start Coot2.Display coordinates3.Display a map4.Zoom in and out5.Recentre on Different Atoms6.Change the Clipping(Slab)7.Recontour the Map8.Change the Map Colour9.Display rotamers and refine residue2.1Get thefilesThe files are already in the "tutorials" folder2.2Start CootBefore you start coot,you need to setup the proper environment.This is currentlydone by“sourcing”a setupfile.The location of this setupfile is systemdependent,For the LMB tutorialTo then use coot,simply type (in the X11 window)% source /Users/vis/.cshrc%cootWhen you first start coot for this tutorial, you may see a message saying that there is an "auto-save" file and asking if you want to use it.For the purpose of this tutorial, click on "No" to answer this question. When youfirst start coot,it should look something like Figure1.Figure 1:Coot at StartupNot much to see at present...Actually,from now coot screenshots will be displayed with a white background,whereas you will see a black one2.3Display CoordinatesSo let’s read in those coordinates:Select “File”from the Coot menu-bar 1Select the “Open Coordinates”menu item[Coot displays a Coordinates File Selection window]For the LMB tutorial, the files you need will be in:/Users/vis/tutorials/cootEither–Select tutorial.pdb from the “Files”listor–Type demo.pdb in the Selection:entryClick “OK”in the Coordinates File Selection window[Coot displays the coordinates in the Graphics Window]2.4Adjust Virtual TrackballBy default,Coot has a “virtual trackball”to relate the motion of the molecule to the motion of the mouse.Many people don’t like this.So you might like to try the following:In the Coot main menu-bar:HID Virtual Trackball Flat(Use the “Spherical Surface”option to turn it back to how it is by default)1Note you can also use “Alt-F”instead of clicking on “File”Figure2:Coot After Loading Coordinates2.5Display mapsWe are at the stage where we are looking at the results of the refinement.The refinement programs stores its data(labelled lists of structure factor amplitudes and phases)in an“MTZ”file.Let’s take a look...Select“File”from the Coot menu-barSelect“Auto Open MTZ”menu item[Coot displays a Dataset File Selection window]Select thefilename rnasa-1.8-all refmac1.mtzIf you choose instead“Open MTZ,cif or phs...”you will see:[Coot displays a Dataset File Selection window]Select thefilename rnasa-1.8-all refmac1.mtz[Coot displays a Dataset Column Label Selection window]Notice that you have a selection of different column labels for the“Ampli-tudes”and“Phases”,however,let’s use the defaults:“FWT”and“PHWT”.Press“OK”in the Column Label WindowNow open the MTZfile and select column labels“DELFWT”and“PHDELWT”.So now we have2maps(whether auto-opened or not).2.6Zoom in and outTo zoom in,click Right-mouse and drag it left-to-right2.To zoom out again,move the mouse the opposite way.2or up-to-down,if you prefer thatFigure3:Coot MTZ Column Label Selection WindowFigure4:Coot after reading an MTZfile and zoomed in.2.7Recentre on Different AtomsSelect“Draw”from the Coot menu-barSelect“Go To Atom...”[Coot displays the Go To Atom window]Select“1A ASP”in the residue listClick“Apply”in the Go To Atom windowAt your leisure,use“Next Residue”and“Previous Residue”(or“Space”and “Shift”“Space”in the graphics window)to move along the chain.Click Middle-mouse over an atom in the graphics window[Coot recentres on that atom]Ctrl Left-mouse&Drag moves the view around.If this is a too slow and jerky:–Select Draw from Coot’s menu-bar–Select the“Dragged Map...”menu item–Select“No”in the“Active Map on Dragging”window–Click“OK”in the“Active Map on Dragging”windowNow the map is recontoured at the end of the drag,not at each step3.Figure5:Coot’s Go To Atom Window.3which looks less good on faster computers.You can display the contacts too,as you do this:–Select“Measures”from the Coot menu-bar–Select“Environment Distances...”–Click on the“Show Residue Environment?”check-buttonAlso Click“Label Atom?”if you wish the C atoms of the residuesto be labelled.–Click“OK”in the Environment Distances window–Click“Apply”in the Go To Atom windowFigure6:Coot showing Atom Label and environment distances.You can turn off the Environment distances if you like.2.8Change the Clipping(Slab)Select“Draw”from the Coot menu-barSelect“Clipping...”from the sub-menu[Coot displays a Clipping window]Adjust the slider to the clipping of your choiceClick“OK”in the Clipping windowAlternatively,you can use“D”and“F”4on the keyboard.4think:Depth of Field.2.9Recontour the MapScroll your scroll-wheel forwards one click5[Coot recontours the map using a0.05electron/˚A higher contour level]Scroll your scroll-wheel forwards and backwards more clicks and see the contour level changing.2.10Change the Map ColourSelect“Edit”from the Coot menu-barSelect“Map Colour”in the sub-menuSelect“0xxx FWT PHWT”in the sub-menu[Coot displays a Map Colour Selection window]Choose a new colour by clicking on the colour widgets[Coot changes the map colour to match the selection]Click“OK”in the Map Colour Selection window2.11Select a MapSelect a map for model building:Menubar:Calculate Model/Fit/Refine...[Coot displays the Model/Fit/Refine window]Select“Select Map...”from the Model/Fit/Refine windowclick OK(you want to select the map with“...FWT PHWT”)3Model Building“So what’s wrong with this structure?”you might ask.There are several ways to analyse structural problems and some of them are available in Coot.Validate[Experimental]Geometry Analysis tutorial.pdbLook at the graph.There are2area of outstanding badness in the A chain,around 41A and89A.Let’s look at89Afirst-click on the block for89A.[Coot moves the view so that89A CA is at the centre of the screen]5don’t click it down.3.1RotamersExamine the situation...The sidechain is pointing the wrong way.Let’s Fix it...Menubar:Calculate Model/Fit/Refine...[Coot displays the Model/Fit/Refine window]Select“Rotamers”from the Model/Fit/Refine window.In the graphics window,(left-mouse)click on an atom of residue89A(the C,say)[Coot displays the“Select Rotamer”window]Choose the Rotamer that most closely puts the atoms into the lump of density Click“Accept”in the“Select Rotamer”window[Coot updates the coordinates to the selected rotamer]Click“RS Refine Zone”in the Model/Fit/Refine window.In the graphics window,click on an atom of residue89A.Click it again.[Coot thinks for a while then displays the refined coordinates in white in the graphics and a new“Accept Refinement”window]Click“Accept”in the“Accept Refinement”window.[Coot updates the coordinates to the refined coordinates.89A nowfits the density nicely.]You can undo these operations by clicking on the“Undo”button(twice).You can then try again tofit the residue to the density using“Auto Fit Rotamer”or“Refine Zone”on that residue and click and drag the intermediate atoms into the density.Figure7:89A nowfits the density nicely.3.2More Real Space RefinementNow let’s have a look at the other region of outstanding badness:Click on the graph block for41A (In the Validate/Geometry analysis) [Coot moves the view so that89A CA is at the centre of the screen]Examine the situation...Residue41is in a mess and notfitting to the density.Can youfix it?Yes you can.The trick is to RS(Real Space)Refine that zone.So...You can either RS Refine a few residues(40,41and42)or just41.Take yourpick.Click on“RS Refine Zone”in the Model/Fit/Refine windowSelect a range by clicking on atoms in the graphics window(either atoms in40then42or an atom in41twice)[Coot displays intermediate(white)atoms]Click and drag on some atoms until the atomsfit nicely in the density.If youwant to move a single atom then Ctrl Left-mouse to select(just)it.4Blobology4.1Find BlobsTo be found under Validate(called“Unmodelled Blobs”).You can use the defaults in the subsequent pop-up.Press“Find Blobs”and wait a short while.You will get a new window that tell you that it has found unexplaned blobs. Time tofind out what they are.4.1.1Blob3Let’s start from Blob3Click on“Blob3”[Coot centres the screen on a blob]Examine the situation...We need something tetrahedral there...“Place Atom At Pointer”on the Model/Fit/Refine window[Coot shows a Pointer Atom Type window]“SO4”in the new window...In the“Pointer Atom Added to Molecule:”frame,change“New Molecule”to“tutorial.pdb”Click OK.Examine the situation...the orientation is not quite right.Let’s RS Refine it(you should know what to do by now...)(“RS Refine Zone”then click an atom in the SO twice.Accept)[The SOfits better now].4.1.2Blob2Click on‘the button‘Blob2”and examine the density.Something is missing from the model.What?This protein and has been co-crystallized with its ligand substrate.That’s what missing:3’GMP.So let’s add it...File Get Monomer...Type“3GP”in the box(Use Upper Case).Press return...[Coot appears to do some thinking for a few seconds][3GP appears]It is generally easier to work without hydrogens,so let’s delete them“Delete...”from the Model/Fit/Refine window“Hydrogens in Residue”click on an atom in3GP[Hydrogens disappear]The3GP is displaced from where we want it to be.“Rotate/Translate Zone”from the Model/Fit/Refine windowclick on an atom in3GP twice[Intermediate(white)atoms appear]Drag it or use the sliders to move the intermediate fragment to the approxi-mately the right place.Click“OK”in the slider windowNow optimize thefit using“RS Refine Zone”like we did before.Now merge this ligand into the protein:Calculate Merge Molecules...Click(activate)“monomer-3GP.pdb”into Molecule:tutorial.pdbMerge114.2Make a (Pretty?)PictureArrange a nice viewPress F8Wait a few seconds..Unfortunately, on most of the macs we've tried, this doesn't seem to work at present .——————————————————This is a far as I expect you to get.——————————————————5Extra Fun (if you have time)5.1WatersFit waters to the structure“Find Waters...”in the Model/Fit/Re fine window,then OK (using the de-faults)[Waters appear]To check the waters:Click on “Measures”in the main menubar.Click on Environment DistancesClick on the “Show Residue Environment?”check-buttonChange the distances as you likeUse the Go To Atom widge t to g o t o t h e fir st w ater (probably t owards t he end of the list of residues in Chain “W”)Use the Spacebar to navigate to the next residue (and Shift Spacebar to go backwards)If you don’t like the fast sliding 6you can turn it off:–Click “Draw”in the main menubar–Click “Smooth Recentering...”–Click “No”5.2Add Terminal Residue[To be found on the Model/Fit/Re fine dialog]Use the Go To Atom window to go to residue 93A.Notice there is some density unaccounted for -it is the as yet unbuilt C terminus of the A chain.This is Blob 1.Add Terminal Residue and click on 93A CA (or any atom in that residue).[Coot displays intermediate (white)atoms]Accept them.Now autozone re fine them:Click on “Re fine Zone”in the Model/Fit/Re fine dialog 6it’s not very good for water checking12Press the“A”key on the keyboard7While pressing A click on an atom in the new residue.[Coot displays intermediate atoms]Accept themDo the same for the next2residues(add and autozone refine).You should now have3extra ALAs at the C-terminus.Mutate them(andfit them):Click on“Mutate Molecule...”in the“Calculate”menu of the main menubar.The new residue numbers are94to96inclusive.Choose the sequence QTCClick on the“Autofit the mutated residues”check button.Click on the“Mutate”button5.3Mutate ResidueYou can also mutate residues individually:Use“Simple Mutate”on the Model/Fit/Refine dialog.Click on an atom in the residue that you wish to mutate.You can choose the rotamer manually using“Rotamers”in the Model/Fit/Refine dialog.5.4Display Symmetry AtomsTo be found on“Draw”“Cell&Symmetry”menu item in the main menu.Try:Show Symmetry Atoms?YesSymmetry as Calphas?[on]Colour symmetry by molecule[on]Symmetry Radius50˚AColour Merge0.1Show Unit Cell?[on]OKZoom out and have a look at how the molecules pack together.5.5Refine with RefmacRefmac is the program that does Maximum Likelihood refinement of the model and the interface to it can be found on the Model/Fit/Refine dialog.First you need to read in an MTZfile(as you did previously)but this time assign the Refmac column labels8using“File”“Open MTZ,CIF or phs...”Now click on“Run Refmac...”in the Model/Fit/Refine windowThe defaults should befine...“Run Refmac”in the new window......Wait...[The cycle continues...]7“A”for Autozone8Which are the default labels,in this case.13。
stop语句
stop语句"stop"语句可以用来终止程序的执行或循环的执行。
在不同的编程语言中,"stop"语句的写法和用法可能会有所不同。
以下是几个常见编程语言中"stop"语句的写法和用法:1. Python中的"stop"语句:在Python中,"stop"语句通常表示程序的退出,可以使用内置函数"exit()"或"sys.exit()"来实现。
例如:pythonimport sys# 当条件满足时退出程序if 条件:sys.exit()2. C语言中的"stop"语句:在C语言中,"stop"语句通常表示程序的退出或循环的终止,可以使用关键字"break"或"return"来实现。
例如:c当条件满足时退出循环while(条件){if(条件满足){break;}}返回值并退出函数int func(){if(条件满足){return 0;}return 1;}3. Java中的"stop"语句:在Java中,"stop"语句通常表示线程的终止,可以使用内置函数"stop()"来实现。
例如:java当线程启动后,10秒钟后终止线程public void run(){try{Thread.sleep(10000);}catch(InterruptedException e){e.printStackTrace();}stop();}需要注意的是,Java官方不推荐使用"stop()"函数,因为该函数会强制终止线程,可能会导致未预料的问题。
stopt简单应用教程 ppt课件

ppt课件
概述
11
优化算法设定窗口
概述
对90%以上的问题,缺省优化设置均可满足要求。
ppt课件
12
概述
1.6 1stopt编程的主要关键词
有定义参数以及参数取值范围; 定义变量、定义常量、定义函数; 定义数据文件、定义优化方法; 定义求和、求积、循环符; 画函数图、画参数方程函数图等。 详见《使用手册》P4~P5。 1stOpt 支持几十种的数学函数,详见P6~P8。
通过不同类型实例,用户可轻松掌握1stOpt 的用法。
ppt课件
6
1.4 1stopt界面
概述
代码本
文件浏览窗口
算法设置
结果显示
ppt课件
代码本表格
属性编辑算法
1) 通用全局优化算法(Universal Global Optimization UGO)
刚才输入的代码呢?重新启动1stOpt,开启一新代码本,在代码本中
按“Ctrl+Shift+T”即可恢复上pp一t课次件 执行的代码。
14
1.8 数据处理电子表格
概述
1stOpt 附带有类似与Excel 的电子表格,多表单,支持公式, 直接输入输出到Excel和文本文件(.txt,.csv),树型表单 管理,直观并可分类,可方便用于数据前、后处理。
4) 非线性曲线拟合可处理任意类型模型公式,任意多数目的 待求参数及变量,批量数据拟合、权重拟合、带约束拟合、 缺失变量拟合。
ppt课件
5
概述
1.3 1stOpt 特长
5) 模型自动率定时可同时处理多个数据文件。 6) 可非常容易处理一些特殊的参数,如降雨径流模型中的流
TSTEP(TED)简易手册繁中 (V01)
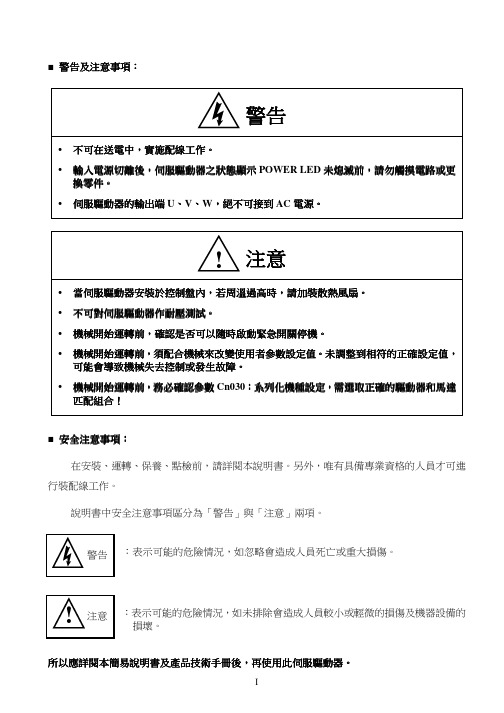
■ 警告及注意事項警告及注意事項::■ 安全注意事項安全注意事項::在安裝、運轉、保養、點檢前,請詳閱本說明書。
另外,唯有具備專業資格的人員才可進行裝配線工作。
說明書中安全注意事項區分為「警告」與「注意」兩項。
:表示可能的危險情況,如忽略會造成人員死亡或重大損傷。
:表示可能的危險情況,如未排除會造成人員較小或輕微的損傷及機器設備的 損壞。
所以應詳閱本所以應詳閱本簡易簡易簡易說明書說明書說明書及產品技術手冊後及產品技術手冊後及產品技術手冊後,,再使用此伺服驅動器再使用此伺服驅動器。
首先,感謝您採用東元精電伺服驅動器TSTEP系列(以下簡稱TSTEP)和伺服馬達。
TSTEP可由數位面板操作器或透過PC人機程式來操作,提供多樣化的機能,使產品更能符合客戶各種不同的應用需求。
在使用TSTEP前,請先閱讀本簡易說明書及產品技術手冊,主要內容包括:伺服系統的檢查、安裝及配線步驟。
數位面板操作器的操作步驟、狀態顯示、異常警報及處理對策說明。
伺服系統控制機能、試運轉及調整步驟。
伺服驅動器所有參數一覽說明。
標準機種的額定規格。
為了方便作日常的檢查、維護及瞭解異常發生之原因及處理對策,請妥善保管本說明書在安全的地點,以便隨時參閱。
註:請將此說明書交給最終之使用者,以使伺服驅動器發揮最大效用。
目錄第一章產品檢查及安裝1-1 產品檢查 (1)1-1-1 伺服驅動器機種確認 (1)1-1-2 伺服馬達機種確認 (2)1-1-3 伺服驅動器與伺服馬達搭配對照表 (2)1-2 伺服驅動器操作模式簡介 (4)1-3 伺服驅動器安裝環境條件與方法 (5)1-3-1 安裝環境條件 (5)1-3-2 安裝方向及間隔 (5)1-4 伺服馬達安裝環境條件與方法 (6)1-4-1 安裝環境條件 (6)1-4-2 安裝方式 (6)1-4-3 其他注意事項 (7)第二章配線準備2-1 系統組成及配線 (8)2-1-1 伺服驅動器電源及週邊裝置配線圖 (8)2-1-2 伺服驅動器配線說明 (9)2-1-3 電線規格 (10)2-1-4 馬達端出線 (11)2-1-5 馬達及電源標準接線圖 (13)2-1-6 TB端子說明 (14)2-1-7 馬達附機械式剎車(BRAKE)接線說明 (14)2-2 I/O信號端子說明 (15)2-2-1 CN1控制信號端子說明 (16)2-2-2 CN2編碼器信號端子說明 (17)2-2-3 C N3/CN4通訊信號端子說明 (18)2-3 控制信號標準接線圖 ......................................................................................................... 19 2-3-1 位置控制(Pe Mode)接線圖(Line Driver) ................................................................... 19 2-3-2 位置控制(Pe Mode)接線圖(Open Collector) ............................................................. 20 2-3-3 位置控制(Pi Mode)接線圖 ......................................................................................... 21 2-3-4 速度控制(S Mode)接線圖 .......................................................................................... 22 2-3-5 轉矩控制(T Mode)接線圖 (23)第三章 面板面板及試運轉及試運轉及試運轉操作說明操作說明3-1 面板操作說明 ..................................................................................................................... 24 3-2 試運轉操作說明 .. (25)第四章 參數機能4-1 參數群組說明 .................................................................................................................... 26 4-2 參數機能表 (26)第五章 異常警報排異常警報排除除5-1異常警報說明 ...................................................................................................................... 60 5-2異常排除對策 . (61)第一章產品檢查及安裝1-1 產品檢查本伺服產品在出廠前均做過完整之功能測試,為防止產品運送過程中之疏忽導致產品不正常,拆封後請詳細檢查下列事項:檢查伺服驅動器與伺服馬達型號是否與訂購的機型相同。