慧荣量产工具使用方法
慧荣SM3259AA芯片U盘量产USB-CDROM启动盘量产教程
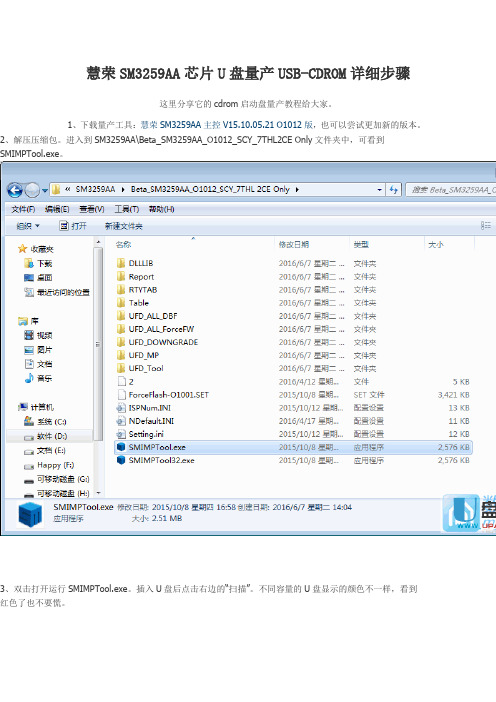
慧荣SM3259AA芯片U盘量产USB-CDROM详细步骤这里分享它的cdrom启动盘量产教程给大家。
1、下载量产工具:慧荣SM3259AA主控V15.10.05.21 O1012版,也可以尝试更加新的版本。
2、解压压缩包。
进入到SM3259AA\Beta_SM3259AA_O1012_SCY_7THL2CE Only文件夹中,可看到SMIMPTool.exe。
3、双击打开运行SMIMPTool.exe。
插入U盘后点击右边的“扫描”。
不同容量的U盘显示的颜色不一样,看到红色了也不要慌。
4、点击右边的“设定”,弹出密码输入框,密码为空,直接确定即可。
进入到选择配置文件界面,直接点击“打开”默认的即可。
进入到设置界面。
可以选择优化方式“速度优先”或者“容量优先”,没有特殊需求的这一页不用做任何修改,点击上边的“U盘设定”选项卡。
5、如果要制作CDROM启动盘,其他的不用修改,仅将图中标识的填入即可。
分区总数2个。
分区1的分区模式为光驱,勾选考入文档,容量比ISO文件大2MB(图中的ZQDigital.iso 101MB 大,我输入103);分区二的分区模式为“擦除式磁盘”,容量输入0表示剩余的所有容量均作为U盘的普通分区。
6、如果要恢复CDROM盘的容量,其他的不用修改,仅将图中标识的填入即可。
分区总数1个。
磁盘分区1分区模式为“擦除式磁盘”,容量0(表示所有容量),不要勾选“考入档案”。
7、设置好之后,点击右上角的“保存”或者“另存为”,回到量产工具主界面。
点击右边的“开始”即可开始量产(量产CDROM或者恢复CDROM容量都是量产),只需要等待即可。
8、如图所示“开卡完成”即表示量产成功,可“退出”弹出U盘或者关闭量产软件。
记得从新插拔U盘才能查看量产的成果,到此就量产完成了,当然如果你不想要cdrom启动盘,可以在上面的设置里把分区总数选1就行。
量产工具使用说明

量产工具使用说明
一.将下载后的压缩文件解压缩
二.进入目录,运行GL3310MP.exe,进入量产工具界面
三.在以下位置点鼠标右键,进入专家方式,提示输入密码时,输入1234.
四.然后在菜单栏中选择设定->工程设定
五.在工程设定中写入韧体,点在GL3310 MP Tool v1.2.9\Configuration\Bin\目录下载入V9091.BIN,在写入EEPROM中在GL3310 MP Tool v1.2.9\Configuration\Bin\载入对应该产品的.EEP文件(如产品型号是G3,则选择G3.eep)
六.载入完设定档案后,点确定返回量产界面
七.在量产界面点选开始按键,开始进入升级量产,量产成功后即显示<执行成功>,重新拔插移动硬盘后即开始使用新固件.。
忆捷(EAGET)U盘碟豹F216G(灰)量产教程详解

百度文库- 让每个人平等地提升自我忆捷(EAGET)U盘碟豹F2-16G(灰)量产教程第一步:使用USB设备芯片型号检测工具检测U盘的芯片 (2)第二步:使用慧荣芯片程序SMI Mass production tool量产U盘。
(3)老版SM324芯片量产教程(供参考) (6)参考资料:老版本软件的设置。
(15)SM3255芯片U盘量产教程及只有CDROM问题的解决办法 (16)晨枫U盘启动工具安装教程 (22)第一步:使用USB设备芯片型号检测工具检测U盘的芯片1、插入忆捷U盘;2、打开检测工具软件;3、检测结果:主控SM3257ENAA第二步:使用慧荣芯片程序SMI Mass production tool量产U盘。
1、首先运行程序再插入U盘;如果在插好U盘以后运行程序,点击一下按钮“Scan USB”2、接着点右边的“Setting”(设置),弹出一个对话框,输入“320”(软件密钥)再确定,接着又弹出一个选择文件的窗口,不用管它,直接点“打开”按钮就行,接着就会弹出设置界面窗口,如下图黑圈①处,个人推荐改成“USB-HDD”,虽然“USB-ZIP”也没有什么问题,但HDD 有个好处,就是可以格式化成NTFS格式,这样就能装大于4G的单文件了。
(USB-ZIP,即大容量软盘仿真模式,启动后U盘的盘符是A,此模式在一些比较老的电脑上是唯一可选的模式,但对大部分新电脑来说兼容性不好,特别是大容量U盘;USB-HDD,即硬盘仿真模式,此模式兼容性很高,但对于一些只支持USB-ZIP模式的老电脑则无法启动。
)黑圈②处,“Make Auto Run”(制作USB-CDROM)这里勾上,再选择需要量产的ISO文件路径黑圈③处,“Format”(格式化)的勾去掉,不知什么原因,我勾上后会失败,不勾就成功了其他的设置不用动它,直接点OK,回到主界面3、再点右上角的“Start(Space Key)”(开始--按空格键)开始量产,接着进度条开始滚动,等一段时间后,量产成功的话,右上角会出现大大的OK字眼接着退出软件,U盘拔掉再插回去就可以了这时,USB-CDROM已经量产成功,但USB-HDD可能还不能正常识别,只需要到“控制面板------管理工具-------计算机管理”里面再格式化一次就好。
慧荣SMI方案不拆U盘,首次量产CDROM 100% 成功教程

慧荣SMI 方案不拆U 盘,首次量产CDROM 100% 成功教程
第一步,打开量产工具,双击SM32XTESTE 。
EXE
2.随便下载一个SMI 方案的量产工具,看能否在量产工具下方能检测到ISP 信息(注意:
必须要量产工具下方检测到ISP 版本信息方可进行量产),如下图,
如果还是不行,继续下载合适的量产工具吧,另外看量产工具下方检测到的主控型号,可缩小搜寻工具范围。
双击运行SM32XTESTE 。
EXE
3.输入密码:320或空格键2 次,进入量产设定画面:如果是只做CDROM 的话,记住只需要勾选Write CID 及MAKE AUTO RUN 项(在这里选择你ISO 镜像文件的存储路径),设定OK 后点OK 保存设定。
打开配置文件
勾选WRITE CID 及Make auto
run 即可
4.点START 开始量产,量产进行中。
如下图。
5写CDROM进行中。
CDROM拷
贝中
6.量产完成,出现绿色图标OK ,即是量产完成。
7.重新插拔U 盘吧
8到我的电脑里面看看吧,可以看到磁盘已经分成2个区了,一个CDROM+一个可移动磁盘
出现OK ,完成量产了。
9打开可移动I盘,提示需要格式化(正常的),按提示操作吧
完成以上动作,量产的部分就算完成了,剩下的就全靠自己的需求了。
如果有任何问题,可以反馈SKY文,谢谢。
BY:SKY文2010.08.06
无忧启动:SMI首次量产CDROM 100%成功教程。
慧荣芯片组U盘量产方法
慧荣芯片组U盘量产方法
本方法简单软件自带成功率高事半功倍
应用工具软件:“慧荣sm32Xtest_V30-7中文版”和“芯片无忧1.63.exe”。
已载入文档,文档下载后可以取出软件。
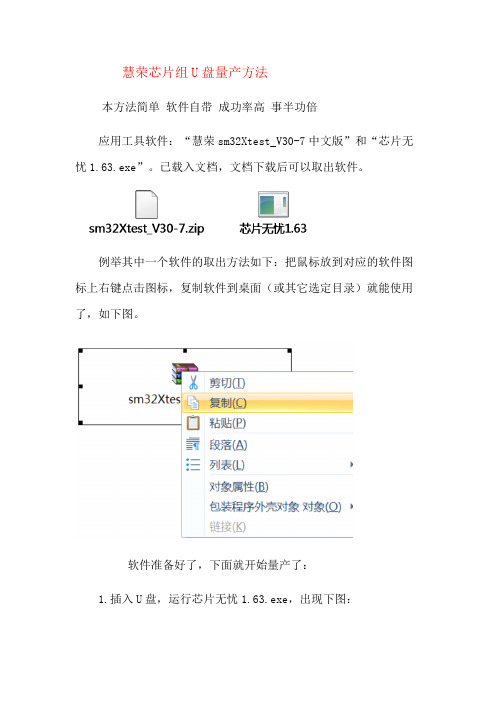
例举其中一个软件的取出方法如下:把鼠标放到对应的软件图标上右键点击图标,复制软件到桌面(或其它选定目录)就能使用了,如下图。
软件准备好了,下面就开始量产了:
1.插入U盘,运行芯片无忧1.63.exe,出现下图:
2.解压sm32Xtest_V30-7中文版后点击sm32Xtest_V30-7.exe运行,插入U盘后会自动检测U盘信息,若检测不到,点击“扫描
USB设备(F5)”,还检测不到,是默认“工厂驱动和HUB”的缘故,
把“工厂驱动和HUB”选项的勾取消,再按F5,出现下图:
3.点击“设置”出现下图:
4.点击“确认”,如下图:
处打勾,并载入你的ISO文件,其它项目已选好如图。
6.点击“OK”,如下图,回到了主界面。
框写盘结束。
意。
SMI(慧荣) SM3257ENAA量产工具教程
生产厂商共存
软盘写入DOS测试 如果量产软盘+U盘,则此时U盘为 FDD启动模式,如果想从软盘启动 的话,则需要更改U盘的启动模式 为其他模式,否则软盘无法启动。
此时的U盘部分仍然可以 使用分区工具重新分区
如果想重新量产,则需先使用默认设置量产一次。 第一次量产会失败(如图),拔掉重插一下,第二次量产就正常了。 然后可以重新量产。
SMI(慧荣) SM3257ENAA量产工具 教程
版本要求:v2.03.46以上的版本
注意事项: 1. Win7用户要以管理员权限运行,否则无法操作硬件; 2. ISP信息要低于下图所示; 3. 如果不能识别硬件,请多点几次刷新,或者重新启动软件, 或者重新插入U盘,只要你的主控芯片是这个型号多折腾 几次就好了。
(2021年整理)慧荣量产工具使用方法
(完整)慧荣量产工具使用方法编辑整理:尊敬的读者朋友们:这里是精品文档编辑中心,本文档内容是由我和我的同事精心编辑整理后发布的,发布之前我们对文中内容进行仔细校对,但是难免会有疏漏的地方,但是任然希望((完整)慧荣量产工具使用方法)的内容能够给您的工作和学习带来便利。
同时也真诚的希望收到您的建议和反馈,这将是我们进步的源泉,前进的动力。
本文可编辑可修改,如果觉得对您有帮助请收藏以便随时查阅,最后祝您生活愉快业绩进步,以下为(完整)慧荣量产工具使用方法的全部内容。
DYNA—SM32XUSB2.0 flash media controllerVersion:3.0➢Introduce:The program is for SMI SM32X’s Mass Production。
This tool can test up to 16 devices at once.➢Platform:There are two drivers for different platform:●win98_factory_driver:⏹Windows98●winXP_factory_driver:⏹Windows 2000⏹Windows XP➢环境设置:●设置功能::(see the Fig. 1)Fig. 1 Setting Function of SM32X Production ToolIt will allow the user to change CID information。
⏹Password Entering:(see the Fig. 2)Fig. 2 Password entering for 「Setting」Function.The system default password is「320」。
The wrong password led userto edit the「Begin Serial」and「End Serial」fields only.Loading the INI File:(see the Fig. 错误!未定义书签。
PNY 16G 虎克盘 慧荣SM3257ENAA主控量产教程

K1118版v2.03.56\Release note文件可以寻找适合的量产工具版本。
本例中为V 2.3.56 v8 11/11/14Builddebug后图密码仍为1111,打开后先点选read flash id 选项,寻找信息,然后清除图片:2.jpg图片:3.jpg图片:4.jpg图片:5.jpg很多朋友喜欢量产U盘,尤其对USB-CDROM情有独钟,但碰到SMI方案可能就会使U盘在电脑中无法识别,下面我对SMI方案做个简单的图片说明量产正确步骤及量产出问题后的解决方法.如量产过CDROM后,再次量产前,U盘插入电脑后SMI的量产工具必定是显示两个盘出来,如下图所以量产过CDROM的SMI方案U盘,再次量产时最好不要直接去进行量产(如直接量产肯定会FAIL 的,这时运气好的话,重新插入电脑仍然可以量产,运气不好的话,重新插U盘就产生不出盘符或USB 无法识别的问题了),针对这种情况在进行再次量产时就要先进入量产软件Debug模式中对FLASH清空操作(即Erase All,工程调试Debug的密码为1111)。
清空FLASH完毕后,就点退出按钮退出,再直接拔出U盘。
重新插上U盘,量产工具就显示一个盘符了,这时的状态相当于全新FLASH装入U盘主控板一样(4GB=4096M容量显示4048个block,其它容量以此类推),现在就可以量产你想要的结果了,无论再次量产CDROM或普通盘,都不会产生不识盘的问题。
安装工厂驱动SMI方案的U盘可能量产时误操作或其它原因,产生U盘插入电脑后,在“我的电脑”中没有盘符,量产工具也识别不到,但电脑设备管理器中有USB装置(电脑右下角也有绿色的USB小图标).这时就可以先考虑使用安装工厂驱动的方法来试一下能否让量产工具识别到U盘而进行再次量产,详细不良现象及方法如下:USB能检测到U盘,电脑中没盘符,量产工具也识别不到,此时安装工厂驱动,在文件SM3257ENAA 芯片U盘量产工具K1118版v2.03.56\UFD_MP\FactoryDriver\WinXP里SMIInfUpdate.exe选mass Storage Drive,按提示操作下一步做。
- 1、下载文档前请自行甄别文档内容的完整性,平台不提供额外的编辑、内容补充、找答案等附加服务。
- 2、"仅部分预览"的文档,不可在线预览部分如存在完整性等问题,可反馈申请退款(可完整预览的文档不适用该条件!)。
- 3、如文档侵犯您的权益,请联系客服反馈,我们会尽快为您处理(人工客服工作时间:9:00-18:30)。
DYNA-SM32XUSB2.0 flash media controllerVersion:3.0Introduce:The program is for SMI SM32X’s Mass Production. This tool can test up to 16 devices at once. Platform:There are two drivers for different platform:●win98_factory_driver:⏹Windows98●winXP_factory_driver:⏹Windows 2000⏹Windows XP环境设置:●设置功能::(see the Fig.1)Fig. 1 Setting Function of SM32X Production ToolIt will allow the user to change CID information.⏹Password Entering:(see the Fig. 2)Fig. 2 Password entering for 「Setting」Function.The system default password is「320」. The wrong password led user to edit the「Begin Serial」and「End Serial」fields only.⏹Loading the INI File:(see the Fig. 3)12Fig. 3 Loading the INI file for「Setting Function」.Loading an 「ini」file which saved in the past or the system default .The system default ini file is located in the same directory with application executable file. If no setting executed, the setting will be according to the「default.ini」file.Configuration:(see the Fig. 4)Fig. 4 The main frame for「Setting Function」There are several parts in the setting main frame, all field descriptions are presented in the Table 1.Table 1 The field descriptions for「Setting Function」.●Config HUB Function:(see the Fig. 5)Fig. 5 The 「Config HUB」function of SM32X Production Tool.The function supports the sequence configuration for specific USB hub port. The user can detect the error USB storage device is failed in which port.Configuration Step:Step 1、 In the Fig. 6, if the configuration is the first time and the device port labels existed 「O」or you want to reset the port mapping, press the『Scan USB』button withoutplugging any UFD to reset the configuration.Step 2、 Plugging the prepared USB storage device into USB hub port, the OS will install the default device driver for this USB storage device.Fig. 6 The process of the first time to configuration in this condition.Step 3、 According to your OS version, ran the specific USB storage device driver existed in the 「winXP」、「Win2000」or 「win98_factory_driver」directory, and pressthe 「SMI Factory Driver」button for driver installation as Fig. 7. If you want toremove the specific USB storage device driver, press the 「Mass Storage Driver」button in the Fig. 7. The driver will become the system default and this applicationprogram will not support exactly.Fig. 7 The installation for Specific USB storage device driver.Step 4、 Pressing the「Scan USB」button to setup, then the USB hub port will mapping to each button when the label become「O」in the Fig. 8. Otherwise it will pop-up anerror message in Fig. 9.Setup Success on Port-1 to Port-5Fig. 8 USB Port mapping to test program successFig. 9 Error Message for「Not Find any device on HUB」Test Steps:Step 1、Plugging the prepared testing devices into the USB hub ports that configured according to「Config HUB」function.Step 2、Because test program using the specific driver, so that the「Factory Driver」must be selected, and press the「Scan USB」for device detect, the button will show the greenicon if plugged USB device and configured with「Config HUB」function. Otherwise arenot changed, the Fig. 10 presents the sub-steps for upper process and result.3231Fig. 10 The result of「Scan USB」using「Factory Driver」Step 3、After pressing the「Start」button, the program would start testing according to the test items selected in Fig. 4. In Fig. 11, the each port presents the Red「X」and 「PretestFail」in the『Status』field besides Port-1. It presents the『FAIL』message in the right-topposition because the『Port-2 to Port-5』is failed. If all ports pass the production, the right-top willpresent the『OK』message.Fig. 11 the result of testingOther Buttons and Key points:●ToolsThe specific tool for mass production.(Fig. 12)⏹Mixing FilesCombining the selected DBF、ISP and pretest file into 「CMB」file.⏹Decode CMB FileDecoding the「CMB」file into specific DBF、ISP and pretest files.⏹Create UDisk ImageCreating the Non-FAT format preload image.⏹COM Port ConnectConnecting to COM port for production controlling with 「Auto Handler」.⏹Multiple Erase AllFor multiple erase all bad block for restoring bad block.Fig. 12 The tools function and dialog presented.●Dialog Option:Setting the UI for『Fonts Size』、『Button Hide』、『Num of Button』and field show or hide control for the list.(See Fig. 13 ).⏹Font:Setting the font size from 12 to 28.⏹Button Hide:Hiding the buttons and resizing list box into frame size.⏹Num of Buttons:Setting the number of button to display.⏹Progress:Enable the「Progress」field in the list box or not.⏹Status:Enable the「Status」field in the list box or not.⏹Capacity:Enable the「Capacity」field in the list box or not .⏹Serial Number:Enable the「Serial Number」field in the list box or not.⏹VID/PID:Enable the「VID/PID」field in the list box or not.⏹Flash ID:Enable the「Flash ID」field in the list box or not.⏹Bad Block:Enable the「Bad Block」field in the list box or not.⏹Inquiry:Enable the「Inquiry」field in the list box or not.⏹Write Protect:Enable the「Write Protect」field in the list box or not.Fig. 13 Dialog Option Function.●Others Setting⏹Extra Setting(Fig. 14)It’s used to specific application. These applications are:⏹uDisk Partitions:◆Setting the size of Reserve Zone、Hidden Area and CDROM.⏹The Software USB serial number:◆Used to identify the internal product. It’s not identical to USB serial number.⏹Preload file into Binary Area:◆There is a simple file system in the ReserveZone, it can support file preloadinto the reserve zone.⏹Security Disk Support◆There are two modes:●Mode-A: The Public/Security mode, just one disk display in the sametime.●Mode-C: The Public+Public/Security mode, there are two disks display inthe same time. The second disk is identical to mode-A.⏹Server Generating SN support◆It needs the socket server to communicate with our MPTool. Just setting theIP address and Port number, out MPTool will negotiate with the server duringproduction.⏹Enable Floppy Support◆Setting the one disk become floppy, it also support floppy format to FAT12and preload functions.⏹COM Communication Settings◆Setting the COM port number which connected to「Auto Handler」andEnable/Disable the COM port function.⏹Log file settings:◆Setup the format of log file and customize information.⏹Enable Unique Serial Number:◆If enable this function, MPTool will retrieve the serial number from this ini fileonly, although used the different INI files.Fig. 14 The Extra Setting Dialog● Debug Button:It ’s for internal debugging using.● Read CID:Press the 「Button 」or 「row item 」of mapped USB hub port, the information for device plugged in this port will be presented in Fig. 15. All fields are defined in Table 2.Fig. 15 The related information of CID. Table 2 The field Descriptions of CID .INI SettingBelow item not show on setting UI , must modify「ini」file :(1)CUSTOMER(2)READCLK(3)WRITECLK(4)RESERVEZONEThe all field in「ini」file description in Table 3.Table 3 The all field descriptions in the「INI」file.。