GV播出切换台-Maestro
五通道切换台 HDS7105P VER 1.0 使用手册说明书

使用手册五通道切换台HDS7105PVER 1.02HDS7105P安全须知如果忽视这些注意事项,可能导致人员伤害或伤亡,可能导致设备损坏、数据丢失、设备性能降低或不可预知的结果。
电器安全特性● 为避免可能的电击造成严重损害,在搬动产品之前,请先将电源线暂时从产品电源接口处移除。
● 当您需要加入新的硬件到产品中或移除产品中现有硬件时,请务必先关闭产品电源。
条件允许的情况下,建议将电源线暂时从产品接口处移除。
● 使用前应确认产品是否已接地,电源电压是否已调整到产品适用的范围内。
否则将可能导致产品以外损坏、性能降低或不可预知的结果。
● 请勿使用松动或损坏的电源插座或在手潮湿的时候接触电源插座,否则将有触电和起火的危险。
● 若听到电源线和电源接口处有噪音,请立即拔下电源线,并向您的销售代表寻求帮助,否则将有起火或触电的危险。
● 若如有异物或液体进入产品或需要清洁产品时,请从产品上移开电源线以及其他的任何电缆线,否则将有触电、起火和损坏产品的危险。
● 若电源已损坏,请不要尝试自行修复。
请联系专业技术服务人员或经销商来处理。
3目录1.概述………………………………………………………………………………………...04 1.1 产品介绍………………………………………………………………......042.功能特性…………………………………………………………………………….…. .052.1 设备尺寸...............................................................................06 3.接口规格说明......................................................................................07 3.1 接口介绍...............................................................................07 3.2 TALLY 接口............................................................................08 3.3 接口参数...............................................................................09 4.控制面板及接口..................................................................................10 4.1 控制面板.. (10)4.1.1 分区说明........................................................................10 4.1.2 按键说明 (11)4.1.2.1功能区.................................................................11 4.1.2.2 音频控制区.. (11)4.1.2.3 转场特效控制区................................................14 4.1.2.4 综合控制区........................................................15 4.1.2.5 PGM 与PVW 的选择. (17)5.系统菜单设置.......................................................................................20 B 接口对接OBS 软件说明.............................................................21 7.切换台软件控制...................................................................................25 8. 同步地区时间和升级固件操作说明.............................................. 29 9.故障及维修............................................................................................34 10.更多切换台选择. (35)4中帝威(DeviceWell)高清视频切换台HDS7105P ,采用便携式一体化设计,金属外壳,体积小重量轻,标准尺寸:280mm*110mm*47mm ,可适用于小型外出场景的视频特效切换需求。
DVS9000系列切换台的配置及使用

a c
ti $
c
a s e s
囵
—
广 东省 南方 电视 台
—
徐维凡
谢超 文
王
8 涛
.
_,
摘
要
\
—
—
—
—
—
—
—
—
—
—
—
—
一
D V S 9000 S F
一
切 换 台为 3 2 路 输入
24
路输 出
L in
.
配备2 5 级
.
索 畦 Bg D
大型切换 台
,
VS 9 0 0 0
系多 n切 换 台 是 H 前 国 内 疆 户 较 多的
连接 通过
一
:
M K S 8 0 10 A 50
,
是面
.
C C P 80 000
,
和
1
M
e n u
p
a n e
l
通过
针排 线 与 之
面 板控制器
.
用于 传递数据
在图
中特 用 红 色 标 出
.
根USB
电缆 向控制 面 板提 供 电源
.
在图
1
中用 粉 红 色
标出
。
该 系 统 采用 双 网 结构
、
即切 换 台主 机 和 面 板控 制 器 的
q -
II
n
采 用 标 清 内核 ( S F
r a m e
.
l
DV S 9 0 0 0 S F
D J 唧
S
m
a
ll F
.
M / E
级数
0 0 /
Maestro E220系列产品快速使用指南说明书

E220 Series Quick Start GuideV3Table of Contents1.0Terms and Conditions (3)2.0E220 Series: (4)3.0Setup: (5)3.1Prerequisite (5)3.2Available Accessories (6)4.0Maestro Router Overview (7)4.1LAN Panel Details (7)4.2WAN Panel Details (9)4.3Front Panel Details (10)5.0Connecting Maestro Router (11)6.0Software Configuration (14)7.0Conformity (17)7.1Federal Communications Commission (FCC) Compliance Statement 17 7.2 FCC RF Exposure statement (17)7.3 ISED Notice (17)7.4 ISED RF Exposure Information (18)8.0Appendix: 08.1Pin Power Cable Schematic 08.2Power over Ethernet (1)8.3RS485 wiring diagram (2)8.4Certified antenna (3)8.5Selection of antenna (3)E220 Series| QUICK START GUIDE 1.0 Terms and Conditions1.1.1 This manual is written without warranty.1.1.2 Maestro Wireless Solutions Ltd. reserves the right to modify or improve the product andits accessories, which can also be withdrawn without prior notice.1.1.3 The company stresses the fact that the performance of the product and its accessoriesdepend on the proper use conditions as well as the surrounding environment.1.1.4 Maestro Wireless Solutions Ltd. assumes no liability for damage incurred directly orindirectly from errors, omissions or discrepancies between the router and this manual.1.1.5 Every effort is made to keep the product and its software up to date and running smoothly.However, Maestro Wireless Solutions Ltd. takes no responsibility for, and will not be liable forthe product or its software being temporarily unavailable due to technical issues beyond ourcontrol.1.1.6 The above terms and conditions are subject to change without prior notice. The presentuse of this product implies that the user approves and understands all the above terms andconditions.E220 Series| QUICK START GUIDE E220 Series| QUICK START GUIDE 2.0 E220 Series:Table 1: E220 Series compatible modelsProduct nameTerritories / Operators Bands Fall-back mode Bands Cellular Type E224 EMEA3/8/20 2G 3/8 LTE cat. 1 E224 AT&T, T-Mobile 2/4/12 None N/A LTE cat. 1 E225 Lite EMEA. Asia 1/8 2G 3/8 3G [1] E225 Lite World 1/2/5/6/8/19 2G 2/3/5/8 3G [1] E225 EMEA, Asia 1/8 2G 3/8 3G [1] E225 Worldwide 1/2/5/6/8/19 2G 2/3/5/8 3G [1] E228 Verizon Wireless 4/13 None N/A LTE cat. 4 E228 AT&T, Rogers 2/4/5/13/17 3G [2] 2/5 LTE cat. 4 E228 Telstra, Spark 3/7/28 None N/A LTE cat. 4 E228 NTT Docomo1/19/21 None N/A LTE cat. 4 E228Korea, Thailand, Brazil, etc.1/3/5/7NoneN/ALTE cat. 4[1] 7.2Mbps downlink; 5.76Mbps uplink; [2] 43.2Mbps downlink; 5.76Mbps uplinkFigure 1: E220 Series: High-speed 3G or LTE router3.0 Setup:3.1 Prerequisite3.1.1 Before installing your E220 Series router, verify you have the following:∙Router Hardware with:o Active sim cardo Ethernet cableo Wi-Fi and cellular antennas∙Computer equipped with:o Windows, Mac or Linux operating system.o Ethernet port or Wi-Fi connectivity and Internet serviceo Web browser such as Internet Explorer 8+ or Google Chrome, Mozilla Firefox or Safari to access the Maestro Web Admin Consoleo DHCP set to enable.3.1.2 To enable DHCP, do the following:∙From the Start menu, select Control Panel > Network and Sharing Center and then select the existing connection.∙The Network Connection Status dialog box appears. Click Properties > double click Internet Protocol Version 4 (TCP/IPv4).∙The Internet Protocol Version 4 (TCP/IPv4) Properties dialog box appears. Under the tab General, select Obtain an IP address automatically and Obtain DNSserver address automatically.E220 Series| QUICK START GUIDE 3.2 Available AccessoriesTable 2: The following accessories are available for purchase:Item DescriptionPower Supply / CableACC-CA30 2-pin Micro-Fit 3.0 (M) to stripped wire with 2.5 A fused, 1-metre long cable ACC-PS20 2-pin Molex 1.2A power adapter with Euro plug 2-pin - EuropeACC-PS21 2-pin Molex 1.2A power adapter with NEMA 2-pin plug - AmericaACC-PS22 2-pin Molex 1.2A power adapter with AS3112 3-pin plug – Australia / NZ ACC-PS23 2-pin Molex 1.2A power adapter with BS1363 3-pin plug - UKWi-Fi AntennaACC-A21 5-band 2.4 / 5.8GHz dipole antenna, hinged RP-SMA (M)Cellular / GPS AntennaACC-A11 or ACC-A17A 5-band 850 / 900 / 1800 / 1900 / 2100MHz magnetic mount antenna, 3-meter cable, SMA (M)ACC-A03 GPS 1575.42MHz Magnetic mount antenna, 3-meter cable, SMA (M)ACC-A22 Ultra-wide-band 698-960 / 1575.42 / 1710-2700MHz L-shaped antenna, hinged, SMA (M)MiscellaneousACC-DIN Metal DIN Rail clipACC-CA29 RJ45(M) to RJ45(M)-cable length=1000mm3.2.1 For a full list of Maestro Wireless accessories, refer to: http://www.maestro-/accessories/E220 Series| QUICK START GUIDE 4.0 Maestro Router Overview4.1 LAN Panel DetailsFigure 2: Maestro Router LAN Panel∙Orange - Reset Button: When pushed for 3 seconds the device will reset to default settings.∙Green - DC Power Supply: 2-pin Micro-fit 3.0 connector. Black (left) negative red (right) positive.∙Blue - Ethernet port (LAN): Ethernet cable connects to LAN∙Red - RS-485 & Digital input/output ports (see figure 3 next page):E220 Series| QUICK START GUIDE Figure 3: Maestro Router LAN Panel I/O connector Array∙Red - Top slots are release pins for bottom ports.∙Blue - RS-485o Full-duplex:▪B: Rx –▪A: Rx +▪G: Common Ground▪Y: Tx +▪Z: Tx –o Half-duplex▪A&Y: DATA +▪B&Z: DATA –▪G: Common Ground∙Green - DIO Ports configurable as input or output, 20 AWG (recommended).o Input detection: 5V, max. 48Vo Output: Open collector, max. current 200mA∙Yellow - Ground for both DIOsE220 Series| QUICK START GUIDE 4.2 WAN Panel DetailsFigure 4: Maestro Router WAN Panel Array∙Blue - Ethernet port: Can switch from WAN to LANSupports PoE (Power over Ethernet): PoE wired Ethernet LANs allow the electrical current necessary for the operation to be carried by the data cable rather than carried bypower cords thus removing the needs for an external power supply.∙Green – Mini SIM slot (2FF)∙Orange – GPS / Diversity SMA Antenna Connector: Female (GPS only on LTE version)∙Yellow - Cellular SMA Antenna Connector: FemaleE220 Series| QUICK START GUIDE E220 Series| QUICK START GUIDE 4.3 Front Panel DetailsFigure 5: Front Panel4.3.1 The top panel of Maestro’s E220 Series features 6 LEDs on the front to indicate criticalsystem information. Table 3: LED States and Description NameColor and State DescriptionWI-FIOFFWi-Fi network is inactive Blue Flashing Wi-Fi network connection traffic Blue ONWi-Fi network is up and activate ActivityOFF Cellular data service is not connected Amber ON Cellular data service is connectedNetworkOFFDevice is not registered on a cellular network Amber Flashing Registered on roaming cellular network Amber ON Registered on home cellular network SignalOFFNo signal (CSQ=0 to 5, 97, 98, 99) Amber ON Strong signal (CSQ > 12) Amber FlashingWeak signal (CSQ > 6 to 12) PowerOFF Power off Green ON Power onAlertOFFNo alert, device is running smoothly Red Flashing Software fault (crash, issues)Red ONHardware fault (high temperature, problem with module or SIM card)5.0 Connecting Maestro Router5.1.1 Insert the SIM card in the router as shown below.Figure 6: Inserting the SIM card in the Maestro router Array5.1.2 Connect the antenna to the main connector of the E220.IMPORTANT:Verify the antenna is tightly secured.5.1.3 Connect the Diversity antenna to the Diversity connector.E220 Series| QUICK START GUIDE E220 Series| QUICK START GUIDE Figure 7: Connecting the Wi-Fi & cellular antenna on Maestro router:5.1.4 If the Maestro Router package includes dual antenna’; connect the Diversity Antenna tothe Diversity Connector.NOTE: Dual antenna provides RF diversification, which allows for improved signalstrength and thus better performance for both Wi-Fi and cellular,Certain circumstances and environments may require the use of specific type of antenna or one mounted in a different location. In such case, Maestro has many antenna options to choose from, please contact Maestro Support at ****************************.Table 4: E220 series models and auxiliary antennas:MainModel Auxiliary CommentCellular onlyE225 Lite N/AE224 LiteCellular only Please ensure that the antenna used is suitable for the cellular frequencies in use, for both main and auxiliary connectors E225 GPS onlyE224 E2282-mode GPS and cellular Please ensure that the antenna used is suitable for the cellular frequencies in use, for both main and auxiliary connectorsE220 Series| QUICK START GUIDE 5.1.5 Connect the router LAN port with the computer LAN port.Figure 8: Connecting the router and computer LAN port5.1.6 Connect the AC power to the DC in connector, then connect the Micro-Fit connector tothe power input, located on the LAN-side panel of the Maestro Router.∙ Plug the AC cord into a standard AC receptacle as shown below. ∙The power LED will light when power is applied.Figure 9: Connecting the AC power connector5.1.7 An alternate option is to power the Maestro Router over Ethernet port as the WAN portsupports PoE (Power over Ethernet).NOTE: Please refer to the section Power over Ethernet on Appendix 1 for connections example.E220 Series| QUICK START GUIDE 6.0 Software Configuration6.1.1 On the computer, open a Web browser and then enter the Maestro routers LAN IPaddress. A login dialog window displays.NOTE: Username and Password are case sensitive.Figure 10: Login Dialog BoxTable 5: Web Admin Page Parameters Details IP Address (LAN)192.168.1.1 Username admin PasswordadminTable 6: Wi-Fi enabled, with WPA/WPA2 TKIP keyParameter Details SSIDMaestro WPA KeyW1rele$$6.1.2Click Next on the Quick Start Network Configuration Page (figure 11).6.1.2.1 Configure the network parameters for LAN , WAN , Cellular and Wi-Fi .6.1.2.2 Alternately, go to Management Settings , import and load predefined settings file. 6.1.2.3 Click Save & Apply to set the configuration.NOTE: Default WAN, LAN and cellular connection settings:6.1.2.4 WAN connection – Automatic (DHCP – Automatic IP address lookup). 6.1.2.5 Active DHCP with starting IP address: 192.168.1.100 with poll off 100 clients. 6.1.2.6 WAN as automatic IP, with Cellular backup.6.1.2.7 Cellular default APN is “internet”Figure 11: Quick Start Network Configuration PageE220 Series| QUICK START GUIDE Table 7: Quick Start Network Configuration PageScreen Element Description Local NetworkIPv4-Address Enter the IPv4 Address of LAN interface. The default IPv4 Address is 192.168.1.1IPv4-Netmask Enter the IPv4 Subnet Mask of LAN interface. The default Netmask is 255.255.255.0IPv4-Gateway Enter the Gateway IPv4 of the Gateway. WANProtocol Select the WAN protocol from the available options: ∙Manual∙Automatic∙PPPoEThe default WAN protocol is selected as Automatic.CellularAPN Enter the APN provided by the cellular network operator.Access Point Name (APN) is the name (Web address) of an access point for LTE data connection. Generally, wireless cellular network operator provides the APN to their end users.PIN Enter the PIN of the SIM card.SIM card Personal Identification Number (PIN) is used to lock the card, preventing unauthorized phone calls or access to cellular data.Username Enter the login name. Password Enter the password. Wi-FiEnable By default, Wi-Fi interface is enabled every time the Maestro Router reboots. Click and disable the Wi-Fi interface if you do not want to use them.SSID Service Set Identifier (SSID) is a sequence of characters, which uniquely names a wireless local area network (WLAN).The default SSID is Maestro.Password The default password is W1rele$$.E220 Series| QUICK START GUIDE 7.0 Conformity7.1 Federal Communications Commission (FCC) Compliance Statement7.1.1 This device complies with part 15 of the FCC Rules. Operation is subject to the followingtwo conditions:∙This device may not cause harmful interference.∙This device must accept any interference received, including interference that may cause undesired operation.7.1.2 This device has been tested and found to comply with the limits for a Class B digitalpursuant to Part 15 of the FCC Rules. These limits are designed to provide reasonableprotection against harmful interference in a residential installation. This equipment generates,uses and can radiate radio frequency energy.7.1.2.1 It not installed and used in accordance with the instructions, may cause harmfulinterference to radio communications. here is no guarantee that interference will notoccur in a particular installation.7.1.2.2 If this equipment does cause harmful interference to radio or television reception,which can be determined by turning the equipment off and on, the user isencouraged to try to correct the interference by one or more of the followingmeasures:∙Reorient or relocate the receiving antenna.∙Increase the separation between the equipment and receiver.∙Connect the equipment into an outlet on a circuit different from that to which thereceiver is connected.∙Consult the dealer or an experienced radio/TV technician for help.7.1.3 FCC Caution:7.1.3.1 Changes or modifications not expressly approved by the party responsible forcompliance could void the user’s authority to operate the equipment.7.2 FCC RF Exposure statementThis device complies with FCC radiation exposure limits set forth for an uncontrolled environment.In order to avoid the possibility of exceeding the FCC radio frequency exposure limits, human proximity to the antenna shall not be less than 20cm (8 inches) during normal operation.7.3 ISED NoticeThis device complies with Innovation, Science and Economic Development Canada license-exempt RSS standard(s). Operation is subject to the following two conditions:(1) this device may not cause interference, and(2) this device must accept any interference, including interference that may cause undesiredoperation of the device.E220 Series| QUICK START GUIDE Le présent appareil est conforme aux CNR Innovation, Sciences et Développement économique Canada applicables aux appareils radio exempts de licence. L'exploitation est autorisée aux deux conditions suivantes :(1) l'appareil ne doit pas produire de brouillage, et(2) l'utilisateur de l'appareil doit accepter tout brouillage radioélectrique subi, même si lebrouillage est susceptible d'enThis Class B digital apparatus complies with Canadian ICES-003.Cet appareil numérique de la classe B est conforme à la norme NMB-003 du Canada.IC: 20055-E228F7, 20055-E224LITEF2, 20055-E224LITEF4, 20055-E225LITEF3, 20055-E225F3, 20055-E228F2, 20055-E228F57.4 ISED RF Exposure InformationThis device complies with ISED radiation exposure limits set forth for an uncontrolled environment. In order to avoid the possibility of exceeding the ISED radio frequency exposure limits, human proximity to the antenna shall not be less than 20cm (8 inches) during normal operation.Cet appareil est conforme aux limites d'exposition aux rayonnements de la ISED CNR-102 définies pour un environnement non contrôlé. Afin d'éviter la possibilité de dépasser les limites d'exposition aux fréquences radio de la ISED CNR-102, la proximité humaine à l'antenne ne doit pas être inférieure à 20 cm (8 pouces) pendant le fonctionnement normal.E220 Series| QUICK START GUIDE 8.0 Appendix:8.1 Pin Power Cable SchematicFigure 12:8.2 Power over EthernetFigure 13: PoE_____________________________________________________________________________________8.3 RS485 wiring diagramFigure 14: Half Duplex (Left) RS485 Full Duplex (Right)8.4 Certified antennaDipole Wi-Fi antenna:∙ 5 dBi high performance antenna∙RP-SMA(M) hinged antenna∙RoHS compliant∙Peakgain:*************~2.5GHzWWAN antenna:∙Dipole 4G swivel blade antenna∙Performance across the LTE frequency bands∙698-960 / 1710-2170 / 2500-2700 MHz∙Up to 2 dBi gain∙SMA connector∙RoHS compliant product8.5 Selection of antennaSelection of Wi-Fi antenna:∙Dipole,PeakGain<*************~2.5GHzSelection of antenna type:∙Using the same dipole antenna type as certified module & Modem for FCC as above or external antenna with length > 20 cm.。
(VJDirector2)纳加软切换台字幕机软件使用说明

南京纳加软件有限公司/广州纳加信息技术有限公司文档编号: 20121229CP002 保密程度: 公开 传阅范围:VJDirector2 纳加软切换台字幕机系统产品说明书南京纳加软件有限公司/广州纳加信息技术有限公司南京纳加软件有限公司/广州纳加信息技术有限公司目 录1 南京纳加软件有限公司概况 ....................................................................................................-2 - 1.1 南京纳加软件有限公司简介..............................................................................................- 2 - 1.2 纳加软件产品速览 ............................................................................................................- 2 - 2 VJDirector2配置需求 .............................................................................................................-3 - 3VJDirector2功能介绍 ..............................................................................................................- 4 - 3.1 功能简介.......................................................................................................................- 4 - 3.2 输 入.......................................................................................................................- 4 - 3.3 实时切换效果 ...............................................................................................................- 4 - 3.4 角 标.......................................................................................................................- 5 - 3.5 字 幕.......................................................................................................................- 5 - 3.6 CG 文件编辑器 ..............................................................................................................- 5 - 3.7 广播级抠像(虚拟演播厅) .........................................................................................- 5 - 3.8 输 出.......................................................................................................................- 5 - 3.9 VJVGA 采集 ....................................................................................................................- 5 - 3.10 延迟播出 ...................................................................................................................- 6 - 3.11 更多功能 ...................................................................................................................- 6 - 3.12 参数表 ......................................................................................................................- 6 - 4VJDirector2应用方案 .............................................................................................................- 8 - 4.1 摄影设备输入 ...............................................................................................................- 8 - 4.2 电脑桌面、PPT 文档输入 .............................................................................................- 8 - 4.3 电视机、大屏输出 ...................................................................................................... - 10 - 4.4 网络直播..................................................................................................................... - 11 - 4.5 CG 文件编辑器 ........................................................................................................... - 13 - 4.6 调音台功能 ................................................................................................................. - 13 - 4.7 角标功能..................................................................................................................... - 14 - 4.8 抠像功能..................................................................................................................... - 14 - 5 外围设备 ................................................................................................................................ - 16 -1南京纳加软件有限公司概况1.1 南京纳加软件有限公司简介南京纳加软件有限公司是一家以流媒体技术为核心,集软件开发、销售,系统集成等为一体的原创型软件企业,为国家双软认定企业(编号R-2009-0062),江苏省软件协会成员,多家大中专院校产学研合作单位,且在国内拥有众多合作伙伴和分销网络,享有极高的业内知名度。
切换台基础讲解

4、其他键控特技 阴影键和深度键。 阴影键就是一种能给前景图像任意添加阴影效果 的键控技术。阴影键一般用于内键或色键中,一 种比较简单的方法就是在前景图像及键源进行处 理后,产生出键信号及经过键控处理的前景信号, 接着用彩底或其它信号填充未被前景图像占据的 屏幕区域。然后调整由前景图像生成的键信号, 一般是对键信号的位置做适当的调整后再与原键 信号相加。这样,抠出的前景图像上除了图像本 身还有背景彩底,调节背景彩底的亮度、色度, 就可得到各种不同的阴影效果,见下图。
1、实现划像特技的基本原理 为实现划像特技,可以将视频信号A和B分别通 过两个门控放大器后再相加。这两个门控放大器 所加的门控电压又称拉幕电压,它们的波形相同, 极性相反,频率是行频或场频的整数倍。下图示 出了实现划像特技的原理方框图。
(四)键控特技 键控(Key)又叫抠像,是在一幅图像中沿一定的轮 廓线抠去它的一部分而填入另一幅图像的特技手段。 在电视画面上插入字幕、符号,或以某种较复杂的图 形、轮廓线来分割屏幕时,需要采用键控特技。 键控特技实质上也是一种分割图像的特技,只是分割 屏幕的分界线多为不规则形状,例如文字、符号、复 杂的图形或某种自然景物等。“抠”与“填”是键控 技术实质所在。 正常情况下,被抠的图像是背景图像,填入的图像为 前景图像,用来抠去背景图像的电信号称为键信号, 形成这一键信号的信号源称为键源。
在数字切换台中,对输入信号之间的时间差 要求也有区别,具体要求由视频切换台的性能决 定。一般来说,数字切换台都有自动输入定时补 偿功能,自动定时时间从十几微秒到一行不等, 因此,数字切换台的输入信号之间的时间差只要 在自动定时时间范围内即可。
(四)对切换台的技术要求
对模拟切换台的技术要求主要是: ①具有足够的视频带宽,对于PAL制而言,应满 足6MHz带宽; ②各信道间的串扰应尽量小; ③非线性失真小。微分增益失真DG≤0.5%,微分 相位失真DP≤0.2°; ④亮度色度增益差不超过±1%,亮度色度时延差 ≤±10ns; ⑤介入增益为1; ⑥切换稳定可靠。
BMD全新现场制作切换台ATEM Constellation 8K正式推出
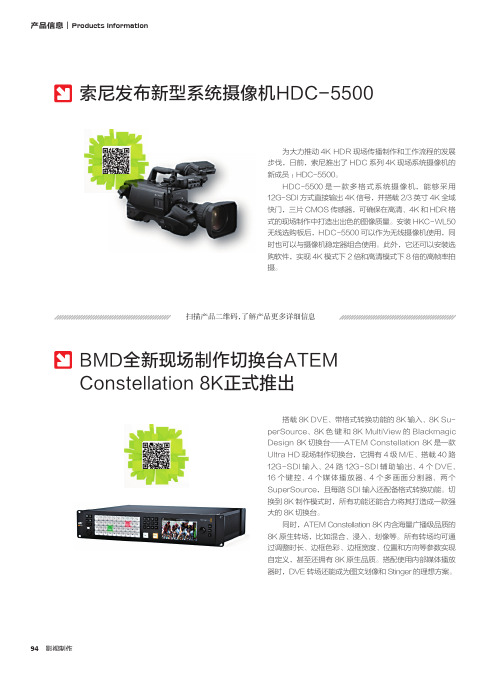
94影视制作扫描产品二维码,了解产品更多详细信息BMD全新现场制作切换台ATEMConstellation 8K正式推出搭载8K DVE 、带格式转换功能的8K 输入、8K Su-perSource 、8K 色键和8K MultiView 的BlackmagicDesign 8K 切换台——ATEM Constellation 8K 是一款Ultra HD 现场制作切换台,它拥有4级M/E 、搭载40路12G-SDI 输入、24路12G-SDI 辅助输出、4个DVE 、16个键控、4个媒体播放器、4个多画面分割器、两个SuperSource ,且每路SDI 输入还配备格式转换功能。
切换到8K 制作模式时,所有功能还能合力将其打造成一款强大的8K 切换台。
同时,ATEM Constellation 8K 内含海量广播级品质的8K 原生转场,比如混合、浸入、划像等。
所有转场均可通过调整时长、边框色彩、边框宽度、位置和方向等参数实现自定义,甚至还拥有8K 原生品质。
搭配使用内部媒体播放器时,DVE 转场还能成为图文划像和Stinger 的理想方案。
为大力推动4K HDR 现场传播制作和工作流程的发展步伐,日前,索尼推出了HDC 系列4K 现场系统摄像机的新成员:HDC-5500。
HDC-5500是一款多格式系统摄像机,能够采用12G-SDI 方式直接输出4K 信号,并搭载2/3英寸4K 全域快门,三片CMOS 传感器,可确保在高清、4K 和HDR 格式的现场制作中打造出出色的图像质量。
安装HKC-WL 50无线选购板后,HDC-5500可以作为无线摄像机使用,同时也可以与摄像机稳定器组合使用。
此外,它还可以安装选购软件,实现4K 模式下2倍和高清模式下8倍的高帧率拍摄。
索尼发布新型系统摄像机HDC-5500产品信息︱Products Information。
详解索尼MVS-8000系列切换台实现“2010中超联赛”转播的回放切换特效

s es
囝 江西电视台 熊 辉 李广 成 ( 本刊特约 通讯员 )
一 摘 要 ~
二 需 求分 析
1 流 程 .
从 实 时 信 号 到 回 放 信 号 的 切 换 中加 入 的 动 画 可 以 被 简
本 文 彼 大 量 的 截 配 合 文 字 详 细 介 绍 姻 知 珏 索 E
( )文件 ( |E 1 FL )管理功能
用于 导 入 和 保 存 T A 文件 序 列 。 G T GA 文 件 序 列 可 以导 入 (mp r)至 帧 存 储 器 中 以 进 I ot
方法 n以避 笼 使 字 幕视 / 11 & 切换 特 效 H 安 全 }效 . l  ̄/ " + 2 l } 伎 简没 ,
个 一 个 连 续 的事 件 按 照 前后 顺 序 的执 行 ( x c t n E e ui )就 构 o 成 了一 个 完 整 的 回放 切 换 {e lyTa s i ) R pa rnio 。慢 动 作 回 放 tn 服务器 以 E VS为 例 。 通过 分析 我 们 可 以 得 出 以 下 一 个 事 件
效 有 多种 方 法 .本 文将 要 叙 述 的是 如何 使 用 索尼 MVS8 0 一0 0 系列 切 换 台 (o yM utF r t wi h r y tm, S n l oma S t e se MVS i c S 一
方式可 以实现这两 个信 号 的逆 转换 ,也就 回到了回放切换 操作前的初始状态。
( )存 健 区域 ( GI 5 RE ON)
。
宏 、特 效 等都 要 存 储 在 寄 存器 里 才 能 被 实 时调 用 。 MVS8 0 一00系列 切换 台 为每个功 能块 都分 配 了一 个存储 区
Blackmagic ATEM Television Studio Pro HD 8路高清切换台开箱作业及升级固件流程实操要点

Blackmagic ATEM Television Studio Pro HD 8路高清切换台开箱作业及升级固件流程实操ATEM Television Studio Pro HD是一款内置硬件控制面板的专业切换台,配备手感极佳的优质按键和旋钮,可实现精准流畅的控制。
它紧凑的机身可容纳于标准设备机架上,因此您也可以将其安装到移动式机架。
这使得它非常适合用于航空箱类的便携式移动机架安装方案,以及紧凑狭小的转播车安装方案。
您可全面控制切换台,包括摄像机输入、转场、键控、渐变推杆、设置、DVE位置及更多功能!这一控制面板能与ATEM Software Control软件控制面板同时使用。
这样一来,其中一位导播可以从事节目的画面切换,另一位导播则可以加载媒体文件、混合音频或者控制各台摄影机!目前在8路高清一体式切换台中Pro HD是最具竞争力的一款机型,没有之一...话不多说,先在库存里拿一台新的开箱.......利用空间来紧密安排必要常用的按键...BMD一贯的风格...此处应点赞...机器后部的接口,挺密实的...接上电、点个亮...反应速度还可以,一排灯闪烁的同时小屏幕亮了...观察台子面板细节,感觉到厂家为了不把台子做的太大而不方便搬运,这些按钮的位置安排也是费了心思的...经验丰富的导演亲自上阵测试点评...顺利点亮,一切OK,由于台子里的固件是英文版的,接下来应客户需求,准备把台子的固件升级一下,厂家发布的最新版的软件已经有中文版了(7.2版本)...升级之前要提前准备一下如下物品:一台PC,笔记本或者台式机都可,win8.1或者win10,64位(Mac也支持);一条短网线,用于连接PC;一条USB打印机常用的线(一头为扁口,一头为方口,不要搞错了);准备妥当之后用这两条线分别接上台子和PC的网口和USB口(注意这两条线以及台子的电源线厂家是不配置的,需要自己准备):有朋友会问,我怎么找不到台子的USB口和网口啊,如果连这个都看不到,我就不说啥了...上图吧(为没睡醒的朋友准备的)...:测试环境如下(公司的测试室):视频源:两个SONY蓝光机、两个机顶盒、一个SDI摄像机、一台PC(可输出HDMI 视频)、一台用来显示的飞利浦电视机...在做这些准备工作之前,先去Blackmagic官网把最新版的软件和说明书下载下来存到电脑里...这个必须的官网地址:https:///cn/support/family/atem-live-production-switchers上图红框内就是官网软件和说明书;下载时直接跳过注册...下载的文件存到电脑里:文件比较大,需要耐心等待...有时候会出现下载不了的情况,可能需要你使用下载工具,如迅雷等,或者官网升级的时候你也下载不了的,耐心等待就是,或者到我公司工作人员那里要软件(如果有的话...)软件下载完成之后(压缩包里说明书也带着...),开始安装,点next就是...突然安装不了了,原因是我们的机器里原有的ATEM切换台软件没有卸载,那么请转回去卸载掉,第一次安装的朋友就不需要这一步了...安装完成之后会提示重新启动电脑,重启就是...,启动完之后点开始菜单的所有程序,找到Blackmagc目录下的红框内的ATEM Setup...会出现这个界面(出现这个界面的前提条件是所有的连接线都连着,比如网线和USB 线,而且台子在开机状态...)继续点红框内的图标...系统自动检测台子地址并显示,出厂默认的地址是192.168.10.250(指的是切换台的地址,不是你的PC,别搞错了),那么这时候把你的电脑的IP也要设置成为192.168.10.50,网关是192.168.10.1,掩码255.255.255.0....(这个就不用我教你了吧,小学生都会得操作),不会的请百度。
- 1、下载文档前请自行甄别文档内容的完整性,平台不提供额外的编辑、内容补充、找答案等附加服务。
- 2、"仅部分预览"的文档,不可在线预览部分如存在完整性等问题,可反馈申请退款(可完整预览的文档不适用该条件!)。
- 3、如文档侵犯您的权益,请联系客服反馈,我们会尽快为您处理(人工客服工作时间:9:00-18:30)。
Maestro Branding 功能概述
• 8 个视频键层: • 4个外部键/填充输入 • 6个内部源 (2个可以为动画) • 8层都能设置优先级 • 4 个上游键, 4 个下游键 (可以有更多不同配置)
• 4 个音频混合器 • 使用4个立体声混合器 (外部或内部源) • 像使用两个8声道混合器一样
Steve Dupaix 矩阵控制,主控产品经理
1/8/02 Page N° 1
Maestro 关键特性
•独立控制最多4 个 audio-overs • 支持最多16路音频通道 • 与矩阵集成于一体 • 自控协议与Saturn兼容 • 可实现单面板多路控制 • 强大的模块化控制面板 • 可以从五种不同的子面板中任意选择:
Maestro 源控制
• 选择转场类型/速度 • 选择划像效果和DVE • 音视频分离
• 选择转场方式 • 选择主输出信号 • 执行紧急操作
1/8/02 Page N° 37
Maestro 源控制
选择一种DVE
1/8/02 Page N° 38
Maestro 键控制
• PGM/PST 类型 使用/禁用键 • 直接控制4个键 • 通过Shift一共可以控制8个键
• 控制面板
• 硬件 • GUI • 键控 & Branding引擎
• Maestro 配置 • 其他
1/8/02 Page N° 15
Maestro 处理板
Branding Store的磁盘驱动箱
视音频处理
Mezzanines DVE, 音频扩展的安装孔
1/8/02 Page N° 16
Maestro 概要
• 1600x1200 分辨率 • 与硬件面板的分布相似
1/8/02 Page N° 25
1/8/02 Page N° 26
1/8/02 Page N° 27
1/8/02 Page N° 28
Maestro 控制面板尺寸概览
N+1 In-Line Supplies
3.5” Deep
没有风扇 = 无噪音
• DVE • Branding • 音频扩展 (16 AES, Dolby-E 解码)
• 控制面板
• 硬件 • GUI • 键控 & Branding引擎
• Maestro 配置 • 其他
1/8/02 Page N° 9
Maestro 后面板选件
可使用的Maestro 后面板:
•基础型号 75 Ohm BNC – 8 路 AES 音频
8RU
4RU
1/8/02 Page N° 6
Concerto+ 详细资料 (8RU)
1/8/02 Page N° 7
Concerto 64 详细资料 (4RU)
1/8/02 Page N° 8
Maestro 概要
• 关键特性 • 处理主机: Concerto • 后面板 • 音频/视频处理板 • Mezzanine 板选件
Squeeze back
Page pushes
Branding Engine
4 still logos
2 animations
On-board storage
Audio Expansion
ANIMATIONS16 channels AES
Dolby-E decode
Dual-Channel 2D DVE
• 关键特性 • 处理主机: Concerto • 后面板 • 音频/视频处理板 • Mezzanine 板选件
• DVE • Branding • 音频扩展 (16 AES, Dolby-E 解码)
• 控制面板
• 硬件 • GUI • 键控 & Branding引擎
• Maestro 配置 • 其他
• 通道控制 • 键控制 • 音频控制 • 源选择 • 源指派 • 功能强大且直观的触摸屏GUI控制面板 • 可创建任何虚拟配置: • 从单个子面板或GUI • 到GUI和任何可用的子面板
1/8/02 Page N° 2
Maestro 概要
• 关键特性 • 处理主机: Concerto • 后面板 • 音频/视频处理板 • Mezzanine 板选件
• 多达 48 路预指派通道 • 通道ganging
(同时控制) • 切换通道 • 可用/禁用 自动控制 • 锁定通道
1/8/02 Page N° 35
Maestro 源指派
• 矩阵源指派到: • PGM/PST •键 • Audio overs • 使用种类/进入 模式
• 进行快速选择指派
1/8/02 Page N° 36
Maestro 后面板详细资料: 其他接口
1/8/02 Page N° 13
Concerto+ (8RU) 后面板详细资料
1/8/02 Page N° 14
Maestro 概要
• 关键特性 • 处理主机: Concerto • 后面板 • 音频/视频处理板 • Mezzanine 板选件
• DVE • Branding • 音频扩展 (16 AES, Dolby-E 解码)
1/8/02 Page N° 5
Maestro 处理主机: Concerto
使用 Concerto+ 或 Concerto 64 主机箱 Concerto 在8RU的主机箱中有四个板的插槽
• 支持最多4块处理板 • 混合了路由和处理板 • 支持多达4路HD
Concerto+ 也能支持128x128 HD 矩阵.
audio over inputs • 通道重定义
• Mix down • Mix up • 测定和监控功能
1/8/02 Page N° 31
Maestro 音频控制
监视器控制: 所有组, 重新设置以及Dim
1/8/02 Page N° 32
Maestro 音频控制
Audio-Over 混合控制
• 260 G的存储容量
1/8/02 Page N° 42
Maestro 概要
• 关键特性 • 处理主机: Concerto • 后面板 • 音频/视频处理板 • Mezzanine 板选件
• DVE • Branding • 音频扩展 (16 AES, Dolby-E 解码)
• 控制面板
• 硬件 • GUI • 键控 & Branding引擎
• DVE • Branding • 音频扩展 (16 AES, Dolby-E 解码)
• 控制面板
• 硬件 • GUI • 键控 & Branding引擎
• Maestro 配置 • 其他
1/8/02 Page N° 3
Maestro 关键特性
• 下一代全功能主控切换台 • 只占用Grass Valley Concerto 系列矩阵的一个插槽 • 在同一个Concerto主机中同时支持路由和主控功能 • 支持 SD, HD, AES, 嵌入音频和Dolby-E • 内部存储上百种logo, 活动图像, 音频素材 • 两个带有独立键选择和合排序的可编程干净输出 • 能实现复杂的音频/视频转换和数字特技 • 单通道, 10比特数字视频特技 (挤压特技) • 灵活的键功能:
1/8/02 Page N° 17
Maestro 硬件 Mezzanines
• 1 路通道 2D DVE
• 挤压 • 推页
• Branding Engine
• 4 个静止logo • 2 个动画 • 板上存储
• 音频扩展
• 16 路 AES 通过外部的 MADI 转换器 • Dolby-E 解码
Dual-Channel 2D DVE
• 关键特性 • 处理主机: Concerto • 后面板 • 音频/视频处理板 • Mezzanine 板选件
• DVE • Branding • 音频扩展 (16 AES, Dolby-E 解码)
• 控制面板
• 硬件 • GUI • 键控 & Branding引擎
• Maestro 配置 • 其他
1/8/02 Page N° 33
Maestro 音频控制
LCD 屏
• 测量 • 增益, 平衡, 相位 • 混合功能
• 淡入混合 • 淡出混合 • 立体声处理
(LL, RR, 混合, 反转) • 混合入干净输出 • AES 到嵌入音频 • 嵌入音频到 AES
1/8/02 Page N° 34
Maestro 通道控制
外部输入
AES AES 背景 背景 AES
A B 监测
嵌入音频 外部键外部键
(视频背景 D)
3
4
Optional Branding Store 内存
MP3 或 WAV 音频素材
内部音频通道路由矩阵
Over 1
Over 2
混合
Over 3
Over 4
混合 PGM/PST/Mon
干净输出 1
1/8/02 Page N° 41
•基础型号 110 Ohm DB25 – 16 路 AES 音频
1/8/02 Page N° 10
Maestro 后面板详细资料: 视频, MADI, 同步
1/8/02 Page N° 11
Maestro 后面板详细资料: 音频
一共 8 个通道 – 通过外加的后面板可扩展至 16 路
1/8/02 Page N° 12
• 键类型 (线性, 亮度)
• 定义参数 (切割, 增益, 透明度)
• 翻转键 • 定义键彩场 • 键参数重置
1/8/02 Page N° 39
Maestro 视频处理结构
Master 控制双节目输出模式