AsteriskWin32
《Asterisk 使用资料》

Asterisk目录及配置文件/etc/asterisk/Asterisk主目录,包含其它关于Asterisk的配置文件;*zaptel.conf这个配置文件放在/etc,因为其它软件也可以使用Zaptel这个硬件及其驱动,所以不是放在/etc/asterisk里./usr/lib/asterisk/modules/这个目录包含所有可以加载Asterisk模块(应用程序\编辑器\格式和有用通道),在Asterisk启运时会加载这些模块(可以编辑modules.conf)./var/lib/asterisk/比较重要的是astdb文件与agi-bin目录;astdb包含Asterisk当地数据库信息.sounds/所有声音提示的文件在里面,包括Asterisk原代码中的sounds.txt文件mohmp3/如果配置了音乐保持,应用程序会在这个目录下查找mp3(用CBR从文件中去除身份标签).keys/使用公钥和私钥系统认证与一个由RSA数字签名形成的一对等连接.公钥和私钥的扩展名分别为.pub和.keyfirmware/这个目录含了很多Asterisk相兼容的设备固件,它只有iax/这个子目录,其中有Digium的IAXy的二进制固件镜像.images/只有在较多的支持并且利用图解式的图像设备被发布,这个目录将会与相应的目录有更大的关联./var/lib/asterisk/agi-bin agi-bin包含所有脚本,可以通过许多已经建立的AGI应用程序与Asterisk连接./var/spool/asteriskoutgoing/gcall/tmp/voicemail/================配置文件================/etc/asterisk/asterisk.conf主要配置文件,/etc/zaptel.conf硬件接口的基本层.修改这个配置文件要用modprobe装载Linux Kernel使用模块./etc/asterisk/zapata.conf为硬件配置Asterisk的接口./etc/asterisk/extensions.conf拨号方案./etc/asterisk/sip.conf SIP协议配置文件/etc/asterisk/iax.conf呼入和呼出IAX通道/etc/asterisk/extensions.conf拨号方案配置文件/etc/asterisk/moduprobe.conf加载模块配置文件Asterisk developer\'s documentation 翻译计划by serva今天,Asterisk已经成为一个VOIP业界使用最广泛的一个集成电信级别P BX的工具,IPPBX如今已经成为VOIP商家争夺的一块重要市场,在我们越来越熟悉使用Asterisk的同时,我们希望能够越来越深入的了解asterisk,特别是对于开发人员,如果有自己特定的需求,在复杂的asterisk文件夹和asteri sk的源代码文件中迷失了方向,不知所措。
Asterisk 入门一 --- Asterisk 1.6.2.6 安装
Asterisk 入门一 --- Asterisk 1.6.2.6 安装2010-04-28 16:27其实asterisk安装灰常简单只要跟着安装包中的readme 文档一步一步走就可以了:1.安装测试环境虚拟机:Sun VirtualBox 3.1X操作系统:CentOS 52.Astrisk各稳定版本以及附加工具/downloads改页面有很多下载选项大概的介绍一下1.AsteriskAsterisk 源码压缩包,这就是我们要用的2.AsteriskNOWAsteriskNOW 是一个光盘镜像包含了linux 系统,一旦安装完成就有一套简单的PBX 系统了3.Asterisk Add-OnsAsterisk Add-Ons 是Asterisk 和Asterisk 一些相关的驱动和组件等。
3.下载安装# wget/pub/telephony/asterisk/releases/asteris k-1.6.2.6.tar.gz#tar -zxvf asterisk-1.6.2.6.tar.gz# cd asterisk-1.6.2.6运行配置脚本检测依赖关系并设置安装目录# ./configure --prefix=/usr/local/asterisk看到硕大的星号了嘛哈哈配置成功.$$$$$$$$$$$$$$$=...$7$7.. .7$$7:..$$:. ,$7.7.$7. 7$$$$ .$$77..$$. $$$$$ .$$$7..7$ .?. $$$$$ .?. 7$$$.$.$. .$$$7. $$$$7 .7$$$. .$$$..777. .$$$$$$77$$$77$$$$$7. $$$,$$$~ .7$$$$$$$$$$$$$7. .$$$..$$7 .7$$$$$$$7: ?$$$.$$$ ?7$$$$$$$$$$I .$$$7$$$ .7$$$$$$$$$$$$$$$$ :$$$.$$$ $$$$$$7$$$$$$$$$$$$ .$$$.$$$ $$$ 7$$$7 .$$$ .$$$.$$$$ $$$$7 .$$$.7$$$7 7$$$$ 7$$$$$$$$ $$$$$$$7. $$ (TM)$$$$$$$. .7$$$$$$ $$$$$$$$$$$$$$7$$$$$$$$$.$$$$$$ $$$$$$$$$$$$$$$$.该步骤可选,该步骤用于选择一些模块#make menuselect编译安装#make#make install安装一些简单的配置文件#make samples好了现在都安装结束了--------------------------------------------------------------------------------------------启动守护进程# safe_asterisk进入CLI#asteriks -r更多的命令可以使用 #man asterisk查看按q退出Asterisk 入门二 --- Asterisk 配置以及控制台命令2010-04-28 16:52接下来我们开始学习asterisk先提供个学习的教材和网址大部分的问题可以在/中找到解答其次提供一本 Asterisk 入门教程叫Asterisk,电话未来之路第二书签版.pdf自个摆渡下吧-------------------------------------------------------------------------------------Asterisk 几个相关目录配置文件/usr/local/asterisk/etc/asterisk可执行文件目录 /usr/local/asterisk/sbin先启动asterisk守护进程#safe_asterisk进入控制台#asterisk -rAsterisk 1.6.2.6, Copyright (C) 1999 - 2010 Digium, Inc. and others.Created by Mark Spencer <markster@>Asterisk comes with ABSOLUTELY NO WARRANTY; type 'core show warranty' for details. This is free software, with components licensed under the GNU General PublicLicense version 2 and other licenses; you are welcome to redistribute it under certain conditions. Type 'core show license' for details.=========================================================================Connected to Asterisk 1.6.2.6 currently running on localhost (pid = 18023)Verbosity is at least 3localhost*CLI>看看有啥命令>core show help或者具体的命令帮助>core show help <command>Asterisk app命令中文翻译2008-11-06 15:15常规指令Authenticate:鉴别用户VMAuthenticate:根据“voicemail.conf”鉴别用户Curl:接受外接URLs的修复。
Asterisk系统的安装与配置

Asterisk系统的安装与配置一、安装包装备asterisk1.8.7.1.tar.gzdahdi-linux-complete-2.6.1+2.6.1.tar.gzdahdi是Asterisk管理硬件的插件(中间件)二、安装dahdi 安装时需要下载东西,所以需要互联网1.tar zxvf dahdi-linux-complete-2.6.1+2.6.1.tar.gz2.cd dahdi-linux-complete-2.6.1+2.6.13.make all4.make install5.make config ;生成启动脚本/etc/init.d/dahdi6./etc/init.d/dahdi restart ;启动dahdi7.chkconfig dahdi on ;检查编译DAHDI时CONFLICTING TYPES FOR ‘BOOL’解决办法,google上面有,说是linux版本宏引起的。
三、安装asterisk1.tar zxvf asterisk1.8.7.1.tar.gz2.cd asterisk1.8.7.13../configure --build=i3864.;指定安装路径 ./configure --prefix=/usr/local5.make menuselect ;在配置界面选中meete应用6.make ;编译7.make install 安装Asterisk8.make samples ;安装配置文件模版/etc/asterisk下9.make progdocs ;安装Asterisk程序文档10.asterisk 启动四、配置SIP通道默认语言 /etc/asterisk/sip.conf[general]language=cn/enbindaddr=0.0.0.0 服务器IP五、配置基本SIP账户 /etc/asterisk/sip.conf1.CLI命令sip show userssip show peerssip show settingssip set debug on/offsip reload2.分机号码模板[SIPPHONE](!)type=friend 呼入呼出均可host=dynamic 分机号注册时获取contex=geeyavoip ; 分机号呼入时使用的上下文extensions.conf中的上下文nat=no 不支持natqualify=20003.使用号码模板定义分机号[301](SIPPHONE) ;继承SIPPHONE模板username=301accountcode=301directrtpsetup=yes aster工作在proxy,不修改sdp实现rtp透传;secret=301 ;无需密码则注释掉这句;directmidia=yes 媒体穿越nat NAT=yes;canreinvite = yes 与上面一行等效的to disable re-invites if you had NAT=yes六、配置电话会议室 /etc/asterisk/meete.conf[rooms] ;会议室号将作为拨号计划中 meetme参数conf => 1001 ;定义会议室号1001,无密码conf => 1002,918 ;定义会议室密码为918备注:拨号计划中调用meetme函数时,将进入会议桥,如需要密码,系统将提示输入会议室密码。
SIP网关压力测试工具SIPp的安装及使用详解收藏

SIP网关压力测试工具SIPp的安装及使用详解收藏上一篇介绍了安装Trixbox的过程。
经过简单的测试,pc2pc、pc2phone的通话功能正常。
要把网络电话业务作为商用,就必须要保证系统的稳定和一定的承载能力,所以接下来需要做的是对Asterisk的压力测试,以了解Asterisk在我们的硬件基础上的承载能力。
google一番,发现有一共叫SIPp的软件,专门用于对SIP网关的压力测试,包括注册、通话、多方meeting等并发的压力测试。
以下是从网上搜集并结合我的实际安装过程整理的资料。
SIPp是一个在Linux下运行的软件,为了便于操作,可将其通过Cygwin模拟运行在win32平台下。
第一步,先要安装的是Cygwin,下载地址:/setup.exe 。
该安装文件是在运行过程中再下载相关安装包进行安装的。
第二步,安装。
摘录网友的安装经验:“这方面的文很多,这里只大概谈一下需要注意的地方:1、下载时前面都是下一步就OK,按默认就好。
到选择镜像站点的时候建议选择前面一点的,希望大家不要浪费时间去试验;2、到选择安装方式——Select Packages页面时,一定要注意每个包后面的状态:Keep,意思就是说保持目前已经安装的版本不动。
不会替换目前已有的版本,下次安装包的时候尽量使用此选项,因为它不会把你已经有的包重新安装一次;Curr,意思就是说把最新的版本统统下载下来安装其它2个没试过。
而且应该注意一下名为Category的一列,该列后面写的是安装的方式,有安装、卸载、重新安装等,不用说,第一次当然是安装。
好了,剩下的就是等待了,相信我,这是相当漫长地。
Cygwin就安装完毕,大家一定要记住安装的路径。
”第二步,安装cygwin的IPv6补丁。
地址:http://win6.jp/Cygwin/index.html1、将其解压出来的3个文件夹:/bin,/lib,/usr复制到刚刚Cygwin的安装目录下即:../Cygwin/这里,以替换已有的文件夹。
Asterisk-相关知识与应用

DialPlan (拨号方案)
dial : 它是Asterisk 很有价值的一功能,当来电者使用不同的通信方式时,它可以进行转换并进 行呼叫连接,如SIP电话到PSTN呼叫
Contexts : 拨号方案(DialPlan)进入部分我我们称为Contexts,每个Contexts 有一些extensions(扩展)构成,来实现一系列相关服务。
举一个例子如下: [default]
在extensions.conf 配制文件中, [default]上下文是拨号方案默认的进入部分
DialPlan (拨号方案)
goto 功能是发送呼叫到拨号方案中的其它context部分.
语法: goto(context,extension,priority)
[default] exten => 123,1,Answer() exten => 123,n,Background(main-menu) exten => 1,1,Playback(digits/1)
支持一条线路,只需要增32KB 的带宽,但是需要网络 质量良好。 Asterisk可支持成千的客户端(需要板卡与带宽支持)
asterisk 安装与启动
1从官方网站下载 asterisk-1.2.26.tar包,拷备到LINUX 下的用户目录. 2 用tar xzvf asterisk-1.2.26.tar 解压到当目录. 3 进入 asterisk 目录 执行如下命令
/usr/lib/asterisk/modules/ 这个目录包含所有可以加载Asterisk模块(应用程序\ 编辑器\格式和有用 通道),在Asterisk启运时会加载这些模块(可以编辑 modules.conf).
/var/lib/asterisk 比较重要的是astdb文件与agi-bin目录;astdb包含Asterisk当地数 据库信息. sounds/ 所有声音提示的文件在里面 mohmp3/ 如果配置了音乐保持,应用程序会在这个目录下查找mp3 keys/ 使用公钥和私钥系统认证与一个由RSA数字签名形成的一对等 连接.公钥和私钥的扩展名分别为.pub和.key
Mikrotik RouterOS Winbox 操作手册说明书
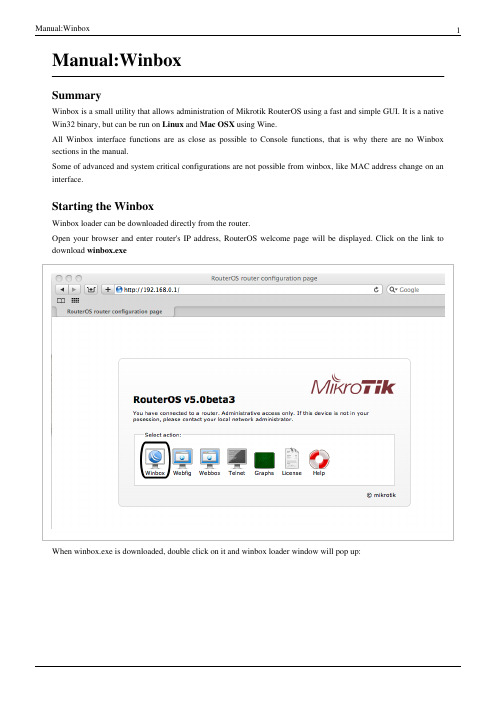
Manual:WinboxSummaryWinbox is a small utility that allows administration of Mikrotik RouterOS using a fast and simple GUI. It is a native Win32 binary, but can be run on Linux and Mac OSX using Wine.All Winbox interface functions are as close as possible to Console functions, that is why there are no Winbox sections in the manual.Some of advanced and system critical configurations are not possible from winbox, like MAC address change on an interface.Starting the WinboxWinbox loader can be downloaded directly from the router.Open your browser and enter router's IP address, RouterOS welcome page will be displayed. Click on the link to download winbox.exeWhen winbox.exe is downloaded, double click on it and winbox loader window will pop up:To connect to the router enter IP or MAC address of the router, specify username and password (if any) and click on Connect button. You can also enter the port number after the IP address, separating them with a colon, like this 192.168.88.1:9999. The port can be changed in RouterOS services menu.Note: It is recommended to use IP address whenever possible. MAC session uses network broadcasts and isnot 100% reliable.You can also use neighbor discovery, to list available routers by clicking on [...] button:From list of discovered routers you can click on IP or MAC address column to connect to that router. If you click on IP address then IP will be used to connect, but if you click on MAC Address then MAC address will be used to connect to the router.Note: Neighbor discovery will show also devices which are not compatible with Winbox, like Cisco routersor any other device that uses CDP (Cisco Discovery Protocol)Description of buttons and fields of loader screen•[...] - discovers and shows MNDP (MikroTik Neighbor Discovery Protocol) or CDP (Cisco Discovery Protocol) devices.•Connect - Connect to the router•Save - Save address, login, password and note. Saved entries are listed at the bottom of loader window.•Remove - Remove selected entry from saved list•Tools... - Allows to run various tools: removes all items from the list, clears cache on the local disk, imports addresses from wbx file or exports them to wbx file.•Connect To: - destination IP or MAC address of the router•Login - username used for authentication•Password - password used for authentication•Keep Password - if unchecked, password is not saved to the list•Secure Mode - if checked, winbox will use TLS encryption to secure session•Load Previous Session - if checked, winbox will try to restore all previously opened windows.•Note - description of the router that will be saved to the list.Warning: Passwords are saved in plain text. Anyone with access to your file system will be able to retrievepasswords.It is possible to use command line to pass connect to user and password parameters automatically:winbox.exe [<connect-to> [<login> [<password>]]]For example (with no password):winbox.exe 10.5.101.1 admin ""Will connect to router 10.5.101.1 with username "admin"without password.IPv6 connectivityStarting from v5RC6 Winbox supports IPv6 connectivity. To connect to the routers IPv6 address, it must be placed in square braces the same as in web browsers when connecting to IPv6 server. Example:Winbox neighbor discovery is now capable of discovering IPv6 enabled routers. As you can see from the image below, there are two entries for each IPv6 enabled router, one entry is with IPv4 address and another one with IPv6 link-local address. You can easily choose to which one you want to connect:Interface OverviewWinbox interface has been designed to be intuitive for most of the users. Interface consists of:•Main toolbar at the top where users ca add various info fields, like CPU and memory usage.•Menu bar on the left - list of all available menus and sub-menus. This list changes depending on what packages are installed. For example if IPv6 package is disabled, then IPv6 menu and all it's sub-menus will not be displayed.•Work area - area where all menu windows are opened.Title bar shows information to identify with which router Winbox session is opened. Information is displayed in following format:[username]@[Router's IP or MAC] ( [RouterID] ) - Winbox [ROS version] on [RB model] ([platform]) From screenshot above we can see that user admin is logged into router with IP address 10.1.101.18. Router's ID is MikroTik, currently installed RouterOS version is v5.0beta1, RouterBoard is RB800 and platform is PowerPC.On the Main toolbar's left side is located undo and redo buttons to quickly undo any changes made to configuration. On the right side is located:•winbox traffic indicator displayed as a green bar,•indicator that shows whether winbox session uses TLS encryption•checkbox Hide password. This checkbox replaces all sensitive information (for example, ppp secret passwords)with '*' asterisk symbols.Work Area and child windowsWinbox has MDI interface meaning that all menu configuration (child) widows are attached to main (parent) Winbox window and are showed in work area.Child windows can not be dragged out of working area. Notice in screenshot above that Interface window is dragged out of visible working area and horizontal scroll bar appeared at the bottom. If any window is outside visible work area boundaries the vertical or/and horizontal scrollbars will appear.Child window menu barEach child window has its own toolbar. Most of the windows have the same set of toolbar buttons:•Add - add new item to the list•Remove - remove selected item from the list•Enable - enable selected item (the same as enable command from console)•Disable - disable selected item (the same as disable command from console)•Comment - add or edit comment•Sort - allows to sort out items depending on various parameters. Read more >>Almost all windows have quick search input field at the right side of the toolbar. Any text entered in this field is searched through all the items and highlighted as illustrated in screenshot belowNotice that at the right side next to quick find input filed there is a dropdown box. For currently opened (IP Route) window this dropdown box allows to quickly sort out items by routing tables. For example if main is selected, then only routes from main routing table will be listed.Similar dropdown box is also in all firewall windows to quickly sort out rules by chains.Sorting out displayed itemsAlmost every window has a Sort button. When clicking on this button several options appear as illustrated in screenshot belowExample shows how to quickly filter out routes that are in 10.0.0.0/8 range1.Press Sort button2.Chose Dst.Address from the first dropdown box.3.Chose in form the second dropdown box. "in" means that filter will check if dst address value is in range ofspecified network.4.Enter network against which values will be compared (in our example enter "10.0.0.0/8")5.These buttons are to add or remove another filter to the stack.6.Press Filter button to apply our filter.As you can see from screenshot winbox sorted out only routes that are within 10.0.0.0/8 range.Comparison operators (Number 3 in screenshot) may be different for each window. For example "Ip Route" window has only two is and in. Other windows may have operators such as "is not", "contains", "contains not".Winbox allows to build stack of filters. For example if there is a need to filter by destination address and gateway, then•set first filter as described in example above,•press [+] button to add another filter bar in stack.•set up seconf filter to filter by gateway•press Filter button to apply filters.You can also remove unnecessary filter from the stack by pressing [-] button.Customizing list of displayed columnsBy default winbox shows most commonly used parameters. However sometimes it is needed to see another parameters, for example "BGP AS Path" or other BGP attributes to monitor if routes are selected properly.Winbox allows to customize displayed columns for each individual window. For example to add BGP AS path column:•Click on little arrow button (1) on the right side of the column titles or right mouse click on the route list.•From popped up menu move to Show Columns (2) and from the sub-menu pick desired column, in our case click on BGP AS Path (3)Changes made to window layout are saved and next time when winbox is opened the same column order and size is applied.Detail modeIt is also possible to enable Detail mode. In this mode all parameters are displayed in columns, first column is parameter name, second column is parameter's value.To enable detail mode right mouse click on the item list and from the popupmenu pick Detail modeCategory viewIt is possible to list items by categories. In tis mode all items will be grouped alphabetically or by other category. For example items may be categorized alphabetically if sorted by name, items can also be categorized by type like in screenshot below.To enable Category view, right mouse click on the item list and from the popupmenu pick Show CategoriesDrag & DropIt is possible to upload and download files to/from router using winbox drag & drop functionality.Note: Drag & Drop does not work if winbox is running on Linux using wine. This is not a winbox problem,wine does not support drag & drop.Traffic monitoringWinbox can be used as a tool to monitor traffic of every interface, queue or firewall rule in real-time. Screenshot below shows ethernet traffic monitoring graphs.Item copyThis shows how easy it is to copy an item in Winbox. In this example, we will use the COPY button to make a Dynamic WDS interface into a Static interface.This image shows us the initial state, as you see DRA indicates "D" which means Dynamic:•Double-Click on the interface and click on COPY:•A new interface window will appear, a new name will be created automatically (in this case WDS2)•You can see that the new interface status has changed:•Transferring SettingsOn Windows Vista/7 Winbox settings are stored in: %USERPROFILE%\AppData\Roaming\Mikrotik\Winbox\winbox.cfgSimply copy this file to the same location on the new host.[ Top | Back to Content ]Article Sources and Contributors17 Article Sources and ContributorsManual:Winbox Source: /index.php?oldid=25527 Contributors: Janisk, Marisb, Normis, Nz monkeyImage Sources, Licenses and ContributorsFile:win-web-snap.png Source: /index.php?title=File:Win-web-snap.png License: unknown Contributors: Marisb, SergejsBFile:winbox-loader.png Source: /index.php?title=File:Winbox-loader.png License: unknown Contributors: MarisbImage:Icon-note.png Source: /index.php?title=File:Icon-note.png License: unknown Contributors: Marisb, RouteFile:winbox-loader2.png Source: /index.php?title=File:Winbox-loader2.png License: unknown Contributors: MarisbImage:Icon-warn.png Source: /index.php?title=File:Icon-warn.png License: unknown Contributors: Marisb, RouteFile:winbox-ipv6-loader.png Source: /index.php?title=File:Winbox-ipv6-loader.png License: unknown Contributors: MarisbFile:winbox-ipv6nd.png Source: /index.php?title=File:Winbox-ipv6nd.png License: unknown Contributors: MarisbFile:Winbox-workarea.png Source: /index.php?title=File:Winbox-workarea.png License: unknown Contributors: MarisbFile:winbox-win-child.png Source: /index.php?title=File:Winbox-win-child.png License: unknown Contributors: MarisbFile:win-add.png Source: /index.php?title=File:Win-add.png License: unknown Contributors: MarisbFile:win-remove.png Source: /index.php?title=File:Win-remove.png License: unknown Contributors: MarisbFile:win-enable.png Source: /index.php?title=File:Win-enable.png License: unknown Contributors: MarisbFile:win-disable.png Source: /index.php?title=File:Win-disable.png License: unknown Contributors: MarisbFile:win-comment.png Source: /index.php?title=File:Win-comment.png License: unknown Contributors: MarisbFile:win-sort.png Source: /index.php?title=File:Win-sort.png License: unknown Contributors: MarisbFile:winbox-window-search.png Source: /index.php?title=File:Winbox-window-search.png License: unknown Contributors: MarisbFile:Winbox-window-sort.png Source: /index.php?title=File:Winbox-window-sort.png License: unknown Contributors: MarisbFile:Winbox-window-field.png Source: /index.php?title=File:Winbox-window-field.png License: unknown Contributors: MarisbFile:Winbox-window-detail.png Source: /index.php?title=File:Winbox-window-detail.png License: unknown Contributors: MarisbFile:Winbox-window-category.png Source: /index.php?title=File:Winbox-window-category.png License: unknown Contributors: MarisbFile:Winbox1.jpg Source: /index.php?title=File:Winbox1.jpg License: unknown Contributors: NormisFile:winbox-window-trafmon.png Source: /index.php?title=File:Winbox-window-trafmon.png License: unknown Contributors: MarisbImage:2009-04-02_1241.png Source: /index.php?title=File:2009-04-02_1241.png License: unknown Contributors: NormisImage:2009-04-02_1241_001.png Source: /index.php?title=File:2009-04-02_1241_001.png License: unknown Contributors: NormisImage:2009-04-02_1242.png Source: /index.php?title=File:2009-04-02_1242.png License: unknown Contributors: NormisImage:2009-04-02_1242_001.png Source: /index.php?title=File:2009-04-02_1242_001.png License: unknown Contributors: Normis。
WIN 系统安装 ASTER V WIN 一拖多安装说明
WIN10系统安装ASTER-V7-WIN10一拖多安装说明(ASTER-V7-WIN10版本支持WIN7WIN8WIN10系统)1、安装好WIN10系统,并且安装所以的驱动程序,查看显卡驱动是否安装好。
(注意:没有安装好显卡驱动的一定要安装驱动否则没有办法下一步安装ASTER)2、查看显示设置里的扩展屏的分辨率。
3、调整扩展屏的分辨率(可以根据不同需求来调整分辨率)4、这里我是将分辨率调整成一样大小的。
5、将分辨率调整好过后点应用。
6、应用好后在点保存更改。
7、一拖多工作站可以同一用户账户登录,也可以根据不同的用户,用不同用户账户登录,那我们可以添加用户账户数。
8、选择添加一个没有Microsoft帐户的用户,点击下一步。
9、创建帐户。
10、输入账户的名称。
11、帐户就已经创建好了,下面将安装ASTER程序。
12、选择安装ASTER-V7-WIN10-SETUP程序13、ASTER-V7-WIN10这是语言选择这里我选English,点击OK。
14、选择Next。
15、在选择Next。
16、选择I agree to these terms and conditions打勾,在选择Next。
17、选择O打勾在点击Install下一步。
18、选择NO,I will restart Windows later不重启电脑,在点击Finish完成19、打开ASTER控制面板程序。
20、选择一拖多的工作的用户数,如一拖四的那下在要打开四个用户数,1-4打开。
21、选择打开。
22、4个用户数都打开了。
23、添加每个ASTER一拖多工作站,用不同的WIN账户登录。
24、这里我们选择(工作站1)用U1帐户登录。
24、选择好帐户点击OK应用。
25、以上的步骤省略不在说明了,每个工作站现在都对应不同的WIN账户登录,选择Automatically run ASTER workplacse on system startup每次开机启动ASTER程序。
evc
本页内容准备学习eVC我的第一个项目仅仅通过另一个简单的步骤创建项目同中有异制作一个声音暂时先到这里欢迎回到大家非常熟悉的MSDN Pocket PC 开发中心,Larry Roof 和我将在这里轮流为您讲解日益流行的手持设备的编程技巧。
当Larry 带着他的iPAQ 走在大街上寻找无线Internet 接入时,像我这样明智的人正在一边查收电子邮件,一边坐在本地星巴克舒适的椅子上,空间有Volkswagen Beetle 那么大。
这不是开玩笑—西雅图令人神往的咖啡商场正忙于安装11Mbps 的无线Internet 接入点,这意味着我可以一只手拿着double-tall latte 编写这个特别的专栏,另一只手拿着油炸圈饼,同时感谢Office XP 的语音识别功能。
上个月,老好人Larry 准备使用令人崇拜的Visual BASIC 语言阐述开发过程。
您知道—它更像图形冒险程序,而不是真正的编程语言,它包含可爱的小图片和对话框,您可以将它们拖过屏幕。
这次我们将使用真正的编程语言— C++。
不用担心,我们不会仅停留在简单的“Hello World”层面上。
如果您是一位经验丰富的C++ 编码人员,那么您会非常吃惊:将您现有的知识应用于这个令人兴奋的新平台是多么的容易啊!如果您刚刚起步,或者很少接触,那么您也可能印象深刻:编写您的Pocket PC 应用程序是多么的简单啊!如果您有Windows ®开发经验,那么您可能想知道,这个C++ 版本是否是某种“玩具”语言。
它会提供Win32 ®兼容的API 吗?MFC 如何呢?ATL 如何呢?有什么样的调试支持呢?好的,你们都会受到很好的款待。
eVisual C++ ®不是C++ 的简装版本,它是真正的McCoy。
此外,Pocket PC 操作系统也不是玩具—它是真正专业的操作系统,因此您可以认为其中存在许多Win32 API。
Asterisk的连接与管理
Asterisk的管理方法很晚了,刚才稍微看了一下Asterisk的管理方法。
现在想做一个记录。
Asterisk有三种管理方法,最常用的当然是通过asterisk命令进入CLI模式对Asterisk进行管理。
另外还有两种方法:1)用TCP协议,连接到5038端口,然后用AMI命令来管理Asterisk;2)用HTTP协议,连接到8080端口,通过WEB的形式对Asterisk进行管理;下面是基本的URL:http://xxx.xxx.xxx.xxx:8088/static/config/index.html1.Asterisk命令行对应的套接字文件是:/var/run/asterisk/asterisk.ctl管理员可以配置cli_permissions.conf对操作系统用户登录asterisk进行授权。
具体的授权方法就不在这里介绍,有兴趣的人可以看看cli_premissions.conf中的说明。
rasterisk的作用基本上和asterisk –r是一致的,不作特别介绍,只对Asterisk命令进行分2.使用AMI方法AMI方法是通过socket登录到Asterisk中,然后用AMI命令对Asterisk进行管理。
通过这个管理接口,我们可以用某种编程语言开发出自己的Asterisk管理平台。
实际上,很多基于GUI的管理平台也是通过这种方法对Asterisk进行管理。
这种方法的配置文件是:manager.conf3.WEB管理Web管理的配置文件是:http.conf浏览器。
具体的登录路径类似于:http:// xxx.xxx.xxx.xxx:8088/static/config/index.html 使用的帐号密码是manager.conf中定义的帐号密码。
登录后的管理终端如下:这个终端的静态页面会保存在下面地方:。
编程获取系统当前cpu使用率空闲率、内存使用率、剩余可用内存等
编程获取系统当前cpu使⽤率空闲率、内存使⽤率、剩余可⽤内存等编程获取系统当前cpu使⽤率/空闲率、内存使⽤率、剩余可⽤内存等2008年06⽉05⽇星期四 16:58得到cpu占有率的API函数:GetSystemTimes得到内存使⽤情况的API函数:GlobalMemoryStatusEx FunctionRetrieves information about the system's current usage of both physical and virtual memory.GetPerformanceInfo FunctionRetrieves the performance values contained in the PERFORMANCE_INFORMATION structure获取特定程序的内存使⽤情况⽤:GetProcessMemoryInfo FunctionRetrieves information about the memory usage of the specified process.我写的⼀个cpu使⽤率例⼦:#define _WIN32_WINNT 0x0501#include <Windows.h>#include <iostream>using namespace std;__int64 CompareFileTime ( FILETIME time1, FILETIME time2 ){__int64 a = time1.dwHighDateTime << 32 | time1.dwLowDateTime ;__int64 b = time2.dwHighDateTime << 32 | time2.dwLowDateTime ;return (b - a);}void main(){HANDLE hEvent;BOOL res ;FILETIME preidleTime;FILETIME prekernelTime;FILETIME preuserTime;FILETIME idleTime;FILETIME kernelTime;FILETIME userTime;res = GetSystemTimes( &idleTime, &kernelTime, &userTime );preidleTime = idleTime;prekernelTime = kernelTime;preuserTime = userTime ;hEvent = CreateEvent (NULL,FALSE,FALSE,NULL); // 初始值为 nonsignaled ,并且每次触发后⾃动设置为nonsignaledwhile (1){WaitForSingleObject( hEvent,1000 ); //等待500毫秒res = GetSystemTimes( &idleTime, &kernelTime, &userTime );int idle = CompareFileTime( preidleTime,idleTime);int kernel = CompareFileTime( prekernelTime, kernelTime);int user = CompareFileTime(preuserTime, userTime);int cpu = (kernel +user - idle) *100/(kernel+user);int cpuidle = ( idle) *100/(kernel+user);cout << "CPU利⽤率:" << cpu << "%" << " CPU空闲率:" <<cpuidle << "%" <<endl;preidleTime = idleTime;prekernelTime = kernelTime;preuserTime = userTime ;}}运⾏效果如图:MSDN中获取内存使⽤情况的例⼦:Example Code [C++]The following code shows a simple use of the GlobalMemoryStatusEx function. // Sample output:// There is 51 percent of memory in use.// There are 2029968 total Kbytes of physical memory.// There are 987388 free Kbytes of physical memory.// There are 3884620 total Kbytes of paging file.// There are 2799776 free Kbytes of paging file.// There are 2097024 total Kbytes of virtual memory.// There are 2084876 free Kbytes of virtual memory.// There are 0 free Kbytes of extended memory.#include <windows.h>#include <stdio.h>// Use to convert bytes to KB#define DIV 1024// Specify the width of the field in which to print the numbers.// The asterisk in the format specifier "%*I64d" takes an integer// argument and uses it to pad and right justify the number.#define WIDTH 7void main(int argc, char *argv[]){MEMORYSTATUSEX statex;statex.dwLength = sizeof (statex);GlobalMemoryStatusEx (&statex);printf ("There is %*ld percent of memory in use.\n",WIDTH, statex.dwMemoryLoad);printf ("There are %*I64d total Kbytes of physical memory.\n",WIDTH, statex.ullTotalPhys/DIV);printf ("There are %*I64d free Kbytes of physical memory.\n",WIDTH, statex.ullAvailPhys/DIV);printf ("There are %*I64d total Kbytes of paging file.\n",WIDTH, statex.ullTotalPageFile/DIV);printf ("There are %*I64d free Kbytes of paging file.\n",WIDTH, statex.ullAvailPageFile/DIV);printf ("There are %*I64d total Kbytes of virtual memory.\n",WIDTH, statex.ullTotalVirtual/DIV);printf ("There are %*I64d free Kbytes of virtual memory.\n",WIDTH, statex.ullAvailVirtual/DIV);WIDTH, statex.ullAvailVirtual/DIV);// Show the amount of extended memory available.printf ("There are %*I64d free Kbytes of extended memory.\n",WIDTH, statex.ullAvailExtendedVirtual/DIV);}MSDN中获取特定程序内存使⽤情况的例⼦:Collecting Memory Usage Information For a ProcessTo determine the efficiency of your application, you may want to examine its memory usage. The following sample code uses the GetProcessMemory Info function to obtain information about the memory usage of a process.Copy Code#include <windows.h>#include <stdio.h>#include <psapi.h>void PrintMemoryInfo( DWORD processID ){HANDLE hProcess;PROCESS_MEMORY_COUNTERS pmc;// Print the process identifier.printf( "\nProcess ID: %u\n", processID );// Print information about the memory usage of the process.hProcess = OpenProcess( PROCESS_QUERY_INFORMATION |PROCESS_VM_READ,FALSE, processID );if (NULL == hProcess)return;if ( GetProcessMemoryInfo( hProcess, &pmc, sizeof(pmc)) ){printf( "\tPageFaultCount: 0x%08X\n", pmc.PageFaultCount );printf( "\tPeakWorkingSetSize: 0x%08X\n",pmc.PeakWorkingSetSize );printf( "\tWorkingSetSize: 0x%08X\n", pmc.WorkingSetSize );printf( "\tQuotaPeakPagedPoolUsage: 0x%08X\n",pmc.QuotaPeakPagedPoolUsage );printf( "\tQuotaPagedPoolUsage: 0x%08X\n",pmc.QuotaPagedPoolUsage );printf( "\tQuotaPeakNonPagedPoolUsage: 0x%08X\n",pmc.QuotaPeakNonPagedPoolUsage );printf( "\tQuotaNonPagedPoolUsage: 0x%08X\n",pmc.QuotaNonPagedPoolUsage );printf( "\tPagefileUsage: 0x%08X\n", pmc.PagefileUsage );printf( "\tPeakPagefileUsage: 0x%08X\n",pmc.PeakPagefileUsage );}CloseHandle( hProcess );}int main( ){// Get the list of process identifiers.DWORD aProcesses[1024], cbNeeded, cProcesses;unsigned int i;if ( !EnumProcesses( aProcesses, sizeof(aProcesses), &cbNeeded ) )return 1;// Calculate how many process identifiers were returned.cProcesses = cbNeeded / sizeof(DWORD);// Print the memory usage for each processfor ( i = 0; i < cProcesses; i++ )PrintMemoryInfo( aProcesses[i] );return 0;}The main function obtains a list of processes by using the EnumProcesses function. For each process, main calls the PrintMemoryInfo function, passi ng the process identifier. PrintMemoryInfo in turn calls the OpenProcess function to obtain the process handle. If OpenProcess fails, the output sho ws only the process identifier. For example, OpenProcess fails for the Idle and CSRSS processes because their access restrictions prevent user-level code from opening them. Finally, PrintMemoryInfo calls the GetProcessMemoryInfo function to obtain the memory usage informa tion.。
- 1、下载文档前请自行甄别文档内容的完整性,平台不提供额外的编辑、内容补充、找答案等附加服务。
- 2、"仅部分预览"的文档,不可在线预览部分如存在完整性等问题,可反馈申请退款(可完整预览的文档不适用该条件!)。
- 3、如文档侵犯您的权益,请联系客服反馈,我们会尽快为您处理(人工客服工作时间:9:00-18:30)。
4.單擊Next, 4.單擊Next,
5.選擇安裝目錄,並單擊Next 5.選擇安裝目錄,並單擊Next
6.選擇Full installation和PBX New Installation 6.選擇Full installation和
7.You can create an desktop icon in this step
database put mgcpphone 333 aaln/1@192.168.1.254
5.SIP 測試 5.1 SIP 測試中moderm鍴的設置與之前的 設置 測試中moderm鍴的設置與之前的 步驟是一樣的 5.2 我們在callagent鍴,可以通過脩改sip.conf來 我們在callagent callagent鍴,可以通過脩改sip.conf sip.conf來 增加或者刪除電話號碼 5.3 打開sip.conf ,我們會看到幾組電話號碼, 打開sip.conf 格式如下圖:
AsteriskWin32使用指南 AsteriskWin32使用指南
安裝AsteriskWin32 安裝AsteriskWin32
1.雙擊AsteriskWin32-0.601.雙擊AsteriskWin32-0.60-Setup.exe
2.單擊Next,開始安裝 2.單擊Next,開始安裝
ห้องสมุดไป่ตู้
3.選擇 I accept the agreement,單擊Next
4.MGCP測試 4.MGCP測試 4.1 配置moderm 配置moderm voice mgcp config callagentaddr=192.168.1.00 voice mgcp config callagentport=2427 4.2 添加電話號碼到database 添加電話號碼到database 在GUI的CLI提示符后執行: GUI的CLI提示符后執行: database put mgcpphone 111 aaln/1@192.168.1.254 aaln/1@192.168.1.254 database put mgcpphone 222 aaln/2@192.168.1.254 aaln/2@192.168.1.254 4.3 添加mgcp 電話號碼 添加mgcp 脩改mgcp.conf,並添加至database 脩改mgcp.conf,並添加至database
配置AsteriskWin32 配置AsteriskWin32
1.AsteriskWin32的配置文件放置在目錄 1.AsteriskWin32的配置文件放置在目錄 Cygroot\asterisk\etc\ Cygroot\asterisk\etc\ 2.對于MGCP,SIP 測試,我們應該脩改三個配置文 2.對于MGCP,SIP 件: sip.conf mgcp.conf 和 extensions.conf 3.我們提供脩改過的三個配置文件,妳可以把這三 3.我們提供脩改過的三個配置文件,妳可以把這三 個配置文件覆蓋原來的配置文件
我們可以依據原有的號碼照葫芦画瓢,增加更多的 我們可以依據原有的號碼照葫芦画瓢,增加更多的mgcp電話號碼 電話號碼
如增加號碼333,並指定 如增加號碼333,並指定 給IP:192.168.1.254 那我們可以在mgcp.conf 那我們可以在mgcp.conf 原來的號碼之后加入: 之后新增的號碼加入database,重新啓動 之后新增的號碼加入database,重新啓動 AsteriskWin32 在GUI的CLI提示符后: GUI的CLI提示符后:
AsteriskWin32常用的命令 AsteriskWin32常用的命令
Sip debug :開啓SIP的debug功能 :開啓SIP的debug功能 Mgcp debug :開啓MGCP的debug功能 :開啓MGCP的debug功能 Database show :查看database中的信息 :查看database中的信息 Database put mgcpphone xxx aaln/x@xxx.xxx.xxx.xxx Sip reload :重新載入sip.conf配置檔 :重新載入sip.conf配置檔 Mgcp reload :重新載入mgcp.conf配置檔 :重新載入mgcp.conf配置檔 Extensions reload:重新載入extensions.conf配置檔 reload:重新載入extensions.conf配置檔 Stop now :立刻中止運行 :立刻中止運行
Thank you !
2.點擊工具欄裏的Tools->PBX Start 2.點擊工具欄裏的Tools-
當屏幕中打印“Asterisk Ready”時,啓動完畢 當屏幕中打印“Asterisk Ready”時,啓動完畢
我們可以在屏幕下部的CLI提示符后輸入常用的命令來執行, 我們可以在屏幕下部的CLI提示符后輸入常用的命令來執行, 鍵入 help 囬車 可以顯示妳可以用的所有命令,快試試看吧
8.檢查安裝信息是否正確,如果正確單擊Install進行安 8.檢查安裝信息是否正確,如果正確單擊Install進行安 裝
9.安裝完成后,單擊Finish來結束安裝 9.安裝完成后,單擊Finish來結束安裝
啓動運行AsteriskWin32 啓動運行AsteriskWin32
1.雙擊桌麵快捷方式圖標,運行AsteriskWin32 1.雙擊桌麵快捷方式圖標,運行AsteriskWin32
我們可以以相同的格式 增加自己需要的號碼: 比如5001,就需要在 比如5001,就需要在 sip.conf中相同的位置加 sip.conf中相同的位置加 入:
脩改保存完畢后,重新啓動AsteriskWin32,然后 脩改保存完畢后,重新啓動AsteriskWin32,然后 我們就可以在moderm中註冊這個新增的號碼。 我們就可以在moderm中註冊這個新增的號碼。