WAS使用手册
TRS WAS 4.5 安装手册
是北京拓尔思信息技术股份有限公司的注册商标。
关于本手册
本手册旨在指导 TRS WAS 4.5 用户完成在各个平台上的安装、部署和配置。
读者对象
本手册读者对象为使用 TRS WAS 4.5 的使用者。
用户反馈
TRS 公司感谢您使用 TRS 产品。如果您发现本手册中有错误或者产品运行不正确, 或者您对本手册有任何意见和建议,请及时与 TRS 公司联系。您的意见将是我们做版 本修订时的重要依据。
2.3.10 创建快捷方式.................................................................................................... 12 2.3.11 查看预安装摘要并安装 .................................................................................... 12 2.3.12 安装完成............................................................................................................ 13 第 3 章 安装后的配置.......................................................................................................... 15 3.1 TRS JAVA BEANS和注册验证相关配置....................................................................... 15 3.2 TOMCAT相关配置 ........................................................................................................ 15 3.2.1 Unix平台下的配置 ............................................................................................... 16 3.2.2 使用JDK 1.4 情况下的配置................................................................................ 16 3.2.3 启动WAS服务 ..................................................................................................... 16 3.3 WEBLOGபைடு நூலகம்C手动部署应用 ............................................................................................ 17 3.3.1 登录到Weblogic控制台....................................................................................... 17 3.3.2 部署Web应用并启动........................................................................................... 17 3.4 WEBSPHERE手动部署应用.......................................................................................... 21 3.4.1 登录到WebSphere控制台.................................................................................... 21 3.4.2 部署Web应用并启动........................................................................................... 22 3.5 其他应用服务器手工部署 ......................................................................................... 25 第 4 章 卸载产品.................................................................................................................. 26 附录A MYSQL的基本使用 ................................................................................................. 27
飞利浦 WAS7000电视机用户手册说明书

(on desktop with stand)or(on wall without stand) o learn more about wall mounting,English 4.Preparation4.1 Setting clockto select Settings followed by Timehour followed by the minute.Helpful hints:is disconnected from the power supply.4.1.1 Viewing clockPress and hold VIEW button for about 5E n g l i s h5.3 Auto-standby 5.4 Volume control 5.5 MUTEMUTE The icon appears.without sound.o switch on the sound,MUTE or adjust the volume with The icon disappears5.6 Sound control5.6.1 EqualizerEqualizer enables you to select predefined sound select Equalizer.3Press 3or 4and 2to select Rock,Pop (default),5.6.2 Bass adjustmentEnglish 5.6.3 Incredible surround5.7 Display adjustmentPress 3or 4to increase or reduce the contrast 5.8 Selecting languagesMUSIC BROADCAST MUSIC FOLLOWS MEE n g l i s h6.1 Playing Hard Disk (HD)All tracks .playing time5T o pause playback,press ÉÅ.T o resume playback,press the button again 6T o stop playback,press STOP ÇREC MARK/UNMARKDBBSEARCHCD/MP3-CDHDSOURCEEnglish 6.2 Selecting and searching6.2.1 Selecting a different option1If necessary,press 1repeatedly to enter previous6.2.2 Searching by keywordsArtist,artist,genre or album) in random order – tracks (under current artist, album) are played in random order During playback,SHUFFLEDuring playback,pressThe iconsound settings (DBB,The iconEnglish 6.5 Viewing track informationmp3/wma files)the playback screen6.6 Moving music playback 6.6.1 MUSIC FOLLOWS METhe selected play modes (e.g.) will be retained on the destination unit (see Different play MUSIC FOLLOWS METhe iconsource unit and continues on the destination unit The iconE n g l i s h6.6.2 MUSIC BROADCASTMUSIC BROADCAST The icon Stations.A 5-second countdown starts.➜On the Center and Stations:The selected second countdown.46.7 Viewing system information ➜The display shows:System,WiFi and Ethernetversion6.HD(Located on Center)for illustration onlyEnglish7.1 T uning to radio stations 1Connect the supplied FM wire antenna to the Station (see Installation)2Check that the set is switched on or in standby mode (see Basic functions)3Press SOURCE once or more times to select Radio➜Playback screen appears.Display shows:Radio,the radio station frequency and a preset number (if already programmed)4Press and hold 3or 4until the frequency in the display starts running.➜The radio automatically tunes to a station of sufficient reception.Display shows Searching during automatic tuning➜ If a station is received in stereo,is shown ➜ When you are receiving an RDS station,is shown5Repeat Step 3 if necessary until you find the desired radio station●T o tune to a weak station,press 3or 4briefly and repeatedly until optimal reception is detected.7.2 Storing preset radio stationsY ou can store up to 60 preset radio stations in the memory.7.2.1 Autostore:automatic programming Autostore automatically starts programming radio stations from Preset 1.Available stations are programmed in the order of radio frequencies:RDS stations followed by FMstations.A maximum of 10 RDS stations will be stored (from Preset 01 to Preset 10).1T o select Autostore radio,a.Press MENUe the navigation controls 3or 4and 2to select Autostore radio➜Display shows:Autostore Please wait...➜After all the stations are stored,the first autostored preset station will then play automatically.7.2.2 Manual programming1T une to your desired radio station (see T uning to radio stations).2Press PROGRAM on the remote control.➜The display shows:INCR.SURR.SLEEPDIMRDS/NEWS6mnoREPEAT SHUFFLE2abc 3SAME GENRESAME ARTIST 5jkl4ghiPROGRAM 1MENUSCROLL VOLVIEWOKE n g l i s h7.FM radio3On the Station,press 3or 4 or the Numeric Keypad (0-9)to select your desired preset number.4Press OK➜Current radio station is stored to that preset location.7.2.3 T o listen to a preset station1Press 1to enter the list of preset stations2Use the navigation controls 3or 4followed by 2to select the desired station.7.3 RDSRDS (R adio D ata S ystem) is a service thatallows FM stations to send additional information along with FM radio signal.1T une to the desired RDS radio station (see Autostore:automatic programming).➜The display shows the following information (if available):– name of the radio station – radio frequency– program type (for example:News,Pop Music)– RDS radio text7.4 NEWSY ou can activate NEWS while listening to HD,USB,UPnP ,or AUX source on WAS7000.The set will tune to the news radio station if the related signals are received from a RDS station.7.4.1 Activating NEWS●During playback in HD,USB,UPnP ,or AUX source,press RDS/NEWS on the remote control.➜The icon appears and NEWS ON is displayed briefly➜Playback continues when the set scans the first 10 preset stations➜When news transmission is detected,the set will switch to the news station.The icon starts flashingHelpful hints:–Make sure that you have stored RDS stations in the first 10 preset locations (see Autostore:automatic programming).–If no news transmission is detected during the scanning of the set,the icon disappears and NO RDS NEWS is displayed.7.4.2 Deactivating NEWS●Press RDS/NEWS again on the remote control.●Switch the set to Radio source➜The icon disappears and NEWS OFF is displayed briefly.SLEEPMUSIC BROADCASTMUSIC FOLLOWS MEDIM6mno7pqrs8tuv 5jkl4ghiRDS/NEWS9wxyzMENUVIEWOKE n g l i s h8.1.2 Playing music from the USB devicedevice8.2 Playing other externalEnglish9.1 About UPnP* (Universal Plugnetworking technologies.9.1.1 About the UPnP-enabled device9.2 Connecting to the UPnP9.3 UPnP playback9.3.1 Playing music from the UPnPdevice1connected UPnP devices (up to 4 UPnP devices).(see HD).E n g l i s h10.Sleep10.1 SLEEPappears.English11.1 Setting alarm11.1.1 Setting alarm time1Enter the alarm setting menu➜Alarm On appears.The icon appears.b.Press OK to confirm11.1.2 Setting repeat mode1T o set repeat mode for the alarm sound.to select Repeat.b.Press3or4and2to select the desired11.2 Activating/de-activating11.2.1 Stopping alarm tone111.2.2 Activating/de-activating alarm 1E n g l i s hwork setting12.1 Adding Additional Station to Station if you are playing the HD source12.1.1 Deleting a Station Center’s Wi-Fi networkfor illustration onlyEnglish work setting12.2 Connecting to external Wi-12.2.1 Network setting on Station1b.Press OK to confirmIf there is no WEP/WPA key for theE n g l i s h12.3 Connecting to external12.3.1 Network setting on Station1Check that the device is switched on and the (see Preparation:Using Alphanumeric Keys).es to apply the settingsthe icon is changed toAccess Point(UPnP device)English work setting12.4 Viewing connection status12.4.1 Viewing the connection withexternal networksettings on the set.E n g l i s h13.1 ResetClick to enter the Firmware Upgradesub-menuClick Firmware upgrade.The PC shows as below:Click Browse and find the location where you kept the firmware upgrade file on your PC Click Apply to start upgrading firmwareOn Philips Wireless Music Station:➜The display shows "Updating firmware, please wait..."➜WAS7000 will reboot itself during the installation processIMPORT ANT!– Never interrupt the firmware upgrading before its completion– Before finishing the installation,never operate other functionsPrinted in ChinaPDCC-2006C Royal Philips Electronics N.V . 2006Need help?OnlineGo to /supportMeet Philips at the Internet WAS 70003141 075 21711。
希捷 Backup Plus 便携式硬盘 1TB 使用手册说明书
安装部署手册

第一部分数据库服务器的安装 (2)1 介绍 (2)1.1引言 (2)1.2术语解释 (2)1.3数据结构 (3)2安装Oracle数据库服务器 (3)2.1 查看安装的产品 (4)2.2 开始安装 (5)3安装Oracle客户端 (7)4 配置Oracle数据库 (8)4.1将数据库添加到树 (8)4.2创建数据库DBA用户及方案库 (9)4.3创建系统数据库表并建立初始数据 (11)4.4、数据库备份与恢复 (13)4.4.1数据库备份—数据导出 (13)4.4.2数据库恢复---数据导入 (13)第二部分W AS 服务器的安装配置 (14)5 W AS的安装与配置 (14)5.1 安装W AS软件 (14)5.2 W AS配置 (19)5.2.1 配置JDBC数据源 (19)5.2.2 发布应用 (27)5.2.3 设置websphere与数据库的连接 (28)5.2.4 发布 (33)6 停止和启动websphere注意事项 (38)6.1 停止websphere (38)7.设置IP地址跳转和页面访问 (40)7.1 设置ip地址跳转 (40)7.2访问地址 (41)第一部分数据库服务器的安装1 介绍1.1引言内网信息共享平台使用的数据库是oracle,这里我们选择安装ORACLE9i作为数据库服务器。
1.2术语解释导向库:是办公自动化系统的一个全局数据库,主要功能如下:1)保存所有地区用户的信息2)保存各地区数据库的导向信息3)保存用户与所在地区的关联信息4)保存系统及各子系统的全局参数地区库:主要功能包括系统用户管理、组织架构管理、服务器管理、数据字典管理、权限管理、应用系统管理和工作日期管理等七部分内容。
为办公自动化系统的各个功能模块提供用户与组织架构信息、向系统提供各模块的数据库服务器信息等基本信息。
WAS:WebSphere Application Server的缩写。
1.3数据结构建库SQL语句参考以下文件:导向库.sql导向库初始化脚本.txt地区库_管理工具.sql地区库_引擎.sql地区库_工作流触发器.sql地区库初始化脚本.txt2安装Oracle数据库服务器安装oracle前需要准备好oracle的安装文件。
wasp6中文操作手册
WASP6中文操作手册Translator :Longtao zhang, Xi'AN University of Architecture and Technology 英文来源:Water Quality Analysis Simulation Program (WASP) Version 6.0 DRAFT: User’s ManualByTim A. WoolRobert B. Ambrose1James L. Martin2Edward A. Comer3US Environmental Protection Agency – Region 4Atlanta, GA1Environmental Research LaboratoryAthens, GA2USACE – Waterways Experiment StationVicksburg, MS3Tetra Tech, Inc.Atlanta, GAWASP6是 USEPA 的一个改进了的Windows版本水质分析模拟程序(WASP) 。
建模者对WASP6的开发完成有助于WASP的应用。
WASP6 包括一个前处理器, 一个快速数据处理器和一个图形处理器,这使得其必先前的WASP运行更快而且更便捷地以数字与图像评估模拟结果。
在WASP6中, 模型的运行能被比早先的USEPA DOS操作系统界面快十倍。
当然,WASP6采用与DOS版本相同的算法解决水质问题。
WASP6 包含1) 一个用户友好的windows界面, 2)一个前处理器,用于协助modelers 把数据处理成WASP识别应用格式, 3) 高速WASP eutrophication 和有机化合物模型处理器, 和4) 一个图解post processor ,对WASP结果WASP并与实际测定数据对比。
由于可以采用模块设计,WASP6 可轻易地用于开发其他动力学模型。
当前, 我们计划开发一个改进的eutrophication 模型,包含以下变量: 2 个另外的藻类, 盐分, 充分的热平衡, coliforms, 二级BOD, 底泥digenesis 模型。
Was使用手册范本

Was Tools alpha 1.2使用手册作者:落魄逍遥、小白日期:2007年2月10日目录Was Tools alpha 1.2使用手册 (1)一、入门篇 (2)二、Was Tools 是什么? (3)三、Was Tools 下载和运行环境的安装 (3)四、Was Tools alpha 1.2的使用 (4)1. 概要介绍 (4)2. 导入资源 (5)3. Was选择技巧 (6)4. 常用功能 (7)5. 文件导出 (10)6. 高级技巧 (11)五、关于 (11)1. 落魄逍遥是谁? (11)2. 为什么做这个工具? (11)3. 这个工具的目的 (11)六、常见问题及解决办法 (11)免责声明:本工具使用的资源及其格式为网易公司所有!如果侵犯了您的合法权益,请联系kylixs163.。
任何企业和个人不得将本工具用于商业用途,否则由此所带来的法律及连带问题,本人不负任何责任!Was Tools alpha 1.2制作:kylixs(落魄逍遥)野豆工作室2007-2主页:kylixs.blog.sohu. QQ群:9106334一、入门篇首先了解下游戏资源的一些背景知识:Wdf文件(后缀为wdf,wd1,wd2,wd3)是《大话西游II》和《梦幻西游》所使用的一种打包格式。
简单的说,所有的游戏美术资源(除了地图资源)以及动画和声音资源都被打包在wdf的文件中,你可以在游戏的安装目录下看到很多这样的文件。
Was文件是大话、梦幻的动画资源保存的一种格式,是基于256调色板和RLE算法的,调色板的每个颜色是16位深度的,was能表现32级透明度。
was动画被打包到Wdf文件里面,不能直接看到。
我们的目的是提取游戏里的各种动画资源,用于四格、漫画、签名、flash等待的制作。
然而我们不能直接使用was动画文件,要把was动画文件转化为一幅幅图片,这样才可以修改和使用。
(图由小白提供)二、Was Tools 是什么?Was Tools是一个Wdf/Was资源查看,提取,转换,合成的工具。
格林西格erwas 200 产品手册说明书
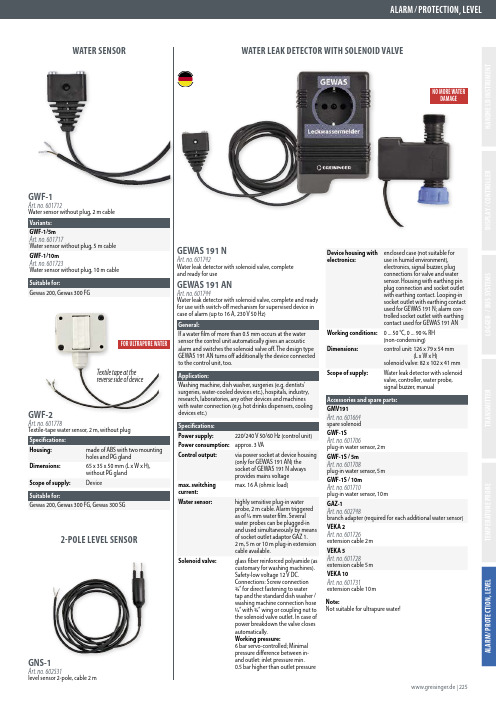
VEKA 10 Art. no. 601731 extension cable 10 m
Note: Not suitable for ultrapure water!
www.greisinger.de | 225
0 ... 50 °C, 0 ... 90 % RH (non-condensing)
control unit: 126 x 79 x 54 mm (L x W x H)
solenoid valve: 82 x 102 x 41 mm
Water leak detector with solenoid valve, controller, water probe, signal buzzer, manual
Suitable for: Gewas 200, Gewas 300 FG, Gewas 300 SG
2-POLE LEVEL SENSOR
GNS-1
Art. no. 602531
level sensor 2-pole, cable 2 m
GEWAS 191 N
Art. no. 601742 Water leak detector with solenoid valve, complete and ready for use
Device housing with electronics:
Working conditions: Dimensions: Scope of supply:
enclosed case (not suitable for use in humid environment), electronics, signal buzzer, plug connections for valve and water sensor. Housing with earthing pin plug connection and socket outlet with earthing contact. Looping-in socket outlet with earthing contact used for GEWAS 191 N; alarm controlled socket outlet with earthing contact used for GEWAS 191 AN
WAS安装部署手册范本
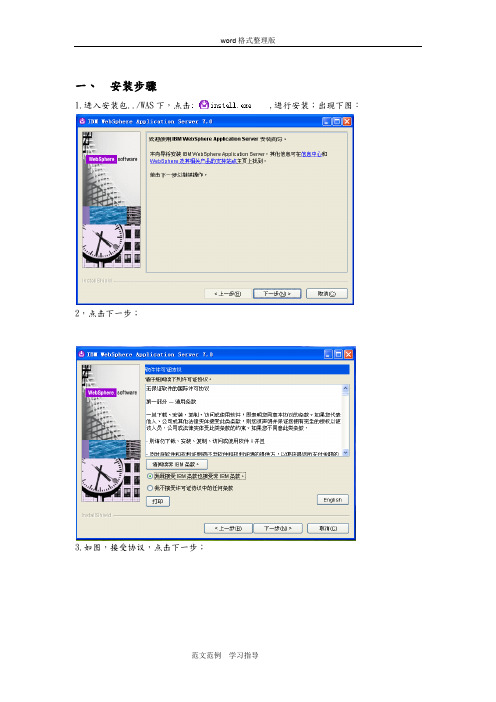
一、安装步骤1.进入安装包../WAS下,点击,进行安装;出现下图:2,点击下一步;3.如图,接受协议,点击下一步;4.如果显示“已通过”,则可进行“下一步”操作;输入安装路径;5.如图所示,默认点击“下一步”即可;6.输入你想设定的用户名及密码;7.如图,一路默认,点击“下一步”即可;8.安装结果显示“成功”,至此安装完成。
点击“完成”,出现以下界面:9.点击“安装验证”,会出现安装结果;10.登录https://localhost:9043/ibm/console/来验证是否安装成功。
11.点击“继续浏览此网站”12.安装成功二、部署应用1.启动websphere第一种方法,打开“第一步”如图,点击“启动服务”第二种方法,点击“启动服务”第三种方法,打开“开始”---“管理工具”---“服务”,启动“IBM WebSphere Application Server”2.部署应用1)Websphere启动之后,打开https://localhost:9043/ibm/console/页面2)点击“继续浏览此网站”3)输入用户名,密码,点击登录4)打开“应用程序”—“新建应用程序”5)点击“新建企业应用程序”6)选择要部署的应用7)点击下一步,这部分需要的时间较长8)点击下一步9)点击下一步10)选中应用之后,点击应用,11)点击“下一步”12)选择web模块,虚拟主机,这选择默认值,点击“下一步;13)如图,输入“上下文根”,点击“下一步”14)如图,15)点击“完成”,该步时间较长,耐心等待;16)点击“保存”,该步也需要时间;17)进入\IBM\WebSphere\AppServer\profiles\AppSrv01\installedApps\PC-20130327CMF CNode01Cell\shanshan_war.ear经行相关配置的修改;18)修改完成后,打开“应用程序类型”—websphere企业应用程序;19)选择要启动的应用程序,点击启动;进行验证,输入:http://服务器IP:端口号/应用名/,这我的是:http://localhost:9080/shanshan/shan.html3.遇到的问题查看\IBM\WebSphere\AppServer\profiles\AppSrv01\logs\server1中的日志文件1,部分安装成功:日志中: CWUPI0000I: 退出代码=2原因可能是:机器名不对,机器名中不能有下划线;2.部署过程中出现内存溢出时:进行如下操作;,点击sever1,选择“Java 和进程管理”---“进程定义”选择“Java 虚拟机”设置“初始堆大小”与“最大堆大小”之后点击“应用”点击保存;重启服务。
- 1、下载文档前请自行甄别文档内容的完整性,平台不提供额外的编辑、内容补充、找答案等附加服务。
- 2、"仅部分预览"的文档,不可在线预览部分如存在完整性等问题,可反馈申请退款(可完整预览的文档不适用该条件!)。
- 3、如文档侵犯您的权益,请联系客服反馈,我们会尽快为您处理(人工客服工作时间:9:00-18:30)。
WAS基本使用手册1.基本介绍WebSphere Application Server(简称WAS)是IBM的应用服务器基本结构:单元(cell) ——> 多个节点(node) ——> 多个服务(server) ——> 多个应用(app)单元是整个分布式网络中一个或多个节点的逻辑分组单元是一个配置概念, 是管理员将节点间逻辑关联起来的实现方法, 可以将单元看作是WAS最大的作用域2.节点部署概要文件(Profile)定义一个独立应用程序服务器(Server)的运行时环境, 包括服务器在运行时环境中处理的所有文件节点(Node)是受管服务器(Server)的逻辑分组, 节点通常与具有唯一IP主机地址的逻辑或物理计算机系统对应, 节点不能跨多台计算机Node Agent 是将管理请求路由至服务器的管理代理程序, Node Agent 是服务器, 是一个管理代理程序, 并不涉及应用程序服务功能, Node Agent 进程在每个受管节点上运行, 并专门执行特定于节点的管理功能, 如服务器进程监视、配置同步、文件传输和请求路由, Deployment Manager通过与Node Agent的交互完成对单元内节点的控制Node是管理上使用的概念, Profile是实际的概要文件, 它们代表同一事物查看所有概要文件:export WAS_HOME=/usr/IBM/WebSphere/AppServercd $WAS_HOME/bin./managepro -listProfiles2.1.D eploymentManagerDeploymentManager(简称DM) 为单元中所有元素提供了单一的管理控制中心点DM属于一个特殊的节点, 用以下步骤创建:export WAS_HOME=/usr/IBM/WebSphere/AppServercd $WAS_HOME/bin./managepro -create \-templatePath $WAS_HOME/pro \-pro Dmgr01 \-pro $WAS_HOME/pro \- nodeName (节点名) \-cellName (单元名) \-hostName (主机名)(其中红色部分为概要文件名, 可根据实际情况修改)2.2.节点1.新增节点:./managepro -create \-pro AppSvr01 \-templatePath $WAS_HOME/prodefault \-pro $WAS_HOME/pro \- nodeName (节点名) \- cellName (单元名) \-hostName (主机名)(其中红色部分为概要文件名, 可根据实际情况修改)2.添加节点到DeploymentManager:cd $WAS_HOME/pro./addNode.sh IP PORT(其中ip为WebSphere DM所在服务器的IP, PORT为WebSphere DM对应的SOAP_CONNECTOR_ADDRESS端口, 默认为8879)3.启动节点:cd $WAS_HOME/pro./startNode.sh或cd $WAS_HOME/bin./ startNode.sh AppSrv014.停止节点:cd $WAS_HOME/pro./stopNode.sh或cd $WAS_HOME/bin./stopNode.sh AppSrv01注:在WAS控制台只能停止节点, 不能启动, 步骤如下:登陆WAS控制台系统管理——> Node Agent选择节点进行操作5.删除节点:确认节点已经停止cd $WAS_HOME/bin删除节点对应的概要文件:./managepro -delete -pro AppSrv01删除所有节点对应的概要文件(谨慎, 会删除DM的概要文件):./managepro -deleteAll最后删除节点文件目录cd $WAS_HOME/profilesrm -Rf AppSrv01注:在WAS控制台只能把节点从DM去除, 不能进行删除节点操作2.3.状态1.登陆WAS控制台2.系统管理——> 节点已同步此节点上的配置文件已与 Deployment Manager 同步未同步此节点上的配置文件未与 Deployment Manager 同步(已过期)未知由于无法访问此节点的 Node Agent, 所以无法确定配置文件的状态不可用由于此节点是非受管节点, 所以状态列不适用于此节点3.集群部署集群由一组应用程序服务器组成3.1.新建1.登陆WAS控制台2.服务器——> 集群3.点击新建4.输入集群名称, 点击下一步5.创建第一个集群成员, 输入成员名, 选择节点, 点击下一步6.创建其他集群成员, 输入成员名, 选择节点, 点击添加成员, 点击下一步7.检查操作总结的信息是否正确, 点击完成8.查看新建的集群3.2.维护新建成功后, 可以在控制台进行启动停止删除等操作注:集群的起停会直接影响到集群下的服务和应用起停, 如果删除集群也会把集群下的服务和应用删除3.3.状态已启动所有集群成员都在运行已部分启动至少其中一个集群成员在运行已部分停止至少其中一个集群成员已停止运行已停止所有集群成员都已停止运行不可用无法确定状态4.服务部署4.1.新建1.登陆WAS控制台2.服务器——> 应用程序服务器3.点击新建4.选择节点, 输入服务名称, 点击下一步5.点击下一步6.点击下一步7.点击完成8.查看新建的服务4.2.维护新建成功后, 可以进行启动停止删除等操作注:如果删除服务, 服务下的应用也会被删除如果起停失败, 也可以通过命令行来进行起停, 步骤如下:export WAS_HOME=/usr/IBM/WebSphere/AppServercd $WAS_HOME/pro(其中红色部分为服务所在节点名, 可根据实际情况修改)启动服务./ startServer.sh server1停止服务./ stopServer.sh server1(其中红色部分为服务名, 可根据实际情况修改)其他常用配置修改点击服务名——> Java 和进程管理——> 进程定义——> Java 虚拟机可以对垃圾回收, 内存大小, 字符集等进行修改4.3.状态已启动服务器正在运行已部分停止服务器在进行从已启动状态更改为已停止状态已停止服务器未运行不可用无法确定状态5.应用部署5.1.发布1.登陆WAS控制台2.应用程序——> 企业应用程序3.点击安装4.选择本地或服务器上的应用工程包, 输入上下文根, 点击下一步5.勾选启动类重新装入, 点击下一步6.指定应用程序中所包含的模块的安装目标, 包括集群、服务和WEB服务器等7.选择虚拟主机, 一般为默认, 点击下一步8.确认下上文根的是否正确, 点击下一步9.最终确认所有配置是否正确, 点击完成10.安装成功, 点击保存11.查看发布的应用5.2.更新发布应用程序是war包, 更新应用程序是zip包zip包目录结构:TEST.war\更新的应用程序, 最后打成zip包(其中TEST为应用名, 可根据实际情况修改, TEST.war为文件夹名称, 而不是war包)1.登陆WAS控制台2.应用程序——> 企业应用程序3.选着需要更新的应用, 点击更新4.选择替换、添加或删除多个文件, 选择本地或服务器上的应用更新包, 点击下一步5.点击确认6.更新成功, 点击保存7.点击应用更新8.更新完成后, 不需要重启应用程序, WAS会自动重新加载更新的内容, 可能会造成短时间无法访问应用5.3.维护发布成功后, 可以进行启动停止卸载导出等操作注:卸载应用成功后, WAS服务器上还会有一些临时文件存在, 但没有任何其他影响如果需要删除, 可以手动删除:cd /usr/IBM/WebSphere/AppServerfind ./ -name TEST*删除所有TEST_war.ear文件或目录(其中红色部分为应用名, 可根据实际情况修改)5.4.状态启动应用程序正在运行部分启动应用程序在进行从已停止状态更改为已启动状态已停止应用程序未在运行部分停止应用程序在进行从启动状态更改为停止状态不可用无法确定状态不可用应用程序不提供有关它是否正在运行的信息6.数据库配置6.1.J2C 认证数据J2C 认证数据指定供 Java(TM) 2 连接器安全性使用的一组用户标识和密码, 配置如下:1.登陆WAS控制台2.安全性——> 安全管理、应用程序和基础结构——> Java 认证和授权服务——> J2C认证数据3.点击新建4.输入别名、用户表示(数据库用户名)、密码(数据库密码), 点击确认5.安装成功, 点击保存6.查看建立的J2C 认证数据6.2.J DBC 提供程序JDBC 提供程序包括特定的 JDBC 驱动程序实现类, 以便访问环境中的特定供应商数据库, 配置如下:1.登陆WAS控制台2.资源——> JDBC ——> JDBC 提供程序3.选择作用域, 可根据需要的范围选择所有作用域:对所有服务生效(不能在此作用域新建JDBC 提供程序)单元:只对该单元下所有服务生效集群:只对该集群下所有服务生效节点:只对该节点下所有服务生效服务:只对该服务生效4.点击新建5.选择数据类型:DB2, 提供程序类型:DB2 Universal JDBC Driver Provider, 实施类型:连接池数据源, 输入名称, 点击下一步6.输入jar包db2jcc.jar, db2jcc_license_cisuz.jar的存放路径如果配置过环境变量里的DB2UNIVERSAL_JDBC_DRIVER_PATH 和DB2UNIVERSAL_JDBC_DRIVER_NATIVEPATH 这里会自动显示路径, 详见7.环境配置7.最终确认所有配置是否正确, 点击完成8.新建成功, 点击保存9.选择所有作用域或刚选择的作用域, 查看新建的JDBC 提供程序6.3.数据源数据源用于提供关系数据库连接的资源, 配置如下:1.登陆WAS控制台2.资源——> JDBC ——> 数据源3.选择作用域, 和JDBC提供程序一致4.点击新建5.输入数据源名, JNDI 名称(用于应用程序JNDI连接名), 选择J2C 认证别名, 点击下一步6.选着JDBC 提供程序, 点击下一步7.输入数据库连名(数据库实例名), 服务器名称(数据库的IP地址或主机名), 端口号(默认是50000), 点击下一步8.最终确认所有配置是否正确, 点击完成9.新建成功, 点击保存10.如果出现节点同步操作, 同步11.选择所有作用域或刚选择的作用域, 查看新建的数据源12.选择新建的数据源, 点击连接测试, 看是否连接成功13.如果连接不成功, 查看点击管理状态, 看状态是否活动14.如果没有信息或状态为不活动时, 检查配置是否正确:J2C 认证数据:配置数据库的用户和密码JDBC 提供程序:配置数据库的驱动程序和连接类型数据源:配置数据库的实例名 IP地址和端口如果配置没问题, 重启节点7.环境配置7.1.环境变量1.登陆WAS控制台2.环境——> WebSphere 变量3.选择作用域, 可根据需要的范围选择4.点击新建5.输入名称和值¸点击确定6.新建成功, 点击保存7.点击需要修改的环境变量, 可进行修改8.常用默认环境变量:JAVA_HOME JAVA目录WAS_INSTALL_ROOT WAS安装目录WAS_LIBS_DIR WAS LIB包目录WAS_TEMP_DIR WAS临时目录LOG_ROOT WAS日志目录WAS_CELL_NAME WAS单元名WAS_SERVER_NAME WAS服务名USER_INSTALL_ROOT 概要文件目录APP_INSTALL_ROOT 应用安装目录SERVER_LOG_ROOT 应用日志目录DB2_JDBC_DRIVER_PATH DB2驱动目录DB2UNIVERSAL_JDBC_DRIVER_PATH DB2驱动目录DB2UNIVERSAL_JDBC_DRIVER_NATIVEPATH DB2驱动目录INFORMIX_JDBC_DRIVER_PATH INFORMIX驱动目录MICROSOFT_JDBC_DRIVER_PATH SQL SERVER驱动目录MICROSOFT_JDBC_DRIVER_NATIVEPATH SQL SERVER驱动目录MSSQLSERVER_JDBC_DRIVER_PATH SQL SERVER驱动目录ORACLE_JDBC_DRIVER_PATH ORACLE驱动目录SYBASE_JDBC_DRIVER_PATH SYBASE驱动目录7.2.性能监控1.登陆WAS控制台2.监视和调整——> 性能查看器——> 当前活动3.勾选需要监视的服务, 点击启动监视4.点击已监视的服务, 进入监视界面, 能很直观的监视应用访问时间5.点击顾问程序, 可以监视应用程序运行时各种数据6.点击摘要报告7.servlet 摘要列出在当前应用程序服务器中运行的所有 servlet8.EJB摘要会列出在服务器中运行的所有 Enterprise beans, 花费在它们的方法中的时间量, EJB 调用次数以及花费在每个 Enterprise bean 中的总时间9. EJB 方法摘要显示每个 EJB 方法的统计信息10.连接池摘要会列出应用程序服务器中定义的所有数据源连接并显示随着时间的过去它们的使用情况11.线程池摘要显示了随着时间的过去, 应用程序服务器中所有线程池的使用情况12.点击性能模块, 这些模块提供系统资源性能数据(例如CPU 利用率), WebSphereApplication Server 池和队列(例如数据库连接池)性能数据和客户应用程序数据性能数据(例如 servlet 响应时间)的图形和图表7.3.日志管理1.登陆WAS控制台2.故障诊断——> 日志和跟踪3.点击需要查看日志的服务4.日志类型诊断跟踪:服务器进程的诊断跟踪配置设置确定服务器进程的初始跟踪状态JVM日志:通过将 JVM 的 System.out 和 System.err 流重定向到独立日志文件来创建JVM 日志进程日志:WAS进程包含两个可供进程中运行的本机代码访问的stdout 和stderr输出流IBM 服务日志:包含写入 System.out 流的WAS 消息和一些包含详尽服务信息的特殊消息5.JVM日志包含应用日志, 可根据情况修改文件大小, 文件个数, 日志时间6.更改日志级别详细信息, 输入指定要跟踪的组件、包或组的日志详细信息级别日志详细信息级别规范的格式是:<component> = <level>其中<component> 是要为它设置日志详细信息级别的组件, 而<level> 是某个有效的记录器级别(关闭、致命、严重、警告、审计、信息、配置、详细信息、精细、较精细、最精细、全部), 用冒号分隔多个日志详细信息级别规范7.日志查看WAS控制台:故障诊断——> 日志和跟踪——> 日志类型——> 运行时, 点击查看也可以直接进入日志目录查看诊断跟踪:${SERVER_LOG_ROOT}/trace.logJVM日志:${SERVER_LOG_ROOT}/SystemOut.log${SERVER_LOG_ROOT}/SystemErr.log进程日志:${SERVER_LOG_ROOT}/native_stdout.log${SERVER_LOG_ROOT}/native_stderr.logIBM 服务日志:${LOG_ROOT}/activity.log8.端口配置8.1.控制台访问端口1.登陆WAS控制台2.系统管理——> Deployment Manager——> 端口3.其中WC_adminhost(默认为9060), WC_adminhost_secure(默认为9043)为控制台访问端口, 点击进行修改, 注意不要和其他端口冲突4.修改成功, 点击保存8.2.应用访问端口1.登陆WAS控制台2.系统管理——> 服务器——> 应用程序服务器3.选择需要修改端口的服务——> 端口4.其中WC_defaulthost(默认为9080)为应用访问端口, 点击进行修改, 注意不要和其他端口冲突5.修改成功, 点击保存8.3.虚拟主机每个虚拟主机有一个逻辑名并且由它的一个或多个域名系统(DNS)别名的列表识别, DNS 别名是用于请求 servlet 的 TCP/IP 主机名和端口号端口新增修改后, 需要在虚拟主机添加相应端口, 才能正常访问1.登陆WAS控制台2.环境——> 虚拟主机3.如果是修改控制台端口, 点击admin_host ——> 主机别名4.点击新建5.输入对应控制台的端口,点击确定6.新建成功, 点击保存7.如果是修改应用端口, 点击default_host ——> 主机别名8.点击新建9.输入对应应用的端口,点击确定10.新建成功, 点击保存9.日常维护9.1.常用目录/usr/IBM/WebSphere/AppServerWAS根目录/usr/IBM/WebSphere/AppServer/binWAS操作目录/usr/IBM/WebSphere/AppServer/profiles 节点根目录/usr/IBM/WebSphere/AppServer/pro 节点操作目录/usr/IBM/WebSphere/AppServer/pro 节点日志目录/usr/IBM/WebSphere/AppServer/pro 应用日志目录/usr/IBM/WebSphere/AppServer/pro 应用程序目录(其中红色部分为概要文件名和应用名, 可根据实际情况修改)9.2.进程查看1.查看所有WAS进程其中WAS控制台对应一个进程, 每个节点每个服务对应一个进程ps -ef|grep wasadmin(其中红色部分为WAS服务器用户名, 可根据实际情况修改)2.查看节点进程ps -ef|grep 'nodename nodeagent'(其中红色部分为节点名, 可根据实际情况修改)3.查看服务进程ps -ef|grep servername(其中红色部分为服务名, 可根据实际情况修改)9.3.应用日志查看export WAS_HOME=/usr/IBM/WebSphere/AppServercd $WAS_HOME/promore SystemOut.log(其中红色部分为概要文件名和应用名, 可根据实际情况修改) 9.4.服务起停export WAS_HOME=/usr/IBM/WebSphere/AppServer1.启动管理控制台cd $WAS_HOME/pro./startManager.sh(其中红色部分为DM名, 可根据实际情况修改)2.启动节点cd $WAS_HOME/pro./startNode.sh(其中红色部分为概要文件名, 可根据实际情况修改)3.启动应用服务器cd $WAS_HOME/pro./startServer.sh server1(其中红色部分为概要文件名和服务名, 可根据实际情况修改)4.停止应用服务器cd $WAS_HOME/pro./stopServer.sh server1(其中红色部分为概要文件名和服务名, 可根据实际情况修改)5.停止节点cd $WAS_HOME/pro./stopNode.sh(其中红色部分为概要文件名, 可根据实际情况修改)6.停止管理控制台cd $WAS_HOME/pro./stopManager.sh(其中红色部分为DM名, 可根据实际情况修改)。