QML学习实例 – 图片切换效果源代码
鼠标点击按钮图片切换+自动切换+左右按钮点击切换效果

鼠标点击按钮图片切换+自动切换+左右按钮点击切换效果上一次在我的文库中分享了点击按钮,图片左右切换轮播效果代码,今天主要是分享【鼠标点击按钮,图片进行切换+图片自动切换+点击左右按钮图片进行切换的三种效果的组合代码】。
最后的效果如下:Html代码部分:<!doctype html><html lang="en"><head><meta charset="UTF-8"><meta name="Generator" content="EditPlus®"><meta name="Author" content=""><meta name="Keywords" content=""><meta name="Description" content=""><title>图片轮播效果制作</title><link rel="stylesheet" type="text/css" href="css/style.css"><script type="text/javascript" src="js/jquery.js"></script><script type="text/javascript" src="js/style.js"></script></head><body><div class="banner"><ul class="pic"><li><a href="#"><img src="images/1.jpg" alt="美女" width="350" height="495"></a></li><li><a href="#"><img src="images/2.jpg" alt="美女" width="350" height="495"></a></li><li><a href="#"><img src="images/3.jpg" alt="美女" width="350" height="495"></a></li><li><a href="#"><img src="images/4.jpg" alt="美女" width="350" height="495"></a></li><li><a href="#"><img src="images/5.jpg" alt="美女" width="350" height="495"></a></li></ul><ul class="anniu"><li class="on"></li><li></li><li></li><li></li><li></li></ul><ul class="lr"><li class="pre"><a href="#"> < </a></li><li class="next"><a href="#"> > </a></li></ul></div></body></html>Css代码部分:*{margin:0px;padding:0px}li{list-style:none}a{text-decoration:none}img{border:0px}.banner{width:350px;height:495px;margin:100px auto;position:relative;overflow:hidden}.banner .pic{width:9999px;height:495px}.banner .pic li{width:350px;height:495px;float:left}.banner .anniu{width:100px;height:16px;position:absolute;left:165px;top:470px}.banner .anniu li{width:16px;height:16px;background:white;float:left;margin:2px;display:inline; cursor:pointer;border-radius:100%}.banner .anniu li.on{background:red}.banner .lr{width:350px;height:50px;position:absolute;top:250px;display:none}.banner .lr a{color:white}.banner .lr .pre{width:20px;height:50px;float:left;background:none repeat scroll 0px 0px rgba(1, 0, 0, 0.6);text-align:center;line-height:50px;cursor:pointer}.banner .lr .next{width:20px;height:50px;float:right;background:none repeat scroll 0px 0px rgba(1, 0, 0, 0.6);text-align:center;line-height:50px;cursor:pointer}Javascript代码部分:$(function(){//鼠标滑过banner,左右按钮进行显示和隐藏$(".banner").hover(function(){$(".lr").show();},function(){$(".lr").hide();});//点击下面的小按钮,图片进行左右切换效果$(".anniu li").click(function(){$(this).addClass("on").siblings().removeClass("on");var num=$(this).index();$(".pic").animate({marginLeft:-350*num},"slow");});//图片自动轮播效果var a=0;var automatic=setInterval(function(){a++;a=a%5;$(".pic").animate({marginLeft:-350*a},"slow");$(".anniu li").eq(a).addClass("on").siblings().removeClass("on");},6000);//点击左右按钮,图片进行切换效果$(".pre").click(function(){a--;a=(a+5)%5;$(".pic").animate({marginLeft:-350*a},"slow");$(".anniu li").eq(a).addClass("on").siblings().removeClass("on");});$(".next").click(function(){a++;a=a%5;$(".pic").animate({marginLeft:-350*a},"slow");$(".anniu li").eq(a).addClass("on").siblings().removeClass("on");});});。
QML Camera例子
QML Camera例子:这个例子使用最多的技术就是State的切换,QML中的Camera组件完成视频的录制和拍摄。
states:[State{name:"PhotoCapture"StateChangeScript{script:{camera.captureMode=Camera.CaptureStillImagecamera.start()}}},State{name:"PhotoPreview"},State{name:"VideoCapture"StateChangeScript{script:{camera.captureMode=Camera.CaptureVideocamera.start()}}},State{name:"VideoPreview"StateChangeScript{script:{camera.stop()}}}]StateChangeScript组件里的script是在进入此State状态的时候执行的。
我们可以在某个过渡动作里面使用ScriptAction来指定State切换脚本,State {name: "state1"StateChangeScript {name: "myScript"script: doStateStuff();}// ...}// ...Transition {to: "state1"SequentialAnimation {NumberAnimation { /* ... */ }ScriptAction { scriptName: "myScript" }NumberAnimation { /* ... */ }}}Camera{id:cameracaptureMode:Camera.CaptureStillImageimageCapture{onImageCaptured:{photoPreview.source=previewstillControls.previewAvailable=truecameraUI.state="PhotoPreview"}}videoRecorder{resolution:"640x480"frameRate:30}}这里这段代码imageCapture这一段看着有点奇怪的,这里是因为CaptureCamera组件是Camera的一个子组件,不能直接创建,而是作为Camera的属性来创建的。
安卓 图片切换(android)源代码+注释
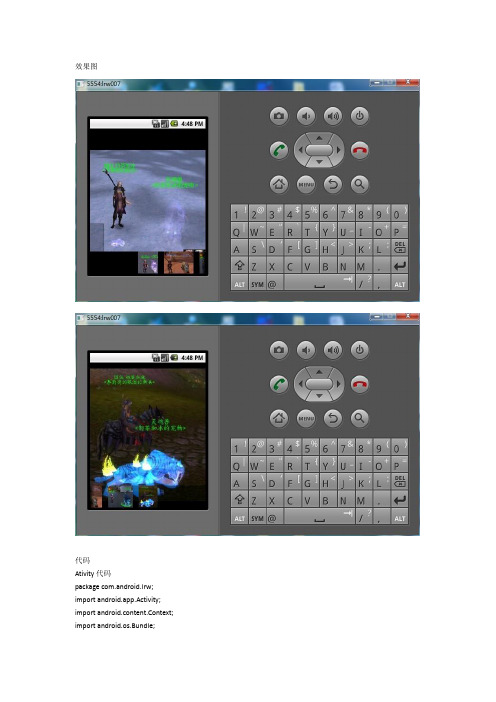
效果图代码Ativity代码package com.android.lrw; import android.app.Activity; import android.content.Context; import android.os.Bundle;import android.v iew.View;import android.v iew.ViewGroup;import android.v iew.Window;import android.v iew.animation.AnimationUtils;import android.widget.AdapterView;import android.widget.BaseAdapter;import android.widget.Button;import android.widget.CheckBox;import android.widget.EditT ext;import android.widget.Gallery;import android.widget.ImageSwitcher;import android.widget.ImageView;import android.widget.T extView;import android.widget.ViewSwitcher;import y outParams;public class ImgShowActivity extends Activity implementsAdapterView.OnItemSelectedListener, ViewSwitcher.ViewFactory {@Overridepublic void onCreate(Bundle savedInstanceState) {super.onCreate(savedInstanceState);requestWindowFeature(Window.FEATURE_NO_TITLE);setContentView(yout.imageshow);setTitle("ImageShowActivity");mSwitcher = (ImageSwitcher) findViewById(R.id.Switcher);mSwitcher.setFactory(this);mSwitcher.setInAnimation(AnimationUtils.loadAnimation(this,android.R.anim.fade_in));mSwitcher.setOutAnimation(AnimationUtils.loadAnimation(this,android.R.anim.fade_out));Gallery g = (Gallery) findViewById(R.id.Gallery);g.setAdapter(new ImageAdapter(this));g.setOnItemSelectedListener(this);}/** 当图片被选择时的方法*/public void onItemSelected(AdapterView parent, View v, int position, long id) {mSwitcher.setImageResource(mImageIds[position]);}/** 当图片未被选择时的方法*/public void onNothingSelected(AdapterView parent) {}/**ImageSwitcher的使用方法*/public View makeView() {ImageView i = new ImageView(this);i.setBackgroundColor(0xFF000000);i.setScaleTy pe(ImageView.ScaleType.FIT_CENTER);i.setLayoutParams(new youtParams(LayoutParams.FILL_PARENT,Lay outParams.FILL_PARENT));return i;}private ImageSwitcher mSwitcher;/**创建图片适配器*/public class ImageAdapter extends BaseAdapter {public ImageAdapter(Context c) {mContext = c;}public int getCount() {return mThumbIds.length;}public Object getItem(int position) {return position;}public long getItemId(int position) {return position;}public View getView(int position, View convertView, ViewGroup parent) {ImageView i = new ImageView(mContext);i.setImageResource(mThumbIds[position]);i.setAdjustViewBounds(true);i.setLayoutParams(new youtParams(LayoutParams.W RAP_CONTENT,Lay outParams.WRAP_CONTENT));i.setBackgroundResource(R.drawable.icon);return i;}private Context mContext;}/**存放图片,mThumbIds为低分辨率图片,mImageIds为高分辨率图片*/private Integer[] mThumbIds = {R.drawable.ps1, R.drawable.ps2,R.drawable.ps3,R.drawable.ps4 };private Integer[] mImageIds = {R.drawable.p1, R.drawable.p2,R.drawable.p3,R.drawable.p4 };}package com.android.lrw;import android.app.Activity;import android.content.Intent;import android.os.Bundle;import android.v iew.View;import android.v iew.View.OnClickListener;import android.widget.Button;public class Android_ImgViewActivity extends Activity {@Overridepublic void onCreate(Bundle savedInstanceState) {super.onCreate(savedInstanceState);setContentView(yout.main);Button mybutton=(Button)findViewBy Id(R.id.imageButton);调用监听器类mybutton.setOnClickListener(new ImageButtonListener());}创建监听器内部类ImageButtonListenerclass ImageButtonListener implements OnClickListener{@Overridepublic void onClick(View v) {Intent intent = new Intent();intent.putExtra("value", "jigsdhgiu");intent.setClass(Android_ImgViewActivity.this, ImgShowActivity.class);startActivity(intent);}}}Main.xml代码<?xml version="1.0" encoding="utf-8"?><LinearLay out xmlns:android="/apk/res/android"android:orientation="vertical" android:layout_width="fill_parent"android:lay out_height="fill_parent"><Button android:id="@+id/imageButton"android:lay out_width="fill_parent"android:lay out_height="wrap_content"android:text="切换图片"/></LinearLayout>imageshow.xml 代码<?xml version="1.0" encoding="utf-8"?><RelativeLay outxmlns:android="/apk/res/android"android:lay out_width="fill_parent"android:lay out_height="fill_parent"><ImageSwitcherandroid:id="@+id/Switcher"android:lay out_width="fill_parent"android:lay out_height="fill_parent"android:lay out_alignParentT op="true"android:lay out_alignParentLeft="true"/><Gallery android:id="@+id/Gallery"android:background="#55000000"android:lay out_width="fill_parent"android:lay out_height="60dp"android:lay out_alignParentBottom="true"android:lay out_alignParentLeft="true"android:gravity="center_vertical"android:spacing="16dp"/></RelativeLayout>注册Ativity<?xml version="1.0" encoding="utf-8"?><manifest xmlns:android="/apk/res/android"package="com.android.lrw"android:versionCode="1"android:versionName="1.0"><uses-sdk android:minSdkV ersion="4" /><application android:icon="@drawable/icon" android:label="@string/app_name"><activity android:name=".Android_ImgViewActivity"android:label="@string/app_name"><intent-filter><action android:name="android.intent.action.MAIN" /><category android:name="UNCHER" /> </intent-filter></activity><activity android:name=".ImgShowActivity"/></application></manifest>。
经典图片切换代码
for(var i=1;i<counts+1;i++){document.write('<a href="javascript:changeimg('+i+');" id="xxjdjj'+i+'" class="axx" target="_self">'+i+'</a>');}
document.write('</div></div>');
document.write('a.axx:active,a.axx:hover{text-decoration:none;color:#fff;line-height:12px;font:9px sans-serif;background-color:#999;}');
document.write('.bxx{padding:1px 7px;border-left:#cccccc 1px solid;}');
document.write('</style>');
document.write('<div style="width:'+widths+'px;height:'+heights+'px;overflow:hidden;text-overflow:clip;">');
document.write('<div><a id="url"><img id="pic" style="border:0px;filter:progid:dximagetransform.microsoft.wipe(gradientsize=1.0,wipestyle=4, motion=forward)" width='+widths+' height='+heights+' /></a></div>');
Qt 5开发及实例 第24章 QML动画特效
其他动画元素
(3)打开MainForm.ui.qml文件,修改代码如下:
... Rectangle {
... MouseArea {
id: mouseArea anchors.fill: parent } CircleRect { x:50; y:30 r元素
作为属性值的来源。可以立即为一个指定的属性使用动画。 在信号处理器中创建。当接收到一个信号(如鼠标单击事件)时触发动画。 作为独立动画元素。像一个普通QML对象一样地被创建,不需要绑定到任何特定的对象和属性。 在属性值改变的行为中创建。当一个属性改变值时触发动画,这种动画又叫“行为动画”。
01
状态和切换
状态和切换
【例】(难度中等)(CH2404)用状态切换机制实现文字的动态增强显示,运行效果如图24.4所 示,其中被鼠标选中的单词会以艺术字放大,而释放鼠标后又恢复原状。
状态和切换
实现步骤如下。 (1)新建QML应用程序,项目名称为“StateTransition”。 (2)右击项目视图“资源”→“qml.qrc”下的“/”节点,选择“添加新文件…”项,新建 StateText.qml文件,编写代码。 其中, (a) states: […]:states属性包含了该元素所有状态的列表,要创建一个状态,就向states中添加一 个State对象,如果元素只有一个状态,则也可省略方括号“[ ]”。 (b) State {…}:状态对象,它定义了在该状态中要进行的所有改变,可以指定被改变的属性或创建 PropertyChanges元素,也可以修改其他对象的属性(不仅仅是拥有该状态的对象)。 (c) name: "highlight":状态名称,每个状态对象都有一个在本元素中唯一的名称,默认状态的状 态名称为空字符串。要改变一个元素的当前状态,可以将其state属性设置为要改变到的状态的名称。
运用代码,轻松实现图片的多种切换效果

运用代码,轻松实现图片的多种切换效果俗话说:“百闻不如一见”,图片在教学中的作用是不言而喻的,特别是在历史教学中,我们常常用相关图片导入新课、点明主题、说明道理。
图片突兀地切换,会使课件显得没有生机,特别是作为课件封面并负有引入新课重任的图片,更要有较“眩”的切换效果。
如何运用代码,在Flash中轻松实现图片的多种切换效果(切换效果可以扩展,通用性强!)。
本文举例说明如下:新建Flash文件。
启动Flash8.0,点选修改菜单,选中文档…选项(或按Ctrl+J),弹出文档属性对话框;将影片大小设置为宽为1024px(像素),高为768 px。
背景色为白色;其它参数尊重Flash的默认设置,不用改变。
1 制作元件1.1 制作一个空的影片剪辑,用于载入图片按Ctrl+F8,新建一个影片剪辑元件,命名为“载入”,单击确定,不做任何操作,返回主场景。
1.2 制作一个空的影片剪辑,用于放置代码按Ctrl+F8,新建一个影片剪辑,命名为“自动播放”,单击确定,不做任何操作,返回主场景。
1.3 各种切换效果影片剪辑的制作1.3.1 圆形扩展①在场景中,按Ctrl+F8,新建一个影片剪辑元件,命名为“圆形”,单击确定,进入元件编辑窗口;选中圆形绘图工具,按下Shift键的同时,在舞台上绘制一任意大小的没有边框的正圆,在属性面板中将其宽高均设为5px(像素);单击工具箱中的选择工具,在舞台中的圆上单击,使其处于选中状态,按Ctrl+K打开对齐面板,点选“水平中齐”和“垂直中齐”标签,使该圆位于舞台的中心。
②选中时间轴上的第12帧,按F6插入关键帧;然后单击舞台中的圆,使其处于选中状态;在属性面板中将其宽高均设为1500px(像素)。
③在时间轴第1帧和第12帧之间的任意一帧单击,然后在帧属性面板补间选项区,选择“形状”选项,创建形状动画。
1.3.2 矩形扩展①在场景中,按Ctrl+F8,新建一个影片剪辑元件,命名为“矩形”,单击确定,进入元件编辑窗口;选中矩形绘图工具,在舞台上绘制一任意大小的没有边框的矩形,单击工具箱中的选择工具,在矩形上单击选中该矩形,然后在属性面板中将其宽设为640 px(像素),高设为480px(像素),然后按F8,将其转换为图形元件,命名为“遮片”;按Ctrl+K打开对齐面板,点选“水平中齐”和“垂直中齐”标签,使该矩形位于舞台的中心。
qml 教程
qml 教程
qml是一种用于创建用户界面的声明式编程语言。
在本教程中,我们将学习如何使用qml来构建各种界面元素和交互功能。
首先,让我们来了解qml的基本语法。
qml由许多对象组成,
每个对象有一些属性和方法。
通过在qml文件中声明对象,
我们可以创建界面布局和定义界面行为。
下面是一个简单的qml代码示例:
```
import QtQuick 2.15
Rectangle {
width: 200
height: 200
color: "red"
Text {
text: "Hello, QML!"
font.pixelSize: 24
anchors.centerIn: parent
}
}
```
在这个示例中,我们创建了一个名为Rectangle的qml对象,
并设置了它的宽度、高度和颜色属性。
在Rectangle对象内部,我们又创建了一个Text对象,并设置了它的文本内容、字体
大小和位置。
通过运行这个qml代码,我们可以看到一个红色的矩形框,并在其中心显示了“Hello, QML!”的文本。
除了基本的界面布局,qml还提供了丰富的交互功能。
例如,我们可以使用鼠标和键盘事件来处理用户输入,使用动画和过渡效果来创建平滑的界面动态效果,使用qml中的状态来管理界面的不同视图。
总结起来,qml是一个功能强大且易于学习的界面设计语言。
在接下来的教程中,我们将深入探讨qml的各种特性,并学习如何创建复杂的用户界面。
QML界面切换的几种方法(带示例代码)
QML界⾯切换的⼏种⽅法(带⽰例代码)QML 开发客户端应⽤,避不可免要进⾏界⾯切换,例如从登录界⾯跳转到主界⾯。
⽹上看了下多篇博客,都⽐较简陋不是很详细,不太好进⾏参考,所以决定⾃⼰参考这些博客,总结⼀下⼏种界⾯切换的⽅法。
先看下效果:静态⼀、隐藏法本质上各页⾯都存在,只是某些隐藏,某些显⽰,当某⼀触发条件满⾜时,设置对应页⾯的显⽰和隐藏。
main.qml------------------------------------import QtQuick 2.9import QtQuick.Window 2.2Window {visible: truewidth: 640height: 480title: qsTr("Hello World")// 主页⾯⼀开始设置"隐藏",登录成功后才显⽰MainPage {id: mainPagewidth: 500height: 350visible: false // 设置"隐藏"anchors.centerIn: parent}LoginPage {id: loginPagewidth: 300height: 200anchors.centerIn: parent}}LoginPage.qml------------------------------------import QtQuick 2.0import QtQuick.Controls 2.3Rectangle {width: 400height: 300color: "#051f58"radius: 8Button {text: "登录页⾯-登录按钮"anchors.centerIn: parentonClicked: {loginPage.visible = falsemainPage.visible = true}}}MainPage.qml------------------------------------import QtQuick 2.0import QtQuick.Controls 2.3Rectangle {color: "#498ff8"radius: 8Button {text: "主页⾯-返回按钮"anchors.centerIn: parentonClicked: {loginPage.visible = truemainPage.visible = false}}}⼆、利⽤ StackView、SwipeView参考:动态⼀、使⽤Loader动态加载QML组件Loader 元素⽤来动态加载可见的 QML 组件,它可以加载⼀个 QML ⽂件(使⽤ source 属性)或者⼀个组件对象(使⽤ sourceComponent 属性)。
QML非常经典的代码
1.介绍QML是一种描述语言,主要是对界面效果等的一种描述,它可以结合javaScript来进行更复杂的效果及逻辑实现。
比如做个游戏,实现一些更有趣的功能等2.简单的例子import Qt 4.7Rectangle{width:200height:200color:"blue"}代码是绘制一个蓝色的矩形,宽200高200,import包含一个qt4.7的包3.基本元素的介绍(自己翻译意思会有出入,敬请见谅)基本可视化项Item基本的项元素在QML中所有可视化的向都继承他Rectangle基本的可视化矩形元素Gradient定义一个两种颜色的渐变过程GradientStop定义个颜色,被Gradient使用Image在场景中使用位图BorderImage(特殊的项)定义一张图片并当做边界AnimatedImage为播放动画存储一系列的帧Text在场景中使用文本TextInput显示可编辑为文本IntValidator int验证器DoubleValidator double验证器RegExpValidator验证字符串正则表达式TextEdit显示多行可编辑文本基本的交互项MouseArea鼠标句柄交互FocusScope键盘焦点句柄Flickable提供一种浏览整张图片的一部分的效果,具体看例子Flipable提供一个平面,可以进行翻转看他的前面或后面,具体看例子状态State定义一个配置对象和属性的集合PropertyChanges使用一个State描述属性的改变StateGroup包含一个状态集合和状态变换ParentChange重新定义父集,也就是换个父节点AnchorChanges在一个状态中改变anchors动画和变换Behavior默认的属性变换动画SequentialAnimation对定义的动画串行播放ParallelAnimation对定义的动画并行播放PropertyAnimation属性变换动画NumberAnimation对实数类型属性进行的动画Vector3dAnimation对QVector3d进行的属性ColorAnimation颜色进行的变换动画RotationAnimation对旋转进行的变换动画ParentAnimation对父节点进行变换的动画,改变绑定的父节点AnchorAnimation对anchor进行改变的动画PauseAnimation延迟处理SmoothedAnimation允许属性平滑的过度SpringAnimation一种加速的效果PropertyAction允许在动画过程中对属性的直接改变ScriptAction允许动画过程中调用脚本Transition在状态变换中加入动作变化工作中的数据Binding在创建的时候绑定一些数据到一些属性ListModel定义链表数据ListElement定义ListModel的一个数据项VisualItemModel包含可视化项(visual items)到一个view中,相当是一个容器VisualDataModel包含一个model和一个delegate,model包含需要的数据,delegate设计显示的项的信息,具体的去看例子Package他的目的是把VisualDataModel共享给多个view,具体还要学习XmlListModel特殊的一个模式使用XPath表达式,使用xml来设置元素,参考例子XmlRole XmlListModel的一个特殊的角色试图ListView提供一个链表显示模型试图GridView提供一个网格显示模型试图PathView提供一个内容沿着路径来显示的模型Path定义一个PathView使用的轨迹PathLine定义一个线性的轨迹PathQuad定义一个二次贝塞尔曲线的轨迹PathCubic定义一个三次贝塞尔曲线的轨迹PathAttribute允许绑定一个属性上,具体看例子PathPercent修改item分配的轨迹不是很明了其中的意思WebView允许添加网页内容到一个canvas上定位器Column整理它的子列(纵)Row整理它的子行(横)Grid设置它的子到一个网格上Flow目的是不让他的子项重叠在一起实用Connections明确连接信号和信号句柄Component封装QML items想一个组件一样Timer提供时间触发器QtObject基本的元素只包含objectName属性Qt qml全局Qt object提供使用的枚举和函数WorkerScript允许在QML使用线程Loader控制载入item或组件Repeater使用一个模型创建多个组件SystemPalette为Qt palettes提供一个通道FontLoader载入字体根据名字或URLLayoutItem允许声明UI元素插入到qtGraphicsView布局中变换Scale分派item缩放行为Rotation分派item旋转行为Translate分派item移动行为4.基本元素的使用例子1. 位置是0,0宽高分别是200Item {x: 0; y: 0;width: 200; height: 200;}2. 位置是:0,0宽高分别是200,颜色是红色Rectangle {x: 0; y: 0;width: 200; height: 200;color: "red"}3.分别在总高度的0颜色红色总高度的1/3黄色总高度的1是绿色Rectangle{width:100;height:100gradient:Gradient{GradientStop{position:0.0;color:"red"}GradientStop{position:0.33;color:"yellow"}GradientStop{position:1.0;color:"green"}}}4.设置一张图片Image {source: "../Images/button1.png"}5.他将一张图片分成9部分当图片进行缩放的时候A.1 3 7 9位置的都不会进行缩放B. 2 8将根据属性horzontalTileMode进行缩放C.4 6将根据属性verticalTileMode进行缩放D.5将根据属性horzontalTileMode和verticalTileMode进行缩放BorderImage {width: 180; height: 180//分割1~9块的4个点是根据border设置的坐标来实现的//本别是距离坐标上边右边下边的距离border { left: 30; top: 30; right: 30; bottom: 30 }horizontalTileMode: BorderImage.StretchverticalTileMode: BorderImage.Stretchsource: "../Images/button1.png"}6.主要用于播放gif图片Rectangle {width: animation.width; height: animation.height + 8AnimatedImage { id: animation; source: "animation.gif" }Rectangle {property int frames: animation.frameCountwidth: 4; height: 8x: (animation.width - width) * animation.currentFrame / framesy: animation.heightcolor: "red"}}7.显示文本(具体的其他设置请看文档)Text{text:"text"}8.下面是设置一个输入文本框,框中的字符串是Text,并设置鼠标可以选择文本TextInput{text:"Text"selectByMouse:true;//鼠标可以选择}9.int型验证器,和输入框结合后就是只能输入整型数据TextInput{//最高可以输入100,最低输入10IntValidator{id:intval;bottom:10;top:100;}width:100;height:20;text:"";//使用校验器validator:intval;}10.只能输入浮点数TextInput{//最高可以输入100,最低输入10decimals最多有多少位小数//notation表示是使用科学计数法还是(默认),还是直接的小数当获取里面的数据DoubleValidator{id:intval;decimals:4;bottom:10;top:100;notation:Double Validator.StandardNotation}width:100;height:20;text:"";//使用校验器validator:intval;}11.使用正则表达式TextInput{//使用一个正则表达式来控制输入的字符串///^[a-zA-Z]{1}[0-1]{0,2}[a-z]{1,3}$/表示开始位置必须是一个大写或小写字母//接下来是0~2个的数字而且是0或1,在接下来是1~3个的小写字母RegExpValidator{id:intval;regExp:/^[a-zA-Z]{1}[0-1]{0,2}[a-z]{1,3}$/;}width:100;height:20;text:"";//使用校验器validator:intval;}12.显示一段hello world的html文本和相同TextEdit {width: 240text: "<b>Hello</b><i>World!</i>"font.family: "Helvetica"font.pointSize: 20color: "blue"focus: true}13.主要是用来判断鼠标事件的区域Rectangle{x: 0; y: 0;width: 100; height:100;Rectangle{id: mousrectx: 20; y: 20;width: 20; height: 20;color: "blue"MouseArea{//使用父的区域作为鼠标判断的区域及x:20;y:20;width:20;height:20;anchors.fill: parent;//但鼠标按下后mousrect变成红色,当鼠标松开后变成蓝色onPressed: { mousrect.color = "red";}onReleased: { mousrect.color = "blue";}}}}14.不是很清楚说的什么,好像是说同一个时刻只有一个item有焦点15.显示一个200x200的框,框中显示图片上200x200的部分Flickable {width: 200; height: 200//设置使用图片的宽高,而现实的是200x200的现实框contentWidth: image.width; contentHeight: image.heightImage { id: image; source: "../Images/need.png" }}16.包含两个面,一个前面,一个后面,实现一个控件前后的翻转效果,并且在后面可以添加一些控制Flipable {id: flipablewidth: 240height: 240property int angle: 0property bool flipped: falsefront: Image { source: "front.png" } //前面back: Image { source: "back.png" } //后面//旋转动画前后面交换transform: Rotation {origin.x: flipable.width/2; origin.y: flipable.height/2axis.x: 0; axis.y: 1; axis.z: 0 //rotate around y-axisangle: flipable.angle}states: State {name: "back"PropertyChanges { target: flipable; angle: 180 }when: flipable.flipped}transitions: Transition {NumberAnimation { properties: "angle"; duration: 1000 }}MouseArea {anchors.fill: parentonClicked: flipable.flipped = !flipable.flipped}}17.//当鼠标按下后改变myRect的颜色Rectangle {id: myRectwidth: 100; height: 100color: "black"MouseArea {id: mouseAreaanchors.fill: parentonClicked: myRect.state == 'clicked' ? myRect.state = "" : myRect.state = 'clicked';}//设置状态states: [State {name: "clicked"PropertyChanges { target: myRect; color: "red" }18.//当鼠标按下后改变状态//状态里面的属性改变包含了文本和颜色的改变Text {id: myTextwidth: 100; height: 100text: "Hello"color: "blue"states: State {name: "myState"//当这个状态被设置的时候,将改变myText的文本和颜色PropertyChanges {target: myTexttext: "Goodbye"color: "red"}}MouseArea { anchors.fill: parent; onClicked: myText.state = 'myState' } 19.一个状态组中可以包含很多的状态和变化,而状态也可以和变换绑定.20.在状态中可以对脚本中的函数进行调用// Sc.jsfunction changeColor() //返回蓝色{return "blue";}// test.qmlimport"Sc.js" as CodeRectangle{id: rectwidth: 50; height: 50color: "red"MouseArea {anchors.fill: parentonClicked: rect.state = "first" //鼠标按下改变状态}states: State {name: "first"; StateChangeScript{name: "myScript";script: rect.color = Code.changeColor();21.把指定的item换一个item父节点Item {width: 200; height: 100Rectangle {id: redRectwidth: 100; height: 100color: "red"}//本来blueRect的父节点是Item当鼠标按下后他被设置到redRect上Rectangle {id: blueRectx: redRect.widthwidth: 50; height: 50color: "blue"states: State {name: "reparented"//改变父节点ParentChange { target: blueRect; parent: redRect; x: 10; y: 10 }}MouseArea { anchors.fill: parent; onClicked: blueRect.state = "reparented" } }}22.Rectangle {width: 120; height: 120color: "black"Rectangle { id: myRect; width: 50; height: 50; color: "red" }states: State {name: "reanchored"AnchorChanges { //改变myRect的anchors属性target: myRectanchors.top: window.topanchors.bottom: window.bottom}PropertyChanges {target: myRectanchors.topMargin: 10anchors.bottomMargin: 10}}//鼠标事件MouseArea { anchors.fill: parent; onClicked: window.state = "reanchored" }23Rectangle {id: rectwidth: 100; height: 100color: "red"//针对宽度的动画Behavior on width {NumberAnimation { duration: 1000 }}anchors.fill: parentonClicked: rect.width = 50}24.串行播放多个动画Rectangle {id: rect1width: 500; height: 500Rectangle{id: rect;color: "red"width: 100; height: 100//串行播放多个动画,先横向移动,在纵向移动SequentialAnimation{running: true;NumberAnimation {target:rect; properties:"x"; to: 50; duration: 1000 } NumberAnimation {target:rect; properties:"y"; to: 50; duration: 1000 } }25.Rectangle {id: rect1width: 500; height: 500Rectangle{id: rect;color: "red"width: 100; height: 100//并行播放动画,同时横向和纵向移动ParallelAnimation{running: true;NumberAnimation {target:rect; properties:"x"; to: 50; duration: 1000 } NumberAnimation {target:rect; properties:"y"; to: 50; duration: 1000 }}}}26.Rectangle {id: rectwidth: 100; height: 100color: "red"states: State {name: "moved"PropertyChanges { target: rect; x: 50 }}transitions: Transition {//属性动画这里是当属性x或y发生变化的时候,就播放这样一个动画PropertyAnimation { properties: "x,y"; easing.type: Easing.InOutQuad }MouseArea{anchors.fill: parent;onClicked: rect.state = "moved";}}27.Rectangle {width: 100; height: 100color: "red"//对当前item的x进行移动,目标移动到x=50 NumberAnimation on x { to: 50; duration: 1000 } }28.29.颜色的过度Rectangle {width: 100; height: 100color: "red"ColorAnimation on color { to: "yellow"; duration: 1000 }}30.默认是绕z轴进行的旋转Item {width: 300; height: 300Rectangle {id: rectwidth: 150; height: 100; anchors.centerIn: parentcolor: "red"smooth: truestates: State {name: "rotated"; PropertyChanges { target: rect; rotation: 180 }transitions: Transition {RotationAnimation { duration: 1000; direction: RotationAnimation.Counterclockwise }}}MouseArea { anchors.fill: parent; onClicked: rect.state = "rotated" } }31.一个切换父节点的动画,平滑的过度Item{width:200;height:100Rectangle{id:redRectwidth:100;height:100color:"red"}Rectangle{id:blueRectx:redRect.widthwidth:50;height:50color:"blue"states:State{name:"reparented"ParentChange{target:blueRect;parent:redRect;x:10;y:10}}transitions:Transition{ParentAnimation{NumberAnimation{properties:"x,y";duration:1000}}}MouseArea{anchors.fill:parent;onClicked:blueRect.state="reparented"} }}32.Item{id:containerwidth:200;height:200Rectangle{id:myRectwidth:100;height:100color:"red"}states:State{name:"reanchored"AnchorChanges{target:myRect;anchors.right:container.right}transitions:Transition{//smoothlyreanchormyRectandmoveintonewpositionAnchorAnimation{duration:1000}}//当控件加载完成后Component.onCompleted:container.state="reanchored"}33.延迟效果Item {id: containerwidth: 200; height: 200Rectangle {id: myRectwidth: 100; height: 100color: "red"SequentialAnimation {running: true;NumberAnimation {target: myRect;to: 50; duration: 1000; properties: "x"; } PauseAnimation { duration: 5000 } //延迟100毫秒NumberAnimation {target: myRect; to: 50; duration: 1000; properties: "y"; } }}34.平滑过度Rectangle {width: 800; height: 600color: "blue"Rectangle {width: 60; height: 60x: rect1.x - 5; y: rect1.y - 5color: "green"Behavior on x { SmoothedAnimation { velocity: 200 } } Behavior on y { SmoothedAnimation { velocity: 200 } } }Rectangle {id: rect1width: 50; height: 50color: "red"}focus: trueKeys.onRightPressed: rect1.x = rect1.x + 100 Keys.onLeftPressed: rect1.x = rect1.x - 100Keys.onUpPressed: rect1.y = rect1.y - 100Keys.onDownPressed: rect1.y = rect1.y + 100}35.平滑的过度过程,在动画结束的时候有种弹性的效果Item {width: 300; height: 300Rectangle {id: rectwidth: 50; height: 50color: "red"Behavior on x { SpringAnimation { spring: 2; damping: 0.2 } } Behavior on y { SpringAnimation { spring: 2; damping: 0.2 } } }MouseArea {anchors.fill: parentonClicked: {rect.x = mouse.x - rect.width/2rect.y = mouse.y - rect.height/2}}36.主要是在动画过程中直接的改变一个属性transitions:Transition{...PropertyAction{target:theImage;property:"smooth";value:true} ...}38.在动画过程中嵌入脚本的调用SequentialAnimation {NumberAnimation { ... }ScriptAction { script: doSomething(); }NumberAnimation { ... }}39.Rectangle {id: rectwidth: 100; height: 100color: "red"MouseArea {id: mouseAreaanchors.fill: parent}states: State {name: "moved"; when: mouseArea.pressedPropertyChanges { target: rect; x: 50; y: 50 }}transitions: Transition {NumberAnimation { properties: "x,y"; easing.type: Easing.InOutQuad } }}40.Item {width: 300; height: 300Text {id: app; text: "xxxfa"}TextEdit { id: myTextField; text: "Please type here..." }//把myTextField和app的enteredText属性进行绑定Binding { target: app; property: "enteredText"; value: myTextField.text } }41.直接看效果Rectangle{width:200;height:200ListModel{id:fruitModelListElement{name:"Apple"cost:2.45}ListElement{name:"Orange"cost:3.25}ListElement{name:"Banana"cost:1.95}}Component{id:fruitDelegateRow{spacing:10Text{text:name}Text{text:'$'+cost}}}ListView{anchors.fill:parent model:fruitModel delegate:fruitDelegate }}42.请参照43.把可视化图元添加到链表试图Rectangle {width: 100; height: 100;VisualItemModel {id: itemModelRectangle { height: 30; width: 80; color: "red" } Rectangle { height: 30; width: 80; color: "green" } Rectangle { height: 30; width: 80; color: "blue" } }ListView {anchors.fill: parentmodel: itemModel}}44.看下面效果Rectangle {width: 200; height: 100VisualDataModel {id: visualModelmodel: ListModel {ListElement { name: "Apple" }ListElement { name: "Orange" } }delegate: Rectangle { height: 25width: 100Text { text: "Name:" + name} }}ListView {anchors.fill: parentmodel: visualModel}}45.具体请参考declarative/modelviews/package 46.从网络获取xml,暂时没有测试成功47.参考48.看效果Rectangle {width: 200; height: 400;ListModel {id: fruitModelListElement {name: "Apple"cost: 2.45}ListElement {name: "Orange"}ListElement {name: "Banana"cost: 1.95}}GridView {anchors.fill: parent model: fruitModel delegate: Column{Text {text:"name" + name} Text {text:"cost"+ cost}}}}49.看例子width:200;height:400;ListModel{id:fruitModelListElement{name:"Apple"cost:2.45}ListElement{name:"Orange"cost:3.25}ListElement{name:"Banana"cost:1.95}}PathView{anchors.fill:parentmodel:fruitModeldelegate:Column{Text{text:"name"+name}Text{text:"cost"+cost}}path:Path{startX:120;startY:100PathQuad{x:120;y:25;controlX:260;controlY:75} PathQuad{x:120;y:100;controlX:-20;controlY:75}}}}50.具体的看运行的例子Rectangle{width:200;height:400; ListModel{id:fruitModel ListElement{ name:"Apple"cost:2.45}ListElement{ name:"Orange" cost:3.25}ListElement{name:"Banana"cost:1.95}}PathView{anchors.fill:parent model:fruitModel delegate:Column{Text{text:"name"+name} Text{text:"cost"+cost}}path:Path{startX:150;startY:120 PathLine{x:200;y:80;} PathLine{x:100;y:80;} PathLine{x:150;y:120;} }}}51.参考52.还要看53.可以直接针对一些属性进行改变Rectangle{width:200;height:400; ListModel{id:fruitModelListElement{ name:"Apple"cost:2.45}ListElement{ name:"Orange"cost:3.25}ListElement{ name:"Banana"cost:1.95}}PathView{anchors.fill:parentmodel:fruitModeldelegate:Item{id:delitem;width:80;height:80;Column{//这里使用图片试试Rectangle{width:40;height:40;scale:delitem.scale;color:"red"}Text{text:"name"+name}Text{text:"cost"+cost}}}//path:Path{startX:120;startY:100PathAttribute{name:"Scale";value:1.0} PathQuad{x:120;y:25;controlX:260;controlY:75} PathAttribute{name:"Scale";value:0.3} PathQuad{x:120;y:100;controlX:-20;controlY:75} }}}54.具体请看QML文档55.import QtWebKit 1.0 WebView {url: "" preferredWidth: 490 preferredHeight: 400 scale: 0.5smooth: false}56横向排列Rectangle{width: 100; height: 100;//纵向排列Column {spacing: 2Rectangle { color: "red"; width: 50; height: 50 } Rectangle { color: "green"; width: 20; height: 50 } Rectangle { color: "blue"; width: 50; height: 20 } }}57Rectangle{width: 100; height: 100;//横向排列Row {spacing: 2Rectangle { color: "red"; width: 50; height: 50 } Rectangle { color: "green"; width: 20; height: 50 } Rectangle { color: "blue"; width: 50; height: 20 } }}58Rectangle{width:100;height:100;//网格排列Grid{columns:3spacing:2Rectangle{color:"red";width:50;height:50} Rectangle{color:"green";width:20;height:50} Rectangle{color:"blue";width:50;height:20} Rectangle{color:"cyan";width:50;height:50} Rectangle{color:"magenta";width:10;height:10} }}59Rectangle{width: 100; height: 100;//网格排列Flow {spacing: 2width: 100; height: 100;Rectangle { color: "red"; width: 50; height: 50 }Rectangle { color: "green"; width: 20; height: 50 } Rectangle { color: "blue"; width: 50; height: 20 }Rectangle { color: "cyan"; width: 50; height: 50 }Rectangle { color: "magenta"; width: 10; height: 10 }}}60下面是3中情况下会使用的,具体的不好翻译Multiple connections to the same signal are required有多个连接要连接到相同的信号时Creating connections outside the scope of the signal sender 创建的连接在范围之外Connecting to targets not defined in QML创建的连接没有在QML中定义的Rectangle{width: 100; height: 100;MouseArea {id: areaanchors.fill: parent;}Connections {target: areaonClicked: { console.log("ok");}}}61组件是可以重用的QML元素,具体还是看QML的文档翻译不是很好Item {width: 100; height: 100//定义一个组件他包含一个10x10的红色矩形Component {id: redSquareRectangle {color: "red"width: 10height: 10}}//动态的载入一个组件Loader { sourceComponent: redSquare }Loader { sourceComponent: redSquare; x: 20 }}62Item {width: 200; height: 40;//和QTimer差不多Timer {interval: 500; running: true; repeat: trueonTriggered: time.text = Date().toString() //使用javascript获取系统时间}Text { id: time }}63他是不可见的只有objectName一个属性通过这个属性我们可以在c++中找到我们想要的对象//MyRect.qmlimport Qt4.7Item{width:200;height:200Rectangle{anchors.fill:parentcolor:"red"objectName:"myRect"}}//main.cppQDeclarativeViewview;view.setSource(QUrl::fromLocalFile("MyRect.qml"));view.show();QDeclarativeItem*item=view.rootObject()->findChild<QDeclarativeItem*>("my Rect");if(item)item->setProperty("color",QColor(Qt::yellow));64提供全局有用的函数和枚举,具体的看QML文档65.使用它可以把操作放到一个新的线程中,使得它在后台运行而不影响主GUI 具体可以看QML中它的文档66.可以参考还有QML中的文档67他可以创建很多相似的组件,QML中还有几个例子Row {Repeater {model: 3Rectangle {width: 100; height: 40border.width: 1color: "yellow"}}}68具体看效果和文档Rectangle{SystemPalette{id:myPalette;colorGroup:SystemPalette.Active} width:640;height:480color:myPalette.windowText{anchors.fill:parenttext:"Hello!";color:myPalette.windowText}}69.载入一种字体,可以是网络上的,也可以是本地的Column {FontLoader { id: fixedFont; name: "Courier" }FontLoader { id: webFont; source: "/myfont.ttf" } Text { text: "Fixed-size font"; font.family: }Text { text: "Fancy font"; font.family: }}70不清楚71对缩放的控制Rectangle {width: 100; height: 100color: "blue"Rectangle{x: 50; y: 50;width: 20; height: 20;color: "red"//这里是在当前矩形的中间位置沿x轴进行3倍缩放transform: Scale { origin.x: 10; origin.y: 10; xScale: 3}}72Rectangle {width: 100; height: 100color: "blue"//绕位置25,25旋转45度transform: Rotation { origin.x: 25; origin.y: 25; angle: 45} }73Row {Rectangle {width: 100; height: 100color: "blue"//沿y轴正方向移动20个像素transform: Translate { y: 20 }Rectangle {width: 100; height: 100color: "red"//沿y轴负方向移动20个像素transform: Translate { y: -20 }。
从头学QtQuick(3)--用QML写一个简单的颜色选择器
从头学QtQuick(3)--⽤QML写⼀个简单的颜⾊选择器先看⼀下效果图:实现功能:点击不同的⾊块可以改变⽂字的颜⾊。
实现步骤:⼀、创建⼀个默认的Qt Quick⼯程:⼆、添加⽂件Cell.qml这⼀步主要是为了实现⼀个⾃定义的组件,这个组件就是我们看到的那个⾊块,很明显定义成组件可以则兼UI的复⽤。
1import QtQuick 2.023Item {4 id: container;5 property alias cellColor: rectangle.color;6 signal clicked(color cellColor);789 width:40;10 height:25;1112 Rectangle {13 id: rectangle;14 border.color: "white";15 anchors.fill: parent;16 }1718 MouseArea {19 anchors.fill: parent;20 onClicked: container.clicked(container.cellColor)21 }2223}View Code我们组件的根元素是⼀个id名为 container的Item。
Item是⼀个最基本的可视元素并经常⽤作其它元素的容器,这个Cell⽂件相当于⼀个⾃定义组件,⾃定义组件只能有⼀个根容器,组件名通常采⽤和Java定义公共类相同的规则。
1property alias cellColor: rectangle.color;声明⼀个cellColor属性,这个属性是从我们组件外访问的,允许我们使⽤不同的颜⾊来实例化单元格,该属性只是对现存的属性使⽤了⼀个别名,相当于我们为这个Cell组件定义了⼀个属性,⽽这个属性就是Rectangle组件的颜⾊属性的引⽤。
signal clicked(color cellColor);定义了⼀个信号,出发这个信号的条件是:MouseArea { anchors.fill: parent; onClicked: container.clicked(container.cellColor) }也就是点击整个组件,信号会带⼀个color类型的参数,传递给捕获信号的地⽅。
- 1、下载文档前请自行甄别文档内容的完整性,平台不提供额外的编辑、内容补充、找答案等附加服务。
- 2、"仅部分预览"的文档,不可在线预览部分如存在完整性等问题,可反馈申请退款(可完整预览的文档不适用该条件!)。
- 3、如文档侵犯您的权益,请联系客服反馈,我们会尽快为您处理(人工客服工作时间:9:00-18:30)。
QML学习实例–图片切换效果源代码因为近期参加了QML的学习总结了一些学习代码因为时间不长1个星期左右只是最肤浅的一些有一起学习的可以联系qq :593751685 验证消息:qml//是调试时候用的。
所有程序的界面大小都是640 360这个附件是部分源代码+图片(还有main button等qml,这个是为了演示弄的,就没加进去)1.水平平移import Qt 4.7Rectangle{width:360;height:630Image{id:frontsource:"1.png"Image{id:backsource:"2.png"//PropertyAnimation on x{to:360;duration:1000;loops: Animation.Infinite}//PropertyAnimation on y{to:630;duration:1000;loops: Animation.Infinite}SequentialAnimation on x{id:animation2running:falseNumberAnimation{to:360;duration:1000}}}MouseArea{anchors.fill:parentonClicked:animation2.running=true}}}2.垂直平移import Qt 4.7Rectangle{width:360;height:630Image{id:frontsource:"1.png"Image{id:backsource:"2.png"//PropertyAnimation on x{to:360;duration:1000;loops: Animation.Infinite}//PropertyAnimation on y{to:630;duration:1000;loops: Animation.Infinite}SequentialAnimation on y{id:animation2running:falseNumberAnimation{to:630;duration:1000}}}MouseArea{anchors.fill:parentonClicked:animation2.running=true}}}3.地震效果import Qt 4.7Rectangle{width:360;height:630Image{id:frontsource:"1.png"Image{id:backsource:"2.png"MouseArea{anchors.fill:parent;onClicked: {animation1.running=true;animation2.running=true;Component.onCompleted=back.destroy(1000)}}SequentialAnimation on x{running:falseid:animation1loops:50PropertyAnimation{easing.type:Easing.InOutElastic;to:8;duration:10}PropertyAnimation{easing.type:Easing.OutInElastic;to:0;duration:10}}SequentialAnimation on y{id:animation2running:falseloops:50PropertyAnimation{easing.type: Easing.InOutBounce;to:8;duration:10}PropertyAnimation{easing.type: Easing.OutInBounce;to:0;duration:10}}}}}4.左下飞出import Qt 4.7Rectangle{width:360;height:630Image{id:frontsource:"1.png"Image{id:backsource:"2.png"MouseArea{anchors.fill:parent;onClicked:{animation1.running=true;animation2.running=true;Component.onCompleted=back.destroy(1000)}}SequentialAnimation on x{running:falseid:animation1PropertyAnimation{to:360;easing.type: Easing.InOutBack;duration:1000;loops:Animation.Infinite}}SequentialAnimation on y{id:animation2running:falsePropertyAnimation{to:630;easing.type: Easing.InOutBack;duration:1000;loops:Animation.Infinite}}}}}5.左翻页import Qt 4.7Rectangle{id:rectwidth:360;height:630Image{id:frontsource:"1.png"Image{id:backsource:"2.png"Behavior on width{NumberAnimation{easing.type: Easing.InOutElastic;duration:1000}}MouseArea{anchors.fill:parentonClicked:back.width=0}}}}6.上翻页import Qt 4.7Rectangle{id:rectwidth:360;height:630Image{id:frontsource:"1.png"Image{id:backsource:"2.png"Behavior on height{NumberAnimation{easing.type: Easing.InOutElastic;duration:1000}}MouseArea{anchors.fill:parentonClicked:back.height=0}}}}7.旋转360度后消失import Qt 4.7Rectangle{id:rectwidth:360;height:630Image{id:frontsource:"1.png"Image{id:backsource:"2.png"states:State{name:"rotated";PropertyChanges{target:back;rotation:180}}RotationAnimation on rotation{id:animation2running:falseeasing.type:Easing.InOutBack;duration:900loops: 1from:0to:360}MouseArea{anchors.fill:parentonClicked:{animation2.running=true;back.state="rotated"Component.onCompleted=back.destroy(1000)}}}}}8.翻转180度import Qt 4.7Flipable {id: flipablewidth: 360; height: 630property int angle: 0property bool flipped: falsefront: Image { source: "1.png" }back: Image { source: "2.png" }transform: Rotation {origin.x: flipable.width/2; origin.y: flipable.height/2axis.x: 0; axis.y: 1; axis.z: 0 // rotate around y-axisangle: flipable.angle}states: State {name: "back"PropertyChanges { target: flipable; angle:180 }when: flipable.flipped}transitions: Transition {NumberAnimation { easing.type: Easing.InOutElastic;properties: "angle"; duration: 1000 }}MouseArea {anchors.fill: parentonClicked: flipable.flipped = !flipable.flipped}}9.龙卷风import Qt 4.7import bs.particles 1.0Rectangle{id:pagewidth:380;height:640Image{id:frontsource:"1.png"Image{id:backsource:"2.png"Particles{lifeSpan:1000;lifeSpanDeviation:600id:starsvisible:falsex:0;y:0;width:parent.width;height:parent.heightsource:"BBB.gif"angleDeviation:360velocity:0;velocityDeviation:0count:parent.width/10fadeInDuration:3000opacity:0.4z:10}MouseArea{anchors.fill:parent;onClicked:{stars.visible=true;Component.onCompleted=back.destroy(3000)}}//}}}10.泡泡import Qt 4.7import bs.particles 1.0Rectangle{id:pagewidth:380;height:640;color:"black"property bool explode:falseImage{id:frontsource:"1.png"Image{id:backsource:"2.png"MouseArea{anchors.fill:parent;onClicked:{stars.visible=true;stars1.visible=true;stars2.visible=trueComponent.onCompleted=back.destroy(5000)}}Particles{lifeSpan:1000;lifeSpanDeviation:600id:starsx:0;y:0;width:parent.width;height:parent.heightsource:"AAA.PNG"visible:falseangleDeviation:360velocity:100;velocityDeviation:30count:parent.width/20fadeInDuration:3000opacity: 1z:10}Particles{lifeSpan:1000;lifeSpanDeviation:600id:stars1x:0;y:0;width:parent.width;height:parent.heightsource:"AAA2.PNG"visible:falseangleDeviation:360velocity:70;velocityDeviation:20count:parent.width/30fadeInDuration:3000opacity: 1z:10}Particles{lifeSpan:1000;lifeSpanDeviation:600id:stars2x:0;y:0;width:parent.width;height:parent.heightsource:"AAA3.PNG"visible:falseangleDeviation:360velocity:50;velocityDeviation:10count:parent.width/40fadeInDuration:3000opacity: 1z:10}states:State{name:"exploding";when:explodeStateChangeScript{script:particles.burst(200);} }}}}11.下雪import Qt 4.7import bs.particles 1.0Rectangle{id:pagewidth:380;height:640;color:"black"Image{id:frontsource:"1.png"Image{id:backsource:"2.png"MouseArea{anchors.fill:parent;onClicked: {stars.visible=true;stars1.visible=true;stars2.visible= trueComponent.onCompleted=back.destroy(5000 )}}lifeSpan:10000;lifeSpanDeviation:1000id:starsx:0;y:0;width:parent.width;height:parent.heightsource:"111.PNG"emissionRate:30visible:falseangle:90angleDeviation:70velocity:50velocityDeviation:30count:parent.width/15opacity:0.3z:10ParticleMotionWander{xvariance:70pace:150}}Particles{lifeSpan:10000;lifeSpanDeviation:1000id:stars1x:0;y:0;width:parent.width;height:parent.heightsource:"222.PNG"visible:falseangle:90angleDeviation:70emissionRate:30velocity:50;velocityDeviation:30count:parent.width/15fadeInDuration:3000opacity:0.5z:10ParticleMotionWander{xvariance:80pace:150}}Particles{lifeSpan:10000;lifeSpanDeviation:1000id:stars2x:0;y:0;width:parent.width;height:parent.heightsource:"333.PNG"emissionRate:30angleDeviation:80visible:falsevelocity:50;velocityDeviation:30count:parent.width/15fadeInDuration:3000opacity:0.4z:10ParticleMotionWander{xvariance:80pace:150}}}}}12.下雨import Qt 4.7import bs.particles 1.0Rectangle{width:360height:630Image{id:frontsource:"1.png"Image{id:backsource:"2.png"MouseArea{anchors.fill:parent;onClicked: {stars.visible=true;stars1.visible= true;stars2.visible=trueComponent.onCompl eted=back.destroy(5000)}}Particles{id:starsvisible:falsewidth:parent.widthheight:300source:"shuidi.png"lifeSpan:900lifeSpanDeviation:300count:50angle:70angleDeviation:36velocity:30velocityDeviation:10ParticleMotionGravity{yattractor:2000xattractor:0acceleration:1000}RotationAnimation on rotation{easing.type:Easing.InOutBack;duration:10000loops:-1from:0to:30}}Particles{id:stars1visible:falsewidth:parent.widthheight:300source:"shuidi3.png"lifeSpan:900lifeSpanDeviation:400count:50angle:70angleDeviation:36velocity:30velocityDeviation:10ParticleMotionGravity{yattractor:2000xattractor:0acceleration:1000}RotationAnimation on rotation{easing.type:Easing.InOutBack;duration:10000loops:-1from:0to:30}}Particles{id:stars2visible:falsewidth:parent.widthheight:300source:"shuidi2.png"lifeSpan:900lifeSpanDeviation:500count:50angle:70angleDeviation:36velocity:30velocityDeviation:10ParticleMotionGravity{yattractor:2000xattractor:0acceleration:1000}RotationAnimation on rotation{easing.type: Easing.InOutBack;duration:10000loops:-1from:0to:30}}}}}13.玫瑰import Qt 4.7import bs.particles 1.0Rectangle{id:pagewidth:380;height:640;color:"black"Image{id:frontsource:"1.png"Image{id:backsource:"2.png"MouseArea{anchors.fill:parent;onClicked: {stars.visible=true;roc.running=true;be1.running=true;be2.running=true;//back.height=back.height*2//back.width=back.height*2Component.onCompleted=back.destroy(10000)}}Particles{id:starsvisible:falsex:0;y:0;width:parent.width;height:parent.heightsource:"rose.png"//angle:360//angleDeviation:360//velocity:0;velocityDeviation:0fadeInDuration:3000fadeOutDuration:1000//opacity:0.5emissionRate:30emissionVariance:1//width:1//height:1//source:"rose.png"lifeSpan:50000//lifeSpanDeviation:500count:10000rotation:10transform:Scale{origin.x:25;origin.y:25;xScale:1} angleDeviation:360velocity:0;velocityDeviation:0//count:parent.width/2//fadeInDuration:2800opacity: 1//angle:360//angleDeviation:450//velocity:50//velocityDeviation:50//ParticleMotionGravity{//yattractor:1//xattractor:1//acceleration:0}RotationAnimation on rotation{id:rocrunning:falseeasing.type:Easing.InOutBack;duration:50000loops:-1from:0to:360}NumberAnimation on width{id:be1running:false;target:back;properties:"width"; to:back.width*1;duration:100000}}NumberAnimation onheight{id:be2;running:false;target:back;properties:"height";to:back.width*1;duration:100000}}}14.星系import Qt 4.7import bs.particles 1.0Rectangle{width:360height:630Image{id:frontsource:"1.png"Image{id:back//x:360//y:630source:"2.png"MouseArea{anchors.fill:parent;onClicked:{stars.visible=true;stars1.visible=true;stars2.visible=truestars3.visible=true//xx.running=trueComponent.onComplete d=back.destroy(10000)}}Particles{anchors.centerIn:parent.Centervisible:falseid:starsy:315x:180source:"star.png"lifeSpan:5000emissionRate:1000count:20000angle:360angleDeviation:360velocity:-1velocityDeviation:1000fadeInDuration:500fadeOutDuration:500}Particles{anchors.centerIn:parent.Centerid:stars1visible:falsey:315x:180width:10height:10source:"bluestar.png"lifeSpan:5000emissionRate:1000count:2000angle:360angleDeviation:360velocity:-1velocityDeviation:800fadeInDuration:500fadeOutDuration:500RotationAnimation on rotation{easing.type:Easing.InOutBack;duration:10000loops:-1from:0to:360}}Particles{anchors.centerIn:parent.Centerid:stars2visible:falsey:315x:180width:10height:10source:"greenstar.png"lifeSpan:5000emissionRate:1000count:2000angle:360angleDeviation:360velocity:-1velocityDeviation:800fadeInDuration:500fadeOutDuration:500RotationAnimation on rotation{easing.type:Easing.InOutBack;duration:10000loops:-1from:0to:360}}Particles{anchors.centerIn:parent.Centerid:stars3visible:falsey:315x:180width:10height:10source:"pstar.png"lifeSpan:5000emissionRate:1000count:2000angle:360angleDeviation:360velocity:-1velocityDeviation:800fadeInDuration:500fadeOutDuration:500RotationAnimation on rotation{easing.type:Easing.InOutBack;duration:10000loops:-1from:0to:360}}ParallelAnimation{id:xxrunning:falseNumberAnimation{id:be1;target:back;properties:"width"; to:back.width*10;duration:1000}NumberAnimation{id:be2;target:back;properties:"height"; to:back.height*10;duration:1000}NumberAnimation{id:be5;properties:"rotation";from:0; to:1300;duration:1000}NumberAnimation{id:be3;target:back;properties:"y"; to:-315;duration:1000}NumberAnimation{id:be4;target:back;properties:"x";to:-180;duration:1000}}}}}。