Rockbox_通行说明
洛雷克Eco BLAcKBox系列产品说明书

LH010 Eco BLAcKBoX SeriesVIEW ON TABLET, SMARTPHONE, PC & MAC 24/7 RELIABLE RECORDINGAFFORDABLE PEACE OF MINDiPhone ®iPad ®REMoTE coNNEcTIVITY & coMPATIBILITY*SUPER-RESSERIES8cHANNELS 4 oR8cAMERAS 500 GB oR 1TB 600TVL RESoLUTIoN 90/66FT NIGHT VISIoNWATcH oVER YoUR WoRLDFROM ANYWHERE IN THE WORLDMoBILE SURVEILLANcEConnect and view your system on the go with your Tablet or Smartphone over a 3G/4G or WiFi network.†SIMPLE YET ADVANcEDRecord on a surveillance grade hard drive, designed for 24/7 operation providing weeks or even months of reliable recording.1SIMULTANEoUS MoNIToR VIEWING Connect to a TV, PC, or CCTV monitors with industry standard VGA & BNC inputs.EASY SYSTEM NAVIGATIoNIntuitive menu options with simple icons allow for fast and efficient DVR programming.•H.264 video compression. D1 capable1 •Real time recording @ (360x240)•Pentaplex operation - View, Record, Playback, Back Up & Remotely control the system simultaneously•24/7 100% Duty cycle hard drive pre-installed •PTZ camera (not included) supported via RS485 •Exclusive LOREX Easy Connect Internet Set-up Wizard 2 •Instant Mobile Viewing on compatible Smart phones & Tablets† •PC and Mac Compatible (Internet Explorer & Safari browsers)†•Free LOREX DDNS (Dynamic Domain Name Service) for advanced remote connectivity at all times•Instant email alerts with snap shot attachment•Accurate Time Stamps with NTP & Daylight Savings TimeDIGITAL VIDEo REcoRDER:LH010 Eco BLAcKBoX Series•Super Resolution with enhanced optics•BrightNight Viewing with enhanced lowlight image sensor•Night Vision up to 90/66ft (28/20m) away 3•Anti-glare feature ensures clear images under strong lighting conditions•Accurate colours with Lorex’s automatic light filtering technology• 3.6mm wide-angle lens captures a 78° Field of View (diagonal) 4•Vandal resistant design with cable pass through mounting bracket•Weatherproof housing for indoors & outdoor installation (IP66) 5•Versatile mounting options: ceiling, counter or wall mountableFEATURESTRUE coLoRSSee accurate colors with Lorex’s automatic light filtering technology.VANDAL RESISTANT DESIGNProtective cable pass-through bracket and metal housing.VIEW YOUR WORLD -IN SUPER RESOLUTION.CLEAR VIDEO DAY AND NIGHTVIEW WITH BRIGHT-NIGHTWEATHERPROOF HOUSINGA SUPER RESoLUTIoN PERSPEcTIVEView your world with improved detail, sharpness, and clarity day and night.Ambient Lighting Total Darkness90FT66FTANTI-GLAREcoLoR REPRoDUcTIoNTypicalCameraAccurate colors with InfraredFilter TechnologyTypicalCameraAnti-glareTechnologycoNNEcTIVITY Easy ConnectLorex Auto Port Forward WizardSupported Operating Systems 4/8/16 ch: Windows ™ XP , Vista, 74/8/16 ch: Mac OSX Snow Leopard 10.6 or above BrowsersInternet Explorer & Safari 6.0Email notification T ext with snapshotInstant Smart Phone Compatibility† Smart Phone & T ablet Compatibility: iPad ®, iPhone ®, BlackBerry (supported model numbers: 9000, 9700, 9800), Android (version 1.5 & above), Windows Mobile (6.0, 6.5), Symbian 3rd & 5th generation phones.DDNSFree Lorex DDNSSystem Configuration Full setup configuration over network PortsProgrammable by UserNetwork Protocol TCP/IP / DHCP / UDP / DDNS / PPPoE Network Interface 10/100-Base-TX, RJ-45 Network Speed Control 48Kb ~ 8MB/sec.GENERAL Power Consumption4/8/16 ch: Approx. 15 watts (HDD Pre-installed)Supply V oltage4/8/16 ch: 100V AC-240V AC, 12VDC , 2A, 50/60Hz Unit Dimensions 4/8/16 ch:11.81”/300mm x 8.66”/220mm x (W x D x H)1.97”/50mmUnit W eight (KGs) 4 & 8 ch: 1.32 kgs/2.9 Lbs16 ch: 1.51s kg/3.33 Lbs Operating temperature32° ~ 104° F / 0° ~ 40° C Humidity10 ~ 90% NCDVR:PRoDUcT SPEcIFIcATIoNSSYSTEM Operating System Linux (embedded)Pentaplex Simultaneous View, Record, Playback, Backup & Remote MonitoringNumber of Channels 4/8/16 ChannelInputs/outputs Video IN 4/8/16 x 1Vp-p, CVBS, 75ohms, BNC Video OUT 4/8 ch: 2 x BNC, 16 ch: 1 x BNC VGA OUT 4/8/16 ch: Y esAudio IN4/8 ch: 1 Line in(RCA), G.71116 ch: 2 Line in(RCA), G.711Audio OUT 4/8/16 ch: 1 line out(RCA), G.711USB Port 1 at the back for Mouse, 1 at the front for firmware upgrade &USB backupVideo Output Resolution 800x600, 1024x768, 1280x1024 PTZ control RS-485 Pelco D & P ProtocolDisplay Live Display 4 ch: 1,4 8 ch: 1, 4, 816 ch: 1, 4, 9, 16Live Display Speed 120 (4 ch)/ 240 (8 ch)/ 480 (16 ch) NTSC100 (4 ch)/ 200 (8 ch)/ 400 (16 ch) P ALOSD ON/OFFSystem Navigation USB Mouse, IR Remote ControllerMotion Area Setting Adjustable grid (10 x15) NTSC Adjustable grid (12 x15) P AL Sensitivity levels 8Firmware Upgrade Via USB device and Network User Authority By user groupTime Synchronization Auto time sync by NTP serverREcoRDINGVideo Compression H.264 Audio Compression G.711Recording Resolution 4/8 ch: NTSC: 360x240 (CIF), 720x240 (HD1), 720x480 (D1) 4/8 ch: P AL: 360x288 (CIF), 720x288 (HD1), 720x576 (D1)16 ch: NTSC: 360x240 (CIF), P AL: 360X288 (CIF)Recording Speed: 4 ch: 120/100 (NTSC/P AL) @ CIF , HD1, 60/50 (NTSC/P AL) @ D1 8 ch: 240/200 (NTSC/P AL) @ CIF , 120/100(NTSC/P AL) @ HDI, 60/50 (NTSC/P AL) @ D116 ch: 480/400 (NTSC/P AL) @ CIFRecording Resolution Setting Per camera for different resolutions (CIF/2CIF/D1). 16 ch: CIF only Recording Quality Control 3 levelsRecording ScheduleBy hour, by day , by recording mode, by motion, by channel Pre Recording Max. 10 Secs Post Recording Max. 5 Minutes Reliability W atch-Dog, Auto-recovery after power failure Covert Video Y esPLA YBAcKPlayback Channel 1~4 Adjustable(4 ch), 1~8 Adjustable (8 ch), 1~16Adjustable (16 ch)Playback Speed V ariable Max 16x Playback Players Backup Player Search By time & eventLog Search Up to 10,00,000 lines for motion detected, configurationchanges, connects/disconnects and video loss.Audio PlayY esSToRAGE & ARcHIVE Storage4/8/16 ch: Up to 1 HDD’s (SA T A) Maximum Capacity 4/8/16 ch: Up to 2TB Backup Media USB Flash Drive & HDDBackup File FormatH.264 file (A VI generator included)CAMERA (CVC7572PK4B):Image Sensor: 1/3” Color Image Sensor Video Format: NTSCEffective Pixels: H: 758 V: 488Resolution: 600 TV Lines Scan System: 2:1 Interlace Sync System: I nternal S/N Ratio: 46.8dB (AGC Off)Iris: AESAES Shutter Speed: 1/60 ~ 1/100,000 Sec.Min. Illumination: 0.1 Lux without IR LED0 Lux with IR LEDVideo Output: Composite 1.0Vpp @75 ohm Lens / Lens Type:3.6mm F1.2 / Fixed FOV (Diagonal): 78°T ermination: BNC Type IR LED Qty / Type: 24 pieces / 850nm Night Vision Range: 90ft (28m)/66ft (20m) Power Requirement: 12V DC ±10%Power Consumption:Max. 280mA (w/IR)Operating T emp. Range: 14° ~ 122°F / -10° ~ 50°C Operating Humidity Range: < 60% RH Environmental Rating: IP66W eight (including stand):0.6lbs / 0.3kgMoDEL coNFIGURATIoN PAcKAGE W x D x H - Inches & mm WEIGHT cUBE UPc code LH018511C4F8 CH DVR x 4 (600) TVL Cameras(CVC7572PK4B) x 500GB HDD Universal Retail Box435mm x 263mm x 313mm/17.3” x 10.38” x 12.32”6.5 kg/14.4 lbs0.036245m /1.28ft7-78597-18514-0LH08548 CH DVR x 4 (600) TVL Cameras(CVC7572PK4B) x 500GB HDD Retail English Giftbox 435mm x 263mm x 313mm/17.3” x 10.38” x 12.32”6.5 kg/14.4 lbs0.036245m /1.28ft7-78597-08540-2LH0181011C8F8 CH DVR x 8 (600) TVL Cameras(CVC7572PK4B) x 1TB HDDUniversal Retail Box 406mm x 431mm x 300mm/16” x 17” x 11.82”9.8 kg/21.65 lbs0.0526m /1.86ft7-78597-18118-0INCLUDES8 Ch DVR with pre-installed HDD, Remote Control, Power Adapter, Mouse, Ethernet Cable, CD, QSG, Instruction Manual, 4 or 8 x Cameras, 4 or 8 x Camera Stands, 4 or 8 x 60ft BNC/DC Extension Cables, 1 or 2 x 4 in 1 Camera Power Adaptors.© 2013 Lorex Technology Inc.As our product is subject to continuous improvement, Lorex Technology & subsidiaries reserve the right to modify product design, specifications &prices without notice and without incurring any obligation. E&OE.Lorex Technology Inc.250 Royal Crest CourtMarkham, Ontario, Canada L3R 3S12-02222013DVR Inputs & outputs901 Elkridge Landing Road, Suite 100Linthicum, Maryland 21090,USA.PRoDUcT INFoRMATIoN8 channel DVRDISCLAIMERS:1. Recording time may vary based on recording resolution & quality, lighting conditions and movement in the scene.2. Requires a high speed internet connection and a router (not included).3. IR Illumination range under ideal conditions. Actual range and clarity may vary depending on scene/object reflection and camera application. Measurements are calculated using ambient lighting and total darkness conditions. Picture automatically switches to B&W delivering better clarity in low light conditions.4. Not intended for submersion in water. Installation in a sheltered location recommended.† PC (Microsoft Windows™ 8/7/Vista/XP) compatible using Internet Explorer browser. Mac OSX Snow Leopard 10.6 or above using Safari browser.† Smartphone & Tablet Compatibility: iPad®, iPhone®, BlackBerry (supported model numbers: 9000, 9700, 9800), Android (version 1.5 & above), Windows Mobile (6.0, 6.5). Mobile phone data plan is required (not included). Router port forwarding required. For the latest compatibility list check as new models become available in the market.• BlackBox is used solely as a marketing term and does not imply that the product can survive fire or extreme conditions. Use product in accordance with the instructions provided.- Number of Channels/ Cameras/ Accessories/ HDD (hard disk drive) capacity may vary by model. Check your package label for specific content information.All trademarks belong to their respective owners. No claim is made to the exclusive right to use the trademarks listed, other than the trademarks owned by Lorex Technology Inc. We reserve the right to change models, configurations or specifications without notice or liability. Product may not be exactly as shown. Images are simulated.DVRDimensions:cVc7572PK4B cAMERA。
Rockbox 手册说明书

What Players does Rockbox Support
The following is an incomplete list ● Apple Ipods (1/2/3/4th gen), Color/Photo, Video, Nano (1st gen), Ipod Mini ● Iriver H10/H100/H320 ● Archos (various) ● Cowan (various) ● Sandisk C2x0 (v1 only)/E2x0 ● Toshiba Gigabeat F ● Others are in Development
● A lot of Mp3 players allow for upgradeable Firmware ● Which given the storage space available on modern Mp3 players gives enough room for an alternative firmware ● Funnily enough, many Mp3 players provide this so they can keep DRM working on their players
What Rockbox Needs
● Klingon Fonts ● Klingon Translation ● More Themes ● A collection of default Open Content ● More publicity :-) ● Port to the Tatung m100 player
Rockbox – Free your Mp3 Player
December OLUG Presentation by
Xboxone操作手册

----------------------------------------------------------------------------------------------------------------------------------------------Xbox one 产品使用资料整理帮助您更好地了解一些您的Xbox One主机,下图展示您将使用的重要按钮和端口。
主机的前部1.弹出按钮:用于从主机中弹出光盘。
光盘将自动插入。
2.Xbox 按钮:主机的电源按钮和 LED 指示灯,触摸式。
主机的侧面1. USB 3.0 端口:用于连接有线配件,例如Xbox One 同步充电套件。
2. 弹出孔:用于很少见的光盘卡滞在主机内的情形。
请参阅手动从您的Xbox One 主机弹出光盘。
3. 配件配对按钮:用于连接无线配件,例如Xbox One 无线控制器。
主机的后部从左到右:1.电源端口:电源连接到此处。
2.HDMI 输出: HDMI 缆线连接到此处,然后连接到您的电视。
3.S/PDIF :连接外部音频系统的光纤音频输出端口(可选;不包括光纤缆线)。
4. HDMI 输入: HDMI 缆线连接到此处,然后连接到HDMI 兼容缆线 /卫星接收器,可让您通过XBOX ONE观看电视节目。
5. USB 3.0 端口:用于连接有线配件(例如Xbox One 同步充电套件)以及其他游戏配件的两个端口。
6. Kinect 端口:专用 USB 端口,仅用于Kinect 。
7.IR 输出:连接红外增强器的红外输出端口(可选;不包括红外增强器)。
8.网络端口:连接来自调制解调器或路由器的以太网线缆(不包括以太网缆线)。
9.锁定端口:允许您将便携式计算机锁连接到主机以将其锁定进行保护(可选;不包含锁)。
【隐私和在线安全设置】游戏要大家一起玩,如果家里有小孩的话,为了避免影响学习,可以更改隐私和在线安全设置的哦,目前有儿童、青少年和成人三种默认设置,详细信息请参考以下链接:/R7yytNq关于金会员的领取(试用版,截至 3 月底)点击手柄上的“菜单”键(手柄正面)选择“设置”进入“订阅”点击“了解金会员的详细信息”点击“继续”选中“ Xbox 金会员CN¥0.00 ”, 按下手柄上的“ A”键点击“查看条款”, 再选择“返回”点击“确认”以上步骤做完,可以在页面上看到“ xbox live 金会员”。
ClubBox使用教程
『ClubBox使用教程』/clubbox/index.html第1节ClubBox简介ClubBox是指现在韩国很流行的100G网络硬盘免费空间。
它是一种网络资源共享方式,下载速度也较为稳定,普通下载限速为50K,高速下载不限速,实际速度取决于你的网络带宽。
ClubBox是基于P2P的,但是没有种子时效的限制,下载的人越多则下载越快。
ClubBox作为文件仓库来用还是不错的。
第2节用户注册目前大部分的ClubBox空间都是免费开放的,但是通常游客只能浏览,需要加入Box成为其会员才可以访问其资源,因此我首先需要注册一个属于自己的用户,然后加入自己所喜欢的Box,而且注册了用户之后还可以挂机赚取积分,类似于QQ一样,然后用积分兑换高速下载券,这一节首先介绍用户注册。
Clubbox的用户注册分为国内注册和海外注册两种,国内注册需要真实的身份证,在此就不做说明了,下面主要介绍海外注册。
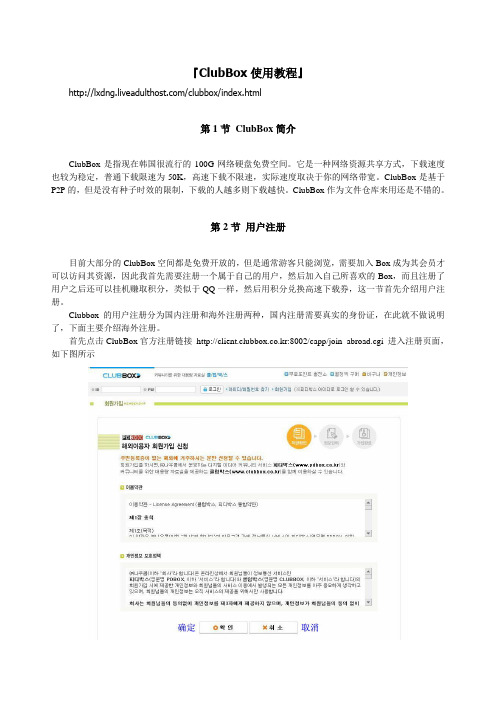
首先点击ClubBox官方注册链接http://client.clubbox.co.kr:8002/capp/join_abroad.cgi 进入注册页面,如下图所示这里是一些同意条款,点确定以后,进入如下页面按照图中中文指示填写完整的注册资料。
点确定以后,进入如下页面这里是对重要的注册资料进行确认,包括用户名,密码和Email,尤其是会员号码非常重要,一定要记住,在忘记密码的时候,必须要用会员号码才可以找回密码。
在小方框里打勾,最后点确定就完成用户注册了。
然后就可以登录ClubBox了,打开ClubBox的主页http://www.clubbox.co.kr, 如下图所示在ClubBox主页的左上角有个登录区,在此输入用户名和密码,如下图所示如果是在自己的计算机上网,可以把记住用户名和记住密码选上,这样就不用每次输入了,我们用刚刚注册用户xiaomang登录,如左下图所示登录以后,左上角的页面如右上图所示这里有个白色的按钮,是退出登录,如果你想换一个用户就先点此按钮,然后重新登录。
Street Rocker 快速入门指南说明书

Quickstart Guide English ( 2 – 12 ) Guía de inicio rápido Español ( 13 – 24 ) Guide d’utilisation rapide Français ( 25 – 36 ) Appendix English ( 38 )Thank you for purchasing the Street Rocker. At ION, your entertainment is as important to us as it is to you. That’s why we design our products with one thing in mind—to make your life more fun and more convenient.Box ContentsStreet RockerPower CableQuickstart GuideSafety & Warranty ManualSupportFor the latest information about this product (documentation, technical specifications, system requirements, compatibility information, etc.) and product registration, visit .For additional product support, visit /support.Items not listed under Introduction > Box Contents are sold separately.2Front Panel1.Cassette Holder: Press the Stop/Eject button to open the cassette deck and insert a tapehere.2.Internal Mic: Use this microphone to record external audio sources such as speech, live music,nature sounds, beatboxing, etc. to USB, SD, and cassette.3.Speakers: Listen to your audio source here.Note: When headphones are connected to the Headphone Output, the internal speakers will be muted.4.Level Display: View the audio playback level for the left and right channels.5.Power LED: The LED will illuminate red when the unit is powered on.6.Stereo LED: The LED will illuminate green when a stereo FM station is selected.7.Radio Channel Display: View the selected radio station here.8.Tuning Dial: Adjust this dial to tune in to a radio station.34Top Panel1. Antenna: Adjust the antenna to get the best radio station reception.2. Volume: Adjust this to control the overall playback volume.3. Bass: Adjust this to control the low frequencies for the audio playback.4. Treble: Adjust this to control the high frequencies for the audio playback.5. Pause: In Tape mode, press this button to pause the tape playback.6. Stop/Eject: In Tape mode, press this button to stop or eject a tape.7.Fast Forward: In Tape mode, press this button to fast forward the tape.Note: The cassette mechanism will not auto-stop when fast forwarding. Press the Stop button after fast forwarding is completed.8. Rewind: In Tape mode, press this button to rewind the tape.Note: The cassette mechanism will not auto-stop when rewinding. Press the Stop button after rewinding is completed.9. Play: In Tape mode, press this button to play the tape.Note: There will be a delay in playback for a few seconds after the Play button is pressed.10. Record: In Tape mode, press the Record button to record to a tape.11. Function: Adjust this switch to select your sound source as Tape/Off , Aux , Radio , or BT(Bluetooth)/USB/SD . 12. Mode: Adjust this switch to change the mode from Mono , Stereo , or Bass Boost . 13. Band: Adjust this switch to select AM or FM radio.Rear Panel1.Battery Compartment: Insert 6 new “D” size alkaline batteries (not included) to power the unit when not using AC power.2. Power Switch: Adjust this switch to enable AC power.5Side Panels1.Headphone Output: Connect your headphones to this 1/8” (3.5 mm) output. When using headphones, the internal speakers will be muted.Note: When headphones are connected to the Headphone Output , the internal speakers will be muted.2. Aux Input: Connect your smartphone, MP3 player, or similar device here using an 1/8” (3.5 mm) cable (not included).3. 2-Prong IEC Power Input: Connect the included power cable here.4. USB Port: Connect your USB flash drive here to play music or record the audio from Bluetooth, tape, radio, internal mic, or the aux input.5. M icro SD Card Slot: nsert your micro SD card here to play music or record audio from Bluetooth, tape, radio, internal mic, or the aux input.6. Mode/Stop Rec: Press and release this button to switch between Bluetooth, USB, or micro SD card source playing modes. When recording, press and release this button to stop recording.7.Switch Folders: Press the M ode/Stop Rec and Previous Track buttons simultaneously to switch between the recorded tracks folder and other music folders on a USB flash drive or micro SD card.8.Previous Track: Press this button to go to the beginning of the current playing track. Duringplayback, double press this button to go to the previous track. Press and hold this button to rewind the track during playback.9.Delete Track: Press and hold both the Previous Track and Next Track buttons to delete thecurrently playing track.10.Next Track: Press this button to go to the next track. Press and hold this button to fast forwardthe track during playback.11.Play/Pause: Press this button to play/pause a USB or micro SD card track. Press and hold thisbutton to disconnect from a paired Bluetooth device.12.Rec./Rep.: Press and hold the Rec./Rep. button to record the audio source (Bluetooth, radio,tape, or mic) to the USB flash drive or micro SD card. Press M ode/Stop Rec to stop the recording and the recorded content will be transferred to the USB flash drive or micro SD card.When playing tracks from the USB flash drive or micro SD card, press and release this button to switch between sequential playback, repeat a single track, and repeat all tracks.13.M edia Status: The LED will slowly flash blue when the USB flash drive, micro SD card, orBluetooth source is playing back. When in Bluetooth pairing mode, the LED will quickly flash blue. When a Bluetooth device is paired, the LED will be lit solid blue. When recording to the USB flash drive or micro SD card, the LED will slowly flash red. When playing back tracks that were recorded to the USB flash drive or micro SD card, the LED will flash purple. When recorded audio is paused, the LED will be lit solid purple.Recording to TapeNote: Most cassettes feature a protective plastic strip which, when removed, will not allow any recording to be made to the cassette. When the plastic strip has been removed, the Street Rocker’s Record button will not function when attempting to record to the cassette. To record to a cassette which no longer has a plastic strip, use adhesive tape to cover the strip opening.Recording from the Internal Microphone to Tape:1.Press Stop/Eject to open the cassette holder.2.Insert a blank tape and close the cassette holder.3.Set theFunction switch to Tape.4.Press the Record button to start recording.5.To stop recording, press Stop/Eject button.6Recording from the Aux Input to Tape:1.Connect your smartphone, MP3 player, or similar device to the Aux Input using an 1/8” (3.5mm) cable (not included).2.Set the Function switch to Aux.3.Connect your external audio device and start its playback. Adjust the output volume on yoursource device.4.Play your source and check the levels on the Level Display.5.To begin recording, press the Record button and the Play button simultaneously.6.To stop recording, press Stop/Eject button.Recording from the Radio to Tape:1.Press Stop/Eject to open the cassette holder.2.Insert a blank tape and close the cassette holder.3.Set the Function switch to Radio.4.Set the Band switch to the desired frequency band (AM or FM).5.Adjust the Tune dial to select a radio station.6.Extend and adjust the antenna for best reception.7.Press the Record button to start recording.8.To stop recording, press Stop/Eject button.Recording Bluetooth to Tape:1.Press Stop/Eject to open the cassette holder.2.Insert a blank tape and close the cassette holder.3.Set the Function switch to Bluetooth/USB/SD.4.Pair your Bluetooth device to the unit and begin playing music. See the section Pairing aBluetooth Device for setup details.5.Press the Record button to start recording.6.To stop recording, press the Stop/Eject button.Recording from a USB Flash Drive or Micro SD Card to Tape:1.Press Stop/Eject to open the cassette holder.2.Insert a blank tape and close the cassette holder.3.Insert a USB Flash Drive or micro SD card into the unit.4.Set the Function switch to Bluetooth/USB/SD.5.Press the side panel Play button to begin playback.6.Press the Record button to start recording.7.To stop recording, press the Stop/Eject button.7Recording to USB/SDRecording from the Internal Microphone to a USB Flash Drive or Micro SD Card:1.Insert a USB flash drive or micro SD card into the unit.2.Set the Function switch to BT/USB/SD and press and release the Mode button to select USBplayback or SD mode. if there are tracks on the USB flash drive, playback will begin.3.To begin recording, press and hold the side panel Rec./Rep. button and speak into the internalmicrophone. Before recording begins, USB playback will stop.4.To stop recording, press Mode/Stop Rec button.Recording from Tape to a USB Flash Drive or Micro SD Card:1.Press the Stop/Eject button to open the cassette holder.2.Insert a tape and close the cassette holder.3.Insert the USB flash drive into the USB port or insert a micro SD card into the micro SD cardslot.Note: Only use either a USB flash drive or a micro SD card at a time, but not both when recording. The unit may not record properly if both a USB and micro SD card are plugged in at the same time.4.Set the Function switch to Tape.5.Press Play to playback the tape.6.To start recording, press and hold the side panel Rec./Rep.button.7.To stop recording, press the side panel Mode/Stop Rec button.Recording from the Aux Input to a USB Flash Drive or Micro SD Card:1.Connect your smartphone, MP3 player, or similar device to the Aux Input using an 1/8” (3.5mm) cable (not included).2.Insert the USB flash drive into the USB port or insert a micro SD card into the micro SD cardslot.Note: Only use either a USB flash drive or a micro SD card at a time, but not both when recording. The unit may not record properly if both a USB and micro SD card are plugged in at the same time.3.Set the Function switch to Aux.4.Connect your external audio device and start its playback.5.Adjust the output volume on your source device and check the levels on the Level Display.6.To start recording, press and hold the side panel Rec./Rep.button.7.To stop recording, press Mode/Stop Rec button.8Recording from the Radio to a USB Flash Drive or Micro SD Card:Insert the USB flash drive into the USB port or insert a micro SD card into the micro SD card slot. Note: Only use either a USB flash drive or a micro SD card at a time, but not both when recording. The unit may not record properly if both a USB and micro SD card are plugged in at the same time.1.Set the Function switch to Radio.2.Set the Band switch to the desired frequency band (AM or FM).3.Adjust the Tune dial to select a radio station.4.Extend and adjust the antenna for best reception.5.To start recording, press and hold the side panel Rec./Rep. button.6.To stop recording, press Mode/Stop Rec button.Recording Bluetooth to a USB Flash Drive or Micro SD Card:1.Insert the USB flash drive into the USB port or insert a micro SD card into the micro SD cardslot.Note: Only use either a USB flash drive or a micro SD card at a time, but not both when recording. The unit may not record properly if both a USB and micro SD card are plugged in at the same time.2.Set the Function switch to BT/USB/SD, and press the side panel M ode/Stop Rec button toselect Bluetooth Mode.3.Pair your Bluetooth device to the unit. See Pairing a Bluetooth Device for pairing details.4.To start recording, press and hold the side panel Rec./Rep. button. The LED will slowly flashred to indicate recording.5.Playback your Bluetooth source.6.To stop recording, press the side panel Mode/Stop Rec button. Press Mode/Stop Rec again toplayback the previously recorded track.PlaybackPlaying a Tape:1.Press the Stop/Eject button to open the cassette holder.2.Insert a tape and close the cassette holder.3.Press the Play button to play the tape.IMPORTANT! After extensive usage, tape heads can acquire oxide build-up, especially if the cassettes are old. To ensure best performance, use a tape head cleaner periodically.9Aux In Playback:1.Connect your smartphone, MP3 player, or similar device to the Aux Input using an 1/8” (3.5mm) cable (not included).2.Set the Function switch to Aux.3.Start playback on your external audio device.4.Adjust the Volume dial to the desired level.Note: If the line output of your external device is connected, you only need to adjust the system’s volume control. If your external device’s headphone output is connected, you may need to adjust the volume control on both your external device and Street Rocker to achieve the desired volume.USB Flash Drive Playback:Note: When the function switch is set to BT/USB/SD, it will default to BT mode always. In order to go to USB mode, insert the USB flash drive and press the Mode button to switch.Note: In USB mode, files are played in order by time.1.Connect the USB flash drive to the USB port.2.Set the Function switch to BT/USB/SD and press the Mode button to switch to USB mode.3.Press the Play button to begin playback.4.Press the side panel Stop button to stop playback.Micro SD Card Playback:Note: When the function switch is set to BT/USB/SD, it will default to BT mode always. In order to go to SD mode, insert the micro SD card and press the Mode button to switch.Note: In SD mode, files are played in order by time.1.Insert the micro SD card into the micro SD card slot.2.Set the Function switch to BT/USB/SD and press the Mode button to switch to SD mode.3.Press the Play button to begin playback.4.Press the side panel Stop button to stop playback.Listening to the Radio:1.Set the Function to Radio.2.Select the desired frequency band (AM or FM).3.Select the desired radio station by turning the Tuning dial.4.Extend and adjust the antenna for best reception.5.Adjust the volume to the desired level.10Radio Reception:For best radio reception and to avoid interference, follow these tips:•Move Street Rocker away from sources that can cause radio frequency interference, such as laptop power supplies, flat screen TVs, electric blankets, external hard drives, light dimmers, walls, and windows.•Try listening to the radio at a park or other open outdoor space, away from tall buildings. •Power Street Rocker with quality, new alkaline batteries instead of a power cable.Cassette CareTo avoid tape jamming, tape tangling, or playback issues, please follow these tips:•Check that there are no loose layers of tape visible through the cassette center window. If there are, manually wind up loose tape using a pencil or hexagonal barrelled ballpoint pen.Note: If the cassette feels tight when manually winding, the tape may be jamming from ridges formed in the winding of the tape (visible through the center window). These may be removed, in most cases, by fast forwarding the cassette to the end, and then rewinding it to the beginning. •When recording, use new high-quality, brand name tapes.•Do not expose cassettes to direct sunlight, fluorescent lights, dust, or oils.•Do not touch the surface of the tape.•Before storing tapes, rewind or fast forward them to the end of a side.•Store tapes in a dry, temperate environment.Tape Head CleaningFor continued high performance from Street Rocker, periodically clean the head, pinch roller, and capstan every 10-20 hours of operation.To clean the tape deck:1.Power off Street Rocker.2.Press the Stop/Eject button to open the cassette holder.3.Remove any tape in the deck.4.Moisten a new cotton swab with isopropyl alcohol (70-80%).5.Carefully rub the face of each head, pinch roller, and capstan with the moistened cotton swab.6.Let the cassette holder dry for 5-10 minutes before putting a tape back in it.11Pairing a Bluetooth Device1.Adjust the Function switch on Street Rocker to the BT/USB/SD position.2.Turn on your Bluetooth device.3.Navigate to your Bluetooth device’s setup screen, find Street Rocker and connect. A voiceprompt will be heard saying “Bluetooth pairing” when pairing and “Bluetooth connected” when connected to your Bluetooth device.Note: If your Bluetooth device prompts for a pairing code, enter “0000”.4.Press and hold the Play/Pause button to disconnect from a paired Bluetooth device. A voiceprompt will be heard saying “Bluetooth disconnected” when disconnected from the Bluetooth device.If the sound is distorted: Try lowering the volume control of your sound source. Also, try to reduce the overall volume of Street Rocker using the Volume knob.If there is too much bass: Try adjusting the tone or EQ control on your sound source to lower the bass level. This will allow you to play the music louder before clipping (distortion) occurs.If there is poor AM reception: When you have a Bluetooth device that is connected, disconnect your Bluetooth device in order to listen to AM radio. To adjust AM reception, move the entire unit.If you cannot connect your audio device to Street Rocker via Bluetooth:•Have your audio device (e.g., smartphone or tablet) and Street Rocker as close together as possible while trying to connect. Make sure both the audio device and Street Rocker are unobstructed by walls, furniture, etc.•Reset the Bluetooth connection on Street Rocker to disconnect Street Rocker from any other audio device and restart the search process. If this does not work right away, power off Street Rocker and then power it back on. See Pairing a Bluetooth Device for more information. •Reset the Bluetooth connection on your audio device by turning Bluetooth off and back on. You can find this under the Bluetooth menu in the Settings for your phone or other audio device.If this does not work, and you have connected to Street Rocker before, find Street Rocker in the list of available or previously connected devices in your audio device's Bluetooth menu, tap the "gear" or “i” icon located next to it and then select Unpair or Forget. Turn Street Rocker off and back on and try pairing again once it reappears in your available devices list.Note: If Street Rocker has been paired to another audio device recently that is still within range, you may need to repeat this process with that audio device to fully disconnect.12。
groov Box用户指南说明书

Form 2063-131004—October 2013Connect the power supplyPlug the small connector on the power supply into the terminal marked 14–36 VDC. Plug the other end into a standard 120 or 240VAC outlet. The LED marked PWR willlight solid green.Get to know the groov BoxTo set up the groov Box, you’ll use the groov Box components shown below. Make sure there is room around the front, top, and sides of the groov Box to allow air to flow freely though the fans on the sides. Also, you need to be able to see theinformation on the top.On/Off buttonLEDsETH0AirflowPower terminalLabelOpen groov in your web browsera.On your computer, open Firefox or Chrome.b.Enter https:// and your groov Box’s hostname as the URL. Thehostname is printed on top of the groov Box. For example, if thehostname is opto-01-ab-c2,you typehttps://opto-01-ab-c2c.Accept the security warning. Your groov data is protected by the SSL (secure socket layer) 256-bitencryption, so you can safely accept the warning.For Chrome : Click “Proceed anyway.”For Firefox:–Expand “I Understand the Risks.”–Click Add Exception to open the Add Security Exception dialog box.–Select “Permanently store this exception.”–Click Confirm Security Exception.The Welcome togroov window opens in your web browser.NOTE: If theWelcome to groov window does not open, your network configuration is probably unique. Please see the groov Box User’s Guide .Connect to the network Quick StartOpenUnpack the groov BoxYou need:• A computer with a modern web browser on the same network you’ll use for the groov Box. For the best user experience, we recommend Chrome or Firefox.•A PAC S-series, PAC R-series, or SoftPAC controller running a strategy with firmware R9.2a or newer, and a strategy developed in Opto 22’s PAC Control. The controller should be on the same network as your computer. The network should have DHCP & DNS.HostnameWatch 5 Minutes to groov op22.co/5min2groovTurn on the groov BoxBriefly press and release the On/Off button. Wait until the SYS LED has stopped blinking and is solid green. Also, take a look at the LNK ACT light for ETH0. If the cable is properly connected, the LNK ACT light should be on or blinking.In the box...Ethernet cableCDgroov BoxAntennas(attach before use)Spare fan filtersPower supplyConnect ETH0 to your computer’s network. If you have a separate control network, see the groov Box User’s Guide.LNK ACT lightForm 2063-131004—October 2013Get your tag database Build your operator interface(continued)Adjust the handheld layouta.Click the gear symbol in the upper-right corner of View, and select Switch togroov Build.b.Add several more tags and gadgets to your project, and arrange them in theDesktop & Tablet view.c.Click the Handheld tab at the top of the work area. You’ll notice that thegadgets are arranged differently in the Handheld view, but they contain exactlythe same gadgets, taqs, and properties.d.Drag each gadget into position, and resize it as necessary for the Handheldview.a.In the upper right corner, configure the RoundGauge properties.To add a zone, click the Add Zone button. Choosethe Min Value, Max Value, and Units that makesense for your variable.b.Select File > Save All and Switch to groov View.You should now see the Round Gauge running inView. The needle shows the tag’s current value.The last wordActivation key Create new usernames and passwordsDrag into positionResizee.Switch to the Desktop & Tablet layout. You’ll notice that arranging the gadgetsin the Handheld layout does not affect the Desktop & Tablet layout.Activating the groov Box and getting updates: Before continuing with yourproject, make sureto activate your groov Box. This is required to take advantage ofimportant updates from Opto 22. You’ll need the activation key that’s on the top ofthe groov Box. Go to To get updates at any time, go to . For update instructions, seethe groovBox User’s Guide on the groov Box CD.Backing up your project: As you work on your project, make sure to back upfrequently in groov Build. For more information, see the groov User’s Guide.a.Click Add Page on the left side under Pages.b.Type a new name for the page, then click OK.c.With the Tags tab selected in Gadget Palette, clickthe plus sign next to the strategy name to expandthe list of tags.d.Click a Numeric Variable tag that changes its valuefrequently.e.In the pop-up dialog box, double-click a RoundGauge.a.In Build, select select Configure > Controllers.b.Click Add Controller.c.Enter the IP address of aPAC S, PAC R, or SoftPACcontroller running a strategyyou would like to use.d.Click Browse to locate theidb.txt file for your strategy.The .idb.txt file resides in thestrategy’s directory. It’screated when the strategy iscompiled.e.Highlight the idb.txt file, click Open, and then click Import. Build imports the.idb.txt file with the strategy’s tags.f.Close the Configure Controllers dialog box.Follow the on-screen instructions to create usernames and passwords forgroov Admin and for groov Build. The security warning will appear once more; whenit does, accept the warning again.CAUTION: Write down your Username and Password, and keep it in a safe place.You will need this information each time you log in. If you lose your logininformation, you will have to reset the groov Box back to factory defaults which willerase your project. There is no password recovery option.After you have completed the instructions in Welcome to groov, groov Build opensin your web browser.。
GearBox MR814 无线路由器安装指南说明书
b. For security reasons, the router has its own user name andpassword. When prompted, enter admin for the router user name and password for the router password, both in lower case letters.Note:The user name and password are not the same as any user name or password you may use to log in to the Internet.3Connect to the Interneta. You are now connected to the router. If you do not see the menuabove, click the Setup Wizard link on the upper left of the main menu.b. Click Next to follow the steps in the Setup Wizard to input therouter configuration settings. See the green ISP Guide for help with identifying your ISP settings.c. At the end of the Setup Wizard, click the Test button to verifyyour Internet connection and register your product.Note:If you were unable to connect to the router, please refer to “Basic Functioning ” in the “T roubleshooting ” chapter of the Reference Manual on the GearBox CD for Wireless Router .*M-10003-02*M -10003-02March 2003Regional Customer Support ContactsYou can contact customer support at the toll free numbers below.Australia Austria CanadaChina Denmark Finland France Germany Hong Kong Holland Italy1 800-787-6380800-202312888-NETGEAR 10800-611-8888807-026660800-111-0360800-771-753************001-800-1233-45660800-023-098102-38-59-1018Japan Korea Malaysia New ZealandNorway SingaporeSpainSweden Switzerland United Kingdom United States00-53-179-0001 080-NETGEAR 1 800-181-01900-800-1233-4566800-12500800-6162-12591-375-45-880200-298-2980800-474744 020-7216-0014888-NETGEARHardware WarrantySubject to the provisions described below, this NETGEAR product is protected for three (3) year against defects in material and workmanship.Should a product fail to perform as described above within the warranted period, it will be repaired or replaced with the same or functionallyequivalent product by NETGEAR, at its discretion, free of charge provided you: (1) return the failed product to a NETGEAR designated repair facility with shipping charge prepaid, and (2) provide NETGEAR with proof of the original date of purchase. Repaired or replacement products will be returned to you with shipping charges prepaid. Replacement products may be refurbished or contain refurbished materials. If NETGEAR, by its sole determination, is unable to repair or replace the defective product, it will refund the depreciated purchase price of the product. This warranty does not apply if, in the judgement of NETGEAR, the product fails due to damage from shipment, handling, storage, accident, abuse or misuse, or if it has been used or maintained in a manner not conforming to product manual instructions, has been modified in any way, or has had any serial number removed or defaced. Repair by anyone other than NETGEAR or an approved agent will void this warranty.The maximum liability of NETGEAR under this warranty is limited to the purchase price of the product covered by the warranty.Prior to returning any defective product, the end customer or the reseller from whom the end customer originally purchased the product must obtain a Return Materials Authorization (RMA) number from NETGEAR. All defective products should be returned to NETGEAR with shipping charges GEAR will not accept collect shipments.Except as specifically provided in this agreement or as required by law, the warranties and remedies stated above are exclusive and in lieu of all others,oral or written, express or implied. Any and all other warranties, including implied warranties of merchantability, fitness for a particular purpose and noninfringement of third party rights are expressly excluded. NETGEAR shall not under any circumstances be liable to any person for any special,incidental, indirect or consequential damages, including without limitation,damages resulting from use or malfunction of the products, loss of profits or revenues or costs of replacement goods, even if NETGEAR is informed in advance of the possibility of such damages.©2003 NETGEAR, Inc. NETGEAR, the Netgear logo, The Gear Guy, Everybody'sConnecting and Auto Uplink are trademarks or registered trademarks of Netgear Inc. in the United States and/or other countries. Other brand and product names are trademarks or registered trademarks of their respective holders. Information is subject to change without notice. All rights reserved.Technical SupportPLEASE REFER TO THE SUPPORT INFORMATION CARD THAT SHIPPED WITH YOUR PRODUCT.By registering your product at /register , we can pro-vide you with faster expert technical support and timely notices of product and software upgrades.NETGEAR, INC.Support InformationPhone: 1-888-NETGEAR (For US & Canada only) See Support information card for other countries.E-mail:*******************©2003 NETGEAR, Inc. NETGEAR, the Netgear logo, The Gear Guy and Everybody's Connecting are trademarks or registered trademarks of Netgear, Inc. in the United States and/or other countries. Microsoft and Windows are registered trademarks of Microsoft Corporation in the United States and/or other countries. Other brand and product names are trademarks or registered trademarks of their respective holders. Information is subject to change without notice. All rights reserved.。
洛雷克 ECO Blackbox3 系列 DVR 设置指南说明书

C O N N E C T I V I T YSETUP IN UNDER3 MINUTES1CQuick Mobile GuideAndroidf g Tap Save . You will be prompted to change the DVR password. Tap Confirm .hEnter a new 6 character password and tap Save . Thispassword will be used to connect to your system from now on.Tap Save again to connect to the DVR. The app opens in Live View and streams video from all connected cameras.Before You Start:• Make sure you have arouter and high-speed Internet access (not included).LH030 ECO Blackbox3 SeriesInstall the free Lorex ECO Stratus app from the Google Play Store.a b c Tap the Lorex ECO Stratus icon to open the app.Tap Device Manager .d Tap Add .eConfigure the following:iPhoned Tap.eConfigure the following:1234512345f Tap Save . You will be prompted to change the DVR password. Tap OK .g Enter a new 6 character password and tap Done . Thispassword will be used to connect to your system from now on.Tap Save again to connect to the DVR. The app opens in Live View and streams video from all connected cameras.hInstall the free Lorex ECO Stratus app from the App Store.a b c Tap the Lorex ECO Stratus icon to open the app.Tap Device Manager .Name: Enter a name for your DVR of your choice.Device ID: Press the QR code icon () next to Device ID and line up the QR code on the top of the DVR using the camera on your device.OR if your device does not have a camera,manually enter the Device ID printed on the label. Client Port: Enter the Client Port (default: 9000).User Name: Enter the DVR’s User Name (default: admin ).Password: Enter the DVR’s Password(default: 000000).1ACongratulations! You can now view video from your cameras on your smartphone or tablet.3 MinutesiPadd Tap.eConfigure the following:12345f Tap Save . You will be prompted to change the DVR password. Tap OK .g Enter a new 6 character password and tap Done . Thispassword will be used to connect to your system from now on.Tap Save again to connect to the DVR. The app opens in Live View and streams video from all connected cameras.hInstall the free Lorex ECO Stratus HD app from the App Store.a b c Tap the Lorex ECO Stratus HD icon to open the app.Tap .Name: Enter a name for your DVR of yourchoice.Device ID: Press the QR code icon () next to Device ID and line up the QR code on the top of the DVR using the camera on your device.OR if your device does not have a camera, manually enter the Device ID printed on the label.1B• Connect your DVR to yourrouter using an Ethernet cable (see the Quick Connection Guide for details).• Upgrade your DVR firmwareand client software or mobile app to the latest versions.• Please note that an upload speed of1Mbps is recommended for the best video performance. Up to 3 devices may connect to the system at the same time.12345Name: Enter a name for your DVR of your choice.DeviceID: Press the QR code icon () next to Device ID and line up the QR code on the top of the DVR using the camera on your device.OR if your device does not have a camera,manually enter the Device ID printed on the label.Client Port: Enter the Client Port (default: 9000).User Name: Enter the DVR’s User Name (default: admin ).Password: Enter the DVR’s Password (default: 000000).13452Device ID: xxxxxxxDevice ID: xxxxxxx13245EXAMPLE Client Port: Enter the Client Port(default: 9000).User Name: Enter the DVR’s User Name (default: admin ).Password: Enter the DVR’s Password(default: 000000).EXAMPLEEXAMPLEEXAMPLEFind your Device IDRecord your information below:DEVICE ID:Quick ReferenceDefault access information:• Default user name: admin • Default password: 000000Default system ports:• HTTP Port: 80• Client Port: 9000Information in this document is subject to change without notice. As our products are subject to continuous improvement, Lorex Corporation and our subsidiaries reserve th e righ t to modify product design, specifications and prices, without notice and without incurring any obligation. E&OE © 2014 LOREX. All rights reserved.lorex.ca/LH030It’s all on the WebNeed Help ?Visit /supportLH030 Blackbox3 Series Quick Network Guide - English - R2If you have forgotten yourpassword, contact Lorex technical support.2b Download the Client Software for PC from lorex.ca/LH030.a Once installation is finished, double-click the Lorex Stratus Client 1 icon () on the desktop. The DVR login appears.Click Login . If this is the first timeconnecting to your system, you will be prompted to change the password. Enter a new 6 character password and click OK .dEnter the new password in the login screen and click Login to connect to the DVR. The Client Software connects to your DVR and streams live video from your cameras.ec123451Select Device ID 2Enter the DVR’s Device ID 3Enter the DVR’s user name (default: admin )4Enter the DVR’s password(default: 000000)5Enter the Client Port (default: 9000)Enter the following information:3PC Usersb ac Mac UsersVisit lorex.ca/LH030 and download the Client Software for Mac .Extract the installer file and double-click it to install.Open the Lorex Stratus Client 1 () from theApplications list.d eg h123451Select Device ID 2Enter the DVR’s Device ID3Enter the DVR’s user name (default: admin )4Enter the DVR’s password(default: 000000)5Enter the Client Port (default: 9000)Enter the following information:Click Login . If this is the first time connecting to your system, you will be prompted to change the password. Enter a new 6 character password and click OK .Enter the new password in the login screen and click Login to connect to the DVR.Quick PC/MAC GuideORCongratulations! You can now connect over the Internet to view and playback video on your PC.Congratulations! You can now connect over the Internet to view and playback video on your Mac computer.Open Safari, then click Safari Quit Safari . This resets Safari to complete the installation.• • • • • •• • • • • •15 MinutesThe Device ID is printed on a label on the top panel of the DVR.Device ID: xxxxxxxxxxxSee the label on top of your DVR for yourDevice ID.NOTE: PC/Mac setup is not required to connect on a smartphone or tablet.See reverse forsmartphone/tablet setup.Scan the QR code or visit the address below to accessthe latest software and instruction manuals.。
- 1、下载文档前请自行甄别文档内容的完整性,平台不提供额外的编辑、内容补充、找答案等附加服务。
- 2、"仅部分预览"的文档,不可在线预览部分如存在完整性等问题,可反馈申请退款(可完整预览的文档不适用该条件!)。
- 3、如文档侵犯您的权益,请联系客服反馈,我们会尽快为您处理(人工客服工作时间:9:00-18:30)。
Rockbox通行说明
Rockbox是一个Open Source的组织,致力于发展DAP上通用的操作系统(即Rockbox Firmware系统)。
其自定义功能非常强大,用户可以自定义背景图片、播放界面等等细节。
Rockbox是一个不断开发的系统,因此随时都可能有新功能出现。
用过MOTO手机的朋友们不可能不知道Rockbox的强大,它支持绝大多数流行的音乐文件格式,支持音轨间的无间隙播放,支持ape、flac等无损音频,甚至支持cue文件的读取。
Rockbox具有Replay Gain功能,在播放不同来源的音乐文件时,你可以设定它们的音量在相似的范围,这就避免了由于音乐文件的来源不同而音量大小不一致的现象。
相比于界面更为漂亮的PowerAMP,个人认为Rockbox的音质更为通透,声音偏暖、柔和,保真度高;而PowerAMP的电子味很重,音效不错,音质则较为沉闷。
因此纯音质方面,Rockbox无疑是目前最佳的。
Rockbox使用参量均衡器,这种均衡器调节起来非常复杂,一般只有在专业的音响设备上才有机会见到,但是这也意味着你可以调节出任何你想要的音效;PowerAMP使用的则是更为常见的图示均衡器(就是一堆滑块的那种),这种均衡器调节起来相对容易,但由于可调频率值是固定的,因此可以调出的音效比参量均衡器要少得多。
在资源占用方面,PowerAMP的服务开机自启并常驻内存,Rockbox则不会常驻内存,仅在你播放音乐时启动后台服务。
如果你是新手,不太了解音乐知识,不懂得如何调校出自己喜欢的音效,那么我建议你使用PowerAMP,它更为简单;而如果你想获得更完美的音质和更为专业的音乐体验,Rockbox 绝对不会让你失望,因为它堪称迄今为止移动设备上最专业的音乐播放器!
该版本的Rockbox理论上支持Android 1.6以上系统,由于是Beta版,Bug免不了还是会有一些的,主要是启动时可能会退出,遇到这种情况再点一下图标重新启动就行;该版本几乎不会在半途中无缘无故停止播放(旧版本这个问题则很严重),如果你不幸遇上了,拖动进度条快进两次即可。
关于参量均衡器的调节,请大家Google一下了解相关知识。
新版本新增了压限器,觉得音乐沉闷的话打开它会有明显改善。
具体怎么调,每个人有不同的爱好。
新版本对Crossfeed(交叉馈音)也有改善,所谓Crossfeed技术,是指把左声道的声音略微延迟并减弱传到右声道(加有高通滤波),右声道反之。
这样的目的是用耳机去模拟音箱的空间特性,使用者会感到声音从两侧传向头中央而不是普通的从头中央扩散开来,类似于Foobar2000的DSP插件foo_dsp_crossfeed.dll,这种技术可以有效解决因为长时间佩戴耳机造成的听觉疲劳(当然,如果你不喜欢,也可以关闭它)。
下面到关键的地方了。
安装你机器所对应的分辨率的版本(请注意,如果你以前装过旧版本的Rockbox,请先卸载旧版本再装新版本,并请删除手机内存卡上旧版本所创建的Rockbox文件夹!),运行一次,然后退出。
此时的Rockbox是英文版,不过已经可以使用了,如果你想用中文的,请按下面方法执行(部分机型的路径可能不完全相同):
1、使用RootExplorer将附件中的“中文字体”文件夹内的9个字体文件,复制到手机内存/data/data/org.rockbox/app_rockbox/rockbox/fonts目录下;
2、打开Rockbox,点击Settings—General Settings—Display—Default Codepage—Simp.Chinese(GB2312);
2、按若干次后退键返回到Rockbox主设置界面(就是你刚打开Rockbox时的那个界面),点击Settings—Theme Settings—Font—fzxh.fnt(刚才复制进去的字体任选一个就行),之后你会发现字变大了;
3、按若干次后退键再次返回到Rockbox主设置界面,点击Settings—General
Settings—Language—chinesesimp.lng,搞定。
为了方便不会设置参量均衡器的机友们,这里提供148个预设EQ。
设置方法是:
1、使用RootExplorer将附件中的“148eqs”文件夹内的148个均衡器预设文件,复制到手机内存/data/data/org.rockbox/app_rockbox/rockbox/eqs目录下;
2、在Rockbox的设置(Settings)—声音设置(Sound Settings)—均衡器(Equalizer)—浏览均衡器设置(Browse EQ Presets) 中选择EQ,搞定。
如果出现安装后首次打开即是口口的情况,请执行以下步骤:打开Rockbox,先选第四个(虽然是口口但是不影响选择),下一个界面上再选第四个,然后选第二个(可以对照下面的截图找到相应选项的次序位置)。
之后随便选一种字体,就能恢复英文。
恢复英文之后再按照正常方法调成中文即可。
在PC平台上,WinAMP引领一个时代,Foobar2000引领一个时代,而在移动终端上,Rockbox显然比其他播放器,甚至比你,更了解声音。
如果说Rockbox有什么缺点,那就是它的UI不好看。
在PC平台上,WinAMP引领一个时代,Foobar2000引领一个时代;在移动设备终端上,Rockbox显然比其他播放器,甚至比你,更了解声音。
请注意,如果你以前装过旧版本的Rockbox,请先卸载旧版本再装新版本,并请删除手机内存卡上旧版本所创建的Rockbox文件夹!
有关Rockbox的详细信息,请访问官方网站(/)及其Android版块(/wiki/AndroidPort/)
By 五岳茗中。