RHCE-125I笔记
Linux学习笔记(rhce 033 133 253-05)
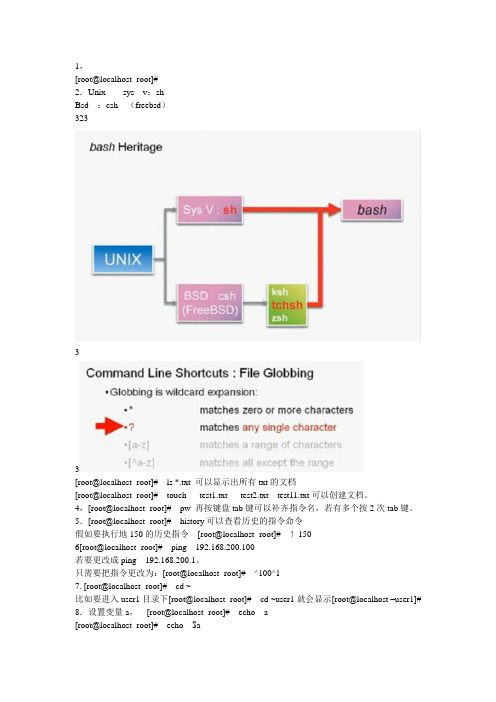
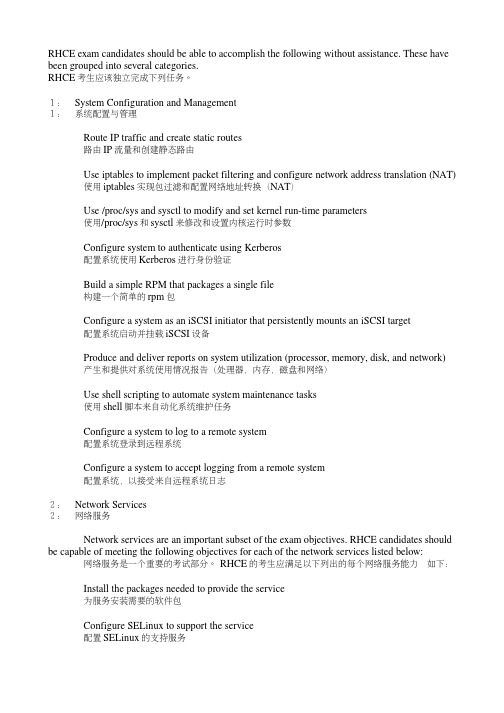
1,[root@localhost -root]#2.Unix sys v:shBsd :csh (freebsd)32333[root@localhost -root]# ls *.txt 可以显示出所有txt的文档[root@localhost -root]# touch test1.txt test2.txt test11.txt可以创建文档。
4,[root@localhost -root]# pw 再按键盘tab键可以补齐指令名,若有多个按2次tab键。
5.[root@localhost -root]# history可以查看历史的指令命令假如要执行地150的历史指令[root@localhost -root]# !1506[root@localhost -root]# ping 192.168.200.100若要更改成ping 192.168.200.1。
只需要把指令更改为:[root@localhost -root]# ^100^17. [root@localhost -root]# cd ~比如要进入user1目录下[root@localhost -root]# cd ~user1就会显示[root@localhost –user1]# 8.设置变量a,[root@localhost -root]# echo a[root@localhost -root]# echo $a显示空就是没有设置。
没有设置就[root@localhost -root]# a=1简单的数学运算:echo $[$a + $b]或者echo $[$a * $b] echo $[$a / $b]结果是取整echo $[$a % $b] 结果是取余数9。
系统工具-终端,下面的快捷键组合。
[全]RHCE 300分的学习笔记
![[全]RHCE 300分的学习笔记](https://img.taocdn.com/s3/m/df6687a448d7c1c708a145c1.png)
RHCE 300分的学习笔记RHCE复习笔记隐含条件:YUM仓库已经配置,IP也已经配置若无法使用ssh远程,说明防火墙限制了ssh登陆# firewall-cmd --list-all# firewall-cmd --add-service=ssh 让防火墙对ssh服务放行## firewall-cmd --add-service=ssh --permanent 让防火墙对ssh服务永久放行第一题:配置Selinux:vim /etc/sysconfig/selinux改为enforcing:wq!:setenforce 1 //在system1和system2上都做一次:getenforce第二题:配置对SSH的限制# vim /etc/hosts.allowsshd : # vim /etc/hosts.denysshd : //在system1和system2上都做一次//可以增加对SSH的规则:(man firewalld.richlanguage example4 ):firewall-cmd --list-all:firewall-cmd --add-rich-rule 'rule family="ipv4" source address="172.17.10.0/24" service name="ssh" reject' --permanent:firewall-cmd --reload:firewall-cmd --list-all第三题:配置IPV6地址:nmcli connection modify eth0 ipv6.addresses fddb:fe2a:ab1e::c0a8:1/64ipv6.method manual connection.autoconnect yes:nmcli connection up eth0 //在system1和system2上都做一次,注意两段ipv6地址不一样,也可以是:nmcli connection up eth0用server0来测试:if# ping6 fddb:fe2a:ab1e::c0a8:2 //server0是1,desktop是2注意下#ping desktop0第四题:配置链路聚合//man nmcli-examples|grep team// man teamd.conf | grep backup#nmcli connection add type team con-name team0 ifname team0 config '{"runner": {"name": "activebackup"}}'//config后面这个在模板中可以找到:man teamd.conf里,查找example,按N 下一个,找到"runner": {"name": "activebackup"}这个参数复制过来,即可,参考命令:man nmcli-examples | grep team |grep \\$ man teamd.conf | grep backup# nmcli connection modify team0 ipv4.addresses 192.168.0.101/24 ipv4.method manual connection.autoconnect yes#nmcli connection add type team-slave con-name team0-s1 ifname eth1 master team0#nmcli connection add type team-slave con-name team0-s2 ifname eth2 master team0# nmcli connection modify team0-s1 connection.autoconnect yes# nmcli connection modify team0-s2 connection.autoconnect yes# nmcli connection show 查看一下然后在desktop上做一样的操作测试:在server上ping desktop的链路地址,一直ping在desktop上:# teamdctl team0 state 查看当前状态是几网卡#nmcli connection down team0-s1 //team0-s1是eth1网卡的意思查看server0上ping是否断掉,没有断则正常最后把team0-s1再正常启动起来,up一下。
RHCE课堂实验笔记(4)

RHCE课堂实验笔记(4)单元五实验 ⽂件访问权限 估计⽤时:30分钟 ⽬标:熟悉多个修改⽂件权限命令的语法和应⽤,并可组合命令以完成⼀般的任务。
实验前准备:⼀台安装好的系统,其上有student 帐号。
实验1:定义⽂件的访问权限的实践 任务: 1、写下⽂件权限的字串(类似rwxr-xr-x): 664:_______________________ 755:_______________________ 000:_______________________ 711:_______________________ 700:_______________________ 777:_______________________ 555:_______________________ 705:_______________________ 111:_______________________ 600:_______________________ 731:_______________________ 2、⼀个⽂件权限为755,哪条命令可以将其权限改为r-xr--r--? 3、你刚从Internet上下载了⼀个值得信任的执⾏⽂件。
在你运⾏它之前你必须做什么?写下两种不同的途径。
4、你在之后的单元中将会学到进程(系统中运⾏的程序)是被⽤户和⽤户组所拥有的,就像⽂件和⽬录⼀样。
⼀个进程只有当它的拥有者和拥有者组拥有相应的权限时,它才可以读、写并执⾏⼀个⽂件或⽬录。
Red Hat Linux 系统通常配置成由⽤户apache 和组apache 运⾏apache Web服务器进程。
在系统安装的时候该⽤户和组已经作为apache 的⼀部分已经建⽴。
假设你有⼀个⽬录结构 /home/student/archive ⾥⾯有许多的⽂件和⽬录,都被设置为权 限700。
你想将archive ⽬录在Internet 上设置为可访问的,但是当前的许可并不允许web服 务器(以⽤户apache 运⾏)访问⽂件。
RHCE笔记

其次将yum源各项参数介绍一下哈:
[root@localhost /]# cat /etc/yum.repos.d/rhel-source.repo
[base]
name=Red Hat Enterprise Linux $releasever - $basearch - Source
DEVICE="eth0" #设备名称叫eth0
HWADDR="00:0C:29:FF:33:5E" #设备MAC地址
NM_CONTROLLED="yes" #是否被NetworkManager服务进行管理。
NetworkManager、NetworkManagerDispatcher
dumpe2fs 1.41.12 (17-May-2010)
Default mount options: user_xattr acl
动态实时重新挂载目录使其支持acl:
我这里以自己的分区/aa为例
mount -o remount,acl /aa
并将选项加入fstab文件使其下次开启自动生效。
二、ACL的名词定义
先来看看在ACL里面每一个名词的定义。
ACL 是由一系列的访问条目所组成的. 每一条访问条目定义了特定的类别可以对
文件拥有的操作权限. 访问条目有三个组成部分: Entry tag type, qualifier
(optional), 权限
我们先来看一下最重要的Entry tag type, 它有以下几个类型
IPV6_AUTOCONF=no (开启或关闭IPv6自动配置;关闭no,开启yes)
NETMASK=255.255.255.0 (网卡对应的网络掩码)
rhce考前注意事项

rhce考前注意事项好的,以下是为您生成的一篇关于“rhce 考前注意事项”的文章:---## 《rhce 考前注意事项》嘿,亲爱的小伙伴们!准备踏上 RHCE 考试的征程啦?别着急,先听我唠唠考前的那些重要注意事项,这可关乎到你能不能在考场上“大杀四方”,顺利拿下证书哦!首先,咱们来说说知识储备这一块。
就好比你要去打仗,得先把武器弹药准备充足不是?把 RHCE 相关的知识点再好好梳理一遍,特别是那些容易混淆的、容易被忽略的“小怪兽”。
别让它们在考场上突然跳出来给你捣乱。
想象一下,如果你在考场上突然忘记了某个关键命令,就像战士上战场发现枪没子弹了,那得多尴尬呀!复习的时候,一定要注重实践操作。
毕竟,RHCE 可不是纸上谈兵的考试。
多在虚拟机里练练手,把各种服务的配置、系统的优化都玩得溜溜的。
这就好比你学骑自行车,光看理论不上去骑几圈,永远也掌握不了平衡。
然后呢,考前一定要保证充足的睡眠。
别为了多复习一点,就熬到半夜三更,结果第二天在考场上哈欠连天,脑袋像浆糊一样。
要知道,一个清醒的大脑比什么都重要。
这就像汽车需要加满油才能跑得飞快,你的大脑也需要充足的休息才能高效运转。
还有哦,考试当天可别迟到!提前规划好路线,算好时间,最好能提前到达考场,熟悉一下环境,缓解一下紧张的心情。
要是因为迟到而错过了考试,那可真是“哑巴吃黄连——有苦说不出”啦。
进入考场后,要遵守考场的规则,别像个调皮的孩子一样到处乱看乱摸。
听从监考老师的安排,他们可是考场上的“指挥官”,不听话可是要吃“苦头”的。
在答题过程中,要仔细阅读题目,别一看到题目就像饿狼扑食一样冲上去。
有时候,题目里可能藏着一些小陷阱,等着你掉进去呢。
就像钓鱼的时候,鱼儿看起来很诱人,但可能鱼钩就藏在鱼饵下面。
遇到难题别慌张,先把会做的题目做完,再回过头来攻克难题。
这就像吃饭,先把容易吃的菜吃掉,再慢慢对付那些难啃的骨头。
考试的时候,心态要放平和,别给自己太大的压力。
RHCE 知识点
RHCE exam candidates should be able to accomplish the following without assistance. These have been grouped into several categories.RHCE考生应该独立完成下列任务。
1: System Configuration and Management1: 系统配置与管理Route IP traffic and create static routes路由IP流量和创建静态路由Use iptables to implement packet filtering and configure network address translation (NAT) 使用iptables实现包过滤和配置网络地址转换(NAT)Use /proc/sys and sysctl to modify and set kernel run-time parameters使用/proc/sys和sysctl来修改和设置内核运行时参数Configure system to authenticate using Kerberos配置系统使用Kerberos进行身份验证Build a simple RPM that packages a single file构建一个简单的rpm包Configure a system as an iSCSI initiator that persistently mounts an iSCSI target配置系统启动并挂载iSCSI设备Produce and deliver reports on system utilization (processor, memory, disk, and network)产生和提供对系统使用情况报告(处理器,内存,磁盘和网络)Use shell scripting to automate system maintenance tasks使用shell脚本来自动化系统维护任务Configure a system to log to a remote system配置系统登录到远程系统Configure a system to accept logging from a remote system配置系统,以接受来自远程系统日志2: Network Services2: 网络服务Network services are an important subset of the exam objectives. RHCE candidates should be capable of meeting the following objectives for each of the network services listed below: 网络服务是一个重要的考试部分。
RHCE学习笔记
目录RHCE 学习笔记 (3)一、破解ROOT密码 (3)二、设置不能破解ROOT密码 (4)三、防火墙 (7)四、SELinux配置 (12)4.1 SELinux的三种模式、两种策略 (12)五SSH远程登录协议 (17)六、system-config-工具 (19)七、LVM逻辑卷轴(LVM) (19)7.1 LVM组件 (19)7.2 使用终端SHELL来管理LVM (23)八、kickstart无人值守安装(踢一脚就开始) (26)九、磁盘主引导记录MBR使用和修复 (30)十、网络共享访问 (34)RHCE 学习笔记一、破解ROOT密码步骤一:在5S中内,抓住时机;按任意键(除Enter键之外),进入操作系统菜单项。
步骤二:注意界面提示,按住E表示编辑菜单项。
步骤三:按住E进入菜单编辑项。
选择内核操作,给当前内核发送一个1或者single,启动后进入单用户模式。
步骤四:按Enter键进入操作系统界面,按B单用户模式启动。
步骤五:进入单用户模式,我们先要关闭SELinux,用getenforce获取状态,用setenforce更改。
密码更改完毕,输入init6重新启动。
二、设置不能破解ROOT密码步骤一:如何防止他人更改密码呢?单用户加密(重要说明:在grub.conf文件中,输入加密密码。
有明文加密和MD5加密两种)[root@huatech ~]# grub-md5-cryptPassword: jstvpsRetype password: jstvps$1$BQRsl1$1KNVkYSKSzvK3rZeLk.Nb0步骤二:把秘钥输入到grub.conf中。
建议:先备份grub.conf文件。
[root@huatech ~]# cp /boot/grub/grub.conf /boot/grub/grub.conf.bak[root@huatech ~]# vim /boot/grub/grub.conf步骤三:此时按E键无法进行编辑,只有先按P键,输入密码,才能进行编辑。
RHCE笔记(监控管理进程-日志管理-控制服务和守护进程)
I.监控管理进程/日志管理/控制服务和守护进程124-7 监控和管理进程一、进程基本概念1、一个进程组成部分1)已分配的内存地址空间2)安全属性、包括所有凭据和特权3)程序代码的一个或多个执行线程4)进程状态2、进程的环境1)本地和全局变量2)当前调度上下文3)分配的系统资源,如文件描述符和网络端口3、父进程和子进程及进程的生命周期1)systemd是所有进程父进程。
2)父进程生成子进程,并为其调度资源。
3)子进程处于前端(显示)。
4)子进程exit后,其运算资源为可被调用,由父进程回收。
5)如果子进程的资源未被父进程回收(父进程意外关闭),将处于僵尸状态,导致内存泄露,资源减少。
二、进程状态1、进程状态关系图2、进程状态表1)Sleep为等待状态,如ping间隔时(主要看应用)如cp进程也会在拷贝过程中sleep,cpu释放进行其他作业,cpu等待i/o结束后再唤醒复制进程。
由于cp进程在复制期间保持不能中断,进程等待。
2)常见状态:R S T ——R状态取决于cpu核数,大部分为S,Z为瞬间出现。
3、查看进程1)使用ps命令可查看当前终端的进程,参数如下:2)常见组合:aux,-ef,-o <title>三、控制作业1、作业控制1)作业控制是shell的一种功能,允许单个shell实例运行和管理多个命令2)每个终端有一个会话(具有一个前台进程和多个后台进程),一个作业只能它所在的终端的会话3)作业可以前台运行也可以后台运行2、查看作业和调度作业1)Jobs命令可以查看当前shell的后台作业2)fg 命令可以将后台作业调到前台3、操作示例四、中断信号1、基本信号管理2、中断信号操作1)kill -l 列举信号2)kill -信号pid暂停一个作业:kill -19 %1恢复一个作业:kill -18 %13)killall 批量杀进程,可匹配关键字4)pkill 针对用户、组中断进程五、监控进程活动1、查看CPU参数1)cat /proc/cpuinfo:查看cpu信息2、查看CPU使用1)uptime 查看1/5/15分钟的cpu使用3、top监控进程动态1)top命令看到系统进程的动态视图2)top操作键135-4 管理进程优先级一、进程优先级和NICE1、Priority和Nice1)进程cpu资源分配就是指进程的优先权(priority),优先权高的进程有优先执行权利。
原创-RHCE学习笔记 11年4月12日 第十三天
原创:RHCE学习笔记11年4月12日第十三天tune2fs -j /dev/sda6 //t2转ext3 mount -t ext2 /dev/sda6 //ext3挂载为ext2 -b 5120 -j /dev/sda6 tune2fs -l/dev/sda6 e2label /dev/sda5 aaa 加卷标 blk /dev/sda6 //查看卷标 fs LATEL=databack //按照卷标找分区 fuser -v /data //查看正在用法文件系统的进程 fuser -km mount_point //结束全部文件系统中活动的进程 mount -o remount,rw/dev/hda5 //修改挂载的属性 shouwmount -e 192.168.0.254 //查看NFS分享资源 mount --bind /data/aaa /dataaaa //挂载其它已经挂载的名目 -a 可查看到交换分区文件和分区查看内存用法状况添加虚拟内存swap,从空白分区 /dev/sda5/dev/sda5 从其它分区的名目添加虚拟内存swap /data/blank swapon swap if =/dev/zero of=swapfile bs=1M count=2048 //创建新文件 mkswap swapfile swapon swapfile swapfile NFS 文件系统 showmount -e 192.168.0.254 mount -t nfs192.168.0.254;/ddata-back /damon //挂载到本地/damon下自动挂载器 vim /etc/auto.master /etc/auto.misc /etc/auto.nis /home/guests /etc/auto.nis vim /etc/auto.nis *(本地name) -ro,soft,in 192.168.0.254:/home/guests/ service autofs restart /my /etc/auto.nis /myftp vim /etc/auto.nis 192.168.0.254:/var/ftp/pub/ vim /etc/auto.master/myftp /etc/auto.nis --out=90 设置超时Windows Server 2003 Standard Edition 全局设置vim /etc/sysconfig/autofs 设置默认超时光隔默认300秒只支持挂载名目比如要挂载远程名目 :/var/ftp/pub名目下的内容 auto.nis里只能写:/var/ftp/pub,若写成 :/var/ftp/pub/ 或者 :/var/ftp/pub/ 都会挂载不胜利。
RHCE培训笔记
2013-12-23星期一上午Linux下的磁盘标识显示型式:sda第一位:磁盘类型标示符IDE—hSATA—sSCSI—s第二位:磁盘标示符—d(disk)第三位:磁盘序列标示符a—第一块b—第二块……以此类推Linux系统下的分区标识Sda1 sda2……Sdb1 sdb2……主分区(引导,最多4个)扩展分区(不可引导,,可以没有要有只有1个)逻辑分区(不可引导,若干个,逻辑分区的大小不能超过扩展分区)Linux下的文件系统Ext2 linux的文件类型Ext4 linux的文件类型,是ext2的升级版本1EB=1024PB=10242TBLinux支持的其他文件系统类型Fat16 fat32NTFSXFS JFS下午1、安装vmware2、配置一台虚拟PC3、安装linux2、配置一台虚拟机PCStep1:新建虚拟机Step2:自定义Step3:选择虚拟机的硬件兼容性(默认)Step4:客户机操作系统安装,选择“我以后再安装操作系统”Step5:选择客户操作系统,linux –版本Red Had Enterprise Linux 6 (32位操作系统)linux –版本Red Had Enterprise Linux 6 -64bit(64位操作系统)step6:虚拟机名称(默认)位置, 选择大于20G的盘在盘中创建新文件夹用来存放linux操作系统。
Step7:处理器配置选择默认。
Step8:该虚拟机内存选项。
物理内存>4G选择2G。
<4G选择一般就行。
Step9:网络类型有物理网卡就行(默认就行)Step10:选择I/O控制器类型SCSI控制器LSI逻辑(L)建议Step11:选择一个磁盘-创建一个新的虚拟磁盘Step12:选择一个磁盘类型SCSI(S)建议。
Step13:指定磁盘容量选择默认20G ,单个文件存储虚拟磁盘。
(可存放超大文件)Step14:继续-完成。
Step15:3、安装时需注意:分区/boot分区350MB/ 分区10240MB(10G)swap分区1024MB[root@localhost desktop]#whoami //当前登录用户[root@localhost desktop]#who //当前用户详细信息[root@localhost desktop]#hostname //主机名[root@localhost desktop]#pwd //当前路径[root@localhost desktop]#cd / //切换路径倒[root@localhost desktop]#ls //查看根目录下的文件[root@localhost desktop]#cd /mnt[root@localhost desktop]#mkdir dir1//创建目录[root@localhost desktop]#ls[root@localhost desktop]#touch file1[root@localhost desktop]#ls[root@localhost desktop]#clear[root@localhost desktop]#rmdir dir1 //删除目录[root@localhost desktop]#ls[root@localhost desktop]#touch file1[root@localhost desktop]#touch file2[root@localhost desktop]#ll //查看目录下的详细信息[root@localhost desktop]#rm file 按tab键补全命令[root@localhost desktop]#rm –f file2 -f force强制[root@localhost desktop]#touch file1[root@localhost desktop]#vim file1[root@localhost desktop]#cat file1//查看文件信息[root@localhost desktop]#ls[root@localhost desktop]#mkdir dir1[root@localhost desktop]#cd dir1[root@localhost desktop]#vi file2[root@localhost dir]#rmdir dir1 //当前目录是dir 只能删除dir目录下的文件和目录[root@localhost dir]#cd .. //回到父级目录[root@localhost dir]#ls[root@localhost dir]#rmdir dir1[root@localhost dir]#rm –r dir1 //–r表示递归表示做同样的操作rm:descend into directory ‘dir1’?yrm:remove regular file ‘dir1/file2’?rm:remove directory ‘dir1’?[root@localhost dir]#ls[root@localhost dir]#rm –r dir1/rm:descend into directory ‘dir1’?yrm:remove regular file ‘dir1/file2’?yrm:remove directory ‘dir1’?y[root@localhost dir]#ls[root@localhost dir]#mkdir dir1[root@localhost dir]#cd dir1[root@localhost dir]#touch file1 file2[root@localhost dir]# cd ..[root@localhost dir]#ll[root@localhost dir]#rm –r –f dir1[root@localhost dir]#ls[root@localhost dir]#ls -a[root@localhost dir]#ls --all[root@localhost dir]#ls --help[root@localhost dir]#ls -a[root@localhost dir]#rmdir 只能删除空目录。
- 1、下载文档前请自行甄别文档内容的完整性,平台不提供额外的编辑、内容补充、找答案等附加服务。
- 2、"仅部分预览"的文档,不可在线预览部分如存在完整性等问题,可反馈申请退款(可完整预览的文档不适用该条件!)。
- 3、如文档侵犯您的权益,请联系客服反馈,我们会尽快为您处理(人工客服工作时间:9:00-18:30)。
第一章get started with the gnome graphical desktop1、using the gnome desktop2、editing files with gedit第二章manage files graphically with nautilus1、nautilus file manager #using nautilus2、using remote storage3、managing local files with nautilus4、accessing remote file systems in nautilus5、managing remote fiels with nautilus6、copy,move ,and remove remote files第三章get help in a graphical environment1、research local documentation2、research on-line documentation3、getting the most from Red Hat Global Support Services第四章configure local services1、understand the role of the root user2、manage the system clock3、configure printers4、manage print queues5、manage print jobs6、print job management第五章get started with bash1、introducing to bash2、using the command line3、using bash4、launching graphical tools from bash第六章manage physical storage I1、IBM PC storage model2、Determine disk usage3、Manage virtual guests4、Create a new file system5、Describe MBR,Primary,Extended ,and logical partitions6、List available disk devices7、Introduce classroom virtual machines8、Create a new disk partition, format it with a file system and use it . 第七章Manage logical volumes1、LVM(logical volume management ) concepts and terms2、Displaying LVM usage3、Deploying LVM4、Extending LVM storage5、Extending a file system on LVM6、Removing a disk from LVM7、General LVM concepts and terms8、Displaying current LVM usage9、Initial LVM deployment10、Extending a volume group11、extending a logical volume12、Removing a physical volume第8章M onitor system resources1、processes, priorities ,and signals #understand2、system monitor #monitor processes bye CPU or Memory3、process management #manage running processes4、Terminate and change process priority5、Monitor disk usage #disk usage analyzer6、Monitoring processes and filesystems第9章manage system software1、software inventory2、Red Hat Network (RHN) registration3、manage packages4、Identify installed packages5、Using packageKit6、Register with Red HAT network (RHN)(1)what is red hat network ?(2) using rhn_register7、install ,remove,and update packages8、software management & update and install software第10章get help in a textual environment1、man reader(1)read documentation using man(2)navigating man pages(3)identify relevant man pages by keyword2、searching for keywords3、pinfo reader #read documentation using pinfo4、additional package documentation5、documentation in /usr/share/doc第11章establish network connectivity1、IPV4 concepts2、Linux network configuration3、Confirming network functionality4、Essential network concepts5、Ipv6 networking concepts6、Network routing and dns concepts第12章administer users and groups1、user and group administration2、creating ,and deleting users3、disabling user accounts4、creating and deleting groups5、changing group memberships6、managing password aging policies第13章manage files from the command line1、linux file system hierarchy2、absolute path names3、file/directory management commands4、relative path names5、command line file management6、save typing with relative path names7、relative path name applications: gather vs.scantter第14章secure linux file access1、user/group/other (UGO)security scheme2、nautilus file security3、cmmand line file security4、manage permissions using GUI tools5、manage permissions from the command line6、changing file/directory user or group ownership7、special permissions第15章administrattor remote systems1、remote shell access2、remote file transfers3、archives and compression4、SSH keys第16章configure general services1、managing network services2、SSH hardening3、Desktop server (VNC) configuration4、Secure remote desktop access5、Deploy a generic network service6、Securing SSH access7、Configuring a VNC server8、Secure Access to a remote GNOME desktop 第17章manage physical storage II1、file system parameters2、modify file system parameters3、partition removal4、swap space concepts5、swap space management6、examine filesystem parameters7、delete an existing partition8、swap space concepts第18章install linux graphically1、anaconda: Red Hat Enterprise Linux’s installer2、Firstboot customization3、Graphical installation with Anaconda getting started with Anaconda4、Troubleshooting Anaconda5、Post-install configuration with firstboot第19章manage virtual machines1、KVM virtualization2、Virtual guest installation3、Autostart at boot4、Introduction to KVM virtualization5、Virtual guest installation6、Configuring guests to start at boot time7、Configuring virtual machines at boot-time第20章control the boot process1、boot an alternate kernel2、boot into a specific runlevel3、overcome bootloader misconfigurations4、/boot/grub/grub.conf5、Kernel boot parameters6、/etc/inittab7、Booting an alternate kernel8、Booting into a different runlevel9、Changing the root password10、Resolve grub issues11、Making persistent grub changes12、Passing kernel arguments13、Passing kernel arguments14、Changing the default runlevel第21 章deploy file sharing services1、ftp server deployment2、ftp server configuration3、web server deployment4、web server configuration5、deploy an ftp server6、ftp server configuration7、restrict ftp access8、deploy a web serverservice vsftpd restartchkconfig vsftpd onvsftpd的配置文件见:/etc/vsftpd/vsftpd.confvsftp server的默认根目录为/var/ftp/pub , 我们也可以通过annon_root= “”来修改。