Unity3D——进度条的显示
unity用代码控制动画的播放的进度

unity⽤代码控制动画的播放的进度using UnityEngine;public class NewBehaviourScript : MonoBehaviour {//Animation 需要将动画调为Legacy,//⾃建的动画可以在Inspector⾯板下调为Debug模式,勾选上Legacy就可以了//public Animation _animation;public Animator _animator;void Start () {//_animation.Play("New Animation1");// _animation["New Animation1"].speed = 0;_animator.speed = 0;}float step = 0;float timer = 0;void Update () {//if (Input.GetMouseButton(0))//{// timer += Time.deltaTime;// if (timer>0.1f)// {// step += 0.1f;// if (step <= 1)// {// _animation["New Animation1"].normalizedTime = step;// Debug.Log(step);// }// else// {// step = 0;// }// timer = 0;// }//}if (Input.GetMouseButton(1)){timer += Time.deltaTime;if (timer > 0.1f){step += 0.1f;if (step <= 1){_animator.Play("New Animation1", 0, step);Debug.Log(step);}else{step = 0;}timer = 0;}}}}How to control animation with sliderHello, Im a noob to unity.Ive searched and it seems there have been similar questions to this, but answered with advanced knowledge. I have no idea how to start this.(attached image) I have a hand pinching a block. i want to use the slider in a way that when I slide the knob to the right, the animation will advance, pinching the block.I have the animation exported in fbx format and placed in my canvas. I added the slider but don't know where to go from there as far as connecting it, and the correctscripting for it.So anything that is along the lines of using the slider to control the imported animation would be great. Please help! Thank you!(154.9 kB)· Show 23条回复·排序:1最佳解答个解答,截⽌ · 2016年08⽉07⽇ 05:17Hello I think I answered this concern base on the link shared, but if things are not yet cleared let me try to clarify it.First of all make sure that the attached component of your model is "Animation" not Animator.second make sure that the animation of your hand is "Legacy". if you don't know how to make your animation Legacy just right click the inspector "Tab" of your animation clip and check the Legacy checkbox. make sure you switch back to normal after doing this so.Third in the animation component, there is an Animations attribute. change the size to 1 and drag and drop the animation of your hand.4th Copy and paste this Script and attached it to your model in the Hierarchy. Don't forget to drag and drop the slider into the slider variable.1. using UnityEngine;2. using UnityEngine.UI;3. using System.Collections;4.5. public class AnimControl : MonoBehaviour {6. Animation anim;7. //Drag and drop your Slider into this variable.8. public Slider slider;9.10. // Use this for initialization11. void Start () {12. anim = GetComponent<Animation> ();13. //Make sure you have attached your animation in the Animations attribute14. anim.Play ("myAnimation");15. anim ["myAnimation"].speed = 0;16. }17.18.19. // Attached this on Slider's On Value Change20. public void AnimateOnSliderValue () {21. anim["myAnimation"].normalizedTime = slider.value;22. }23. }24.Hope this works.· 隐藏 1 ·· 0Something isn't working but it looks like it almost is.1. I bring my 'handAnim' fbx into the scene. The part where you say to right click for Legacy ( I think we are using different Unity versions) but I changed theAnimation type to Legacy and did 'Apply', you say put back to normal but I dont see a normal option'. see screen shot below on 'answer' ( I couldnt add on reply)2. Confirmed Im using Animation with size 1, used your script and where it says 'myAnimation' replaced with with 'handAnimation', and dropped it on my handAnimcomponent hierarchy, and after bringing my slider into the scene, and also dragged and dropped the slider into the Slider variable3. // Attached this on Slider's On Value Change public void AnimateOnSliderValue () { anim["myAnimation"].normalizedTime = slider.value; --For this part, On ValueChange under Runtime, I connected the 'handSlider (slider) and selected 'value' (is that right?)4. I hit play, notice there are no errors in my console but the slider isn't affecting the animation. Now I do realize my animation starts and ends (23.0-49.0) Will thisaffect the slider when the slider triggers the animation and do I need to indicate that its starts at frame 23? If so, how?Thanks A TON!!!2个解答,截⽌ · 2017年02⽉22⽇ 14:56The solution provided by Vfxjex doesn't work for me because the Animation component has to be marked as Legacy. I try this solution using Animator insteadof Animation and it works for me:1. using UnityEngine;2. using UnityEngine.UI;3.4. public class ControlAnimation : MonoBehaviour5. {6. private Animator anim;7. public Slider slider; //Assign the UI slider of your scene in this slot8.9. // Use this for initialization10. void Start()11. {12. anim = GetComponent<Animator>();13. anim.speed = 0;14. }15.16. // Update is called once per frame17. void Update()18. {19. anim.Play("TEST_DELETE", -1, slider.normalizedValue);20. }21. }22.· 隐藏 1 ·· 0I am trying to control my animation via scroll wheel, and this method works fine. Thanks for posting. :)个解答,截⽌ · 2016年08⽉10⽇ 19:27I got it working! ThanksFor anybody thats looking for how I got it to work, I put a step-by-step tutorial (Im still a noob to Unity so my explanation is very basic!!)Lets use a simple example to demonstrate how to use a slider to control a simple animated object that has been exported (fbx)Im using a model of fingers pinching a skin anatomical figure that I built and animated called 'handAnimationsv002'. I’ve exported the model, joints and blend shape (animated from frame 0-24). I will refer to the names I used in the project, but substitute whatever you may have. Use these images to reference the figuresImport your fbx into your Unity project (Im using the 2D option)Figure 1. Select your model. Go into the ‘Rig’ tab. Change Animation type to Legacy and hit Apply.Figure 2 Create your Canvas (this will add an EventSystem to your project). Drag your fbx over the canvas to create a child of Canvas.I adjusted the scale and rotation for this just because my export came out too small. Ive also put in a directional light (default) to light this model. Expand the fbx icon in your project folder to reveal all the parts of the model.Ive changed name of the icon with the play button to ‘animateHand’ for the script later.Drag the ‘animateHand’ icon into the value of Animation and make sure your size is set to 1.Hit Play. You may not see anything. In this case. Ive adjusted both my canvas and main camera settings. I also switched over to 3D view temporarily to see how things are aligned.Figure 3 Take note of your Pos X and Pos Y to use on your Main Camera Settings. Change the render mode to ‘World Space’ .Figure 4 Select the Main Camera and Plug in the X and Y position to match the canvas.Using your 3D scene, move the camera in Z-Axis to get your models in view.Adjust the Size and Clipping Planes accordingly.Hit Play now and the scene should be in place. If you notice the object animates, turn off ‘Play Automatically’ on ‘handAnimationsv002’ settingFigure 5 Create the script ‘AnimControl’ and copy paste this script (courtesy of )using UnityEngine; using UnityEngine.UI; using System.Collections;public class AnimControl : MonoBehaviour { Animation anim;1. //Drag and drop your Slider into this variable.2. public Slider slider;3.4. // Use this for initialization5. void Start () {6. anim = GetComponent<Animation> ();7.8. //Make sure you have attached your animation in the Animations attribute9. anim.Play ("animateHand");10. anim ["animateHand"].speed = 0;11.12. }13.14. void Update (){15. anim ["animateHand"].normalizedTime = slider.value;}}Select ‘handAnimationsv002’ in the hierarchy and drag the AnimControl script into the components area Then drag ‘Slider’ into the ‘slider value’Figure 6 Select Slider in the hierarchy and drag Slider to the On Value Changed (Single) valueFigure 7 Select value for the FunctionPress Play and try it!!。
Unity3D游戏开发之进度条制作

private List<GameObject>line; public GameObject prbCube; public Vector2 vect2; public static int tmp_x; public UILabel label1; private string str; private int tmp_num;
/// <summary> /// 显示进度 /// </summary> void OnGUI() {
label1.text=str+(tmp_num*5).ToString()+"/100"; label1.color=Color.yellow; } }
准备工作好了,运行效果:
tmp.transform.localPosition=new Vector3(((float)line.Count/10-2f)+1.2f,0.8f,0);
line.Add(tmp); } } else { foreach(GameObject i in line) {
Destroy(i); } tmp_num=0; line.Clear(); } }
2,创建 UI
3,在 Panel 下添加 slider。
4,此处 label 是为了显示游戏进度。 5,脚本 Procebar.cs,将此脚本添加到 slider 上。
using UnityEngine;using System.Collections;using System.Collections.Generic;
}
/// <summary> /// 进度条 /// </summary> void CreateLine() {
unity3D游戏开发之NGUI 圆形血条、进度条制作实现详解

通常,为了美化界面布局,进度条或者角色血条、经验条并丌是长方形的,可能会是个圆形,看了下别人的制作过程都稍显复杂,为此整理了一份步骤非常简单的制作圆形进度条或者圆形血条、经验条的方法。
这儿我们使用了一个遮罩Shader。
先来看看最终效果图:需要的美术素材如图所示:导入NGUI 以及布局经验条的步骤省略,最终的经验条树形结构如图:这儿需要特别注意的是,附加到圆形经验条的NGUI 组件类一定要是UITexture,因为UITexture 有Material 选项,这样才可以使用我们的遮罩材质。
下面是遮罩Shader 的代码:1 2 3 Shader "Custom/CircleAlphaMask" {Properties4 5 6 7 8 91011121314151617181920212223242526272829303132333435363738394041424344454647 {_Color ("Main Color", Color) = (1,1,1,1)_MainTex ("Base (RGB) Trans (A)", 2D) = "white" {}_MaskTex ("Mask (A)", 2D) = "white" {}_Progress ("Progress", Range(0,1)) = 0.5}Category{Lighting OffZWrite OffCull backFog { Mode Off }Tags {"Queue"="Transparent" "IgnoreProjector"="True"} Blend SrcAlpha OneMinusSrcAlphaSubShader{Pass{CGPROGRAM#pragma vertex vert#pragma fragment fragsampler2D _MainTex;sampler2D _MaskTex;fixed4 _Color;float _Progress;struct appdata{float4 vertex : POSITION;float4 texcoord : TEXCOORD0;};struct v2f{float4 pos : SV_POSITION;float2 uv : TEXCOORD0;};v2f vert (appdata v){v2f o;o.pos = mul(UNITY_MATRIX_MVP, v.vertex);o.uv = v.texcoord.xy;return o;}half4 frag(v2f i) : COLOR{48495051525354555657585960616263646566 67fixed4 c = _Color * tex2D(_MainTex, i.uv);fixed ca = tex2D(_MaskTex, i.uv).a;c.a *= ca >= _Progress ? 0 : 1;return c;}ENDCG}}SubShader{AlphaTest LEqual [_Progress]Pass{SetTexture [_MaskTex] {combine texture}SetTexture [_MainTex] {combine texture, previous}}}}Fallback "Transparent/VertexLit"}新建一个材质,把Shader 赋予这个新建立的材质,然后设置如下属性,如图所示:最后通过代码来控制进度的显示:1 2 3 4 5 6 7 8 91011 12using UnityEngine;using System.Collections;public class ExpBar : MonoBehaviour{public UITexture uiTexture;void Awake(){this.uiTexture.material.SetFloat ("_Progress", 0.9f);}}把ExpBar.cs 拖到ExpBar 对象上,然后把Bar 对象拖到uiTexture 属性上,如图所示:。
unity3d游戏开发之打字机·输入框·进度条·按钮
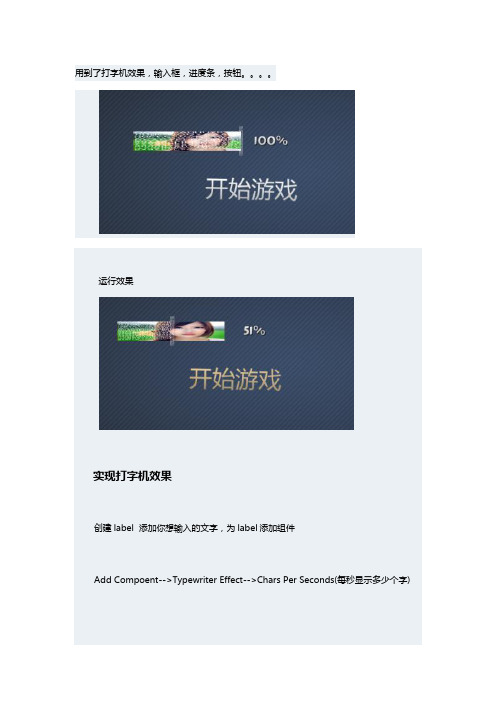
用到了打字机效果,输入框,进度条,按钮。
运行效果
实现打字机效果
创建label 添加你想输入的文字,为label添加组件
Add Compoent-->Typewriter Effect-->Chars Per Seconds(每秒显示多少个字)
添加输入框
新建一个Sprite-->为Sprite添加Box Cllider和Input Field Script-->为Sprite添加一个子Lable-->把子Label拖拉到Sprite属性Input的Label里面-->设置字体对齐方式
制作滑动条
首先,添加Sprite,再为Sprite添加一个子Sprite【要区分两个Sprite的颜色】
右键子Sprite-->Attach-->Box Collider-->右键-->Attach-->Slider Script
把子Sprite拖拉到Foregroud里面,添加一个Label(值为100%)
选中子Sprite,把Label拖拉到属性On Value Change的Notify里面,并为Method 选取setCurrentPercent值
Thumb为游标,可以添加一个子Sprite(黑色条)缩小一下放在滑动条的右边,作为游标使用
制作按钮上一篇已经说了,下面来说给按钮添加声音
添加声音
选择Label-->右键-->Box Collider-->Add Compoent-->Paly Sound-->Audio Clip-->选择声音
这篇文章来自狗刨学习网
Trigger:点击事件
Volume:声音大小
Pitch:播放速度。
Unity实现3D循环滚动效果

Unity实现3D循环滚动效果本⽂实例为⼤家分享了Unity实现3D循环滚动效果展⽰的具体代码,供⼤家参考,具体内容如下然后通过SetDepthAndPosition这个⽅法,实现图⽚的空间空间展开Z轴和Y轴,系数是⼀样的经过上⾯设置,空间就摆开了using UnityEngine;using System.Collections;using System.Collections.Generic;public class SelectRole : MonoBehaviour {public GameObject rolesObj;private int _half = 0;//⼀侧的卡⽚数private int _movX = 150;//X轴移动距离private int _movY = 50;//Y轴移动距离private int _movZ = 60;//Z轴移动距离private int count = 3;//组件数private List<RoleItem> _roleList = new List<RoleItem>();// Use this for initializationvoid Start () {//加载图⽚Object[] textureList = (Object[])Resources.LoadAll("Pictures");int maxDepth = textureList.Length % 2 == 1 ? textureList.Length / 2 + 1 : textureList.Length / 2;//最⼤深度 _half = maxDepth;for (int i = 0; i < textureList.Length; i++){//加载⾓⾊图⽚预设GameObject role = Instantiate(Resources.Load("Role", typeof(GameObject))) as GameObject;role.transform.parent = rolesObj.transform;role.transform.localScale = Vector3.one;EventDelegate.Add(role.GetComponent<UIToggle>().onChange , RoleToggleChange);RoleItem item = role.GetComponent<RoleItem>();item.texture.mainTexture = textureList[i] as Texture;//设置⾓⾊卡⽚排序命名 = maxDepth.ToString();if (i > 0){//奇数设置为右边,下标为正数if (i % 2 == 1){maxDepth--; = maxDepth.ToString();}//偶数设置为左边,下标为负数else{ = "-" + maxDepth.ToString();}}SetDepthAndPosition(item,0,0);_roleList.Add(item);}}private void SetDepthAndPosition(RoleItem role,int dir,int index){int indexDepth = 0;//左右移动后,重新排序命名if (dir != 0){if (index*dir > _half )indexDepth = -dir * (_half - 1);elseindexDepth = index > -1 && index < 1 ? dir : index; = indexDepth.ToString();}else{indexDepth = int.Parse();}TweenPosition tp = role.GetComponent<TweenPosition>();int x = indexDepth < 0 ? -(_half + indexDepth) * _movX : (_half - indexDepth) * _movX;indexDepth = System.Math.Abs(indexDepth);tp.to = new Vector3(x, (_half - indexDepth) * _movY, (_half - indexDepth) * _movZ);role.bg.depth = count * indexDepth;role.active.depth = 1 + count * indexDepth;role.texture.depth = 2 + count * indexDepth;role.GetComponent<UIToggle>().value = indexDepth == _half ? true:false;tp.PlayForward();}/// <summary>/// 左边/// </summary>public void LeftClick(){//重新排列顺序foreach (RoleItem role in _roleList){int index = int.Parse();print(index);SetDepthAndPosition(role,1,++index);}}/// <summary>/// 右边/// </summary>public void RightClick(){//重新排列顺序foreach (RoleItem role in _roleList){int index = int.Parse();SetDepthAndPosition(role,-1,--index);}}/// <summary>/// ⿏标选中某个⾓⾊/// </summary>public void RoleToggleChange(){if(UIToggle.current.value){int index = int.Parse();int moveCount = _half - System.Math.Abs(index);//移动个数for (int i = 0; i < moveCount;i++ ){if (index > 0)LeftClick();elseRightClick();}}}}以上就是本⽂的全部内容,希望对⼤家的学习有所帮助,也希望⼤家多多⽀持。
unity匀速经验条-概述说明以及解释

unity匀速经验条-概述说明以及解释1.引言1.1 概述概述部分的内容:经验条在游戏中扮演着非常重要的角色,它被广泛应用于各种类型的游戏中,为玩家提供了一种可视化的方式来表示角色或者玩家在游戏中的进展和成长。
Unity作为一款功能强大的游戏开发引擎,也为开发者提供了丰富的工具和资源来设计和实现经验条。
本文将讨论Unity中的一种特定类型的经验条,即匀速经验条。
与其他类型的经验条不同,匀速经验条具有一种特殊的设计风格和表现形式,旨在提供平稳且可预测的游戏体验。
通过匀速经验条,玩家可以清晰地了解到他们在游戏中的进展情况,并且便于预判和计划下一步的行动。
在本文的后续章节中,我们将首先探讨Unity中经验条的作用,以及为何匀速经验条是一种受欢迎且有效的设计选择。
随后,我们将介绍Unity 中设计匀速经验条的原则和技巧,以便开发者能够根据自己的需求和游戏特性来设计并实现一个合适的匀速经验条。
最后,在结论部分,我们将总结匀速经验条在游戏中的应用价值,并展望其未来的发展方向。
希望通过本文的阅读,读者们能够对Unity中的匀速经验条有一个全面的了解,并能够运用这些知识来设计和实现自己的游戏经验条。
文章结构部分的内容可以按照以下方式来编写:在编写本文时,将按照以下结构来组织文章内容:1. 引言1.1 概述在本节中,我们将介绍本文所要讨论的主题——Unity中的匀速经验条。
我们将解释经验条的概念和其在游戏中的重要作用。
1.2 文章结构本文将分为三个主要部分:引言、正文和结论。
在引言中,我们将简单介绍本文的目的和结构。
接下来,正文部分将详细讨论Unity中经验条的作用和设计原则。
最后,在结论部分,我们将总结经验条在游戏中的应用价值,并展望其未来的发展方向。
1.3 目的本文的目的是为读者提供关于Unity中匀速经验条的全面指导。
通过阅读本文,读者将了解到经验条在游戏中的重要性以及如何根据设计原则来设计和实现匀速经验条。
Unity3D游戏开发之自定义 Unity 网络播放器加载屏幕
Unity3D游戏开发之自定义 Unity 网络播放器加载屏幕自定义 Unity 网络播放器 (Web Player) 加载屏幕Unity网络播放器 (Web Player) 在加载内容时默认显示一个小的 Unity 徽标和进度条。
可以自定义加载屏幕的外观,包括徽标和进度条显示。
(请注意,只有 Unity 专业版可以修改载入程序图像。
)有六个可选参数可以传递给 UnityObject,用来自定义 Unity 网络播放器 (Web Player) 加载屏幕的外观。
它们分别是:1、backgroundcolor:加载时网络播放器内容显示区域的背景色,默认为白色。
2、bordercolor:加载时网络播放器内容显示区域的边框色,默认为白色。
3、textcolor:错误信息文本的颜色(如数据文件加载失败时)。
默认为黑色或白色,根据背景色而定。
4、logoimage:自定义徽标图像的路径。
加载时徽标图像位于网络播放器内容显示区域的中央。
5、progressbarimage:加载时用作进度条的自定义图像路径。
进度条图像的宽度根据完成的文件加载量进行裁剪,采用动画效果,从零像素宽开始直至加载完成时到达原始宽度。
进度条位于徽标图像下方。
6、progressframeimage: 加载时将进度条框起来的自定义图像路径。
提供的所有颜色值必须为六位数十六进制颜色(如 FFFFFF、020F16 等)。
提供的图像路径可以是相对链接或绝对链接,所有图像文件必须为 RGB 格式(不透明)或 RGBA 格式(透明)以 8 位数/通道保存的 PNG 文件。
最后,progressframeimage 和 progressbarimage 的高度应相等。
文章出处【狗刨学习网】以下是自定义 Unity 网络播放器 (Web Player) 加载屏幕外观的脚本示例。
背景色设为浅灰 (A0A0A0),边框颜色为黑色 (000000),文本颜色为白色 (FFFFFF),载入程序图像为 MyLogo.png、MyProgressBar.png 和 MyProgressFrame.png。
Unity3D技术之使用WWW加载游戏场景并显示进度条实现详解
Unity3D 使用 WWW 加载游戏场景并显示进度条实现详解Unity3D加载场景有很多种方式,做一些小的 DEMO 的时候往往是直接使用Application.LoadLevel 或者 Application.LoadLevelAsync 加载场景,,但是这种办法不适合在真正的 Unity3D 开发中,因为前一种需要把所有的场景都打包,这在某些情况下是不现实的,比如开发页游,我们不可能把所有的场景都打包让用户下载,我们需要一个场景一个场景的加载,这时候我们可以使用 WWW 先通过 HTTP 加载场景到本地缓存,然后再使用 Application.LoadLevel 或者 Application.LoadLevelAsync 函数加载场景,使用这种加载方式,不仅不需要 Build Settings -> Add Current 处理加载场景,进度条的显示也更加容易,但是使用这种方式,需要先把场景打包成 unity3d 或者 assetbundle 文件。
--来自狗刨学习网先把测试场景搭建好,如图:然后添加一个 C# 脚本,取名 UseWww.cs,全部代码如下:ing UnityEngine;ing System.Collections;3.4.public class UseWww : MonoBehaviour5.{6.public UISlider progressBar;7.public UILabel lblStatus;8.9.private WWW www;10.private string scenePath;11.12.void Awake()13.{14.this.scenePath = "file:///" + Application.dataPath +"/Assets/MainScene.unity3d";15.// 开始加载场景16.this.StartCoroutine (this.BeginLoader ());17.}18.19.void Update()20.{21.if (this.www != null && this.progressBar != null && !this.www.isDone)22.{23.// 更新进度24.this.progressBar.value = this.www.progress;25.}26.}27.28.private IEnumerator BeginLoader()29.{30.this.lblStatus.text = "场景加载中,请稍候。
Unity3D游戏开发之异步加载游戏场景与异步加载游戏资源进度条
Unity3D游戏开发之异步加载--游戏场景游戏资源进度条异步任务相信大家应该不会陌生那么本章内容将带领大家学习Unity中的一些异步任务。
在同步加载游戏场景的时候通常会使用方法Application.LoadLevel(“yourScene”); 这句代码执行完毕后程序会干什么呢如下图所示这是我随便找了一个游戏场景在Hierarchy视图中我们可以看到该场景中“天生”的所有游戏对象。
天生的意思就是运行程序前该场景中就已经存在的所有游戏对象。
然后这些对象就会在执行完Application.LoadLevel(“yourScene”);方法后加载至内存当中。
如果该场景中的游戏对象过多那么瞬间将会出现卡一下的情况因为LoadLevel()方法是同步进行的。
把这种加载起个名字叫A形式加载。
下面我说说“后天“加载的游戏对象。
意思是这些游戏对象是通过脚本动态的创建出来的。
比如常用方法:GameObject Obj = (GameObject)Instantiate(prefab);这句代码执行完毕后同样会在Hierarchy视图中添加对应的游戏对象。
把这种加载起个名字叫B形式加载。
下面我们学习异步加载游戏场景异步异步顾名思义就是不影响当前游戏场景的前提下加载新场景。
通常异步加载的方式分为两种第一种是异步加载新游戏场景当新场景加载完成后进入新场景并且销毁之前的场景。
第二种:同样异步加载新场景新场景加载完毕后保留旧场景的游戏对象并且进入新场景。
这里加载的内容就是上面提到的A形式加载。
然后B形式加载不会记入这里的加载。
第一种异步加载游戏场景对应的方法是Application.LoadLevelAsync("yourScene");第二种异步家在游戏场景对应的方法是Application.LoadLevelAdditiveAsync ("yourScene");这两种方法加载的方式完全一样。
Unity场景加载进度条优化
Unity场景加载进度条优化Unity场景加载进度条优化Unity场景加载进度条优化1. 场景进度条优化Du先⽣开发游戏**为了增加游戏体验,我在⽣常会对进度条进⽣优化。
通常通过异步的⽣式加载场景,从⽣获取场景进度。
为了增加游戏体验,会使⽣两个变量⽣个变量接受场景的实际加载进度,另外⽣个⽣来接受UI 显⽣进度。
使⽣显⽣进度向实际进度靠近的⽣式显⽣进度条。
主要代码如下:public Slider slider_loader;private void Start(){StartCoroutine(LoadSliderSync("Main"));}private IEnumerator LoadSliderSync(string sceneName){int dispayProject =0;int toProject =0;AsyncOperation async= SceneManager.LoadSceneAsync(sceneName);async.allowSceneActivation =false;if(async.progress <0.9){toProject =(int)async.progress *100;while(dispayProject < toProject){++dispayProject;SetLoadSlide(dispayProject);yield return new WaitForEndOfFrame(); }}toProject =100;while(dispayProject<toProject){++dispayProject;SetLoadSlide(dispayProject);yield return new WaitForEndOfFrame(); }async.allowSceneActivation =true;}private void SetLoadSlide(float prg) {slider_loader.value= prg /100;}**。
- 1、下载文档前请自行甄别文档内容的完整性,平台不提供额外的编辑、内容补充、找答案等附加服务。
- 2、"仅部分预览"的文档,不可在线预览部分如存在完整性等问题,可反馈申请退款(可完整预览的文档不适用该条件!)。
- 3、如文档侵犯您的权益,请联系客服反馈,我们会尽快为您处理(人工客服工作时间:9:00-18:30)。
Unity3D——进度条的显示
今天做项目我只要的做的是进度条但是加载场景我现在还没有学习需要用到异步所以我用血条的方法简单的写了一下代码如下:
public Texture2D load_write; //进度条底纹表还没有加载
public Texture2D load_yellow; // 进度条表示加载的进度
public float loading = 0f; //进度条数字显示用数字来显示加载的多少
public Texture2D img; //背景图
void Update()
{
if (loading <= 100)
{
loading += Time.deltaTime*10; //当进度条的底纹为空时进度条开始加载
}
else if (loading > 100) //当进度条>100 的时候开始跳转场景
{
Application.LoadLevel("Country_Continent");
}
}
void OnGUI()
{
//加载背景图
string aa = "";
GUIStyle bb = new GUIStyle();
bb.normal.background = img;
bel(new Rect(0, 0, 1370,600), aa, bb);
//进度条加载
if (loading <= 100)
{
float blood_width = load_yellow.width * loading /100; //进度条分为100分来跑
//进度条底纹
GUI.DrawTexture(new Rect(170, 400, load_write.width, load_write.height), load_write);
// 进度条
GUI.DrawTexture(new Rect(170, 400, blood_width, load_yellow.height), load_yellow);
//Loading 字体
GUIStyle go = new GUIStyle();
go.fontSize = 30;
bel(new Rect(170, 360, 100, 100), "Loading.....", go);
//加载数字的显示
GUIStyle go1 = new GUIStyle();
go1.normal.textColor = Color.blue;
bel(new Rect(660, 400, 50, 30), (int)loading+"%",go1);
}
}
想要了解更多请到狗刨学习网。