华三华为交换机路由器配置常用命令
华三华为交换机-路由器配置常用命令

H3C交换机配置命令大全1、system-view 进入系统视图模式2、sysname 为设备命名3、display current-configuration 当前配置情况4、language-mode Chinese|English 中英文切换5、interface Ethernet 1/0/1 进入以太网端口视图6、port link-type Access|Trunk|Hybrid 设置端口访问模式7、undo shutdown 打开以太网端口8、shutdown 关闭以太网端口9、quit 退出当前视图模式10、vlan 10 创建VLAN 10并进入VLAN 10的视图模式11、port access vlan 10 在端口模式下将当前端口加入到vlan 10中12、port E1/0/2 to E1/0/5 在VLAN模式下将指定端口加入到当前vlan中13、port trunk permit vlan all 允许所有的vlan通过H3C路由器配置命令大全1、system-view 进入系统视图模式2、sysname R1 为设备命名为R13、display ip routing-table 显示当前路由表4、language-mode Chinese|English 中英文切换5、interface Ethernet 0/0 进入以太网端口视图6、ip address 192.168.1.1 255.255.255.0 配置IP地址和子网掩码7、undo shutdown 打开以太网端口8、shutdown 关闭以太网端口9、quit 退出当前视图模式10、ip route-static 192.168.2.0 255.255.255.0 192.168.12.2 description To.R2 配置静态路由11、ip route-static 0.0.0.0 0.0.0.0 192.168.12.2 description To.R2 配置默认的路由H3C S3100 SwitchH3C S3600 SwitchH3C MSR 20-20 Router1、调整超级终端的显示字号;2、捕获超级终端操作命令行,以备日后查对;3、language-mode Chinese|English 中英文切换;4、复制命令到超级终端命令行,粘贴到主机;5、交换机清除配置:<H3C>reset save ;<H3C>reboot ;6、路由器、交换机配置时不能掉电,连通测试前一定要检查网络的连通性,不要犯最低级的错误。
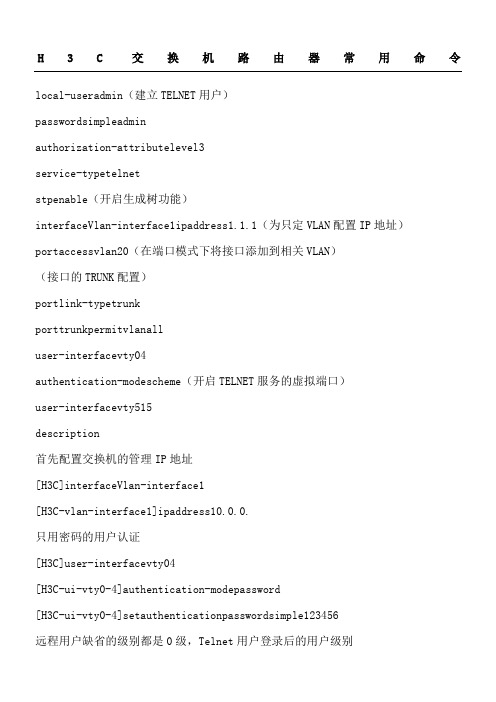
H3C华为交换机配置基本命令

H3C华为交换机配置基本命令H3C交换机路由器常用命令local-user admin (建立TELNET 用户)password simple adminauthorization-attribute level 3service-type telnetstp enable (开启生成树功能)interface Vlan-interface1 ip address 1.1.1.1 255.255.255.0(为只定VLAN配置IP地址)port access vlan 20 (在端口模式下将接口添加到相关VLAN)(接口的TRUNK配置)port link-type trunkport trunk permit vlan alluser-interface vty 0 4authentication-mode scheme(开启TELNET 服务的虚拟端口)user-interface vty 5 15description首先配置交换机的管理IP地址[H3C]interface Vlan-interface 1[H3C-vlan-interface1]ip address 10.0.0.1255.255.255.0只用密码的用户认证[H3C]user-interface vty 0 4[H3C-ui-vty0-4]authentication-mode password[H3C-ui-vty0-4]set authentication password simple 123456远程用户缺省的级别都是0级,Telnet用户登录后的用户级别[H3C-ui-vty0-4]user privilege level 3本地用户名和口令的认证[H3C]user-interface vty 0 4[H3C-ui-vty0-4]authentication-mode scheme[H3C]local-user H3C[H3C-ui-vty0-4]password simple huawei[H3C-ui-vty0-4]service-type telnet level 31.调整超级终端的显示字号;2.捕获超级终端操作命令行,以备日后查对;3.复制命令到超级终端命令行,粘贴到主机;4.路由器.交换机配置时不能掉电,连通测试前一定要检查网络的连通性,不要犯最低级的错误。
华三常用命令总结
进入凌驾区域vlink-peer对端的router-id
认证ospf只支持区域认证
进入区域下开启认证
area 0
authentication simple/md5
进入接口下
ospf authentication-mode simple /md5 1密码
ospf 1 router-id
进去相应的区域模式
area区域id
区域模式下
network直连反掩码宣告直连网段
4.路由引入/重发布
在路由协议模式下
import-route协议名称协议号码cosip下default-route originate
ospf协议default-route-advertise always
rip启动协议
version 1/2开启版本
undo summary关闭汇总
network直连通告网段---主类
认证和汇总接口模式下rip authentication simple密码---明文+两端都配
rip summary-address汇总地址掩码/cidr
3.ospf配置ospf
启动ospf协议
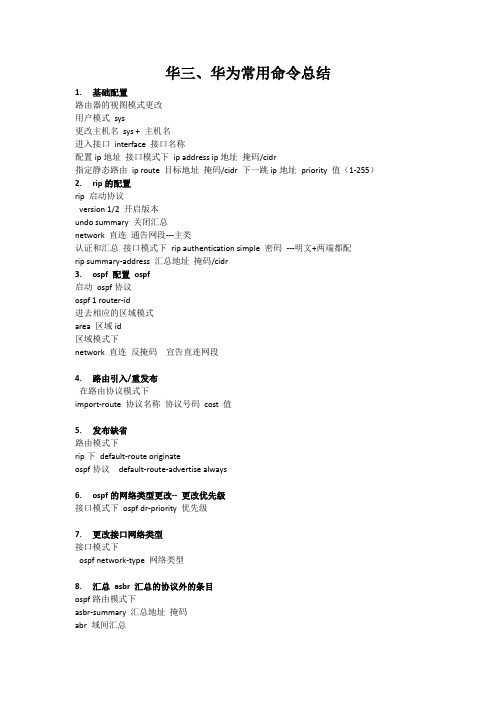
华三、华为常用命令总结
1.基础配置
路由器的视图模式更改
用户模式sys
更改主机名sys +主机名
进入接口interface接口名称
配置ip地址接口模式下ip address ip地址掩码/cidr
指定静态路由ip route目标地址掩码/cidr下一跳ip地址priority值(1-255)
2.rip的配置
6.ospf的网络类型更改--更改优先级
接口模式下ospf dr-priority优先级
H3C华为交换机配置基本命令
H3C交换机路由器常用命令local-useradmin(建立TELNET用户)passwordsimpleadminauthorization-attributelevel3service-typetelnetstpenable(开启生成树功能)interfaceVlan-interface1ipaddress1.1.1(为只定VLAN配置IP地址)portaccessvlan20(在端口模式下将接口添加到相关VLAN)(接口的TRUNK配置)portlink-typetrunkporttrunkpermitvlanalluser-interfacevty04authentication-modescheme(开启TELNET服务的虚拟端口)user-interfacevty515description首先配置交换机的管理IP地址[H3C]interfaceVlan-interface1[H3C-vlan-interface1]ipaddress10.0.0.只用密码的用户认证[H3C]user-interfacevty04[H3C-ui-vty0-4]authentication-modepassword[H3C-ui-vty0-4]setauthenticationpasswordsimple123456[H3C-ui-vty0-4]userprivilegelevel3本地用户名和口令的认证[H3C]user-interfacevty04[H3C-ui-vty0-4]authentication-modescheme[H3C]local-userH3C[H3C-ui-vty0-4]passwordsimplehuawei[H3C-ui-vty0-4]service-typetelnetlevel31.调整超级终端的显示字号;2.捕获超级终端操作命令行,以备日后查对;3.复制命令到超级终端命令行,粘贴到主机;4.路由器.交换机配置时不能掉电,连通测试前一定要检查网络的连通性,不要犯最低级的错误。
华三华为交换机路由器配置常用命令汇总

H3C交换机配置命令大全1、system-view 进入系统视图模式2、sysname 为设备命名3、display current-configuration 当前配置情况4、 language-mode Chinese|English 中英文切换5、interface Ethernet 1/0/1 进入以太网端口视图6、 port link-type Access|Trunk|Hybrid 设置端口访问模式7、 undo shutdown 打开以太网端口8、 shutdown 关闭以太网端口9、 quit 退出当前视图模式10、 vlan 10 创建VLAN 10并进入VLAN 10的视图模式11、 port access vlan 10 在端口模式下将当前端口加入到vlan 10中12、port E1/0/2 to E1/0/5 在VLAN模式下将指定端口加入到当前vlan中13、port trunk permit vlan all 允许所有的vlan通过H3C路由器配置命令大全华为交换机常用配置实例H3C交换机路由器telnet和console口登录配置2009年11月09日星期一 10:00级别说明Level 名称命令0参观ping、tracert、telnet1监控display、debugging2配置所有配置命令管理级的命令除外3管理文件系统命令、FTP命令、TFTP命令、XMODEM命令telnet仅用密码登录,管理员权限Routeruser-interface vty 0 4Router-ui-vty0-4user privilege level3Router-ui-vty0-4set authentication password simple abctelnet仅用密码登录,非管理员权限Routersuper password level 3 simplesuperRouteruser-interface vty 0 4Router-ui-vty0-4user privilege level1Router-ui-vty0-4set authentication password simple abctelnet使用路由器上配置的用户名密码登录,管理员权限Routerlocal-user admin passwordsimple adminRouterlocal-user admin service-type telnetRouterlocal-useradmin level 3Routeruser-interface vty 04Router-ui-vty0-4authentication-mode localtelnet使用路由器上配置的用户名密码登录,非管理员权限Routersuper password level 3 simple superRouterlocal-user manage password simple manageRouterlocal-usermanage service-type telnetRouterlocal-user manage level2Routeruser-interface vty 0 4Router-ui-vty0-4authentication-mode local对console口设置密码,登录后使用管理员权限Routeruser-interface con0Router-ui-console0user privilege level 3Router-ui-console0set authentication password simple abc对console口设置密码,登录后使用非管理员权限Routersuper password level 3 simple superRouteruser-interfacecon 0Router-ui-console0user privilege level 1Router-ui-console0set authentication password simple abc对console口设置用户名和密码,登录后使用管理员权限Routerlocal-user admin password simpleadminRouterlocal-user admin service-type terminalRouterlocal-user adminlevel 3Routeruser-interface con 0Router-ui-console0authentication-modelocal对console口设置用户名和密码,登录后使用非管理员权限Routersuper password level 3 simple superRouterlocal-user manage password simple manageRouterlocal-user manage service-type terminalRouterlocal-usermanage level 2Routeruser-interface con0Router-ui-console0authentication-mode localsimple 是明文显示,cipher 是加密显示路由器不设置telnet登录配置时,用户无法通过telnet登录到路由器上Router-ui-vty0-4acl 2000 inbound可以通过acl的规则只允许符合条件的用户远程登录路由器华为路由器ospfnat。
华三路由器交换机配置命令
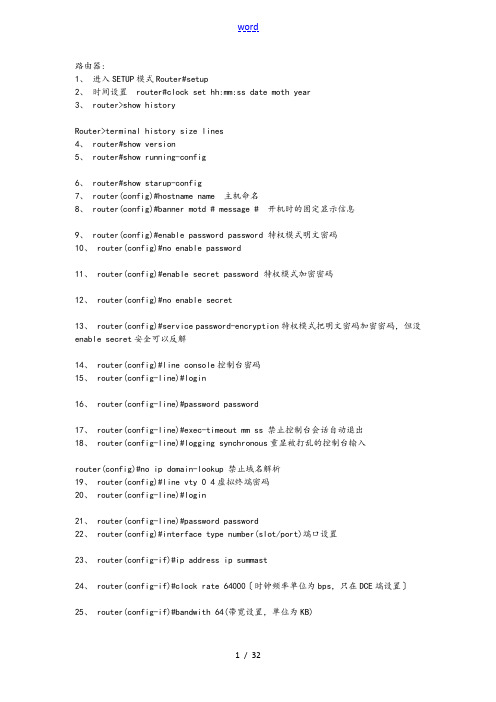
路由器:1、进入SETUP模式Router#setup2、时间设置router#clock set hh:mm:ss date moth year3、 router>show historyRouter>terminal history size lines4、 router#show version5、 router#show running-config6、 router#show starup-config7、 router(config)#hostname name 主机命名8、 router(config)#banner motd # message # 开机时的固定显示信息9、 router(config)#enable password password 特权模式明文密码10、 router(config)#no enable password11、 router(config)#enable secret password 特权模式加密密码12、 router(config)#no enable secret13、 router(config)#service password-encryption特权模式把明文密码加密密码,但没enable secret安全可以反解14、 router(config)#line console控制台密码15、 router(config-line)#login16、 router(config-line)#password password17、 router(config-line)#exec-timeout mm ss 禁止控制台会话自动退出18、 router(config-line)#logging synchronous重显被打乱的控制台输入router(config)#no ip domain-lookup 禁止域名解析19、 router(config)#line vty 0 4虚拟终端密码20、 router(config-line)#login21、 router(config-line)#password password22、 router(config)#interface type number(slot/port)端口设置23、 router(config-if)#ip address ip summast24、 router(config-if)#clock rate 64000〔时钟频率单位为bps,只在DCE端设置〕25、 router(config-if)#bandwith 64(带宽设置,单位为KB)26、 router(config-if)#no shutdown(shutdown)27、 router(config-if )#media-type type(10base) 为以太网端口选择适当的介质类型28、 router(config-if )#ctrl+z保存退出到特权模式29、 router#30、 router>用户模式enable进入router#特权模式config terminal进入router(config)#全局配置模式31、Interface Router(config-if)#端口设置Subinterface Router(config-subif)# 子端口设置Controller Router(config-controller)# 控制口设置Line Router(config-line)# 虚拟口设置Router Router(config-router)# 路由设置IPX router Router(config-ipx-router)#IPX路由设置32、 router#show interface33、 router#show interface Ethernet 034、 router#show interface serial 035、 router#show running-config36、 router#show starup-config37、 router#show flash38、 router#show controller39、 router#show controller interface type40、 router#show running-configrouter#copy running-config starup-configrouter#copy running-config tftprouter#copy starup-config tftprouter#copy flash tftprouter#copy tftp star-configrouter#copy tftp flash--------------------------------------------------------------------------------端口状态Serial1 is up, line protocol is up正常工作Serial1 is up, line protocol is down连接问题Serial1 is down, line protocol is down端口问题Serial1 is administratively down, line protocol is down人为关闭配置存放器的值1、关闭路由器的电源重新启动按住ctrl+break键入进2、>3、>o/r 0×2142(跳过nvarm启动恢复密码)4、>I5、当系统提示是否进入setup模式时,按N6、 router>7、 router>enable8、 router#9、进入修改后〔包括密码、存放器的值:0×2100为rom monitor启动、0×2101为setup 模式启动、0×2102为10、 router#copy running-config starup-config11、 router#reload12、也可以在router#setup进入setup模式静态路由协议设置router(config)#ip route network submask(要到达的网络号掩码)ip address(下一跳或出口ip地址)router(config)#ip route 0.0.0.0 s0〔出口端口或下一跳IP地址〕rip设置router(config)#router riprouter(config-router)#network network-numberrouter#show ip protocol查看RIP信息router#show ip route 查看路由表router#debug ip rip查看RIP更新信息router(config-router)#passive-interface e0(阻止发出作息)router(config-router)#ip rip receive version 1 2接收1、2RIP版本信息igrp设置router(config)#router igrp as numberrouter(config-router)#network network numberrouter#show ip route 查看路由表router#debug ip igrp events 查看IGRP路由更新大概信息router#debug ip igrp transaction 查看IGRP路由更新详细信息Router(config-router)#variance multiplier 控制 IGRP load balancingRouter(config-router)#traffic-share {balanced | min}控制load-balanced traffic 的分布eigrp设置router(config)#router eigrp as numberrouter(config-router)#network network numberrouter(config)#no auto-summry 关闭自动汇总router(config)# auto-summry 打开自动汇总〔默认是打开的〕router#show ip route eigrp 显示当前的路由表里的EIGRP条目router#show ip protocol 显示活动的路由协议进程的参数和当前的状态router#show ip eigrp neighbors 显示被EIGRP发现的邻居router#show ip eigrp traffic 显示发出和收到的IP EIGRP 包的数量router#show ip eigrp topology 显示IP EIGRP的拓扑表Router#debug ip eigrpospf设置1. Router(config)#router ospf process-idRouter(config-router)#network address(可以是网络号也可以是Ip地址 mask〔通配掩码〕area area-idRouter(config-if)# ip ospf priority numbe 配置OSPF的优先级Router#show ip protocols 验证OSPF的配置Router#show ip route 显示路由器学到的所有路由Router#show ip ospf interface type number 显示 area-ID 和邻接信息Router#show ip ospf neighbor 基于每接口显示OSPF邻居信息Router#debug ip ospf eventsRouter#debug ip ospf packet2. Router(config)# interface loopback number〔lookback回路配置〕Router(config-if)# ip address ip-address subnet-maskRouter(config-if)# ip ospf cost cost-numbe 修改OSPF 的Cost数值Router(config-if)# ip ospf authentication-key key 配置明文口令Router(config-if)# ip ospf messge-digest-key keyid md5 key 配置MD5口令(keyid和key必须配对一致,两邻居才可以通信)Router(config-route)# area area-id authentication [message-digest]message-digest为可选项,使用后路由器只传送口令消息的摘要〔或散列〕配置OSPF区域的验证:3. Router(config-if)# ip ospf hello-interval seconds 配置hello间隔:Router(config-if)# ip ospf dead-interval seconds配置down机判断间隔--------------------------------------------------------------------------------访问列表1.标准访问列表(standard access lists):只使用源IP地址来做过滤决定Router(config)#access-list 10 permit anyRouter(config)#int e1Router(config-if)#ip access-group 10 out使用IP标准ACL来控制VTY线路的访问.Router(config)#line vty 0 4Router(config-line)#access-class 50 in删除IP标准ACLRouter(config-line)#no ip access-class 50 inRouter(config)#no access-list 502.扩展访问列表(extended access lists):它比拟源IP地址和目标IP地址,层3的协议字段,层4端口号来做过滤决定Router(config)#access-list 110 deny tcp any host 172.16.30.5 eq 21Router(config)#access-list 110 deny tcp any host 172.16.30.5 eq 23Router(config)#access-list 110 permit ip any anyRouter(config)#int e1Router(config-if)#ip access-group 110 outrouter(config)#line vty 0 4outer(config-line)#access-class 12 in3.show ip interface:只显示IP访问列表信息4.show ip interface:显示所有接口的信息和配置的ACL信息5.show ip interface [接口号]:显示具体某个接口的信息和配置的ACL信息6.show running-config:显示DRAM信息和ACL信息,以与接口对ACL的应用信息. 交换机配置交换机上设置登陆口令Switch(config)# enable password level level passwordSwitch(config)# no enable password level level passwordhostname1900/2900(config)#hostname hostnameIP Address1900(config)#ip address {ip address} {mask}2950(config#interface vlan 12950(config-if)#ip address {ip_address} {mask}2950(config)#interface vlan 1default gateway1900/2950(config)#ip default-gateway {ip address}查看交换机的IP地址1900#show ipManagement VLAN: 12950#show interface vlan 1Vlan1 is up, line protocol is upHardware is Cat5k Virtual Ethernet, address is 0010.f6a9.9800 (bia 0010.f6a9.9800)设置双工选项1900(config)#interface e0/11900(config-if)#duplex {auto | full |full-flow-control | half}2950(config)#interface fe0/12950(config-if)#duplex {auto | full | half}设置端口速度:switch(config-if)# speed {10|100|auto}查勘双工选项Switch#show interfaces fastethernet0/3查看MAC地址表1900/2950#show mac-address-table配置永久MAC地址1900(config)#mac-address-table permanent {mac-address type module/port}1900(config)#mac-address-table permanent 2222.2222.2222 ethernet 0/31900#show mac-address-table2950(config)#mac-address-table static mac_addr {vlan vlan_id} [interface int1 [int2 ... int15]]--------------------------------------------------------------------------------配置受限静态MAC地址1900(config)#mac-address-table restricted static {mac-address type module/port src-if-list}1900(config)#mac-address-table restricted static 1111.1111.1111 e0/4 e0/11900#show mac-address-table2950(config)#mac-address-table secure mac-addr interface [vlan vlan-id]2950(config)#mac-address-table secure 0003.3333.3333 fa 0/1 vlan 12950#show mac-address-table配置端口安全性1900(config-if)#port secure max-mac-count count1900(config)#interface e0/41900(config-if)#port secure1900(config-if)#port secure max-mac-count 11900(config)#address-violation {suspend | disable | ignore1900# show mac-address-table security2950(config-if)#port security max-mac-count count2950(config)#interface fa0/12950(config-if)#port security2950(config-if)#port security max-mac-count 102950(config-if)#port security action {shutdown | trap} 2950#show mac-address-table secure2950#show port-security管理配置文件1900#copy nvram tftp://host/dst_file1900#copy tftp://host/src_file nvram2950#copy startup-config tftp://host/dst_file去除 NVRAM1900#delete nvram2950#erase startup-configvlan配置1900 VLAN建立1900下,使用vlan [vlan#] name [name] [vlan#]命令, 如下: >en#config t(config)#hostname 19001900(config)#vlan 2 name sales1900(config)#vlan 3 name marketing1900(config)#vlan 4 name mis1900(config)#exit端口分配1900(config)#int e0/21900(config-if)#vlan-membership static 21900(config)#int e0/41900(config-if)#vlan-membership static 31900(config)#int e0/51900(config-if)#vlan-membership static 41900(config-if)#exit1900(config)#exitVLAN验证1900#sh vlan2900 VLAN建立在2950下创建VLAN,在特权模式下使用vlan database命令2950#vlan database2950(vlan)#vlan 2 name MarketingVLAN 2 modified:Name: Marketing2950(vlan)#vlan 3 name AccountingVLAN 3 added:Name: Accounting2950(vlan)#applyAPPLY plete2950(vlan)#Ctrl+C2950#端口分配2950下的端口配置,使用switchport access vlan [vlan#]命令, 2950(config-if)#int f0/22950(config-if)#switchport access vlan 22950(config-if)#int f0/32950(config-if)#switchport access vlan 32950(config-if)#int f0/42950(config-if)#switchport access vlan 42950(config-if)#exit2950(config)#exit验证配置信息,如下:2950#sh vlan或2950#sh vlan brieftrunk配置1900 trunk配置1900(config)#int f0/261900(config-if)#trunk on2950下在接口配置模式,使用switchport命令,如下:2950(config)#int f0/122950(config-if)#switchport mode trunk2950(config-if)# switchport trunk encapsulation {isl|dot1q}2950(config-if)#^Z将某VLAN从中继中删除2950(config-if)# switchport trunk allowed vlan remove vlan-list添加某个VLAN到中继线路2950(config-if)# switchport trunk allowed vlan add vlan-listConfiguring Inter-VLAN Routing给连接1900的trunk端口配置,使用encapsulation isl [vlan#]命令,如下:2600Router(config-subif)#encapsulation isl [vlan#]2600Router(config-subif)#ip add ip add submask给连接2950的这样配置,如下:2600Router(config-subif)#encapsulation dot1q [vlan#]2600Router(config-subif)#ip add ip add submask--------------------------------------------------------------------------------VTP配置1900(config)#vtp server1900(config)#vtp domain noco1900(config)#vtp password noko在特权模式下使用show vtp命令验证,如下:1900#sh vtpVTP version: 1Configuration revision: 0Maximum VLANs supported locally: 1005Number of existing VLANs: 5VTP domain name: nocoVTP password: nokoVTP operating mode: Server2950如下:2950(config)#vtp mode server2950(config)#vtp domain noco验证信息,如下:2950#sh vtp ?counters VTP statisticsstatus VTP domain status2950#sh vtp statusNAT配置配置静态转换Router(config)#ip nat inside source static local-ip global-ipRouter(config-if)#ip nat insideRouter(config-if)#ip nat outside配置动态地址转换Router(config)#ip nat pool name start-ip end-ip {netmask netmask | prefix-length prefix-length}Router(config)#access-list access-list-number permit source [source-wildcard]Router(config)#ip nat inside source listaccess-list-number pool name配置OverloadingRouter(config)#access-list access-list-number permitsource source-wildcardRouter(config)#ip nat inside source listaccess-list-number interface interface overload去除NAT Translation TableRouter#clear ip nat translation * 去除所有的动态地址转换条目Router#clear ip nat translation inside global-iplocal-ip [outside local-ip global-ip] 去除一个简单的动态地址转换条目〔、外〕Router#clear ip nat translation outsidelocal-ip global-ip去除一个简单的动态地址转换〔外〕Router#clear ip nat translation protocol inside global-ipglobal-port local-ip local-port [outside local-iplocal-port global-ip global-port] 去除一个扩展动态地址转换条目Show命令输出信息Router#show ip nat translations------------------------------------------------------------------------------------------------------------------------------------------------------------------------------------------------------------------------------------------------------------------------------------------------------------------------------------------------------------------------------------------------------------------------------------------------------------------------------------------------------------------------------------------------------------------交换机:1.在基于IOS的交换机上设置主机名/系统名:switch(config)# hostname hostname在基于CLI的交换机上设置主机名/系统名:switch(enable) set system name name-string2.在基于IOS的交换机上设置登录口令:switch(config)# enable password level 1 password在基于CLI的交换机上设置登录口令:switch(enable) set passwordswitch(enable) set enalbepass3.在基于IOS的交换机上设置远程访问:switch(config)# interface vlan 1switch(config-if)# ip address ip-address netmaskswitch(config-if)# ip default-gateway ip-address在基于CLI的交换机上设置远程访问:switch(enable) set interface sc0 ip-address netmask broadcast-addressswitch(enable) set interface sc0 vlanswitch(enable) set ip route default gateway4.在基于IOS的交换机上启用和浏览CDP信息:switch(config-if)# cdp enableswitch(config-if)# no cdp enable为了查看Cisco邻接设备的CDP通告信息:switch# show cdp interface [type modle/port]switch# show cdp neighbors [type module/port] [detail]在基于CLI的交换机上启用和浏览CDP信息:switch(enable) set cdp {enable|disable} module/port为了查看Cisco邻接设备的CDP通告信息:switch(enable) show cdp neighbors[module/port] [vlan|duplex|capabilities|detail] 5.基于IOS的交换机的端口描述:switch(config-if)# de脚本ion de脚本ion-string基于CLI的交换机的端口描述:switch(enable)set port name module/number de脚本ion-string6.在基于IOS的交换机上设置端口速度:switch(config-if)# speed{10|100|auto}在基于CLI的交换机上设置端口速度:switch(enable) set port speed moudle/number {10|100|auto}switch(enable) set port speed moudle/number {4|16|auto}7.在基于IOS的交换机上设置以太网的链路模式:switch(config-if)# duplex {auto|full|half}在基于CLI的交换机上设置以太网的链路模式:switch(enable) set port duplex module/number {full|half}8.在基于IOS的交换机上配置静态VLAN:switch# vlan databaseswitch(vlan)# vlan vlan-num name vlaswitch(vlan)# exitswitch# configure teriminalswitch(config)# interface interface module/numberswitch(config-if)# switchport mode accessswitch(config-if)# switchport access vlan vlan-numswitch(config-if)# end在基于CLI的交换机上配置静态VLAN:switch(enable) set vlan vlan-num [name name]switch(enable) set vlan vlan-num mod-num/port-list9. 在基于IOS的交换机上配置VLAN中继线:switch(config)# interface interface mod/portswitch(config-if)# switchport mode trunkswitch(config-if)# switchport trunk encapsulation {isl|dotlq}switch(config-if)# switchport trunk allowed vlan remove vlan-listswitch(config-if)# switchport trunk allowed vlan add vlan-list在基于CLI的交换机上配置VLAN中继线:switch(enable) set trunk module/port [on|off|desirable|auto|nonegotiate]Vlan-range [isl|dotlq|dotl0|lane|negotiate]--------------------------------------------------------------------------------10.在基于IOS的交换机上配置VTP管理域:switch# vlan databaseswitch(vlan)# vtp domain domain-name在基于CLI的交换机上配置VTP管理域:switch(enable) set vtp [domain domain-name]11.在基于IOS的交换机上配置VTP 模式:switch# vlan databaseswitch(vlan)# vtp domain domain-nameswitch(vlan)# vtp {sever|cilent|transparent}switch(vlan)# vtp password password在基于CLI的交换机上配置VTP 模式:switch(enable) set vtp [domain domain-name] [mode{ sever|cilent|transparent }][password password]12. 在基于IOS的交换机上配置VTP版本:switch# vlan databaseswitch(vlan)# vtp v2-mode在基于CLI的交换机上配置VTP版本:switch(enable) set vtp v2 enable13. 在基于IOS的交换机上启动VTP剪裁:switch# vlan databaseswitch(vlan)# vtp pruning在基于CL I 的交换机上启动VTP剪裁:switch(enable) set vtp pruning enable14.在基于IOS的交换机上配置以太信道:switch(config-if)# port group group-number [distribution {source|destination}] 在基于CLI的交换机上配置以太信道:switch(enable) set port channel moudle/port-range mode{on|off|desirable|auto}--------------------------------------------------------------------------------15.在基于IOS的交换机上调整根路径本钱:switch(config-if)# spanning-tree [vlan vlan-list] cost cost在基于CLI的交换机上调整根路径本钱:switch(enable) set spantree portcost moudle/port costswitch(enable) set spantree portvlancost moudle/port [cost cost][vlan-list]16.在基于IOS的交换机上调整端口ID:switch(config-if)# spanning-tree[vlan vlan-list]port-priority port-priority在基于CLI的交换机上调整端口ID:switch(enable) set spantree portpri {mldule/port}priorityswitch(enable) set spantree portvlanpri {module/port}priority [vlans]17. 在基于IOS的交换机上修改STP时钟:switch(config)# spanning-tree [vlan vlan-list] hello-time secondsswitch(config)# spanning-tree [vlan vlan-list] forward-time secondsswitch(config)# spanning-tree [vlan vlan-list] max-age seconds在基于CLI的交换机上修改STP时钟:switch(enable) set spantree hello interval[vlan]switch(enable) set spantree fwddelay delay [vlan]switch(enable) set spantree maxage agingtiame[vlan]18. 在基于IOS的交换机端口上启用或禁用Port Fast 特征:switch(config-if)#spanning-tree portfast在基于CLI的交换机端口上启用或禁用Port Fast 特征:switch(enable) set spantree portfast {module/port}{enable|disable}19. 在基于IOS的交换机端口上启用或禁用UplinkFast 特征:switch(config)# spanning-tree uplinkfast [max-update-rate pkts-per-second]在基于CLI的交换机端口上启用或禁用UplinkFast 特征:switch(enable) set spantree uplinkfast {enable|disable}[rate update-rate] [all-protocols off|on]--------------------------------------------------------------------------------20. 为了将交换机配置成一个集群的命令交换机,首先要给管理接口分配一个IP地址,然后使用如下命令: switch(config)# cluster enable cluster-name cv21. 为了从一条中继链路上删除VLAN,可使用如下命令:switch(enable) clear trunk module/port vlan-range22. 用show vtp domain 显示管理域的VTP参数.23. 用show vtp statistics显示管理域的VTP参数.24. 在Catalyst交换机上定义TrBRF的命令如下:switch(enable) set vlan vlan-name [name name] type trbrf bridge bridge-num[stp {ieee|ibm}]--------------------------------------------------------------------------------25. 在Catalyst交换机上定义TrCRF的命令如下:switch (enable) set vlan vlan-num [name name] type trcrf{ring hex-ring-num|decring decimal-ring-num} parent vlan-num26. 在创建好TrBRF VLAN之后,就可以给它分配交换机端口.对于以太网交换,可以采用如下命令给VLAN分配端口:switch(enable) set vlan vlan-num mod-num/port-num27. 命令show spantree显示一个交换机端口的STP状态.28. 配置一个ELAN的LES和BUS,可以使用如下命令:ATM (config)# interface atm number.subint multiointATM(config-subif)# lane serber-bus ethernet elan-name29. 配置LECS:ATM(config)# lane database database-nameATM(lane-config-databade)# name elan1-name server-atm-address les1-nsap-addressATM(lane-config-databade)# name elan2-name server-atm-address les2-nsap-addressATM(lane-config-databade)# name …--------------------------------------------------------------------------------30. 创建完数据库后,必须在主接口上启动LECS.命令如下:ATM(config)# interface atm numberATM(config-if)# lane config database database-nameATM(config-if)# lane config auto-config-atm-address31. 将每个LEC配置到一个不同的ATM子接口上.命令如下:ATM(config)# interface atm number.subint multipointATM(config)# lane client ethernet vlan-num elan-num32. 用show lane server 显示LES的状态.33. 用show lane bus显示bus的状态.34. 用show lane database显示LECS数据库可容.35. 用show lane client显示LEC的状态.36. 用show module显示已安装的模块列表.37. 用物理接口建立与VLAN的连接:router# configure terminalrouter(config)# interface media module/portrouter(config-if)# de脚本ion de脚本ion-stringrouter(config-if)# ip address ip-addr subnet-maskrouter(config-if)# no shutdown38. 用中继链路来建立与VLAN的连接:router(config-ig)# encapsulation[isl|dotlq] vlan-numberrouter(config-if)# ip address ip-address subnet-mask39. 用LANE 来建立与VLAN的连接:router(config)# interface atm module/portrouter(config-if)# no ip addressrouter(config-if)# atm pvc 1 0 5 qsaalrouter(config-if)# atm pvc 2 0 16 ilnirouter(config-if)# interface atm module/port.subinterface multipoint router(config-if)# ip address ip-address subnet-maskrouter(config-if)# lane client ethernet elan-numrouter(config-if)# interface atm module/port.subinterface multipointrouter(config-if)# ip address ip-address subnet-namerouter(config-if)# lane client ethernet elan-namerouter(config-if)# …--------------------------------------------------------------------------------40. 为了在路由处理器上进展动态路由配置,可以用如下IOS命令来进展:router(config)# ip routingrouter(config)# router ip-routing-protocolrouter(config-router)# network ip-network-numberrouter(config-router)# network ip-network-number 〔FengNet.〕41. 配置默认路由:switch(enable) set ip route default gateway42. 为一个路由处理器分配VLANID,可在接口模式下使用如下命令:router(config)# interface interface numberrouter(config-if)# mls rp vlan-id vlan-id-num43. 在路由处理器启用MLSP:router(config)# mls rp ip44. 为了把一个外置的路由处理器接口和交换机安置在同一个VTP域中:router(config)# interface interface numberrouter(config-if)# mls rp vtp-domain domain-name45. 查看指定的VTP域的信息:router# show mls rp vtp-domain vtp domain name46. 要确定RSM或路由器上的管理接口,可以在接口模式下输入如下命令:router(config-if)#mls rp management-interface47. 要检验MLS-RP的配置情况:router# show mls rp48. 检验特定接口上的MLS配置:router# show mls rp interface interface number49. 为了在MLS-SE上设置流掩码而又不想在任一个路由处理器接口上设置访问列表:set mls flow [destination|destination-source|full]50. 为使MLS和输入访问列表可以兼容,可以在全局模式下使用如下命令:router(config)# mls rp ip input-acl--------------------------------------------------------------------------------51. 当某个交换机的第3层交换失效时,可在交换机的特权模式下输入如下命令:switch(enable) set mls enable52. 假如想改变老化时间的值,可在特权模式下输入以下命令:switch(enable) set mls agingtime agingtime53. 设置快速老化:switch(enable) set mls agingtime fast fastagingtime pkt_threshold54. 确定那些MLS-RP和MLS-SE参与了MLS,可先显示交换机引用列表中的容再确定:switch(enable) show mls include55. 显示MLS高速缓存记录:switch(enable) show mls entry56. 用命令show in arp显示ARP高速缓存区的容。
华三路由器交换机配置命令
路由器:1、进入SETUP模式Router#setup2、时间设置router#clock set hh:mm:ss date moth year3、 router>show historyRouter>terminal history size lines4、 router#show version5、 router#show running-config6、 router#show starup-config7、 router(config)#hostname name 主机命名8、 router(config)#banner motd # message # 开机时的固定显示信息9、 router(config)#enable password password 特权模式明文密码10、 router(config)#no enable password11、 router(config)#enable secret password 特权模式加密密码12、 router(config)#no enable secret13、 router(config)#service password-encryption特权模式把明文密码加密密码,但没enable secret安全可以反解14、 router(config)#line console控制台密码15、 router(config-line)#login16、 router(config-line)#password password17、 router(config-line)#exec-timeout mm ss 禁止控制台会话自动退出18、 router(config-line)#logging synchronous重显被打乱的控制台输入router(config)#no ip domain-lookup 禁止域名解析19、 router(config)#line vty 0 4虚拟终端密码20、 router(config-line)#login21、 router(config-line)#password password22、 router(config)#interface type number(slot/port)端口设置23、 router(config-if)#ip address ip summast24、 router(config-if)#clock rate 64000(时钟频率单位为bps,只在DCE端设置)25、 router(config-if)#bandwith 64(带宽设置,单位为KB)26、 router(config-if)#no shutdown(shutdown)27、 router(config-if )#media-type type(10base) 为以太网端口选择适当的介质类型28、 router(config-if )#ctrl+z保存退出到特权模式29、 router#30、 router>用户模式enable进入router#特权模式config terminal进入router(config)#全局配置模式31、Interface Router(config-if)#端口设置Subinterface Router(config-subif)# 子端口设置Controller Router(config-controller)# 控制口设置Line Router(config-line)# 虚拟口设置Router Router(config-router)# 路由设置IPX router Router(config-ipx-router)#IPX路由设置32、 router#show interface33、 router#show interface Ethernet 034、 router#show interface serial 035、 router#show running-config36、 router#show starup-config37、 router#show flash38、 router#show controller39、 router#show controller interface type40、 router#show running-configrouter#copy running-config starup-configrouter#copy running-config tftprouter#copy starup-config tftprouter#copy flash tftprouter#copy tftp star-configrouter#copy tftp flash--------------------------------------------------------------------------------端口状态Serial1 is up, line protocol is up正常工作Serial1 is up, line protocol is down连接问题Serial1 is down, line protocol is down端口问题Serial1 is administratively down, line protocol is down人为关闭配置寄存器的值1、关闭路由器的电源重新启动按住ctrl+break键入进2、>3、>o/r 0×2142(跳过nvarm启动恢复密码)4、>I5、当系统提示是否进入setup模式时,按N6、 router>7、 router>enable8、 router#9、进入修改后(包括密码、寄存器的值:0×2100为rom monitor启动、0×2101为setup 模式启动、0×2102为10、 router#copy running-config starup-config11、 router#reload12、也可以在router#setup进入setup模式静态路由协议设置router(config)#ip route network submask(要到达的网络号掩码)ip address(下一跳或出口ip地址)router(config)#ip route 0.0.0.0 s0(出口端口或下一跳IP地址)rip设置router(config)#router riprouter(config-router)#network network-numberrouter#show ip protocol查看RIP信息router#show ip route 查看路由表router#debug ip rip查看RIP更新信息router(config-router)#passive-interface e0(阻止发出作息)router(config-router)#ip rip receive version 1 2接收1、2RIP版本信息igrp设置router(config)#router igrp as numberrouter(config-router)#network network numberrouter#show ip route 查看路由表router#debug ip igrp events 查看IGRP路由更新大概信息router#debug ip igrp transaction 查看IGRP路由更新详细信息Router(config-router)#variance multiplier 控制 IGRP load balancingRouter(config-router)#traffic-share {balanced | min}控制load-balanced traffic 的分布eigrp设置router(config)#router eigrp as numberrouter(config-router)#network network numberrouter(config)#no auto-summry 关闭自动汇总router(config)# auto-summry 打开自动汇总(默认是打开的)router#show ip route eigrp 显示当前的路由表里的EIGRP条目router#show ip protocol 显示活动的路由协议进程的参数和当前的状态router#show ip eigrp neighbors 显示被EIGRP发现的邻居router#show ip eigrp traffic 显示发出和收到的IP EIGRP 包的数量router#show ip eigrp topology 显示IP EIGRP的拓扑表Router#debug ip eigrpospf设置1. Router(config)#router ospf process-idRouter(config-router)#network address(可以是网络号也可以是Ip地址 mask(通配掩码)area area-idRouter(config-if)# ip ospf priority numbe 配置OSPF的优先级Router#show ip protocols 验证OSPF的配置Router#show ip route 显示路由器学到的所有路由Router#show ip ospf interface type number 显示 area-ID 和邻接信息Router#show ip ospf neighbor 基于每接口显示OSPF邻居信息Router#debug ip ospf eventsRouter#debug ip ospf packet2. Router(config)# interface loopback number(lookback回路配置)Router(config-if)# ip address ip-address subnet-maskRouter(config-if)# ip ospf cost cost-numbe 修改OSPF 的Cost数值Router(config-if)# ip ospf authentication-key key 配置明文口令Router(config-if)# ip ospf messge-digest-key keyid md5 key 配置MD5口令(keyid和key必须配对一致,两邻居才可以通信)Router(config-route)# area area-id authentication [message-digest]message-digest为可选项,使用后路由器只传送口令消息的摘要(或散列)配置OSPF区域的验证:3. Router(config-if)# ip ospf hello-interval seconds 配置hello间隔:Router(config-if)# ip ospf dead-interval seconds配置down机判断间隔--------------------------------------------------------------------------------访问列表1.标准访问列表(standard access lists):只使用源IP地址来做过滤决定Router(config)#access-list 10 deny 172.16.40.0 0.0.0.255Router(config)#access-list 10 permit anyRouter(config)#int e1Router(config-if)#ip access-group 10 out使用IP标准ACL来控制VTY线路的访问.Router(config)#access-list 50 permit 172.16.10.3Router(config)#line vty 0 4Router(config-line)#access-class 50 in删除IP标准ACLRouter(config-line)#no ip access-class 50 inRouter(config)#no access-list 502.扩展访问列表(extended access lists):它比较源IP地址和目标IP地址,层3的协议字段,层4端口号来做过滤决定Router(config)#access-list 110 deny tcp any host 172.16.30.5 eq 21Router(config)#access-list 110 deny tcp any host 172.16.30.5 eq 23Router(config)#access-list 110 permit ip any anyRouter(config)#int e1Router(config-if)#ip access-group 110 out3.虚拟通道访问router(config)#access-list 12 permit 192.89.55.0 0.0.0.255router(config)#line vty 0 4outer(config-line)#access-class 12 in3.show ip interface:只显示IP访问列表信息4.show ip interface:显示所有接口的信息和配置的ACL信息5.show ip interface [接口号]:显示具体某个接口的信息和配置的ACL信息6.show running-config:显示DRAM信息和ACL信息,以及接口对ACL的应用信息. 交换机配置交换机上设置登陆口令Switch(config)# enable password level level passwordSwitch(config)# no enable password level level passwordhostname1900/2900(config)#hostname hostnameIP Address1900(config)#ip address {ip address} {mask}1900(config)#ip address 10.5.5.11 255.255.255.02950(config#interface vlan 12950(config-if)#ip address {ip_address} {mask}2950(config)#interface vlan 12950(config-if)#ip address 10.5.5.11 255.255.255.0default gateway1900/2950(config)#ip default-gateway {ip address}1900/2950(config)#ip default-gateway 172.20.137.1查看交换机的IP地址1900#show ipIP address: 10.5.5.11Subnet mask: 255.255.255.0Default gateway: 10.5.5.3Management VLAN: 12950#show interface vlan 1Vlan1 is up, line protocol is upHardware is Cat5k Virtual Ethernet, address is 0010.f6a9.9800 (bia 0010.f6a9.9800) Internet address is 172.16.80.79/24Broadcast address is 255.255.255.255设置双工选项1900(config)#interface e0/11900(config-if)#duplex {auto | full |full-flow-control | half}2950(config)#interface fe0/12950(config-if)#duplex {auto | full | half}设置端口速度:switch(config-if)# speed {10|100|auto}查勘双工选项Switch#show interfaces fastethernet0/3查看MAC地址表1900/2950#show mac-address-table配置永久MAC地址1900(config)#mac-address-table permanent {mac-address type module/port}1900(config)#mac-address-table permanent 2222.2222.2222 ethernet 0/31900#show mac-address-table2950(config)#mac-address-table static mac_addr {vlan vlan_id} [interface int1 [int2 ... int15]]--------------------------------------------------------------------------------配置受限静态MAC地址1900(config)#mac-address-table restricted static {mac-address type module/port src-if-list}1900(config)#mac-address-table restricted static 1111.1111.1111 e0/4 e0/11900#show mac-address-table2950(config)#mac-address-table secure mac-addr interface [vlan vlan-id]2950(config)#mac-address-table secure 0003.3333.3333 fa 0/1 vlan 12950#show mac-address-table配置端口安全性1900(config-if)#port secure max-mac-count count1900(config)#interface e0/41900(config-if)#port secure1900(config-if)#port secure max-mac-count 11900(config)#address-violation {suspend | disable | ignore1900# show mac-address-table security2950(config-if)#port security max-mac-count count2950(config)#interface fa0/12950(config-if)#port security2950(config-if)#port security max-mac-count 102950(config-if)#port security action {shutdown | trap} 2950#show mac-address-table secure2950#show port-security管理配置文件1900#copy nvram tftp://host/dst_file1900#copy tftp://host/src_file nvram1950#copy nvram tftp://10.1.1.1/wgswd.cfg2950#copy startup-config tftp://host/dst_file清除 NVRAM1900#delete nvram2950#erase startup-configvlan配置1900 VLAN建立1900下,使用vlan [vlan#] name [name] [vlan#]命令, 如下: >en#config t(config)#hostname 19001900(config)#vlan 2 name sales1900(config)#vlan 3 name marketing1900(config)#vlan 4 name mis1900(config)#exit端口分配1900(config)#int e0/21900(config-if)#vlan-membership static 21900(config)#int e0/41900(config-if)#vlan-membership static 31900(config)#int e0/51900(config-if)#vlan-membership static 41900(config-if)#exit1900(config)#exitVLAN验证1900#sh vlan2900 VLAN建立在2950下创建VLAN,在特权模式下使用vlan database命令2950#vlan database2950(vlan)#vlan 2 name MarketingVLAN 2 modified:Name: Marketing2950(vlan)#vlan 3 name AccountingVLAN 3 added:Name: Accounting2950(vlan)#applyAPPLY complete2950(vlan)#Ctrl+C2950#端口分配2950下的端口配置,使用switchport access vlan [vlan#]命令, 2950(config-if)#int f0/22950(config-if)#switchport access vlan 22950(config-if)#int f0/32950(config-if)#switchport access vlan 32950(config-if)#int f0/42950(config-if)#switchport access vlan 42950(config-if)#exit2950(config)#exit验证配置信息,如下:2950#sh vlan或2950#sh vlan brieftrunk配置1900 trunk配置1900(config)#int f0/261900(config-if)#trunk on2950下在接口配置模式,使用switchport命令,如下:2950(config)#int f0/122950(config-if)#switchport mode trunk2950(config-if)# switchport trunk encapsulation {isl|dot1q}2950(config-if)#^Z将某VLAN从中继中删除2950(config-if)# switchport trunk allowed vlan remove vlan-list添加某个VLAN到中继线路2950(config-if)# switchport trunk allowed vlan add vlan-listConfiguring Inter-VLAN Routing给连接1900的trunk端口配置,使用encapsulation isl [vlan#]命令,如下:2600Router(config)#int f0/0.12600Router(config-subif)#encapsulation isl [vlan#]2600Router(config-subif)#ip add ip add submask给连接2950的这样配置,如下:2600Router(config)#int f0/0.12600Router(config-subif)#encapsulation dot1q [vlan#]2600Router(config-subif)#ip add ip add submask--------------------------------------------------------------------------------VTP配置1900(config)#vtp server1900(config)#vtp domain noco1900(config)#vtp password noko在特权模式下使用show vtp命令验证,如下:1900#sh vtpVTP version: 1Configuration revision: 0Maximum VLANs supported locally: 1005Number of existing VLANs: 5VTP domain name: nocoVTP password: nokoVTP operating mode: Server2950如下:2950(config)#vtp mode server2950(config)#vtp domain noco验证信息,如下:2950#sh vtp ?counters VTP statisticsstatus VTP domain status2950#sh vtp statusNAT配置配置静态转换Router(config)#ip nat inside source static local-ip global-ipRouter(config-if)#ip nat insideRouter(config-if)#ip nat outside配置动态地址转换Router(config)#ip nat pool name start-ip end-ip {netmask netmask | prefix-length prefix-length}Router(config)#access-list access-list-number permit source [source-wildcard]Router(config)#ip nat inside source listaccess-list-number pool name配置OverloadingRouter(config)#access-list access-list-number permitsource source-wildcardRouter(config)#ip nat inside source listaccess-list-number interface interface overload清除NAT Translation TableRouter#clear ip nat translation * 清除所有的动态地址转换条目Router#clear ip nat translation inside global-iplocal-ip [outside local-ip global-ip] 清除一个简单的动态地址转换条目(内、外)Router#clear ip nat translation outsidelocal-ip global-ip清除一个简单的动态地址转换(外)Router#clear ip nat translation protocol inside global-ipglobal-port local-ip local-port [outside local-iplocal-port global-ip global-port] 清除一个扩展动态地址转换条目Show命令输出信息Router#show ip nat translations------------------------------------------------------------------------------------------------------------------------------------------------------------------------------------------------------------------------------------------------------------------------------------------------------------------------------------------------------------------------------------------------------------------------------------------------------------------------------------------------------------------------------------------------------------------交换机:1.在基于IOS的交换机上设置主机名/系统名:switch(config)# hostname hostname在基于CLI的交换机上设置主机名/系统名:switch(enable) set system name name-string2.在基于IOS的交换机上设置登录口令:switch(config)# enable password level 1 password在基于CLI的交换机上设置登录口令:switch(enable) set passwordswitch(enable) set enalbepass3.在基于IOS的交换机上设置远程访问:switch(config)# interface vlan 1switch(config-if)# ip address ip-address netmaskswitch(config-if)# ip default-gateway ip-address在基于CLI的交换机上设置远程访问:switch(enable) set interface sc0 ip-address netmask broadcast-addressswitch(enable) set interface sc0 vlanswitch(enable) set ip route default gateway4.在基于IOS的交换机上启用和浏览CDP信息:switch(config-if)# cdp enableswitch(config-if)# no cdp enable为了查看Cisco邻接设备的CDP通告信息:switch# show cdp interface [type modle/port]switch# show cdp neighbors [type module/port] [detail]在基于CLI的交换机上启用和浏览CDP信息:switch(enable) set cdp {enable|disable} module/port为了查看Cisco邻接设备的CDP通告信息:switch(enable) show cdp neighbors[module/port] [vlan|duplex|capabilities|detail] 5.基于IOS的交换机的端口描述:switch(config-if)# de脚本ion de脚本ion-string基于CLI的交换机的端口描述:switch(enable)set port name module/number de脚本ion-string6.在基于IOS的交换机上设置端口速度:switch(config-if)# speed{10|100|auto}在基于CLI的交换机上设置端口速度:switch(enable) set port speed moudle/number {10|100|auto}switch(enable) set port speed moudle/number {4|16|auto}7.在基于IOS的交换机上设置以太网的链路模式:switch(config-if)# duplex {auto|full|half}在基于CLI的交换机上设置以太网的链路模式:switch(enable) set port duplex module/number {full|half}8.在基于IOS的交换机上配置静态VLAN:switch# vlan databaseswitch(vlan)# vlan vlan-num name vlaswitch(vlan)# exitswitch# configure teriminalswitch(config)# interface interface module/numberswitch(config-if)# switchport mode accessswitch(config-if)# switchport access vlan vlan-numswitch(config-if)# end在基于CLI的交换机上配置静态VLAN:switch(enable) set vlan vlan-num [name name]switch(enable) set vlan vlan-num mod-num/port-list9. 在基于IOS的交换机上配置VLAN中继线:switch(config)# interface interface mod/portswitch(config-if)# switchport mode trunkswitch(config-if)# switchport trunk encapsulation {isl|dotlq}switch(config-if)# switchport trunk allowed vlan remove vlan-listswitch(config-if)# switchport trunk allowed vlan add vlan-list在基于CLI的交换机上配置VLAN中继线:switch(enable) set trunk module/port [on|off|desirable|auto|nonegotiate]Vlan-range [isl|dotlq|dotl0|lane|negotiate]--------------------------------------------------------------------------------10.在基于IOS的交换机上配置VTP管理域:switch# vlan databaseswitch(vlan)# vtp domain domain-name在基于CLI的交换机上配置VTP管理域:switch(enable) set vtp [domain domain-name]11.在基于IOS的交换机上配置VTP 模式:switch# vlan databaseswitch(vlan)# vtp domain domain-nameswitch(vlan)# vtp {sever|cilent|transparent}switch(vlan)# vtp password password在基于CLI的交换机上配置VTP 模式:switch(enable) set vtp [domain domain-name] [mode{ sever|cilent|transparent }][password password]12. 在基于IOS的交换机上配置VTP版本:switch# vlan databaseswitch(vlan)# vtp v2-mode在基于CLI的交换机上配置VTP版本:switch(enable) set vtp v2 enable13. 在基于IOS的交换机上启动VTP剪裁:switch# vlan databaseswitch(vlan)# vtp pruning在基于CL I 的交换机上启动VTP剪裁:switch(enable) set vtp pruning enable14.在基于IOS的交换机上配置以太信道:switch(config-if)# port group group-number [distribution {source|destination}] 在基于CLI的交换机上配置以太信道:switch(enable) set port channel moudle/port-range mode{on|off|desirable|auto}--------------------------------------------------------------------------------15.在基于IOS的交换机上调整根路径成本:switch(config-if)# spanning-tree [vlan vlan-list] cost cost在基于CLI的交换机上调整根路径成本:switch(enable) set spantree portcost moudle/port costswitch(enable) set spantree portvlancost moudle/port [cost cost][vlan-list]16.在基于IOS的交换机上调整端口ID:switch(config-if)# spanning-tree[vlan vlan-list]port-priority port-priority在基于CLI的交换机上调整端口ID:switch(enable) set spantree portpri {mldule/port}priorityswitch(enable) set spantree portvlanpri {module/port}priority [vlans]17. 在基于IOS的交换机上修改STP时钟:switch(config)# spanning-tree [vlan vlan-list] hello-time secondsswitch(config)# spanning-tree [vlan vlan-list] forward-time secondsswitch(config)# spanning-tree [vlan vlan-list] max-age seconds在基于CLI的交换机上修改STP时钟:switch(enable) set spantree hello interval[vlan]switch(enable) set spantree fwddelay delay [vlan]switch(enable) set spantree maxage agingtiame[vlan]18. 在基于IOS的交换机端口上启用或禁用Port Fast 特征:switch(config-if)#spanning-tree portfast在基于CLI的交换机端口上启用或禁用Port Fast 特征:switch(enable) set spantree portfast {module/port}{enable|disable}19. 在基于IOS的交换机端口上启用或禁用UplinkFast 特征:switch(config)# spanning-tree uplinkfast [max-update-rate pkts-per-second]在基于CLI的交换机端口上启用或禁用UplinkFast 特征:switch(enable) set spantree uplinkfast {enable|disable}[rate update-rate] [all-protocols off|on]--------------------------------------------------------------------------------20. 为了将交换机配置成一个集群的命令交换机,首先要给管理接口分配一个IP地址,然后使用下列命令: switch(config)# cluster enable cluster-name cv21. 为了从一条中继链路上删除VLAN,可使用下列命令:switch(enable) clear trunk module/port vlan-range22. 用show vtp domain 显示管理域的VTP参数.23. 用show vtp statistics显示管理域的VTP参数.24. 在Catalyst交换机上定义TrBRF的命令如下:switch(enable) set vlan vlan-name [name name] type trbrf bridge bridge-num[stp {ieee|ibm}]--------------------------------------------------------------------------------25. 在Catalyst交换机上定义TrCRF的命令如下:switch (enable) set vlan vlan-num [name name] type trcrf{ring hex-ring-num|decring decimal-ring-num} parent vlan-num26. 在创建好TrBRF VLAN之后,就可以给它分配交换机端口.对于以太网交换,可以采用如下命令给VLAN分配端口:switch(enable) set vlan vlan-num mod-num/port-num27. 命令show spantree显示一个交换机端口的STP状态.28. 配置一个ELAN的LES和BUS,可以使用下列命令:ATM (config)# interface atm number.subint multiointATM(config-subif)# lane serber-bus ethernet elan-name29. 配置LECS:ATM(config)# lane database database-nameATM(lane-config-databade)# name elan1-name server-atm-address les1-nsap-addressATM(lane-config-databade)# name elan2-name server-atm-address les2-nsap-addressATM(lane-config-databade)# name …--------------------------------------------------------------------------------30. 创建完数据库后,必须在主接口上启动LECS.命令如下:ATM(config)# interface atm numberATM(config-if)# lane config database database-nameATM(config-if)# lane config auto-config-atm-address31. 将每个LEC配置到一个不同的ATM子接口上.命令如下:ATM(config)# interface atm number.subint multipointATM(config)# lane client ethernet vlan-num elan-num32. 用show lane server 显示LES的状态.33. 用show lane bus显示bus的状态.34. 用show lane database显示LECS数据库可内容.35. 用show lane client显示LEC的状态.36. 用show module显示已安装的模块列表.37. 用物理接口建立与VLAN的连接:router# configure terminalrouter(config)# interface media module/portrouter(config-if)# de脚本ion de脚本ion-stringrouter(config-if)# ip address ip-addr subnet-maskrouter(config-if)# no shutdown38. 用中继链路来建立与VLAN的连接:router(config)# interface module/port.subinterfacerouter(config-ig)# encapsulation[isl|dotlq] vlan-numberrouter(config-if)# ip address ip-address subnet-mask39. 用LANE 来建立与VLAN的连接:router(config)# interface atm module/portrouter(config-if)# no ip addressrouter(config-if)# atm pvc 1 0 5 qsaalrouter(config-if)# atm pvc 2 0 16 ilnirouter(config-if)# interface atm module/port.subinterface multipoint router(config-if)# ip address ip-address subnet-maskrouter(config-if)# lane client ethernet elan-numrouter(config-if)# interface atm module/port.subinterface multipointrouter(config-if)# ip address ip-address subnet-namerouter(config-if)# lane client ethernet elan-namerouter(config-if)# …--------------------------------------------------------------------------------40. 为了在路由处理器上进行动态路由配置,可以用下列IOS命令来进行:router(config)# ip routingrouter(config)# router ip-routing-protocolrouter(config-router)# network ip-network-numberrouter(config-router)# network ip-network-number ()41. 配置默认路由:switch(enable) set ip route default gateway42. 为一个路由处理器分配VLANID,可在接口模式下使用下列命令:router(config)# interface interface numberrouter(config-if)# mls rp vlan-id vlan-id-num43. 在路由处理器启用MLSP:router(config)# mls rp ip44. 为了把一个外置的路由处理器接口和交换机安置在同一个VTP域中:router(config)# interface interface numberrouter(config-if)# mls rp vtp-domain domain-name45. 查看指定的VTP域的信息:router# show mls rp vtp-domain vtp domain name46. 要确定RSM或路由器上的管理接口,可以在接口模式下输入下列命令:router(config-if)#mls rp management-interface47. 要检验MLS-RP的配置情况:router# show mls rp48. 检验特定接口上的MLS配置:router# show mls rp interface interface number49. 为了在MLS-SE上设置流掩码而又不想在任一个路由处理器接口上设置访问列表:set mls flow [destination|destination-source|full]50. 为使MLS和输入访问列表可以兼容,可以在全局模式下使用下列命令:router(config)# mls rp ip input-acl--------------------------------------------------------------------------------51. 当某个交换机的第3层交换失效时,可在交换机的特权模式下输入下列命令:switch(enable) set mls enable52. 若想改变老化时间的值,可在特权模式下输入以下命令:switch(enable) set mls agingtime agingtime53. 设置快速老化:switch(enable) set mls agingtime fast fastagingtime pkt_threshold54. 确定那些MLS-RP和MLS-SE参与了MLS,可先显示交换机引用列表中的内容再确定:switch(enable) show mls include55. 显示MLS高速缓存记录:switch(enable) show mls entry56. 用命令show in arp显示ARP高速缓存区的内容。
华三交换机-路由器配置命令
华三交换机-路由器配置命令华三交换机-路由器配置命令第一章:登录华三交换机-路由器1. 使用浏览器登录:a. 打开浏览器;b. 在地址栏中输入交换机-路由器的IP地址;c. 输入正确的用户名和密码;d. 单击登录按钮。
2. 使用命令行登录:a. 打开命令提示符或终端窗口;b. 输入telnet或ssh命令,后跟交换机-路由器的IP地址;c. 输入正确的用户名和密码;d. 按下回车键登录。
第二章:基本配置1. 设置主机名:hostname [主机名]2. 设置登录密码:enable password [密码]3. 配置管理接口:interface [接口]ip address [IP地址] [子网掩码] 4. 配置默认网关:ip default-gateway [默认网关]第三章:VLAN(虚拟局域网)配置1. 创建VLAN:vlan [VLAN号]name [VLAN名称]2. 配置端口―VLAN关联:interface [端口]switchport mode accessswitchport access vlan [VLAN号] 3. 配置交换机端口为Trunk口:interface [端口]switchport mode trunk第四章:路由配置1. 静态路由配置:ip route [目标网络] [目标子网掩码] [下一跳IP地址] 2. OSPF(开放最短路径优先)配置:router ospf [进程号]network [网络地址] [通配符] area [区域号]3. BGP(边界网关协议)配置:router bgp [自治系统号]neighbor [对等体IP地址] remote-as [对等体自治系统号]第五章:安全配置1. 配置SSH(安全外壳协议):crypto key generate rsaip ssh server enable2. 配置访问控制列表(ACL):ip access-list [ACL名称]permit/deny [源IP地址] [目标IP地址] [协议]第六章:性能优化配置1. 配置端口速率限制:interface [端口]bandwidth [带宽]2. 配置端口链路聚合(LACP):interface port-channel [聚合组号]channel-group [组号] mode active3. 配置端口流量控制:interface [端口]storm-control [选项]附件:本文档涉及的附件可在[link]。
- 1、下载文档前请自行甄别文档内容的完整性,平台不提供额外的编辑、内容补充、找答案等附加服务。
- 2、"仅部分预览"的文档,不可在线预览部分如存在完整性等问题,可反馈申请退款(可完整预览的文档不适用该条件!)。
- 3、如文档侵犯您的权益,请联系客服反馈,我们会尽快为您处理(人工客服工作时间:9:00-18:30)。
H3C交换机配置命令大全1、system-view 进入系统视图模式2、sysname 为设备命名3、display current-configuration 当前配置情况4、language-mode Chinese|English 中英文切换5、interface Ethernet 1/0/1 进入以太网端口视图3、display ip routing-table 显示当前路由表4、language-mode Chinese|English 中英文切换5、interface Ethernet 0/0 进入以太网端口视图6、ip address 192.168.1.1 255.255.255.0 配置IP地址和子网掩码7、undo shutdown 打开以太网端口8、shutdown 关闭以太网端口9、quit 退出当前视图模式10、ip route-static 192.168.2.0 255.255.255.0 192.168.12.2 description To.R2 配置静态路由11、ip route-static 0.0.0.0 0.0.0.0 192.168.12.2 description To.R2 配置默认的路由H3C S3100 SwitchH3C S3600 Switch192.168.1.1 248、设备命名规则:地名-设备名-系列号例:PingGu-R-S3600H3C华为交换机端口绑定基本配置2008-01-22 13:401,端口MACa)AM命令使用特殊的AM User-bind命令,来完成MAC地址与端口之间的绑定。
例如:[SwitchA]am user-bind mac-address 00e0-fc22-f8d3 interface Ethernet 0/1配置说明:由于使用了端口参数,则会以端口为参照物,即此时端口E0/1只允许PC1上网,而使用其他未绑定的MAC地址的PC机则无法上网。
但是PC1使用该MAC地址可以在其他端口上网。
b)mac-address命令、b)arp命令使用特殊的arp static命令,来完成IP地址与MAC地址之间的绑定。
例如:[SwitchA]arp static 10.1.1.2 00e0-fc22-f8d3配置说明:以上配置完成对PC机的IP地址和MAC地址的全局绑定。
3,端口IP MAC使用特殊的AM User-bind命令,来完成IP、MAC地址与端口之间的绑定。
例如:[SwitchA]am user-bind ip-address 10.1.1.2 mac-address 00e0-fc22-f8d3 interface Ethernet 0/1配置说明:可以完成将PC1的IP地址、MAC地址与端口E0/1之间的绑定功能。
由于使用了端口参数,则会以端口为参照物,即此时端口E0/1只允许PC1上网,而使用其他未绑定的IP地址、MAC地址的PC机则无法上网。
但是PC1使用该IP地址和MAC地址可以在其他端口上网。
dis users 显示用户dis startup 显示启动配置文件的信息dis user-interface 显示用户界面的相关信息dis web users 显示web用户的相关信息。
header login 配置登陆验证是显示信息header shellundo headerlock 锁住当前用户界面acl 访问控制列表acl number inbound/outbound[h3c]user-interface vty 0 4[h3c-vty0-4] acl 2000 inboundinterface vlan-interface vlan-id 进入valnmanagement-vlan vlan-id 定义管理vlan号reset ip routing-table statistics protocol all 清除所有路由协议的路由信息.display garp statistics interface GigabitEthernet 1/0/1 显示以太网端口上的garp统计信息display voice vlan status 查看语音vlan状态[h3c-GigabitEthernet1/0/1] broadcast-suppression 20 允许接受的最大广播流量为该端口传输能力的20%.超出部分丢弃.[h3c-GigabitEthernet1/0/1] broadcast-suppression pps 1000 每秒允许接受的最大广播数据包为1000传输能力的20%.超出部分丢弃.display interface GigabitEthernet1/0/1 查看端口信息display brief interface GigabitEthernet1/0/1 查看端口简要配置信息display loopback-detection 用来测试环路测试是否开启ipdisplay am user-bind 显示端口绑定的配置信息display mac-address 显示交换机学习到的mac地址display stp 显示生成树状态与统计信息[h3c-GigabitEthernet1/0/1]stp instance 0 cost 200 设置生成树实例0上路径开销为200stp cost 设置当前端口在指定生成树实例上路径开销。
instance-id 为0-16 0表cist 取值范围1-200000<h3c> display system-guard ip-record 显示防攻击记录信息.system-guard enable 启用系统防攻击功能display icmp statistics icmp流量统计display ip socketdisplay ip statistics通过)display qos-interface GigabitEthernet1/0/1 traffic-limit 查看端口上流量端口速率限制line-rate inbound/outbound target-rateinbound:对端口接收报文进行速率限制outbound: 对端口发送报文进行速率限制target-rate 对报文限制速率,单位kbps 千兆口inbound范围1-1000000 outbound范围20-1000000undo line-rate取消限速.[h3c]interface GigabitEthernet1/0/1[h3c-GigabitEthernet1/0/1]line-rate outbound 128 限制出去速率为128kbpssys 进入到系统视图Enter system view, return to user view with Ctrl+Z.[Quidway]user-interface aux 0[Quidway-ui-aux0]authentication-mode schemeNotice: Telnet or SSH user must be added , otherwise operator can't login![Quidway-ui-aux0]qu[Quidway]local-user huawei 增加用户名New local user added.[Quidway-luser-huawei]password simple huawei 配置密码,且密码不加密[Quidway-luser-huawei]service-type telnet ssh level 3服务类型为SSH和telnet,且用户登陆后权限为管理员权限[Quidway-luser-huawei]qu[Quidway]user-interface vty 0 4[Quidway-ui-vty0-4]authentication-mode schemeNotice: Telnet or SSH user must be added , otherwise operator can't login![Quidway-ui-vty0-4]<Quidway>save之设置交换机的名称[Quidway]sysname TRAIN-3026-1[TRAIN-3026-1]配置用户登录[Quidway]user-interface vty 0 4[Quidway-ui-vty0]authentication-mode scheme创建本地用户[Quidway]local-user huawei[Quidway-luser-huawei]password simple huawei[Quidway-luser-huawei] service-type telnet level 34、VLAN配置方法『配置环境参数』SwitchA端口E0/1属于VLAN2,E0/2属于VLAN3『组网需求』把交换机端口E0/1加入到VLAN2 ,E0/2加入到VLAN3数据配置步骤『VLAN配置流程』(1)缺省情况下所有端口都属于VLAN 1,并且端口是access端口,一个access端口只能属于一个vlan;(2)如果端口是access端口,则把端口加入到另外一个vlan的同时,系统自动把该端口从原来的vlan中删除掉;(3)除了VLAN1,如果VLAN XX不存在,在系统视图下键入VLAN XX,则创建VLAN XX 并进入VLAN视图;如果VLAN XX已经存在,则进入VLAN视图。
【SwitchA相关配置】方法一:(2)使用display interface Ethernet 0/1可以看到端口为access端口,PVID为2;(3)使用display interface Ethernet 0/2可以看到端口为access端口,PVID为35、交换机IP地址配置功能需求及组网说明『配置环境参数』三层交换机SwitchA有两个端口ethetnet 0/1、ethernet 0/2,分别属于vlan 2、vlan 3;以vlan 2的三层接口地址分别是1.0.0.1/24作为PC1的网关;以vlan 3的三层接口地址分别是2.0.0.1/24作为PC2的网关;『组网需求』PC1和PC2通过三层接口互通【SwitchA相关配置】(1)创建(进入)vlan2[Quidway]vlan 2(2)将端口E0/1加入到vlan2[Quidway-vlan2]port ethernet 0/1(3)进入vlan2的虚接口[Quidway-vlan2]interface vlan 2(4)在vlan2的虚接口上配置IP地址[Quidway-Vlan-interface2]ip address 1.0.0.1 255.255.255.0(5)创建(进入)vlan3[Quidway]vlan 3[SwitchA]vlan 20(4)将E0/2加入到vlan20[SwitchA-vlan20]port Ethernet 0/2(5)实际当中一般将上行端口设置成trunk属性,允许vlan透传[SwitchA-Ethernet0/3]port link-type trunk(6)允许所有的vlan从E0/3端口透传通过,也可以指定具体的vlan值[SwitchA-Ethernet0/3]port trunk permit vlan all【SwitchB相关配置】(1)创建(进入)vlan10[SwitchB] vlan 10(2)将E0/1加入到vlan10[SwitchB-vlan10]port Ethernet 0/1(3)创建(进入)vlan20[SwitchB]vlan 20(4)将E0/2加入到vlan20[SwitchB-vlan20]port Ethernet 0/2(5)实际当中一般将上行端口设置成trunk属性,允许vlan透传[SwitchB-Ethernet0/3]port link-type trunk(7)允许所有的vlan从E0/3端口透传通过,也可以指定具体的vlan值[SwitchB-Ethernet0/3]port trunk permit vlan all【补充说明】信(2)汇聚端口必须工作在全双工模式[SwitchA-Ethernet0/1]duplex full(3)汇聚的端口速率要求相同,但不能是自适应[SwitchA-Ethernet0/1]speed 100(4)进入端口E0/2[SwitchA]interface Ethernet 0/2(5)汇聚端口必须工作在全双工模式[SwitchA-Ethernet0/2]duplex full(6)汇聚的端口速率要求相同,但不能是自适应[SwitchA-Ethernet0/2]speed 100(7)根据源和目的MAC进行端口选择汇聚[SwitchA]link-aggregation Ethernet 0/1 to Ethernet 0/2 both【SwitchB交换机配置】[SwitchB]interface Ethernet 0/1[SwitchB-Ethernet0/1]duplex full[SwitchB-Ethernet0/1]speed 100[SwitchB]interface Ethernet 0/2[SwitchB-Ethernet0/2]duplex full[SwitchB-Ethernet0/2]speed 100[SwitchB]link-aggregation Ethernet 0/1 to Ethernet 0/2 both【补充说明】(1)定义一个ACL[SwitchA]acl num 200(2)定义一个规则从E0/1发送至其它所有端口的数据包[SwitchA]rule 0 permit ingress interface Ethernet0/1 egress interface Ethernet0/2 (3)定义一个规则从其它所有端口到E0/1端口的数据包[SwitchA]rule 1 permit ingress interface Ethernet0/2 egress interface Ethernet0/1 (4)将符合上述ACL的数据包镜像到E0/8[SwitchA]mirrored-to link-group 200 interface e0/89、生成树STP配置『配置环境参数』(1)交换机SwitchA、SwitchB和SwitchC都通过GE接口互连(2)SwitchB和SwitchC交换机是核心交换机,要求主备。