博朗190s-1, 170s-1剃须刀说明书中文版
飞利浦S11xx电气剃须刀用户指南说明书
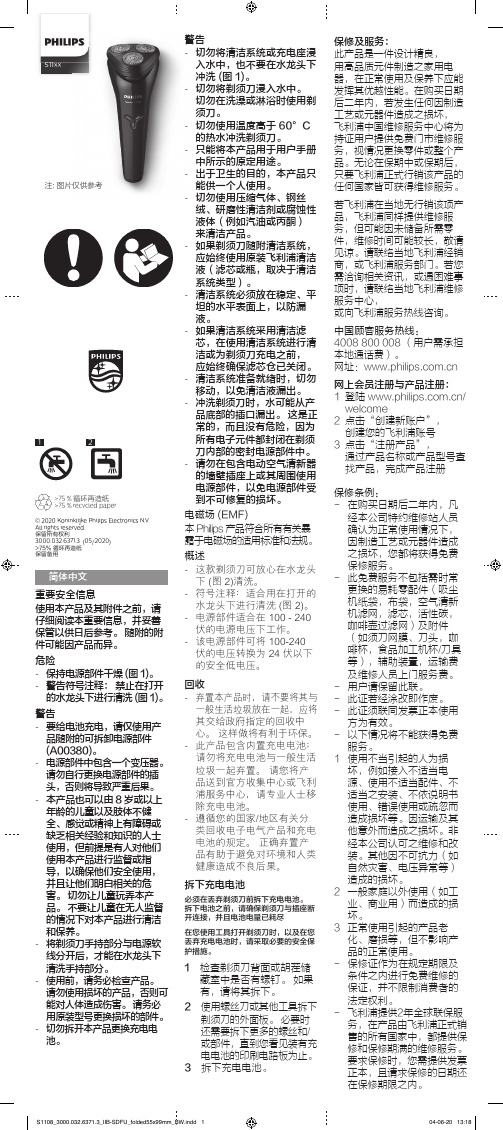
注: 图片仅供参考
您没有正 确保剃须4222.002.5978.1_cHR.indd 1 确插入剃 刀头凸起 须刀头。 部位正好
插入凹陷 部位。
/support
按下开/ 关钮 时,产 品不工 作。
充电电池 给电池充 的电量已 电。 耗尽。
立即扫码进入官网公众号注册
S1103
2
1
Hale Waihona Puke 1S1108 32
4
5
SH30
6
S1101 1 S1102
S1103
S1108 1
2
2
4
7
S1108_3000.032.6371.3_IIB-SDFU_folded55x99mm_BW.indd 2
04-06-20 13:18
- 电源部件中包含一个变压器。 请勿自行更换电源部件的插 头,否则将导致严重后果。
- 本产品也可以由 8 岁或以上 年龄的儿童以及肢体不健 全、感觉或精神上有障碍或 缺乏相关经验和知识的人士 使用,但前提是有人对他们 使用本产品进行监督或指 导,以确保他们安全使用, 并且让他们明白相关的危 害。 切勿让儿童玩弄本产 品。 不要让儿童在无人监督 的情况下对本产品进行清洁 和保养。
- 切勿使用温度高于 60°C 的热水冲洗剃须刀。
- 只能将本产品用于用户手册 中所示的原定用途。
- 出于卫生的目的,本产品只 能供一个人使用。
- 切勿使用压缩气体、钢丝 绒、研磨性清洁剂或腐蚀性 液体(例如汽油或丙酮) 来清洁产品。
- 如果剃须刀随附清洁系统, 应始终使用原装飞利浦清洁 液(滤芯或瓶,取决于清洁 系统类型)。
- 清洁系统必须放在稳定、平 坦的水平表面上,以防漏 液。
Philips 西式 handsfree 点灭电动剃须刀说明书

S7887/55shave, advanced skin protectionwith SkinIQ T echnologyThe Philips Series 7000 glides smoothly over your skin, while cutting each hairclose - even on 3-day beards. Equipped with advanced SkinIQ technology, theshaver senses, adapts and guides on the correct motion, for better skinprotection.A close shavePowerful performance in every passEngineered for precision and cutting efficiencyA djusts to your facial contour for optimal skin contactSkinIQ technologyReduces friction on skin to minimize irritationA djusts to your beard for effortless shavingEnhanced shaving experience with appGuides you to an improved technique with fewer passesFor a convenient shaveDeep cleaning in just 1 minute for hygienic shavingShave wet, dry and even under the showerPrecision trimmer integrated in the handleSustainabilityConvenient chargingHighlightsNano SkinGlidecoatingA protective coating lies between the shaver heads and your skin . Made of up to 250.000micro -tech beads per square centimetre ,improves gliding on skin by up to 30%***, to minimize irritation .SteelPrecisionbladesWith up to 90.000 cutting actions per minute , the SteelPrecision blades shave close , cutting more hair per stroke *. The 45high -performance blades are self -sharpening and made in Europe .Motion ControlsensorMotion -sensing technology tracks how you shave and guides you to a more e fficient technique . A fter just three shaves , the majority of men achieved a better shaving technique for fewer passes ***.Personalization viaappPerfect your shave by pairing your shaver with the Philips GroomTribe app . Shave by shave , track the progress of your skin ,personalize your shave and master your technique for a shave that 's as close as it is kind to skin .Power A daptsensorThe intelligent facial -hair sensor reads hair density 250 times per second . The technology dynamically auto -adapts cutting power for an e ffortless and gentle shave .360-D FlexingheadsFully flexible heads turn 360° to follow your facial contours . Experience optimal skin contact for a thorough and comfortable shave .Hair -Guide PrecisionheadsThe new shape of the shaving heads is engineered for precision . The surface is enhanced with hair guiding channels ,designed to move hair into an e ffective cutting position .Cable -free Quick CleanPodPowerful cleaning pod thoroughly cleans and lubricates your shaver in just 1 minute ,keeping it performing at its best for longer .The pod is 10x more e ffective than cleaning with water **. It is the world 's smallestcleaning pod , so you can store it easily and use it anywhere .Wet &DryA dapt your shaving routine to your needs .With Wet & Dry , you can go for a comfortable dry shave or a refreshing wet shave . Y ou can shave with gel or foam even under the shower .SpecificationsA ccessoriesCharging standQuick Clean Pod: Y es, 1 cartridge included Integrated pop-up trimmerTravel and storage: Travel caseUSB-A cable included: Power adapter not includedSoftwareA pp: Daily Care, Connects via Bluetooth®Smartphone compatibility: iPhone andA ndroid™ devicesPowerCharging: 1 hour full charge, 5 min quick chargeRun time: 60 minutes A utomatic voltage: 5 VBattery type: Li-ionStand-by power: 0.04 WMax power consumption: 5 WVoltage: 5 VDesignHandle: Rubber gripColor: Dark ChromeShaving heads: A ngularService2-year warrantyReplacement head SH71: Replace every 2 yrswith SH71Shaving PerformanceShaving system: SteelPrecision bladesContour following: 360-D Flexing headsSkinIQ technology: Nano SkinGlide Coating,Motion Control sensor, Power A dapt sensorEase of useDisplay: LED display, Battery level indicator,Motion control indicator, Travel lockWet & Dry: Wet and dry useCleaning: One-touch open, Fully washableCharging: USB-A Charging* compared to non-coated material* *Tested versus Philips Series 3000.* **Based on Philips Series S7000 and Daily Care appusers in 2019* ***comparing shaving debris after using cleaning fluidvs. water in the cartridge© 2023 Koninklijke Philips N.V.A ll Rights reserved.Specifications are subject to change without notice. Trademarks are the property of Koninklijke Philips N.V. or their respective owners.Issue date 2023‑07‑15 Version: 7.7.1E A N: 87 20689 00869 3 。
[剃须刀使用说明书范文]博朗剃须刀使用说明书范文
![[剃须刀使用说明书范文]博朗剃须刀使用说明书范文](https://img.taocdn.com/s3/m/41ab8d1054270722192e453610661ed9ad5155e4.png)
[剃须刀使用说明书范文]博朗剃须刀使用说明书范文本说明适用于各类充电式剃须刀。
充电:将电源插头插入AC220V电源之中,视充电指示灯亮、充电12-16小时。
注意:充电时间不要过长,以免影响电池寿命。
剃须:将开关键上推至(on)开启位置,即可剃须。
为求最佳之刮须效果,请将皮肤拉紧,使胡子成直立状,然后以逆胡子生长的方向缓慢移动。
修剪刀:如有修剪刀功能的剃须刀,请在剃须前,先将修剪刀推出,修短胡须后再用网刀剃净。
清洁:剃须刀要经常清洁。
清洁前应先关上开关。
旋下网刀,用毛刷将胡须屑刷净。
清洁后轻轻放回刀头架、且到位。
清洁时应轻拿轻放,避免损坏任何部件。
保修条例:保修服务只限于一般正常使用下有效。
一切人为损坏例如接入不适当电源,使用不适当配件,不依说明书使用;因运输及其它意外而造成之损坏;非经本公司认可的维修和改造,错误使用或疏忽而造成损坏;不适当之安装等,保修服务立即失效。
此保修服务并不包括运输费及维修人员上门服务费。
保修期外享受终身维修,维修仅收元器件成本费。
剃须刀中内、外刃属消耗品不在保修范围内。
保修期:正常使用六个月。
注意事项:充电时间12~16小时。
换刀网刀头时一定要选用原厂配件。
评析:这是一篇剃须刀的使用说明书。
该使用说明书还附上了“保修条例”部分,严格来讲,“保修条例”不属于使用范围内的东西,可以略去。
就其使用说明来讲,该文谈到三个主要的步骤,一是充电,二是剃须,三是清洁。
这类剃须刀属于充电式的,由于刚打开的产品尚未充电,故要求先充电。
该部分介绍了所接用的充电电压,充电时间及注意事项等。
剃须部分将剃须的具体方法,剃刀走动的方向等都介绍的很清楚。
除此而外,还指出有“修剪刀”的剃刀可在剃须前先将长须修短,再用剃须刀剃净。
清洁是剃须后必做的,这里详细地了剃须刀的保养清洁工作。
为延长剃须刀的寿命这都是很有必要的。
博朗Series 5官方中文说明书

()614s h 19EngliBraun GmbHFrankfurter Straße 145 61476 Kronberg/Germany 96620210/X-13China/Korea/UKSer ies 5S e ri e s 511b5090cc112EnglishOur products are designed to meet the highest standards of quality, functionality and design. Thank you for your trust in Braun’s quality and we hope you enjoy your new Braun shaver.Please read the use instructions carefully and completely before using the appliance.Keep them for future reference.WarningYour appliance is provided with a special cord set, which has an integrated Safety Extra Low Voltage power supply. Do not exchange or tamper with any part of it, otherwise there is risk of an electric shock.Only use the special cord set provided with your appliance.Do not shave with a damaged foil or cord.The shaver is suitable forcleaning under running tabwater. Detach the shaver fromthe power supply before clean-ing it in water.Model 5040s w&d only:This appliance is suitable forcleaning under running waterand use in a bath or shower. Forsafety reasons it can only beoperated cordlessly.This appliance can be used by children aged from 8 years and above and per-sons with reduced physical, sensory or mental capabilities or lack of experience and knowledge if they have been given supervision or instruction concerning the safe use of the appliance and under-stand the hazards involved.Children shall not play with the appliance. Cleaning and user maintenance shall not be made by children unless they are older than 8 years and supervised.Oil bottle(models 5040s w&d/5030s/5020s) Keep out of reach of children. Do not swallow. Do not apply to eyes. Dispose of properly when empty.Clean&Charge Station(models 5090cc/5070cc/5050cc) To prevent the cleaning fluid from leaking, ensure that the Clean&Charge Station is placed on a flat surface. When a cleaning cartridge is installed, do not tip, move suddenly or transport the station in any way as cleaning fluid might spill out of the cartridge. Do not place the station inside a mirror cabinet, nor place it on a polished or lacquered surface.The cleaning cartridge contains a highly flammable liquid so keep it away from sources of ignition. Do not expose to direct sunlight and cigarette smoking nor store it over a radiator.Do not refill the cartridge and use only original Braun refill cartridges.1 Foil & Cutter cassette2 Cassette release button3 MultiHeadL ock switch4 On/off switch5 Shaver display6 Long hair trimmer7 Shaver-to-station contacts8a Release button for long hair trimmer8b Model number of shaver9 Shaver power socket10 Special cord set11a Brush11b Hard travel case*11c Protection cap**not with all modelsPrior to first use remove the protection foil if any from the shaver display and connect the shaver to an electrical outlet using the special cord set (10). Charging and basic operating information• A full charge provides up to 45 minutes of cordlessshaving time. This may vary according to your beard growth and environmental temperature.• Recommended ambient temperature for charging is 5 °C to 35 °C. The battery may not charge properly or at all under extreme low or high temperatures. Recommended ambient temperature for shaving is 15 °C to 35 °C.• Do not expose the appliance to temperatures higher than 50 °C for extended periods of time.• When the shaver will be connected to an electrical outlet, it may take some minutes until the display illuminates.Charge statusThe shaver display (5) shows the charge status of the battery.During charging: The battery symbol will blink. (5090cc: The respective battery segment will blink.) Fully charged (shaver is connected to an electrical outlet): The battery symbol will light up for a few seconds. (5090cc: All battery symbols will light up for a few seconds.)Low chargeThe low-charge light flashes red when the battery is running low. You should be able to finish your shave. With switching off the shaver a beep sound reminds of the low charge status.Cleaning status(models 5090cc/5070cc/5050cc only)Travel lockThe lock symbol lights up when the shaver has been locked to avoid unintended starting of the motor (e.g. for storing it in a suitcase).Press the on/off switch (4) to operate the shaver. Tips for a perfect dry shaveFor best results, Braun recommends you to follow 3 simple steps:1. Always shave before washing your face.2. At all times, hold the shaver at the right angle(90°) to your skin.3. Stretch your skin and shave against the directionof your beard growth.MultiHeadLock switch (head lock)To shave hard-to-reach areas (e.g. under the nose) slide the MultiHeadLock switch (3) down to lock the shaver head. The shaver head can be locked in five positions. To change position, move the shaver head with your thumb and forefinger back or forth. It will automatically click into the next position.To set it back into the pivoting position the MultiHeadLock switch needs to be slid up again. Models 5090cc/5070cc/5050cc: For automatic cleaning in the Clean&Charge Station the head lock should be released.Long hair trimmerTo trim sideburns, moustache or beard press the release button (8a) and slide the long hair trimmer (6) upwards.Shaving with the cord (models 5090cc/5070cc/ 5050cc/5030s/5020s only)If the shaver has run out of power (discharged), you may also shave with the shaver connected to an electrical outlet via the special cord set.Travel lock• A ctivation: By pressing the on/off switch (4) for3 seconds the shaver is locked. This is confirmed by a beep sound and the lock symbol in the display. Afterwards the display turns off.• D eactivation: By pressing the on/off switch for3 seconds the shaver is unlocked again.• S witch the shaver on (cordless) and rinse the shaver head under hot running water until all residues have been removed. You may use liquid soap without abrasive substances. Rinse off all foam and let the shaver run for a few more seconds.• N ext, switch off the shaver, press the release button (2) to remove the Foil & Cutter cassette (1) and let it dry.• I f you regularly clean the shaver under water, then once a week apply a drop of light machine oil on top of the Foil & Cutter cassette.Alternatively, you may clean the shaver with a brush:• S witch off the shaver. Remove the Foil & Cutter cassette (1) and tap it out on a flat surface. Using the brush, clean the inner area of the pivoting head. Do not clean the cassette with the brush as this may damage it!Model 5040s only:The shaver should be cleaned after each foam usage.The Clean&Charge Station has been developed for cleaning, charging, lubricating, disinfecting and storing your Braun shaver.12 Station power socket13 Lift button for cartridge exchange14 Station-to-shaver contacts15 Clean&Charge Station display15a Status light16 Start button17 Cleaning cartridgeInstalling the Clean&Charge Station (see fig. D)• Remove the protection foil from the Clean&Charge Station display.• Using the special cord set (10), connect the station power socket (12) to an electrical outlet. • Press the lift button (13) at the rear side of the Clean&Charge Station to lift up the housing.• Hold the cleaning cartridge (17) down on a flat, stable surface (e.g. table).• Carefully remove the lid from the cartridge.• Slide the cartridge from the rear side into the base of the station until it snaps into place.• Slowly close the housing by pushing it down until it locks.Charging the shaver in the Clean&Charge Station (see fig. D)Insert the shaver head down into the cleaning station. Important: The shaver needs to be dry and free from any foam or soap residue!The contacts (7) on the back of the shaver need to align with the contacts (14) in the station. Push the shaver in the correct position.A beep sound confirms that the shaver sits properly in the station. Charging will start automatically. Model 5090cc: The Clean&Charge Station analyzes«Cleaning programs» below.Cleaning the shaver(see fig. D)Station, upside down and with the front showing (with released head lock/contact alignment/beep sound). Cleaning programs5090cc: The hygiene status will be analyzed and oneshort economical cleaningnormal level of cleaninghigh intensive cleaning5070cc/5050cc: One standard cleaning program included.Start automatic cleaningStart the cleaning process by pressing the start button (16). If status light (15a) does not shine (Clean&Charge Station switches to stand-by after ca. 10 minutes), press start button twice. Otherwise cleaning will not start. For best shaving results, we recommend cleaning after each shave.Each cleaning program consists of several cycles, where cleaning fluid is flushed through the shaver head. Depending on your Clean&Charge Station model and/or program selected, the cleaning time takes up to 3 minutes. During this time the status light blinks. Leave the shaver in the station for drying.It takes several hours until remaining moisture evaporates depending on the climatic conditions. Afterwards the shaver is ready for use.After completing the cleaning and charging proce-dure, all indicators turn off.Removing the shaver from the Clean&Charge Station (see fig. E)Hold the Clean&Charge Station with one hand and tilt the shaver slightly to the front to release it. Cleaning Cartridge / Replacement (see fig. F) When the level indicator lights up permanently red, the remaining fluid in the cartridge is sufficient for about 3 more cycles. When the level indicator blinks red, the cartridge needs to be replaced - (about every 4 weeks when used daily.)After having pressed the lift button (13) to open the housing, wait for a few seconds before removingthe used cartridge to avoid any dripping. Before discarding the used cartridge, make sure to close the openings using the lid of the new cartridge, since the used cartridge will contain contaminated cleaning solution.The hygienic cleaning cartridge contains ethanol, which once opened will naturally evaporate slowly into the surrounding air. Each cartridge, if not used daily, should be replaced after approximately8 weeks to ensure optimal disinfection.The cleaning cartridge also contains lubricants for the shaving system, which may leave residual marks on the outer foil frame and the cleaning chamberof the Clean&Charge Station. These marks can be removed easily by wiping gently with a damp cloth. Braun recommends changing your shaver’sFoil & Cutter cassette every 18 months to maintain your shaver’s maximum performance.Available at your dealer or Braun Service Centres:• Foil & Cutter cassette: 52S/52B• Cleaning cartridge Clean&Charge Station: CCR •Braun Shaver cleaner spray21This product contains rechargeable batteries.In the interest of protecting the environment, please do not dispose of the product in the household waste at the end of its useful life. Disposal can take place at a Braun Service Centre or at appropriate collection points provided in your country.The cleaning cartridge can be disposed of with regular household waste.Subject to change without notice.For electric specifications, see printing on thespecial cord set.22。
剃须刀设备说明书

显示屏上的图标是什么意思? (图 B) - 主菜单
您可以按菜单按钮来切换菜单项。 长按即可启用或禁用某些功能。 图标 含义 此菜单以百分数的形式显示电池状态。
可以通过此菜单启用或禁用旅行锁。
可以通过此菜单禁用或重新启用光环反馈。
- 打开剃须刀电源
20 简体中文
按下开/关按钮启动剃须刀。
从此菜单项中,您可以取消配对剃须刀和 智能手机。 注意: 请确保您的智能手机配备了 Bluetooth® 4.2 或更高版本。
本剃须刀配备了 Bluetooth® 4.2 及更高版 本,可与该应用程序连接。 将剃须刀和智 能手机配对后,即使剃须刀已关闭,剃须 刀上的蓝牙也会自动打开。 这样方便在随 后同步剃须数据,因此您在剃须时无需随 身携带智能手机。 有关将剃须刀和智能手
主菜单(图 A) 关闭剃须刀时,您可通过按菜单按钮在四 个菜单功能之间进行切换。
电池剩余电量 该菜单项显示电池剩余电量。
22 简体中文压力网罩传感源自 该菜单项显示上次剃须的压力反馈。
动作控制传感器 该菜单项显示上次剃须的动作反馈。
旅行锁 蓝牙
从此菜单项中,您可以通过按住菜单按钮 3 秒钟来锁定和解锁剃须刀。 您在旅行 时,可以锁住剃须刀,以防止电源意外开 启。
简体中文 23
机配对的好处的信息,请参阅“将剃须刀 连接到应用程序的好处”。 注意: 您可以通过激活旅行锁来关闭剃须 刀上的蓝牙。
主菜单(图 B) 您可以按菜单按钮来切换菜单功能。
电池剩余电量 该菜单项显示电池剩余电量。
剃须后反馈 旅行锁
注意: 只有通过应用程序设置启用此功能 后,才会显示此菜单。
- 蓝牙 图标 含义
此图标显示剃须刀已与您的智能手机配对。
Philips 电动刮刀用户手册说明书

SW3700English 6简体中文 19IntroductionCongratulations on your purchase and welcome to Philips! To fully benefit from the support that Philips offers, register your product at/welcome .Please read this user manual, as it contains information about the features of this shaver as well as some tips to make shaving easier and more enjoyable.General description (Fig. 1)1Protective cap2Shaving unit3Shaving unit release button4On/off button5Charging light6Socket for small plug7Trimmer8Trimmer release slide switch9Supply unit10Small plugImportant safety informationRead this important information carefully before you use the appliance and its accessories and save it for future reference. The accessories supplied may vary for different products.Danger-Keep the supply unit dry.6EnglishWarning-To charge the battery, only use the detachable supply unit (HQ850) provided with the appliance.-The supply unit contains a transformer. Do not cut off the supply unit to replace it with another plug, as this causes a hazardous situation.-This appliance can be used by children aged from 8 years and above and persons with reduced physical, sensory or mental capabilities or lack of experience and knowledge if they have been given supervision or instruction concerning use of the appliance in a safe way and understand the hazards involved. Children shall not play with the appliance. Cleaning and user maintenance shall not be made by children without supervision.-Always unplug the shaver before you clean it under the tap.-Always check the appliance before you use it.Do not use the appliance if it is damaged, as this may cause injury. Always replace a damaged part with one of the original type.-Do not open the appliance to replace the rechargeable battery.Caution -Never immerse the cleaning system or the charging stand in water and do not rinse it under the tap.-Never immerse the shaver in water. Do not use the shaver in the bath or in the shower.-Never use water hotter than 60°C to rinse the shaver.-Only use this appliance for its intended purpose as shown in the user manual.-For hygienic reasons, the appliance should only be used by one person.7English-Never use compressed air, scouring pads,abrasive cleaning agents or aggressive liquids such as petrol or acetone to clean theappliance.-If your shaver comes with a cleaning system,always use the original Philips cleaning fluid (cartridge or bottle, depending on the type of cleaning system).-Always place the cleaning system on a stable,level and horizontal surface to prevent leakage.-If your cleaning system uses a cleaning cartridge, always make sure the cartridge compartment is closed before you use the cleaning system to clean or charge the shaver.-When the cleaning system is ready for use, do not move it to prevent leakage of cleaning fluid.-Water may drip from the socket at the bottom of the shaver when you rinse it. This is normal and not dangerous because all electronics are enclosed in a sealed power unit inside the shaver.-Do not use the supply unit in or near wallsockets that contain an electric air freshener to prevent irreparable damage to the supply unit.Electromagnetic fields (EMF)-This Philips appliance complies with allapplicable standards and regulations regarding exposure to electromagnetic fields.General-This shaver can be safely cleaned under the tap.-The supply unit is suitable for mains voltages ranging from 100 to 240 volts.-The supply unit transforms 100-240 volts to a safe low voltage of less than 24 volts.8EnglishChargingCharge the shaver before you use it for the firsttime and when the display indicates that thebattery is almost empty.Charging takes approx. 8 hours. A fully chargedshaver has a shaving time of up to 40 minutes.Note: You cannot use the shaver while it ischarging.Note: Depending on your shaving/styling behaviorand beard type, the operating time may vary overtime.Charging with the supply unit1Make sure the shaver is switched off.2Put the small plug in the shaver and put thesupply unit in the wall socket.-The charging light on the shaver indicates thecharging status (see 'Charge indications').3After charging, remove the supply unit from thewall socket and pull the small plug out of theshaver.Charge indicationsWhen the battery is almost empty, the charging light starts to flash red.When you switch off the shaver, the charging light continues to flash red for a few seconds.9EnglishWhen the shaver is charging, the charging light flashes green.When the battery is fully charged, the charging light lights up green continuously.Note: After approx. 30 minutes, the charging light goes out to save energy.rinsed under running tap water.-Use this shaver for its intended household use as described in this manual.-For hygienic reasons, the shaver should only be used by one person.-Trimming is easier when the skin and hair are dry.Note: This shaver can only be used without a cord.Skin adaptation period Your first shaves may not bring you the result you expect and your skin may even become slightly irritated. This is normal. Your skin and beard needtime to adapt to any new shaving system. To allow your skin to adapt to this new appliance, we advise you to shave regularly (at least 3 times a week) and exclusively with this appliance for a period of 3weeks.For the best results on skin comfort, pre-trim your beard if you have not shaved for 3 days or longer.When you press the on/off button for the very first time, the charging light flashes in an irregular pattern.Charge the shaver before use.1To switch the shaver on or off, press the on/off button once.1Switch the shaver on.2Move the shaving heads over your skin in both straight and circular movements to catch all hairs growing in different directions. Exertgentle pressure for a close comfortable shave.Note: Do not press too hard, this can cause skin irritation.3Switch off and clean the shaver after each use.4Put the protective cap on the shaver to protect shaving heads.11EnglishUsing the trimmerYou can use the trimmer to groom your sideburns and moustache.1Push the trimmer release slide switch downwards to open the trimmer.2Switch the shaver on.3Hold the trimmer perpendicular to the skin and move it downwards while exerting gentle pressure.4Switch off and clean the trimmer after each use.5Close the trimmer (‘click’).-Regular cleaning guarantees better shaving results.-Never clean, remove or replace the shaving unit while the shaver is switched on.-Do not apply pressure to shaving head combs.-Do not touch shaving heads with hard objects as this may dent or damage the precision-made slotted combs.-Do not use abrasives, scourers or aggressive liquids such as gasoline or acetone to clean the shaver.12EnglishCleaning the shaver under the tapClean the shaver after every shave for optimal2Rinse the shaving unit under a warm tap.3Press the unit release button to open the shaving unit.4Rinse the shaving unit and hair chamber undera warm tap.5Carefully shake off excess water and let the shaver air dry.6Close the shaving unit.Clean the trimmer after each use.1Switch the shaver off.13English2Push the trimmer release slide switch down to open the trimmer.3Switch the shaver on and rinse the trimmer under the tap.4Switch the shaver off after cleaning.5Carefully shake off excess water and let the trimmer air dry.6Close the trimmer (‘click’).Tip: For optimal performance, lubricate the teeth of the attachment with a drop of sewing machine oil regularly.For maximum shaving performance, we advise you to replace the shaving heads every two years.Replace damaged shaving heads immediately.Always replace the shaving heads with original Philips shaving heads.1Switch the shaver off and disconnect it from the wall socket.Press the shaving unit release button to open the shaving unit. Pull the shaving unit off the shaver.14EnglishPut the protective cap on the shaver to preventdamage.Note: Always let the shaver dry completely beforestoring.To buy accessories or spare parts, visit/service or go to yourPhilips dealer. You can also contact the PhilipsConsumer Care Center in your country (see theinternational warranty leaflet for contact details).The following accessories and spare parts areavailable:-SH30 Philips Shaving Heads.-HQ110 Philips shaving head cleaning spray Recycling-Do not throw away the product with the normalhousehold waste at the end of its life, but handit in at an official collection point for recycling.By doing this, you help to preserve theenvironment.-This product contains a built-in rechargeablebattery which shall not be disposed of withnormal household waste. We strongly adviseyou to take your product to an official collectionpoint or a Philips service centre to have aprofessional remove the rechargeable battery.-Follow your country’s rules for the separatecollection of electrical and electronic productsand rechargeable batteries. Correct disposalhelps prevent negative consequences for theenvironment and human health.16EnglishRemoving the rechargeable batteryshaver or in the hair chamber. If so, remove them.2Remove the outer panels of the shaver with a screwdriver or other tool. If necessary, alsoremove additional screws and/or parts until you see the printed circuit board with therechargeable battery.3Remove the rechargeable battery.Warranty and supportIf you need information or support, please visit /support or read theinternational warranty leaflet.Warranty restrictionsThe shaving heads (cutters and guards) are not covered by the terms of the international warranty because they are subject to wear.TroubleshootingThis chapter summarizes the most commonproblems you could encounter with the appliance.If you are unable to solve the problem with the information below, visit/support17Englishfor a list of frequently asked questions or contact the Consumer Care Center in your country.Problem Possible cause Solution The appliance do es not shave as well as it used to.The shaving heads are damaged or worn.Replace the shaving heads.Long hairs obstruct the shaving heads.Clean the shaving heads one by one.You have not inserted the shaving heads properly.Make sure that the projections of the shaving heads fit exactly into the recesses.The appliance does not work when I press the on/off button.The rechargeable battery is empty.Recharge the battery.The temperature of the appliance is too high. In this case,the appliance does not work.As soon as thetemperature of the appliance has dropped sufficiently, you can switchon the appliance again.18English介绍感谢您的惠顾,欢迎光临飞利浦! 为了让您能充分享受飞利浦提供的支持,请在 /welcome 上注册您的产品。
博朗190s-1, 170s-1剃须刀说明书中文版
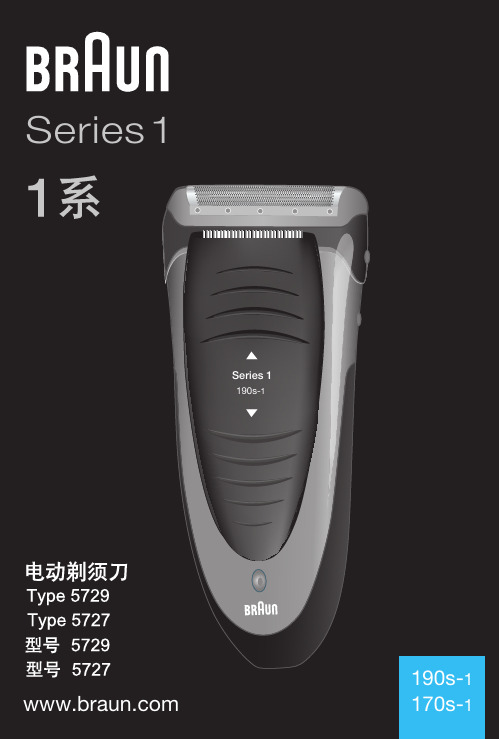
Series1Series 1190s-1612 English 16Braun GmbH Frankfurter Straße 145 61476 Kronberg/Germany Our products are designed to meet the highest standards of quality, functionality and design. We hope you entirely enjoy your new Braun shaver.WarningYour shaver is provided with a special cord set with integrated Safety Extra Low Voltage power supply. Do not exchange or manipulate any part of it. Otherwise there is a risk of electric shock.Never use the appliance with a damaged foil or cord.This appliance is not intended for use by children or persons with reduced physical or mental capabilities, unless they are given supervision by a person responsible for their safety. In general, we recommend that you keep the appliance out of reach of children. Children should be supervised to ensure that they do not play with the appliance.Oil bottleKeep out of reach of children. Do not swallow. Dispose of properly when empty.Description1 Foil protection cap2 Shaver foil3 Cutter block4 Long hair trimmer5 Charging light (190s only)6 On/off switch7 Special cord setCharging (190s only)The best environmental temperature for charging is between 15 °Cand 35 °C.• Using the special cord set, connect the shaver to an electrical outlet with the motor switched off.• When charging for the first time, leave the shaver to charge continuously for 4 hours. The charging light (5) shows that the shaver is being charged. When the battery is fully charged, the charging light intermit-tently blinks on and off. This indicates that the battery maintains its full English• Once the shaver is completely charged, discharge the shaver through normal use. Then recharge to full capacity. Subsequent charges will take about 1 hour.• Maximum battery capacity will only be reached after several charging/ discharging cycles.• If the rechargeable batteries are discharged, you may also shave by connecting the shaver to an electrical outlet via the special cord set.ShavingRemove the foil protection cap (1). Activate the on/off switch (6). The floating foil frame automatically adapts to your skin surface for a close, smooth shave.For pre-shaving after a few days of not having shaved, use the long hair trimmer (4) to pre-cut long hairs. For a close, smooth shave, finish with the foil.TrimmingPush out the long hair trimmer (a). It allows controlled trimming of moustache and sideburns. It evenly cuts and trims larger areas: ideal for shaping sideburns, moustaches and partial short beards.Frequent use of the long hair trimmer may reduce the battery capacity (190s only).Tips for the perfect shave• We recommend that you shave before washing, as the skin tends to be slightly swollen after washing.• Hold the shaver at right angles (90°) to the skin. Stretch the skin andshave against the direction of beard growth.• To maintain 100% shaving performance, replace your foil and cutterblock at least every 18 months or when worn.CleaningThe shaver head is suitable for cleaning under running tap water.Warning: Detach the shaver from the power supply before cleaningthe shaver head in water.• Model 190s only: Switch the shaver on and rinse the shaver head under hot running water.• You may use liquid soap without abrasive substances. Rinse off all foam and let the shaver run for a few more seconds.• Next, (model 190s: switch off the shaver) remove the shaver foil (2) and cutter block (3). Then leave the disassembled shaving parts to dry. Alternatively, you may clean the shaver using the brush provided (c):• Switch off the shaver. Remove the shaver foil.• Using the brush, clean the cutter block and the inner area of the shaver head. However, do not clean the shaver foil with the brush as this may damage the foil.Keeping your shaver in top shapeAbout every four weeks, clean the cutter block with Braun cleaning agents. Put a drop of light machine oil onto the long hair trimmer and the shaverfoil (d).Replacing the shaving partsTo maintain 100% shaving performance, replace your foil and cutter blockat least every 18 months or when worn. Change both parts at the same time for a closer shave with less skin irritation.(Shaver foil and cutter block: 10B)Preserving the batteries (190s only)In order to maintain the optimum capacity of the rechargeable batteries, the shaver has to be fully discharged (by shaving) every 6 months approximately. Then recharge the shaver to full capacity. Do not expose the shaver to temperatures higher than 50 °C for extended periods of time.Environmental noticeThis product contains rechargeable batteries. In the interest ofprotecting the environment, please do not dispose of the product inthe household waste at the end of its useful life. Disposal can takeplace at a Braun Service Centre or at appropriate collection points provided in your country.。
电动刮胡刀使用说明

电动刮胡刀使用说明使用电动刮胡刀前,请务必阅读以下说明以确保正确的使用方法,并获得最佳刮胡体验。
一、前言电动刮胡刀是一种方便快捷的刮胡工具,它能够提供干净、舒适的剃须效果。
本使用说明将为您介绍刮胡刀的基本组件、操作方法以及注意事项。
二、刮胡刀构造1. 刮刀头:刮刀头是用来剃须的主要部分。
请注意保持刮刀头的清洁,避免积聚细菌。
2. 电源开关:刮胡刀通常配有一个电源开关,用来控制刀头的旋转。
3. 充电插头:电动刮胡刀通常通过充电器进行充电,充电插头是与充电器插座相连接的部分。
三、使用方法1. 准备工作a. 确保刮胡刀已经充电完毕。
请根据所配充电器的说明进行充电,一般需要约1-2小时。
b. 清洁刮刀头,确保其表面没有残留物,并保持干燥。
2. 使用步骤a. 打开刮胡刀的电源开关,确保刮刀头旋转。
b. 用右手握住刮胡刀的手柄,将刮刀头轻轻贴近脸部的皮肤。
c. 沿着胡须生长的方向,轻轻地将刮刀头从上至下或者从下至上刮动。
避免用力过猛,以免造成皮肤刺激或伤口。
d. 在刮胡的过程中,可以用左手拉紧皮肤以提供更平滑的刮剃体验。
e. 刮胡完成后,关闭电源开关。
四、注意事项1. 刮胡前应将脸部清洁干净,使用洗面奶或者热毛巾敷脸能够软化胡须,减少刮胡时的不适感。
2. 刮胡刀仅适用于脸部和颈部的剃须,不可用于其他部位的剃毛。
3. 刮胡刀使用过程中应避免与水直接接触,以防水分进入电机造成损坏。
4. 保持刀头的清洁,并定期更换刮刀头,以保证刮胡效果和卫生安全。
5. 如果您对刮胡刀刀头的清洁和更换有任何疑问,请参照刮胡刀的说明书或者咨询专业人士。
五、总结电动刮胡刀是一种现代化的剃须工具,使用方便,刮胡效果出色。
在使用刮胡刀时,请确保按照正确的步骤进行操作,并保持刮刀头的清洁和更换。
祝您拥有一个清爽的剃须体验!以上就是电动刮胡刀的使用说明。
希望本文对您有所帮助,如果您还有其他问题或需要更多信息,请参考刮胡刀的专业说明书或向专业人士咨询。
- 1、下载文档前请自行甄别文档内容的完整性,平台不提供额外的编辑、内容补充、找答案等附加服务。
- 2、"仅部分预览"的文档,不可在线预览部分如存在完整性等问题,可反馈申请退款(可完整预览的文档不适用该条件!)。
- 3、如文档侵犯您的权益,请联系客服反馈,我们会尽快为您处理(人工客服工作时间:9:00-18:30)。
Series1Series 1190s-1612 English 16Braun GmbH Frankfurter Straße 145 61476 Kronberg/Germany Our products are designed to meet the highest standards of quality, functionality and design. We hope you entirely enjoy your new Braun shaver.WarningYour shaver is provided with a special cord set with integrated Safety Extra Low Voltage power supply. Do not exchange or manipulate any part of it. Otherwise there is a risk of electric shock.Never use the appliance with a damaged foil or cord.This appliance is not intended for use by children or persons with reduced physical or mental capabilities, unless they are given supervision by a person responsible for their safety. In general, we recommend that you keep the appliance out of reach of children. Children should be supervised to ensure that they do not play with the appliance.Oil bottleKeep out of reach of children. Do not swallow. Dispose of properly when empty.Description1 Foil protection cap2 Shaver foil3 Cutter block4 Long hair trimmer5 Charging light (190s only)6 On/off switch7 Special cord setCharging (190s only)The best environmental temperature for charging is between 15 °Cand 35 °C.• Using the special cord set, connect the shaver to an electrical outlet with the motor switched off.• When charging for the first time, leave the shaver to charge continuously for 4 hours. The charging light (5) shows that the shaver is being charged. When the battery is fully charged, the charging light intermit-tently blinks on and off. This indicates that the battery maintains its full English• Once the shaver is completely charged, discharge the shaver through normal use. Then recharge to full capacity. Subsequent charges will take about 1 hour.• Maximum battery capacity will only be reached after several charging/ discharging cycles.• If the rechargeable batteries are discharged, you may also shave by connecting the shaver to an electrical outlet via the special cord set.ShavingRemove the foil protection cap (1). Activate the on/off switch (6). The floating foil frame automatically adapts to your skin surface for a close, smooth shave.For pre-shaving after a few days of not having shaved, use the long hair trimmer (4) to pre-cut long hairs. For a close, smooth shave, finish with the foil.TrimmingPush out the long hair trimmer (a). It allows controlled trimming of moustache and sideburns. It evenly cuts and trims larger areas: ideal for shaping sideburns, moustaches and partial short beards.Frequent use of the long hair trimmer may reduce the battery capacity (190s only).Tips for the perfect shave• We recommend that you shave before washing, as the skin tends to be slightly swollen after washing.• Hold the shaver at right angles (90°) to the skin. Stretch the skin andshave against the direction of beard growth.• To maintain 100% shaving performance, replace your foil and cutterblock at least every 18 months or when worn.CleaningThe shaver head is suitable for cleaning under running tap water.Warning: Detach the shaver from the power supply before cleaningthe shaver head in water.• Model 190s only: Switch the shaver on and rinse the shaver head under hot running water.• You may use liquid soap without abrasive substances. Rinse off all foam and let the shaver run for a few more seconds.• Next, (model 190s: switch off the shaver) remove the shaver foil (2) and cutter block (3). Then leave the disassembled shaving parts to dry. Alternatively, you may clean the shaver using the brush provided (c):• Switch off the shaver. Remove the shaver foil.• Using the brush, clean the cutter block and the inner area of the shaver head. However, do not clean the shaver foil with the brush as this may damage the foil.Keeping your shaver in top shapeAbout every four weeks, clean the cutter block with Braun cleaning agents. Put a drop of light machine oil onto the long hair trimmer and the shaverfoil (d).Replacing the shaving partsTo maintain 100% shaving performance, replace your foil and cutter blockat least every 18 months or when worn. Change both parts at the same time for a closer shave with less skin irritation.(Shaver foil and cutter block: 10B)Preserving the batteries (190s only)In order to maintain the optimum capacity of the rechargeable batteries, the shaver has to be fully discharged (by shaving) every 6 months approximately. Then recharge the shaver to full capacity. Do not expose the shaver to temperatures higher than 50 °C for extended periods of time.Environmental noticeThis product contains rechargeable batteries. In the interest ofprotecting the environment, please do not dispose of the product inthe household waste at the end of its useful life. Disposal can takeplace at a Braun Service Centre or at appropriate collection points provided in your country.。