Letter M Cut and Paste
翻翻书letterR
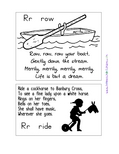
Rr rowRow, row, row your boat, Gently down the stream. Merrily, merrily, merrily, merrily, Life is but a dream.Ride a cockhorse to Banbury Cross, To see a fine lady upon a white horse. Rings on her fingers, Bells on her toes, She shall have music, Wherever she goes.Rr rideROBINCut book out as one piece. Fold accordion style. Paste back page in to your lapbook/ notebook. Let your student cut and paste all the animals beginning with the letter r on to the minit book.RACCOONRABBITLet your student paint the rocket red. Add some glue and sprinkle red glitter on the rocket, if desired. Cut the rocket out and paste in to your notebook. If desired, write “My Red Rocket” next to the rocket.Cut pocket out as one piece. Fold back up. Wrap flaps around the back and glue down.Print cards on cardstock, if desired. Cut apart. You will need to go through the cards and decide which ones you want your student to use depending on which version of the story you read together and depending on your student’s age/development. A younger student should have less cards to work with. Use the cards to help the child tell the story back to you or for story sequencing (what happened first, second, next, etc.). Store cards in pocket on next pageR R R R R RChoose a strip and cut it out. If you’d like, laminate the strip so your student can use a dry erase marker to trace the letters over and over again.RAINBOWRAINRAKE ROSES ROBOTRINGCut out book on previous page as one piece. Follow Hot Dog Book directions. If desired, print this page on a full sheet label. Let your student cut and stick the items to the correct spots on the book.。
翻翻书letterW
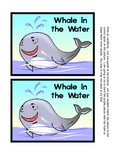
Print on cardstock. Cut out puzzle at the bottom. Let your student match the pieces to the correct spots on the picture. I am going to try to back the puzzle pieces with fun foam to make them more sturdy. You may or may not want to try this!Whale in the WaterWhale in the WaterA wonderful world I live in. I watch the worms and leaves in the wind. I wash my window way up high and walk in the woods as I wave good-bye.Motions for this rhyme: A wonderful world, I live in (make a round world with hands) I watch the worms and leaves in the wind. (make fingers wriggle for worms and sway for leaves in the wind.) I wash my window way up high (stand on tip toes and put hands as high as possible) And walk in the woods as I wave good-bye (Walk and wave)Use the word cards from the rhyme (next page) to make a minit book however you desire.windowwalkworldwormwavewindCut out both strips. Glue as indicated. Fold like an accordion.Paste to the back of the next strip.woodpeckerMy Ww Animals Coloring Bookwalrus whalewolfCut book out as one piece. Fold in half. Let your student hunt for W and w in a magazine or newspaper. Cut out the letters and paste them in this book.。
sage_word_template_guidelines_3

SAGE Word template guidelinesQuick start-up instructions∙Open the template∙Save it to your desktop, or if you use the template frequently attach the template (see Appendix C: Word techniques)∙If you have already started writing your article, copy and paste your entire article into the template (“ctrl + A” > “ctrl +C” > “ctrl + V, see Appendix A: Generalkeyboard shortcuts)∙Apply the paragraph styles listed in Appendix B.The copy-editor and typesetter will particularly need to be clear about the following paragraph styles:1.Heading levels2.Quotes3.Extracts4.Bulleted and numbered lists∙Formatting references: Please make sure the reference list is consistent in its structure. If you have already finished the list and it is not in the required journal-specific style, it is still an acceptable format, but please do not mix differentreference styles, like Vancouver and APA.Applying paragraph stylesEach paragraph section of text needs to be given a style …tag‟. To view the available styles go to …Format‟, …Styles and Formatting‟. Select …Available styles‟. The styles and formatting pane should now be displayed on the right hand side of your screen.A list of which style should be used for which types of text is included in Appendix B. Author biographies should be tagged as …TEXT‟.You do not need to insert any additional space above or below extracts, or any other elements.Applying character stylesApply character styles after applying paragraph styles, highlighting the words to be tagged. Currently, there are 3 inbuilt character styles, “CPB”, “H3”, and “H4”.Endnotes/reference numbers: Within the text, please delete and retype endnote markers and style these as …superscript‟ (E.G., using the …Format‟, …Font‟ function). Endnotes should not be embedded.Funding statementIf there is no “Declaration of conflicting interests” or funding mentioned in the article, insert the following paragraph (for most SAGE journals; copyeditor to confirm with Production Editor):FundingThe author(s) received no financial support for the research, authorship, and/or publication of this article.Order of front matter headings1.Article type2.Corresponding author infoCorresponding Author:Sarah D. Brown, Georgia State University, NCBDDD/CDC, 0000 Stanton Road MS E-23, Atlanta, GA,505003, USAEmail: sbrown@3.Article title4.AuthorsSocial SciencesSarah D. BrownGeorgia State University, Atlanta, GAScience, Technical, Medical (STM) titlesSarah D. Brown1. Paul Smith2. Vera Klein11Georgia State University, Atlanta, GA2University of California, California, CA5.AbstractAbstractThe goals of our study were to …..Keywordsautism, M-CHAT, PEDS, screeningOrder of end matter headings6.Acknowledgements(if present)7.Funding statement or Declaration of conflicting interests(mandatory)8.Notes (if present)9.References (or endnotes)Other style elementsPlease refer to the journal‟s style guide, and the SAGE Journal Guidelines, for further information on style elements within the articles.4. ChecklistDo’s✓Save as you go, backing up your work regularly.✓Insert bookmarks to help you move round the document without losing your place.✓Hide the mouse! Taking time to teach yourself how to move round the screen and use the more common formatting shortcuts (see Appendix C) will pay off handsomely in terms of time saved, extra productivity in all your screen work and reduced risk of RSI.If you need to use the mouse, use tools like “Format painter”✓Use the copy editor‟s best friend, CTRL + Z, to undo the last comm and (can be repeated indefinitely), or CTRL + Y to redo the last command.✓Type numbers with a tab (not a space) after them for lists.To insert a special character, go to /Insert/Symbols/, and select a character from the list or key it in, then copy and paste down the list. There is no need anymore to insert unicode characters✓Use Word‟s search facilities and useful options such as “Match Case”.✓Use global changes, but beware –ise spellings and other style variations should follow original author style in quotes and references.✓Contact the SAGE production editor if you have any queries.✓Make suggestions if you can see a better way of doing something✓Insert the figure and table after first text reference. Typesetters will then place them at the bottom of that page, or at the top of the next page.Don’tsDon‟t use entity codes (previously used to add en dashes, bullet points, non-breaking spaces, and figure spaces (before numbered notes when there are more than 9), etc.Don‟t add tabs to indent paragraphs. Eac h paragraph style determines how a paragraph should look. For instance, there is no need to insert a tab or spaces at the start ofparagraphs styled with the text indent paragraph style.Don‟t alter the appearance of a paragraph locally; for example, don‟t use Word‟s style toolbar or tab facilities to change spacing.Word‟s extended character styles should cover all foreign accents and therefore don‟t need unicode styles. However, if in doubt, please highlight the respective areas and attach a pdf in SMARTDon‟t use Word‟s facilities to number lists or add bullets.Avoid callouts (“CL”), unless necessaryAppendix A: General keyboard shortcuts Home Please note these shortcuts are for guidance only, and subject to change with each newAppendixB: SAGE T emplate style Names HomeShortcut keysBelow the list of styles. The list of shortcut keys has to be customized by the user.To install these on your machine, follow this procedure:1.Open “Styles and Formatting” panel (select >Format >Styles and Formatting)2.Right-click on style, >modify >Format >shortcut key, then in “Press newshortcut key” enter your preferred shortcut for this style, then >assign,making sure you assign this style not only in your opened article, but also onthe template on your c-drive3.Depending on how often you use a particular style, you repeat this to thestyles you useList of paragraph styles used by SageAppendix C: Word T echniques Home Here are some quick 'How to' procedures for performing some key tasks in WordAttaching a Word Template∙Click on the Tools menu.∙Select Templates and Add-Ins.∙Click on the Attach box.∙Select the new SAGE template and click Open∙Tick the Automatically Update Document Styles box just underneath the Attach box.∙Click on the Add box.∙Select the new SAGE template and click OK.Opening Toolbars∙Click on the View Menu.∙Click on Toolbars.∙Click on the Toolbar you want to open. The ticks show which toolbars are already open. Alternatively, move the mouse pointer over the grey toolbar area at the top of the screen and click the Rightmouse button. Click on the toolbar you want to open.Closing Toolbars∙Click on the View Menu.∙Click on Toolbars.∙Click on the Toolbar you want to close. The ticks show which toolbars are already open. Alternatively, move the mouse pointer over the grey toolbar area at the top of the screen and click the Right mouse button. Click on the toolbar you want to close.Moving ToolbarsYou should see two light grey lines at the end of the toolbar. Move the mouse pointer over these two lines and press and hold the left mouse button. You can now 'drag' the toolbar to a new position. You can also drag the tool bar in or out of the grey area at the top of screen.If you want to drag a toolbar back into the grey toolbar area at the top of the screen, move the mouse pointer over blue bar above the toolbar and click and hold the left mouse button. You can now 'drag' the toolbar back into the grey toolbar area.Customizing and creating ToolbarsIf you want to see the styles in the toolbar, as you did with the old coffeecup template, you can set these up individually, deciding which to include.∙Go to >Tools>Customize, and click on “New” (see image below)∙Name the toolbar accordingly, for example “Opening page styles”, or “Main body text styles”∙Click ok and close the window∙Go to >Tools>Customize>Commands, scroll down and select >Styles; then, using the cursor, highlight and drag and drop the styles you need, into the newly created toolbar∙Right-click the style, and in the drop-down list go to the field giving the name, and delete the word “Style” (otherwise your toolbars get to long)∙Remember: Only once you are in >Tools>Customize>Commands, you can customize your toolbarsSearch and Replace∙Press CTRL + h to call up the Search and Replace box.∙Type the word or words you want to search for in the Find What box.∙Type the word or words you want to replace in the Replace With box.∙Click Find Next to search.∙Click Replace to replace the word you found or click Replace All to do a Global Search and Replace.It is possible to search for anything in Word including paragraph markers, styles, comments and manual line breaks. You can select these from the Special menu. Word has its own codes for these. For instance tabs become ^t, a manual page break is ^m and a paragraph marker is ^p.If you want to search for italics or fonts click the Format button.Search and Replace TipMake sure you check the formatting below the Find What and Replace With boxes. Click the No Formatting button to clear all formatting before your search.。
一篇关于自己中国剪纸的英语作文

一篇关于自己中国剪纸的英语作文全文共5篇示例,供读者参考篇1My Favorite Art: Chinese Paper CuttingHi there! My name is Xiaoming and I'm 10 years old. Today I want to tell you about my favorite kind of art – Chinese paper cutting! It's called jianzhi in Chinese. I just love how colorful and detailed the designs can be. Paper cutting is super cool and I'm going to explain why I like it so much.First, let me tell you what paper cutting actually is. It's where you take a piece of paper and cut out different shapes and patterns to make a picture or design. The paper is usually red, but other colors can be used too. The artist uses tiny scissors to carefully cut out the design. It takes a lot of patience and skill!The history of Chinese paper cutting goes back over 1,500 years to the Six Dynasties period between 265-589 AD. Back then, people used paper cutting designs to decorate windows, lamps, and even their clothes. Can you imagine wearing a dress with beautiful paper cut patterns? So pretty!There are different styles of paper cutting from different regions of China. The styles from the provinces of Shaanxi and Sichuan are especially famous and intricate. The paper cutters in those areas make designs that look almost too detailed to be possible. It's like magic!My favorite style is from Guangdong province in southern China. The Guangdong style uses a lot of images of flowers, birds, fish and other nature scenes. I love all the bright colors they use like red, yellow, green and purple. The paper is so thin and delicate but the artists can create such stunning pictures. It's incredible!Speaking of pictures, one of the most common paper cutting designs is of the Chinese zodiac animals. You know, like the rat, ox, tiger, rabbit and all those. Paper cuttings with the zodiac animal for the upcoming year are considered very lucky. My zodiac is the dragon, so I have a really cool paper cutting of a fierce dragon hanging in my room!Another popular design is paper cut window grilles, which are decorations that hang in windows. The grilles let in light while adding a beautiful design to the window. You can also find paper cut designs used to decorate lanterns, fans, and even ceramic or jade artwork. So colorful and pretty!I'm lucky because my grandma is a really skilled paper cutter. She's been doing it since she was a young girl. Grandma has taught me some basic techniques and I've made a few simple designs myself. It's not easy! You have to be so careful with those tiny scissors.Someday I want to get really good at paper cutting so I can make elaborate designs just like the professionals. I love looking at their work in books or at cultural exhibits. The amount of detail is just mind-blowing. How can someone cut such tiny, perfect patterns out of a single piece of paper? It seems impossible but they do it!My dream is to become a famous paper cutting artist when I grow up. I would create giant pieces using many layered sheets of paper in different colors. Can you imagine a life-size paper cut sculpture of a phoenix or dragon? That would be the ultimate! I'd travel around putting my artwork on display so everyone could see the amazing art of Chinese jianzhi paper cutting.Well, that's enough rambling from me. I hope you can see why I'm such a huge fan of this traditional Chinese folk art. The endless designs, vibrant colors, and intricate cutting skills make paper cutting one of the coolest and most beautiful artforms ever. Isn't it just amazing what you can create with some paperand tiny scissors? I'm in awe of the masters and I can't wait to continue learning more. Paper cutting is the best!篇2My Favorite Chinese Art: Paper CuttingHi there! My name is Xiaoming and I'm going to tell you all about my favorite type of Chinese art - paper cutting! Paper cutting is so much fun and I love making beautiful designs out of plain paper. It's an ancient art form that has been practiced in China for hundreds of years.Paper cutting isn't like regular cutting with scissors. It's a special skill where you take a single sheet of paper and carefully cut out intricate designs and patterns. The finished pieces look like delicate lace or amazing silhouettes. The cut-out negative spaces are just as important as the positive spaces that remain.There are different styles of paper cutting from different regions of China. The most famous is probably the delicate and colorful Hua style from Shandong province. The designs often feature flowers, birds, fish and other nature scenes. Another popular style is the bold and striking designs of Shaanxi paper cuts with their strong lines and geometric patterns.My favorite style is probably the folk art paper cuts from the rural areas. They tend to have simple but charming scenes of farming life, animals, or auspicious symbols for luck and prosperity. I love how they capture the spirit of traditional Chinese culture.The tools for paper cutting look quite simple but you need to develop great skill to use them properly. All you really need is a very sharp tiny scissors or a special paper cutting knife. The paper has to be very thin but also strong enough not to tear. Holding the paper firmly with one hand while cutting out the designs with the other takes a ton of practice.My grandma is a master paper cutter and she taught me the basics when I was little. She has paper cuts dating back over 60 years! I remember watching in awe as she would transform a blank red sheet into an amazing scene of monkeys or dragons. The paper would seem to come alive in her hands.At first, my early attempts at paper cutting were awful. The cuts were jagged, the patterns were sloppy, and I accidentally ripped the paper constantly. But grandma was very patient with me and gave me lots of tips and encouragement. She showed me how to hold the scissors properly, how to plan out the designs, and most importantly - how to stay calm and focused.Slowly but surely, my skills improved over years of practice. Nowadays, I can cut fairly decent designs myself, though I'm still not as talented as my grandma. For my 10th birthday last year, I made her a paper cut of a cat chasing a butterfly. She loved it and hung it up proudly in her room. That made me so happy!Paper cutting is more than just an art form to me. It connects me to my heritage and my family's traditions going back generations. When I'm carefully cutting away, focused entirely on bringing my design to life, it feels almost meditative. All my worries fade away and my mind is at peace.I'm so glad paper cutting didn't die out as an ancient relic, but instead remained a living, evolving art in China. These days, paper cuts aren't just something grandmas make anymore. Contemporary artists have breathed new life into the art with bold modern designs, 3D sculpture pieces, animated lightboxes, and incredible giant paper cut installations.Some paper cuts are true masterpieces taking weeks or months of painstaking work. I saw an exhibition once with a massive 16 foot long paper cut depicting an epic historical scene with hundreds of individual figures and elements. It was ajaw-dropping display of skill and dedication.While those giants pieces are amazing, I still prefer the humble, handmade paper cuts imbued with cultural meaning and personal stories. To me, that's the true spirit of this beautiful folk art.I want to keep paper cutting for the rest of my life. It's a wonderful hobby, an amazing art form, and a connection to my roots. One day, I'll hopefully pass the skills down to my own grandchildren just like my grandma taught me. Maybe I'll even become a master paper cutter myself!So that's my story about why I love Chinese paper cutting so much. It's an intricate art with a long history that still continues to evolve today. Give it a try yourself if you can - you might just get hooked too! Thanks for reading my essay. I hope you enjoyed learning about this special part of Chinese culture!篇3My Favorite Chinese Art: Paper CuttingMy name is Xiaoming and I am 10 years old. I live in Beijing with my mom, dad, and little sister Huihui. One of my favorite things is the beautiful art of Chinese paper cutting. It's so cool and amazing!Paper cutting is when you take a piece of paper and carefully cut out shapes and designs with tiny scissors. The finished pieces look like delicate lace or pretty snowflakes. The art has been practiced in China for over 1,500 years! Can you believe something so old is still popular today?There are many different styles of Chinese paper cutting. In the north, the designs are usually more simple with lots of symmetrical patterns. But in the south, the cuts are super detailed and show scenes of people, animals, flowers, and even entire stories from ancient legends. No matter the style, paper cuttings are always bright and colorful.The paper cutters, who are called jianzhi artists, have to be very patient and skilled. With just a few folds and snips of their tiny scissors, they can create the most amazing and intricate designs. It's like magic! My mom is pretty good at paper cutting and sometimes she lets me try, but my cuts never look as nice as the professionals.Paper cutting isn't just for decoration though. The designs also have special symbolic meanings. For example, a butterfly design represents love and hope. A peony flower stands for wealth and prosperity. And a design with two lions shows strength and bravery. During the Spring Festival, which isChinese New Year, red paper cuttings with lucky words and images are hung up to welcome the new year.My favorite part of paper cutting is all the cool stories behind the designs. There are lots of legends about how paper cutting first began in China. One story says that a girl named Shengnu lived long ago. She didn't have any money, but she loved drawing patterns in the dust. One day she was inspired to start cutting the patterns out of paper instead. Her amazing skills spread and now her art is famous all over! Another legend tells of a prince who fell in love with a phoenix made from paper cuttings.Paper cutting is considered an important part of Chinese folk art and culture. The government has even made efforts to protect and promote it as an Intangible Cultural Heritage. Jianzhi artists teach classes and give performances all around China. There are even paper cutting clubs at schools! I really want to join the one at my school so I can learn more about this awesome traditional art.In recent years, paper cutting has become super popular not just in China but all around the world. International artists have started creating their own modern styles inspired by the ancient Chinese craft. It has been used on clothing, furniture, buildings,and all kinds of fun projects. I've even seen paper cut designs on cars! How cool is that?Even though paper cutting has been around for centuries, it is still evolving today. Long ago the cuts could only be made with scissors, but now lasers and computers can create much more detailed designs. There are also new tools like special paper punches to make different shapes. With all these advancements, who knows what amazing paper cut art we'll see in the future!To me, Chinese paper cutting is one of the coolest and most beautiful arts ever. The intricate patterns, the symbolic meanings, the ancient stories - I just love it all! When I look at a delicate paper cutting, I am reminded of the long history and skilled artists behind this traditional craft. Paper cutting is an important part of my Chinese culture and heritage that I am proud of. I hope people everywhere can continue to appreciate and practice this magical art for thousands of years to come!篇4My Favorite Art: Chinese Paper CuttingHi, my name is Lily and I'm 10 years old. Today I want to tell you all about my favorite art form - Chinese paper cutting! It'scalled jianzhi in Chinese. Paper cutting is super cool and I love making different designs.Paper cutting has been around for a really really long time in China, like over 1500 years! Can you believe people were making awesome paper cuts way back then? The earliest paper cuttings may have come from the 6th century during the Tang Dynasty. Folk artists living in villages would cut designs out of paper for decoration or telling stories.There are a few different styles of Chinese paper cutting. One major style is called kezhi which uses scissors to cut out designs. Another is called jianzhizhi which folds the paper to create patterns before cutting. My favorite is probably kezhi because it's easier for cutting fun shapes and pictures.The best part is you can use paper cuttings to decorate all sorts of things! They look so beautiful hung up as window decorations with the light shining through. People also use them for lanterns, New Year's decorations, gift wrappings, and more. Some people even frame really awesome paper cuts like artwork for walls. How cool is that?Making paper cuts takes a lot of patience and skill. The artists have to carefully cut out every single tiny detail using little scissors or knives. One mistake and you could ruin the wholedesign! Imagine how steady your hands need to be. The most detailed paper cuts look like amazing lace or stained glass with all the fancy cutouts.A lot of the paper cutting designs have special meanings too. Different symbols and characters represent things like good luck, wealth, happiness, and longevity. Using certain flowers or animals in the designs can stand for different virtues someone wishes to have.My favorites are definitely the pretty florals and adorable animal shapes. I've made paper cut designs with pandas, cats, rabbits, and all kinds of flowers like peonies, lotuses, and chrysanthemums. Don't they just sound so lovely? The colors used are often red, yellow, and green which are lucky colors.Learning to make my own paper cuts has been really fun but also kind of tricky. You have to be so careful and take your time. First, you fold the paper into halves or quarters however many times you need. Then you start cutting out shapes and patterns while keeping certain sections uncut so it stays as one piece. Cutting out the tiny details is the hardest part for sure!Last year for Chinese New Year, I made a paper cutting of the zodiac animal which was the tiger. I did an orange tiger surrounded by pretty flowers and Chinese characters for luck andprosperity. Everybody loved it and said I did an amazing job! That made me really proud of myself.This year I'm working on a super intricate paper cutting for the rabbit zodiac sign. It's a white rabbit sitting under a blossoming tree. Cutting out all the little flower shapes has taken me forever but I'm getting there slowly but surely. Hopefully I can finish it in time to hang up for New Year's!In the future, I hope I can get even better at paper cutting. It would be so awesome to create massive hanging paper cut designs like they have in some museums. Those look like stained glass windows that took years of work. Of course, I need to get waaay better at cutting all those tiny details first!Maybe I could start teaching paper cutting classes when I'm older too. It would be great to share this amazing Chinese folk art with more people. Then everyone could make their own pretty decorations at home.Well, that's about it for paper cutting! I could probably talk all day about how much I love it. Let me know if you'd like to learn more. Who knows, maybe you'll get bitten by the paper cutting bug too! Just be ready for some sore hands at first from all that cutting. It's worth it in the end when you make something beautiful though. Thanks for reading all about my favorite art!篇5My Favorite Chinese Art: Paper CuttingHave you ever made a paper snowflake? You fold a piece of paper, cut out cool designs with scissors, and then unfold it to reveal a beautiful pattern. Well, that's kind of like the Chinese art of paper cutting, except it's way harder and more amazing!Paper cutting is a traditional Chinese folk art that has been around for centuries. It involves cutting intricate designs and pictures out of paper using just a small pair of scissors. The designs can be super simple or incredibly detailed and complex. The prettiest paper cuttings look like delicate lace or elegant stained glass windows.I first learned about paper cutting in art class at school last year. Our teacher showed us some examples and I was blown away by how beautiful and intricate they were. She let us try making some simple designs to get the hang of it. Even the easiest paper cut-outs were harder than I expected!After that, I became obsessed with Chinese paper cutting. I looked up videos online to learn different folding techniques and cutting patterns. My parents got me some proper paper cutting scissors with super sharp tips to try more advanced designs. Ipracticed for hours, snipping away at red paper, trying to make delicate flowers, elegant butterflies, and cute little animals.The hardest part is getting the details just right without ripping the paper. You have to cut using these tiny precise scissors at exactly the right angle. One wrong snip and you've ruined the whole design! Let me tell you, I went through a lot of crumpled up paper trying to get it perfect.My personal favorite designs to cut out are birds, especially swans and peacocks. I love how you can make the feathers look so thin and delicate with intersecting cut-out patterns. Some of the most famous paper cuttings show phoenixes or dragons surrounded by clouds and flowers. Those are incredibly hard to do with all the tiny details.Once I got better, I moved on to 3D paper cutting where you cut out shapes and figures that stand up and cast shadows. I made this awesome 3D dollar to hang in my room. It has layers of cut paper that make it look like a swimming fish when the light hits it. For Chinese New Year, I made a hanging decoration with cut-out red lanterns and a cute little paper cut mouse for the Year of the Rat.Paper cutting isn't just something you do for fun either. In Chinese culture, it's an important traditional art form. People usepaper cuttings for decorations at holidays, weddings, and other celebrations. The designs often have symbolic meanings related to good luck, prosperity, happiness, and other well wishes.My dream is to become a master paper cutting artist when I grow up. I'd love to create enormous, crazy detailed paper cut designs to hang in museums or theaters. Maybe I could design a humongous paper cut landscape stretching across an entire building! That would be so awesome.For now though, I just really enjoy the relaxing process of folding the paper, snipping out patterns, and watching the design slowly come to life, cut by tiny cut. I love the delicate beauty of Chinese paper cuts. To me, it's like turning a simple piece of paper into clay and sculpting it into a vibrant work of art with just a few strategic snips. Pretty cool, right?。
怎样写abstract,proposal,cover letter
ABSTRACTS
Stay within or under the required number of words. Edit carefully. Have a colleague who knows your work well edit. Edit again. Check your word choices and structures against other recent abstracts in the journal to which you plan to send your paper.
Cover Letters
Introductory and Application Letters
Informal as to be impolite. ‘Hi,’ or ‘Hi Petey,’ or ‘Hi Dr. Young’ Overly formal ‘My Very Dear Dr. Young’ or ‘Honored Professor’.
ABSTRACTS
Writing an abstract requires unusual cognitive and linguistic discipline. Excess words must be carefully eliminated. The clarity of the words will determine. If others will read your work. If readers will accurately report its information to others.
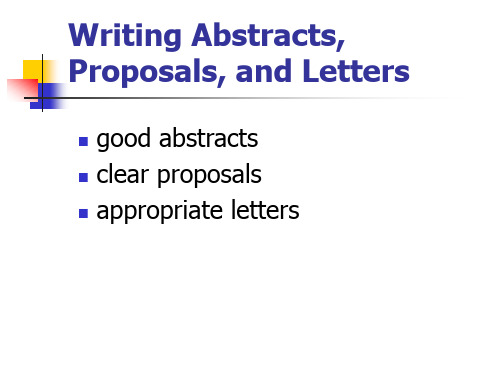
Writing Abstracts, Proposals, and Letters
good abstracts clear proposals appropriate letters
Organic Letters投稿模板说明书

Instructions for Using the Organic Letters Manuscript TemplateWord 2010 for WindowsThe Organic Letters manuscript template is a guide to be used to prepare manuscripts for submission to Organic Letters. There are a number of paragraph styles available for use with this template to identify the different parts of your manuscript, i.e., Title, Author Names, Abstract, etc. In Microsoft Word, the name of the current paragraph style is displayed in the Styles section of the home tab. Use the styles provided in the template for each corresponding section of your paper. The template is designed to closely approximate a composed manuscript. A manuscript may not exceed 2200 words, including abstract, main text, and titles/footnotes of approximately five to eight graphics. Additional graphics will require areduced word count. To calculate the word count, select all text from the abstract through the end of the main text (excluding title, authors, affiliations, and content after main text) and view the word processor word count data NOTE: references are NOT included in the word count.. For best approximation, do not manipulate elements of the template such as font size, margins, spacing,etc. to suit your word processed draft. Formatting in the Organic Letters journal style will occur as part of the editorial production process.Authors should refer to the documentation for their individual word processor or graphics package for answers to questions directly related to those programs.Downloading the template1.From the Organic Letters Information for Authors page, click on the manuscripttemplate that corresponds to the version of word-processing software you will be using to prepare your manuscript.2.Save the template in the Templates folder. With the template open in Word, click Filethen Save As. Scroll to the top of the folder list, Click Microsoft Word, then clickTemplates. In the Save as type drop down list, select Word Template, then click Save.This places the template in the proper folder so it will be listed as an available template for manuscript preparation.Working with the templateThere are several ways to use this template to generate your final manuscript to be submitted for publication. Two of the most straightforward are to (a) type your manuscript directly in the template or (b) attach the template to a working document. Instructions are given below for each of these methods as well as general instructions for all methods. Be sure to frequently check the Organic Letters Information for Authors page to ensure that you are using the most recent version of the template.For best results, template method A is recommended.A.Typing directly into the template1.Open the saved OL template and create your manuscript directly in the template bychoosing File, New. Click My Templates to locate the OL template. NOTE: If it does not appear, open the template file from the location where you saved it and resave it as aDocument Template using the same file name. This should make it so that it does appear on the My Templates tab in the New dialog box.2.Select the OL template and make sure the option Create New: Document (not Template)is selected. Click OK. You will see a file containing sample text sections with tips forusing the template and guidelines for what each section contains. This text is formattedwith the paragraph style appropriate for the section. In addition, a Styles toolbar can bedisplayed listing the Word Styles available in the template. The Styles toolbar can beopened from the Styles menu on the ribbon or by the shortcut Alt+Ctrl+Shift+S. Whenyou use the template to create a document, the new document will be a document copy(.docx) of the template containing your manuscript text, and the original template file will remain unchanged.3.Select (highlight) the text of the template that you want to replace and begin typing yourmanuscript (i.e., select the Title section for typing in your title), ensuring that you haveselected text from the appropriate section (i.e., the Author Names section for typing inyour author names).B.Attaching the template to a documentIf you have prepared your document in a file not using the template, you can attach the template to your working document and apply the Word style tags. If attaching the template to your document, it is helpful to print a copy of the template first so that you can identify which Word style should be applied to the different sections of your manuscript (File, New, My Templates and select the OL template).1.Open your manuscript file.2.Select File on the toolbar and then Options. NOTE: There are several ways to importtemplates/styles into working documents within Word. See the "templates" section ofMicrosoft Word Help for further instructions.3.Choose Add-Ins in the Word Options dialog box.4.Select Templates from the Manage drop-down list, then click Go.5.Click the Attach button and choose the appropriate template, then select Open.6.Click Automatically update document styles, then clikc OK. This will return you to theworking document. The OL template styles will be available for this manuscript.7. A popup Styles toolbar has been generated that will display the different Word styles foreasier use. If you do not see this toolbar, do (Alt+Ctrl+Shift+S), and it should appear.You can close this at any time and reopen it when needed.8.Attaching the OL template sytles does not automatically change the page layout to matchthe template dimensions; you must make the following adjustments for the best fit. Under Page Layout, select the Margins drop down list. Select Custom Margins tab, type in the following dimensions: Top 0.5”, Bottom 0.5”, Left0.76”, Right 0.76”, Gutter 0”. On the Paper Size drop-down select More Paper Sizes,in Paper tab set size Letter, Width 8.5”, Height 11”, then on the Layout tab set the Header 0.5”, and Footer 0.5”.NOTE: Page layout settings other than those prescribed here will not give accurate layout estimates.9.Place the cursor in the title section of your document. Using the Word Style menu on theformatting toolbar, select Word Style “BA_Titl e”. This will apply the Word Style to the title.Do this for the author names and addresses using the appropriate style.10.Insert TOC/Abstract graphic (sized at desired publication size).11.Place the cursor in the abstract section of your document and apply the Word Style“BD_Abstract”.12.After the last word of the abstract, enter a continuous page break (Page Layout, Breaks,select Continuous from Breaks drop- down) then change the page format for the rest of the manuscript to two-column text. Click on the Columns drop-down from the Page Setupsection in Page Layout and select More Columns. Make the following changes in thiswindow: Number of Columns 2, Width 3.33”, Spacing 0.32”. Click OK. Assign theappropriate Word Styles to the remaining paragraphs/text of the manuscript.13.Insert figures, schemes, and tables by creating a blank line (style Normal) where you wanteach to appear, making sure the image is sized appropriately for desired reproduction in publication.Additional Guidelines (see Organic Letters Author Guidelines for complete details)1.Include a graphical entry for the Table of Contents (TOC) that, in conjunction with themanuscript title, should give the reader a representative idea of one of the following: akey structure, reaction, equation, concept, or theorem, etc., or an ingeniousrepresentation, thereof, that is discussed in the manuscript. Insert this graphic, atpublication size, above the abstract text on the first page of the template.2.Submit a concise, self-contained, one-paragraph abstract (75 words or less).Space for this is provided on the first page of the template.e paragraph returns to end headings and paragraphs only. Do not use paragraphreturns to break lines. Use a spell checker to detect any typos and eliminate any spacesbefore punctuation.4.Pay particular attention to the format of the references to ensure that they comply withjournal style. Authors are responsible for the accuracy of the references.5.Present tabular material by using the table-formatting feature in your word-processingpackage. Enter each data element in its own cell. Apply template table styles to tabletitles, footnotes, and table body text.6.Ensure all characters are correctly represented throughout the manuscript: for example, 1(one) and l (ell), 0 (zero) and O (oh). Use symbol font for all Greek letters and mathsymbols. Use only characters in your file that came with the character sets in your wordprocessor.Working with graphics in the templateTo insert a graphic within the text or as a figure, scheme, or table, create a new line (Wordstyle “Normal”) and insert the graphic where desired.Size and place the graphics at the size they should be in the journal. For best results, most artwork should be sized to fit in a single journal column. NOTE: If your artwork is larger than the width of a column, Word may reduce the size so that it fits within the column. This will alter the resolution of your graphic and may make it unacceptable for publication.For double column artwork, enter a continuous page break, change number of columns from 2 to 1, place the artwork, then insert another continuous page break and configure two columns with previous settings.If your artwork does not appear where you placed it and is floating over text, select the piece of artwork by clicking on it. Under Picture Tools, select Picture or Object and then select the Position tab. Make sure the Float over text box is NOT selected. If it is, deselect it and select OK. This should make your artwork appear where you originally placed it.ChemDraw directionsFollow the drawing settings in the ACS-1996 Style Sheet for preparing your artwork. It is best to copy the actual artwork and paste it into Word rather than saving it as a file and inserting the file. In addition, for versions later than 2.1.3, in the ChemDraw Preferences (File, Preferences), ensure that the Optimize for High-Resolution non-Postscript Printing, Include ChemDraw LaserPrep, and Include PostScript Preferences are ON. Use of ChemDraw versions 2.1.3 or below and any version of ChemDraw Plus is not encouraged, as they are not compatible with the process that generates the PDF file for your manuscript. If it is absolutely necessary to use one of these older versions of ChemDraw, deselect Include PostScript Atom Labels (File, Preferences). This will prevent incompatible PostScript information from being embedded in the structure. NOTE: this may result in structures of inferior quality; thus, the use of an updated version of ChemDraw is strongly encouraged.Saving your manuscript in the templateWhen you are finished and are ready to save your document, if necessary, delete all sections from the template that are not needed, including the first page of instructions. Assign the file a name that will identify your manuscript, one that is different than that of the template. Save the file with the graphics in place. In Microsoft Word, click Save As (File menu) and save it as a “docume nt” file (.docx).NOTE: To use the template with Microsoft Word 2007 (PC version) and Microsoft Word 2008 (Macintosh version), Save your Word files in the compatibility format (Word 97-2003) using the “Save As” option.Checking your manuscript for completenessReview a printout of the manuscript (from a 600 dpi or higher laser printer) to ensure that all parts of the manuscript are present and clearly legible.Submitting your manuscriptFollow the Author Guidelines link from the Organic Letters home page for the latest instructions on how to proceed with the submission of your manuscript. If submitting electronically, your manuscript will be converted to a PDF file. This file is used strictly for peer review. The length of the file when converted to the PDF version may change. Additional formatting changes may occur in prodouction. In addition, the appearance of footnote numbers does not need to be changed to match the journal style.Additional resourcesAuthors should refer to the User's Guides for their individual word processor and graphics programs for more specific instructions on how to use these packages. In addition, most software manufacturers maintain on-line help resources. Two good sources of additional information are the Microsoft Web site (/) and the ChemDraw Web site (/software/ChemDraw/).Appendix: ReferencesGiven below are the recommended formats to be used for the various reference types. Journals: Author 1; Author 2. Journal Abbreviation year, volume, pages. For example: Smith, J.A.; Jones, B. R. Article . Lett. 1999, 1, 1.Books with Editors: Author 1; Author 2. In Book Title; Editor 1, Editor 2, Eds.; Publisher: Place of Publication, year; volume, pages. For example: The ACS Style Guide, 2nd ed.; Dodd, J. S., Ed.; American Chemical Society: Washington, DC, 1997.Books without Editors: Author 1; Author 2. Book Title; Publisher: Place of Publication, year; volume, chapter, pages. For example: Stothers, J. B. Carbon-13 NMR Spectroscopy; Academic: New York, 1972; Chapter 2.U.S. Government Publications: Author 1; Author 2. Document Title; Government Publication Number; Publisher: Place of Publication, year; pages. For example: National Handbook of Recommended Methods for Water Data Acquisition; Office of Water Data Coordination, U.S. Geological Survey: Reston, VA, 1977; Chapter 5.Technical Reports: Author 1; Author 2. Title; Technical Report Number; Publisher: Place of Publication, year; volume, pages. For example: Schneider, A. B. Expert Systems in Analytical Chemistry; Technical Report No. 1234-56; ABC Company: New York, 1985.Patents: Author. Patent number, year. (Patent number with reference to country granting the patent.) For example: Lyle, F. R. U.S. Patent 5 973 257, 1985; Chem. Abstr. 1985, 65, 2870.Thesis: Author. Level of Thesis, Degree-Granting University, Location of University, date. For example: Fleissner, W. Ph.D. Dissertation, University of Tennessee, Knoxville, TN, 1984. Series: Author 1; Author 2. In Title; Editor 1, Editor 2, Eds.; Series Title and Number; Publisher: Place of Publication, year; volume, pages. For example: Nonlinear Optical Properties of Organic Polymeric Materials; Williams, D. J., Ed.; ACS Symposium Series 233; American Chemical Society: Washington, DC, 1983.Citation to Meetings: Author 1; Author 2. Title of Presentation. Published Title of Collected Work, Proceedings of the Name of the Meeting, Location of the Meeting, Date of the Meeting; Editor 1, Editor 2, Eds.; Publisher: Place of Publication, year; abstract number, pages. For example: Baisden, P. A. Abstracts of Papers, 188th National Meeting of the American Chemical Society, Philadelphia, PA; American Chemical Society: Washington, DC, 1984; NUCL 9。
牛津小学英语6B Unit 7 A letter to a penfriend(Part A)
牛津小学英语6B Unit 7 A letter to a penfriend(Part A) The first period 无锡市蠡园中心小学周敏教材依据:译林版牛津小学英语Book 6A Unit 7 A letter to a penfriendA. Look, read and learn教学要求:1.能听懂、会说、会读和会拼写单词letter, penfriend.2.能听懂、会说和会读单词yesterday, read, both,address, would like to be等。
3. 能听懂、会说和会读日常用语Who do you want to write to? I want to write to …You both have the same hobbies. I’m going to tell him about my school and my favourite subjects.教学重点:1.能听懂、会说、会读和会拼写单词letter, penfriend.2.能听懂、会说和会读日常用语Who do you want to write to? I want to write to …You both have the same hobbies.教学理念:多种活泼的教学形式,激起学生的求知欲望。
让每个学生都有兴趣积极参与课堂,体验成功的喜悦。
教具准备:课件、彩笔、录音机、纸片、信息表教学过程:Step 1 Warm up1. Sing a song: Can I have some writing paper?T: First, let’s sing a song"Can I have some writing paper?"Ss sing the song.(学生一边唱歌,一边做动作。
歌曲调同〈伦敦桥要倒了〉。
)T: Can you make a dialogue like this? Practise the dialogue with your parterner.Then the Ss practise.S1: Can I have a pen?S2: What for?S1: I want to do my homework.S2: Sure. Here you are.……T: Can I have some writing paper?Ss: What for?T: I want to write a letter to my penfriend.Ss: Sure. Here you are.T: Thank you.Ss: You‟re welcome.设计意图:把第一课时所学的四会句型:Can I have some writing paper? What for? What for? I want to write a letter to my penfriend.编成学生熟悉的儿歌,既可活跃课堂气氛,又有效复习前一课时的主要内容,并使得学生尽快进入角色。
国际商务函电吴雯版翻译
1.现借此机会向贵公司介绍,我们是外资企业,专门经营工艺品。
We avail ourselves of this opportunity to introduce to you as a foreign-invested corporation specializing in arts and crafts.2.我们想熟悉一下刚才的供应情况。
We want to acquaint ourselves with the supply position of steel products.3.我们随函附上一份价目表。
We are enclosing a copy of price list.4.我们公司在全球有28个分销商。
We have 28 distributors across the world.5.我们是中国轻工产品的主要出口商之一,愿与你公司建立业务关系。
We are one of the leading exporters of Chinese light industrial products and are desirous of entering into business relations with you.6.我们从企业同业名录得知你方公司名称和地址。
We obtain your company name and address from list of corporate peers.7.我有两年以上跟单和船务经验。
I have 2 years of order follow-up and shipping experience.8.我们有在英国热销的运动鞋款式的图片。
We have picture collections of sports shoes that are hot selling in UK.9.已另邮一些样品盒小册子供你方参考。
We are sending some samples and brochures under separate cover for your reference.10.我们对你方目录里的电器用品感兴趣,请寄报价表来。
职场英语:几个面试时需要注意的问题
Cut and paste isn't your friendMatthew Lanier, a Boston-based corporate1 recruiter at technology staffing firm Eliassen Group, recalls the resume of an applicant2 in her twenties, who had mostly retail3 and customer-service experience. So he was surprised when lower down on the CV, he found an executive-level position with a major finance company and dates of employment spanning almost 10 years. Turns out the applicant had searched professional-looking resumes online, found one she really liked, and cut and pasted her own experiences over it. But, she mistakenly left some of the other person's work history and personal contact information on the document."You have to assume that your entire resume will be looked at prior to being contacted, and that a careless mistake could be the difference between getting the job you want or being passed over," wrote Lanier in an email.There's also another important reason to take the extra time -- you can more easily support your story in interviews, according to Lanier."There is a huge difference between the candidate who can naturally apply their experience to the questions being asked of them versus4 one who is looking down at their resume for every answer," he said.Toss the form letterWhen Ed Zitron, founder5 of EZPR, a public relations firm in San Francisco, listed an opening for a paid intern6 on , he received more than 100 applications. Not one contained a personal cover letter."Every single one was a form letter, clearly copied and pasted," said Zitron by email. Worse, almost none of the applicants7 even bothered to "put my name, or the firm's name, anywhere in the body" of the cover letter."I'm so easy to Google: you type my name in, there's my Twitter, there's my personal and my professional website," Zitron said. "Getting even the most basic facts… is easy."His advice: Don't send a generic8 cover letter, ever. Instead, share a bit of who you are and how that might relate to the position for which you are applying. Spend afew minutes Googling the firm. If you have a contact's name, Google that person, too.Be selectiveExecutive career coach Irene McConnell has clients who tell her they apply to more than 100 jobs per week. This is a big mistake, according to the director of Sydney-based Arielle Careers."The recruiters remember your name and begin to associate it with ‘that dude/gal who spams me every time I put a job ad up'," McConnell said.Think of it like a house that's on the market for too long. You start wondering what's wrong with it and why it won't sell.Don't think recruiters don't know which applications have made the rounds. Some tell-tale signs: a resume and cover letter that are completely non-aligned, the wrong recruiter's name or an incorrect role of interest, according to McConnell. The recruiting world is a lot smaller than you might think."If you damage your reputation in the eyes of recruiters, it will be more difficult to get a call back even when you put a thought-through application in," McConnell said.Keep photos to yourselfRoy Cohen, a New York-based veteran career counsellor and executive coach, remembers when a new client included an image of herself in a bikini in her application packet.She had come to him for job search advice and strategy because she was frustrated9 that she wasn't getting beyond the first round or getting many interviews."In advance of our first session, I asked her to provide me with a little background, a resume, and a sample cover letter," said Cohen in an email. "That's how I discovered her very wrong approach."She wanted to work in marketing10 for a hedge fund and told Cohen that she knew that hedge funds typically hired "babes," so she thought the photo might give her the upper hand.While it is quite common in Europe to include a photo of oneself when applying for jobs – and sometimes it is even requested by companies – it is not expected and is often frowned upon in the US. Even where it is expected, keep it professional and current.Cohen counselled his client against the use of the photo, not just for its inappropriateness but also because it was quite dated. "Imagine the awkwardness when you discover that a candidate has misrepresented the facts. In this case, by submitting a photo that is 10 plus years old," said Cohen. "In addition to feeling like a ‘bait and switch' occurred, interviewers are likely to wonder if the candidate is delusional11 or simply prone12 to lying."Shikha Arora, senior recruiter with SAP Asia, who is based in Singapore, has had other photo issues. "I received [an] application from an experienced professional from Hong Kong. The file size was 14 MB and I was taken aback to see more than 10 pictures shared in the document," she wrote in an email. Some of the images were of the applicant receiving rewards and other showed him doing a favourite hobby."In my opinion, not the best way to tell and sell your story," she said.Follow instructionsEmily LaRusch, founder of Phoenix13-based virtual receptionist services firm Back Office Betties, likes to test applicants' attention to detail right from the start. Recently, she included in a job posting two straightforward14 instructions and a mention that anyone who didn't apply as instructed wouldn't be considered.She received more than 30 applications in two days; only three people followed the instructions, and only one of them had a good command of English grammar. She is the only one who LaRusch is even considering for the post."This is supposed to be where applicants put their best foot forward, so I can't take a gamble on someone who can't follow the first instructions I give," said LaRusch.Don't be too sure of yourselfAmy Silverman, managing editor of Phoenix New Times, recently advertised a food critic opening on the newspaper's food blog. What she quickly learned: "Everyone eats so everyone feels like they could make a great food critic."More troubling, Silverman found that a lot of people out there don't take the application process very seriously. Whether it's refusing to submit a resume or making up excuses, she's seen it all. As one applicant put it, "I don't have a resume. I'm a business owner and, quite frankly15, have complete disregard for resumes. They're snapshots of what a person wants you to know, not a synopsis16 of who a person really is. That type of understanding can only be gained through interaction."Needless to say, Silverman didn't give the applicant a second glance. Another applicant talked about "wetting" one's appetite and another who mentioned her own "little to none experience in food."Her advice: "If you want a job writing, don't send a cover letter with typos and grammar errors."词汇表:1 corporateadj.共同的,全体的;公司的,企业的参考例句:This is our corporate responsibility.这是我们共同的责任。
2023年自考英语二试卷与详细答案
全国2023年10月高等教育自学考试英语(二)试题和答案课程代码:00015第一部分:阅读判断(第1~10题,每题1分,共10分)下面的短文后列出了10个句子,请根据短文的内容对每个句子作出判断:假如该句提供的是对的信息,选择A;假如该句提供的是错误信息,选择B;假如该句的信息文中没有提及,选择C,并将所选答案的代码(指A、B或C)填在答题纸的相应位置上。
The Stranger Who Changed My LifeIt was a sunny morning in the spring of 1966. I was driving a taxi, looking for a customer. While passing New York Hospital, I found a man running down the hospital steps, waving at me.I stopped. The man reached the taxi and jumped in. "The Airport,please," he said. As always, I wondered about my passenger. Was this man a talker? After a few moments, he started saying, "How do you like driving a taxi?""It's OK," I said. "I make a living and meet interesting people sometimes.""What do you do?" I asked."I am a doctor at New York Hospital."Many times during long rides, I'd developed a good relationship with my passengers and received very good advice from them. This time I decided to ask for his help."Could I ask a favor of you?" He didn't answer. "I have a son, 15, a good kid. He wants a job this summer. Is it possible that you get one for him?"He still wasn't talking, and I was starting to feel foolish. Finally, he said, "Well, my students have a summer research project. Maybe he could join in. Have him send me his school record."He left his address and paid me. It was the last time I ever saw him.Robbie sent off his grades the next morning. And gradually this incident was forgotten. Two weeks later, when I arrived home from work, Robbie handed me a letter. He was informed to call Dr. Plum for an interview.Robbie got the job. The following summer, Robbie worked at the hospital again, but this time, he was given more responsibility. Then, he worked at the hospital for a third summer and gradually developed a love of medical profession.Near graduating from college, Robbie applied to and was admitted to New York Medical College. After getting his medical degree, Robbie, the son of a taxi driver, became a doctor at Columbia Medical Center.1.The doctor shouted at the taxi driver for a ride.A.TrueB.FalseC.Not Given2.The doctor wanted to go to the railway station by taxi.A.TrueB.FalseC.Not Given3.The taxi driver liked talking with his customers.A.TrueB.FalseC.Not Given4.The taxi driver had two children.A.TrueB.FalseC.Not Given5.The taxi driver became Dr. Plum’s friend.A.TrueB.FalseC.Not Given6.The doctor wrote a recommendation letter for Robbie.A.TrueB.FalseC.Not Given7.Robbie joined in a summer research project.A.TrueB.FalseC.Not Given8.Robbie gradually got interested in medicineA.TrueB.FalseC.Not Given9.Robbie finally became a doctor at New York Hospital.A.TrueB.FalseC.Not Given10.Big opportunities can come out of ordinary meetings.A.TrueB.FalseC.Not Given第二部分:阅读选择(第11~15题,每题2分,共10分)阅读下面短文,请从短文后所给各题的4个选项(A、B、C、D)中选出1个最佳选项,并将所选答案的代码(指A、B、C或D)填在答题纸的相应位置上。
- 1、下载文档前请自行甄别文档内容的完整性,平台不提供额外的编辑、内容补充、找答案等附加服务。
- 2、"仅部分预览"的文档,不可在线预览部分如存在完整性等问题,可反馈申请退款(可完整预览的文档不适用该条件!)。
- 3、如文档侵犯您的权益,请联系客服反馈,我们会尽快为您处理(人工客服工作时间:9:00-18:30)。
Answer Key
1. Mail 4. Markers 7. Monkey 2. Monster 5. Mug 3. Milk 6. Mars
Cardstock Tracing Patterns
(Students trace themselves)
ter Let
Re d ut 1 MC
Hands Cut 2 Lime Green
Letter Mm
Directions for Letter Craft
*Please use the picture as a guide!*
1. Copy patterns onto coordinating construction paper or cardstock if you want your students to trace the patterns themselves. 2. Distribute the patterns to your students and have them cut them out. 3. Time to glue. Glue the body underneath the middle of the letter M. 4. Then glue the eye on top of the body, between the middle of the letter M. 5. Glue the antennas underneath the top of the body. 6. Glue one hand on top of each side of the letter M. 7. Glue the feet underneath the bottom of the body so they show in between the letter M. 8. With a black marker add a smile to the martian. 9. Finally glue the letter M craft on top of the middle of the left side of a notebook page. All done!
Body: Lime Green (een ( 2 per student )
Feet: Lime Green ( 2 per student )
Antennas: Black ( 2 per student )
Eye: White ( 1 per student )
Body Cut 1 Lime Green
Antennas Cut 2 Black
Feet Cut 2 Lime Green
Xeroxing Patterns for Construction Paper
(Students do not trace, cut only)
Letter M: Red ( 1 per student )