Robot Navigation by Conditional Sequencing (s~lbmiile(i to the 199 IEEE Confcrcncc on Robo
robot framework语法

robot framework语法Robot Framework语法指的是Robot Framework测试框架中所使用的语法规则和关键字。
本文将围绕Robot Framework语法展开讨论,介绍其基本语法规则、关键字和常见用法,帮助读者更好地理解和使用Robot Framework。
一、基本语法规则1. 标题定义:在Robot Framework中,可以通过使用两个或多个等号来定义标题。
例如:```=== 测试用例 ===```2. 嵌套定义:在Robot Framework中,可以使用缩进来定义嵌套关系,从而构建测试用例的层次结构。
例如:```测试用例1关键字1关键字2测试用例2关键字3关键字4```3. 注释:在Robot Framework中,可以使用井号(#)来添加注释。
例如:```# 这是一个注释```4. 变量定义:在Robot Framework中,可以使用变量来存储和传递数据。
变量以$开头,并使用大括号{}包围。
例如:```${变量名} 值```5. 关键字调用:在Robot Framework中,可以使用关键字来执行测试步骤和断言。
关键字可以是内置关键字、库关键字或自定义关键字。
例如:```关键字名参数1 参数2```6. 测试用例定义:在Robot Framework中,使用`***测试用例***`关键字来定义测试用例。
例如:```*** 测试用例 ***测试步骤1关键字1测试步骤2```二、关键字和常见用法1. 内置关键字:Robot Framework提供了一系列内置关键字,用于执行常见的测试操作,如断言、等待、点击等。
例如:```Should Be Equal ${变量1} ${变量2}Wait Until Element Is Visible ${元素}Click Element ${元素}```2. 库关键字:除了内置关键字,Robot Framework还支持导入外部库,并使用库中提供的关键字。
让ros机器人行走、建图、路径规划、定位和导航
让ros机器⼈⾏⾛、建图、路径规划、定位和导航准备导航所需要的包。
a.ros-kinetic-gampping :我们不需要修改包内的东西,所以直接安装可执⾏⽂件就好了。
sudo apt-get install ros-kinetic-slam-gmappingb.安装雷达的驱动(我的是robopack),直接将提供的ros驱动包拷贝到⼯作空间中,c.安装导航定位包,navigation 进⼊git:https:///ros-planning/navigation/tree/indigo-devel,下载和⾃⼰ros版本匹配的包,解压到⾃⼰的⼯作空间中,cd ~/catkin_wscatkin_makeindigo的navigation包会出现⼀个依赖问题,:Orocos-bfl not found while installing navigation stack ROS indigo + Ubuntu 14.04解决⽅法:rosdep install --from-paths src --ignore-src --rosdistro indigo -yd.由于导航包在/cmd_val下发布的移动数据加速度会过于不友好,所以我们需要对速度做平滑处理,其实就是控制加速,⼀般通过滤波即可实现,在此我们采⽤turtlebot的平滑包即可, 安装平滑包yocs_velocity_smoother,具体的平滑算法和输⼊切换请⾃⼰阅读源码。
apt-get install ros-indigo-yocs-velocity-smoother所有的包准包好后,我们去准备启动所需的launch⽂件,⾸先是机器⼈地盘的启动⽂件base_unch:<launch><param name="use_sim_time" value="false" /><node name="link_laser" pkg="tf" type="static_transform_publisher" args="0.15 0 0.15 0 0 0 base_link laser 50"/><node name="link_footprint" pkg="tf" type="static_transform_publisher" args="0 0 0 0 0 0 base_link base_footprint 50"/> <node pkg="odom_tf_package" type="tf_broadcaster_node" name="serial_send_recevice" output="screen"/><include file="$(find odom_tf_package)/launch/include/rplidar_unch.xml"></include><arg name="node_name" value="velocity_smoother"/><arg name="nodelet_manager_name" value="nodelet_manager"/><arg name="config_file" value="$(find odom_tf_package)/config/yocs_velocity_smoother.yaml"/><arg name="raw_cmd_vel_topic" value="cmd_vel"/><arg name="smooth_cmd_vel_topic" value="smoother_cmd_vel"/><arg name="robot_cmd_vel_topic" value="robot_cmd_vel"/><arg name="odom_topic" value="odom"/><!-- nodelet manager --><node pkg="nodelet" type="nodelet" name="$(arg nodelet_manager_name)" args="manager"/><!-- velocity smoother --><include file="$(find yocs_velocity_smoother)/launch/velocity_unch"><arg name="node_name" value="$(arg node_name)"/><arg name="nodelet_manager_name" value="$(arg nodelet_manager_name)"/><arg name="config_file" value="$(arg config_file)"/><arg name="raw_cmd_vel_topic" value="$(arg raw_cmd_vel_topic)"/><arg name="smooth_cmd_vel_topic" value="$(arg smooth_cmd_vel_topic)"/><arg name="robot_cmd_vel_topic" value="$(arg robot_cmd_vel_topic)"/><arg name="odom_topic" value="$(arg odom_topic)"/></include></launch>2.然后去准备建图包的启动⽂件unch<launch><arg name="scan_topic" default="scan" /><node pkg="gmapping" type="slam_gmapping" name="slam_gmapping" output="screen" clear_params="true"><!--because my used rtabmap_ros --><param name="odom_frame" value="/odom""/><!--param name="odom_frame" value="/base_controller/odom""/--><param name="map_update_interval" value="30.0"/><!-- Set maxUrange < actual maximum range of the Laser --><!-- Set maxUrange < actual maximum range of the Laser --><param name="maxRange" value="5.0"/><param name="maxUrange" value="4.5"/><param name="sigma" value="0.05"/><param name="kernelSize" value="1"/><param name="lstep" value="0.05"/><param name="astep" value="0.05"/><param name="iterations" value="5"/><param name="lsigma" value="0.075"/><param name="ogain" value="3.0"/><param name="lskip" value="0"/><param name="srr" value="0.01"/><param name="srt" value="0.02"/><param name="str" value="0.01"/><param name="stt" value="0.02"/><param name="linearUpdate" value="0.5"/><param name="angularUpdate" value="0.436"/><param name="temporalUpdate" value="-1.0"/><param name="resampleThreshold" value="0.5"/><param name="particles" value="80"/><!--<param name="xmin" value="-50.0"/><param name="ymin" value="-50.0"/><param name="xmax" value="50.0"/><param name="ymax" value="50.0"/>make the starting size small for the benefit of the Android client's memory... --><param name="xmin" value="-1.0"/><param name="ymin" value="-1.0"/><param name="xmax" value="1.0"/><param name="ymax" value="1.0"/><param name="delta" value="0.05"/><param name="llsamplerange" value="0.01"/><param name="llsamplestep" value="0.01"/><param name="lasamplerange" value="0.005"/><param name="lasamplestep" value="0.005"/><remap from="scan" to="$(arg scan_topic)"/></node></launch>3,导航包(move_base)和定位(amcl)的启动⽂件:savvy_unch<launch><param name="use_sim_time" value="false" /><!-- Set the name of the map yaml file: can be overridden on the command line. --><arg name="map" default="map.yaml" /><!--node name="map_odom" pkg="tf" type="static_transform_publisher" args="0 0 0 0 0 0 map odom 50"/--><!-- Run the map server with the desired map --><node name="map_server" pkg="map_server" type="map_server" args="$(find savvy)/maps/$(arg map)"/><!-- The move_base node --><include file="$(find savvy)/launch/move_base_unch" /><!--zxw add Fire up AMCL--><include file="$(find savvy)/launch/tb_unch" /></launch>move_base_unch:<launch><node pkg="move_base" type="move_base" respawn="false" name="move_base" output="screen" clear_params="true"><rosparam file="$(find savvy)/config/savvyconfig/costmap_common_params.yaml" command="load" ns="global_costmap" /> <rosparam file="$(find savvy)/config/savvyconfig/costmap_common_params.yaml" command="load" ns="local_costmap" /> <rosparam file="$(find savvy)/config/savvyconfig/local_costmap_params.yaml" command="load" /><rosparam file="$(find savvy)/config/savvyconfig/global_costmap_params.yaml" command="load" /><rosparam file="$(find savvy)/config/savvyconfig/base_local_planner_params.yaml" command="load" /><rosparam file="$(find savvy)/config/nav_obstacles_params.yaml" command="load" /></node></launch>tb_unch:<launch><arg name="use_map_topic" default="false"/><arg name="scan_topic" default="scan"/><node pkg="amcl" type="amcl" name="amcl" clear_params="true"> <param name="use_map_topic" value="$(arg use_map_topic)"/> <!-- Publish scans from best pose at a max of 10 Hz --><param name="odom_model_type" value="diff"/><param name="odom_alpha5" value="0.1"/><param name="gui_publish_rate" value="10.0"/><param name="laser_max_beams" value="60"/><param name="laser_max_range" value="12.0"/><param name="min_particles" value="500"/><param name="max_particles" value="2000"/><param name="kld_err" value="0.05"/><param name="kld_z" value="0.99"/><param name="odom_alpha1" value="0.2"/><param name="odom_alpha2" value="0.2"/><!-- translation std dev, m --><param name="odom_alpha3" value="0.2"/><param name="odom_alpha4" value="0.2"/><param name="laser_z_hit" value="0.5"/><param name="laser_z_short" value="0.05"/><param name="laser_z_max" value="0.05"/><param name="laser_z_rand" value="0.5"/><param name="laser_sigma_hit" value="0.2"/><param name="laser_lambda_short" value="0.1"/><param name="laser_model_type" value="likelihood_field"/><!-- <param name="laser_model_type" value="beam"/> --><param name="laser_likelihood_max_dist" value="2.0"/><param name="update_min_d" value="0.25"/><param name="update_min_a" value="0.2"/><param name="odom_frame_id" value="odom"/><param name="resample_interval" value="1"/><!-- Increase tolerance because the computer can get quite busy --> <param name="transform_tolerance" value="1.0"/><param name="recovery_alpha_slow" value="0.0"/><param name="recovery_alpha_fast" value="0.0"/><remap from="scan" to="$(arg scan_topic)"/></node></launch>4.导航的配置参数如下:base_local_planner_params.yamlcontroller_frequency: 2.0recovery_behavior_enabled: falseclearing_rotation_allowed: false TrajectoryPlannerROS:max_vel_x: 0.3min_vel_x: 0.05max_vel_y: 0.0 # zero for a differential drive robot min_vel_y: 0.0min_in_place_vel_theta: 0.5escape_vel: -0.1acc_lim_x: 2.5acc_lim_y: 0.0 # zero for a differential drive robot acc_lim_theta: 3.2holonomic_robot: falseyaw_goal_tolerance: 0.1 # about 6 degreesxy_goal_tolerance: 0.15 # 10 cmlatch_xy_goal_tolerance: falsepdist_scale: 0.8gdist_scale: 0.6meter_scoring: trueheading_lookahead: 0.325heading_scoring: falseheading_scoring_timestep: 0.8occdist_scale: 0.1oscillation_reset_dist: 0.05publish_cost_grid_pc: falseprune_plan: truesim_time: 2.5sim_granularity: 0.025angular_sim_granularity: 0.025vx_samples: 8vy_samples: 0 # zero for a differential drive robot vtheta_samples: 20dwa: truesimple_attractor: falsecostmap_common_params.yamlobstacle_range: 2.5obstacle_range: 2.5raytrace_range: 3.0robot_radius: 0.30inflation_radius: 0.15max_obstacle_height: 0.6min_obstacle_height: 0.0observation_sources: scanscan: {data_type: LaserScan, topic: /scan, marking: true, clearing: true, expected_update_rate: 0}global_costmap_params.yamlglobal_costmap:global_frame: /maprobot_base_frame: /base_linkupdate_frequency: 1.0publish_frequency: 0static_map: truerolling_window: falseresolution: 0.01transform_tolerance: 0.5map_type: costmaplocal_costmap_params.yamllocal_costmap:global_frame: /odomrobot_base_frame: /base_linkupdate_frequency: 1.0publish_frequency: 1.0static_map: falserolling_window: truewidth: 6.0height: 6.0resolution: 0.01transform_tolerance: 0.5map_type: costmap四,准备好以上所有的启动⽂件和配置参数后,我们开始创建地图和导航,1.创建地图:roslaunch savvy base_unch //启动地盘控制器roslaunch savvy base_unch //启动地盘控制器roslaunch savvy unchroscd savvy/maps/rosrun map_server map_saver -f mymap然后会产⽣以下地图⽂件mymap.pgm mymap.yaml2.开始导航roslaunch savvy base_unch //启动地盘控制器roslaunch savvy savvy_unch map:=mymap.yamlrosrun rviz rviz -d `rospack find savvy`/nav_test.rviz然后指定导航⽬标,开始⾃⼰慢慢玩吧,不过因为我的TF变换主要是⾥程计更新的,车体打滑或者地盘电机震荡都会积累误差,所以我们必须添加视觉⾥成计或者闭环检测。
HMM

Markov Processes
• For a Markov process, the next state depends only on the current state:
• This property in turn implies that
“Conditioned on the present, the past & future are independent”
State Transition Diagrams
0.5 0.5 0.3 0.2 0.1 0.0 0.9 0.0 0.4 0.6 0.3 0.6 0.2 0.1 0.9
1
3
0.4
2
• Think of a particle randomly following an arrow at each discrete time step • Most useful when N small, and Q sparse
• Standard learning methods have statistical & computational limitations:
Do not exploit known temporal dependencies Computation & storage scale poorly
Visual tracking of articulated objects
(L. Sigal et. al., 2006)
• Estimate motion of targets in 3D world from indirect, potentially noisy measurements
Robot Navigation: SLAM
基于VSLAM的UAV室内导航系统

摘要摘要无人机技术在物流、工业等领域发挥着重要的作用,传统的无人机主要依托GPS进行室外导航,但无人机室内导航与自动驾驶为亟待解决的问题。
针对这一问题本文对UA V导航系统、VSLAM技术以及语义SLAM进行研究,设计出基于VSLAM的UA V室内导航系统,可实现UA V在室内未知环境下的自主导航。
本文主要工作内容如下。
(1)VSLAM技术的研究综述。
首先对传统的SLAM技术与VSLAM技术进行研究,分析VSLAM技术在无人机平台运行的可行性。
其次对图像的特征提取、2D/3D的信息感知方法进行综述,将与VSLAM技术相关联的感知方案进行总结。
然后对深度学习与VSLAM技术各部分融合的经典方法进行整理,通过对比体现了在VSLAM中引入深度学习技术的优势。
(2)VSLAM算法的研究与实现。
VSLAM系统一般基于经典的VSLAM框架,本文选取ORB-SLAM2作为本系统的基础框架,使用基于ORB特征的视觉里程计作为前端部分,选用图优化+词袋法作为系统的后端与回环检测部分。
在建图方面分别针对UV A导航的特点对2D/3D点云以及八叉树地图进行介绍,并在Ubuntu+ROS平台中进行各个部分的算法验证。
(3)语义SLAM技术的研究与实现。
对语义SLAM进行研究,将VSLAM系统引入语义信息。
首先基于扩展卡尔曼算法实现传感器数据融合,优化相机位姿的判断以增加视觉里程计的鲁棒性。
其次基于RetinaNet+光流法实现动态特征点的筛选,并提出基于Yolact/DeepLab+条件随机场的3D点云分割与检测算法,将地图模型中的物体进行3D检测与分割并存储至物体库中。
在物体库中加入实例与语义判断标签、相对位置的分布权重标签,对于元素的类别信息作为语义信息的首个标签做处理,在存储时进行筛选判断最后使用基于特征描述向量的物体库更新方法,优化物体库的更新效率。
(4)基于VSLAM的UA V室内导航系统的设计与实现。
对无人机的飞控、外扩模块以及地面监测站进行设计,并将本文所设计的VSLAM系统引入该四旋翼无人机平台中进行测试,为无人机室内导航系统的开发提供支持与参考。
移动机器人路径规划和导航(英文)
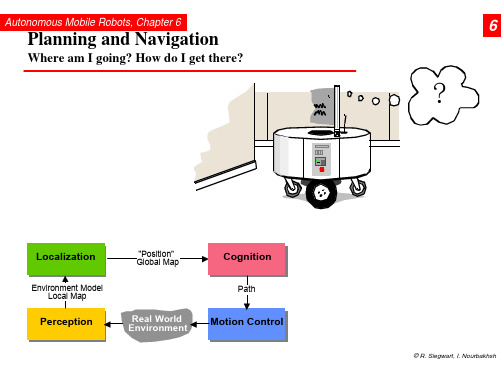
Autonomous Mobile Robots, Chapter 6
6.2.1
Road-Map Path Planning: Voronoi Diagram
• Easy executable: Maximize the sensor readings • Works also for map-building: Move on the Voronoi edges
© R. Siegwart, I. Nourbakhsh
Autonomous Mobile Robots, Chapter 6
6.2.1
Road-Map Path Planning: Adaptive Cell Decomposition
© R. Siegwart, I. Nourbakhsh
Autonomous Mobile Robots, Chapter 6
© R. Siegwart, I. Nourbakhsh
Autonomous Mobile Robots, Chapter 6
6.2.1
Road-Map Path Planning: Voronoi, Sysquake Demo
© R. Siegwart, I. Nourbakhsh
Autonomous Mobile Robots, Chapter 6
Ø Topological or metric or a mixture between both.
• First step:
Ø Representation of the environment by a road-map (graph), cells or a potential field. The resulting discrete locations or cells allow then to use standard planning algorithms.
使用AI技术进行船舶自动导航的步骤与技巧

使用AI技术进行船舶自动导航的步骤与技巧一、引言船舶自动导航是利用人工智能(AI)技术实现的一种新型自动导航系统。
它可以通过感知环境、规划路径和控制运动等一系列操作,使船只能够在复杂的海洋环境中高效安全地行驶。
本文将介绍使用AI技术进行船舶自动导航的步骤与技巧。
二、数据收集与预处理数据是AI技术的基础,而在船舶自动导航中也不例外。
首先,我们需要收集大量关于海洋环境、水深、岸线、其他船只等方面的数据。
这些数据可以来自卫星图像、雷达监测设备、传感器等多个来源。
然后,我们需要对这些数据进行预处理,包括数据清洗、去噪和标准化等操作,以确保数据的质量和可用性。
三、环境感知在船舶自动导航中,准确地感知周围环境是非常重要的。
为了实现这一目标,我们可以借助计算机视觉和传感器技术。
计算机视觉可以通过图像识别和目标检测等技术,实时获取船只周围的环境信息。
而传感器技术可以用来感知海洋水流、海浪高度、风速等关键指标。
通过综合分析这些数据,我们可以构建一个全面准确的环境感知模型。
四、路径规划与优化一旦我们获得了准确的环境感知信息,下一步就是进行路径规划与优化。
在船舶自动导航中,路径规划是指确定最佳的行驶路线,以达到目的地或完成特定任务。
而路径优化则是通过数学建模和算法求解等方法,对路径进行进一步改进和优化。
在这个过程中,我们需要考虑多种因素,包括海洋环境、其他船只、安全距离等,并且需要充分利用AI技术的强大计算能力。
五、动作控制与自主决策路径规划完成后,接下来就是实际的动作控制与自主决策阶段。
这涉及到如何根据预定的路线和目标,在现实环境中进行运动控制和决策调整。
为了做到这一点,我们可以使用机器学习(ML)和深度强化学习(DRL)等AI技术。
通过对历史数据的学习和模型训练,船舶可以逐渐提高自身的决策能力和运动控制准确性。
六、实时监控与反馈调整在船舶自动导航过程中,实时监控和反馈调整是必不可少的环节。
通过传感器获取实时数据,并根据当前环境做出相应的反馈调整,可以有效保证船只的安全性和稳定性。
机器人智能导航系统的开发与实现
机器人智能导航系统的开发与实现智能导航系统是一种通过结合机器人技术和导航算法,实现对空间位置和路径规划的自动化导航系统。
它能够帮助机器人在未知环境中进行自主导航,并实时进行环境感知和路径规划,以实现高效、安全的导航。
本文将重点介绍机器人智能导航系统的开发与实现。
首先,实现智能导航系统需要基础的硬件设备支持。
一般来说,机器人导航系统需要搭载激光雷达、摄像头、惯性测量单元等传感器,用于获取环境信息和机器人的运动状态。
此外,还需要安装运动控制系统,如电机驱动器和编码器,以实现机器人的精确控制和位置定位。
这些硬件设备的选择和布局需要根据实际需求和环境条件进行评估和设计。
其次,开发智能导航系统需要使用适当的导航算法。
目前常用的导航算法包括路径规划算法和自动避障算法。
路径规划算法用于计算机器人从起始位置到目标位置的最优路径,常用的算法有A*算法、Dijkstra算法等。
自动避障算法则用于处理机器人在导航过程中遇到的障碍物,常见的算法有基于激光雷达数据的障碍物检测与避障算法。
开发人员需要根据机器人实际情况选择和实现适合的导航算法,并进行算法优化和调试,以提高导航的精度和效率。
此外,智能导航系统还需要进行地图构建和环境感知。
地图构建是指将机器人所处的环境转化为可导航的地图信息,以便机器人根据地图进行定位和路径规划。
常用的地图构建方法有基于激光雷达的建图算法和视觉SLAM算法。
环境感知则通过传感器获取环境信息,如障碍物位置、距离等,以便机器人能够实时判断和响应。
在开发智能导航系统时,还需要考虑机器人的运动控制和定位技术。
机器人的运动控制可以通过PID控制器或者模糊控制器等方法实现,以达到机器人期望的位置和速度控制。
定位技术则是为了保证机器人在导航过程中准确地定位自身位置,常见的定位方法有里程计、激光雷达定位等。
开发人员需要根据机器人实际需求选择合适的控制和定位技术,并进行系统调试和优化。
最后,为了实现机器人智能导航系统的开发与实现,还需要进行系统集成和测试。
Adobe RoboHelp 2017 用户指南说明书
About the T utorialThis is a tutorial on Adobe RoboHelp 2017. Adobe RoboHelp is a Help Authoring Tool (HAT) that allows you to create help systems, e-learning content and knowledge bases. The latest version of RoboHelp is packed with features, which allows you to create Responsive HTML5 layouts that work on any device size.This tutorial will help the readers in understanding the basics of the program and enable to create help files or documentation for various technical communications.AudienceAdobe RoboHelp is used by industry professionals looking to create great technical content for their end-users. As such, it does require some knowledge of HTML and other web technologies. Some advanced features such as creation of custom dialog boxes require programming knowledge in Visual Basic, C/C++, Java or JavaScript.However, newer versions make it easy for anyone to get started without having to write a line of code. Therefore, users of all experience levels can follow this tutorial.PrerequisitesThe reader should have proficient knowledge of navigating your way around the Windows OS (Windows 7 or later) along with good technical knowledge of the software for which the readers are going to prepare the documentation.Adobe RoboHelp is part of the Technical Communication Suite (TCS). You can purchase a subscription to TCS, which will also give you access to tools such as FrameMaker, Captivate, Acrobat and Presenter. If you are interested only in RoboHelp, the reader should purchase a separate license, which can be either an individual license, a perpetual license as part of the Cumulative Licensing Program (CLP), perpetual license as part of the Transactional Licensing Program (TLP) or an Enterprise Term License Agreement (ETLA). Prices and licensing options can be checked on the following link –/products/robohelp/buying-guide.html. The reader can also download a fully functional 30-day trial version to test out the software from the following link –https:///products/robohelp/download-trial/try.html#.Copy right and DisclaimerCopyright 2019 by Tutorials Point (I) Pvt. Ltd.All the content and graphics published in this e-book are the property of Tutorials Point (I) Pvt. Ltd. The user of this e-book is prohibited to reuse, retain, copy, distribute or republish any contents or a part of contents of this e-book in any manner without written consent of the publisher.We strive to update the contents of our website and tutorials as timely and as precisely as possible, however, the contents may contain inaccuracies or errors. Tutorials Point (I) Pvt. Ltd. provides no guarantee regarding the accuracy, timeliness or completeness of our website or its contents including this tutorial. If you discover any errors on our website or in this tutorial, please notify us at **************************T able of ContentsAbout the Tutorial (i)Audience (i)Prerequisites (i)Copyright and Disclaimer (i)Table of Contents ...................................................................................................................................... i i1.RoboHelp – Overview (1)2.RoboHelp – New Features (2)3.RoboHelp – Server (3)4.RoboHelp – Workspace Overview (4)5.RoboHelp – Working with Tabs (7)6.RoboHelp – Working with Pods (10)7.RoboHelp – Environments (13)8.RoboHelp – Keyboard Shortcuts (14)9.RoboHelp – General Settings (16)10.RoboHelp – Overview of Projects (18)Project Files (18)11.RoboHelp – Creating & Managing Projects (20)12.RoboHelp – Opening a Project (23)13.RoboHelp – Configuring Project Settings (25)14.RoboHelp – Defining a Chapter Layout (26)15.RoboHelp – Managing Project Files (27)16.RoboHelp – Managing Project Folders (31)17.RoboHelp – Multilingual Authoring (33)18.RoboHelp – Importing PDF Files (35)19.RoboHelp – Importing & Linking MS Word Docs (38)20.RoboHelp – Converting Word Styles (42)21.RoboHelp – Importing DITA Map & XML Files (44)Importing DITA Map Files (44)Importing XML files (46)22.RoboHelp – Importing WinHelp Files (47)HTML Limitations with HLP Files (47)23.RoboHelp – Version Control (49)24.RoboHelp – Working with Reports (51)25.RoboHelp – Generating & Customizing Reports (52)26.RoboHelp – Creating, Saving & Opening Topics (54)27.RoboHelp – Authoring Topics in XHTML (57)28.RoboHelp – Creating & Working on Master Pages (58)29.RoboHelp – Managing Topics (61)30.RoboHelp – Spell Check, Find & Replace (63)31.RoboHelp – Ensuring W3C compliance (66)32.RoboHelp – Editing (67)33.RoboHelp – Formatting Characters (69)34.RoboHelp – Formatting Paragraphs (71)35.RoboHelp – Borders, Backgrounds & Sounds (72)36.RoboHelp – Working with Tables (75)37.RoboHelp – Working with Lists (77)38.RoboHelp – Creating & Editing Variables (79)39.RoboHelp – Media Rules & Attributes in Styles (81)40.RoboHelp – Managing Style Sheets (83)41.RoboHelp – Styling for Style Sheets (85)42.RoboHelp – Creating Table Styles (87)43.RoboHelp – Creating List Styles (89)44.RoboHelp – Creating HTML Styles (91)45.RoboHelp – Editing Styles in CSS (93)46.RoboHelp – Creating & Printing ToC (95)47.RoboHelp – Editing ToCs (97)48.RoboHelp – Managing ToCs (99)49.RoboHelp – Working With Multiple ToCs (101)50.RoboHelp – Creating Indexes & Keywords (102)51.RoboHelp – Editing Index Keywords (104)52.RoboHelp – Managing Indexes (106)53.RoboHelp – Automatic Indexing (107)54.RoboHelp – Creating Multiple Indexes (110)55.RoboHelp – Customizing, Adding ToC & Index Controls (111)56.RoboHelp – Glossaries (113)Glossary Hotspots (115)57.RoboHelp – Creating Text Links for Navigation (116)58.RoboHelp – Creating & Editing Bookmarks (117)59.RoboHelp – Linking Images & Multimedia (118)60.RoboHelp – Linking External Sources (119)61.RoboHelp – Maintaining & Repairing Links (120)62.RoboHelp – Link Controls (121)63.RoboHelp – Working With Text-Only Pop-Ups (125)64.RoboHelp – Create & Edit Browse Sequences (126)65.RoboHelp – Output Search (128)66.RoboHelp – Optimize & Configure Search (131)67.RoboHelp – External Content Search (133)68.RoboHelp – Working With Images (134)69.RoboHelp – Import Adobe Captivate Demos (137)70.RoboHelp – Adding & Removing Multimedia (138)71.RoboHelp – Adding DHTML Effects (140)72.RoboHelp – DHTML Triggers & Targets (142)73.RoboHelp – Marquees (144)74.RoboHelp – HTML Comments (145)75.RoboHelp – Working With iFrames (146)76.RoboHelp – Conditional Text (147)77.RoboHelp – Context-Sensitive Help (148)78.RoboHelp – Managing Map IDs (149)79.RoboHelp – Dynamic Editing of CST (151)80.RoboHelp – Developer Information (152)81.RoboHelp –What’s This? Help (153)82.RoboHelp – Single-Source Layouts (155)83.RoboHelp – Generate DUCC (157)84.RoboHelp – Generate Output for MS SharePoint (159)85.RoboHelp – Multiscreen Layouts (162)86.RoboHelp – MS HTML, JavaHelp & Oracle Help Layouts (163)87.RoboHelp – EPUB & Kindle Book Outputs (165)88.RoboHelp – Review & Collaboration (168)89.RoboHelp – Managing Shared Resources (171)90.RoboHelp – ActiveX Controls (173)91.RoboHelp – Forms & Frames (175)92.RoboHelp – HTML Help Controls (177)1.Adobe RoboHelpAdobe RoboHelp is a popular Help Authoring Tool (HAT) from Adobe. It is used by industry professionals to deliver engaging help content, e-learning resources, organizational policies and knowledge base articles to a wide audience irrespective of device form factor. The latest version of RoboHelp (2017 release) helps you to easily create next-gen Responsive HTML5 layouts, which enable seamless navigation and rich interactivity. RoboHelp was first created by Gen Kiyooka and released by Blue Sky Software in 1992. Blue Sky Software was acquired by Macromedia, which was subsequently acquired by Adobe in 2005. Adobe RoboHelp 2017 is versioned as 13.0 although technically it is version 21 taking into account the previous versions released under Macromedia. RoboHelp has evolved from being just a HAT to a versatile tool, which can help you create eBooks and even web sites. RoboHelp can output to a variety of help formats using the following Single Source Layouts (SSLs) –∙Responsive HTML5∙eBook∙Microsoft HTML Help∙JavaHelp∙Oracle Help∙Eclipse Help∙Adobe AIR Help∙Standard Word and PDF documentationOne of the biggest challenges faced in content delivery is ensuring that the intended audience is able to view it. RoboHelp allows content creators to create native apps for Android and iOS without the need for any extra software.With a plethora of new features in the latest release, Adobe RoboHelp remains the industry standard HAT for creating engaging help, e-learning and technical content which addresses the varied needs of the target audience in a dynamic way. It is easy to use –both by seasoned authors as well as by novices.2.Adobe RoboHelpThe 2017 release of RoboHelp packs in many new features. These include –∙Next-generation HTML5 layouts∙Auto-complete∙Thumbnail support∙Favorites in Responsive HTML5 layouts∙Baggage file folder import∙Variable viewsLet us understand them in detail.Next-generation HTML5 layoutsThe 2017 release of RoboHelp promises to help you create visually engaging borderless HTML5 layouts. These layouts offer a superior search and navigation experience and are preloaded with many features like topic sliders, show/hide widgets, etc. The responsive design enables the content to scale well across screens of different sizes.Auto-completeNow you can get predictive search results in the search field of the responsive HTML5 output after typing the first few characters. The results appear instantaneously and are contextual without the user having to enter the full search string. The results are ranked based on the frequency of the keyword in the content.Thumbnail supportYou can now publish thumbnails of images, which can reduce page loading times, saving bandwidth, while also being mobile friendly. If needed, the user can simply load the larger image by clicking on the thumbnail. It is possible to maintain a standard thumbnail size in order to maintain consistency throughout the content.Favorites in Responsive HTML5 layoutsIt is now possible to mark topics as favorites and add custom links with the new Indigo themed Responsive HTML5 layout.Baggage File Folder ImportYou can now add multiple baggage files stored in a folder in a single click by adding the folder to the project thereby making it easy to import folders containing support information.Variable viewsYou can now easily toggle between the variable name and its value by a keyboard shortcut or from the context menu. You can toggle a single variable or all variables to view content exactly as your audience would view it.3.Adobe RoboHelpAdobe RoboHelp Server is a server based help solution. You can upload your help content on a server, which can then provide real-time end user feedback. It can log data on the queries, which is asked by the users. RoboHelp Server can graphically show how users are navigating around the help system.(Image Source: Adobe RoboHelp 2017 documentation)You can use an authoring tool to author the content, which can include multiple projects and upload the entire project onto the RoboHelp Server. The RoboHelp Server includes automatic project merging, which allows authors to work on different projects at different schedules and publish all of them to the same server. Authors can also publish projects written in various languages on the same server.The RoboHelp Server can also interface with database servers such as Oracle or MS SQL Server and generate reports and logs. The response to the user query is relayed back via an Apache HTTP Server.Adobe RoboHelp The typical RoboHelp workspace comprises of elements called Pods , Panes , Bars and Windows . Let us have a look at some of the components of the workspace.Quick Access ToolbarThe Quick Access Toolbar provides access to frequently used commands. It can be customized to access the commands you access the most.The default commands include: Save All, Copy, Paste, Undo, and Redo.4.TabsTabs are logical groups of commands put together. A tab contains commands of related functionality. Tabs are contextual and change depending on the type of content and formatting.Document PaneThe document pane generally comprises of three rows of tabs as shown in the following screenshot.These tabs are explained below.∙The first row is the Tabbed Document Pane. Each tab comprises of one project.You can work on multiple projects at once and copy paste assets between these projects.∙The second row is the Design and HTML View Panes. For any given document, you can toggle between the design you are working on and the HTML code of your design. You can edit the HTML for even finer control. The HTML code is auto-generated as you keep working on the design.∙The third row shows the Document Area Selectors. These help you to jump to various sections of the document such as Paragraphs, Headings and Hyperlinks.PodsPods are panes that you can dock anywhere in the workspace to get access to all features, which are logically grouped. For example, the Project Manager pod shows all the components of the project. Pods can be grouped together or can be free floating on theworkspace.You can also make them auto-hide or move them to a different monitor.5.Adobe RoboHelpRoboHelp makes it easy to locate and identify commands associated with a particular function by organizing them into tabs. The tabs are organized in a ribbon similar to the Microsoft Office suite of programs.The ribbon comprises several tabs, which include –∙File∙Project∙Edit∙Insert∙Review∙Collaborate∙Output∙ToolsLet us understand each of these in detail.FileCreate new projects, open, save the existing project, view recent projects and change program settings.ProjectCreate, import, edit, and delete project components such as topics, snippets, tags, and variables. You can save the currently unsaved changes across the project.EditCreating and editing stylesheets, text formatting and content tagging.InsertInsert objects such as tables, images, Adobe Captivate content and snippets.ReviewTrack changes, accept and reject changes in a document review.CollaborateShare project resources across users and enable version control.OutputCreate, search, setup, generate, view and open RoboHelp outputs.ToolsYou can create and view reports. RoboHelp ships with a number of scripts, which you can use to perform certain commands. Select and execute scripts from the Scripts list in this tab.6.Adobe RoboHelpA pod is a floating or docked window of the workflow or associated functions organized in a logical manner. To open a pod, go to the Project tab, then in the Open section, click on the Pods icon to reveal a list of pods. Select a pod from the list. You can either dock the pod or keep it floating on your desktop. You can also auto-hide the pod or open it as a tabbed document.RoboHelp includes many types of pods. Some of them include –∙Starter Pod∙Project Manager Pod∙Output Setup PodLet us discuss each of these in detail.Starter PodThe Starter Pod usually appears as a tabbed document but just like any other pod, you can make it float or even dock it. It usually the starting point in the RoboHelp workflow.The Starter Pod comprises of four sections, which are –∙Recent Projects – Shows a list of recently opened projects.∙Create – Lets you choose the type of help file you want to create.∙Import –Import content from Microsoft Word, Adobe FrameMaker, Adobe PDF files, HTML or other supported formats.∙Resources –Contains links to help resources, seminars and knowledge base articles to help you get the most out of RoboHelp.Project Manager PodThe Project Manager pod contains all the various folders in which you store and edit your project files. The Project Manager pod has default folders for each content type.For example, all images in the project are stored under the Images folder, videos andsounds are stored under the Multimedia folder, etc.The Project Manager Pod also contains the Baggage Files folder, which contains theindirectly linked files that are part of the project. The baggage files might include –PDF files, PowerPoint presentations, etc. Double-clicking on files within the Baggage Files folderopens the file in its associated application.Output Setup PodThe Output Setup Pod helps you to view and modify the output of the content based on the targeted device. It contains a hierarchical organization of the different output components such as the Window, Master Pages, Skins, Device Profiles, Screen Layouts, etc.Right-click on any container to change its properties.For example –If you want to alter the dimensions of the MS_HTML output window, right-click on the MS_HTML container in the Windows folder and select how you want the window to be displayed on the screen.Adobe RoboHelpThe arrangement of workspace elements such windows, pods and other elements is called an environment. Environments can be customized as desired by the user. There can be specific arrangements of windows and pods, which can be saved as an environment. Environments can then be recalled by selecting the environment from the Workspace menu on the upper right hand corner of the window. Environments are saved in an ‘.rhs file ’, which can be exchanged with other authors.Creating and saving an environmentArrange all the pods in the workspace. Click on the dropdown arrow next to the Workspace in the upper right hand corner of the RoboHelp window. Click on Save... and select a location and name for the workspace.Loading a Saved EnvironmentClick on the dropdown arrow next to the Workspace in the upper right hand corner of the RoboHelp window and select Load…Browse to the file location of the .rhs file and click on Open to load the environment.Deleting an EnvironmentTo delete an environment, navigate to the location on the disk, where the .rhs file was stored and simply delete the .rhs file pertaining to that environment.7.Adobe RoboHelpEnd of ebook previewIf you liked what you saw…Buy it from our store @ https://。
机器人导航系统中的路径规划算法教程
机器人导航系统中的路径规划算法教程导语:随着人工智能的快速发展,机器人已逐渐成为我们日常生活中的一部分。
而机器人导航系统中的路径规划算法则是机器人能够在未知环境中自主导航的关键。
本文将介绍机器人导航系统中常用的路径规划算法及其原理。
一、Dijkstra算法Dijkstra算法是一种常用的单起点最短路径算法,被广泛应用于机器人导航系统中。
该算法通过计算起点到其他所有节点的最短路径,找到离起点最近的节点,然后以该节点为中间节点继续遍历,直到遍历到终点为止。
Dijkstra算法的基本步骤如下:1. 初始化:设置起点的最短路径为0,其他节点的最短路径为无穷大。
2. 选择最近的节点:从距离起点最近的未访问节点中选择一个节点作为当前节点。
3. 更新最短路径:对于当前节点的相邻节点,如果通过当前节点到达相邻节点的路径比已知最短路径短,则更新最短路径值。
4. 标记当前节点为已访问节点,并回到第2步,直到遍历到终点节点。
二、A*算法A*算法是一种启发式搜索算法,能够在保证最优解的情况下提高搜索效率。
该算法通过估计当前节点到终点的距离,选择最有希望通向终点的节点进行下一步搜索。
A*算法的基本步骤如下:1. 初始化:设置起点节点的启发式值为0,其他节点的启发式值为无穷大。
2. 选择最有希望的节点:对于每个未访问节点,计算启发式值(一般使用曼哈顿距离或欧几里得距离),选择启发式值最小的节点作为当前节点。
3. 更新节点的启发式值和代价:对于当前节点的相邻节点,如果通过当前节点到达相邻节点的路径比已知最短路径短,则更新最短路径值和启发式值。
4. 标记当前节点为已访问节点,并回到第2步,直到遍历到终点节点。
三、RRT算法RRT(Rapidly-Exploring Random Tree)算法是一种基于随机采样的快速探索算法,被广泛运用于机器人导航系统中。
该算法通过随机采样、生成树的方式构建一颗探索树,从而找到起点到终点的路径。
机器人导航与路径规划方法与实现
机器人导航与路径规划方法与实现机器人导航和路径规划是智能机器人领域的关键技术,其目的是使机器人能够在未知环境中自主移动,并通过优化路径规划来避免碰撞或绕过障碍物。
本文将介绍机器人导航和路径规划的常见方法和实现。
一、机器人导航方法1.传感器感知方法:机器人通过传感器获取周围环境的信息,例如激光雷达、摄像头、红外线等。
然后利用这些信息构建地图,并通过比对当前位置和目标位置之间的距离和方向来进行导航。
这种方法的优点是能够获得更准确的环境信息,但同时也需要较多的计算资源。
2.基于模型的方法:机器人根据已有地图模型和自身的运动模型,预测出在不同位置和姿态下的行动结果,并选择潜在导航路径中最优的一条。
这种方法的优点是能够通过建模和计算来实现自主导航,但需要准确的地图模型和运动模型。
3.强化学习方法:机器人通过与环境的交互来学习最佳的导航策略。
它基于奖励机制,根据不同的行动结果给予机器人奖励或惩罚,并通过更新价值函数来优化导航策略。
这种方法的优点是能够在未知环境中进行学习和适应,但需要大量的实验和训练时间。
二、路径规划方法1.基于图搜索的方法:机器人将环境表示为图,其中节点代表位置,边代表路径。
然后使用图搜索算法(如A*算法、Dijkstra算法)来找到起始节点到目标节点的最短路径。
这种方法的优点是能够找到全局最优路径,但需要准确的地图数据和高效的搜索算法。
2.基于采样的方法:机器人通过在环境中随机采样一系列点,并评估每个点的可通行性和距离目标的代价。
然后使用最优化算法(如RRT、PRM)来连接这些点,生成一条可行的路径。
这种方法适用于复杂和动态的环境,但可能无法找到最优解。
3.基于人工势场的方法:机器人根据环境中的障碍物和目标位置,构建一个势场模型,其中障碍物产生斥力,目标位置产生吸引力。
然后机器人根据当前位置和势场,选择产生最小势能的方向来移动。
这种方法简单有效,但可能会陷入局部最小值。
三、路径规划实现1.地图构建:在实现路径规划前,需要先将环境进行地图构建。
- 1、下载文档前请自行甄别文档内容的完整性,平台不提供额外的编辑、内容补充、找答案等附加服务。
- 2、"仅部分预览"的文档,不可在线预览部分如存在完整性等问题,可反馈申请退款(可完整预览的文档不适用该条件!)。
- 3、如文档侵犯您的权益,请联系客服反馈,我们会尽快为您处理(人工客服工作时间:9:00-18:30)。
Robot Navigation to theon Robotics and Automation)of Michiganapplication of conditionalsequencingby layering a conditional behaviors. The approach is uniquely flexible, permitting verycomplex tasks toperiods of time. The tcchniquc was used in the mobile robot contest. All of thecontest-specific code was written in by a single programmer.The robot turned in the bestoverall performance of any entry. ofcircumstances.In earlier work wc formobiletoongoingArtificialtheinvestigations in this direction, asTo date wc have performedover ninety formalfor getting a robot to follow instructions.Conditional scqucnccs arc distinguished from the more classical notion of a plan in that theinstructions are noton the situation may includeconstraints on situations which do notis an To assemble a widget, locate PartA and PartB and a l/2-inch screw. A into the hole in Part R and the screw.Ifslide into sandpaper to remove any protruding bumps.This is a set of instructions, but it is not alinearis a constraint to bc applied simultaneously with the fastening operation. The last instruction is an example of a contingency procedure.It isFor example, locating for searching for an object, which carries with it its own constraints about where to search, and contingencyprocedures about what to do if the search2.2 softwareAllis a customincludes an assembler, anoperatingprogramming language [Gat91 ] which isuseddcscribcd in this paperconditional sequencing was done usingThe firstinconstruct. The secondusingbeenandescribed in more detail inOurbehaviors which arcused a building blocks for more complex activities.In this case wc arc concerned with navigation in anindoor environment where walls and doorways canThe robotobstacles, but must not relytoo heavily on dead reckoning.fastersquare ofFor indoor environments wc usc three basicbehaviors: dead-reckoning to a position whileavoiding obstacles, following walls, and aligning towalls. Thisslows down and veersaway from the obstacle. If the robotmove forward by a smallamount. This “directionalempirically.Wall-following is performed by simplyfollowing algorithm also stop for obstacles.(Reliably moving around obstacles while followinga wall is an unsolvedshown mathematically that the naivealgorithm oughtunstable.reliability.Wall alignment is done byread the samedistance, Experimentally this simple algorithmaligns the robotWall alignment is usedmisalignments in the robot’s wheels, The result isdramatically improved dead-reckoningHowever,to show thatconditional sequencing works. In fact, to testconditional sequencing the primitivebehaviors not work perfectlycanfrom failures, and thus produce reliable performance even when the primitives arc unreliable.In order tofor the robot tofailures whencanTo produce cognizant failure wcy.These monitor routines vary fromsituation to situation, but arc is outside of a bounding region.It also imposes a time limit on reaching thedestination, The timechanged by the to the goal,The wall-following monitor checks the robot’sheading it is not turning faster than also makessure that the distancetime limit on the alprogrammer ifThe dead-reckoning and wall-alignmentprimitives can more robust dead-reckoning and wall-a simplyby retrying the primitive if it fails. For an for circumnavigatingthe obstacle, the robot chooses a thean inefficient path. At some point the robot monitor indicates a cognizant failure when the robotface thegoal, at which obstacle is on thecourse,procedures.I basic sequence.A second example of a basic is no longer a wall tofollow. Ifsimply invokesrequires its own monitorto the building up successively more complex wc have beenable toin 1: The AAAI Robot ContestThe hardware and computational infrastructurecode was written in three days by a single programmer.The robot turned in the bestoverall performance of any entry in the eventsThetwo werethird boxes whichour smalltook place in a large arena made ofThe sequencing infrastructure used inwas ausing the catch/throw facility ofFor this simplified when a cognizant failure occurred. Wctherefore procedure )(f a i l u r e -c o d eof failure. This failure code was propagated upwards through nested with-recovery-procedureformsproccdurc forhad a robot’s motors off.On lop of this basic sequencing facility wcafrom the OfficeThe required the robot 10 explore amock-up office and find its waydoors, chosen was opened. The robot had to find the open door, go through it, and then navigate an obstacle field to afinish line some fifteen within two meters of the finish line.The robot was starred at a known orientation but at an unknown randomly chosen location within the Oft-lee.The strategy used was the following. The robot wandered randomly around the office for oncminute (the time that the doors were guaranteed to of x-y positions,Using this data it computed x-y positions that would guarantee that it was outside of the office. It then began to try each door in turnuntil it rcckoning primitive.The robot was tested about a dozen times during the preparation for the contest. It never failed, During the contest the judges consistently chose to open the door that happened to result in theworst-case performance.proceduresfor entering and exiting the arena autonomously.all wc had to do was write a singletop-levelruns) and worked every time. cardboard boxes were placed in the arena to serve as obstacles. The robots were allowedto have changed from run to run),Thewhich was in the arena and deliver it to a designated location, To accommodate robots without any manipulation hardware the robots were not required to actuallypick up theand indicate that it knewwas in, and thelocation of the destination.The robot was not told its initial location nor had tobegin by self-localizingThe robot began by searching for a wall (in amannerbegan following the wall while making and right turns it was making. Itturnsthisassemblies inits position after locating andcircumnavigating a wall plan awhich was located in roomC. where the found thesince the robotwas in the same room.) The robot then moved directly tothe deliveryrecorded at was only performed once.However, our robot was the only robot in thecontest to hours 10 program therobot for this event.4. Experiment 2: Trek to the Lab Theonly anecdotal data, and is thus of limited utility for drawing general conclusions about conditional sequencing. In order to provide somemore rigorous data wc set out to perform an wc used was the hallways of the building where wc work, a typical modern office building consisting of a maze of orthogonal hallways with doorways and random obstacles. We wanted to show that the performance of the robotimproved in aas theywere being tested.For thesewc used a slightly Action Package (RAP) systcm. RAPs arca sophisticated conditional sequencingis dcscribcd in detail inbridge the gapexecutionWc chose as our initial benchmark task meters away on theopposite side of the hallway. This turned out nottrials version of the software; all butonc worked room for improvement, wcchose a more difficult task.This time wcprogrammed the robot to navigate to ourWe defined a based on thedistance traveled before an procedures asproblems occurred. By the tenth trial the robot was Figure 4:Fifteen consecutive runs from the office to the lab.Wc once andprogrammedlab of the run was now nearly150 meters, Wc ran forly-sevenare shown inbut a clear upward trend in performancecantimeof(including the Work Wc have of the efficacy of conditional sequencing for controlling real-world autonomous mobile robots inindoor environments. Wc runs in a variety of situations using two different conditional sequencing infrastructures.In all cases, robust effectiveperformance waspreliminary despite the large number of trials relative to other published studied of this kind. Wc arc currently working on adesign for a rigorousconditional sequencing to run on small processors such as those available for planetary rovers. Some preliminarywork in this direction has already been doneof Technology undera contract withRonald C. Arkin,Navigation,” Robotics and Autonomous Systems, vol.6,“Using Parallel Program Specifications For Journal of Applied, MA, June 1992.for a Mobile Robot”,and Automation,Jonathan Applied to Robot Navigation,”unpublished manuscript,Executionthesis, Yale UniversityRoboticConference on Robotics and Automation, 1991,Erann Gat, “Low-compilationControl fora n d Automation, )991.AsynchronousNational Conference on Artificial IntelligenceTransactions on Robotics and Automation,Michael“A864, Yale UniversityReid Simmons, “AnGuy。