codewarrior快速使用手册
CodeWarrior V5.0开发环境快速入门-工程创建 for 9S12DG128B
CodeWarrior 开发环境快速入门-工程创建先看一下你的实验板上单片机是MC9S12DG128吧?如果是,往下看。
如果不是,去看“CodeWarrior 开发环境快速入门-工程创建 for 9S12XDT512.doc”。
注意一下文末的“注”。
1、运行CodeWarrior IDEa、选择开始> 程序> CodeWarrior > CodeWarrior Development Studio for S12(X) V5.0 --- 弹出菜单。
b、选择CodeWarrior IDE。
启动集成开发环境(IDE)。
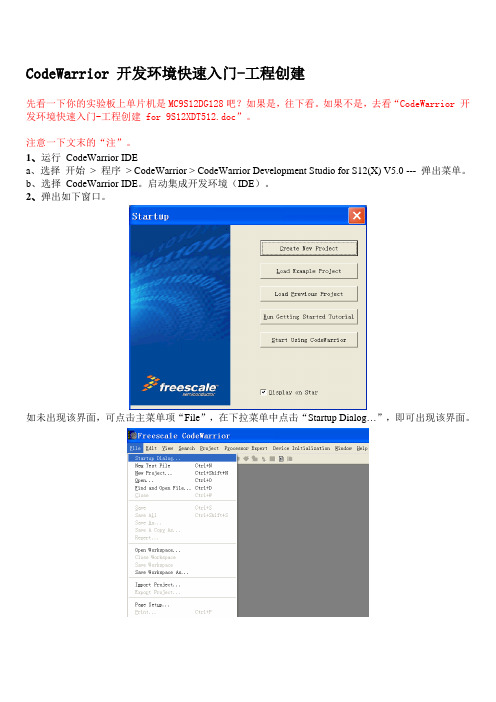
2、弹出如下窗口。
如未出现该界面,可点击主菜单项“File”,在下拉菜单中点击“Startup Dialog…”,即可出现该界面。
3、点击“Create New Project”按钮a、选择单片机型号为“MC9S12DG128B”,并选择调试方式为“TBDML”(因为需连接实验板进行调试,故需选上TBDML)。
点“下一步(N)>”。
b、选中复选框“C”。
需需用C和汇编嵌套编程,还需选中复选框“Relocatable assembly”。
然后在上述界面中更改工程名称和存取路径:在Project name 文本框中, 输入工程名,工程创建后IDE 会自动添加.mcp 扩展名;在Location 文本框中输入工程保存的位置或者点击Set... 浏览文件夹。
之后点“下一步(N)>”。
c、在下面的界面中可为新建的工程加入一些有用的文件。
如不需要加入一些文件,可直接点“下一步(N)>”。
d、在下面的界面中选中“None”。
然后点“下一步(N)>”。
e、在下面的界面中进行如图所示的配置(默认配置)。
然后点“下一步(N)>”。
f、在以下界面中选择“No”,即不需要将工程配置使用PC-lint。
然后点“下一步(N)>”。
然后点“完成”。
至此系统创建已经好了一个工程。
FreescaleCodeWarrior10.6集成开发环境(IDE)使用用户手册
e.选择编程语言和浮点数支持以及控制 台(console)硬件支持:
f.选择是否使用处理器专家系统以及工 程外设driver的使用模式:
CodeWarrior 10.6 IDE使用手册
4
利用工程向导快速创建KEA工程
处理器专家系统工程介绍 工程及文件窗口
处理器专家为
每一个组件 (compontent) 生一个对应 的.h和.c文件, 包含该组件图
Freescale CodeWarrior 10.6 集成 开发环境(IDE)使用手册
本手册详细介绍了利用Freescale CodeWarrior 10.6 IDE 处 理器专家系统(Processor Expert)快速建立KEA工程和调试的 步骤,以及该IDE常用的编程及调试技巧,旨在帮助用户快速 熟悉和掌握CodeWarrior 10.6的使用,利用处理器专家系统快 速搭建应用工程进行产品原型验证。
CodeWarrior 10.6 IDE使用手册
2
利用工程向导快速创建KEA工程
c. 选择器件,这里KEA属于Kinetis E系列, d. 选择调试工具,这里必须选择TRK-KEA128板
故选择如下:
载的OpenSDA作为本工程的调试工具:
CodeWarrior 10.6 IDE使用手册
3
利用工程向导快速创建KEA工程
6
CPU组件介绍及配置
在CPU组件的属性设置中还包括常
规设置(common settings)
其中包含了默认看门狗、SWD调试口以及Flash Memory 的设置
在CPU组件的属性设置中还包括CPU
内核中断/复位设置(CPU
interrupt/reset)
其中包含了CPU内核系统级中断(ARM Cortex M0+实现的 异常):不可屏蔽中断NMI、硬件错误异常Hard fault(当 CPU执行非法指令、非对其地址访问时触发该异常,可以 用于捕获程序跑飞时的场景)、超级调用Supervisor Call和 可请求服务异常(用于RTOS系统任务切换),以及内部时 钟失锁(ICS Loss of lock)。所有这些中断的优先级都高于 外设中断。
codewarrior使用指南
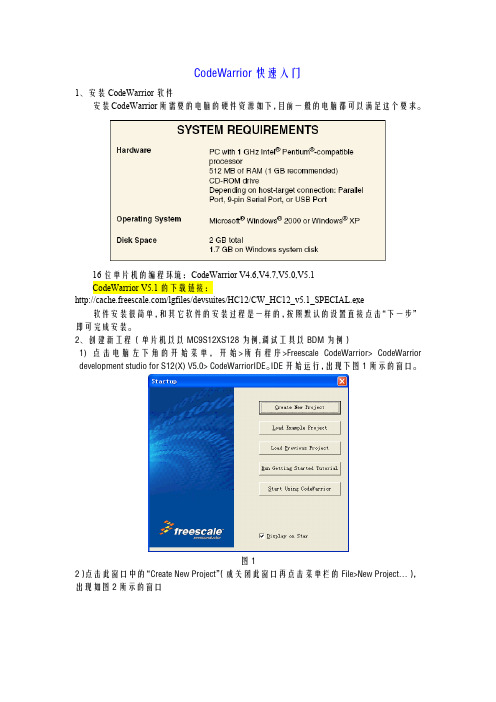
1、安装 CodeWarrior 软件 安装 CodeWarrior 所需要的电脑的硬件资源如下,目前一般的电脑都可以满足这个要求。
16 位单片机的编程环境:CodeWarrior V4.6,V4.7,V5.0,V5.1 CodeWarrior V5.1 的下载链接: /lgfiles/devsuites/HC12/CW_HC12_v5.1_SPECIAL.exe 软件安装很简单,和其它软件的安装过程是一样的,按照默认的设置直接点击“下一步” 即可完成安装。 2、创建新工程(单片机以以 MC9S12XS128 为例,调试工具以 BDM 为例) 1) 点 击电 脑 左下 角 的 开始 菜 单, 开 始 >所 有 程 序>Freescale CodeWarrior> CodeWarrior development studio for S12(X) V5.0> CodeWarriorIDE。IDE 开始运行,出现下图 1 所示的窗口。
图11
图12 接下来给核心板供电,核心板的供电电压是 5V。有的 BDM 有 5V 供电模式,这个时候 直接用 BDM 供电就可以。 2)在新建的工程中键入如下代码 #include <hidef.h> #include "derivative.h" #define LEDCPU PORTK_PK4 #define LEDCPU_dir DDRK_DDRK4 void delay(void) { unsigned int i; for(i=0;i<50000;i++); } void main(void) { LEDCPU_dir=1; EnableInterrupts;
图8
Codewarrior IDE快速入门[1]
![Codewarrior IDE快速入门[1]](https://img.taocdn.com/s3/m/585a74eb5ef7ba0d4a733bc8.png)
图 2.6 选择 PC-lint 在 New Project Wizard – Page5 中,选择启动程序类型。如图 2.7 所示。
图 2.7 选择启动程序类 在 New Project Wizard – Page6 中,选择浮点数类型。如图 2.8 所示。
图 2.8 选择浮点数类型 在 New Project Wizard – Page7 中,选择存储器类型。如图 2.9 所示。
图 2.18 软件仿真窗口
2) 在线仿真和下载程序(In-Circuit Debug/Programming)
这种方式是将程序下载到目标板上,然后在硬件 MCU 上运行程序,通过 Multilink 接 口来控制程序的运行。
在 Codewarrior IDE 窗口中, 在左边 Lab1.mcp 下面选择框中,选择 P&E ICD 目标,然 后编译。将 P&E USB Multilink08 将 PC 机和目标板(DEMO908GZ60)连起来,如图 2.19 所示。然后按 F5 键进入调试。
//时钟初始化函数 void TBM_Init(void) {
//时基中断使能,时基中断标志位清 0,外部晶振 8MHZ,时钟中断频率 8MHz/8192 1ms
TBCR = (TBCR_TBIE_MASK|TBCR_TACK_MASK| TBCR_TBR0_MASK);
TBCR_TBON = 1; //时钟启动 }
3 编译(Make)
编辑完源程序后,点击 codewarrior IDE 工具栏上的 Make 图标(或按 F7 键),会编译 和链接项目。如图 2.13 所示。
图 2.13 Make 图 标 如果源程序有错误,IDE 会在 Errors & Warnings 窗口中显示错误和警告信息,如图 2.14 所示。改正错误后,重新编译,直到没有错误为止。
CodeWarrior介绍(自己整理)
写给CodeWarrior初学者1.运行CodeWarrior IDE,打开软件界面;2.点击“File”菜单下的“New”选项,然后在“Project”选项卡中选择“HC(S)12 New Project Wizard”,也就是新建工程向导,在右侧输入你要键入的工程名和你要放在哪个文件夹下面;3.点击“确定”后下面选择你采用的单片机型号,比如你选择“MC9S12D64”或者“MC9S12NE64”;(其中如果选择MC9S12NE64,则必须安装光盘上的NE64补丁插件)4.点击“下一步”后,选择你采用哪种编程语言,尽量不要选第三个“C++”,因为好像我试的有问题,如果你单纯的C,则选择第二个,如果你是C和汇编混合编程,则前两个都要选的;5.选择是否采用“处理器专家”,该项功能可以方便程序的寄存器设置,但我用过感觉比较糊涂,所以我一般选择“No”;6.下面就是选择是否采用“PC-lint”,选择“No”;7.选择是不是支持浮点数,如果你的工程采用浮点数则选择下面的两个中一个,否则选择“No”;8.选择采用哪种内存定位模式,一般选择第一个“Small”模式9.最后一步,选择前面两项,如果仅选择第一项,则仅可以软件调试,前两项都选择可以支持软件和硬件调试。
10.完成后,软件会自动创建一个工程,如下图所示,,其中左侧的sources 文件夹下面的main.c就是你的主程序文件,你可以在里面添加代码,同时在左侧按鼠标右键,会弹出菜单,里面有“Add Files”或“Create Group”等,可以根据你的需要往新创建的工程里添加你自己的头文件或者C文件。
11.你可以在main.c里面编辑你的代码,如果需要加入中断,则在左侧找到Prm文件夹下面打开“P&E_ICD_Linker.prm”,然后在右侧该文件里你可以加入你自己的中断函数和中断向量入口地址,记住:你在这个Prm里定义的自己的中断函数名,要和主函数里面的中断函数名对应起来;比如我在Prm文件里定义了串口接收中断:VECTOR ADDRESS 0XFFD6 SCI0Recive_ISR则在主函数(main.c)里面这样引用该中断函数:interrupt void SCI0Recive_ISR(void){里面是你自己的代码}12.现在一个简单的工程基本创建完成,点击下面的编译按钮进行或者调试按钮就进入调试环境13.如果您点击调试(绿色类似箭头按钮)的时候没反应,那可能是您设置的Debug 路径有问题,如果您采用我的方法,比如CW3.0仅安装了Compiler,然后安装了CW4的Debugger,这样的话就要设置一下Debug的路径。
CodeWarrior V10.1 使用方法快速入门
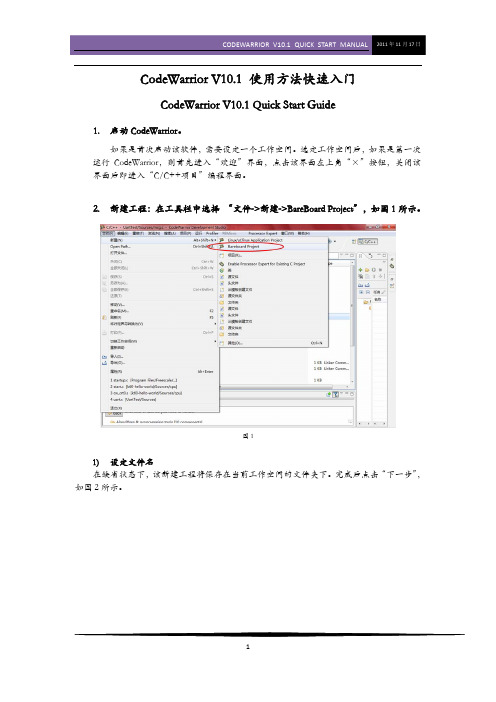
CodeWarrior V10.1 使用方法快速入门CodeWarrior V10.1 Quick Start Guide1.启动CodeWarrior。
如果是首次启动该软件,需要设定一个工作空间。
选定工作空间后,如果是第一次运行CodeWarrior,则首先进入“欢迎”界面,点击该界面左上角“×”按钮,关闭该界面后即进入“C/C++项目”编程界面。
2.新建工程:在工具栏中选择 “文件->新建->BareBoard Project”,如图1所示。
图11)设定文件名在缺省状态下,该新建工程将保存在当前工作空间的文件夹下。
完成后点击“下一步”,如图2所示。
图22)选择芯片类型。
此处以MK10N512VMD100为例。
选择好芯片类型后,点击“下一步”,如图3所示。
图33)选择调试器类型(可多选)如果成功安装了新的USBBDM并且patch成功,此处会出现USBDM选项,如图4所示。
如果要在该工程中添加一些已有文件、或者希望生成一个默认的main.c文件,则完成后点击“下一步”。
如无上述需求,则直接点击“完成”。
此时将生成一个包含Startup Code、但不含main.c 的新工程。
图44)选择导入的默认文件以及是否生成main.c,完成后点击“下一步”。
CodeWarrior的默认编程语言是C,也支持C++和汇编,如果使用C语言编程,此处也可直接单击“完成”,具体操作如图5所示。
图55)选择编程语言,完成后点击“下一步”,如图6所示。
图66)选择是否需要调用一些快速开发工具(如Processor Expert、Device Initialization),完成后点击“完成”,如图7所示。
图7至此,CodeWarrior将为您生成一个包含Startup.c和main.c的新工程。
在编程界面(C/C++项目)下的工程窗口下,您可以浏览该工程含有的全部文件。
如果您无法找到上述窗口,可在CodeWarrior界面左下角的视图管理器中寻找。
CodeWarrior 10.2简明手册(V1.1)
CodeWarrior 10.2简明手册CodeWarrior 10.2简明手册 (1)1 下载安装CW v10.2 (1)2 安装BDM驱动 (2)3 导入现有工程 (3)4 编译、下载源码工程 (4)5. 带有操作系统程序的编译、下载 (6)5.1 带有操作系统模板程序的打开 (6)5.2 带有操作系统模板程序的编译 (7)5.3 带有操作系统模板程序的下载 (7)6 CodeWarrior 10.2常用操作 (8)7 常见问题说明 (9)基于Eclipse的CodeWarrior Development Studio for Microcontroller v10.2(简称CW10.2)作为一个完整的集成开发环境,提供了高度可视化操作及自动创建复杂嵌入式系统应用的功能,为使用Freescale嵌入式产品开发提供了便利。
官方推荐使用CW v10.2进行Freecale Kinetis嵌入式产品的开发。
本文将对使用CW v10.2开发K60项目的操作进行简要说明。
本文安装的cw10.2 版本是特别版的,支持128KB的代码大小。
用户若需要更大的代码空间和更多的功能的话,则需要向飞思卡尔申请license,这些license都是要收费的。
1 下载安装CW v10.2飞思卡尔半导体为注册用户在其官方网站的网址链接处下载后,双击可执行安装文件,如图1所示,根据提示即可完成安装。
由于有的CW10.2版本安装完成后默认是中文版的,有的默认是英文版的。
集成开发环境的原版是英文版的,所以英文版的运行速度比中文版的快很多。
这里建议用英文版的CW10.2,不建议用户使用中文版集成开发环境,所以本章介绍的使用说明都是基于英文版的。
想将飞思卡尔的CW10.2集成开发环境变成英文版,首先需要关闭当前的CW10.2,然后右击CW10.2桌面图标选择“属性”,在“目标”栏下“…”后面加上“–nl en”再单击“应用”后便改成英文版;加上“–nl zh”可以改2 安装BDM驱动CW_v10.2中已包含了BDM写入器(Open Source BDM,OSBDM)的驱动文件,将BDM接到PC机器时,Windows会提示发现新硬件:提示连接到“Windows Update”更新,选择“否,暂时不”,点击“下一步”。
CodeWarrior开发环境快速入门-工程创建for9S12DG128B
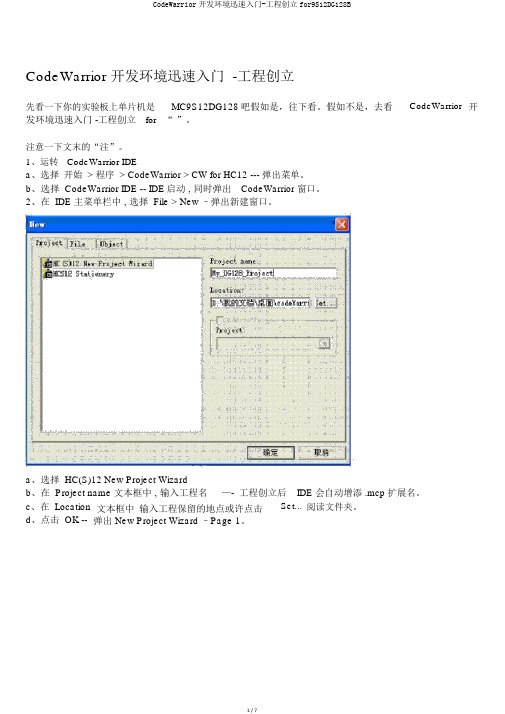
CodeWarrior 开发环境迅速入门 -工程创立先看一下你的实验板上单片机是发环境迅速入门 -工程创立forMC9S12DG128吧假如是,往下看。
假如不是,去看“”。
CodeWarrior 开注意一下文末的“注”。
1、运转CodeWarrior IDEa、选择开始 > 程序 > CodeWarrior > CW for HC12 --- 弹出菜单。
b、选择 CodeWarrior IDE -- IDE启动 , 同时弹出CodeWarrior 窗口。
2、在 IDE 主菜单栏中 , 选择 File > New –弹出新建窗口。
a、选择 HC(S)12 New Project Wizardb、在 Project name 文本框中 , 输入工程名—-工程创立后IDE 会自动增添 .mcp 扩展名。
c、在 Locationd、点击 OK --文本框中输入工程保留的地点或许点击弹出 New Project Wizard –Page 1。
Set... 阅读文件夹。
点击 Next --弹出 New Project Wizard –Page 2。
f、选择MC9S12DG128B。
g、点击 Next -- 弹出 New Project Wizard - Page 3 。
h、保证复选框 C 被选中。
i、点击 Next –弹出 New Project Wizard - Page 4 ;用户能够选择能否用“ Processor Expert”,由软件自动达成中止向量,外头模块初始化等工作。
j、选择Nok、点击Next –弹出 New Project Wizard - Page 5 ;用户能够选择能否将工程配置使用PC-lint。
l、选择Nom、点击Next –弹出 New Project Wizard - Page 6 ;用户能够选择启动代码的种类。
n、选择 ANSI startup codeo、点击 Next button -- New Project Wizard - Page 7 ;用户能够选择工程配置的浮点种类。
- 1、下载文档前请自行甄别文档内容的完整性,平台不提供额外的编辑、内容补充、找答案等附加服务。
- 2、"仅部分预览"的文档,不可在线预览部分如存在完整性等问题,可反馈申请退款(可完整预览的文档不适用该条件!)。
- 3、如文档侵犯您的权益,请联系客服反馈,我们会尽快为您处理(人工客服工作时间:9:00-18:30)。
CodeWarrior™ Development Studiofor Microcontrollers V6.x Quick StartSYSTEM REQUIREMENTSHardware PC with 1 GHz Intel® Pentium® compatibleprocessor512 MB of RAM (1 GB recommended)CD-ROM driveDepending on host-target connection: ParallelPort, 9-pin Serial Port, or USB PortOperating System Microsoft® Windows® XP orMicrosoft Windows Vista® Operating Systems32-bit (Home Premium Edition and BusinessEdition)Disk Space 2 GB total400MB on Windows system diskThis Quick Start explains how to install the CodeWarrior Development Studio for Microcontrollers V6.x software, and how to use the IDE to create, build, and debug a project.NOTE You must install the CodeWarrior software on the equipment on which you intend to use the software.1.Insert CodeWarrior Development Studio CD into CD-ROM drive —CW Auto Install beginsNOTE If Auto Install does not start, run launch.exe, which is located in the root directory of the CD.The CodeWarrior software may be part of a DVD included withyour kit. In this case, click Install CodeWarrior DevelopmentStudio for Microcontrollers, follow the on-screen instructions,and skip to step "Check for updates".2.Follow setup program's on-screen instructionsNOTE Special Edition: The Special Edition license is automatically installed with your product and you do not need to register it.This license allows you to develop projects with unlimitedassembly code, up to 32KB of C code for HC(S)08/RS08derivatives and up to 64KB of C code for ColdFire V1derivatives.NOTE Evaluation Edition: The Evaluation license is automatically installed with your product and you do not need to register it.This license allows you to develop projects as ProfessionalEdition within the 30-day evaluation period. After 30 days, thelicense works as Special Edition license (free permanent, butfeature limited) which supports unlimited assembly code, up to32KB of C code for HC(S)08/RS08 derivatives and up to 64KBof C code for ColdFire V1 derivatives.1.Create a projecta.Select Start > Programs > Freescale CodeWarrior >CW forMicrocontrollers V6.x > CodeWarrior IDE — IDE starts and displaysstartup dialog box.Startup Dialog Boxb.Select Create New Project — the Microcontrollers New Project Deviceand Connection dialog box appears.NOTE This section of the quick start demonstrates using the New Project Wizard. We use an MC68HC908GZ60target as anexample.c.Expand HC08 and GZ Family and select MC68HC908GZ60 derivative. NOTE If your MCU is missing from the list, download a service pack for that device at /codewarrior/downloads.Device and Connection Dialog Boxd.Select Full Chip Simulation as your default connection.e.Click Next — the Project Parameters dialog box appears.Project Parameters Dialog Boxf.In Project name text box, the IDE supplies a default project name. Entera project name of your choice.NOTE The IDE automatically creates a folder with the same name in specified location. The IDE automatically adds .mcp extensionwhen it creates project.g.In Location text box enter location to store project, click Set to browse tofolder locationh.Select C as language to be supported by project.NOTE You can click Finish to accept defaults for remaining options.i.Click Next — the Add Additional Files dialog box appears.This dialog box lets you browse folders and add or remove files to or fromthe project.Add Additional Files Dialog Boxj.Click Next — the Processor Expert dialog box appears.This dialog box let you specify whether you want your project configuredto use Device Initialization or Processor Expert.Processor Expert Dialog Boxk.Select the None option button.l.Click Next — the C/C++ Options dialog box appears.This dialog box allows you to specify C/C++ Options.C/C++ Options Dialog Boxm.Select ANSI startup code as code, the New Project Wizard will place in your project as startup code.n.Select Small as memory model to use.o.Select None for floating point format to support.p.Click Finish — the IDE creates your project according to your specifications; Project window appears, docked at left side of mainwindow.Project WindowNOTE To undock project window, double-click the double gray lines.To re-dock window, right click in title tab and select Docked.2.Select connectionFor this example, we specified Full Chip Simulation (FCS).a.To change MCU and connection, select Project >Change MCUConnection.b.Make sure Full Chip Simulation is selected in drop-down list.3.Edit source codea.Double click main.c in Sources folder — the Editor window opensdisplaying contents of file.main.c in Editor Windowb.Make changes to contents of main.c file, if desired.c.From the IDE main menu bar, select File > Save — the IDE saveschanges.4.Add files if appropriatea.In the project window, select a folder.b.From IDE main menu bar, select Project > Add Files.The Select files to add dialog box appears.c.Navigate to the directory that contains file you want to add.d.Select the filename of file you want to add to project.e.Click Open — the Project Messages window appear indicating accesspath has been added to target, if the path is new to the project.f.In the project window, filename of the added file appears under theselected folder.5.Build projecta.From IDE main menu bar, select Project > Make — the IDE builds(assembles, compiles, and links) project; Error & Warnings windowopens showing any error messages and warning messages1.Start debuggera.Click on project window title bar to ensures that window is active projectb.From main menu bar, select Project > Make.c.From main menu bar, select Project > Debug — the True-TimeSimulator & Real-Time Debugger window opens.True-Time Simulator & Real-Time Debugger WindowNOTE The Source and Assembly panes display the main.c program and code.2.Set breakpointa.Point at a C statement in Source window and right-click — the Sourcecontext menu appears.b.Select Set Breakpoint — a permanent breakpoint mark is set.3.Run applicationa.From the True-Time Simulator & Real-Time Debugger window, selectRun — the Run menu appears.b.Select Start/Continue or click on Start/Continue icon — theProgram executes till the first breakpoint; Command pane displaysprogram statusDebugger Simulator Command Pane4.Click the Start/Continu e icon — the simulator resumes programexecution.5.Click the Halt icon — the Simulator stops program execution.6.From the True-Time Simulator & Real-Time Debugger windowtoolbar, select File > Exit to exit the debugger.7.From IDE main Window toolbar, select File > Exit to exit theCodeWarrior IDE.Congratulations!You have successfully created, built, and run an HC08 application with the CodeWarrior for Microcontrollers V6.xsoftware!Freescale™ and the Freescale logo are trademarks of Freescale Semiconductor, Inc. CodeWarrior is a trademark or registered trademark of Freescale Semiconductor, Inc. in the United States and/or other countries. PROCESSOR EXPERT and EMBEDDED BEANS are trademarks of Freescale Semiconductor, Inc. All other product or service names are the property of their respective owners.Copyright © 2009 Freescale Semiconductor, Inc. All rights reserved.Information in this document is provided solely to enable system and software implementers to use Freescale Semiconductor products. There are no express or implied copyright licenses granted hereunder to design or fabricate any integrated circuits or integrated circuits based on the information in this document.Freescale Semiconductor reserves the right to make changes without further notice to any products herein. Freescale Semiconductor makes no warranty, representation or guarantee regarding the suitability of its products for any particular purpose, nor does Freescale Semiconductor assume any liability arising out of the application or use of any product or circuit, and specifically disclaims any and all liability, including without limitation consequential or incidental damages. “Typical” parameters that may be provided in Freescale Semiconductor data sheets and/or specifications can and do vary in different applications and actual performance may vary over time. All operating parameters, including “Typicals”, must be validated for each customer application by customer's technical experts. Freescale Semiconductor does not convey any license under its patent rights nor the rights of others. Freescale Semiconductor products are not designed, intended, or authorized for use as components in systems intended for surgical implant into the body, or other applications intended to support or sustain life, or for any other application in which the failure of the Freescale Semiconductor product could create a situation where personal injury or death may occur. Should Buyer purchase or use Freescale Semiconductor products for any such unintended or unauthorized application, Buyer shall indemnify and hold Freescale Semiconductor and its officers, employees, subsidiaries, affiliates, and distributors harmless against all claims, costs, damages, and expenses, and reasonable attorney fees arising out of, directly or indirectly, any claim of personal injury or death associated with such unintended or unauthorized use, even if such claim alleges that Freescale Semiconductor was negligent regarding the design or manufacture of the part.How to Contact UsCorporate Headquarters Freescale Semiconductor, Inc. 6501 William Cannon Drive West Austin, Texas 78735U.S.A.World Wide Web /codewarrior Technical Support /supportRevised: 24 September 2009。