松下NE-BS1000水波炉中文说明书_Part1
使用说明书洗涤知识-松下洗衣机

非常感谢您购买了本公司生产的洗衣机■ 使用产品前请仔细阅读本使用说明书,以做 到正确使用。
使用前请务必先阅读「安全注 意事项」(2~4页),以做到安全使用。
■ 如有技术变动,恕不另行通知。
■ 请妥善保管本使用说明书。
■ 本机包含可再次利用的材料,废弃时请协助 正确处理或回收利用,以保护环境。
双桶洗衣机(家用)使用说明书型号双桶洗衣机 使用说明书地 址:杭州经济技术开发区松乔街6号原产地:中国 杭州Panasonic 洗衣机/干衣机·客户服务热线:400-6611-315 400-8811-315周一至周日:7:30~21:30Panasonic 官方网站: 服务邮箱(E-mail ):CS315@ 邮编:杭州松下家用电器有限公司符合国家标准:GB4706.1-2005 GB4706.24-2008GB4343.1-2009 GB4706.26-2008GB17625.1-2012 GB/T4288-2008■一次洗涤数量:■粉末漂白剂的使用方法■装箱单■技术参数■一次洗涤时间:产品型号*洗 净 比*能 效 等 级额定输入功率洗涤脱水额定频率产品净重额定洗涤容量额定脱水容量标准水量使用水压 洗涤噪声值脱水噪声值*耗电量(千瓦时/工作周期)*用水量(升/工作周期)220 V ~50 Hz 0.03-1 Mpa <62 dB (A 计权)<72 dB (A 计权)27 7.0 6.0 52 L 0.105140350 W 135 W 0.80 3级额定电压洗涤知识目次产品特点 ……………………………2安全注意事项 ………………………2各部件名称 …………………………5附件 …………………………………5操作部的使用方法 …………………6安装注意事项 ………………………7洗涤程序 ……………………………8■ 洗涤前的准备 …………………8■ 洗涤 ……………………………8■ 中间脱水 ………………………9■ 漂洗 ……………………………9■ 脱水 ……………………………9保养方法 ……………………………10■ 日常保养 ………………………10■ 特殊情况的处理 ………………10■ 线屑过滤网的清洁 ……………10■ 进水过滤器的清洁 ……………10■ 线屑过滤器的清洁 ……………10故障检修 ……………………………11■ 要求维修之前 …………………11■ 下列现象并非故障 ……………11■ 产品中有害物质的名称及含量…11洗涤知识 ……………………………封底■ 一次洗涤数量 …………………封底■ 一次洗涤时间 …………………封底■ 粉末漂白剂的使用方法 ………封底■ 技术参数 ………………………封底● 本机的额定洗涤、脱水容量是以国标规定的试验布为准。
Panasonic 2-in-1 炉类合一烹饪机快速启动和烹饪指南及菜谱说明书

Convection · Steam2-in-1 Combination Oven Quick Start and Cooking Guide with RecipesDinner is served.Embark on your culinary journey with ease, thanks to the Panasonic 2-in-1 Combination Oven . Upgrade your meal repertoire with the power to CONVECTION and STEAM , along with several additional features.Use these two cooking methods individually or in combination to make anything from a mid-day quick bite to a decadent eight course meal. Enjoy the kind of versatility that enriches the appetite of everyone around you. It’s time for less kitchen, more cuisine. So, who’s hungry?Table of Contents Getting StartedProduct Features - SteamProduct Features - Convection BakeRecipes IntroLemon Poppy Seed LoafBreakfast MuffinsVegan Carrot CakeTuna CasseroleStuffed Portobello MushroomsLoaded PotatoesCauliflower Buffalo WingsCoconut ShrimpNachos with Shredded Barbecue ChickenDetroit Style PizzaPork DumplingsSteamed Mussels in White WineCleaning Instructions 7891112 - 1314 - 1516 - 1718 - 1920 - 2122 - 2324 - 2526 - 2728 - 2930 - 3132 - 3334 - 3536Getting Started ModeTwo modes of steam cooking:Steam-MedSteam-High StewHealthy FryFermentationConvectionSteam ConvectionAuto MenusA Accessories Placing PositionB Normal WorkingC Start/ SetD One Push FunctionE Steam System Cleaning Function, Citric Acid Cleaning FunctionF Full Water IconG Steam Shot IconH Child Safety LockI Preheat IconJ Preheat End Icon EAD BC F G H I JControl PanelIncluded AccessoriesWire Rack X 2Steam Convection BakeMetal Tray X 2(All cooking must use the metal tray.)Steam Convection BakeIntegrated Water TankThis STEAM feature allows you to add steam during cooking for up to 60 minutes. Steaming is one of the best ways to preserve nutrients and enhance the natural flavours in your dish.S t e a mPro Tips:•Steaming dough before baking will create fluffier cakes and puffs.•It’s normal for the whole oven to be covered in steam while using the STEAM function — it will go away at the end of the cooking cycle.The CONVECTION BAKE function circulates hot air throughout the oven in and around the food for fast, easy cooking. Temperature ranges from 100°C - 230°C. Preheating is optional.Convection Bake Healthy Fry Pro Tips: •Always have it pre-heated at the proper temperature. •Turn the accessories 180° halfway during cooking to ensure a more even cooking result.This function quickly circulates hot air around the food, producing crispy, brown results. Air-fried foods are healthier than deep-fried foods because they need less oil to produce a similar taste and texture. Nopre-heating required.RecipesMake the most of your 2-in-1 COMBINATION OVEN with these amazing recipes that will keep your culinary journey brimming with savoury flavours and unforgettable meals.Feast your eyes on 12 thoughtfully crafted dishes, inspired by the everyday occasions that bring us joy. Whether you’re in the mood for something fast, fresh or festive — there will always be a dish here waiting for you.Prep Time: 10 minutesCook Time: 45 minutesTotal Time: 55 minutesIngredientsLoaf1½ cup all-purpose flour2 tbsp poppy seeds1 tsp baking powder½ tsp baking soda¼ tsp salt1 cup sugar½ cup butter, room temperature 2 eggs2 lemons, zest and juice¼ cup milk1 tbsp oilIcing1 cup icing sugar2 tbsp lemon juiceOptional garnish: lemon zestPreparation•Select the Steam Conv. mode and set the temperature to 190°C. Press Start to preheat the oven.•In a medium bowl, combine flour, poppy seeds, baking powder, baking soda and salt.•In a large bowl, cream sugar and butter together with a wooden spoon. Add eggs and stir until combined. Add lemon zest and lemon juice, and milk. Slowly pour the dry mixture into the wet mixture and stir until just combined. •Grease a 9x5 loaf pan with oil and pour in batter. •Place on the lower rack position of the oven.Set the timer for 45 minutes.•Insert a toothpick to ensure that the loaf is fully cooked. Let rest in the pan for five minutes and then transfer to a cooling rack. Allow to cool completely. •In the meantime, combine icing sugar and lemon juice to make the icing.•Slowly pour the icing on top of the cooled cake, add lemon zest if required. Let sit for five minutes until the icing hardens. Serve and enjoy.Tip: Don’t get stuck with a sticky mess! Place a cookie sheet under the cooling rackbefore pouring the icing.Yield: 1 LoafLemon Poppy Seed Loaf Perfectly moist and packed with an elegant lemony flavour, this beautifully glazed poppy seed-speckled delight is not only delicious but super easyto make.STEAM CONVECTIONPrep Time: 5 minutes Cook Time: 15 minutes Total Time: 20 minutes Preparation Ingredients 1 cup whole wheat flour ¼ cup rolled oats + 2 tbsp for topping ½ tsp baking soda ¼ tsp salt ¼ tsp cinnamon 1 tbsp pumpkin seeds + 1 tbsp for topping 1 tbsp flax seeds 3 tbsp olive oil ¼ cup maple syrup 1 egg ½ cup banana, mashed 2 tbsp milk 1 tsp vanilla ½ apple, peeled, cored and diced 1 tbsp vegetable oil•Select the Steam Conv. mode and set the temperature to 190°C. Press Start/Set to preheat the oven. •In a medium bowl, mix flour, oats, baking soda, salt, cinnamon, pumpkin seeds and flax seeds. •In a big bowl, combine olive oil, maple syrup, egg, mashed banana, milk and vanilla. •Add the dry to the wet mixture and mix until just combined. Fold in the diced apple.•Oil two 6 muffin cups pans and divide the mixture evenly, filling about two-thirds of each cup. Sprinkle each muffin with the remaining oats and pumpkin seeds. Place the two trays on the two levels of the oven and bake for 15 minutes. •Let cool for five minutes in the tray and then placethe muffins on a cooling rack until fully cooled.Yield: 12 Muffins Breakfast Muffins With the hearty combination of oats, apples, bananas, pumpkin seeds, flax seeds and a touch of maple syrup, these delicious breakfast muffins make morning meals easy.Prep Time: 15 minutes Cook Time: 40 minutes Total Time: 55 minutes Preparation Ingredients Cake 2 medium carrots, shredded ½ cup applesauce ¼ cup olive oil 2 tsp cider vinegar 1 tbsp ground flax seeds 2 tbsp water 1½ cup all-purpose flour ½ cup sugar ½ tsp baking soda 1½ tsp cinnamon ¼ tsp ground nutmeg ⅛ tsp ground cloves ½ tsp salt 1 tbsp oil Icing 4 cups icing sugar ¼ cup vegan butter 4 tsp vanilla extract ¼ cup soy milk Optional garnish: carrot curls •Select the Steam Conv. mode and set the temperature to 190°C. Press Start/Set to preheat the oven. •In a large bowl, combine carrots, apple sauce, olive oil and cider vinegar. In a separate bowl, combine flax seeds and water and then add mix to large bowl and combine. •In a medium bowl, combine flour, sugar, baking soda, cinnamon, nutmeg, cloves and salt. •Mix the dry mixture with the wet mixture until just combined. •Line 2 8-inch round pans with parchment paper cut into circles. Grease the two pans with the oil. Divide the batter between the two pans, place them on the two levels of the oven and cook for 40 minutes.•Insert a toothpick to ensure the cakes are fully cooked and let them cool completelyon a cooling rack. •In the meantime, add the icing sugar, vegan butter and vanilla to a stand mixer bowl and mix with the paddle attachment on low for two minutes. Gradually add the soy milk until it reaches a smooth texture. •When the cakes are totally cooled, spread a layer of icing on the first cake, then stack the second cake on top of the first one and spread the remainingicing on top. Garnish is required.Yield: 1 Cake Vegan Carrot Cake While staying true to the beloved taste of this carroty classic, this vegan recipe has a few hidden tricks up its sleeve. By taking a slightly steamier approach, the sweet essence of the carrots brings out an unbelievably moist, rich and indulgent texture that bursts with carrot and cinnamon flavour.Prep Time: 15 minutesCook Time: 35 minutesTotal Time: 50 minutesIngredientsFilling1 lbs mini potatoes2 5oz cans chunk light tuna in water3 cups kale, chopped1 stalk celery, chopped½ cup frozen peas, thawed Sauce2 cup heavy cream½ cup dill, chopped½ tsp salt½ tsp ground sage½ tsp white pepperPreparation•Select the Steam Conv. mode and set the temperature to 190°C. Press Start/Set to preheat the oven.•Place the potatoes on the metal tray and cookfor 20 minutes.•In the meantime, combine the sauce ingredients in a pot, and reduce for five minutes, stirring frequently. •Once steamed, cut potatoes into quarters and mix with tuna, kale, celery and peas. Place the mixture in an 8x8 casserole dish and pour the sauce evenly over the top.•Select the Convection mode and set the temperature to 190°C to preheat the oven.•Bake for 15 minutes.Yield: 4 Servings Tuna CasseroleThis simple dish is a delicious andhearty combination of tuna, potatoes,kale, celery and peas, drizzled in acreamy dill sauce. The tangy notesand warm filling will make it a perfectaddition to your next summer potluck!Prep Time: 10 minutes Cook Time: 15 minutes Total Time: 25 minutesPreparationIngredients6 portobello mushroom caps 1 tbsp olive oil Salt and pepper¾ cup soft herbed spreadable cheese 2 tbsp melted butter ¼ cup panko¼ cup parsley, finely chopped 12 cherry tomatoes, sliced in half•Select the Convection mode and set thetemperature to 190°C. Press Start/Set to preheat the oven. •Clean the mushroom caps, remove the stem and place caps on a wire rack ontop of the metal tray facing up. Drizzle with olive oil and salt and pepper. Evenly divide the cheese between the caps.•In a small bowl, combine melted butter, bread crumbs and parsley. Sprinkle on top of the cheese. Place a few halved tomatoes on top. •Place on the lower level of the oven and bake for 15 minutes or until the bread crumbs are goldenand the mushrooms have softened.Yield: 6 MushroomsStuffed Portobello MushroomsWhether you serve it as a steak side or enjoy it as a vegetarian main, these Stuffed Portobello Mushrooms are a savoury experience. This dish isbrimming with luscious flavour, topped with a crunchy exterior of golden panko crumbs and juicy halved tomatoes with a layer of melted cheese.Prep Time: 15 minutesCook Time: 1 hour and 25 minutesTotal Time: 1 hour and 40 minutesIngredients2 russet potatoes4 strips of bacon, sliced ¼ inch thick½ block cream cheese¼ cup chives, choppedSalt and pepper½ cup shredded cheddarOptional garnish: sour cream, chopped chives and bacon bitsPreparation•Select the Convection mode and set the temperature to 190°C. Press Start/Set to preheat the oven.•Pierce potatoes a few times with a fork and then wrap in foil. Place them on a baking sheet and bake for 1 hour 15 minutes, or until fork tender.•In the meantime, preheat a frying pan on medium high, and cook the bacon. In a bowl, combine cream cheese, chives, bacon and salt and pepper. •When the potatoes are ready, unwrap them carefully as they will be very hot. Cut them in half, scoop out⅔ cup of potato from each side, keeping the skin whole. Add the potato to the cream cheese mixture and mash until combined.•Divide the mixture in between the four potato skins and sprinkle with cheese. Bake for an extra 10 minutes or until the cheese is melted and golden. •Garnish if required and serve immediately.Yield: 4 Halved Potatoes Loaded PotatoesA fluffy bed of creamy baked potatomash covered in a blanket of meltedcheese, sizzling bacon and sprinkledchive can only mean one thing: loadedpotatoes. Try out this classic stuffedtwice-baked potato recipe for afoolproof side dish that never failsto please.Prep Time: 10 minutesCook Time: 24 minutesTotal Time: 34 minutesIngredients1 cup all-purpose flour2 tsp paprika1 tsp black pepper2 tsp garlic powder2 tsp cumin2 tsp salt1 tsp baking powder1 head cauliflower, cut into bite size florets1 tbsp vegetable oil4 tbsp milk of choice½ cup butter1 cup hot sauceOptional garnish: serve with fresh cut vegetables and your choice of dipping saucePreparation•Select the Auto Cook Setting #14 “Teriyaki Chicken Wings” 2 levels for 24 minutes.•In a medium bowl, mix all the dry ingredients together.•Completely coat the cauliflower florets with the oil and toss them in the flour mixture until well coated. Add 4 tbsp of milk and mix well. •Place the cauliflower bites on the two parchment lined metal trays and cook for 14 minutes.•In the meantime, melt the butter and combine with the hot sauce. Brush onto the cauliflower bites and return to the oven for 10 minutes.•Serve with vegetables and your favouritedipping sauce.Yield: 4 Servings CauliflowerBuffalo WingsHands down, these Cauliflower BuffaloWings are a wing night game-changer.Addictively crispy on the outside, tenderon the inside and loaded with flavour-packed spiciness, this recipe will besavoured by all.Prep Time: 10 minutesCook Time: 12 minutesTotal Time: 22 minutesIngredients1 lbs shrimp, thawed½ cup flour1 egg½ cup coconut milk2 limes, zest and juice1½ cup unsweetened coconut flakes1 tsp ground gingerCooking sprayOptional garnish: lime, fresh herbs and cocktail saucePreparation•Select the Auto Cook Setting #10 “Fried Shrimp with Bread Crumbs” 1 level for 12 minutes. (remove with 4 minutes left on the timer). •Butterfly the shrimp: cut halfway through the back, stopping at the tail, so they’re able to stand tail up. Pat dry with paper towel.•In a shallow bowl, mix flour, egg, coconut milk, lime zest and juice to form a smooth batter.•On a plate, combine coconut flakes andground ginger.•Dip the shrimps in the batter followed by thecoconut flake mixture. Place on the baking traytail up.•Spray with cooking spray and cook for 12 minutes.•Garnish if required.Yield: 4 ServingsCoconut ShrimpAdd this tropical-inspired dish to your dinner entourage with this flavourful sweet blend of crispy coconut flakes and juicy shrimp.Prep Time: 30 minutes Cook Time: 1 hourTotal Time: 1 hour 30 minutesPreparation•In a medium bowl, combine the sauce ingredients and transfer to an 8x8 baking dish. Place chicken breast in the dish, making sure they are submerged in the sauce. •Steam for 25 minutes and once cooled slightly, shred the chicken. •Select the Convection mode and set the temperature to 190°C to preheat the oven.•Put back the shredded chicken in the oven and bake for another 25 minutes, until the sauce caramelizes.•In the meantime, procced to pickling the jalapenos. Combine all the pickling ingredients in a pot and bring to a boil. Remove from heat and add in the sliced jalapenos and allow to cool. •On a metal tray, place a layer of ½ chips, ½ the cheese, tomatoes and onions as well as half the chicken. Repeat with next layer and then sprinkle with pickled jalapenos. •Bake for 10 minutes and serve with guacamole, sour cream and cilantro if required.Yield: 8 ServingsIngredientsBBQ Shredded Chicken1 cup ketchup ¼ cup apple sauce1 tbsp apple cider vinegar 1 tsp garlic powder ½ tsp black pepper ½ tsp salt1/8 tsp ground cloves ¼ tsp cinnamon 1 tsp ground ginger 1 tbsp smoked paprika ½ tsp dried thyme ½ cup water2 chicken breastsPickled Jalapenos½ cup white vinegar ½ cup water2 cloves garlic, smashed 1 tbsp sugar 1 tsp salt3 jalapenos, sliced1 350g bag of nacho chips1½ cup shredded cheddar cheese 2 tomatoes, diced ½ red onion, diced ½ cup cilantroOptional garnish : fresh cilantroTip: You never know when the big game might go into overtime. Be sure to make a little extra Barbeque Chicken and keep a few buns handy, to enjoy as a delicious Pulled Chicken sandwich.Nachos with Shredded Barbecue ChickenFact: Not all nachos are created equal. You’ll agree after you reach into this pile of tortilla chips loaded with mouth-watering layers of shredded chicken drenched in homemade BBQ sauce, melted cheese and pickled jalapenos.Prep Time: 20 minutes Cook Time: 46 minutesTotal Time: 1 hour and 6 minutesPreparation•In a medium bowl, mix 1¼ cup flour, instant yeast, sugar, salt, garlic, and Italian herbs. Add water and 2 tbsp oil then mix with a wooden spoon until well combined. Add the flour slowly and use your hands to knead the flour into the dough until it forms a ball. •Grease a large bowl with 1 tbsp olive oil and place your dough in the bowl, making sure it is well coated in oil. Cover with plastic wrap. Place in the oven, select Auto Menu No.18, press Start/Set to ferment and let rise for 30 minutes or until doublein size. When oven beeps, remove the dough and press Start/Set to preheat.•Punch the dough and flatten it on a greased metal tray. Poke with a fork. Spoon pizza sauce all over, then layer with cheese, baby spinach, prosciutto and goat cheese. Drizzle with honey. •Place pizza in the oven and press Start/Set to bake for 14-16 minutes. •Serve immediately!Yield: 4 ServingsIngredients Dough2 - 2 ½ cups all-purpose flour, divided 1 pack instant yeast 1½ tbsp sugar ¾ tsp salt2 garlic cloves, minced ½ tsp dry Italian herbs 4 tbsp olive oil, divided ¾ cup warm waterToppings½ cup pizza sauce½ cup shredded mozzarella cheese ½ cup baby spinach3 slices prosciutto, halved ¼ cup goat cheese 2 tbsp honeyTip: If pizza night has you craving for something with a thin crust, divide the dough into two portions and double therequired toppings. Bake for 14-16 minutes.Detroit Style PizzaRenowned for its rectangular shape and signature thick crust, the Detroit Style Pizza offers the perfect landscape for those who want a little more out of their pizza. Take full advantage with this goat cheese and prosciutto with honey drizzle recipe.Prep Time: 30 minutes Cook Time: 40 minutesTotal Time: 1 hour and 10 minutesPreparation•In a medium bowl, combine ground pork, sesame oil,chili-garlic sauce, rice vinegar, soy sauce, kosher salt, black pepper and chives. •Open package of dumpling wrappers and remove one. Cover remaining wrappers with a damp kitchen towel while you fill one at a time. •Dampen inside edge of wrapper and place 2 teaspoons of filling in centre. Fold over the wrapper and pinch sides together,sealing the dumpling. Place on an oiled tray and repeat until all wrappers are filled. •Select the Auto Cook Setting #3 “Steamed Chinese Buns”. Select 2 levels and select Start/Set . Place both trays of dumplings into oven and start the cook timer. •Meanwhile, in a small bowl, whisk together the dipping sauce ingredients until well combined. •Once cooking is complete, remove from oven, garnish andserve immediately.Yield: 24 DumplingsIngredients Filling½ lb ground pork ¼ tsp sesame oil½ tsp Vietnamese chilli-garlic sauce 1½ tsp rice vinegar 2 tsp soy sauce ½ tsp kosher salt pinch black pepper3 tbsp chives, finely chopped 24 round dumpling wrappers vegetable oil for greasing trayDipping sauce6 tbsp rice vinegar 2 tsp soy sauce 3 tsp honey1 tsp fresh ginger, grated2 tsp chives, finely choppedOptional garnish: chopped chives and curly onionsPork DumplingsFeel free to use any shape of dumpling wrapper for this super easy dish. With a bit of prep, you’ll soon be able to enjoy this heap of delicious flavours.Prep Time: 15 minutes Cook Time: 25 minutes Total Time: 40 minutesIngredients1 lbs mussels4 sliced bacon, diced 2 shallots, sliced3 garlic cloves, minced ½ cup parsley, chopped ⅓ cup white winePreparation•Select the Auto Cook Setting #7 “SteamedScallops” for 17 minutes. Ensure the oven water tank is full. •Rinse the mussels well under cold water. Pick them over, pulling off any beards and discarding any mussels that are broken or gaping open.•In an 8inch Dutch oven over medium high heat,cook the bacon for four minutes or until golden coloured. Turn off the heat, mix in the shallots, garlic, parsley and white wine. Add the mussels and stir.•Place in the oven. Press Start/Set . •Serve immediately with garlic bread.Yield: 4 ServingsSteamed Mussels in White WineThis seafood delicacy is a set it and forget it dish that requires only ahandful of simple ingredients. Enjoy this eloquent ensemble of shallots, garlic, parsley and white wine that brighten and balance the delicate seafood flavours, as well as compliment the plump and juicy texture of the mussels.Tip: If any mussels do not open, do not eat them and toss immediately!Flat Interior DesignThe inside of the oven is flat, so it’s easy to clean. Andbecause the heater’s flat, a quick wipe is all it takesto clean the top. No turntable also means there’s lesswashing up for even more trouble-free cleaning.No need to remove turntable No troublesome heater tubeCleaning ProgramsFour built-in automatic cleaning programs handle tedious tasks with a touch of a button.Deodorization (Auto Menu No. 21)This function should be used to treat odors in the oven. Before maintenance(cleaning the oven), please empty the oven and wipe inside. Takes 20 minutes.Cavity Cleaning (Auto Menu No. 22)This function is suitable for cleaning a dirty oven caused by oil. Takes 30 minutes.System Cleaning (Auto Menu No. 23)After using the steam function, this function will make the water pump through thepipe into the drip tray.Citric Acid (Auto Menu No. 24)If “ ” appears in the display window after cooking, you should use citric acid to clean thewater-piping. After using citric acid to clean, rinse with water again. Takes 30 minutes.Panasonic Canada 。
松下 超声波射频美容仪 EH-XRF1 使用说明书

PB015691 - EH-XRF1 ������_06-12-18.indd 5
2018/6/12 11:36:39
警告
取出充电电池后,请勿将其放在儿童和婴儿可触 及的范围内。 - 不慎吞服电池会给造成人身伤害。 →如发生此种情况,应立即就医。
如电解液泄漏并接触到眼睛,请勿揉眼,用自来 水等清水彻底冲洗。 - 否则可能导致眼部受伤。 →如发生此种情况,应立即就医。
感谢您购买松下电器产品。 在使用本产品前,请仔细阅读本说明书并妥善保管,以备将来参考。
PB015691 - EH-XRF1 ������_06-12-18.indd 1
2018/6/12 11:36:37
安全注意事项
为减少触电、受伤、火灾、死亡以及财产损失的危险,请 务必遵守以下安全注意事项。
标志说明
出异常声音 →请联系客户咨询服务中心。
4
PB015691 - EH-XRF1 ������_06-12-18.indd 4
电源 请勿用湿手将适配器连接到家用电源 插座中,或从家用电源插座中拔出适 配器。 - 否则可能发生触电或受伤。
请勿将机身或电源适配器浸入水中或用水清洗。 - 否则可能造成触电或火灾。
以下标志用于对因无视标志说明和使用不当而导致的危 险、伤害和财产损失的程度进行分类和描述。
危险 警告 注意
表示极有可能导致重伤或死亡的潜在 危险。 表示可能会导致重伤或死亡的潜在危 险。 表示可能会导致轻伤或财产损失的危 险。
以下标志用于对需要遵循的说明的种类进行分类和描述。
此标志用于提醒用户注意禁止采取的操作步骤。
不充电时,请从家用电源插座上断开电源适配器。 - 否则可能因绝缘性能下降而导致漏电,从而引
松下洗碗机

●为了方便区分各种按钮操作时的基准点(例 :“程序”
按钮中选择“标准”),蜂鸣声会有所变化。
7
6/8/2010 11:22:43 AM
使用窍门!
确认
①连接电源插头 ②打开水龙头
结束运转后,请务必关闭水龙头。
③确认可以清洗的餐具、烹饪用具
④过滤网的安装
洗碗机
不宜洗涤的器皿
注意
■请勿放入容易被洗涤水甩飞的 轻质物品及洗碗布等
各部位名称uuuuuuuuuuuuuuuuuuuuuuuuuuuuuuuuuuuuuuuuuuuuuu 4 准
开启/关闭机门uuuuuuuuuuuuuuuuuuuuuuuuuuuuuuuuuuuuuuuuuuuu4 备 与
附件uuuuuuuuuuuuuuuuuuuuuuuuuuuuuuuuuuuuuuuuuuuuuuuuuuuuuuuuuuuuu5 确 认
NP-TG1_CS.indd 7
启动时 暂停时
接通电源时
( ) 启动十分钟后仍未运转, 则自动切断电源
准 备
与
确
认
切断电源时 重新设定时
使
用
前
请
检
查
安
装
状
态
!
/
操
作
面
注意
板
●启动后欲更改程序时,请重新打开电源。 ●启动后欲更改烘干内容时,请按下“烘干”按钮。 正在烘干时,则无法更改烘干内容。
示 意 图
使用前请检查安装状态!uuuuuuuuuuuuuuuuuuuuuuu 6
操作按键说明uuuuuuuuuuuuuuuuuuuuuuuuuuuuuuuuuuuuuuuuuu 6
使用窍门!uuuuuuuuuuuuuuuuuuuuuuuuuuuuuuuuuuuuuuuuuuuuuuuuuuuuu8
水净化器TWP-N1890UK(W)操作手册说明书
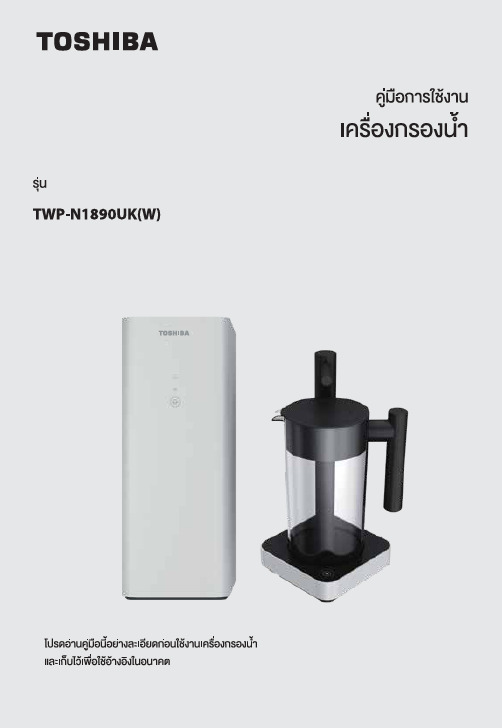
TWP-N1890UK(W)1. Safety Instruction----------------------------------------------------------------------------------------------1 1-1 Safety Instructions----------------------------------------------------------------------------------------1 1-2 Packing List------------------------------------------------------------------------------------------------52. Product Introduction-----------------------------------------------------------------------------------------5 2-1 Name of parts----------------------------------------------------------------------------------------------5 2-2 Operation panel-------------------------------------------------------------------------------------------5 2-3 Water treatment process diagram--------------------------------------------------------------------6 2-4 Electric schematic diagram-----------------------------------------------------------------------------6 2-5 How to use--------------------------------------------------------------------------------------------------73. Cleaning and maintenance--------------------------------------------------------------------------------10 3-1 Trouble shooting ----------------------------------------------------------------------------------------10 3-2 Maintenance steps---------------------------------------------------------------------------------------114.Filter introduction--------------------------------------------------------------------------------------------- 12 4-1 Filter introduction----------------------------------------------------------------------------------------12 4-2 Filter change----------------------------------------------------------------------------------------------135. Technical Parameters-----------------------------------------------------------------------------------------13 5-1 Basic parameter------------------------------------------------------------------------------------------131-1 Safety Instructions2-1 Name of parts1-2 Packing List2-2 Operation panelswitch/indicator for lter life2-4 Electric schematic diagram2-5 How to use2. Take the three-way ball valve out and install1. First, open the three-way ball valve, then-----------------------------------------------------------------------------------------------------------------------------1. Open the three-way ball valve, and then plug1. Close the three-way ball valve, and then unplug the power cord.1. First, open the three-way ball valve and turnproduced at rst. The suggestion is making 3 glasses of water rst, then, in stand-by condition for3-1 Trouble shootinguse water to wash 3-5minutesPlease cut o the water source/power supply anduse water to wash 3-5 minutes. If it did not work,water, after-sales service site will make a reservation and remind you (or you can contact with local after-sales service site) at xed period to have a maintenance for equipment and change of lter .3-2 Maintenance stepslarge-grained substance and organic and residual chlorine .up to 0.0001-0.001 micron. RO membrane lter intercept organics 112-24 months4.4-1 Filter introduction5-1 Basic parameter4-2 Filter change2. First close three-way ball valve, then 0.26 L/min0.4-0.8MPa 0.1-0.4MPa TWP-N1890UK(W)。
松下a1伺服说明书

松下a1伺服说明书篇一:Panasonic伺服参数设定说明Panasonic(MINAS A系列)伺服參數設定說明:备注: 1、首先设置驱动器的电子齿轮比和需要马达转一圈回授的脉冲数计算方法如下:MSMA0421A通常新代控制器所设精度单位 1um/Pules (可在系统参数17中设所需精度单位)通常新代控制器所设的倍频数是4 倍(可在系统参数81~100中所设轴卡的倍频)计算公式:F= f × (Pr 46 × 2Pr 4A) / Pr 4B = 10000或(217) 注: F —电机转一圈所需的内部指令脉冲数(编码器的分辨率)f —电机转一圈所需指令脉冲数马达转一圈回授的脉冲数= 负载转一圈移动量脉冲数÷控制器内部所设的倍频 4****** ex: ******当螺杆的节距是10mm,马达选用A 型编码器分辨率,采用直传连轴器那齿轮比计算如下:负载转一圈移动量脉冲数 = 10mm÷1um/Pules =104 Pules M / N = 1 / 1F(10000) = f(10000) × { Pr 46 × 2Pr 4A ) ÷Pr 4B 把 Pr 4A = 0 1、Pr 46 = 100002、Pr 4B = 100002、设定上表中的驱动器参数,值为后面的设定值;Pr 4A、Pr 46、Pr 4B为上面公式根据实际情况计算出来的值;Pr 10、Pr 11、Pr 12先(原文来自:小草范文网:松下a1伺服说明书)不修改数值,为出厂值;3、调整机台的刚性,先进行X、Y、Z 轴的来回运动,通过自动整定调谐驱动器参数值,按加1数值增大;通常调节到机台出现震动或有声音后,降回原一级。
注意一点:调完后,需把X、Y、Z的位置增益Pr 10设成一样大;注意:齿轮比设错,编码器会无回授,同时控制器发遗失位置命令、严重追随误差警报。
使用面板设定参数的方式:1、接通驱动器电源;2、按set键按钮;3、按住MODE键按钮,到显示为:“PA_ 00”;4、按上↑、或下↓键按钮,来选择需要设定的数号,如选择10号参数,显示为:“PA_ 10”;5、按set键按钮,进入对应参数值,显示为:“ 50”;6、用左←键、上↑键、下↓键,来修改设定数值;7、修改完后,按set键按钮,确认退出;当修改完所有要修改的参数后,要执行选择EEPROM模式写入,8、按MODE键按钮,到显示为:“EE_ SET”; 9、按set键按钮,到显示为:“EEP -”; 10、按住上↑键按钮约(持续3秒钟),显示转换如下:“EEP -”→“EEP - -”→“- - - - - -”→“START” [→“FINISH”[→“Reset” [→“ERROR”“FINISH”与“Reset”写入完成;“ERROR”写入出错,须重新设定参数,后再写入;显示“Reset”需要关电源,重开电源后,设定参数值生效;常规自动增益调节:1、选择常规自动增益调节模式,初始显示“r0”;2、按SET键按钮一次,按MODE模式键切换,按钮三次,到显示为“At_no 1”;3、按上↑、下↓键来选择机器的刚性,刚性越高越好,但前提条件是机台不抖动;4、按SET键按钮,进入监视器 / 执行模式;显示为:“Atu -”;5、在监视器 / 执行模式上运作:按住上↑键按钮约3秒,直到出现显示“start”,电机开始运转,大约15秒内,电机重复5个周期,包括两圈的正转和反转。
松下变频器操作使用手册

松下变频器操作使用手册NBSL门机变频调速系统使用手册一.系统构成NBSL开门机变频调速系统为我公司为适应市场需求开发的门机控制系统,为保证系统性能的可靠,系统硬件部分采用日本松下公司的VF-7F0.4KW的变频器,FPI-C14 型可编程控制器,门机运行变速位置由双稳态开关控制。
变频器具体外形如图所示;1.电源开关2、调试切换开关3、4、手动开关门开关6、输入公用端7。
安全触板或光幕常闭触点输入8、开门信号输入9、关门信号输入10、输出公用端11、关门到位输出12、开门到位输出13、接地14、15、电源输入16-18、门电机输入端21、关门终端开关22、开门终端开关23、关门变速开关24、开门变速开关25、关门到位力矩保持选择输入端。
二.开关、端子功能简述1、调试切换开关;当该开关置于调试状态时,系统对外部信号不相应,按下手动开关门时,门机动作,当开关置于系统状态时,系统由外部信号控制,手动实效。
2、手动关门开关;3、手动开门开关4、输入控制:5、输出端6、输入部分三.变频器操作说明:本变频器门位置采用双稳态开关,门机加减速位置可根据自己调整,以满足不同客户的要求。
门机开门的速度由P01,P02,P36,P37,P38,等五个参数控制,关门速度由P32,P33,P34,P39—P44等参数控制。
具体参数功能如下:P01---开门加速时间(第一加速时间)P02---开门减速时间(第一减速时间)P36---开门快速频率(预设频率6)P37---开门高速频率(7)P38---开门低速频率(8)P32---关门低速频率(2)P33---关门高速频率(3)P34---关门低速频率(4)P39---关门快速加速时间P40---关门快速减速时间P41---关门高速加速时间P42---关门高速减速时间P43---关门低速加速时间P44---关门低速减速时间注:关门快速频率P32高于高速频率P33时,P42起作用,P41不起作用。
SK-B803ZL 水波炉 使用说明书
161-060-0080: 뿔 맞새 3501 뛰 맵 졸 미 과 \ 뱅 가봉 므 는 랩 브 죽 구 페 띄 빼 를 [ 브 블 롬 222-0080] 967500-0080 : 배 투 태 별 르 2 ELE HEYKHTEWYIK F 줄 브 를 ㆍ [므 는 패 브 다 재 루 볼
^
PSBHLEE
00005
우 롤콤티복 뼈 콤부쏟트 购买 时 请 要 求 经 销 商 填 妥 购买 日期及 董 店 章 , 以 确保 您的权益
ㄱ 260898->0
SK-B803ZL
User Manual
使 用 电源
AC 110V/160Hz
产品 尺寸
33x21x63(cm)
摧 造 年份 2008 年
消耗 功率
窗户 、 装 面 或像俱 表 面有水 份 凝结 @ 请 立即关于 水 圳 功能 ,以免 损坏 像俱。
11
Simple good life, Sampo
紧急 处理 方法
全 有 烧 焦 味 或产品 温度 过 高 发生 黑 常 时 , 订 立拔即 除 电源 插头 。 若 在 界 常 状态 下 继续 使用, 易 造成 火炎 之 发生。
存时放 之 注意 事项 如 长 期不 使 用时 : 1. 按 照每过 维护 之 步县 清洗 乾 泽 。 注意 : 存放 时 , 不 可有 水 残留机 器 内 。 2. 最 好 可 以 放置 於原纸 箱 内 , 存 放 於 险 泳乾燥 不。
- 1、下载文档前请自行甄别文档内容的完整性,平台不提供额外的编辑、内容补充、找答案等附加服务。
- 2、"仅部分预览"的文档,不可在线预览部分如存在完整性等问题,可反馈申请退款(可完整预览的文档不适用该条件!)。
- 3、如文档侵犯您的权益,请联系客服反馈,我们会尽快为您处理(人工客服工作时间:9:00-18:30)。
安全注意事项 请务必遵守
为防止对人的伤害和财产损失,此部分将说明用户务必遵守的事项。
˙按照误操作后产生的危害和损失程度,分别说 明。
˙用户必须遵守的内容,用以下的标识说明。 (以下为标识示例)
危险 「会造成死亡和重伤的重要内容」。
禁止事项。
配 件
警告 「会造成死亡和重伤的内容」。
必须遵守事项。
・ 另
ྉཧϨγϐฤ
ε
Ոఉ༻ενʔϜΦʔϒϯϨϯδ
ν
ồ
൪ /
Ϝ Φ
ồ
ϒ
ϯ Ϩ
更加简单,更加美味的
ϯ
δ 微波炉
使用方法
附只需10分 钟即可享用 的百份菜谱
使用说明书
家用蒸汽微波炉
产品型号NE-BS1000
/Pख࡞Γ·Μʢ1ʣ /Pνϧυ͗ΐ͏͟ʢ1ʣ
/PܲͷϨϞϯ෩ຯরΓম͖ʢ1ʣ
ビーフカレー(牛肉咖喱) 肉じゃが(土豆炖肉)
、 、 いわしのしょうが煮(生姜煮沙丁鱼) かれいの煮つけ(煮蝶鱼)
、 さつまいもと鶏肉のうま煮(地瓜煮鸡肉)
、 、 、 五目豆(什锦豆)
黒豆(黑豆)
金時豆(金时豆)
除外。 野菜のうま煮(煮蔬菜)
(手动)
手動 「レンジ(菜单)」需要控制 设定时间、一边留意加热情况 一边加热
安
银杏等有壳有膜的食品请
全 注
割开口后放入
意
破裂会碎片壳四散,冲击会使微波炉内部底
事 项
面碎裂导致受伤、烧伤
︵
请
取下瓶·容器的盖子和
务
螺旋式容器的栓子
必 遵
破裂会碎片壳四散,冲击会使微波炉内部底面
守
碎裂导致受伤、烧伤
︶
˔请勿呈密闭状态。 ˔覆盖微波炉用的盖子和保鲜膜时,
打开一点缝隙。
电源插头·电源线等
保修和售后 76
客户咨询窗口
规格
78
3
配件・另购品
注意
请勿在内部只有配件和另购品时使用微波加热。
以免出现火花,导致微波炉底面赤热、异常高温,从而烧伤。 ˔为避免故障,微波炉会启动安全机能,停止运作。
连 指 手 套 一对 产品编号:A060M-1R50
只需10分钟即可享用的百份菜谱集 产品编号:A0617-1S30
配 件
角皿2个 产品编号:A0603-1S30 ˔为了防止受热变形,故不平整。
烤盘(「グリル皿(烤盘)」和刻印)1个 产品编号:A443S-1S30
若用微波加热,会出现火花,故 请勿使用。
˔关于如何使用角皿、烤盘 P.12
树脂 把手
请勿在烤炉模式下使用。 温度设定超过ˆ时,侧面的把手会因高温 变形。
※ 黄 油 、生 奶 油 、橄 榄 油 等
(手动)
手動 「レンジ(微波)」模式加
热时,请减少设定时间
加热后取出,会突然爆沸四溅,造成 烧伤。
容器需放置于微波炉内部中央, 广口低矮的容器请放入至8成
置于前端和গྔ加热会使其沸 腾,会 导致突然爆沸四溅,造成 烧伤。
加热前、加热后请务必用勺子搅拌
加热后取出,会突然爆沸四溅,造成烧伤。
以免烧伤、触电、受伤
请拔下电源插头,待舱内冷却 后再进行清洁保养
以免烧伤、触电、受伤
请勿靠坐、拉扯舱门上
以免微波炉倾倒落下,导致受伤
婴幼儿食品和老年食品加 热时、加热后,请搅拌 并确认温度
以免烧伤
遇到异常、故障时
请立刻中止使用,拔出电源插头
以免着火冒烟、触电 异常、故障示例 ˔电源线和插头异常发热。 ˔出现异味和异响。 ˔舱门变形。 ˔触碰时感觉到电流。
全 注
菜
区 分 使 用 热 饭
90℃ 方 法
菜
不
功
同
能
。
可用容器ɾ不可用容器
24
使用要点
26
准备工作时(往给水槽注水)
设定时
加热后ʢ按照喜好再加热ʣ
加热过程 28
推荐机能的介绍ɾɾɾɾɾɾɾɾɾɾɾɾɾ
日常使用方法
自动加热
加热
30
解冻 自 40 煮 动 42
42 40 39
关于收藏夹
44
提手 产品编号:A0604-1E00 最小建议售价:840日元(税后)
柠檬酸(40g×2袋) 产品编号:SAN-80 最小建议售价:294日元(税后) ˔此为食品添加物,
不会造成食品卫生上的问题。
最小建议售价自2013年3月开始实行
http://club.panasonic.jp/mall/sense/
请勿在有水的地方使用
以免触电和漏电
请确实安装接地线
以免发生故障和漏电时导致触电
接地线 ˔和接地线端口连接。另外,搬家等时候也请勿忘安装接地线安装方法 P.14 ˔严禁与天然气管道、自来水管、电话、避雷针的地线等连接。(法令禁止) ˔无接地线端口时,在湿气重的场所和有水的场所,必须安装接地线端口 请务必阅读P.12。
购
注意 「会导致轻伤和财产损失的内容」。
需要注意的事项。
品 /
按
注
危险
意 事
项
请勿自行修理、分解、改造。
请勿将铁丝等金属物、异物、手指
︵ 请
伸入吸气口、排气口、产品的缝隙 务
以免因触电、火灾、异常动作受伤
必
排气口
遵
因有高电压部分,以免
守
出现故障时
触电和受伤。
︶
请咨询购买店。
若异物进入本体, 请先拔出电源插头,
接下页
5
安全注意事项
请务必遵守
警告
微波加热时
请勿对食品进行过分加热
以免引起着火和冒烟
˔以下场合请勿自动加热 少量和指定份量※1以外的食品 不满100g的食品 (设定为45℃以上进行加热时) 对盖子和带盖子的容器进行加热※2
※1 指定份量根据菜单而定。
请参照各页。
※2ྉཧू茶わん蒸し (蒸蛋)ɺ ɺ த՚෩ΘΜৠ͠(中华风蒸蛋) 、 、 (料理集)
另
防倾倒金属部件C (将微波炉固定于木质墙面所使用的金属部件。) 产品编号:A195A-1K20 最小建议售价:1,050日元(税后)
˔即使是为了应对地震,也请安装固定。
购 ˔安装示意图
品
防倾倒金属部件 木 质 墙 面
防倾倒金属部件
木
前
质
面
微波炉
侧面
墙 面
˔ 照片和插图仅供参考,一切以实际为准。
˔请前往销售店购买配件和另购品。 也可登陆松下家电产品直销网站ňύφηϯεʼn购买。
以免因异常发热导致火灾
〈禁止多插〉
请着实将电源插头插到底
以免因触电发热引起火灾
请勿使用不牢固的插座
请定期用干布擦去电源插头 上的灰尘
灰尘会积聚吃起,导致绝缘不良诱发火灾
长时间不使用时,请拔除 电源插头
绝缘劣化会引起火灾
接下页
7
安全注意事项
请务必遵守
请注意以下几点
ࠂܯ
请勿让儿童单独操作,微波炉 请放置在幼儿触碰不到的地方
ύφιχοΫͷձһαΠτňヤロヶャチヱㄏㄔㄐㄏㄊʼnͰň͝Ѫ༻ऀొʼnΛ͍ͯͩ͘͠͞ɻʢϖʔδ͝ࢀরʣ
菜单设置和烹调…
手動 (手动)
50 48
烧 5下1 5上1 5两0 面面面 烤烤烤 烤 ︵ ︵ ︵ 单单双 面面面 烤烤烤 ︶︶︶
微 4˔9 ˔ 4˔8
结
ủủ
波 合
强 38
火 和 弱 火
加 0 0
使
用 57˔ 56˔ 54˔ 通 无有
过 蒸
预预 热热
烤
汽 发
使使 用用
炉
酵
烹
饪
握使
﹁
蒸 火 用
候﹁ 和烤
蒸 汽 ﹂
蒸
汽 蛋 炉
糕﹂
汽
等﹁
+ 的 烧
蓬烤
蒸
松﹂ 感烹
煮
时饪
时
想
要
掌
4选6 择
46按 照
45 以
健
材
50
康
料
音
饮 食 菜
选 择
顺 序
单
选
择
44
收 4˔4
删呼 收
藏 除 出 藏 夹
˔本书所载照片和插图与实际情况有出入。照片是盛碗后的例子。 ˔烹调时请谨遵书中所记材料份量。若材料份量发生改变会导致菜肴不美味。
请勿损坏电源线和电源插头
ʢ自行改装、排气口等部位接近高温部、强行 扭曲,打结、拉扯、放置重物、捆扎、 夹嵌等)
请勿使用损坏的电源插头
以免因破损引起触电,短路引发火灾
请咨询销售店。
请勿用湿手插拔电源插头
以免触电
请勿握住电源线拉出 电源插头
以免触电,短路引发火灾
请务必单独使用额定15A以上·交 流100V的电源插座,包括延长电 源线
6
ࠂܯ
防止微波加热时出现破裂
请勿加热水煮蛋(有壳和无壳)
破裂会使碎片四散,冲击会使微波炉内部底面 碎裂导致受伤、烧伤
有壳鸡蛋请用
料理集「No.103 温泉卵」加热
(料理集)
(编号No.103 温泉蛋)
破裂会使碎片四散,冲击会使微波炉内部底面 碎裂导致受伤、烧伤
请打散鸡蛋
破裂会碎片壳四散,冲击会使微波 炉内部底面碎裂导致受伤、烧伤
从料理集中搜索菜单
45
区域加热
47
蔬煮
4˔2
菜 叶
果 菜 根 菜
对
40˔ 肉
全类
解 冻
和
鱼
解 冻
类
用
蒸 汽