acto lcd projector6500投影仪说明书
投影机使用手册与问题解答(doc 8页)
投影机使用手册与问题解答(doc 8页)⏹当前文档修改密码:8362839⏹当前文档修改密码:8362839投影机的亮度指标随着投影机产品的发展,各厂家不断推出具有更高亮度的投影机产品,投影机的亮度已经达到2000ANSI流明以上,但在用户购买过程中,对投影机亮度指标的理解常有偏驳,不同品牌,相同亮度指标的机器在比较中也相差较远,那么如何理解投影机的亮度指标呢?“light out” 是投影机主要的技术指标, "light out" 通常以光通量来表示,光通量是描述单位时间内光源辐射产生视觉响应强弱的能力,单位是流明。
LCD 投影机表示光通量的单位是ANSI流明,ANSI流明是美国国家标准化协会制定的测量投影机光通量的方法,它测量屏幕“田”字形九个交叉点上的各点照度,乘以面积,再求九点的平均值,即为该投影机的ANSI流明值,液晶投影机的光输出主要决定于光源的亮度和光路系统以及液晶板的透射或反射能力。
目前高亮度投影机在不增加光源功率的前提下通过技术提高光利用率,在光路上设置P.S光转换板,把起偏以后的垂直方向震动的S光反射转向,P 光透射来提高光的效率。
DLP 投影机的亮度单位为ANSI流明。
DLP投影机(数字光处理技术美国德州仪器公司技术)以数字微反射镜器件(DMD)作为光阀成像器件通过信号放大,输出大屏幕图像。
大多数DLP投影机都采用1块DMD光阀片,用滤色片旋转出色彩。
液晶投影机和DLP投影机是目前中国市场上主要机种,其亮度指标由于测试环境的差异,各品牌的机器ANSI流明指标有所差异。
但是厂家提供的ANSI流明数值基本反映了投影机的亮度水平。
CRT(三枪)投影机的光输出用峰值流明来表示,即在一个白窗口的测试图像上,以扫描线尚清晰可见的情况下,测量白窗口的最大照度(LUX)乘以白窗面积(m²)来确定投影机光通量,峰值流明具有很好的实际意义,由于您看到的任何一帧视频图像不可能全部都是白场,白色所占的比例一般占图像面积的20%左右。
光线投影仪安装指南说明书
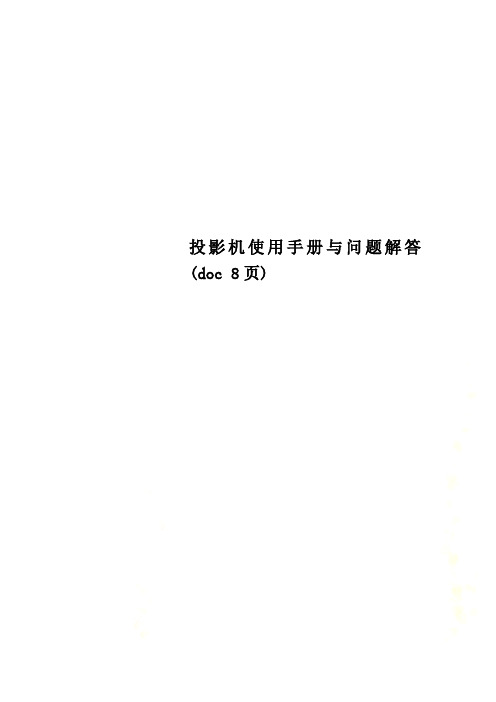
Installation ManualSafety InstructionsThis guide explains how to install the projector on a lighting track using the Lighting Track Mount.Make sure you read this guide carefully to use the installation mounts and the projector safely. Incorrect handling that ignores instructions in this guide could damage this product or could result in personal injury or property damage. Keep this installation guide at hand for future reference.Regarding how to handle the projector, read the User's Guide and Safety Instructions supplied with your projector and follow the instructions in these documents.The documentation and this product use graphical symbols to show how to use this product safely and correctly to prevent injury to customers and others, and damage to property.The indications and their meaning are as follows. Make sure you understand them properly before reading the guide.General Information IndicationsPrecautions on Installing the ProjectorContentsUsing the Product SafelySafety Instructions (1)Safety Indications (1)General Information Indications (1)Precautions on Installing the Projector (1)Warnings and Cautions on the InstallationLocations (3)Preparing the ProjectorPackage Contents (5)Mountable Lighting Tracks (6)Installation ProcedurePrep aring the Projector (7)Attaching the Mount to the Projector (8)Attaching the Rotating Unit (8)Attaching the Plate Unit (9)Attaching the Projector to the Lighting Track (11)Attaching the Stopper Unit (11)Attaching the Plate Unit to the Stopper Unit (12)Connecting Cables (15)Installing the Safety Wire (16)Appendix Specification (18)Figures of Installation Dimensions (18)Package ContentsCheck that you have all of the following accessories before you start work.Stopper unit Plate unit Rotating unitStopper cover Spacers x10Power adapterPower adapter cover•Make sure you use the bolts or screws supplied with this product to install mounts.•Gather the tools and parts you need before you begin installation.Mountable Lighting TracksCheck the model number of the lighting track you want to install on before performing installation. You can attach the mount to the following types of lighting track.Preparing the ProjectorAdjust the orientation of the projector to make installing easier.a Place the projector on a flat surface on a soft cloth.b Loosen the screw for the ball joint with a hexagonal wrench supplied with the projector.c Change the projector's orientation.You can change the orientation of the projector as shown below.d Tighten the screw for the ball joint with a hexagonal wrench to secure it in place.Make sure you tighten the screw completely so that the ball joint does not move during installation.Attaching the Mount to the Projectora Place the projector on your workbench.Place the projector on a soft cloth on a workbench (330 mm (13 inches) high).b Remove the M4 x 10 mm screw securing the lever of the rotating unit.c Rotate the lever 90 degrees counterclockwise.d Place the rotating unit on the projector.Align the pins (2 points) on the projector with the holes on the rotating unit.Secure the rotating unit to the projector using the M4 x 10 mm screws supplied (x3).a Place the plate unit on the projector.Align the pins (2 points) on the projector with the holes on the plate unit.b Secure the plate unit to the projector using the M4 x 10 mm screws supplied (x4).Attaching the Projector to the Lighting TrackAttaching the Stopper Unita Loosen the nut for the stopper unit.Loosen until the nut reached the end of the rotating shaft.b Insert the rotating shaft of the stopper unit into the groove on the lighting track.Push the rotating shaft up so that the tip of the shaft fits into the duct.c Rotate the stopper unit 90 degrees.The rotating shaft for the stopper unit fits into the groove on the lighting track.d Push up the stopper unit to insert the protruding section into the groove on the lightingtrack.e Completely tighten the nut for the stopper unit to secure the lighting track and the stopperunit.a Attach the hook on the plate unit to the stopper unit.b Insert the protruding section on the rotating unit into the groove on the lighting track.c Rotate the lever of the rotating unit 90 degrees clockwise.Rotate so that the screw hole positions overlap as shown in the following image.d Secure the lever for the rotating unit with the M4 x 10 mm screw (x1).Secure using the screw removed in step 2 from "Attaching the Rotating Unit" p.8.e Secure the plate unit to the stopper unit using the M4 x 10 mm screws supplied (x2).f Attach the stopper cover to the stopper unit.Press in the stopper unit tabs until they snap into the stopper cover.Connecting Cablesa Connect the power adapter supplied to the projector's power inlet.b Connect the power adapter to the lighting track.c Connect the necessary cables and the SD card to the projector's interface.Check the Projector's User's Guide for information on the connection ports.dInstalling the Safety WireInstall the safety wire supplied to the projector to prevent the projector from falling.a Attach the wire hook mount supplied with the projector to the ceiling.c•When installing the wire hook mount, use commercially available wood screws with a nominal diameter of 3.8 mm (0.15 inch).•Make sure that the wood screws enter at least 20 mm (0.8 inch) into the ceiling's underlay. b Loosen the carabiner for the safety wire supplied with the projector.c Insert the loosened carabiner through the hole in the plate unit, and then tighten it.d Attach the carabiner for the safety wire to the wire hook mount attached to the ceiling.SpecificationFigures of Installation DimensionsThe following provides the dimensions for the EV-100/105.[Unit: mm/inches]150 / 5.9Width of top of projectorVertical width of top of projectorHeight from ceiling to top of projectorHeight from ceiling to bottom of projector©SEIKO EPSON CORPORATION 2018. All rights reserved.。
Epson PowerLite U50 WUXGA 3LCD 无线投影仪说明书

EducationSPECIFICATION SHEETSpecification Sheet | Page 1 of 2PowerLite ®U50 WUXGA 3LCD Wireless ProjectorWUXGA classroom projector with up to a 10,000-hour lamp life in Normal Mode 1.Ultra bright, vivid color — 3,700 lumens color/white brightness 2; advanced 3-chip, 3CLD technologyAmazing, widescreen images — native WUXGA resolution (1920 x 1200)Ultra long-life lamp — up to a 10,000-hour lamp life in Normal Mode; up to 17,000 hours in ECO Mode 1Easy classroom collaboration — integrated wireless networking with enterprise-level securityWireless sharing with Epson iProjection ™3 — connect up to 50 devices, includingChromebook ™, iOS ®, Android TM , Mac ® and PC screens; simultaneously display content from up to four devices 3Easy maintenance and remarkable dust handling — up to 10,000-hour filter cycle (20,000 hours in ECO Mode)4Remote management and control tools — compatible with Crestron ®, AMX ®, PJLink and moreSimple setup and positioning flexibility — 1.2x optical zoom, ± 30 degrees horizontal and vertical keystone correctionVersatile connectivity — 2x HDMI ® supports multiple high-definition A/V devices Powerful sound to engage every student — built-in 5 W speaker/educationEpson ProjectorsProjector shown with mount.Mount sold separately.Specification Sheet | Page 2 of 2Epson America, Inc.3840 Kilroy Airport Way, Long Beach, CA 90806Epson Canada Limited185 Renfrew Drive, Markham, Ontario L3R 6G3 www.epson.ca(Zoom: Wide)Keystone Correction (Automatic) Vertical: ± 30 degrees Horizontal: ± 30 degreesUSB Plug ’n Play Projector is compatible with PC and Mac computersContrast Ratio Up to 16,000:1 (Auto Iris on)Auto Iris High Speed/Normal/Off (Dynamic, Cinema only)Color Reproduction Up to 1.07 billion colorsWireless SpecificationsSupported Security Modes Quick Mode: OPEN, WPA2-PSKAdvanced Mode: OPEN, WPA/WPA2-PSK, WPA/WPA2-EAP Supported EAP Type: PEAP , PEAP-TLS, EAP-TLS, EAP-Fast, LEAPSupported SpeedsIEEE 802.11g (2.4 GHz): 54 Mbps*IEEE 802.11n (2.4 GHz): 130 Mbps* IEEE 802.11b (2.4 GHz): 11 Mbps**These modes and actual data throughputs depend on the supported wireless mode of the source devices and/or environment.Projection LensType Optical Zoom (Manual)/Focus (Manual)F-number 1.50 – 1.71Focal Length 20.42 – 24.50 mm Zoom Ratio 1 – 1.2(5 °C to 35 °C)Power Supply Voltage 100 – 240 V AC ±10%, 50/60 Hz Power Consumption 298 W (Normal Mode)226 W (ECO Mode)2.0 W Standby (Communication On) 0.3 W Standby (Communication Off)Fan Noise 37 dB (Normal Mode), 28 dB (ECO Mode)Security Kensington-style lock provisionDimensions (W x D x H)Including Feet 14.3" x 9.7" x 3.7" Excluding Feet 14.3" x 9.7" x 3.4"Weight 6.83 lb (3.1 kg)Remote ControlFeatures Brightness, Contrast, Tint, Saturation, Sharpness, Input Signal, Sync, Tracking, Position, Color Temperature, Volume, Split Screen 5Operating Angle Right/left: ± 30 degrees, Upper/lower: ± 30 Operating Distance Front/rear: 22.96 ft (7 m)Eco FeaturesRoHS compliant Recyclable product 6Epson America, Inc. is a SmartWay ® Transport Partner 7Service Programs 2-year projector limited warranty, Epson Road Service Program, PrivateLine ® dedicated toll-free support and 90-day lamp limited warrantyWhat’s in the BoxPowerLite U50 projector, remote control, batteries, power cable, computer cable (VGA), warranty card, Quick Setup SheetOrdering InformationPowerLite U50 ProjectorV11H952020Replacement Lamp (ELPLP97) V13H010L97Replacement Filter (ELPAF59) V13H134A59PowerLite Pilot ™ III (ELPCB03)V12H927020Universal Projector Mount (ELPMBPJG) V12H808001Ceiling Mount (ELPMB60)V12H963010Lighting Track Mount (ELPMB61)V12H964020Specifications and terms are subject to change without notice. EPSON, and PowerLite are registered trademarks, EPSON Exceed Y our Vision is a registered logomark and Better Products for a Better Future and Epson iProjection are trademarks of Seiko Epson Corporation. PrivateLine is a registered trademark, Pilot is a trademark and Epson Connection is a service mark of Epson America, Inc. Mac is a trademark of Apple Inc., registered in the U.S. and other countries. Android and Chromebook are trademarks ofGoogle LLC. SmartWay is a registered trademark of the U.S. Environmental Protection Agency. All other product and brand names are trademarks and/or registered trademarks of their respective companies. Epson disclaims any and all rights in these marks. Copyright 2019 Epson America, Inc. Com-SS-Oct-13 CPD-56871R1 6/191 Actual lamp life will vary depending on mode selected, environment conditions and usage. Lamp brightness decreases over time. The lamp comes with a 90-day limited warranty. |2 Color brightness (color light output) and white brightness (white light output) will vary depending on usage conditions. Color light output measured in accordance with IDMS 15.4; white light output measured in accordance with ISO 21118. |3 For wireless functionality, including via the Epson iProjection App, the projector must be configured on a network, either through the Ethernet port on the projector (check model specifications for availability) or via a wireless connection. Not all Epson projectors are able to be networked. The Epson iProjection App does not support all files and formats. See for details. |4 10,000 hours is the estimated life of the air filter when the projector is used in Normal Mode in an ordinary environment. Actual hours may vary depending on mode and usage environment. |5 Split Screen feature requires remote control. Consult your user manual for input combinations. |6 For convenient and reasonable recycling options, visit /recycle |7 SmartWay is an innovative partnership of the U.S. Environmental Protection Agency that reduces greenhouse gases and other air pollutants and improves fuel efficiency.Learn more about how our products can empower your institution. Visit us at /foreducation/educationContact:。
投影仪正确使用方法及投影仪

投影仪正确使用方法及投影仪The manuscript was revised on the evening of 2021投影仪正确使用方法及注意事项多媒体投影机是一种贵重的教学设备,使用和保养中必须养成良好习惯,严格按操作要求去做,如若操作不当,就会给投影机带来致命损坏。
一、开机:开启设备前,先打开电源插座开关,后开设备。
1.在连接好电脑之后,先打开头投影机,再打开电脑,尤其是windowsXP系统的机器。
2.投影仪开机时,指示灯闪烁说明设备处于启动状态,当指示灯不再闪烁时,方可进行下一步操作。
开机时,机器有个预热的过程,大概有10秒钟。
在这期间,千万不要以为投影仪还没有工作而反复按压启动键,频繁开机产生的冲击电流会影响灯泡的使用寿命。
3.安装银幕的,放下银幕时,银幕开关掷于向下,放下银幕,放到最低后,一定要记得把银幕开关掷于中间停止位置。
(如学校通用技术教室)二、使用:严禁反复开关机,注意多进行画面切换。
1.快速反复开光投影机会损坏灯泡,缩短灯泡寿命,因此平时尽量减少开关机次数。
关机后请至少等待5分钟再打开投影机。
在使用过程中,如出现意外断电却仍需启动投影仪的情况时,要等投影机冷却5—10分钟后,再次启动。
2.连续使用时间不宜过长,一般控制在4小时以内,夏季高温环境中,使用时间应再短些。
3.使用笔记本电脑时,需要链接电源线,防止中途电源用完,而导致投影机灯泡烧坏。
4.开机后,要注意不断切换画面以保护投影机灯泡,不然会使LCD 板或DMD 板内部局部过热,造成永久性损坏。
5.画面不清楚时,可通过调节投影机上的光圈进行调整。
6.在投影机使用过程若要移动,需轻轻移动,以免振动造成内部部件损坏。
附:投影机使用误区:①开大会时,长时间固定一个标题投影在大屏幕上。
②上课提前小时开机并固定一个画面不动。
③上课中间固定一个画面超过15分钟不切换画面。
④下课后忘记关闭多媒体投影机。
三、关机:关闭设备,先关闭各设备电源,等投影机自动冷却再后关闭插座电源,用遥控器关闭电源(<ON-OFF>键),指示灯不闪烁时才能关闭投影仪。
EPSON 20,000-Lumen 3LCD 激光投影仪说明书

Large VenueSPECIFICATION SHEETSpecification Sheet | Page 1 of 2/largevenueEB-PU2120W 20,000-Lumen 3LCD Laser Projector with 4K EnhancementThe world’s smallest and lightest 20,000-lumen projector 2.The world's smallest and lightest 20,000-lumen projector 2 — produces incredibly bright images from a light and compact bodyIncredible color — Epson ® 3-chip 3LCD technology produces 20,000 lumens of equal white and color brightness 1WUXGA with 4K Enhancement 3 — accepts 4K content and delivers up to 4.6 million pixels on-screen for an incredibly crisp and vibrant image Long-lasting laser light source — 20,000-hour virtually maintenance-free laser light source 4Simplified installation — 9 optional powered lenses (sold separately), including an ultra short-throw .35 throw lens with unique zero offset design, provide enhanced flexibility and convenience during installationEngineered for reliability — hermetically sealed optical engine offers high dust resistance while filterless cabinet and liquid cooling system support easy, low-maintenance operationOutstanding image quality — high native contrast ratio produces deep blacks; frame interpolation delivers realistic moving images; HDR support 5 and scene adaptive gamma correction for true-to-life imagesFast installation — built-in NFC functionality 6 to streamline multi-projector installations using the easy-to-use Epson Projector Configuration Tool (EPCT)7mobile app for Android ™ and iOS ®Optional attachable PixAlign™ camera — provides access to powerful features, including projector stacking assist function 8, tiling assist 8 for edge blends, color calibration 9 and screen matching 9Product shown with lens. Lens sold separately.Ultra BrightColor Brightness: 20,000 lumens 1 White Brightness: 20,000 lumens 13Specification Sheet | Page 2 of 2Specifications and terms are subject to change without notice. EPSON is a registered trademark, EPSON Exceed Your Vision is a registered logomark and Better Products for a Better Future is a trademark of Seiko Epson Corporation. PixAlign is a trademark of Epson America, Inc. and Epson Connection is a service mark of Epson America, Inc. Android is a trademark of Google LLC. SmartWay is a registered trademark of the U.S. Environmental Protection Agency. All other product and brand names are trademarks and/or registered trademarks of their respective companies. Epson disclaims any and all rights in these marks. Copyright 2022 Epson America, Inc. Com-SS-Oct-13 CPD-62053R1 3/221 Color brightness (color light output) and white brightness (white light output) will vary depending on usage conditions. Color light output measured in accordance with IDMS 15.4; white light output measured in accordance with ISO 21118. |2 Comparison based on projectors rated at 20,000 lumens. Lumens, size and weight based on the manufacturers' onlinespecifications and industry-available data as of December, 2021. Excludes other Epson models. | 3 4K Enhancement Technology shifts each pixel to surpass Full HD resolution on screen. | 4 No required maintenance for the light source for up to 20,000 hours. Approximate time until brightness decreases 50% from first usage. Measured by acceleration test assuming use of 0.04 - 0.20 mg/m 3 of particulate matter. Time varies depending on usage conditions and environment. Replacement of parts other than the light source may be required in a shorter period. | 5 HDR performance available with select third-party devices. For more information, see /hdrcompatibility | 6 NFC requires use of a device that includes NFC, and may require additional software. | 7 Internet connection required for download. Data usage fee may apply. | 8 Requires Epson external camera or built-in camera for each projector and the Epson Projector Professional Tool app. | 9 Using separate camera for each projector. | 10 IP5X-certified optical engine and laser light source module in accordance with IEC standard 60529. | 11 For convenient and reasonable recycling options, visit /recycle | 12 SmartWay is an innovative partnership of the U.S. Environmental Protection Agency that reduces greenhouse gases and other air pollutants and improves fuel efficiency.See the latest innovations from Epson Business Solutions at /forbusinessEpson America, Inc.3131 Katella Ave., Los Alamitos, CA 90720Epson Canada Limited185 Renfrew Drive, Markham, Ontario L3R 6G3 www.epson.ca/largevenueContact:Keystone Correction Vertical: ±45 degrees; horizontal: ±30 degreesIllumination Technology Laser DiodeProjection Lens (Standard)See website for information on optional lenses.Standard Lens ELPLM15 (sold separately)Type Powered shift/focus/zoom F-Number 2.0 – 2.1Focal Length 14.8 mm – 17.7 mm Zoom Ratio Optical zoom: 1.0 – 1.6Throw Ratio Range 1.57 – 2.56Lens Shift Vertical: ±60%; horizontal: ±18%Other FeaturesOperating Temperature 32 ˚ to 122 ˚F (0 ˚ to 50 ˚C)Power Supply Voltage 220 – 240 V ± 10%, 50/60 Hz AC Power Consumption 1,301 W (Normal / Custom) 899 W (Quiet / Extended)2.0 W Standby (Network Standby)0.4 W Standby (Energy Saving)Fan Noise 45 dB (Normal Mode); 37 dB (ECO)IP Rating IP5X 10Security Security cable hole, lens lock, Kensington ® lock provision, wireless LAN unit lockVideo I/OInput Signal Input Video Signal (HDMI ®, DVI-D and HDBaseT™ ports) 480i/480p/576i/576p/720p/1080i/1080p/3840 x 2160/ 4096 x 2160Weight 53.7 lb (24.4 kg)Remote ControlFeatures Power; Source Search Selection; Lens Shift/Zoom/Focus; Test Pattern Selection; A/V Mute, Freeze, User ID, Auto Aspect, Color Mode, Number, Page Up and Down, E-Zoom, Volume, Help, Menu, Enter, ESC and Pointer Functions Operating AngleFront: Right/Left: 60 to +60; Upper/Lower: +30 to 30 degrees Rear: Right/Left: 30 to +30; Upper/Lower: +40 to +10 degrees Operating Distance 98 ftEco FeaturesRoHS compliant Recyclable product 11Epson America, Inc. is a SmartWay ® Transport Partner 12SupportEpson Connection SMPre-sales support: U.S. and Canada: 800-463-7766 Internet website: Service ProgramsThe projector has a limited warranty of 3 yearsWhat’s in the BoxEB-PU2120W projector, power cable, remote control with two batteries, cable cover, user guide and warranty sheetUltra Short-Throw Lens (ELPLX02S)V12H004X0B Ultra Short-Throw Lens - White (ELPLX02WS) V12H004Y0B Short-Throw #1 Zoom Lens (ELPLU03S) V12H004UA3Short-Throw #2 Zoom Lens (ELPLU04) V12H004U04Wide-Throw #2 Zoom Lens (ELPLW06) V12H004W06Wide-Throw #3 Zoom Lens (ELPLW08) V12H004W08Middle-Throw #2 Zoom Lens (ELPLM15) V12H004M0F Middle-Throw #3 Zoom Lens (ELPLM10) V12H004M0A Middle-Throw #4 Zoom Lens (ELPLM11) V12H004M0B Long-Throw Zoom Lens (ELPLL08) V12H004L08Rigging Frame (ELPMB59)V12H996A01Wireless LAN Module (ELPAP11) V12H005A02Projector Ceiling Mount (ELPMB67) V12HA54010Suspension Adapter (ELPFP15) V12HA55010PixAlign Camera (ELPEC01)V12HA46010。
博朗IRT6500中文说明书家用版

若错误持续。
若错误再持续 电量低,但耳温计仍能正确操 作。 电量太低,无法正确测量温 度。
……将电池取出重置后再开 启。 ……请与服务中心联系。 插入新电池。
插入新电池。
产品规格:
显示的温度范围: 工作环境的温度范围: 存储温度范围: 工作和存储相对湿度: 显示分辨率:
34-42.2℃(93.2-108℉) 10-40℃(50-104℉) -25-55℃(-13-131℉) 10-95%RH(非冷凝) 0.1℃/℉
钟。
所得温度不在正常体温范围 (34-42.2℃或 93.2-108℉) HI=太高
LO=太低
确保红外探针和探头干净,且 佩戴的是全新干净的耳套。确 保耳温计插入方式正确后再 进行测温。
系统错误——自我检测不停 闪烁,且随后无准备蜂鸣音和 准备标志出现。
等待 1 分钟,直到耳温计自 动关闭,然后重新打开。
2、红外耳温枪是一种高科技,高灵敏度的测量仪,在使用过程中,对操作环境,测量方法 (是否对准耳鼓)均有较高的要求,所以容易造成人为的测量不准而非仪器本身的问题,具 体注意事项:
①在新环境下,需待 30 分钟后才能使用。
②新生儿体温相当均匀,不必将探头插入太深。 ③将耳朵向上向后拉让耳道变直,以便对准耳鼓。 a)1 周岁以内的幼儿,测量时外耳需往耳朵后方拉。 b)1 周岁以上及成人,耳朵需往上及往耳朵后方拉,以便耳道拉直。 ④拉耳朵的同时,将探测头温柔地插入耳道里,并按下开始键,显示屏会显示测量到的 温度。 ⑤为了确保读数准确,连续测量 3-5 次后请等至少 30 秒。多次测量后,取最高值为耳 温测量值。 ⑥对婴儿使用时,最好让小孩躺平,将头侧放,让耳朵朝上,对于较大的儿童或成人, 持仪器者最好站在被测人后面,稍微朝向被测人的侧面。 ⑦一定要测同一个耳朵的温度,因为左耳及右耳测到的温度可能不同。 ⑧睡醒之后请等几分钟再测温。 ⑨在下列情形里建议同一个耳朵测三次温度,取其中最高的一个作为读数。 a)出生未满 100 天的新生儿。 b)3 周岁以下、免疫系统有缺陷的儿童。 因为每个人左、右的耳道不尽相同,所以测量的温度是因人而异。一般人相差 0.5℃,亦有 相差高达 1.0℃,但有少部分人左、右耳温是相同的。
Philips 6500 Series 电视用户手册说明书

用户手册32P H F657643P F F6576Register your product and get support at /TVsupport内容1 公告 31.1 公告3 1.2 像素特性 39 智能应用 189.1 媒体中心 18 9.2 多屏互动 18 8 连接设备 178.1 使用Philips EasyLink 1710 产品信息1911.3 支持的输入信号格式 19 11.4 多媒体 1911 故障排除 2011.1 一般电视问题 20 11.2 电视频道问题 20 11.3 画面问题 2011.4 声音问题 2011.5 连接问题 2111.6 网络连接问题 21 11.7 联系我们 2112 开源 22 12.1 开源软件 22 12.2 开源执照 221.3 保修 31.4 版权 32 重要信息 42.1 安全 42.2 屏幕养护 42.3 旧产品和电池的处理 53 电视概述 63.1 控制面板 6 3.2 遥控器 64 使用更多电视功能 8 4.1 访问电视菜单 84.2 变更语言 84.3 重命名外接设备 84.4 更改声音设置 8 4.5 ECO(节能)设定 94.6 更改画面设置 9 4.7 更改画面格式 94.8 使用应用选单 104.9 使用定时器 104.10 频道编辑 104.11 更新电视软件 114.12 更改电视的偏好设定 115 媒体中心 125.1 开启互联易享观看照片与播放音乐及影片 125.2 从连接的USB储存设备中观看照片与播放音乐及影片 125.3 移除USB储存裝置 13 5.4 USB支持的音频格式 13 5.5 USB支持的视频格式 14 5.6 USB支持的图片格式 146 设定频道 15 6.1 自动搜索频道 15 6.2 手动设定频道 15 6.3 安装数字频道 157 网络设置 167.1 打开/关闭智能电视 16 7.2 网络类型 177.3 有线安装 177.4 无线安装 174.13 使用EPG 11 4.14 重置外接设备 114.15 重置到出厂时的设定 111公告1.2像素特性此液晶显示产品具有很高的彩色像素。
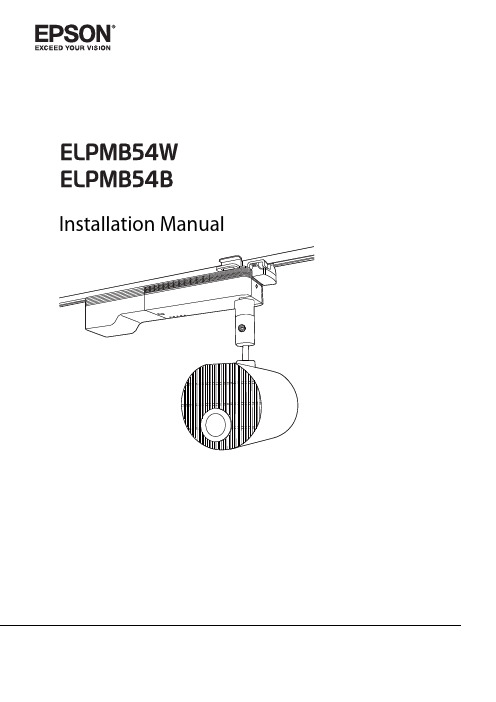
欧普图像DX606v投影机使用说明书
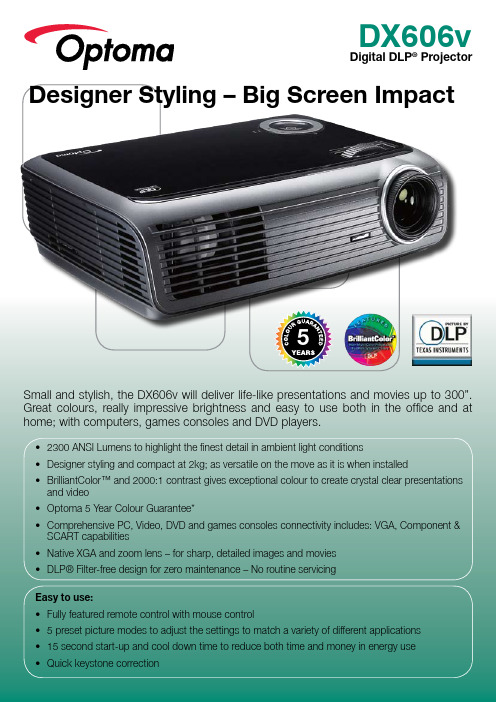
Designer Styling – Big Screen Impact589101112DX606v - Digital DLP ®ProjectorSpecifications• Express start-up & cool down • Built in speaker for multi media use • Long Lamp Life – 3000 hours standardBrilliantColor™ maximises colour accuracy fordeeper saturated coloursOptoma guarantees colour quality willremain as new for 5 years*BrilliantColor™3241DX606v Remote Control 1 Remote Mouse2 Vertical Keystone Correction3 Volume Control4Brightness Adjustment 5 Contrast Adjustment 6 AV Mute7 Direct Input Source Selection DX606v Connections8 VGA In – Component & SCART via adaptor 9 Composite 10 S-Video11 Audio In12 USB (Remote Mouse)567Optoma Europe Ltd.42 Caxton Way, Watford Business Park, Watford, Hertfordshire, UK. WD18 8QZ* Optoma guarantees that in normal use, Optoma DLP® colour quality will be indistinguishable from when new. Please note that worn lamps will give slight variance. Exclusion: (1) Guarantee is voided if the projector is subject to damage through mis-use. (2) Guarantee may be void in industrial or commercial entertainment environments where dust or smoke is particularly excessive (3) Guarantee will not apply if lamp brightness is below 50% due to wear or if the projector is not working due to other fault. **Typical lamp life achieved through testing. Will vary according to operational use and environment conditions. Copyright © 2008, Optoma Europe Ltd. All other product names and company names used herein are for identifications purposes only and may be trademarks or registered trademarks of their respective owners. *** Optoma guarantees that in normal use, the DLP® imager guarantee will retain quality for at least 5 years providing consistent pixel performance. Exclusion: (1) Guarantee is voided if the projector is subject to damage through mis-use. (2) Guarantee may be void in industrial or commercial entertainment environments where dust or smoke is particularly excessive. Errors and omissions excepted, all specifications are subject tochange without notice. DLP®, BrilliantColor™ and the DLP logo are registered trademarks of Texas Instruments.Optoma recommends Panoview screens www.panoview.eu。
- 1、下载文档前请自行甄别文档内容的完整性,平台不提供额外的编辑、内容补充、找答案等附加服务。
- 2、"仅部分预览"的文档,不可在线预览部分如存在完整性等问题,可反馈申请退款(可完整预览的文档不适用该条件!)。
- 3、如文档侵犯您的权益,请联系客服反馈,我们会尽快为您处理(人工客服工作时间:9:00-18:30)。
acto lcd projector6500投影仪说明书
一、接线
1.1设备的连接方式:
连接acto lcd projector6500投影仪电源,将acto lcd projector6500投影仪的熔断器打开,切断acto lcd projector6500投影仪的断路器,对acto lcd projector6500投影仪的变频器进行设置,在设置中输入输出用交流电抗器的电压频率,acto lcd projector6500投影仪的变频电机打开。
1.2注意事项:
使用acto lcd projector6500投影仪的多芯屏蔽电缆或双绞线连接控制端子。
靠acto lcd projector6500投影仪变频器一端的屏蔽电缆接地,应连接到变频器的接地端子PE。
布线时控制电缆远离主由路和强由线路20cm以上,避免平行走线,采用垂直布线,以防止外部干扰引起变频器误动作。
三级菜单分别为:
1、功能码组号(一级菜单);
2、功能码标号(二级菜单);
3、功能码设定值(三级菜单);说明:在三级菜单操作时,可按
PRG/ESC键或DATA/ENT键返回二级菜单。
两者的区别是:按DATA/ENT键将设定参数存入控制板,然后再返回二级菜单,并自动转移到下一个功能码;按PRG/ESC 键则直接返回二级菜单,不存储参数,并保持停留在当前功能码。
举例:将功能码 P1.01从00.00Hz更改设定为01.05Hz的示例。