海波龙(Hyperion)8.5安装说明
海波龙系统使用手册

ANINTRODUCTIONTOHYPERIONDATABASE Controller's Department3607 Administrative Services BuildingDesktop ScreenHyperion Enterprise is a database that contains data that can be used to develop and print reports. Hyperion Retrieve is an Excel interface that provides a method to pull numbers from the Hyperion database into Excel. The accounting information is entered into the Hyperion database at the central location (the Controller's Department) and then used by the branches (departments, colleges, reporting units) to manage their accounts. Hyperion allows users the flexibility to view financial information in different formats and groupings. The Enterprise Desktop serves as the starting point for all operations performed in the Hyperion Enterprise system. The eleven large icons in the lower three-fourths of the screen are Desktop icons. Actual Hyperion Database data is seen in only the Data Entry and the Reports modules. The modules that are gray are used by the database administrators.Data is loaded from the central accounting system, which is similar to information on thedepartmental class reports. The data is loaded into Hyperion at the class code level; so, not every transaction is shown. It is also at the fund group or fund account level; project-section level breakdown is not available. In the Data Entry module, it is possible to view databasecontents. In the Reports module, reports that have been created at ISU can be viewed, printed, and downloaded to Excel. Hyperion Retrieve is also available to create Excel spreadsheets that pull information from the Hyperion Database in an updateable format.Data Elements There are five data elements that can be set in Hyperion. These will determine how theinformation is selected and arranged. The data elements are Category, Period, Organization, Entity and Account.. Different combinations of data elements are used to retrieve specific data for viewing or reporting.Period Organization Entity AccountThe choices for each of these buttons can be viewed by clicking on the appropriate button on the Point of View bar.The Category designates the set of data to work with. The choices are based on the state or federal fiscal year, the current year or one of the two previous years and receipts and expenses, allocations or encumbrances.The Period designates a month and is limited to the months within the Category that is chosen. The Organization refers to the grouping of accounts. To look at one single account, the selection of the Organization will not matter. However, to look at a group or summarized information, choose Fund, Unit or Dept.The Entity refers to an ISU account number or an org code, department or unit.The data element Account corresponds to the ISU class codes. A specific class code, the class code rollup, or summary totals can be viewed.Organization and EntitiesTo see how the Organizations and Entities are organized, click on the Entities icon on the Desktop Screen. The Entities module displays the groupings that areavailable. Click on the third box on the point of view bar to see thedifferent Organizations. The choices are Consolid, Fund, Unit and Dept. Select Unit and click ok. The screen will first show an expanded list forthe Organization “Unit.”Organization Options. This box will be displayed:Select Description to see the number and description in the label field. The font type and size To collapse the list, click on the minus sign next to "Total ISU by Unit." Then click on the plus sign that appears.The plus sign indicates that a list can be expanded. Try changing the Organization to Department.Then change the Organization to Fund and look at the subaccounts. This will show how the database is organized.Setting the Data ElementsThe data elements can be set from the Desktop Screen or from any of the modules by clicking on the Point of View bar or by selecting Edit – Point of View from the menu.CategoryWhen preparing to look at the Data Entry module or a report, the Category to look at will need to be considered. The decision will be based on:- which fiscal year - state fiscal year (7/1-6/30) or federal fiscal year (10/1-9/30);- the current fiscal year (CYR) or one of the two previous fiscal years (PY1, PY2);- and the receipts and expenses (ISU or FISU), allocations(ALO or FALO) or encumbrances (ENC or FENC).Click the Category box on the point of view bar to see the options that are available.PeriodThe Period is dependent on the Category that is choosen. For example, if it is November 2001 and the Category ISU_CYR is selected, the Period that could be selected would be a month between July 2001 and June 2002.OrganizationThe Organization determines how the ISU accounts will be grouped. The choices are Unit, Department, or Fund. Refer to the Entities module, as described on pages 3-5, to see what groups are available.EntityThe Entity can be a single ISU account number or a unit, department or org code. The groups that are available will be determined by the Organization that has been selected. After clicking the Entity box on the point of view bar, a box with a list of choices will be displayed. When the Entity box is open, if both the parent and base boxes along the bottom are checked, all of the possible choices will be listed. It is possible to type the entity in the box at the top.If the check next to Base is removed and only the "Parent" box is checked, only the highest level entities (org codes, departments and units) will be displayed.Notice that the org code entity labels include the letter "D." This is necessary so that Hyperion can distinguish between similar 5-character numbers.To find an org code for a fund account, look in the Financial Management System (FM). Use option LB - Lists/Browses and type in the fund-account number. The org code will be displayed on the screen.AccountWhen in the Data Entry module, all of the Accounts (class codes) are listed. However, some reports require the selection of a specific Account.SummaryUser PreferencesTo define user preferences in Hyperion, from the Desktop select File – Preferences – User.In the box that is shown, specify preferences to control how the Enter key operates, if changes will be saved when exiting Hyperion, and how data will be displayed when using Retrieve. It is also possible to select colors.Change PasswordFrom the Desktop, select File – Change Password.Type the old password and new password in the appropriate boxes. Click ok to save the changes.Data Entry and Reports ModulesIn Hyperion Enterprise, only two modules, Data Entry and Reports, show actual data from the Hyperion Database. The Data Entry module displays a table of data for a particular Name and Category. The data is view-only.Data Entry ModuleSelect the Data Entry module by clicking the Data Entry icon on the main menu screenor by selecting the menu bar items File – Desktop – Data Entry. On the Data Entry screen below, the Category “ISU_CYR” and Entity “D013” are shown in Periodic(Monthly) view. Category, Organization, and Entity can be changed by clicking the point of view bar buttons. Since all of the Periods and Accounts are shown in Data Entry, these boxes are grayed out in the Data Entry module.In the Show Account box, if Label is selected only the class code number will be displayed. ToThe View can be designated as Periodic (Monthly) or Category(Year)-to-Date by clicking the appropriate icon on the Tool Bar. Another button that is useful is the Frequency icon; data can be viewed on a monthly, quarterly, semi-annual or annual basis.The Reports ModuleThe Reports require specification of the Category, Period, Organization, Entity and/or Account . The current settings for these data elements are visible on the Point of View bar along the top of the screen.To preview a report, specify the data elements (Category, Period, Organization, Entity and Account) and double click the report name or highlight the report name in the list and click the print preview icon. To print from the Reports main screen, highlight the report and click the print icon. It is also possible to print the report from the print preview screen, by clicking the print button. It is possible to save a report to an excel spreadsheet. To do this, from theReports main screen, select File – Export to Excel.Hyperion defaults to saving the file to the Hyperion network drive. It is best not to save files to the this drive. To designate where the file should be saved, click on the drop down arrow next to “Save in" and select which drive to save the file to. Then, specify a name for the file. When the selections have been made, click on Save. After the file has been saved, start excel and open the report.Standard ReportsReport 01 - Cash Balance Status ReportListing by ISU account number (Entity) of Allocations, Receipts, Expenditures and Cash Balances. This report is based on the parent entity; however, it will print for a single account also.Report 02 - Free Balance Status ReportListing by ISU account number of Allocations, Receipts, Expenditures, Free Balance and the percentage of the allocation that is remaining. This report is also based on the parent entity and will print for a single account.Report 03 - Dependents Class SummaryListing by ISU account number of a class code or class total (Account) for a particular month (specified by the Period) and year to date. Need to specify which Account you would like the report to be based on. This report is also based on the parent name. It will not print when a single account is specified.Report 04 - Comparative of Total ExpendituresListing by major expenditure categories of a comparison of a point in time this fiscal year to a point in time in the prior fiscal year. Based on the percentage that was expended at this same given point in time last year, a projection is made for the expected expenditure this fiscal year. This report is useful for one particular account or for a group of accounts.Report 05 - Dependents Total Expenditures SummarySimilar to Report 04, with the listing being by ISU account number. This report is useful for one particular account or for a group of accounts.Report 06 - Expenditure AnalysisListing by major expenditure categories of specified month and year to date expenditures. This report is useful for one particular account or for a group of accounts.Report 07 - Budget Status ReportListing by major expenditure categories of current allocations and expenditures and compares them to the same point in time in the previous fiscal year. This report is useful for one particular account or for a group of accounts.Report 10 - Comparative and Projected ReceiptsReceipts by class code that compares receipts this year with receipts in the previous year, projects receipts for the remainder of the current year. This report is useful for one particular account or for a group of accounts.Report 11 - Base Level Dependents Class SummaryListing by ISU account number for expenditure class (Account) specified by users selection. Need to specify which Account you would like the report to be based on. This report is based on the parent entity; it will not print when a single entity is specified.Report 12 - Budget Status Report - DetailListing by ISU account number that shows the budget and expenditures and compares them to the same point in time in the previous year. This report is also based on the parent entity. It will not print when a single entity is specified.Report 16 - Dependents Total Receipts SummaryListing by ISU account number of year to date and projected total receipts and compares them to the prior year. This report is also based on the parent entity and will print for a single entity. Report 20 - Sources and Uses ReportListing by ISU account number of expenditures, receipts and allocations. This report is also based on the parent entity and will print for a single entity.Hyperion Retrieve for ExcelHyperion Retrieve allows retrieval of data from the Hyperion Database within an Excel spreadsheet environment.Working with Hyperion Retrieve is similar to working with Excel. There are two added features: the addition of the RHXL menu bar item; and the addition of Retrieve-Enterprise functions. These features allow building various templates and worksheets using different data elements as arguments.Starting Hyperion Retrieve:- Click the Hyperion Retrieve for Excel shortcut.- A Microsoft macros box appears, warning that a file is being opened that contains macros. Click Enable Macros.- A box appears prompting for a User Name and Password.- After login, a standard Excel screen appears with RHXL added to the Menu Bar.RHXLThe RHXL menu bar item is used to select and change the data elements Entity, Category, Account, Period, and Frequency. The data element Organization is not used in Retrieve-Hyperion because all of the Entities are available. To change the data elements, click RHXL on the Menu bar. A drop-down list will appear. The Change Application option is available; however, there is currently only one application. The values set here for the data elements are used as arguments in Retrieve-Enterprise Functions (as described later).Hyperion Retrieve FunctionsRetrieve functions are used to retrieve and manipulate different types of Hyperion Database data. Retrieve functions are similar to standard Excel functions except their arguments relate specifically to Hyperion Data Elements.Every Retrieve function is followed by a list of arguments that identifies the data needed from the Hyperion Database. Some of the functions currently available are listed in the following table. In Excel an equal sign (=) must precede each function. The function’s arguments are enclosed in parentheses. The arguments may be either text that is enclosed in double quotation marks (e.g. “7011215”), or a cell reference that is not enclosed in double quotation marks (e.g. B4).Some of the Retrieve functions that are useful are outlined below.Function Purpose SyntaxHPCDE Category Description - Displays the description for aspecified Category.=HPCDE("Category")HPFNA First Entity Description - Displays the first Entitydescription for a specified Entity.=HPFNA("Entity")HPFUL Entity Description- Displays the description for aspecified Entity.=HPFUL("Entity”)HPHEA Account Description- Displays the description for aspecified Account.=HPHEA("Account")HPHMJ Major Account Description- Displays the description ofthe major Account for a specified Account.=HPHMJ(“Account”)HPVAL Data Value- Displays the latest Hyperion data for a specified Entity, Category, Account, Period, andFrequency. =HPVAL("Entity","Category", "Account","Date","Frequency")A Sample WorksheetThis section shows how to build a sample Hyperion Retrieve worksheet to get the year-to-date total expenditure on August 31, 2001 for Entity "7011215".First, open Hyperion Retrieve and set up a worksheet similar to the one below.Move the cursor to cell B3 and select the Change Category RHXL menu bar item.Next a dialog box appears. The selectable Categories are shown.Highlight ISU_CYR (June 30 fiscal year) and click OK. ISU_CYR is copied to cell B3.- Change Frequency to "M.YTD" in cell B4.- Change Entity to "7011215" in cell B2.- Change Account to "TotExp" in cell A8.- Change Period to "8/31/2001" in cell C7(use the RHXL menu bar similar to changing Category).All of these items can be typed directly into the appropriate cells if you know the exact format used in Hyperion. However, the RHXL menu bar can be used to provide a list of available items. One reminder is that when Entities or Accounts start with zero (i.e, 0010001, 001, 010, etc) a '(single quote) must be typed before the 0’s. Otherwise the leading 0’s are removed. - The necessary data elements have now been entered.- Now use the Retrieve functions to get the needed information.In this example, the Entity description should appear in cell C2, the Account's description in cell B8, and the Year-To-Date Total Expenditures amount in cell C8.Move the cursor to cell C2 and select Menu Bar item Insert/Function to get the Entity description.Highlight Hyperion Retrieve in the Function Category list (it's at the end of the list).The right side of the dialog box shows all available functions for Retrieve. Descriptions for some of these functions are shown in an earlier section.Highlight HPFUL to find an Entity's description, and click the Next button.Another box appears.Position the cursor in the Entity field. To move the formula box out of the way, position the mouse pointer anywhere in the gray area of the box, click and drag the box. Next highlight cell B2 in the worksheet. Click the OK button.The description of Entity "7011215" appears in cell C2.Perform similar actions to get the Account description in cell B8. Use function HPHEA instead of HPFUL. The result is shown.Use function HPVAL to get the Year-To-date Total Expenditures on 8/31/2001 for Entity "7011215". The figure below shows the required arguments for function HPVAL. Cell references (ex. B2, B3, A8, etc) can be used instead of actual values (7011215, ISU_CYR, TotExp, etc). Using cell references is usually faster but actual values can be entered instead if they are enclosed in quotation marks.The figure below shows the results of the sample.SAVING HYPERION RETRIEVE SPREADSHEETSThe "File/Save As" Menu Bar option must be used the first time a spreadsheet is saved. Save the Hyperion Retrieve spreadsheets in drives and directories where your work is normally saved.。
中国信息化全面预算管理软件“十佳”品牌揭晓

2023中国信息化全面预算管理软件“十佳”品牌揭晓2023年,我国全面预算管理信息化产业迎来了高速发展,全面预算软件旳应用与推广,弥补了我国管理信息化领域旳一项空白,也是提高我国企业信息化竞争力旳重要手段。
全面预算管理信息化旳应用与普及,让我国信息化产业建设重现曙光!回忆过去,我国企业信息化建设之路似一条长征路,漫长而又艰苦,当OA、MRP、ERP、CRM、协同软件、SCM等多种管理和应用软件纷纷走进企业时,我们仍然看不到信息化旳理想效果,仍然进入不了信息化旳最高境界。
为何?专家在问,企业在问,厂商在问。
不是我们软件无用,而是我国旳企业数量太庞大、需求太复杂;不是我们旳产品不好,而是我们旳企业行为约束力太差,有章不循,无章可循;不是我们旳技术落后,而是我们旳企业积累太少、管理制度和管理措施太缺,人治不小于法治旳现象比比皆是;为了让企业信息化见效,为了让企业领导偿到信息化带来旳甜头,全面预算管理软件将与其他管理软件分工配合、协同作战,深入企业管理虎穴,将从“事前、事中预算、过程控制、事后分析、预警决策”等不一样旳角度切入信息化管理与应用旳最深层次,通过集成ERP、财务软件、OA、BI/KM 等系统和数据,实现企业信息化目旳。
全面预算管理软件旳介入为我国成长旳企业信息化市场注入了新旳活力。
这是一场风暴,是一场产品技术风暴,更是一场运用全面预算管理软件引起旳企业管理变革旳风暴。
为此,我国专业管理网站IT863网联合中国软件行业协会、中国计算机顾客协会、北京信息产业协会等专业行业协会与组织,历经2个半月时间,对IT863网站近1739家目旳企业顾客进行了网络调查,从抽样调研旳企业客户需求数据分析来看,58%旳被调查企业认为,海波龙、东华厚盾、用友、金算盘、金蝶、浪潮通软、北京诺亚舟、北京久其、SAP、上海复旦天翼等10家厂商旳软件产品及服务很有竞争力,一致推荐这些品牌为顾客承认旳品牌,从而上述品牌一举获得2023信息化“十佳”全面预算管理软件荣誉称号。
WebSphere8安装说明

WebSphere8安装说明yangmg目录1.环境所需软件或工具准备 ............................................................. 错误!未定义书签。
2.WebSphereApplicationServer安装步骤...................................... 错误!未定义书签。
2.1安装Installation Manager ....................................................... 错误!未定义书签。
2.2安装WebSphere Application Server ....................................... 错误!未定义书签。
2.2.1运行Installation Manager................................................ 错误!未定义书签。
2.2.2添加存储库 ...................................................................... 错误!未定义书签。
2.2.3安装WebSphere Application Server................................ 错误!未定义书签。
2.3配置WebSphere Application Server ....................................... 错误!未定义书签。
2.3.1创建概要文件 .................................................................. 错误!未定义书签。
2.3.2启动控制台完成整个安装过程 ...................................... 错误!未定义书签。
海波龙Planning_功能介绍

Oracle EPM 全面预算解决方案介绍
袁海龙 Oracle EPM Senior Sale Consultant
日程
• 绩效管理解决方案概述 • Oracle’s Hyperion Planning 计划预算解决方案
• Demo • Q&A • Break
3
Oracle’s Hyperion 绩效管理解决方案概述:
许多级签批和审查 ▪ 提供流程审批的完整记录
和审计线索 ▪ 改进沟通、协作计划和决
策过程,缩短计划周期时间
19
满足国内客户灵活、复杂的审批流程
多层次预算流程的循环
▪ 跟踪状态并识别预算所有 者
▪ 管理计划进度 ▪ 电子邮件通知和预警 ▪ 支持复杂的组织结构,允
许多级签批和审查 ▪ 提供流程审批的完整记录
Sales Plans
Marketing Plans
Project Plans
IT Plans
Hyperion Planning Application Essbase OLAP Server
Data Warehouses
Transactional Systems
Performance Management Applications
与ERP系统设置SSO(单点登录) 提高用户工作效率
14
预算编制-灵活的Web界面
•Planning支持按目 录树的方式组织预
算表; •同时支持任务列表, 对不同角色用户定 义不同任务列表,
提高工作效率
15
预算编制-灵活的Web界面
•可直接输入文本和 日期
•众多输入辅助工具 (指导、附注、分 摊到月等)
Oracle’s Hyperion Planning 计划预算解决方案
图解光盘安装海蜘蛛V 8.0正式版
3.1. 通过光盘安装海蜘蛛V8 正式版3.1.1. 刻录ISO到光盘3.1.1.1. 校验MD5码先下载路由系统的ISO镜像文件(以 .iso 结尾),为了保证您所下载的文件的完整性,建议在下载完成后对其进行MD5 校验,以确保下载文件的完整性,否则错误的ISO文件可能会导致安装无法正常进行。
小知识--- 什么是MD5 ?MD5 是信息-摘要算法的缩写,被广泛用于加密和解密技术上,它可以说是文件的“数字指纹”。
任何一个文件,都有且只有一个独一无二的MD5信息值,并且如果这个文件被修改过,它的MD5值也将随之改变。
因此,我们可以通过对比同一文件的MD5值,来校验这个文件是否被“篡改” 过。
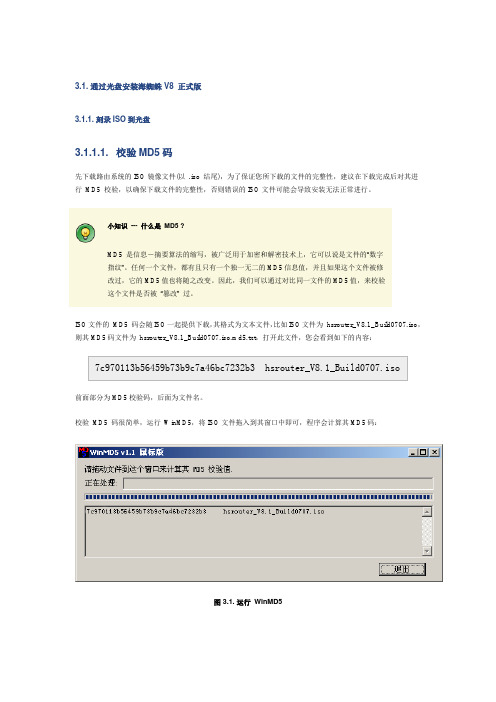
ISO文件的MD5 码会随ISO一起提供下载,其格式为文本文件,比如ISO文件为hsrouter_V8.1_Build0707.iso,则其MD5码文件为hsrouter_V8.1_Build0707.iso.md5.txt,打开此文件,您会看到如下的内容:前面部分为MD5校验码,后面为文件名。
校验MD5 码很简单,运行WinMD5,将ISO文件拖入到其窗口中即可,程序会计算其MD5码:图 3.1. 运行WinMD5上图中可以看到校验得到的MD5码:7c970113b56459b73b9c7a46bc7232b3 将此值与hsrouter_V8.1_Build0707.iso.md5.txt文件中的值进行对比,如果相同,则表明下载的文件是完整的,否则您需要重新下载,并重复上述MD5校验步骤。
这里推荐使用ONES 或ImgBurn 刻录ISO文件,此工具体积小巧、操作简单方便,且为中文免费绿色软件。
这两款刻录软件的使用方法很简单,只需几步即可轻松完成刻录。
重要刻录ISO文件时,请选用镜像模式刻录(即直接刻录ISO镜像),请勿将ISO文件解压再刻录,否则刻录后的光盘将无法启动,或导致安装时出现不可预知的错误。
3.1.1.2. 使用ONES 刻录ISO 文件第一步:运行ONES,选择“刻录常见映像”图 3.2. 运行ONES第二步:选择ISO文件,速度选择“Medium”(中等),点击“刻录”按钮开始刻录图 3.3. ONES开始刻录第三步:等待刻录完成即可3.1.1.3. 使用ImgBurn 刻录ISO文件第一步:运行ImgBurn,选择ISO文件位置图 3.4. 运行ImgBurn第二步:放入空白刻录盘,点击“写入”图标开始刻录图 3.5. ImgBurn开始刻录最后,等待光盘刻录完成即可。
Smartview-11版本操作使用说明-V2011.1

Smartview-11版本操作说明大唐联通项目组2010年10月一、海波龙Smartview介绍Smartview是海波龙公司开发的合并报表系统与OFFICE连接的软件。
安装Smartview后,可通过Smartview程序直接连接合并报表系统的数据库,根据使用者的用户权限将系统数据传出至EXCEL。
Smart View 面板通过 Smart View 面板,您可以管理数据源连接、访问数据和任务列表以及创建报表。
Smart View 面板从 Smart View 功能区打开,默认情况下显示在 Microsoft Office 应用程序的右侧。
您可以通过标题栏上的向下箭头对 Smart View 面板的位置和大小进行调整,或者关闭面板。
Smart View 面板包含下列窗格:•主页:包含一个面板,其中显示指向“共享连接”和“专用连接”的链接,以及最近使用项目的列表(如即席网格、数据表单和任务)。
您可以单击它们建立连接。
•共享连接:包含一个显示Oracle Hyperion® Shared Services 提供的可用连接的下拉菜单和一个显示当前选定连接的内容的树形视图。
•专用连接:包含一个显示本地计算机上保存的可用连接的下拉菜单和一个显示当前选定连接的内容的树形视图。
您还可以在此处输入 URL 直接连接到数据源。
•任务列表:任务的树列表,您可通过该列表管理任务。
只有当您从“共享连接”或“专用连接”中选择某个任务列表时,此窗格才会打开。
二、下载安装说明2.1、在IE浏览器中输入:http:// 10.192.137.19:19000/workspace/index.jsp打开登录页面。
2.2、输入用户名、密码。
登录进入以下页面。
2.3、点击“工具”按钮出现下拉框,找到“安装”再点击,出现下拉框,选择Smart view(s)点击。
2.4、点击Smart view(s)后,出现下载保存页面。
HYPERION服务组件安装说明

HYPERION服务组件安装说明2008 .03目录1.服务组件整体结构 (3)1.1.服务器端依赖结构图 (3)1.2.客户端依赖结构图 (4)2.安装的次序 (4)2.1.服务器端安装次序 (4)2.2.客户端安装次序 (52)3.启动的次序 (71)3.1.服务器端启动次序 (71)3.2.客户端启动次序 (72)1.服务组件整体结构1.1. 服务器端依赖结构图1.1.1.对应安装路径HLS授权服务器:hls_92030_windowsHSS共享服务器:hss_92030_windowsSVCS基础平台服务器:hbi92030_svcs_windowsUISCVS数据访问加载服务器:hbi92030_uisvcs_windows ESSBASE多维数据库服务器:esb_92030_server_windows_zh.exe1.2. 客户端依赖结构图1.2.1.对应安装路径HLS授权服务器:hls_92030_windowsHSS共享服务器:hss_92030_windowsAAS管理服务控制台:aas_92030_windows.exeBRIO客户端:hbi92030_client_windowsESSBASE客户端:esb_92030_client_windows_zh.exe2.安装的次序2.1. 服务器端安装次序根据服务器端依赖结构图,安装次序如下:2.1.1.HLS授权服务器安装2.1.1.1. 安装前的准备首先将HLS服务器windows下的安装介质hls_92030_windows文件夹拷贝到服务器D盘根目录,如下图:将2个注册文件拷贝到服务器目录中,如下图:2.1.1.2. 安装步骤运行安装介质文件夹下的setup.exe安装文件选择语言为:简体中文,确定屏幕将出现初始化向导界面,如下图:等待初始化完毕,点击“下一步”按钮,选择“美国”点击“下一步”按钮将海波龙的安装目录从默认的C盘改为D盘,如下图:在“我已收到许可证文件”一项前打勾,并选择许可证文件的位置为前期安装准备中拷贝的许可证文件的位置,选择的许可证为:HS9_MasterLicenseFile.lic 如下图所示:选择将HLS服务器做为windows服务安装,如下图:进入安装过程,如下图所示:安装完成后,选择启动配置程序并点“完成按钮”。
WAS8.5安装部署文档(AIX图形化安装)

WAS8安装部署文档(图形化安装)二〇一二年十二月文档信息编写者施呈柳编写日期2012-12-18 审核者审核日期批准人批准日期变更历史版本号日期变更描述批准1.00 2012-12-18 新建文档2012-1-18 修改目录1安装前的准备工作 (3)1.1安装环境: (3)1.2主机名不能带”-”等非法字符 (3)1.3集群环境,各服务器的时间相差不要超过2分钟 (4)1.4防火墙要开放相应的端口(实际环境可能不一要,登录WAS控制台查看各个应用服务器及NODEAGENT的端口) (4)1.5关闭LINUX的增强安全策略SELINUX ......... 错误!未定义书签。
1.6创建was用户及组 (5)2集成环境约定 (5)2.1磁盘规划 (5)3部署结构图 (5)4安装IM和WAS (6)4.1安装IM (6)4.2通过IM安装WAS (8)4.3安装WAS补丁............................. 错误!未定义书签。
5创建概要文件 (20)5.1.1192.111.1.48服务器上创建DM概要文件 (20)5.1.2192.111.1.107、192.111.1.48服务器上创建应用服务器概要文件并将节点联合到WAS控制台中 (21)5.1.2.1192.111.1.107服务器: (21)5.1.2.2192.111.1.48服务器: (24)6创建数据源 (8)6.1创建JDBC提供程序........................ 错误!未定义书签。
6.2创建J2C认证............................. 错误!未定义书签。
6.3创建数据源............................... 错误!未定义书签。
7WAS优化 . (33)7.1Jvm内存设置 (33)7.2Web container (34)7.3JDBC连接池 (34)8日常维护 (34)8.1192.111.1.48服务器 (34)8.2192.111.1.107服务器 (35)1安装前的准备工作1.1安装环境:操作系统AIX6.1,中间件:websphere 8.5Was8.5操作系统要求1.2操作系统检查,相关组件是否安装•atk-1.12.3-2.aix5.2.ppc.rpm•cairo-1.8.8-1.aix5.2.ppc.rpm•expat-2.0.1-1.aix5.2.ppc.rpm•fontconfig-2.4.2-1.aix5.2.ppc.rpm•freetype2-2.3.9-1.aix5.2.ppc.rpm•gettext-0.10.40-6.aix5.1.ppc.rpm•glib2-2.12.4-2.aix5.2.ppc.rpm•gtk2-2.10.6-4.aix5.2.ppc.rpm•libjpeg-6b-6.aix5.1.ppc.rpm•libpng-1.2.32-2.aix5.2.ppc.rpm•libtiff-3.8.2-1.aix5.2.ppc.rpm•pango-1.14.5-4.aix5.2.ppc.rpm•xcursor-1.1.7-3.aix5.2.ppc.rpm•xft-2.1.6-5.aix5.1.ppc.rpm•xrender-0.9.1-3.aix5.2.ppc.rpm•zlib-1.2.3-3.aix5.1.ppc.rpm•pixman-0.12.0-3.aix5.2.ppc.rpmrpm -ivh expat-2.0.1-1.aix5.2.ppc.rpmrpm -ivh zlib-1.2.3-3.aix5.1.ppc.rpmrpm -ivh freetype2-2.3.9-1.aix5.2.ppc.rpmrpm -ivh fontconfig-2.4.2-1.aix5.2.ppc.rpmrpm -ivh gettext-0.10.40-6.aix5.1.ppc.rpmrpm -ivh glib2-2.12.4-2.aix5.2.ppc.rpmrpm -ivh libjpeg-6b-6.aix5.1.ppc.rpmrpm -ivh libpng-1.2.32-2.aix5.2.ppc.rpmrpm -ivh libtiff-3.8.2-1.aix5.2.ppc.rpmrpm -ivh xcursor-1.1.7-3.aix5.2.ppc.rpmrpm -ivh xft-2.1.6-5.aix5.1.ppc.rpmrpm -ivh xrender-0.9.1-3.aix5.2.ppc.rpmrpm -ivh pixman-0.12.0-3.aix5.2.ppc.rpmrpm -ivh cairo-1.8.8-1.aix5.2.ppc.rpmrpm -ivh pango-1.14.5-4.aix5.2.ppc.rpmrpm -ivh atk-1.12.3-2.aix5.2.ppc.rpmrpm -ivh gtk2-2.10.6-4.aix5.2.ppc.rpm1.3主机名不能带”-”等非法字符编辑HOSTS文件,添加相应的主机名和IP,修改好后,PING主机名,是否使相通。
- 1、下载文档前请自行甄别文档内容的完整性,平台不提供额外的编辑、内容补充、找答案等附加服务。
- 2、"仅部分预览"的文档,不可在线预览部分如存在完整性等问题,可反馈申请退款(可完整预览的文档不适用该条件!)。
- 3、如文档侵犯您的权益,请联系客服反馈,我们会尽快为您处理(人工客服工作时间:9:00-18:30)。
海波龙8.5安装说明
1概述
本文以orace9i作为海波龙配置库,tomcat作为应用服务器进行说明。
2安装步骤
第一步、安装jdk1.4.2
第二步、安装oracle9i,建立海波龙配置库(要注意数据库字符集的设置,下文有详细说明),建表空间和用户
第三步、安装海波龙8.5
第四步、启动服务
3详细安装说明
3.1安装jdk1.
4.2
略
3.2安装oracle9i
说明:
1、若已安装oracle9i,请跳过此步直接到3.3
2、若未安装oracle9i。
安装时如果建立数据库,请参考3.3说明进行。
详细安装步骤请参考oracle9i安装文档,此处略
3.3建立海波龙配置库
请注意(7)的数据库库字符集设置,该步不能设置错误。
(1)选择database configuration assistant
(2)下一步
(3)选择“创建数据库”
(4)数据库类型选择“一般用途”(“General Purpose”)
(5)输入要建立的数据库服务名,此处以hp85为例
(6)使用“专用服务器模式”
(7)该步关键,请注意。
选择“字符集”Tab页。
数据库字符集选择“从字符集列表中选择”,然后在下拉列表中选
择“AL32UTF8”。
国家字符集选择“UTF8”。
(8)下一步
(9)选择“创建数据库”,完成
(10)点击“确定”,开始创建数据库的过程
(11)最后输入sys和system用户的密码,完成创建数据库的过程。
3.4建立数据库表空间和用户
可使用oracle9i的OEM工具或命令行建立,详细步骤略。
命令行参考:
--连入数据库
Sqlplus 用户/密码@服务名
--创建表空间
Create tablespace 表空间名datafile ‘数据文件路径(如d:\oracle\oradata\hp85\hp85.dbf)’size 100m;
--创建用户
Create user 用户名identified by 密码default tablespace 表空间名;
--给用户赋权限
Grant connect,dba to 用户名;
3.5安装HP8.5
(1)运行安装程序,选择安装时使用的语言
(2)下一步
(3)查看许可证
(4)输入序列号,使用Intelligence iserver:1M02-6PKEZ-7J057-UG44G或实际序列号。
(5)选择自定义安装
(6)下一步
(7)选择安装目录
(8)设置起点目录
(9)选择安装的组件,默认即可
(10)下一步
(11)设置临时目录
(12)选择配置库类型,此处选择oracle。
(13)填入oracle配置库的连接参数,用户为以上步骤中新建的用户,运行数据库的机器指数据库所在服务器地址,端口,最后是服务名。
按实际情况填写。
(14)此处可以设置海波龙配置库的用户,由于我们已经建立了数据库用户,此处填入建立好的用户名和密码。
(15)服务器端口设置,按默认即可。
(16)默认,下一步
(17)默认,下一步
(18)因为用不到邮件服务器,选择“稍后配置邮件服务器”
(19)设置缓存目录
(20)选择应用服务器类型,此处选择tomcat
(21)选择“安装并配置Tomcat servlet引擎”
(22)设置jdk的主目录,按jdk实际安装地址设置
(23)默认,下一步
(24)开始安装过程
(25)默认,下一步
(26)默认,下一步
(27)完成安装,并重启机器。
3.6启动服务
安装完成后,在系统服务中会建立三个服务,如下图
按以下步骤启动
(1)启动BrioPlatform服务。
如BrioPlatform1_ lazybone_LAZYBONE_1800
(2)启动BI服务。
如BI1_lazybone_LAZYBONE_1800
(3)启动DAS服务。
如DAS1_lazybone_LAZYBONE_1800
待这三个服务正常启动后,到海波龙安装目录下找到tomcat的启动文件startup.bat,并运行。
如D:\Hyperion\common\appServers\Tomcat\4.1.30\bin\startup.bat。
启动之后如图
4登录系统
打开IE浏览器,在地址栏中输入如下内容
http://主机名:8080/Hyperion
其中8080为tomcat的默认端口,Hyperion的大小写必须和此处一样。
打开后如图
输入用户名和密码登陆。
默认用户名和密码为:administrator
登录后界面如下图
到此确认安装成功。