移动电源摄像机说明书
欧尔法户外移动电源使用说明

欧尔法户外移动电源使用说明(原创实用版)目录1.欧尔法户外移动电源简介2.欧尔法户外移动电源使用步骤3.安全注意事项4.维护与保养5.客户服务与保修正文【欧尔法户外移动电源简介】欧尔法户外移动电源是一款专为户外活动设计的便携式电源设备,可以为您的手机、平板电脑、相机等电子设备提供便捷的充电服务。
该电源设备具有大容量、高性能、便携等特点,是户外出行的理想充电伴侣。
【欧尔法户外移动电源使用步骤】1.在使用欧尔法户外移动电源前,请先确认电源开关处于关闭状态。
2.将需要充电的电子设备连接到电源设备的输出端口。
3.打开电源开关,电源设备开始为连接的电子设备充电。
4.充电完成后,关闭电源开关,断开连接。
【安全注意事项】1.请勿将欧尔法户外移动电源置于潮湿、高温或极度寒冷的环境中,以免影响电源设备的使用寿命和性能。
2.请勿将欧尔法户外移动电源暴露在直接阳光或雨水中,以免造成损坏。
3.请勿在电源设备充电过程中使用不兼容的充电器或数据线,以免导致设备损坏。
4.请勿在电源设备充电过程中拔插其他设备,以免发生短路。
5.请勿将电源设备投入火源、水域或剧烈振动的环境中,以免造成损坏。
【维护与保养】1.请定期检查欧尔法户外移动电源的性能和外观,确保其处于良好状态。
2.如发现电源设备出现异常现象,请立即停止使用,并联系专业人员进行检查和维修。
3.长期不使用电源设备时,请将电源开关关闭,并将电源设备存放在干燥、通风、避光的环境中。
【客户服务与保修】1.如您在使用欧尔法户外移动电源过程中遇到任何问题,请随时联系我们的客户服务团队,我们将竭诚为您提供支持与帮助。
2.本产品享有一年的保修期,保修期内如出现非人为损坏的质量问题,请及时联系我们,我们将为您提供免费维修或更换服务。
通过以上内容,相信您已经了解了欧尔法户外移动电源的使用方法和注意事项。
powerbank说明书

摄像部分操作说明:1.开机短按摄像开机键一次,蓝灯长亮,机器进入待机状态。
2.录像在待机状态下(蓝灯长亮)按下功能键一次,录像指示灯绿灯慢闪3下后熄灭进入录像状态。
录像过程中按摄像按键一次,机器保存录像文件并停止录像,录像文件每20分钟自动保存一个文件。
3.拍照在待机状态下连按两次摄像按键,此时蓝色指示灯慢闪两次则就拍照一张。
4.录音在待机状态下连按三次摄像按键,此时蓝色指示灯快闪三次熄灭则进入录音中,若要停止再按一次摄像按键即可。
5.移动侦测在待机状态下连按四次摄像按键,此时蓝色指示灯均匀闪烁,检测到移动目标后蓝灯快闪三次后熄灭进入录像中,若要停止再按一次摄像按键即可。
(每1分钟保存一个文件)6.关机在待机状态下(或者其他开机的模式下面),长按摄像开机键,绿色指示灯熄灭,机器关机。
7.连接电脑读数据先开机,再通过数据线连接电脑,电脑识别可移动磁盘。
注意:关机状态下连接电脑USB数据口,默认是给机器充电,绿色指示灯长亮,充满电指示灯熄灭。
8.充电本产品可以连接到电脑USB口充电,也可以通过专用USB 5V充电器充电,关机状态下,连接摄像充电座(DC 5V 2A USB口)与充电器,绿色指示灯长亮,充满电指示灯熄灭。
9.录像文件时间设置设置时间日期以及水印的方法如下:A.开启产品电源——》连接电脑——》打开可移动磁盘——》在根目录空白处新建文本文档,重命名为“timeset.txt”。
B.打开“timeset.txt”文本文档,在里面输入,要设置时间,请按以下格式设置:2012.01.01 12:00:00 Y(N) 表示2012年元月1号12点00分00秒Y是录像文件有时间水印显示,N是录像文件无时间水印显示。
10.录像分辨率设置本机可设置4种视频分辨率:1920*1080,1280*720,640*480,320*240,根据不同的需要,可以自由设置,方法如下:编辑一个“sizeset.txt”文本文件,内容为1时,分辨率设置成320*240;内容为2时,设置成640*480;内容为3时,设置成1280*720,内容为4时,设置成1920*1080。
RunCam 3 摄像机使用手册说明书

3·包装内容电源/快门键工作状态灯麦克风 1microSD卡槽1234WiFi 状态灯WiFi/模式切换键Micro-USB接口麦克风 25678RunCam 3X 1Micro-USB线X 1USB视频电源线X 1说明书X 157861243充电状态(红色)DC 5-17VRunCam 3 电池是内置的,开机后当电池电量高于50%工作状态灯(绿色) 闪烁5次,低于50%工作状态灯(绿色) 闪烁10次,低于15%工作状态灯(绿色) 持续闪烁。
如果录制过程中电量降到0% ,摄像机将存储文件并关机。
RunCam 3 USB接口支持DC5-17V供电,建议使用手机充电器(输出5V 1A)为RunCam 3 充电。
充电时工作状态灯(红色) 常亮,约2小时充满;满电后,充电状态灯熄灭。
提示:极度寒冷的气温可能会降低电池寿命。
要在低温条件下延长电池寿命,请在使用摄像 机前将其置于温暖的地方。
警告:切勿将RunCam 3当做行车记录仪使用,会导致摄像机电池受损、引发安全隐患。
·microSD卡按照卡槽旁的图标指示插入microSD卡。
microSD卡(单独出售)要求:·microSD,microSDHC或microSDXC·10级,UHS-I级或UHS-II级·最高支持microSD 64GB卡注意事项:装卸microSD卡时请务必小心。
避免接触液体、灰尘和碎屑。
为谨慎起见,插 入或取出microSD卡前请关闭摄像机。
请参照microSD卡制造商的说明指示, 在可接受的温度范围内使用。
·连接电脑将RunCam3开机后,用USB线连接电脑,即会被电脑识别为可移动磁盘。
注意:连接电脑后若不能识别,请确认RunCam 3内有microSD卡;如不能正常读取 microSD卡内信息,请更换USB线或电脑USB接口重试。
·操作指引开机:长按电源/快门键 3秒(提示音“哔”3次)关机:长按电源/快门键 3秒(提示音“哔”5次)模式切换:开机后长按WiFi/模式切换键 ,可循环切换录像、拍照、OSD设置等三种工作模式。
迷你 DV 说明书

迷你DV使用说明书MODEL: MDC250L V2.1一、 产品简介本产品是当今首款采用内置存储器的先进摄像器。
用于数码有声视频拍摄,使用十分方便,是现代科技的完美结合。
产品操作简便,小巧精致,美观实用,便于携带,是商务、教育、安防、媒体、司法、旅游、医疗、生活等领域必备的实用工具,受到广大用户的青睐。
1、录像键(开始/停止)2、电源指示灯3、录音指示灯4、录像指示灯5、电源开关6、功能开关7、 TF卡插槽8、 USB接口9、摄像头10、麦克风11、迷你手电筒二、 操作说明1. 开机操作:将电源开关拨到“ON”处,先是红灯亮(大概2秒左右)到蓝灯或绿灯长亮即开机。
2. 开始录像:开机后,直接进入待机状态,功能开关打至VIDEO位置,蓝灯长亮,按下Start键蓝灯闪亮,录像开始。
3. 录像停止:在录像模式下,再次按Start键,则停止当前的录像,蓝灯快闪并保存录像内容,转为蓝灯长亮进入待机状态,重复第2、3点操作进入下一个片段录制。
(录像文件命名为VIDEO_001.... VIDEO_999存储在VIEDO文件夹内)。
4. 开始录音:开机后,直接进入待机状态,功能开关打至AUDIO位置,绿灯长亮,按下Start键绿灯闪亮,录音开始。
5. 录音停止:在录音模式下,再次按Start键,则停止当前的录音,绿灯快闪并保存录音内容。
6. 转为绿灯长亮进入待机状态,重复第4、5点操作进入下一个片段录制。
(录像文件命名为 AUDIO_001....AUDIO_999存储在AUDIO文件夹内)。
7. 关机:在待机状态下,将电源开关打至OFF,指示灯全灭,完成关机。
8. 连接电脑:在关机(指示灯全灭)或者VIDEO待机状态(蓝灯长亮)下时,可以做为U盘连接电脑,此时,电脑将会弹出可移动磁盘标识,录像文件保存目录为:可移动磁盘//Ucorder//VIDEO或AUDIO拔出可移动磁盘时,请点击右下角任务栏的可移动设备管理图标,在里面卸载该可移动存储设备,待系统确认可以安全拔出硬件后,再断开本产品与电脑的连接。
移动电源摄像机说明书
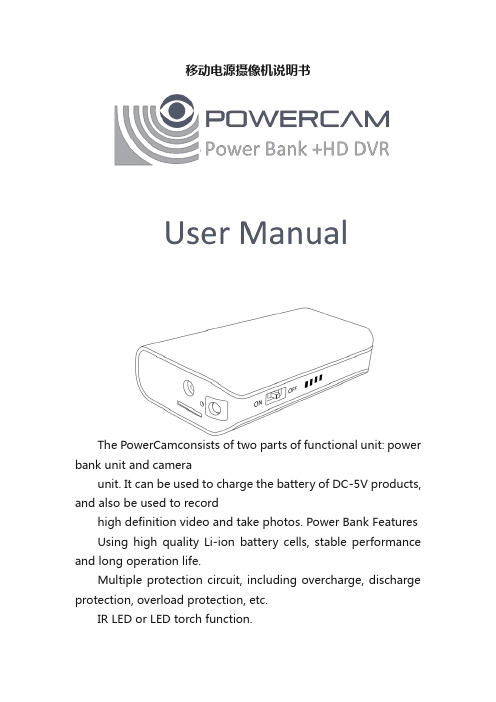
移动电源摄像机说明书The PowerCamconsists of two parts of functional unit: power bank unit and cameraunit. It can be used to charge the battery of DC-5V products, and also be used to recordhigh definition video and take photos. Power Bank Features Using high quality Li-ion battery cells, stable performance and long operation life.Multiple protection circuit, including overcharge, discharge protection, overload protection, etc.IR LED or LED torch function.Small and lightweight design, easy to carry, to meet emergency charging.Camera featuresSuper image sensor for low illumination video recording, quick light response.Full HD 1080P up to 30fps,720P up to 60fps.H.264 compression.Support up to 32GB micro SD card.RF remote control, easy operation.Integrated compact design, suitable formeeting recording, evidence recording, andoutdoor sports scenes, etc.Easy download to PC/MAC with USB plug.PowerCam LayoutPower Bank Operation1.Charging the PowerCamUse the micro USB cable to charge the PowerCam.The battery can be charged by following ways:(1). Charging from your computer’s USB.(2). Charging fromadapter’s USB.Ifthe red lightturns on, that means the PowerCam is in charge.Please wait for the red light turns off, which means the PowerCamis full of power. NOTE: When connecting with computer or adapter, it is recommended that the PowerCam is switchedoff.2.To Charge Other DevicesThe PowerCam fit for charging digital devices with DC-5V:(1).Connect your device to the USB outletof PowerCam.(2).Turn on the power of PowerCam to startcharging the device.When PowerCam’s battery close to low limit, the red indicator will light.3.Turning IR or LED Torch On/Off NOTE:This product has two configuration types: IR LED type and white-light LED type.(1).Turn on the power of PowerCam.(2).Keep push the remote control button○A 2 seconds to turn DV unit on.(3).Keep push the remote control button○C2 seconds will turn IR LED or LED torch on;and keep push the button○C2 seconds again, the IR LED or LED torch will be turned off.DVRecorder Operation1.Turning DVUnit On/OffSwitchon the power of PowerCam, Keep push the remote control button○A2 seconds will turn DV unit on. The blue indicatorwill light.Keep push the button○A 2 seconds again, theDV unit will be turned off.2.RecordingVideoTurn on the DV unit as in step 1. Keep push the remote control button○B2 seconds will start video recording, the green indicatorwill flash several times and then turn off.Keep push the button○B2 seconds again, the DV unit will stop recording, the blue indicatorwill lightand the PowerCam is in standby mode. The video streaming is divided into one file every 10 minutes.NOTE:(1). When the battery power is low, the bluelight will flash for seconds, and then the PowerCam will shut downautomatically. (2). When the memory is full, both the blue and green light will flash for seconds, and then the PowerCam will shut downautomatically.4.TakingPhotoBe sure the DV unit is turned on, short press the remote control button○B once to take a picture, the blue indicatorwill flash twice to indicatethat the picture was taken successfully.5.Setting the PowerCamConnect the PowerCamwith your computer USB port, a new removable disk will appear on the computer screen. Open the removable disk, you will find the file setup.exe under the root directory, double-click the file to run it, following window will appear:You can set date/time, frame size, videoimage quality, audiovolume, etc. After finishinglower left to save the settings. ClickdefaultSettings.Aftersafely removing the PowerCam from the computer and turn on the DV unit, the settings willtake effect.Specifications:Caution:ThePowerCam may become fairly hot during recording – this is normal. To ensure proper cooling do not block the flow of air to thecover of the PowerCam.No crash, do not open orknock thePowerCam. Do not expose them to fire, high temperatures, or water.We suggest charge with the qualifiedadaptor, if you find there is bulge or otherfaulty phenomena on PowerCam or charged device, pleasestop using it.Important:All jurisdictions have specific laws and regulations relating to the use of cameras and voice recorders. Before using any camera and/or voice recorder for any purpose it is the buyer′s responsibility to be aware of all applicable laws and regulations that prohibit or limit the use of cameras and voicerecorders, and to comply with the applicable laws and regulations.PowerCam是一款移动电源和摄像机合二为一的产品。
充电器摄像机说明书

多功能摄录充电器说明书首先对您使用本公司的产品表示感谢!在使用之前请先阅读此说明书,正确使用此产品。
为了更好的服务,本用户手册的内容可能变更。
因为产品的性能和功能而发生的变更,将不做另行通知。
一、外型、按键(图片仅供参考,请以实物为准)1:摄像头、2:指示灯孔、3:开\关机键、4:电源工作指示灯、5:USB、6:电源指示灯、二、产品简介本产品具有高清数码摄像MINI DV,TF卡存储器,可拍摄照片和高画质视屏,本产品操作简便,小巧精致,美观实用,便于携带,是家庭安防、生活等领域必备的实用工具,深受各用户的青睐。
三、操作说明1、各部件说明:1.1、指示灯说明:状态指示灯(图示2)。
开机:红灯亮。
关机:红灯闪两次熄灭USB状态:读、写U盘时,红灯快闪。
、移动侦测录像:按下(图3)按键,红灯闪烁2次,灯不亮了,就是移动侦测录像。
录像暂停:红灯长亮。
1.2、按钮说明:开、关机键(图示3):用于开机、关机、摄像。
1.3、插座说明:USB插座(图示5),用于连接电脑,进行数据传输和DC 5V输出。
1.4、摄像头:(图示1),用来拾取摄像信号。
2、开关机、摄像:把机器插入110V-220V交流电源,机器即开机(指示灯亮),初始化完后自动进入待机状态。
在待机过程中短按移动侦测按键,开始移动侦测摄像,在按下停止录像。
注:●机器为循环摄像,请注意保存磁盘里的文件,以免丢失。
●在从电源上取下本机前,请先短按开机键保存文件,以免丢失正在摄像的文件3、移动磁盘:使用本机专配的USB延长线直接连接到你的电脑USB接口上,此时电脑会弹出可移动盘标识,您也可以在“我的电脑”找到“可移动磁盘”的盘符。
当本机连接到电脑后,本机作为电脑的移动磁盘已经开始工作了,你可以非常方便的通过电脑查看、传输、拷贝、删除文件。
本机影像文件保存录为:*盘\_DCIM\100DSCIM。
需要卸载本机时,请点击右下角任务栏的可移动设备图标,在里面卸载该可移动存储设备,待系统确认可以安全拔出硬件后,再断开本机与电脑的连接注意:根据电脑配置或者系统差异,识别可移动磁盘的时间会稍有不同,请耐心等待,此期间最好不要进行摄像机的操作,以免对电脑识别硬件造成影响,如果长时间未识别到可移动磁盘,请尝试重新插入,如果仍旧无法识别该硬件,请确认你的操作系统,驱动程序、USB接口、连接线是事都正常;4、电脑网络摄像头功能:首先您必须在您的电脑上安装随机附带光盘里的摄像头驱动。
移动式摄像机使用手册

1
2
3
二、安装步骤之球形摄像机的连接(1)
1、把摄像机端引出的视 频线接在VIP X1的视 频线接口端,用于将 摄像机端获取的模拟 信号转换成数字信号, 可使其在网络上进行 传输
二、安装步骤之球形摄像机的连接(2)
2、X1的接线端子处可接 X1的电源线及球形摄 像机的控制线
二、安装步骤之球形摄像机的连接(3)
五、视频播放软件操作流程
•1 、 Archive Player 是用于播放历史档案的软件程 序,它可以从硬盘录像机中搜索到所要查看的摄 像机的录像文件,并进行回放,它还提供了录像 文档的转出和摘录功能,并可以刻录光盘在别处 使用查看。
五、视频播放软件操作流程
•2、在桌面上找到所示图标 ; •双击此图标以启动该程序(也可Windows开始菜单 或从配置管理器启动); •该程序开始作为一个为期30天的演示版程序,也 可以再无授权的情况下正常使用。
快进/快退:快进或快退录像, 按住鼠标将移动按钮移动到向右或左侧,就会以所选定的速度进行快进 或快退,把移动按钮拉到下方则可以以固定速度播放
保存快照:快照会保存在配置管理器中所设置的存储路径 打印快照:打印前开始,在打印预览中。快照打印在默认 打印机 上一个书签:在播放标记跳过到以前的书签。 添加书签:设置当前位置的书签。 下一个书签:在播放标记跳过到下一个书签。
View Help
五、视频播放软件操作流程 ◙ 查看选定的历史记录
6.1 一旦进入了从搜索结果中,播放的录像选择自动启动; 暂停/播放:使用此按钮可以暂停选定的录像和回 放再次点击恢复播放 最早的一帧:跳过到最后一帧 下一个图像:跳过到下一张画面
五、视频播放软件操作流程
6.2 其他操作和控制
Coolook移动电源使用说明书(2012年8月修订版)

Coolook移动电源使用说明书(2012年8月修订版)Best iPower for You目录功能概述 (II)使用方法 (II)所需充电电源 (II)充电指示 (III)电量指示 (III)为移动电源充电 (III)移动电源给数码产品充电 (III)提醒 (IV)名词解释 (V)开机情况 (V)关机情况 (V)电源容量 (VI)放电效率 (VI)待机电流 (VI)常见问题Q&A (VI)安全提示及高阶说明 (VIII)更换电芯 (IX)限流跳线 (XI)感谢 (XI)品牌:Coolook 型号:PB-2000输入:DC 5V 0.5A-2.5A 输出:DC 5V 2.0A尺寸:120mm x 85mm x 23mm 输入接口:DC5.5/2.1(内正外负)输出接口:双USB输出(USB-A USB-B)其他:带一条USB转DC充电线功能概述本移动电源具有超高的容量,极高的效率,电芯智能保护,具有过流、过冲、过放保护。
可为众多的数码产品提供超长的续航时间,给每一位数码用户提供最及时的便利。
可用于且不限于出差、旅行、户外、探险、停电等各种场合,为您免除意外没电的烦恼:)使用方法所需充电电源为本产品充电的充电电源的输出为DC5V,输出电压范围为DC4.6V~5.5V,可使用台式电脑,笔记本电脑USB接口或者USB转AC充电器(USB接口充电需使用随本品配套的USB转DC线);也可采用5V的DC5.5/2.1(内正外负)电源;充电电流最高可达2.5A(依据电源输出能力而定),可快速充满本移动电源,为您节约宝贵的时间。
充电指示充电过程中,指示灯会闪烁,依据充电电量越多指示灯亮起越多,让您直观了解此时电源电量,充电过程为单片机控制的先恒流后恒压的公认最快最好的充电方式,充满后指示灯全亮并停止闪烁(充电期间任何时候均可停止充电取下使用,当然未充满的话电量会有所不足,不过本品使用18650锂电芯,无需过于担心记忆效应)。
- 1、下载文档前请自行甄别文档内容的完整性,平台不提供额外的编辑、内容补充、找答案等附加服务。
- 2、"仅部分预览"的文档,不可在线预览部分如存在完整性等问题,可反馈申请退款(可完整预览的文档不适用该条件!)。
- 3、如文档侵犯您的权益,请联系客服反馈,我们会尽快为您处理(人工客服工作时间:9:00-18:30)。
The PowerCamconsists of two parts of functional unit: power bank unit and cameraunit. It can be used to charge the battery of DC-5V products, and also be used to recordhigh definition video and take photos. Power Bank FeaturesUsing high quality Li-ion battery cells, stable performance and long operation life.Multiple protection circuit, including overcharge, discharge protection, overload protection, etc.IR LED or LED torch function.Small and lightweight design, easy to carry, to meet emergency charging.Camera featuresSuper image sensor for low illumination video recording, quick light response.Full HD 1080P up to 30fps,720P up to 60fps.H.264 compression.Support up to 32GB micro SD card.RF remote control, easy operation.Integrated compact design, suitable formeeting recording, evidence recording, andoutdoor sports scenes, etc.Easy download to PC/MAC with USB plug.PowerCam LayoutPower Bank Operation1.Charging the PowerCamUse the micro USB cable to charge the PowerCam.The battery can be charged by following ways:(1). Charging from your computer’s USB.(2). Charging fromadapter’s USB.Ifthe red lightturns on, that means the PowerCam is in charge.Please wait for the red light turns off, which means the PowerCamis full of power. NOTE: When connecting with computer or adapter, it is recommended that the PowerCam is switchedoff.2.To Charge Other DevicesThe PowerCam fit for charging digital devices with DC-5V:(1).Connect your device to the USB outletof PowerCam.(2).Turn on the power of PowerCam to startcharging the device.When PowerCam’s battery close to low limit, the red indicator will light.3.Turning IR or LED Torch On/Off NOTE:This product has two configuration types: IR LED type and white-light LED type.(1).Turn on the power of PowerCam.(2).Keep push the remote control button○A 2 seconds to turn DV unit on.(3).Keep push the remote control button○C2 seconds will turn IR LED or LED torch on;and keep push the button○C2 seconds again, the IR LED or LED torch will be turned off.DVRecorder Operation1.Turning DVUnit On/OffSwitchon the power of PowerCam, Keep push the remote control button○A2 seconds will turn DV unit on. The blue indicatorwill light.Keep push the button○A 2 seconds again, theDV unit will be turned off.2.RecordingVideoTurn on the DV unit as in step 1. Keep push the remote control button○B2 seconds will start video recording, the green indicatorwill flash several times and then turn off.Keep push the button○B2 seconds again, the DV unit will stop recording, the blue indicatorwill lightand the PowerCam is in standby mode. The video streaming is divided into one file every 10 minutes.NOTE:(1). When the battery power is low, the bluelight will flash for seconds, and then the PowerCam will shut downautomatically. (2). When the memory is full, both the blue and green light will flash for seconds, and then the PowerCam will shut downautomatically.4.TakingPhotoBe sure the DV unit is turned on, short press the remote control button○B once to take a picture, the blue indicatorwill flash twice to indicatethat the picture was taken successfully.5.Setting the PowerCamConnect the PowerCamwith your computer USB port, a new removable disk will appear on the computer screen. Open the removable disk, you will find the file setup.exe under the root directory, double-click the file to run it, following window will appear:You can set date/time, frame size, videoimage quality, audiovolume, etc. After finishinglower left to save the settings. ClickdefaultSettings.Aftersafely removing the PowerCam from the computer and turn on the DV unit, the settings willtake effect.Specifications:with upgrade and update. Please base on real object.Caution:ThePowerCam may become fairly hot during recording – this is normal. To ensure proper cooling do not block the flow of air to thecover of the PowerCam.No crash, do not open orknock thePowerCam. Do not expose them to fire, high temperatures, or water.We suggest charge with the qualifiedadaptor, if you find there is bulge or otherfaulty phenomena on PowerCam or charged device, please stop using it.Important:All jurisdictions have specific laws and regulations relating to the use of cameras and voice recorders. Before using any camera and/or voice recorder for any purpose it is the buyer′s responsibility to be aware of all applicable laws and regulations that prohibit or limit the use of cameras and voicerecorders, and to comply with the applicable laws and regulations.PowerCam是一款移动电源和摄像机合二为一的产品。