联想电脑使用说明书
联想 拯救者 Y7000P Y7000P-1060 使用说明书

使用说明书Lenovo 拯救者 Y7000P/Y7000P-1060温馨提示:您可以随时访问联想官方网站( )以获得快捷的网络支持服务:点击“驱动下载专区”然后输入您的主机编号或机型,即可查询机器的配置、保修和相应的驱动程序信息;点击“维修网点”然后选择您所在的城市与您的产品,即可查询当地的服务网点信息以便于您送修计算机!谢谢!第一版(2018 年 3 月)© 版权所有 联想 2018。
•注释在使用本产品之前,请先阅读《联想安全及通用信息指南》。
•本指南中的某些说明可能假设您所使用的是 Windows ® 10。
如果您使用的是其它 Windows 操作系统,某些操作可能会稍有不同。
如果您使用的是其它操作系统,则某些操作可能不适合您。
•说明书描述的是多数机型具备的通用功能。
您的计算机可能没有其中某些功能,或者说明书中没有介绍您的计算机上的某些功能。
•本说明书中的插图可能与实际产品不同。
请以实物为准。
•如未另行标注,本说明书中使用插图机型为 Lenovo 拯救者 Y7000P 。
目录第1章认识您的计算机 (1)正视图 (1)左视图 (5)右视图 (6)后视图 (7)底视图 (11)第2章开始使用 Windows 10 (12)首次配置操作系统 (12)操作系统界面 (12)使计算机进入睡眠状态或关机 (14)任务和桌面管理 (16)连接至无线网络 (17)第3章恢复系统 (18)重置此电脑 (18)第4章故障排除 (19)常见问题 (19)故障排除 (21)附录A 产品特殊声明 (24)“能源之星”型号信息 (24)商标 (25)注释:虚线区域表示外部不可见的部件。
注意:•显示屏打开切勿超过 135 度角。
合上显示屏时,请注意不要在显示屏和键盘之间遗留下钢笔或任何其他物件,否则可能会损坏显示屏。
第1章认识您的计算机a计算机显示屏提供鲜艳的视觉输出。
b内置摄像头使用此摄像头进行视频交流或拍照。
联想 ideapad 120S-11IAP 120S-14IAP 使用说明书

注释:虚线区域表示外部不可见的部件。 注意:
• 显示屏打开切勿超过 180 度角。合上显示屏时,请注意不要在显示屏和键盘之间遗留下钢笔或任何其他物 件,否则可能会损坏显示屏。
2
第 1 章 认识您的计算机
a 内置摄像头 b 内置麦克风 c 计算机显示屏 d 无线局域网天线 5 电源按钮 6 触控板
俘ᨀ皮˖ ᛘਟԕ䲿ᰦ䇯䰞㚄ᜣᇈᯩ㖁ㄉ˄˅ԕ㧧ᗇᘛᦧⲴ㖁㔌᭟ᤱᴽ࣑ ⛩ࠫĀ傡ࣘл䖭у४ā❦ਾ䗃ޕᛘⲴѫᵪ㕆ਧᡆᵪරˈণਟḕ䈒ᵪಘⲴ䝽㖞ǃ઼؞؍ᓄⲴ傡ࣘ 〻ᒿؑ˗ ⛩ࠫĀ㔤؞㖁⛩ā❦ਾ䘹ᤙᛘᡰ൘ⲴᐲоᛘⲴӗ૱ˈণਟḕ䈒ᖃൠⲴᴽ࣑㖁⛩ؑԕׯҾᛘ䘱؞ 䇑㇇ᵪ 䉒䉒 ㅢж⡾δ2017ᒪ5ᴾε © ⡾ᵹᡶᴿ 㚊ᜩ 2017Ⱦ
商标 ................................................................................................................................................... 22
第 3 章 恢复系统 ................................................................................................................................ 16 重置此电脑.................................................................................................................................................... 16
联想Lenovo IdeaPad Y400 Y500 使用说明书
Lenovo IdeaPad Y400/Y500使用说明书 V1.0温馨提示:您可以随时访问联想官方网站(/)以获得快捷的网络支持服务:点击“服务与支持”,在“驱动及电脑配置查询”栏目中输入您的主机编号,即可查询机器的配置、保修和相应的驱动程序信息;点击页面左侧的“维修网点查询”并输入您的电话区号,即可查询当地的服务网点信息以便于您送修电脑!谢谢!第一版(2012年7月)© 版权所有联想 2012。
目录第1章了解您的计算机 (1)正视图 (1)左视图 (7)右视图 (9)前视图 (12)底视图 (14)第2章开始使用Windows 8 (16)初次使用时,配置操作系统 (16)操作系统界面 (16)超级按钮 (17)使计算机进入睡眠状态或关机 (19)无线局域网连接 (21)帮助与支持 (22)第3章联想一键恢复系统 (23)第4章故障排除 (24)常见问题 (24)故障排除 (26)附录A 产品特殊声明 (30)“能源之星”型号信息 (30)商标 (32)i第1章了解您的计算机注释:本手册中使用的图示可能与实际产品不同。
请参考实际产品。
小心:•显示屏打开切勿超过130度角。
关闭显示屏时,请注意不要在显示屏和键盘之间遗留下钢笔或任何其它物件。
否则,显示屏可能会损坏。
12第1章 了解您的计算机Y500内置摄像头使用此摄像头进行视频交流。
内置麦克风(带降噪功能)捕获声音,可用于视频会议、配音或录音。
计算机显示屏提供清晰明亮的图形显示。
电源按钮按此按钮打开计算机。
JBL 扬声器提供音频输出。
abcde第1章 了解您的计算机3触控板触控板起传统鼠标的作用。
一体式多点触控板:屏幕上的光标运动方向会与手指在触控板上划过的方向相同。
左键区域:功能与传统鼠标的左键按钮对应,单击此区域即可。
右键区域:功能与传统鼠标的右键按钮对应,单击此区域即可。
数字键盘(Y500)详细说明,请参见第4页上的“使用键盘”。
联想笔记本电脑安全使用指南说明书
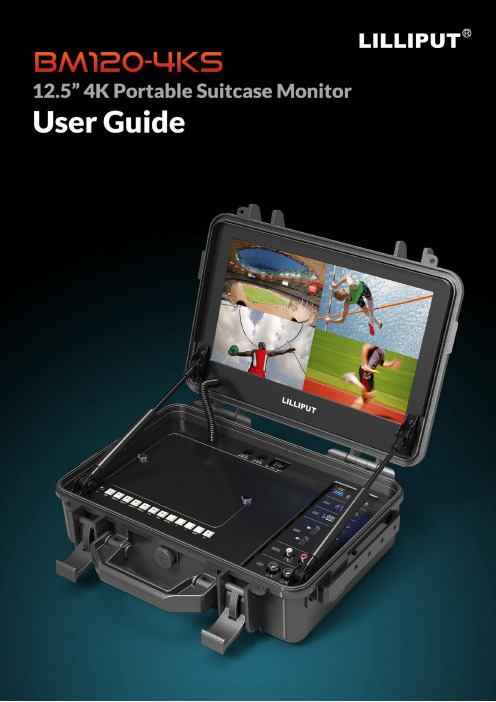
Important Safety Instructionscertified for international use. However, like all electronic equipment, the device should be usedwith care. Please read and follow the safety instructions to protect yourself from possible injury andto minimize the risk of damage to the unit.●Please do not place the display screen towards the ground to avoid scratching the LCD surface.●Please avoid heavy impact.●Please do not use chemical solutions to clean this product. Simply wipe with a soft cloth to keep clean of thesurface.●Please do not place on uneven surfaces.●Please do not store the monitor with sharp, metallic objects.●Please follow the instructions and trouble-shooting to adjust the product.●Internal adjustments or repairs must be performed by a qualified technician.●Please keep user guide for future reference.●Please unplug the power and remove the battery if long-term no-use, or thunder weather.Safety Disposal For Old Electronic EquipmentPlease do not regard the old electronic equipment as municipal waste and do not incinerate old electronic equipment. Instead please always follow local regulations and hand it over to the applicable collection stand for safe recycling. Ensure that these waste materials can be effectively disposed of and recycled to prevent ourenvironment and families from negative effects.IntroductionBM120-4KS is a precision broadcast monitor designed for the film and video shooting on any type of camera. Providing the superior picture quality, as well as a variety of professional assist functions, including 3D-Lut, HDR, Level Meter, Histogram, Peaking, Exposure, False Color, etc. It can help the photographer analyzing every detail of the picture and final capture the best side.FeaturesSupport multiple signal inputs 3G-SDI, HDMI, DVI and VGA.Multiple View Display supports quad view split from different input singles simultaneously.Ultra HD 4K screens containing 8.3 million pixel (3840×2160), so the resolution is four times that of Full HD. 3D LUT for Accurate Color Reproduction and Color space display(Native/Rec.709/User1~User3).Support to upload 3D LUT table via USB port.Equip HDR function.Image flip offers great convenience for user’s user to place the monitor with various mounting methods under different conditions. Users can view the monitor normally no matter what mounting angles.Perfect size for both suitcase and rack mount.WHDI wireless module for optionalCONTENTS1. Product Description (4)1-1. Front Panel (4)1.2 Rear Panel (5)1-2-1. Interfaces (5)2. Sun Shade Installation (6)3. MENU Settings (8)3-1. FN user definable shortcut buttons (8)3-2. / Buttons Operation (9)3-3. MENU Operation (9)3-3-1. Picture (9)3-3-2. Function (12)3-3-3. Display Mode (15)3-3-4. Display Settings (16)3-3-5. Select Region (17)3-3-6. Input (18)3-3-7. Audio (18)3-3-8. VGA (19)3-3-9. System (19)3-3-10. Information (21)4. Accessories (22)5. Parameters (23)6. Trouble Shooting (25)7. Appendix 1: 3D LUT of Loading Manual (26)8. Warranty (30)8-1. Repair Procedure and Terms (30)8-2. Free Repair Exclusions (30)1.P roduct Description 1-1. Front Panel1.2 Rear Panel1-2-1. Interfaces1. Earphone jack: 3.5mm earphone slot.2. SDI button: Signal switch to SDI mode when light on.3. Speaker4. HDMI 1 ~ 4 buttons: Signal switch to HDMI mode when light on.5. DVI button: Signal switch to DVI mode when light on.6. VGA button: Signal switch to VGA mode when light on.7. MENU button Press to enter menu.Press to enter option in the menu.14562 789101117181920218.◄ Left selection keySelect option in the menu. Decrease the option value.Before enter the menu, single press to activate volume, press again to decrease the volume.9. ► Right selection keySelect option in the menu. Increase the option value.10. EXIT button: To return or exit the menu function.11. FN: User definable shortcut button.Default: [Peaking]12. SDI input/output ports13. Audio L/R14. HDMI input port ×4HDMI 1 & HDMI 2: HDMI2.0, support 4K 60HzHDMI 3 & HDMI 4: HDMI1.4, support to 4K 30HzNote!Only HDMI 1 support HDR15. DVI input port16. VGA input port17. TALLY port18. USB port19. Power switch20. DC 12V/3A input21. DC 8V/1A output2. Sun Shade InstallationAs shown below after finished.3. MENU SettingsPlease check whether the device is connected well or not.3-1. FN user definable shortcut buttonsLong keep pressing FN buttons for 3-5 seconds to activate shortcut menu setting. Option selected will be highlighted as white. option will be highlighted as yellow, unavailable option will be highlighted as gray. Select option via " / " buttons. Then press "MENU" button to confirm to set as default option.Shortcut functions can be customized to meet user’s needs as following:NO Shortcut Menu when long press FN shortcut button1 Center Marker2 Safety Marker3 Aspect Marker4 Aspect5 Underscan6 Check Field7 Freeze8 Pixel to Pixel9 Peaking10 False Color11 Exposure (Only available under SDI mode)12 Histogram(Only available under SDI mode)13 Time Code (Only available under SDI mode)14 Display Mode15 Disp Mirror16 Color Space3-2./ Buttons OperationUnder non menu screen, press " / " buttons to activate volume bar, Use " / " buttons to select the option in the menu.3-3. MENU OperationWhen power on, press "MENU" on the device, the menu of function setting will display on the screen. Press " / " button to choose menu;Then press "MENU" button to confirm; Press "EXIT" button to return / exit menu.3-3-1. PicturePicture Brightness0~100Contrast0~100Saturation0~100Hue0~100Sharpness0~4Color Space Native/Rec.709/User1~User3HDR Off/Auto/HDR10 (Available only under “HDMI1”mode)BacklightModeStandard/Outdoor/UserBacklight 0~100 (Note: Available only under “User” mode)Temperature 9300/7500/6500/5800/UserRed Gain 0~256 (Note: Available only under “User”mode)Green Gain0~256Blue Gain0~256● BrightnessAdjust the general brightness of the LCD. For example, if it uses outside in bright conditions, increase the LCD brightness to make it easier to view.● ContrastIncrease or decrease the range between the bright and dark areas of the image. High contrast can reveal detail and depth in the image, and low contrast can make the image appear soft and flat.● SaturationAdjust the color intensity. Press " / " buttons to increase or decrease the color intensity.● HueIt means tint. Use this setting to choose the tint from 0 to 100.● SharpnessIncrease or decrease the sharpness of the image. When the sharpness of image is insufficient, the value of sharpness can be increased to make the image clearer.● Color SpaceSelects the color space from among [Native], [Rec.709] [User1~User3]:- Saturation/Hue/Color Temperature is only available under Native mode.- Select [AUTO] or [HDR10] mode under HDR function, the color space will be saved as Native mode automatically. It can be only changed to other color space mode by hand.- It supports to upload user-defined Lut table "User1~User3".- User-defined Lut table only support RGB format. If the format is not correct, please transform it to the correct format by using tool "Lut Converter" (See appendix 1 for details) and named as User1.cube, User2.cube orUser3.cube.- Copy the User-defined Lut table to flash disk and insert it to the device, the screen displays a prompt message to show whether to upgrade. Select upgrade, the device will be loading automatically in a black screen and then restart after finishing loading.- Requirements for flash diskFormat: FAT32Memory: <16GFile directory: root directoryMust be formatting before using it.- Please note that the responding time for loading user-defined Lut table will be a bit slower. Please wait patiently. - The device only supports loading one table at a time. If needs to load more than one tables, please load them one by one.● HDRSelect HDR from among [Off], [Auto], [HDR10].- HDR is only available under HDMI 1 signal input.- HDR under AUTO or DHR10 mode, and the input signal support HDR, the below function is disabled: Contrast, Brightness, Saturation, Hue, Sharpness, Color Space, BackLightColor Temperature- [Auto]Automatically recognize whether the input HDMI signal supports HDR. If it supports, the input signal shows as the HDR10 performance. If it doesn’t, HDR function is disabled. It’s suggested select [Auto] when use HDR function.- [HDR10]Do not recognize whether the input HDMI signal supports HDR, it will activate the HDR function enforcedly when input signal. If the input signal does not support the HDR function, the image displays abnormal color.● Backlight ModeSelect Backlight Mode from among [Standard], [Outdoor], [User].● BacklightIt is only available under [User] mode.● TemperatureAdjust the color temperature to make the image warmer (Yellow) or colder (Blue). Increase the value to make the image be warmer, decrease the value to make the image be colder. User can use this function to strengthen, weaken or balance the image color according requirements. The standard white light color temperature is 6500K.Note! ONLY available under "User" mode to adjust Color Gain.3-3-2. FunctionFunction Center Marker OFF/ ONSafety Marker OFF, 95%, 93%, 90%, 88%, 85%, 80% Aspect Marker OFF, Full, 17:9, 16:9, 4:3, 1.85:1, 2.35:1 Aspect Full ,17:9, 16:9, 4:3, 1.85:1, 2.35:1 Underscan OFF/ ONPixel To Pixel OFF/ ONCheck Filed OFF/ Red, Green, BlueFreeze OFF/ ONPeaking OFF/ ONPeaking color Red/Green/Blue/White Only available whenunder SDI Mode.Peaking level 0~100 Peaking level 0~100 False Color OFF/ ON Exposure OFF/ ONOnly available when under SDI ModeExposure level 0~100 Histogram OFF/ ON Time CodeOFF/ LTC/ VITC● Center MarkerSelect On, it will appear "+" marker on center of screen. ● Safety MarkerUse this setting to set off the safety marker or choose the one of the safety markers: [OFF], [95%], [93%], [90%], [88%], [85%], [80%]. ● Aspect MarkerDisplay the different aspect of the displayed image. [OFF], [Full], [17:9], [16:9], [4:3], [1.85:1], [2.35:1]. ● AspectSwitch aspect ratio setting among from [Full][17:9][16:9][4:3][1.85:1][2.35:1]. For example: In [Full] mode, images are scaled to fill the entire screen.In [4:3] mode, images are scaled up or down to fill the maximum 4:3 portion of the screen. In [16:9] mode, images are scaled to fill the entire screen if the device aspect is 16:9. ● UnderscanIf the image shows size error, use this setting to zoom in/out pictures automatically when receiving HDMI signals ● Pixel to PixelThe pixel to pixel is a monitor set to 1:1 pixel mapping with native fixed pixels, which avoids loss of sharpness due to scaling artifacts and normally avoids incorrect aspect ratio due to stretching.● Check FieldUse the check field modes for monitor calibration or to analyze individual color components of an image. The device preset in Blue, Green, and Red check field modes, only the selected color will be shown.● PeakingThe peaking is used to aid the camera operator in obtaining the sharpest possible picture. Select "On" to display colored outlines around sharp areas of the image.Note! Peaking color and level ONLY can be changed when under SDI mode.● False ColorThis monitor has a false color filter to aid in the setting of camera exposure. As the camera Iris is adjusted, elements of the image will change color based on the luminance or brightness values. This enables proper exposure to be achieved without the use of costly, complicated external equipment..● Exposure & Exposure LevelThe exposure feature helps the user achieve optimum exposure by displaying diagonal lines over areas of the image that exceed the setting exposure level. The exposure level can be set to 0~100.Note!ONLY available when under SDI mode.● HistogramThe histogram makes users view visually the exposure of whole and each RGM channels. It has the full contrast rang of video for easy color correction during post production. NOTE: Only available when under SDI mode.● Time CodeThe Time Code supports Longitudinal time code (LTC) and Vertical interval time code (VITC). The time code display on the monitor is synchronizing with that of Full HD camcorder’s. It displays the duration of the clips in hours: minutes: seconds: frames. It’s very useful for identifying specific frame in film and video production.Note! ONLY available when under SDI mode.3-3-3. Display ModeDisplay Mode 1P,2P LR,2P TB,2P PIP,4P● Display ModeThe monitor presets 1P, 2P LR, 2P TB, 2P PIP, 4P five display modes. This function can be work with Select Region function to meet user’s requirement. For example: In 1P mode, images are scaled to fill the entire screen. In 2P LR, display two different signals on the left and right sides.3-3-4. Display SettingsDisplay Setting Display Rotate0°, 90°, 180°, 270°Available when singledisplayDisplay Mirror OFF, L/R, U/D Available when dual displayon left and right.● Display RotateThis setting support to flip the image to 0°, 90°, 180°, 270° modes. It is only available when single display.● Display mirrorThis setting displays two different input signals to Light/Right or Up and Down, the user can choose it to view the images according to the requirement. It is only available when dual display on left and right.3-3-5. Select RegionSelect Region Unavailable Display mode 1PLeft Side/Right Side/Full Display mode 2P LRTop Side/Bottom Side/Full Display mode 2P TBMain/Sub/Full Display mode 2P PIP1P In/1P Out/2P In/2P Out/3PIn/3P Out/4P In/4P Out/4P fullDisplay mode 4PNote! This Menu is enabled for audio source selection. It is only available when under multi-picture and picture-in-picture mode. Activate the corresponding EN source to select the needed audio and picture under Audio Source function.3-3-6. InputInput Signal switch to region selected according to users’ needs. 3-3-7. AudioAudio Volume0~100Level Meter OFF/ON(NOTE: Only available when under SDI mode) Audio Source Analog/Digital region 1~4Digital region 2~4 is only available under multi-displays mode and must activate the corresponding Region under Select Region function at the same time.3-3-8. VGAVGA Auto AdjustH Position 0~100V Position 0~100ClockPhase0~100 3-3-9. SystemSystem Reset Press to confirm after selected. Menu Time10~60sOSD H Position 0~100 (To set menu display area) OSD V Position0~100 (To set menu display area) Language English, Chinese Transparency 0~255 (To set menu transparency) Color Calibration Off/OnRotate0°, 90°, 270°Border Width0~10Border Color R, G, B, W● ResetIf there is any problem unknown, press to confirm after selecting. The monitor will return to default set.● Menu TimeAdjust the OSD displaying time form 10 to 60s.● OSD H Position and OSD V PositionMove OSD horizontally or vertically.● LanguageSwitch between English and Chinese.● TransparencySet Menu transparency. Increase the value, the more transparent it will be.● OSD RotateFlip OSD to three modes.● Border Width and Border ColorUser can choose the border color among Red, Green, Blue, White. And adjust the thickness by using Border Width function. This setting is available when display in 2P LR, 2P TB, 2P PIP, 4P mode.The lines separate the different inputsignals means Border.3-3-10. InformationInformation To display current information.4. Accessories1.V-mount battery plate 1 piece2.Tally connector 1 piece3.Sunshade 1 pieceB drive disk 1 piece5.WHDI wireless module (optional) 1 pair6.12V 3A DC power adapter (optional) 1 piece5. ParametersDISPLAY Panel12.5"LCDPhysical Resolution3840x2160Aspect Ratio16:9Brightness400cd/m2(+/-10%@center) Contrast1500:1Viewing Angle170*/170"(H/V)INPUT 3G-SDI3G SDI(support up to1080p60Hz) HDMI HDMI2.0x2(support up to4K60Hz)HDMI1.4b ×2(support up to4K30Hz) DVI1VGA1Audio2(L/R)Tally1USB1OUTPUT3G-SDI3G SDI(support up to1080p60Hz) AUDIO Speaker1Ear Jack1POWER Input Voltage DC10-24VPower Consumption23W(12V)Battery Plate V-mount battery plate Power Output DC8VENVIRONMENT Operating Temperature0'C~50'CStorage Temperature-10'C~60'CDIMENSION Dimension(WD)356.8mm x309.8mm x122.1mm Weight 4.75kg6. Trouble Shooting1) Only black-and-white display.Check whether the color saturation is properly setup or not.2) Power on but no pictures.Check whether the cables of HDMI, VGA,DVI and 3G-SDI are correctly connected or not. Please use the standard power adapter coming with the product package. Improper power input may cause damage.3) Wrong or abnormal colors.Check whether the cables are correctly and properly connected or not. Broken or loose pins of the cables may cause a bad connection.4) When on the picture shows size error.Press “MENU → Function → Underscan” to zoom in/out pictures automatically when receiving HDMI signals 5) Other problems.Please press “MENU” button and choose “MENU → System → Reset → confirm”6) According to the ISP, the machine cannot function properly.ISP for program upgrades, non-professionals do not use. Please reboot your device if press accidentally!7) No Sound.Press HDMI button if no sound; if still unavailable, please contact the technician.8) No signal displayed when connecting with HDMI 1.Please long press HDMI 1 button for 3-5 seconds to activate HDMI signal.Note! Due to constant effort to improve products and product features, specifications may change without notice.7. Appendix 1: 3D LUT of Loading ManualBM-4KS supports 3DLUT to load the color calibration document and the User Log by using flash disk.● Format Requirement●LUT format:Type: .cube3D Size: 17x17x17Data Order: BGRTable Order: BGR●USB flash disk versionUSB: 2.0System: FAT32Size: <16G●Color calibration document: Rec709. cube●User Log: User1 ~User3.cube● LUT Format ConversionThe format of LUT should be transformed if it doesn’t meet Lilliput’s requirement. It can be transformed by using Lut Converter (V1.3.30).● Activate Lut ConverterOne individual Product ID for one computer. Please send the ID number to Lilliput to get an Enter Key. Then the computer gets the permission of Lilliput Lut Converter after inputting the Enter Key.● Enter the Lut Converter interface after input the Enter Key● Click Input File, then select *LUT● Click Output File, and then select the file name as required format.*Such as:Rec709.cube, 3D Size: 17, Data Order: RGB, Table Order: RGB.Note! The format which shown in Red Box above should be selected to RGB.● Click Generate Lut button to finish the transform.● USB Loading●The USB flash disk must be formatted before using to make sure that there are no other files in the root directory.●Copy needed files to the root directory of the USB flash drive. Please note that the system only supports updating one LUT table at a time. Therefore, only a single file to be loaded can be copied to the USB flash drive. If it needs to update more LUT tables, please delete other files in USB flash disk and repeat the above steps.●Power on the device, insert the corresponding video signal into any video signal interface, and switch the signal to the corresponding channel to make sure the device displays normally. (It doesn’t suggest that update the LUT table when there is no input signal as the device will enter the power saving mode in such situation.)●Insert the flash disk into the USB interface on the device and wait for about 5 seconds. It will pop-up prompt box "Load Rec709.cube" after detecting the flash disk. Operate by using press "MENU", "", "", "EXIT" on the front of device. Click "YES" to load, and click "NO" or press "EXIT" to exit. The device displays a black screen after confirmed the loading, and it will update the corresponding LUT table back-stage according to the name of the updated LUT. The device will be restarted automatically after completed. The whole updating process takes about6 seconds according to the updated LUT name.●Please activate and set up the updated LUT table under the menu after restart. It doesn’t need to be reset if the current updated LUT has been selected before updating.●Please note it only calibrates the color for Rec709 mode and upload it to the device in the factory. User1~User3 is grayed out and disabled in the menu. After loading the user LUT table, the corresponding button will be shown as blue and able to be use, shown as the following figure.Before loading After loading[在此处键入]8. Warranty8-1. Repair Procedure and Terms8-1-1. Those products bought from Lilliput, we promise to provide one (1) year free repair service. Lilliput warrants its products against defects (excluding physical damage to the product) in materials and workmanship under normal use for a period of one (1) year from the date of delivery. Beyond the warranty period such services shall be charged at the then prevailing rates in Lilliput’s price list.8-1-2. It is possible that you may need to return products to Lilliput for servicing or troubleshooting. Before you send any product to Lilliput, you must e-mail us, telephone us or fax us and wait for a Return Material Authorization (RMA) form to be sent to ually within two business days, your RMA request will be reviewed and we will contact you with the results. If approved, a RMA number will be e-mailed to you.Customers should deliver the defective products to our appointed service center within 15 days from when you receive the RMA number. For our best receipt, the defective products should be properly packed.Letting us know the packaging details, as well as sender and delivery date.Note!Returned products MUST be subject to the following operations, otherwise, Lilliput has theright to reject.●RMA number must be clearly written on the shipping boxes.●Returned products must be delivered within 15 days from when we send out the RMA number.●Returned items must be in accordance with the RMA form.●Malfunction or damage caused by improper packaging during transportation.8-1-3. Transportation cost which includes shipping charges, duties, insurance, taxes and any other charges for returned products to our repair center is the responsibility of the purchaser. After our verification that the returned product matches our warranty terms and conditions, Lilliput will repair the defective product free of charge, and also bear the resend transportation charge. If the delivered product is confirmed out of warranty, our customer service center will inform the customers. Then, you may decide to pay for the repair items or not.8-2. Free Repair Exclusions●Warranty labels of products or accessories are removed or alteration.●There is no Lilliput RMA number of the returned products.●Operated and maintained in any manner inconsistent with the manual terms and conditions.●Malfunction or damage resulting from repairs or alterations made by parties other than Lilliput or anauthorized distributor.●Malfunction or damage caused by forces of nature (for example, earthquake, fire, flood, lighting strike,War, etc).●Any damages caused by accidents, any unreasonable use or neglect, deterioration, mishandling or failure ofmaintenance (for example, damages caused in transit).●Beyond one (1) year warranty period.30Thank You for Using Lilliput BM120-4KS。
联想 小新Air+14IWL、15IWL使用说明书

图 2. 左视图 - Lenovo 小新 Air 14IWL/15IWL
a 交流电源插孔
连接自带的交流电源适配器。
b HDMI 输出端口
HDMI- 输出端口可连接您的计算机与外接显示设备。
注释:需要兼容的传输线,且传输线需单独售卖。
c USB (Type-A) 此 USB 端口支持 USB 3.1 Gen 1 标准,支持 AOU 功能。 端口
商标 ........................................................................................................ 26
i
第 1 章 认识您的计算机 正视图 ------------------------------------------------------------------------------
第 4 章 故障排除 .................................................................................... 21 显示问题......................................................................................................................21 睡眠问题......................................................................................................................22 电池组问题..................................................................................................................23 声音问题......................................................................................................................23 其他问题......................................................................................................................23
联想 拯救者 Y7000P 7000P-1060 使用说明书
1
第 1 章 认识您的计算机
a 计算机显示屏
提供鲜艳的视觉输出。
b 内置摄像头
使用此摄像头进行视频交流或拍照。
c 内置麦克风
捕获声音,可用于视频会议、配音或录音。
d 电源按钮
按此按钮打开计算机。
e 数字键盘
详细信息,请参见第 3 页的 “使用键盘”。
f 无线局域网天线
连接至无线局域网适配器以发送和接收无线信号。
此键盘有单独的数字键盘。若要启用或禁用此数字键盘,按 Num Lock 键。
功能键组合
使用功能键,可以立即改变操作功能。若要使用此功能,按住 Fn a;然后按住其中一个 功能键 b。
2
2
1
2
2
3
第 1 章 认识您的计算机
以下内容描述了每组功能键的功能。
Fn + F1:
设为静音/取消静音。
Fn + F2:
第 4 章 故障排除 ................................................................................................................................ 19 常见问题........................................................................................................................................................ 19 故障排除........................................................................................................................................................ 21
联想 笔记本电脑 说明书

1第一章 轻松入门本使用说明书提供了您所使用的笔记本电脑的硬件和软件信息。
由于笔记本电脑属于精密电子设备,在使用前您应该阅读全文。
特别是,如果您最近才对笔记本电脑产生兴趣或仅仅是一位初学者的话。
如果在您第一次阅读后有不懂的地方,请不必担心,将这本说明书放在计算机旁,边用边学。
无论您的电脑操作水平如何,请注意被标记的警告信息和安全信息,同时请注意前言中的各项安全信息。
注意:1、在使用本机的时候,严禁在开机时对本机的各种部件进行插拔(支持热插拔的USB 设备、PCMCIA 设备和光驱设备除外)2、由于该机型采用较多新器件,请用户严格按照本说明书的指导安装驱动程序,以获得最佳效果。
1.1 了解您的笔记本电脑感谢您购买并使用联想天逸Y200系列笔记本电脑。
该笔记本电脑集精巧的设计和强大的性能于一身, 并能够连接多种不同外设进行扩展,是您办公、休闲、娱乐的好伙伴。
1.1.1正面视图21 TFT 彩色液晶屏 7电池指示灯2 设备状态指示灯 8 电源状态指示灯3 电源按钮 9 内置Micphone4 NOVO 快捷键 10 触控板(Touch Pad )5 静音快捷键11 读卡器指示灯 6键盘1. TFT 彩色液晶屏本机采用13.1英寸15:9 TFT 彩色液晶显示屏(约等于33CM ),最高支持分辨率为1280*768,32bit 彩色。
32. 设备状态指示灯1. 硬盘/光驱指示灯 蓝色指示灯亮时表示硬盘在使用; 红色指示灯亮时表示光驱在使用。
2. 大写指示灯 指示灯亮时表示大写启动3. 卷轴指示灯 显示目前是否处于卷轴状态4. 小键盘指示灯指示灯亮时表示小键盘启动注意:此四个状态指示灯置于键盘盖板下,只有在使用灯亮时才能看到。
3. 电源按钮用于打开和关闭笔记本电脑的电源。
通过在系统的电源管理设置,在开机状态下按此键可以进入休眠/待机状态,或从休眠/待机状态中唤醒。
4提示:当系统不能正常关机时,可按住电源按钮保持4-5秒,实现关机。
Lenovo C3 C4 系列 电脑使用说明书 ( Win7 )

LenovoC3/C4系列电脑使用说明书 (Win7)重要安全信息:在使用本手册之前,阅读和了解本产品的所有相关安全信息十分重要。
请参阅本产品随附的《安全与保修指南》以获取最新的安全信息。
阅读和了解这些安全信息有助于减少造成人身伤害或损坏产品的风险。
危险:对高度危险要警惕警告:对中度危险要警惕注意:对轻微危险要关注目录重要安全信息第一章电脑硬件使用说明 (1)1.1 电脑前面接口 (2)1.2 电脑侧面接口 (3)1.3 电脑后部接口 (4)1.4 接口说明 (5)1.5 电源连接 (6)1.6 显示器可调角度 (7)1.7 读卡器 (7)1.8 主机的使用方法 (8)1.9 键盘 (9)第二章拯救系统使用说明 (10)2.1 OEM 分区特殊说明 (11)2.2 驱动与随机软件安装方法 (11)2.3 一键恢复 (13)2.4 系统设置 (15)2.5 一键杀毒 (20)第三章软件使用说明 (23)3.1 联想通行证注册 (24)3.2 联想成才学院 (25)3.3 网络保护 (26)3.4 智能测距和智能亮度感应 (31)3.5 联想服务通 (34)1目录第四章常见问题处理 (35)4.1 显示 (36)4.2 声音 (38)4.3 软件问题 (38)4.4 光驱和硬盘 (40)4.5 Windows 特殊说明 (41)4.6 日常维护 (42)2目录1234本章主要内容介绍:电脑硬件介绍电脑连接方法和注意事项请务必仔细阅读。
请注意:所有机型的配置以您购买到的实物为准。
注意:请勿在电脑运行期间开启电脑后盖。
3765489内置麦克风菜单摄像头方向按键硬盘指示灯方向按键无线网卡指示灯显示器开关显示器开/关状态指示灯内置红外接收器(请勿遮挡,部分机型配备)2C3/C4系列电脑使用说明书3C3/C4系列电脑使用说明书USB 接口读卡器接口耳机接口电源开关麦克风接口光驱按钮USB 接口光驱注意:请勿遮挡电脑通风孔,防止电脑因通风不畅而过热。
- 1、下载文档前请自行甄别文档内容的完整性,平台不提供额外的编辑、内容补充、找答案等附加服务。
- 2、"仅部分预览"的文档,不可在线预览部分如存在完整性等问题,可反馈申请退款(可完整预览的文档不适用该条件!)。
- 3、如文档侵犯您的权益,请联系客服反馈,我们会尽快为您处理(人工客服工作时间:9:00-18:30)。
ideapad 300S-14ISK ideapad 500S-14ISK
Փ⫼䇈ᯢк
⊼䞞 • Փ⫼ᴀѻકПࠡˈ䇋ܜ䯙䇏lj㘨ᛇᅝܼঞ䗮⫼ֵᙃᣛफNJDŽ • ᴀᣛफЁⱘᶤѯ䇈ᯢ؛䆒ᙼ᠔Փ⫼ⱘᰃ Windows® 10DŽབᵰᙼՓ⫼ⱘᰃ݊
ᅗ Windows ᪡㋏㒳ˈᶤѯ᪡ৃ㛑Ӯ᳝ϡৠDŽབᵰᙼՓ⫼ⱘᰃ݊ᅗ᪡ ㋏㒳ˈ߭ᶤѯ᪡ৃ㛑ϡ䗖ড়ᙼDŽ • 䇈ᯢкᦣ䗄ⱘᰃ᭄ᴎൟⱘ䗮⫼ࡳ㛑DŽᙼⱘ䅵ㅫᴎৃ㛑≵᳝݊Ёᶤѯ ࡳ㛑ˈ㗙䇈ᯢкЁ≵᳝ҟ㒡ᙼⱘ䅵ㅫᴎϞⱘᶤѯࡳ㛑DŽ • བ㸠ᷛ⊼ˈᴀ䇈ᯢкՓ⫼ⱘᦦᴎൟЎ Lenovo ideapad 300S-14ISKDŽ • ᴀ䇈ᯢкЁⱘᦦৃ㛑Ϣᅲ䰙ѻકϡৠDŽ䇋ҹᅲ⠽ЎޚDŽ
连接 USB 设备。
注释:详细信息,请参见第 7 页的 “连接 USB 设备”。
d 记忆卡插槽
将记忆卡 (未提供)插入此处。
注释:详细信息,请参见第 8 页的 “使用记忆卡 (未提供)”。
e 组合音频插孔
连接头戴式耳机 (带话筒)。
注释: • 组合音频插孔不支持传统麦克风。 • 因行业标准不同,连接第三方头戴式耳机或第三方头戴式耳机 (带话筒)时,可能不支
使用记忆卡 (未提供) 本计算机支持下列类型的记忆卡: • Secure Digital (SD) 卡 • Secure Digital High Capacity (SDHC) 卡 • SD eXtended Capacity (SDXC) 卡 • MultiMediaCard (MMC)
注释: • 每次仅在插槽中插入一张记忆卡。 • 本读卡器不支持 SDIO 设备 (如 SDIO 蓝牙通讯卡等)。
插入记忆卡 插入记忆卡,直到记忆卡接触到插槽的底端。 取出记忆卡 从记忆卡插槽中轻轻拉出记忆卡。
注释:在取出记忆卡之前,请用 Windows 安全删除硬件并弹出媒体工具停用记忆卡,以避免 数据损坏。
i
第 1 章 认识您的计算机 正视图 ------------------------------------------------------------------------------------------------------------
b ab
c
d
e
f
g
注释:虚线区域表示外部不可见的部件。
电池电量低于 5%。
电池正在充电。当电池电量 到 20% 时,闪烁颜色将变 为白色。
电池电量在 20% 到 80% 之 间,正在继续充电。电池电 量到达 80% 时,指示灯停止 闪烁,但充电过程将继续直 至电池充满电。
电源打开。
计算机在睡眠状态。
电源切断。
6
第 1 章 认识您的计算机 连接 USB 设备
第 2 章 开始使用 Windows 10 ................................................................ 11 首次配置操作系统......................................................................................................11 操作系统界面..............................................................................................................11 使计算机进入睡眠状态或关机..................................................................................14 连接至无线网络..........................................................................................................16 获取 Windows 帮助 ..................................................................................................17
断开 USB 存储设备前,请先确保计算机已完成与该设备的数据传输。点击 Windows 通知区域中的安全删除硬件并弹出媒体图标,等确定能安全移除后 再断开设备。
注释:如果 USB 设备使用电源线,请先将该设备连接至电源,然后再连接至计算机。否则, 系统可能会无法识别该设备。
7
第 1 章 认识您的计算机
⏽佼ᦤ冫˖ ᙼৃҹ䱣ᯊ䆓䯂㘨ᛇᅬᮍ㔥キ˄/˅ҹ㦋ᕫᖿ᥋ ⱘ㔥㒰ᬃᣕ᳡ࡵ ⚍ߏĀ偅ࡼϟ䕑ϧऎā✊ৢ䕧ܹᙼⱘЏᴎ㓪োᴎൟˈेৃᶹ䆶ᴎ఼ⱘ䜡㕂ǃ ֱׂⳌᑨⱘ偅ࡼᑣֵᙃ˗ ⚍ߏĀ㓈ׂ㔥⚍ā✊ৢ䗝ᢽᙼ᠔ⱘජᏖϢᙼⱘѻકˈेৃᶹ䆶ᔧഄⱘ᳡ࡵ㔥 ⚍ֵᙃҹ֓Ѣᙼ䗕ׂ䅵ㅫᴎ 䇶䇶 ϔ⠜˄2015ᑈ7᳜˅ © ⠜ᴗ᠔᳝ 㘨ᛇ 2015DŽ
a b c d e fg
a Kensington 槽b 交流电源适配器 源自孔c USB 2.0 端口
此处连接安全锁 (未提供),有助于防止计算机被盗和被 他人擅自使用。 您可以在计算机上安装安全锁,有助于防止他人未经允许 而搬移计算机。关于安装安全锁的详细说明,请参阅所购 买安全锁的使用说明。 连接交流电源适配器。
b
a
以下内容描述了每组功能键的功能。
Fn + Home:
激活暂停功能。
Fn + End:
激活中断功能。
Fn + PgUp:
启用 / 禁用滚动锁定。
Fn + PgDn:
激活插入功能。
4
第 1 章 认识您的计算机
左视图 ------------------------------------------------------------------------------------------------------------
带 LED 背光的液晶显示屏提供了清晰明亮的图形显示。
d 无线局域网天线 连接至无线局域网适配器以发送和接收无线信号。
e 电源按钮
按此按钮打开计算机。
f 触控板
触控板起传统鼠标的作用。
触控板:屏幕上的光标会以指尖在触控板上划过的相同方 向运动。 触控板按钮:左 / 右侧按钮的功能与传统鼠标的左 / 右键 相同。
注释:您可以通过按 F6 (
) 启用 / 禁用触控板。
g NFC 感应区域
此区域支持近场通信 (NFC, Near Field Communication,), 结合银联的专有客户端软件,可以实现银联迷你付功能 (仅限特定型号)。
2
使用键盘 热键 按特定的热键可立即进入相应的系统设置。
第 1 章 认识您的计算机
常见问题......................................................................................................................20 故障排除......................................................................................................................22 附录 A 产品特殊声明............................................................................... 25 “能源之星”型号信息...............................................................................................25 商标......................................................................................................... 27
: 设为静音 / 取消静音。 : 降低音量。
: 调高音量。
: 关闭当前活动的窗口。
:
刷新桌面或当前活动的 窗口。
: 启用 / 禁用触控板。
: 启用 / 禁用飞行模式。
:
显示所有当前活动的应用 程序。
:
打开 / 关闭 LCD 显示屏 的背光灯。
:
在计算机和外接设备之间 切换显示。
: 降低显示屏亮度。
: 提高显示屏亮度。
将 USB 设备的 USB 插头 (A 类)插入计算机上的 USB 接口,即可将此设备 连接至计算机。
首次将某一 USB 设备插入计算机上的特定 USB 端口时, Windows 将自动为 该设备安装驱动程序。安装驱动程序之后,将不再需要执行任何其他步骤即可 断开或连接该设备。
注释:通常情况下, Windows 检测到连接了新设备后,会自动安装驱动程序。但是,某些设 备可能需要您在连接之前先安装驱动程序。连接设备之前,请先查看设备制造商提供的 说明书。
目录
第 1 章 认识您的计算机............................................................................. 1 正视图............................................................................................................................ 1 左视图............................................................................................................................ 5 右视图............................................................................................................................ 9 底视图..........................................................................................................................10