阿里云搭建SVN服务器安装日志
WINDOWS下搭建SVN服务器端的步骤
WINDOWS下搭建SVN服务器端的步骤在Windows操作系统上搭建Subversion(SVN)服务器端需要进行以下步骤:1.安装SVN软件:2.配置环境变量:为了方便使用SVN命令行工具,需要将SVN的安装路径(例如"C:\svn\bin")添加到系统的环境变量"PATH"中。
通过以下步骤实现:-右键点击"我的电脑",选择"属性"。
-在系统属性对话框中,选择"高级系统设置"。
-在系统属性对话框中,选择"环境变量"。
-点击"确定"保存环境变量更改,并关闭对话框。
3.创建版本库:在搭建SVN服务器之前,需要创建一个版本库来存储代码版本历史。
可以通过以下步骤创建版本库:- 打开命令行提示符(在Windows中按下"Windows键+R",输入"cmd",然后点击"确定")。
-在命令行提示符中,输入以下命令创建一个新的版本库:svnadmin create [版本库路径]例如,输入"svnadmin create C:\svnrepos"来创建一个版本库。
4.配置密码文件:SVN使用密码文件来管理访问权限。
需要创建一个密码文件,并设置用户的访问权限。
可以通过以下步骤完成:-在密码文件中添加用户及其密码,格式为"用户名=密码"。
-保存密码文件。
5.配置访问权限文件:SVN使用访问权限文件来定义用户可以访问版本库的哪些部分。
可以通过以下步骤进行配置:-在访问权限文件中添加对应的用户及其访问权限,格式为"路径=用户:访问权限"。
-保存访问权限文件。
6.配置服务器:需要对SVN服务器进行配置,以指定版本库和访问权限文件的位置。
可以通过以下步骤完成配置:-在文件中找到并修改以下两行:-配置文件路径:例如,修改" # anon-access = read"为"anon-access = none",表示禁止匿名访问;修改" # password-db = passwd"为"password-db= ../conf/passwd",指定密码文件的路径;修改" # authz-db = authz"为"authz-db = ../conf/authz",指定访问权限文件的路径。
svn 提取日志方法

svn 提取日志方法svn是一款非常常用的版本控制工具,使用它可以轻松地管理代码的版本,同时也可以提取代码的日志信息。
下面介绍一下 svn 提取日志的方法。
1. 使用 svn log 命令svn log 命令是通过 svn 查看版本库的历史记录,可以查看每个版本的修改信息。
使用命令格式如下:svn log [URL]其中,URL 表示要查看的版本库地址。
如果不指定 URL,则默认查看当前目录的版本库。
执行该命令后,会列出版本库中所有的提交记录,包括提交者、提交时间、修改文件等信息。
可以通过加上一些参数,来过滤和格式化输出的内容。
例如,使用 -r 参数可以指定要查看的版本号。
使用 -v 参数可以显示每个文件的详细修改信息。
使用 --xml 参数可以输出 XML 格式的日志信息,方便后续的处理。
2. 使用 svn diff 命令svn diff 命令是比较两个版本之间的差异,可以查看每个文件的修改内容。
使用命令格式如下:svn diff -r 版本号1:版本号2 [URL]其中,-r 参数指定要比较的版本号范围,URL 表示要比较的版本库地址。
如果不指定 URL,则默认比较当前目录的版本库。
执行该命令后,会列出每个文件的修改内容,包括添加、删除、修改的行数和内容。
可以通过加上一些参数,来过滤和格式化输出的内容。
例如,使用 -x 参数可以指定要比较的文件类型。
使用--summarize 参数可以只显示文件名和修改状态,方便快速查看。
以上就是 svn 提取日志的方法,通过使用 svn log 和 svn diff 命令,可以轻松地查看版本库的历史记录和每个文件的修改内容,方便我们进行代码的管理和维护。
SVN服务的部署及使用
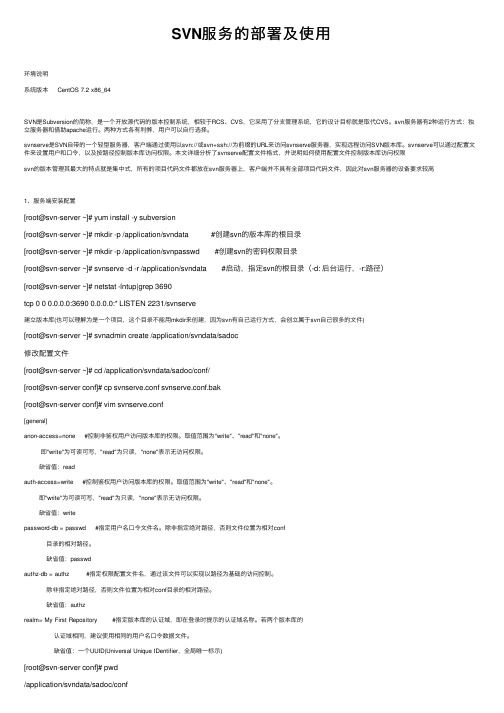
SVN服务的部署及使⽤环境说明系统版本 CentOS 7.2 x86_64SVN是Subversion的简称,是⼀个开放源代码的版本控制系统,相较于RCS、CVS,它采⽤了分⽀管理系统,它的设计⽬标就是取代CVS。
svn服务器有2种运⾏⽅式:独⽴服务器和借助apache运⾏。
两种⽅式各有利弊,⽤户可以⾃⾏选择。
svnserve是SVN⾃带的⼀个轻型服务器,客户端通过使⽤以svn://或svn+ssh://为前缀的URL来访问svnserve服务器,实现远程访问SVN版本库。
svnserve可以通过配置⽂件来设置⽤户和⼝令,以及按路径控制版本库访问权限。
本⽂详细分析了svnserve配置⽂件格式,并说明如何使⽤配置⽂件控制版本库访问权限svn的版本管理其最⼤的特点就是集中式,所有的项⽬代码⽂件都放在svn服务器上,客户端并不具有全部项⽬代码⽂件,因此对svn服务器的设备要求较⾼1、服务端安装配置[root@svn-server ~]# yum install -y subversion[root@svn-server ~]# mkdir -p /application/svndata #创建svn的版本库的根⽬录[root@svn-server ~]# mkdir -p /application/svnpasswd #创建svn的密码权限⽬录[root@svn-server ~]# svnserve -d -r /application/svndata #启动,指定svn的根⽬录(-d: 后台运⾏,-r:路径)[root@svn-server ~]# netstat -lntup|grep 3690tcp 0 0 0.0.0.0:3690 0.0.0.0:* LISTEN 2231/svnserve建⽴版本库(也可以理解为是⼀个项⽬,这个⽬录不能⽤mkdir来创建,因为svn有⾃⼰运⾏⽅式,会创⽴属于svn⾃⼰很多的⽂件)[root@svn-server ~]# svnadmin create /application/svndata/sadoc修改配置⽂件[root@svn-server ~]# cd /application/svndata/sadoc/conf/[root@svn-server conf]# cp svnserve.conf svnserve.conf.bak[root@svn-server conf]# vim svnserve.conf[general]anon-access=none #控制⾮鉴权⽤户访问版本库的权限。
阿里云搭建SVN服务器

阿里云搭建SVN服务器1:安装svnapt-get install subversion2. 开启svn服务器svnserve -d检查是否开启:ps aux | grep svnserve若出现如下内容:wkr 6537 0.0 0.0 13784 956 ? Ss 16:18 0:00 svnserve -dwkr 7593 0.0 0.0 5784 864 pts/0 S+ 21:57 0:00 grep –color=auto svnserve表示服务已开启。
(注意:一定要有第1行,只有第2行说明服务未启动)停止svn服务: killall svnserve3. 建立仓库svnadmin create /home/svnrepos理论上,仓库可以建立在任何目录中。
注意:重启svnserve 执行svnserve -d -r /home这样在eclipse客户端把工程导入svn的时候url需要填写svn://ip/svnrepos/project_name如果启动的时候带如下参数:svnserve -d -r /home/svnrepos客户端:svn://ip/project_name 这样子会报错。
验证失败4. 修改配置文件编辑svnserve.confvi /home/svnrepos/conf/svnserve.conf把anon-access = read 改为none,auth_access = writepassword-db = passwd authz-db = authz 的注释去掉,还有[general]的注释也要去掉(这个默认没有注释)。
注:当你去掉注释的时候,不要简单的把前面的#去掉,要把前面的空格一块去掉,不然在Eclipse中使用的时候会出现配置文件格式错误的问题。
注意:如果authz-db = authz 这个注释掉了,则不需要配置/home/svnrepos/conf/authz 5. 修改帐户文件vi /home/svnrepos/conf/passwd### This file is an example password file for svnserve.### Its format is similar to that of svnserve.conf. As shown in the### example below it contains one section labelled [users].### The name and password for each user follow, one account per line.[users]# harry = harryssecret# sally = sallyssecretuser1 = pass1 # 输入你定义的用户名和密码,密码显然没有加密6. 修改授权文件gedit /home/svnrepos/conf/authz修改或者输入下面2行:[svnrepos:/] ##格式为版本库名称 + :/user1 = rw其中,repos1是仓库名称,user1是用户名,rw代表读写。
SVN安装与使用教程总结
SVN安装与使⽤教程总结转载:SVN简介:为什么要使⽤SVN?程序员在编写程序的过程中,每个程序员都会⽣成很多不同的版本,这就需要程序员有效的管理代码,在需要的时候可以迅速,准确取出相应的版本。
Subversion是什么?它是⼀个⾃由/开源的版本控制系统,⼀组⽂件存放在中⼼版本库,记录每⼀次⽂件和⽬录的修改,Subversion允许把数据恢复到早期版本,或是检查数据修改的历史,Subversion可以通过⽹络访问它的版本库,从⽽使⽤户在不同的电脑上进⾏操作。
⼀:SVN服务器搭建和使⽤。
1. ⾸先来下载和搭建SVN服务器,下载地址如下: ,进⼊⽹址后,滚动到浏览器最底部看到如下截图:个⼈认为最好⽤VisualSVN server 服务端和 TortoiseSVN客户端搭配使⽤. 点开上⾯的VisualSVN连接,下载VisualSVN server,下载完成后双击安装,如下图:点击Next下⼀步,如下:然后再点击Next项,下⼀步,如下:点击【Next】如下:Location是指VisualSVN Server的安装⽬录,Repositorys是指定你的版本库⽬录.Server Port指定⼀个端⼝,Use secure connection勾⼭表⽰使⽤安全连接,点击Next,进⼊下⼀步,如下图:再点击【Install】,进⼊如下安装图:等待安装完成后,点击【next】,进⼊下⼀步:如下图点击【Finish】即可完成安装。
安装完成后,启动VisualSVN Server Manager,如图:可以在窗⼝的右边看到版本库的⼀些信息,⽐如状态,⽇志,⽤户认证,版本库等.要建⽴版本库,需要右键单击左边窗⼝的Repositores,如下图:在弹出的右键菜单中选择Create New Repository或者新建->Repository:进⼊下⼀步,如下图:点击【下⼀步】,如下图:点击【create】,如下图:点击【Finish】即可完成基本创建。
Windows环境架设SVN服务器

Windows 环境架设SVN服务器硬件设备:PC机软件设备:xp 或者windows2003 ,TortoiseSVN-1.6.14.21012-win32-svn-1.6.16.msi:SVN客户端Setup-Subversion-1.6.16.msi:SVN安装程序SVNService.rar:svn服务命令AnkhSvn-2.1.8420.8.msi部署:1、安装svn服务器端安装Setup-Subversion-1.6.16.msi,我把这个安装在“C:\Program Files\Subversion”目录。
和AnkhSvn-2.1.8420.8.msi(默认安装即可)2、安装TortoiseSVN-1.6.14.21012-win32-svn-1.6.16.msi。
以上两步中的安装选择均选默认。
重启电脑(客户端软件)3、因为这个软件开机就要用,所以对开发者来讲把它安装成一个服务是最好的(这样电脑一启动这个软件的服务器就运行了,要不然你要到命令行模式去手工启动服务)。
下面就来讲述怎么样把它设置成一个服务。
1) 把“SVNService.exe”拷贝到“C:\Program Files\Subversion\bin\”2) 在D盘新建文件夹d:\svn. 进入命令行模式:开始菜单--运行--进入“C:\Program Files\Subversion\bin\”这个目录。
打入命令:svnservice -install -d-r "d:\svn"。
(这一步很重要很重要,以前我就是这一步误解走了很多弯路)。
具体详细介绍见3.3。
把它设为自动启动:开始菜单--控制面板--性能维护--管理工具--服务,进去以后你会在服务列表中看到svnservice这个服务,右击--把它设为自动启动(这样开机的时候这个服务也启动了)3) 这里就是把“d:\svn” 这个目录指定为SVN版本控制的服务目录(网上很多帖子把上面这个命令称作建立仓库是不对的)其实这个目录应该称作仓库所在的目录,假如我有有三个仓库:repository_1,repository_2,repository_3他们的位置应该是:d:\svn\repository_1, d:\svn\repository_2,d:\svn\repository_3。
linux下搭建svn服务器
自己摸索了几天,今天终于小有成就!从零基础逐渐壮大,收获还是颇丰的!系统环境:虚拟机中Red Hat Enterprise Linux 4客户端windows: TortoiseSVN-1.6.5.16974-win32-svn-1.6.5.msi需要的软件包:subversion-1.6.5.tar.bz2apr-1.3.8.tar.gz apr-util-1.3.9.tar.gzsqlite-amalgamation-3.6.13.tar.gzhttpd-2.2.4(不需要支持http访问的可以不安装)文章将阐述全过程,不需要支持http的可以不配置appche接下来的安装都是在root身份下安装apache#tar -zxvf httpd-2.2.4.tar.gz#cd httpd-2.2.4.tar.gz#./configure --prefix=/usr/local/apache 此处将会在后面的make时创建--enable-dav --enable-so --enable-modules=most注:--enbalce-dav 选项一定要加上启动apache#/usr/local/apache/bin/apachectl start打开浏览器http://192.168.58.xxx 如果有显示"It works!"则证明已经安装成功注:其中IP为安装apache机器的IP 也就是svn服务器的IP#make#make install安装apr apr-util#tar -zxvf apr-1.3.8.tar.gz注:解压时也可在此指定解压路径当然了安装时要进入其中#cd apr-1.3.8#./configure --prefix=/usr/local/apr 此路径为最终安装路径留个印象后面能用到#make#make install#tar -zxvf apr-util-1.3.9.tar.gz#cd apr-util-1.3.9.tar.gz#./configure=/usr/local/apr-util --with-apr=/usr/local/apr 提供apr支持 =后面为apr安装路径#make#make install安装 sqlite#tar -zxvf sqlite-amalgamation-3.6.13.tar.gz#cd sqlite-3.6.13#./configure --prefix=/usr/local/sqlite#make#make install安装svn#tar -zxvf subversion-1.6.5.tar.bz2#cd subversion-1.6.5#./configure --prefix=/usr/local/svn--with-paxs=/usr/local/apache/bin/apxs--with-apr=/usr/local/apr--with-apr-util=/usr/local/apr-util--with-sqlite=/usr/local/sqlite--with-zlib=/usr/local/zlib 此处地址不定看看你zlib的安装路径在哪把它写在这没有的话自己装一个路径写这--with-ssl--enable-maintainer-mode#make#make install注:--with-zlib=/...后面不写路径会报错svn服务器安装结束安装svn客户端windows 下安装TortoiseSVN-1.6.5.16974-win32-svn-1.6.5.msi 常用软件安装方法SVN配置建立版本库#mkdir -p /opt/svn#/usr/bin svnadmin create /opt/svn/repository#ls -l /opt/svn/repository有内容显示说明版本库建立成功#vi /opt/svn/repository/conf/svnserve.conf修改如下内容:并把每行的#去掉[general]anon-access = noneauth-access = writepassword-db = /opt/svn/repository/conf/passwd 此为系统自动生成文件,但要修改过之后才能生效authz-db = /opt/svn/authz.conf 此文件还没有创建但系统已经为此自动生成了一个文件,路径同上我用我自己创建的realm = repository创建svn用户此用户也就是客户端的登陆用户#htpasswd -c /opt/svn/htpasswd admin之后体统会提示输入密码、校验密码注:第一次创建svn用户时要加 -c 意思是:如果htpasswd存在将覆盖写入往后再创建svn用户时也是执行此命令不过不用加 -cadmin 为用户名标识登陆用户例:新增加用户user#htpasswd /opt/svn/htpasswd user用户配置文件#vi /opt/svn/repository/conf/passwd在最下面添加两行代码格式为:用户名 = 密码admin = admin 前不要加# 、留空格user = user权限配置文件#vi /opt/svn/authz.conf写入如下代码[groups]admin = admin,user[/]@admin = rw 代表admin的所有组员有读写权限注:admin组里面有admin和user组员其中有一个以上的组员时要用逗号隔开这一部分自己可以找资料看看设计内容很多,我只建了一个版本库,还有多个版本库的设置,版本库下的具体目录权限设置启动svn服务#svnserver -d --listen-port 9999 -r /opt/svn/repository注:启动时也是有名堂的可以找资料看看-d 后台运行9999是要监听的端口-r 后面的是版本库路径#ps -ef | grep svnserve 查看svn有没有启动成功成功显示root 5088 1 0 Jul05 ? 00:00:00 svnserve -d --listen-port 9999 -r /opt/svn/repository客户端登陆右键单击某个文件夹点击check out输入URL:svn://192.168.58.XXX:9999/opt/svn/repository其中IP为启动svn服务的机器的IP不用支持http的下面范围内可以不用理会/***********************************/配置apache#vi /usr/local/apache/conf/httpd.conf做如下修改:listen 80 如果是以root用户启动apache此处不用修改其他用户启动的要修改大于1024的否则报错# Example:# LoadModule foo_module modules/mod_foo.soLoadModule dav_module modules/mod_dav.soLoadModule dav_svn_module modules/mod_dav_svn.soLoadModule authz_svn_module modules/mod_authz_svn.so注:此段代码我的没有我自己添加的因为后面启动apache时报:Invalid command 'DAV', perhaps mis-spelled or defined by a module not included in the server configuration 别光添加代码还要确保此文件上级目录下的 modules 里面有相应的模块没有的话另外下载其他的 httpd-xxx-xxx 解压安装把其中的相应模块拷贝过来User svnGroup svnServerName 192.168.58.xxx IP设置svn服务器的IP把DocumentRoot "/usr/local/apache/htdocs"改为DocumentRoot "/opt/svn/repository"把<Directory "/usr/local/apache/htdocs">改为<Directory "/opt/svn/repository">另外在最下面添加:<Location /opt/svn>DAV svn 如果没有Loadmodules xxx_dav xxx.so 此处会报错SVNParentPath /opt/svn svn设置AuthType Basic 连接类型设置AuthName "Subversion Authorization" 连接框提示AuthzSVNAccessFile /opt/svn/authz.conf 权限配置文件此文件中有 [group] AuthUserFile /opt/svn/htpasswd 此文件中存的是用 htpasswd 创建的Require valid-user 采用何种认证</Location>重启apache 验证配置/usr/local/apache/bin/apachectl restart 如果没有启动用start打开浏览器访问http://192.168.58.xxx/opt/svn/repository --》弹出登陆框如果不弹出登陆框则配置失败/***********************************/最后:我安装过程中错误千奇百怪的,一点一点上网搜资料,慢慢的就完善了!也预祝你们顺利!。
阿里云安全日志源管理使用手册说明书

q q q q qq使用手册控制台操作指南 安全日志源管理(Security log manager)是一套针对用户在阿里云环境中产生的安全相关日志的采集、存储、分发的基础设施,我们的核心价值是做安全日志的搬运工,为用户呈现真实的云上安全记录。
安全日志源包含但不仅限于:云盾检测安全事件ECS操作系统日志网络流量日志网站访问日志云产品操作日志数据库操作日志 开通服务用户首次进入安全日志源管理页时,用户点击"立即开通"按钮:点击立即开通后,进入公测申请页:点击申请公测资格后,打开公测申请单:信息填写完整后,点击"申请提交",系统会在1个工作日内完成审核,审核通过后即该服务开通成功。
日志采集开通进入后,默认进入开通日志页,设置日志源开关开关点击开启后,系统检测采集通道是否正常,正常时则表示可顺利采集到该日志源,异常则表示未能采集到该日志源,需要在指导文档的帮助下调整配置,具体异常指南请参见"常见问题"。
通过左下角的批量开通,可快速开通所有日志源的采集开关。
点击右上角的"更新设备列表",可重新获取用户名下的可采集日志的设备清单。
开通后效果图:开通完成后,点击左上角"概览",返回概览页:q qq日志源开通及采集的概况日志查询在日志概览页点击"查看日志"或当前存储的日志数量的值,均可跳转至日志查询页:默认显示近15分钟之内的日志记录支持关键词模糊搜索保存搜索条件方便下次快速查阅关注的日志记录导出搜索后的当前页,每页可设最大显示的记录数为100条 保存查询条件如下: 点击常用搜索条件的名称后,可快速查看相关记录日志授权用户可将日志授权给阿里云认证的安全服务商,服务商可通过授权后,获取日志读取的权限,并方便接入自己的安全产品。
系统默认将日志授权给态势感知,满足基本的日志查询和分析。
用户可以控制已开通日志采集的日志源按需分类输入指定服务商的邮箱地址,点击下一步,认证通过后,该服务商会收到授权码信息发送至邮箱。
- 1、下载文档前请自行甄别文档内容的完整性,平台不提供额外的编辑、内容补充、找答案等附加服务。
- 2、"仅部分预览"的文档,不可在线预览部分如存在完整性等问题,可反馈申请退款(可完整预览的文档不适用该条件!)。
- 3、如文档侵犯您的权益,请联系客服反馈,我们会尽快为您处理(人工客服工作时间:9:00-18:30)。
Welcome to aliyun Elastic Compute Service!Last login: Wed Jan 21 20:45:49 2015 from 123.169.2.1root@iZ9999t0o8xZ:~# apt-get install subversionReading package lists... DoneBuilding dependency treeReading state information... DoneThe following extra packages will be installed:libapr1 libaprutil1 libdb4.8 libneon27-gnutls libsvn1Suggested packages:subversion-tools db4.8-utilThe following NEW packages will be installed:libapr1 libaprutil1 libdb4.8 libneon27-gnutls libsvn1 subversion0 upgraded, 6 newly installed, 0 to remove and 125 not upgraded.Need to get 2,037 kB of archives.After this operation, 5,659 kB of additional disk space will be used.Do you want to continue [Y/n]?Do you want to continue [Y/n]? YGet:1 /ubuntu/ precise/main libdb4.8 amd64 4.8.30-11ubuntu1 [679 kB]Get:2 /ubuntu/ precise/main libapr1 amd64 1.4.6-1 [89.6 kB] Get:3 /ubuntu/ precise/main libaprutil1 amd64 1.3.12+dfsg-3 [74.6 kB]Get:4 /ubuntu/ precise-updates/main libneon27-gnutls amd64 0.29.6-1ubuntu1 [76.4 kB]Err /ubuntu/ precise-updates/main libsvn1 amd64 1.6.17dfsg-3ubuntu3.3404 Not Found [IP: 112.124.140.210 80]Err /ubuntu/ precise-updates/main subversion amd64 1.6.17dfsg-3ubuntu3.3404 Not Found [IP: 112.124.140.210 80]Fetched 920 kB in 0s (2,128 kB/s)Failed to fetch /ubuntu/pool/main/s/subversion/libsvn1_1.6.17dfsg-3ubuntu3.3_a md64.deb 404 Not Found [IP: 112.124.140.210 80]Failed to fetch /ubuntu/pool/main/s/subversion/subversion_1.6.17dfsg-3ubuntu3. 3_amd64.deb 404 Not Found [IP: 112.124.140.210 80]E: Unable to fetch some archives, maybe run apt-get update or try with --fix-missing?root@iZ9999t0o8xZ:~# apt-get update(或者--fix-missing 命令)Ign precise InReleaseIgn precise-security InReleaseIgn precise-updates InReleaseIgn precise-proposed InReleaseIgn precise-backports InReleaseGet:1 precise Release.gpg [198 B]Get:2 precise-security Release.gpg [198 B]Get:3 precise-updates Release.gpg [198 B]Get:4 precise-proposed Release.gpg [198 B]Get:5 precise-backports Release.gpg [198 B]Get:6 precise Release [49.6 kB]Get:7 precise-security Release [53.0 kB]Get:8 precise-updates Release [194 kB]Get:9 precise-proposed Release [194 kB]Get:10 precise-backports Release [53.1 kB]Get:11 precise/main Sources [934 kB]Get:12 precise/restricted Sources [5,470 B]Get:13 precise/universe Sources [5,019 kB]Get:14 precise/multiverse Sources [155 kB]Get:15 precise/main amd64 Packages [1,273 kB]Get:16 precise/restricted amd64 Packages [8,452 B]Get:17 precise/universe amd64 Packages [4,786 kB]Get:18 precise/multiverse amd64 Packages [119 kB]Get:19 precise/main i386 Packages [1,274 kB]Get:20 precise/restricted i386 Packages [8,431 B]Get:21 precise/universe i386 Packages [4,796 kB]Get:22 precise/multiverse i386 Packages [121 kB]Hit precise/main TranslationIndexHit precise/multiverse TranslationIndexHit precise/restricted TranslationIndexHit precise/universe TranslationIndexGet:23 precise-security/main Sources [124 kB]Get:24 precise-security/restricted Sources [3,759 B]Get:25 precise-security/universe Sources [33.5 kB]Get:26 precise-security/multiverse Sources [1,819 B]Get:27 precise-security/main amd64 Packages [480 kB] Get:28 precise-security/restricted amd64 Packages [8,943 B] Get:29 precise-security/universe amd64 Packages [106 kB] Get:30 precise-security/multiverse amd64 Packages [2,460 B] Get:31 precise-security/main i386 Packages [520 kB]Get:32 precise-security/restricted i386 Packages [8,939 B] Get:33 precise-security/universe i386 Packages [113 kB] Get:34 precise-security/multiverse i386 Packages [2,651 B] Get:35 precise-security/main TranslationIndex [208 B] Get:36 precise-security/multiverse TranslationIndex [199 B] Get:37 precise-security/restricted TranslationIndex [202 B] Get:38 precise-security/universe TranslationIndex [205 B]Get:39 precise-updates/main Sources [485 kB]Get:40 precise-updates/restricted Sources [7,981 B]Get:41 precise-updates/universe Sources [112 kB]Get:42 precise-updates/multiverse Sources [8,904 B]Get:43 precise-updates/main amd64 Packages [868 kB]Get:44 precise-updates/restricted amd64 Packages [13.6 kB] Get:45 precise-updates/universe amd64 Packages [253 kB] Get:46 precise-updates/multiverse amd64 Packages [15.3 kB] Get:47 precise-updates/main i386 Packages [905 kB]Get:48 precise-updates/restricted i386 Packages [13.6 kB] Get:49 precise-updates/universe i386 Packages [261 kB] Get:50 precise-updates/multiverse i386 Packages [15.5 kB] Get:51 precise-updates/main TranslationIndex [10.6 kB] Get:52 precise-updates/multiverse TranslationIndex [7,613 B] Get:53 precise-updates/restricted TranslationIndex [7,297 B] Get:54 precise-updates/universe TranslationIndex [8,333 B] Get:55 precise-proposed/main Sources [15.2 kB]Get:56 precise-proposed/restricted Sources [1,424 B]Get:57 precise-proposed/universe Sources [4,217 B]Get:58 precise-proposed/multiverse Sources [2,033 B]Get:59 precise-proposed/main amd64 Packages [185 kB] Get:60 precise-proposed/restricted amd64 Packages [1,140 B] Get:61 precise-proposed/universe amd64 Packages [12.5 kB] Get:62 precise-proposed/multiverse amd64 Packages [1,898 B] Get:63 precise-proposed/main i386 Packages [219 kB]Get:64 precise-proposed/restricted i386 Packages [1,138 B] Get:65 precise-proposed/universe i386 Packages [19.8 kB] Get:66 precise-proposed/multiverse i386 Packages [1,897 B] Get:67 precise-proposed/main TranslationIndex [10.6 kB] Get:68 precise-proposed/multiverse TranslationIndex [7,613 B] Get:69 precise-proposed/restricted TranslationIndex [7,297 B] Get:70 precise-proposed/universe TranslationIndex [8,333 B] Get:71 precise-backports/main Sources [5,371 B]Get:72 precise-backports/restricted Sources [14 B]Get:73 precise-backports/universe Sources [41.4 kB]Get:74 precise-backports/multiverse Sources [5,737 B]Get:75 precise-backports/main amd64 Packages [5,477 B] Get:76 precise-backports/restricted amd64 Packages [14 B] Get:77 precise-backports/universe amd64 Packages [43.4 kB] Get:78 precise-backports/multiverse amd64 Packages [5,405 B] Get:79 precise-backports/main i386 Packages [5,470 B]Get:80 precise-backports/restricted i386 Packages [14 B] Get:81 precise-backports/universe i386 Packages [43.2 kB] Get:82 precise-backports/multiverse i386 Packages [5,399 B]Get:83 precise-backports/main TranslationIndex [202 B]Get:84 precise-backports/multiverse TranslationIndex [202 B] Get:85 precise-backports/restricted TranslationIndex [193 B] Get:86 precise-backports/universe TranslationIndex [205 B]Hit precise/main Translation-enHit precise/multiverse Translation-enHit precise/restricted Translation-enHit precise/universe Translation-enGet:87 precise-security/main Translation-en [214 kB]Hit precise-security/multiverse Translation-enGet:88 precise-security/restricted Translation-en [2,066 B]Get:89 precise-security/universe Translation-en [64.8 kB]Get:90 precise-updates/main Translation-en [383 kB]Hit precise-updates/multiverse Translation-enGet:91 precise-updates/restricted Translation-en [2,982 B]Get:92 precise-updates/universe Translation-en [147 kB]Get:93 precise-proposed/main Translation-en [60.0 kB]Get:94 precise-proposed/multiverse Translation-en [976 B]Get:95 precise-proposed/restricted Translation-en [460 B]Get:96 precise-proposed/universe Translation-en [5,901 B]Get:97 precise-backports/main Translation-en [4,911 B]Get:98 precise-backports/multiverse Translation-en [4,838 B]Hit precise-backports/restricted Translation-enGet:99 precise-backports/universe Translation-en [34.4 kB] Fetched 25.0 MB in 12s (1,970 kB/s)Reading package lists... Doneroot@iZ9999t0o8xZ:~# apt-get install subversionReading package lists... DoneBuilding dependency treeReading state information... DoneThe following extra packages will be installed:libapr1 libaprutil1 libdb4.8 libneon27-gnutls libsvn1Suggested packages:subversion-tools db4.8-utilThe following NEW packages will be installed:libapr1 libaprutil1 libdb4.8 libneon27-gnutls libsvn1 subversion0 upgraded, 6 newly installed, 0 to remove and 177 not upgraded.Need to get 1,118 kB/2,038 kB of archives.After this operation, 5,663 kB of additional disk space will be used.Do you want to continue [Y/n]? YGet:1 /ubuntu/ precise-security/main libsvn1 amd64 1.6.17dfsg-3ubuntu3.4 [821 kB]Get:2 /ubuntu/ precise-security/main subversion amd64 1.6.17dfsg-3ubuntu3.4 [297 kB]Fetched 1,118 kB in 0s (5,763 kB/s)Selecting previously unselected package libdb4.8.(Reading database ... 54216 files and directories currently installed.)Unpacking libdb4.8 (from .../libdb4.8_4.8.30-11ubuntu1_amd64.deb) ...Selecting previously unselected package libapr1.Unpacking libapr1 (from .../libapr1_1.4.6-1_amd64.deb) ...Selecting previously unselected package libaprutil1.Unpacking libaprutil1 (from .../libaprutil1_1.3.12+dfsg-3_amd64.deb) ...Selecting previously unselected package libneon27-gnutls.Unpacking libneon27-gnutls (from .../libneon27-gnutls_0.29.6-1ubuntu1_amd64.deb) ... Selecting previously unselected package libsvn1.Unpacking libsvn1 (from .../libsvn1_1.6.17dfsg-3ubuntu3.4_amd64.deb) ...Selecting previously unselected package subversion.Unpacking subversion (from .../subversion_1.6.17dfsg-3ubuntu3.4_amd64.deb) ... Processing triggers for man-db ...Setting up libdb4.8 (4.8.30-11ubuntu1) ...Setting up libapr1 (1.4.6-1) ...Setting up libaprutil1 (1.3.12+dfsg-3) ...Setting up libneon27-gnutls (0.29.6-1ubuntu1) ...Setting up libsvn1 (1.6.17dfsg-3ubuntu3.4) ...Setting up subversion (1.6.17dfsg-3ubuntu3.4) ...Processing triggers for libc-bin ...ldconfig deferred processing now taking placeroot@iZ9999t0o8xZ:~#root@iZ9999t0o8xZ:~# svnserve -droot@iZ9999t0o8xZ:~# ps aux | grep svnserveroot 21324 0.0 0.0 71216 836 ? Ss 21:58 0:00 svnserve -droot 21326 0.0 0.0 8108 928 pts/0 S+ 21:59 0:00 grep --color=auto svnserveroot@iZ9999t0o8xZ:~#svnadmin create /home/svnrepos。