网件NETGEAR设置说明书
netgear无线路由器设置图文详解
netgear无线路由器设置图文详解netgear无线路由器在市场上也占有很大的份额,而我们对netgear无线路由器设置却可能不太了解,下面是店铺整理的netgear 无线路由器设置的相关知识,希望对您有一些帮助!netgear无线路由器设置图文详解1.进入初始的设置向导后,我们发现有5个步骤。
前面两个步骤是提醒用户需要做的准备工作以及连接设备,这里我们不做详细阐述,跳过前两个步骤,直接进入第三步——激活网络。
页面提示我们是否通过设置向导设置网络。
这里本人建议对路由器设置还不大熟悉的大虾们选择“是”,通过向导设置,方便省事。
然后我们点击下一步。
2.接着,系统要求我们设置无线网络名,用于在多个无线网络下,对此网络进行识别。
如果采用默认名字的话,很有可能跟别人的热点重名,会造成很大干扰,所以我们最好改一个个性化的SSID。
输入好自定义名字之后,点击下一步进入下一个步骤。
3.接着我们进入第四步骤——网络安全。
简单的选择是否引导无线安全设置。
选择是,点击下一步继续设置。
4.接着系统询问我们希望使用哪种加密功能,由于我的设备支持WPA-PSK加密方式,所以选择了这个选项。
大家也可以根据自己设备的具体状况选择相应的加密方式,然后点击下一步输入密匙。
5.接下来的这一步非常简单,输入密码即可。
不过这一页面的亮点在打印按钮上,由此看出Netgear为用户考虑周到,方便用户把密码打印下来,以便日后忘记密码后能够有迹可寻。
6.最后,系统询问我们是否更改管理员的帐号密码。
这里我们建议大家把管理员帐号密码改成一个自己不易忘记而别人又不知道的密码,这样便能防止别人胡乱修改你的设置。
如果不需要更改,则选择下面的选项,点击下一步。
7.这样,我们就进入了第五步骤,完成了网络设置向导。
8.完成设置向导后,我们进入基本设置页面。
首先我们需要弄清楚我们是否通过拨号的方式上网,一般ADSL用户都是使用拨号方式进行上网,专线的话则不需要拨号。
NETGEAR 非网管交换机操作指南说明书
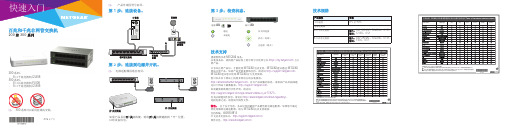
注:产品外观因型号而异。
第 2 步:连接到电源并开机。
第 1步:连接设备。
注:电源适配器因地区而异。
计算机因特网第 3 步:检查状态。
电源 LED端口 LED通电以太网连接未通电活动(闪烁)无连接(熄灭)技术支持感谢您购买此 NETGEAR 设备。
安装设备后,请找到产品标签上的序列号并使用它在https://上注册产品。
只有在注册产品后,才能使用 NETGEAR 电话支持。
NETGEAR 建议通过 NETGEAR网站注册产品。
如需产品更新和网络支持,请访问 。
NETGEAR 建议您只使用 NETGEAR 官方支持资源。
您可以在以下网站上找到多种语言的安装指南: 。
有关产品规格的信息,请参阅产品页面或通过以下网站下载数据表: 。
如需最新的欧盟符合性声明,请访问/app/answers/detail/a_id/11621/ 。
有关法规遵从性信息,请访问/about/regulatory/ 。
连接电源之前,请查阅合规性文件。
警告:出于安全考虑,务必仅使用随附产品销售的电源适配器。
如果您不确定要使用哪种电源适配器,请与 NETGEAR 技术支持联系。
支持热线:4008303815中文技术支持站点:网件社区:技术规格百兆和千兆非网管交换机200 和 300 系列200 系列:• 8 口千兆交换机 GS208300 系列:• 8 口百兆交换机 FS308• 8 口千兆交换机 GS3082016 年 7 月有限保修产品注册感谢您选择NETGEAR产品。
如果您想注册您的产品、获取免费支持期(可以于购买产品后的 90 天内通过电话获得基础技术支持)以及查看通用的产品信息和文档,请浏览:https:///registration/login.aspx敬请保管好您产品的有效购买凭证。
本保修声明涵盖的产品NETGEAR 通过本保修声明赋予消费者的权益是对消费者在与商品和服务保修相关的中国法律项下所享有的权利和救济的补充(如果其范围超过消费者在中国法律项下的权利和救济)。
NETGEAR无线路由器说明书
注意:完成上述连接并启动Modem 及路由器后,请检查路由器面板的指示灯。若正确连接,电源指示
灯、无线指示灯、WAN 口指示灯及对应的LAN 口指示灯均亮,对照“WGR614v10 的指示灯及端口” 介
绍检查指示灯是否显示正常。
计算机网络属性配置
例:某电信ADSL 用户,电信提供的相关信息如下:
宽带用户名gzDSL1234@163.gd
密码12345678
1.
选择菜单设置→基本设置:第一个问题您的因特网
连接需要登录吗? 选择“ 是” ;因特网服务提供商
选择“PPPoE” ;在登录名和密码后面的空白栏中分
别输入所用宽带的帐号和密码,如右图:
WGR614v10
固件升级
进入管理界面,显示路由器正在检查固件升级。若选中“ 登
录时检测新版本” 复选框,则每次登录WGR614v10 管理界
面时,路由器会自动检查NETGEAR 服务器,查看是否有
新的固件发布。
通常情况下,路由器现有固件都可以稳定工作,不必经常
升级。如果需要刷新固件,建议您登录NETGEAR 中文站
201-12333-01
手动连接:若您希望自己控制路由器与Internet 的连接或断开,请选择手动连接;需要上网时,首先进
入路由器管理界面,在路由器状态→连接状态中点击连接即可,需要注意的是,手动连接后路由器将一
直保持在线,必须在连接状态中点击断开连接方可断开与Internet 的连接。
端口已获取到IP 地址,说明路由器与Internet 连接成功。
关于WGR614v10
连接模式的说明
NETGEAR路由器用户手册说明书

iTunes Server and AirPlay Setup for RoutersUser ManualSeptember 2015202-11594-01350 East Plumeria DriveiTunes Server and AirPlay Setup for RoutersSupportThank you for purchasing this NETGEAR product. You can visit /support to register your product, get help, access the latest downloads and user manuals, and join our community. We recommend that you use only official NETGEAR support resources.ConformityFor the current EU Declaration of Conformity, visit /app/answers/detail/a_id/11621.ComplianceFor regulatory compliance information, visit /about/regulatory.See the regulatory compliance document before connecting the power supply.Trademarks© NETGEAR, Inc. NETGEAR and the NETGEAR Logo are trademarks of NETGEAR, Inc. Any non-NETGEAR trademarks are used for reference purposes only.ContentsChapter 1Set Up the Router as an iTunes ServerSet Up the Router as an iTunes Server. . . . . . . . . . . . . . . . . . . . . . . . . . . . . . . . . . . 5Supported NETGEAR Routers for iTunes Server. . . . . . . . . . . . . . . . . . . . . . . . . 5Supported USB Storage Devices. . . . . . . . . . . . . . . . . . . . . . . . . . . . . . . . . . . . . . 5Supported File Formates for iTunes Server. . . . . . . . . . . . . . . . . . . . . . . . . . . . . 5Maximum Number of Files iTunes Server Supports. . . . . . . . . . . . . . . . . . . . . . 6 Set Up the Router’s iTunes Server With iTunes. . . . . . . . . . . . . . . . . . . . . . . . . . . . 6Set Up the Router’s iTunes Server With the Remote App . . . . . . . . . . . . . . . . . . . 8 Chapter 2Set Up AirPlay and Stream Media Using iTunes Server Set Up AirPlay and Stream Media Using iTunes Server . . . . . . . . . . . . . . . . . . . . 141This chapter contains the following sections:•Set Up the Router as an iTunes Server•Set Up the Router’s iTunes Server With iTunes•Set Up the Router’s iTunes Server With the Remote AppFor more information about the topics covered in this manual, visit the support website at .Set Up the Router as an iTunes ServerIf your router can be set up as an iTunes server, the router’s iTunes Server lets you play music from a USB storage device that is connected to a USB port on your router with iTunesNote:The router shown in this image is the Nighthawk R7000.Supported NETGEAR Routers for iTunes ServerTo determine if your NETGEAR router can be set up as an iTunes server, see your router’s user manual, which is available at .Supported USB Storage DevicesFor the most up-to-date list of USB storage devices that your router supports, visit/readyshare.Supported File Formates for iTunes ServerThe following music file formats are supported with iTunes Server:•MP3•AAC•FLACMaximum Number of Files iTunes Server SupportsThe maximum number of music files supported is 10,000.Set Up the Router’s iTunes Server With iTunes You can play music from a USB storage device that is connected to your router with iTunes on your Windows or Mac computer using Home Sharing. To set up Home Sharing, you need an Apple account and the latest version of iTunes installed on your computer.Note:The iTunes images used in this section were taken with a MacBookAir with iTunes version 12.2.1.16 installed.To set up the router’s iTunes server to play music on iTunes:1. Connect a USB storage device to a USB port on your router.2. Launch a web browser from a computer or WiFi device that is connected to your router’snetwork.3. Enter .A login window displays.4. Enter the router user name and password.The user name is admin. The default password is password. The user name andpassword are case-sensitive.The BASIC Home page displays.5. Select ADVANCED > USB Functions > ReadySHARE Storage.The USB Storage (Advanced Settings) page displays.Note:This navigation path might be different depending on your router. Seeyour router’s user manual for more information. Your router’s usermanual is available online at .6. Select the Media Server tab.7. Select the Enable iTunes Media Server (Music Only) check box and click the Applybutton.Your settings are saved.8. On your Windows or Mac computer, launch iTunes.9. Select File > Home Sharing > Turn On Home Sharing.10. Enter your Apple ID email address and password and click the Turn On Home Sharingbutton.When Home Sharing is enabled, a Home Sharing icon displays in iTunes .11. Click the Home Sharing icon and from the menu, select your router.The music that is on the USB storage device that is connected to the router displays in iTunes.Set Up the Router’s iTunes Server With the Remote App You can play music from a USB storage device that is connected to your router on your iPhone or iPad using the Apple Remote app.Note:The Remote app images used in this section were taken with aniPhone 5S running iOS 8.4.To set up the router’s iTunes server to play music on your iPhone or iPad:1. Connect a USB storage device to a USB port on your router.2. Connect your iPhone or iPad to your router’s WiFi network.3. Download the Remote app from the Apple App Store.4. Launch the Remote app from your iPhone or iPad.5. Click the Add a Device button.6. Specify the passcode in the router to set up your iTunes Server:unch a web browser from a computer or WiFi device that is connected to your router’snetwork.b. Enter .A login window displays.c. Enter the router user name and password.The user name is admin. The default password is password. The user name andpassword are case-sensitive.The BASIC Home page displays.d. Select ADVANCED > USB Functions > ReadySHARE Storage.The USB Storage (Advanced Settings) page displays.Note:This navigation path might be different depending on your router. See your router’s user manual for more information. Your router’s usermanual is available online at .e. Select the Media Server tab.f. Select the Enable iTunes Media Server (Music Only) check box and click theApply button.g. Enter the passcode and click the Allow Control button.Your settings are saved.Your iPhone or iPad pairs with the router and the iTunes Server is ready. The router displays in the Remote app.7. In the Remote app, tap the router your iPhone or iPad is connected to.The music that is on the USB storage device that is connected to the router displays in the app.2If you own an Apple TV, you can use AirPlay to stream media from a USB storage device connected to your router onto a TV.Set Up AirPlay and Stream Media Using iTunes Server You must first set up iTunes server on your iOS device before you can stream the media from the USB storage device. For more information about setting up iTunes server, see Set Up the Router’s iTunes Server With the Remote App on page8.To use an Apple TV and the Remote app to stream media from your USB storage device to a TV:1. Make sure that your Apple TV is connected to your router’s network.For more information, see the documentation that came with your Apple TV.2. Connect a USB storage device to a USB port on the router.3. Connect your iOS device to the router’s WiFi network.4. Set up iTunes server on your iOS device using the Remote app.For more information see, Set Up the Router’s iTunes Server With the Remote App on page8.5. On your iOS device, swipe up from the bottom of your screen.The Control Center displays.6. T ap AirPlay.7. T ap Apple TV.8. Slide the Mirroring slider to right to display your iOS device’s screen on the TV.9. On your iOS device, open the remote app.10. T ap the router your iPhone or iPad is connected to.11. T ap a media file.The media file displays on your TV.。
网件(NETGEAR)无线路由器设置图文教程
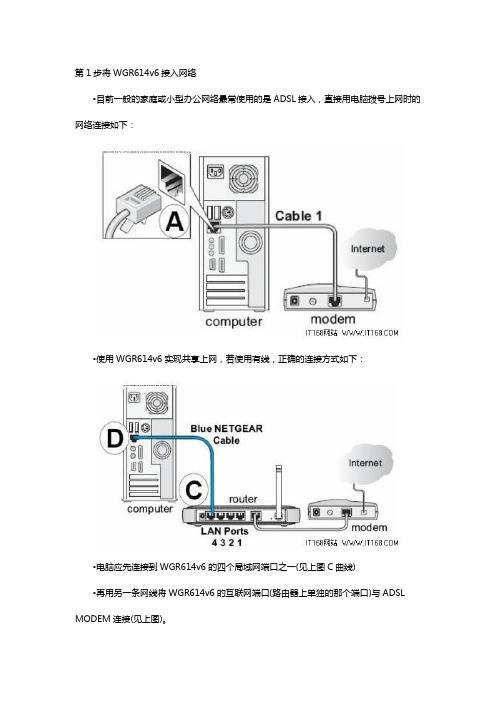
第1步将WGR614v6接入网络•目前一般的家庭或小型办公网络最常使用的是ADSL接入,直接用电脑拨号上网时的网络连接如下:•使用WGR614v6实现共享上网,若使用有线,正确的连接方式如下:•电脑应先连接到WGR614v6的四个局域网端口之一(见上图C曲线)•再用另一条网线将WGR614v6的互联网端口(路由器上单独的那个端口)与ADSL MODEM连接(见上图)。
第2步电脑网络属性配置•在配置路由器前,首先要对用来管理路由器的电脑进行网络属性的配置,下面以Windows XP Home Edition Service Pack 2为例来说明电脑的配置过程:2.1. 启动电脑,右键单击桌面或“开始”中的“网上邻居”选“属性”,右键单击“本地连接”选“属性”,选中“Internet协议(TCP/IP)”,点击“属性”:2.2. 将电脑设为“自动获得IP地址”,“自动获得DNS服务器地址”点击“确定”:第3步登录路由器3.1. 确保电脑已按照第一步所述通过有线连接到路由器的四个LAN口之一,启动路由器。
3.2. 打开电脑的Internet Explorer或者Netscape Navigator等其他浏览器,在浏览器的地址栏键入http://192.168.1.1/basicsetting.htm后回车『注』初次设置路由器须按以上步骤,以后管理路由器或者更改配置,只需要在IE浏览器中输入192.168.1.1,此时路由器会要求提供用户名和密码。
登录路由器用户名:admin,密码:password,都是小写:默认进入的页面是”基本设置”页面,如图:『注意』无论您的宽带采用何种接入方式,都须先通过有线方式连接到路由器,在基本设置页面中进行相应的设置,完成后无线收发功能才会开启,才可使用无线连接。
接下去的内容就将介绍ADSL拨号、固定IP及动态IP三种宽带接入方式在基本设置中的配置。
重要提示:如果3.2的操作结果并非如上所述,而是无法打开网页,则继续3.3步骤,否则跳至第4步。
网件路由器设置
网件路由器设置一、简介网件(Netgear)是一家全球领先的网络设备制造商,其路由器产品在用户中非常受欢迎。
通过网件路由器,用户可以将家庭或办公室的网络连接到互联网,实现无线和有线设备的联网访问。
本文将介绍网件路由器的设置过程,帮助用户快速搭建自己的网络环境。
二、前期准备在开始设置网件路由器之前,确保完成了以下准备工作:1. 购买了一台网件路由器,并确保其处于正常状态。
2. 准备了一个可以连接路由器的电脑或手机。
3. 能够连接到互联网的宽带或者光纤网络。
三、连接路由器1. 确保电脑或手机处于可连接网络的状态,打开无线或有线连接。
2. 将电脑或手机的网线或无线信号连接到网件路由器的WAN口或LAN口。
如果使用有线连接,插入网线时要确保连接牢固。
3. 如果是使用无线连接,打开电脑或手机的Wi-Fi功能,并搜索网络列表中的网件路由器名称(通常以NETGEAR_开头)。
选择该网络并输入密码进行连接。
四、登录路由器管理界面1. 打开电脑或手机上的浏览器,输入默认的路由器管理IP地址,通常为192.168.1.1。
如果无法访问,请参考路由器说明书中的IP地址。
2. 在弹出的登录界面中,输入初始的用户名和密码,默认为admin/admin。
如果之前更改过密码,请输入新密码进行登录。
五、设置无线网络1. 在管理界面中,找到“无线设置”菜单或选项。
2. 在无线设置页面中,可以更改无线网络的名称(SSID)、加密方式(如WPA2-PSK)、密码等参数。
确保设置一个足够强壮的密码以提高网络安全性。
3. 配置完成后,保存设置并等待路由器重启。
六、配置有线网络1. 在管理界面中,找到“LAN设置”菜单或选项。
2. 在LAN设置页面中,可以更改局域网的IP地址、子网掩码等参数。
如果不太了解这些参数的含义,建议使用默认设置。
3. 确认设置无误后,保存设置并等待路由器重启。
七、高级功能设置1. 在管理界面中,可以找到各种高级功能设置,如端口转发、UPnP、QoS等。
美国网件(NETGEAR)路由器的设置
美国⽹件(NETGEAR)路由器的设置美国⽹件NETGEAR)路由器的设置1、在设置⽹件(NETGEAR)路由器的时候,可以在浏览器中输⼊,也可以输⼊,也可以直接输⼊IP地址:192.168.1.1打开设置界⾯。
其实,⽹件(NETGEAR)路由器机⾝的标签(铭牌)上,已经标明了登陆地址的。
初次设置,当精灵设置向导询问“需要NETGEAR精灵为您提供帮助吗?”请选择:不需要,我想⾃⼰配置因特⽹连接——>点击“下⼀步”——>再点击“确定”;有的⽤户或许会看到写有“重要的更新”的提⽰,请点击继续。
、设置NETGEAR路由器上⽹重要说明:宽带类型有三种:PPPoE、固定IP、动态IP。
⽤户在设置之前,应该弄清楚⾃⼰办理的宽带属于哪⼀种类型;如果不清楚,可以拨打宽带运营商的客服电话,进⾏咨询。
(1)PPPoE拨号上⽹设置:PPPoE拨号介绍:宽带运营商会提供⼀个宽带账号、宽带密码给⽤户,在未使⽤路由器的时候,电脑上需要⽤“宽带连接”程序拨号上⽹。
详细设置:点击“设置”——>“基本设置”——>“您的因特⽹连接需要登录吗”选择:是——>“因特⽹服务提供商”选择PPPoE——>在“登录”和“密码”后⾯的空⽩栏中分别输⼊:宽带的帐号、宽带密码——>“因特⽹IP地址”选择:从ISP处动态获取——>点击“应⽤”如下图:⽹线(NETGEAR)路由器PPPoE拨号上⽹设置(2)动态IP上⽹设置动态IP上⽹介绍:如果直接使⽤电脑上⽹时,电脑中的IP和DNS只需要设置为:⾃动获得,且⽆需运⾏任何拨号或连接程序,就能上⽹,那么您就属于这种接⼊⽅式了。
详细设置:选择菜单“设置”—>“基本设置”—>“您的因特⽹连接需要登录吗”选择:否——>“因特⽹IP地址”选择:从ISP处动态获取——>“域名服务器(DNS)地址”选择:从ISP处动态获取——>“路由器MAC地址”选择:使⽤缺省地址——>点击上⽅“应⽤”如下图⽹线(NETGEAR)路由器动态IP 上⽹设置(3)固定IP上⽹设置固定IP上⽹介绍:宽带运营商会提供固定IP地址、⼦⽹掩码、⽹关、DNS服务器地址给⽤户;未使⽤路由器的情况下,需要在电脑本地连接中,⼿动填写宽带运营商(⽹络管理员)提供的IP地址、⼦⽹掩码、⽹关和DNS,之后电脑才能上⽹。
Netgear AC1200设置指南说明书
Graduate Accommodation Internet ServiceNetgear AC1200 Setup guideInternet access is via a network router that connects to a data socket in your flat. This requires your IT Services Remote Access username and password. All network traffic will be logged against your username for audit purposes. For more details about how the University processes personal data please refer to the privacy policy.By connecting to the service you agree to abide by all relevant law, rules and regulations.Before you beginYou will need1.An Eduroam Wi-Fi/VPN account (also known as a Remote Access account) same username asyour Oxford SSO account. See https:///self/remote_access. For security, usea different password to your Oxford SSO account.2.NB make sure your internet web browser allows ‘Pop-Ups’. Seehttps:///Allow-Pop%E2%80%93ups3. A Netgear router.4. A mains power adapter.5. 1 supplied network cable. Note: Do not use the blue cable included in the Netgear router box.Connecting your routerStep 1: Turning your router on - Plug the mains adapter into the wall and connect the power cable to the back of the router and press the power button on rear of the router. At this stage DO NOT connect your network cable to the router’s Internet port (highlighted blue).Step 2: Router Reset – Your router should be reset. Wait until the 2nd LED is lit green then press and hold the reset button at the back of the router until all the LEDs blink green.Step 3: Connect to the router – After router reset you need to connect to it and configure it. Wireless ConnectionThe label on the bottom of the router has connection information i.e. Wi Fi network name (SSID on your device choose name ending in 5G or 5GHz) and password (passphrase/network key).Step 4: Connect to the management interface.When connected open a web browser and type in the following address or you can type http://192.168.1.1NOTE: If you see a Netgear Service Terms/Condition, screen select ‘I Agree’ and click ‘Apply/Next’.Step 5: On NETGEAR genie webpage select No, I want to configure the Internet connection myself and select NEXT.Select OK on the pop up screen.Step 6: You should now be on the Admin Account Settings page. Set a password for logging in to the router’s management page and set your own security questions and answers.Select NEXT and you will have to login again with username: admin and the new password you have just setup.Step 7: Select the Basic Tab then the Internet ERROR Not Connected option.Step 8: Select No. I want to configure the Internet connection myself and select NEXT.Step 9: Select Yes to Does your Internet connection require a login? The Internet Service Provider should be set to PPPOE. In Login enter your Single Sign On username***************.UK(forexample**************.UK).In password, enter your Remote Access password. This is the same password you use for Eduroam and the IT Services VPN service. Click Apply and plug your network data cable between the router’s Internet port (highlighted blue) and your active wall socket.Select the internet setup Test button and you should see a successful connection screen. Do not register on the Netgear customer registration page instead Select the X (Close) button to close the registration pop up window. On the ‘Are you sure page’ select option Do Not Create Account. You should now be able to browse the internet. If you had problems configuring your router see Common Problems.Common ProblemsCannot access 192.168.1.1 address1)Switch off your device/laptop2)Disconnect the network cable from the router’s Internet port (highlighted blue) on rear of yourrouter3)Reset your router as detailed in Step 2 in these instructions4)Switch on your device/laptop and continue from Step 3 in these instructions5)No Test success or Customer Netgear Registration page opened in your browser at Step 96)Browser Pop Ups need to be enabled.7)Once Pop Ups enabled login to router and do Test again or start from Step 1 in these instructions 3rd LED on your router lit amber/orange?▪Eduroam Remote Access password entered at Step 9 in these instructions is failing to authenticate ▪Retry entering Eduroam Remote Access password at Step 9▪Unable to remember Eduroam Remote Access password then reset it here:https:///self/remote_access3rd LED on your router is not lit green▪Check your network cable is in your active wall socket & the internet port on rear of your router▪Only one wall socket in your Flat is active so is there another wall socket to try?▪The network cable could be faulty so do you have another cable to try?FAQHow do I report a problem with my internet? Please call 01865 280923 or email*******************************andconfirm:Your OXFORD Single Sign On (SSO) username:Contact email & Telephone number:Site / Building / Room:How you are connecting: wireless/wired?Are there 3 LEDs lit green on your router?Have you setup your Remote Access account password?I am due to leave my accommodation, what should I do? When leaving your accommodation, reset the router by holding the reset button for at least 10 seconds until all of the lights come on. This wipes your logon credentials.What can I use the service for? The network is intended primarily for academic purposes but the reasonable and limited use for social and recreational purposes is acceptable for tenants. All use must be legal and meet the University regulations and policies applying to all University ICT facilities.Who can use the connection in my flat? The only people permitted to using the connection in the flat are those living in it. Ultimate responsibility for the service and all activity on the connection lies with the individual whose remote access account is being used.。
NETGEAR 交换机设置指南说明书
InstallationConnect the Switch to Your Network During initial setup, you must connect the switch to a network that you can access with a local WiFi connection to use the Insight mobile app, or to the Internet to use the Insight Cloud Portal.For Gigabit connections, use Category 5e (Cat 5e) or higher-rated Ethernet cables terminated with RJ-45 connectors.To use an SFP port, you must insert a 1G SFP transceiver module, which is available from NETGEAR.To use an SFP+ port, you must insert either a 10G SFP+ or 1G SFP transceiver module, which is available from NETGEAR. ¾To connect the switch:1. Connect devices to the network ports on the switch.2. Connect the switch to a network.3. Power on the switch and wait for two or three minutes.The Power LED lights green, indicating that switch completed its startup process and is available on the network.The switch receives an IP address from a DHCP server (or a router that functions as a DHCP server) in your network. If your network does not include a DHCP server, the switch uses 192.168.0.239 as its default IP address.4. To check the port connections from the switch to the powered-ondevices that you connected, do the following:• Make sure that the Ethernet cables are plugged in correctly.• Check the left LED for each port on the switch.The left port LED lights solid green to indicate a valid connection to a powered-on device and blinks green to indicate traffic on this port.Package ContentsUnpack the box and verify the contents:• Switch model GC752X or GC752XP • Power cord (localized to the country of sale)• Rack-mount kit• Four rubber footpads for tabletop installation • Installation guideInsightGC7252XPAccess the Switch for ConfigurationThe NETGEAR Insight app lets you use your mobile device to discover,configure, manage, and monitor your switch. You can use this app to access the switch with a local WiFi connection or you can log in to the Insight Cloud Portal. The Cloud Portal lets you configure, manage, and monitor the switch from your PC, Mac, or tablet for a larger-screen experience.Local WiFi access . When you use the Insight mobile app for initialconfiguration, the switch must be connected to a WiFi access point (because the switch does not provide WiFi capacity). Connect your mobile device to that access point’s WiFi network.Cloud access from a mobile device . After initial configuration, as long as your switch is on a network with an Internet connection, you can access the switch through the cloud using the Insight mobile app.Insight Cloud Portal . The Insight Cloud Portal is available for Insight Premium subscribers to setup, manage, and monitor their Insight devices. A seven-day free trial of Insight Premium and the Insight Cloud Portal are included with each 24-port or larger Insight Smart Cloud Switch. Visit https:///#/login.NETGEAR Insight Managed52-Port Gigabit Ethernet Smart Cloud Switch with 2 SFP 1G & 2 SFP+ 10G Fiber Ports (GC752X)52-Port Gigabit Ethernet PoE+ Smart Cloud Switch with 2 SFP 1G & 2 SFP+ 10G Fiber Ports (GC752XP)Sample connectionFebruary 2018© NETGEAR, Inc., NETGEAR and the NETGEAR Logo are trademarks of NETGEAR, Inc. Any non‑NETGEAR trademarks are used for reference purposes only.NETGEAR, Inc.350 East Plumeria DriveSan Jose, CA 95134, USANETGEAR INTL LTDBuilding 3, University Technology Centre Curraheen Road, Cork, IrelandNote: You might be prompted to connect the switch to power and to an uplink. Since you already did this (Connect the Switch to Your Network ), tap the NEXT button.The NETGEAR Insight app discovers the switch and registers it on the network that you named in Step 6.If you are using the local WiFi access method and the app does not discover the switch, make sure that your mobile device and the switch are connected to the same WiFi network.9. Select the switch to configure and manage it.You can use the NETGEAR Insight app to access the switch later to view or change the configuration settings.For more information about how to connect a NETGEAR Insight managed switch to an existing network, visit https:///000044341.Note: We do not recommend using the switch’s local browser–basedmanagement interface to configure the switch offline. Changes made using this method are not pushed to the cloud, so they are not reflected in the Insight app or the Insight Cloud Portal, and might create conflicts with the Insight-managed network to which the switch is connected. If you cannot connect your switch to a network with Internet access, and you want to use the local-only browser interface to access the switch, see the user manual.To download the user manual, visit /support/product/GC752X or /support/product/GC752XP .Configure the Switch Using the NETGEAR Insight App¾To configure the switch:1. On your iOS or Android mobile device, visit the app store, search forNETGEAR Insight, and download the app.2. Connect your mobile device to the WiFi network of the access pointthat is connected to the switch.For initial configuration, you must use local WiFi access. After youcomplete initial configuration and discover the switch, you can use cloud access if the switch is connected to the Internet. 3. Open the NETGEAR Insight app on your mobile device.4. If you did not set up a NETGEAR account yet, tap CREATE NETGEARACCOUNT and follow the onscreen instructions.5. To log in to your NETGEAR account, tap LOG IN and enter yourcredentials.6. Name your network and specify a device admin password that appliesto all devices that you add to this network.7. Tap the NEXT button.8. To add the switch to your account, use one of the following options:• Enter the serial number.• Scan the serial number bar code.• Tap Switch as the device type and follow the prompts to scan thenetwork or scan the QR code.PoE Troubleshooting for Model GC752XPHere are some tips for correcting simple problems that might occur:• Make sure that the PoE Max LED is off. The switch provides a total powerbudget of 505 watts. If the PoE Max LED is solid amber, disconnect one or more powered devices (PDs) to prevent PoE oversubscription. Start by disconnecting the PD from the highest-numbered port.Note: You can manually override the amount of power that is reserved for each PoE port and attached PD by using the Insight mobile app or the Insight Cloud Portal.• Check the right LED for the port on the switch that is connected to apowered PD. The right port LED on the switch lights solid green to indicate that PoE is being delivered to the PD. If the right port LED lights solid amber, a PoE fault occurred.SupportThank you for purchasing this NETGEAR product. You can visit/support to register your product, get help, access the latest downloads and user manuals, and join our community. We recommend that you use only official NETGEAR support resources.Si ce produit est vendu au Canada, vous pouvez accéder à ce document en français canadien à /other/.(If this product is sold in Canada, you can access this document in Canadian French at /other/.)For the current EU Declaration of Conformity, visit/app/answers/detail/a_id/11621/.For regulatory compliance information, visit /about/regulatory/.See the regulatory compliance document before providing power to the switch.InsightInsight。
美国网件(NETGEAR)WNDAP350的基本配置说明
WNDAP350 的基本配置说明1.打开IE浏览器,输入WNDAP350的默认管理IP192.168.0.237输入默认的用户名 admin 密码 password,点 LOGIN 进入管理界面首先进入的是 Configuration->System->Basic->General 界面,默认的国家是美国 United States,这里在下拉列表里面选择中国 China,点 APPLY 应用后重起生效。
2.在登陆进管理界面,进入 Configuration->System->Basic->Time 界面,设置设备的时间。
选择时区中国 China,用户还可以自己定义 NTP Server来同步时间。
3. 进入 Configuration->System->Advanced->General 界面用户可以选择是否启用STP生成树功能,可以定义一个 Untagged VLAN 和Management VLAN,注意只有 Management VLAN 才可以登陆设备的管理界面,默认都是 VLAN1。
4、进入 Configuration->System->Advanced->Hotspot 界面支持地址重定向的功能。
5. Configuration->System->Advanced->Syslog界面支持日志服务器功能.6. Configuration->IP->IP SettingsWNDAP350默认的管理地址是192.168.0.237,可以选择是否由DHCP指派还是手动指定,支持网络完整性检测功能.7. Configuration->IP->DHCP Server SettingsWNDAP350支持DHCP服务器功能,可以充当网络中的DHCP服务器.8. Configuration->Wireless->Basic->Wireless Settings->802.11b/bg/ngWNDAP350同时工作在2.4GHz和5GHz频段,在2.4GHz频段下支持11b、11bg、11ng 模式,并且在11ng模式下绑定了2个20MHz的频段,可以选择运行在40MHz的频宽下支持高达300Mbps的速率,,用户可以定义无线SSID名,选择是否开启无线广播,还可以调整输出功率为1/2、1/4、1/8以及最小功率。
- 1、下载文档前请自行甄别文档内容的完整性,平台不提供额外的编辑、内容补充、找答案等附加服务。
- 2、"仅部分预览"的文档,不可在线预览部分如存在完整性等问题,可反馈申请退款(可完整预览的文档不适用该条件!)。
- 3、如文档侵犯您的权益,请联系客服反馈,我们会尽快为您处理(人工客服工作时间:9:00-18:30)。
原装网件NETGEAR WGR614 V8 dd-wrt 无线路由器万能中继AP网桥使用说明书
一、打开IE浏览器,在地址栏输入:192.168.1.1
第一次使用输入用户名root密码admin —定要注意是小写,且不能输错,不然无法进入系统设置界面•
进入系统设置界面,然后把界面改成中文语言
3 I l.h ulld 1 T?<UI | ■ ■ 1st E lit IM ■ VtnddDVf lift BiEAiit Xfepl fUfi-E
MML.-W L^rd bupwt
MT1C n-vr-
IP Flftrr
(drifiatl: Hine fnr P :
TB 匚ar”b5 Ccrfcrcr
dd-wrt..-nrn
ccrtnol panel
|
时机孑&: £Xj-«A"l € i -^xr 厲
:!
aa
.■ r :・artM — e RM 轨灯巧您 册」厢■' I
-.-i
i
i
Arbwr^t^F^inn
™ i .ii 〔.-.
naiWBwmt t 申 fti 怯
(wtni#wh
Will
FvU 审hs.堆事屮 **
ft* ki*
■wtw PawRvdi R^jki 」箝”3亡 EnJrr 刊肝rE
加卸d EsTtn
Webj^CLU Pcdtgri
ijn Twirls J
E?^hh Wa Sh
niS Sfe P*3£rd h«L£rtli \ Ip-r § 打
kWg
H M1P '□ HTTPS
tavw^n AniE ■■■
getting
<*) Enahb Dusaih
捌 turn 怙 Wet 'M fltfriTijri- * 卅*
iriitiri^dl d dnc Wtuip
Fngl^i
■□-irme liaJlEind
•-中文:界面
R*uter M*R^perwse<it JTftl' Mil.'置总塑 换炉 工AH) —
.申中M 中电n t.
2屮时下粒剽止进项
如果还没有变成中文界面,请点IE 菜单栏的刷新,就会出现中文界面,或者重新打开IE 浏览器 二、上网设置(此功能相当于一台普通的无线路由器, 下面的“三、无线中继设置”可省略) 1基本设置。
一般宽带是ADSL 上网方式,请按如下设置,设置完后要点保存并应用。
Me>Wjrfi F»tJ
TCP THiwiX 脚 ^eionis)
UDF TECftS (n Kfflndl)
-T-tL (jue?e a* ianl pjjIliUidik dj 刊》「i f overim
生 I I
■~fvrdd -i
(Defoui 机巧為対『炉:
lid
典
i
芙
ng
和「啓: [PHojKg ㈣ g;
汝-40? &) I ■箕他I
I O^UIII
UwrKlD>dking Nidt 5_ppnixedl
R 测t«r All 轨
金
AutorftMjiit
LETnmon [rtermri: FileSpsfce-n
点此谨项,供存生迪
jr
•; Enatle f » Duxa^e
3 I l.h ulld 1 T?<UI | ■ ■ 1st E lit IM ■ VtnddDVf lift BiEAiit Xfepl fUfi-E
I I I I VIVI ■■■■■■■■ I I I dd-wrt.
rr
国呼;CC- wW ¥f* 5|i' I 曲A 初补汕
K fl
肪喇」足T!J*・ U W. iriciu D
U I
WAN>liQL&Q4
KfAi»
Ra
i :比IF 豪倉
射*
2 •无线安全设置
A4<tr OHCfe
XK£r
益》書砂吃诒住机£・
HFUXIL !
uHU ■鼻團
見耗trim 管/的北
2后曲
克虫也匚芮
±-±i 乞
AV
L
匡弔•相
三、无线中继设置(此功能相当于一个中继器使用,上面的二、上网设置是可省略的)1修改路由器的IP,使之跟被中继的路由器IP不一样
可鹰讲!I
主机名
MTU
內第侵倉 ■曲黒沪
T 电匸-也址
亍F1借玛
例如:被中继的前一级无线信号的默认网关 192.168.1.1 (可点击“无线网络连接”一“支持”
选项卡下查看)应把 192.168.1.1改为192.168.0.1或192.16821等相异的IP
注意:改了之后要及时保存,并且点击应用。
应用后再要成功访问路由器则应在地址栏输入 修改后的IP 地址才可成功访问。
2.查找无线信号
nt 1 r I i ■ > ■ ■ ■
i i i M
dd-V\rtcom
control j:
时呵 00:^3:11
1舌査 虽K£ 安全 iSHRlSI
JkiT «' rvt. i
LJU J
Hr "V S J D
1 基丰设誉
融题N5 tex 州5 7 MA 匚地址克桂
匪15姿型 5TP 目 OHCP *
―小 方莖由 理DHCP ,匸
审下屋请降対应的 土吐
3选择您需要中继的信号,并点“加入”按钮
找列您哩中繼的慌号,点一右边的询入“杭讥
>■ IL 7= 矿
T if 1「广2
4•设置物理接口和添加及设置虚拟接口
f 芒工 :w 叭
Fk+
«M
f*:I
亠
R"社 J!
顽”酊JB 粘:ppcn 的
SP*
dczl
■W^t;
zat
心甲詔
S&iB MAL I HK :
眾 r ■'i.'W -
'H!1-! ft
<i
717 nW
RM
0-» S 3
Ak|j»
iD^r.
理星驰匡位剧军it®S 尺 尹性到丼机刖■归 Mta-
(Sa *
+ *
■■^'®j£,^t V
<El6*^JA9tiJEM 4MDR3LW4«iRaJH ■ixm*卄几
心扑
I TIT I
!TI
fl
IT' , ir I 丁丄 5^
墓耳说苣 貼如 无鞭妥全 旳⑴1泥 碗左扭
W3S
W99U #d - SSIDltP UIMCI IIWAddr fftthJC:1 D;A 比3氐弧] 无
tfi 和式
无战冋圮茫
I ⑹“
艮 AQ ^T 序〉
阳名趾豐
鱼拟暧门
£MSO vaiQj SSID [«W-wrt_vApJ
无建网妞£( 7: D1
壬甥券世—毋
AP 曲
dd-wt_vip ________
& an o 藥用
■■.启用上蕖用
o ®
.T'.l I 2%
5•如果对方的无线加了密码,还要进行加密设置
安全模式可访问对方无线路由器的无线安全查看是什么模式 或通过刷新无线网络表列查看无线信号是启用安全的无线网络( )中的安全模式
还可以通过查看对方的无线设置知道加密计算等信息
设置好后要点保存并应用,后再访问一下中继路由器“状态” 一一“
WAN ”查看路由器是
否分配到了 IP 地址,而不是0.0.0,如果分配到了说明中继成功。
否则再进入下一步。
-三呈中心律盏
$SID 为对方的$SID 占
( 注番大小写)
[珂迎祇口屮
对方无线基本设置中的信道(频道)是否为自动,如为自动就应改为1或6或11等固定值, 修改后还要保存和重启对方的路由器。
(此步骤是无法中继对方信号下才用)
墓耳说苣 貼如 无鞭妥全 旳⑴1泥 碗左扭
W3S
说着 无嵯 監务 呎壬 访冋糾制 MT / CnS 耳士评H 无辦妥盘 yjKd'iff 誨戶昏 畑5
盍揖童# NIO
蓼带ft 口 ¥^<1 节WD [lP-[ IP«J HW^rtrtr fllM :冉:m ;抖TQATh]
帘龄片空 專下尊
^―给目£押无巩u
"TI ->_
注意:如果设置失败或无法访问路由器可恢复路由器的出厂设置再从新上述设置。
恢复路由
器的方法如下。
方法1在断电情况下,用铅笔,牙签等尖端顶住路由器天下附近的小孔(
reset 空)一直不
放。
接通路由器,此时路由器一行指示灯均亮 7秒左右才就熄灭(除电源灯不灭),在断电。
再重复红色字体操作 4次,即可恢复路由器的出厂设置。
方法2:再可以访问路由器的前提下,自己慢慢找,好像在管理菜单下
诵行主语
fe ■皿 秘因3 租钥斗
討 b^ts I D dQk$ v
1 iSenerate
1(人对方的窒码
ffWUwlai ^]D[ckHhH “邮]
安全樓弍
选圣龙方的加空方式。