Jenkins插件开发手册
jenkins入门手册

Jenkins入门手册2013-08-08写在前面的话网络上很多大神的博客有关于Jenkins的文章,有点蛋疼的是。
大神们往往写的很简单,像我这种小白级人物看着像天书。
我现在写下的都是我在使用jenkins时的一些经验。
原本打算直接在网页上写的,但是网页写着不是很方便。
word写好了,那就顺便发布一个pdf版本的吧。
如果文章中有错误,我会在/zz0412/p/jenkins02.html更正。
非常欢迎大家一起交流。
QQ群:172758282邮箱:492738140@zjl 写于2013-09-04目录第一章JENKINS是什么? (1)1 JENKINS的由来 (1)1.1J ENKINS的目标 (2)第二章JENKINS安装与配置 (3)2 JENKINS安装 (3)3 JENKINS配置 (4)3.1系统管理 (4)3.1.1 提示信息 (4)3.1.2 系统设置 (5)3.1.3 Configure Global Security(安全设置) (7)3.1.4 管理用户设置 (8)3.1.5 管理插件设置 (9)3.2项目构建设置 (9)3.2.1 构建自由风格的Job (9)3.2.2 构建Maven风格的Job (12)3.2.3 邮件通知设置 (15)3.2.4 War文件部署设置 (15)3.3监控 (17)4 JENKINS插件 (19)4.1J ENKINS插件安装 (19)4.2J ENKINS插件安装示例 (21)第一章Jenkins是什么?Jenkins 是一个可扩展的持续集成引擎。
主要用于:●持续、自动地构建/测试软件项目。
●监控一些定时执行的任务。
Jenkins拥有的特性包括:●易于安装-只要把jenkins.war部署到servlet容器,不需要数据库支持。
●易于配置-所有配置都是通过其提供的web界面实现。
●集成RSS/E-mail通过RSS发布构建结果或当构建完成时通过e-mail通知。
jenkins中文使用手册范本

Jenkins 操作手册苏州测试部目录第 1 章概述 (1)第 2 章基础篇 (3)2.1 Jenkins安装 (3)2.1.1资源下载 (3)2.1.2运行Jenkins的前提 (3)2.1.3 Jenkins启动 (3)2.1.4 Jenkins访问 (4)2.2 Jenkins基本设置 (8)2.2.1设置JDK (9)2.2.2设置ANT (9)2.2.3配置邮件信息 (10)2.3 创建任务 (10)2.4 运行并监控构建作业 (15)2.4.1主控制面板 (15)2.4.2手动构建一个任务 (15)2.4.3任务构建状态 (16)第 3 章提高篇: (18)3.1 插件管理: (18)3.1.1 FindBugs 插件设置 (18)3.1.2 Ftp插件配置 (20)3.1.3 Junit插件 (21)3.1.4通过远程访问触发 (21)3.1.5 WebLogic.Deployer (21)3.2 安全篇 (22)3.3 个性化设置 (23)第 4 章常见问题 (25)4.1 edit lock问题 (25)4.2 IOException: Unable to delete问题 (25)4.3 not recognized as a valid application type 问题 (26)第 5 章其它说明 (27)5.1 CI挑战 (28)5.2 ANT基本知识 (28)第 1 章概述1.1什么是持续集成随着软件开发复杂度的不断提高,团队开发成员间如何更好地协同工作以确保软件开发的质量已经慢慢成为开发过程中不可回避的问题。
尤其是近些年来,敏捷(Agile)在软件工程领域越来越红火,如何能再不断变化的需求中快速适应和保证软件的质量也显得尤其的重要。
持续集成正是针对这一类问题的一种软件开发实践,对于提高软件开发效率并保障软件开发质量提供了理论基础。
它倡导团队开发成员必须经常集成他们的工作,甚至每天都可能发生多次集成。
jenkins2 使用手册
Jenkins 2是一个开源的持续集成/持续部署工具,用于自动化各种构建、测试和部署任务。
以下是Jenkins 2的使用手册:
一、安装和配置
首先,您需要下载和安装Jenkins 2,并按照官方文档进行配置。
您需要配置工作空间、源代码管理、构建触发器和构建环境等基本设置。
二、创建构建任务
在Jenkins中,您可以创建构建任务来自动化各种构建任务。
在"新建构建任务"中,选择适当的构建类型(例如自由风格、流水线等),并配置项目的源代码库、构建选项和构建步骤等。
三、配置流水线
Jenkins 2内置了强大的流水线功能,可以自动化构建、测试和部署流程。
在构建任务中,您可以配置流水线脚本,定义各个阶段和步骤,以及使用适当的插件来集成各种工具和平台。
四、监控和通知
Jenkins提供了实时的监控和通知功能,以便您能够跟踪构建状态并在出现问题时及时获得通知。
您可以使用Jenkins的仪表板来查看构建历史记录、日志和图表等数据。
五、扩展和定制
Jenkins具有强大的扩展性,您可以根据需要安装和使用各种插件来扩展Jenkins 的功能。
您还可以通过编写自定义的Groovy脚本或使用Jenkinsfile来定制Jenkins的配置和工作流。
总之,Jenkins 2使用手册旨在提供全面的指南,帮助用户更好地利用Jenkins自动化各种构建、测试和部署任务。
建议用户在使用过程中参考官方文档或寻求专业技术支持。
jenkins入门手册
Jenkins入门手册2013-08-08写在前面的话网络上很多大神的博客有关于Jenkins的文章,有点蛋疼的是。
大神们往往写的很简单,像我这种小白级人物看着像天书。
我现在写下的都是我在使用jenkins时的一些经验。
原本打算直接在网页上写的,但是网页写着不是很方便。
word写好了,那就顺便发布一个pdf版本的吧。
如果文章中有错误,我会在/zz0412/p/jenkins02.html更正。
非常欢迎大家一起交流。
QQ群:172758282邮箱:492738140@zjl 写于2013-09-04目录第一章JENKINS是什么? (1)1 JENKINS的由来 (1)1.1J ENKINS的目标 (2)第二章JENKINS安装与配置 (3)2 JENKINS安装 (3)3 JENKINS配置 (4)3.1系统管理 (4)3.1.1 提示信息 (4)3.1.2 系统设置 (5)3.1.3 Configure Global Security(安全设置) (7)3.1.4 管理用户设置 (8)3.1.5 管理插件设置 (9)3.2项目构建设置 (9)3.2.1 构建自由风格的Job (9)3.2.2 构建Maven风格的Job (12)3.2.3 邮件通知设置 (15)3.2.4 War文件部署设置 (15)3.3监控 (17)4 JENKINS插件 (19)4.1J ENKINS插件安装 (19)4.2J ENKINS插件安装示例 (21)第一章Jenkins是什么?Jenkins 是一个可扩展的持续集成引擎。
主要用于:●持续、自动地构建/测试软件项目。
●监控一些定时执行的任务。
Jenkins拥有的特性包括:●易于安装-只要把jenkins.war部署到servlet容器,不需要数据库支持。
●易于配置-所有配置都是通过其提供的web界面实现。
●集成RSS/E-mail通过RSS发布构建结果或当构建完成时通过e-mail通知。
jenkins使用手册

2.4
2.4.1
当配置完成一个任务后,回到主控制面板:
△上图中右边列表列举现在已经配置的任务已经任务当前的状态
△左边有构建队列,当有构件时,会把当前正在构建的队列在上面进行列举;
△上图右下角有RSS订阅,支持订阅全部、失败和最后一次等;
①None:手动方式;
②CVS:从CVS仓库中获取;
备注:CVS通过Module(s)获取多个项目工程
③SVN:从SVN仓库中获取;
备注:SVN通过“Add more locations”来添加多个工程,在SVN的URL中需要添加用户名密码信息,例如:
svn://username:passwd@192.168.1.15/SKELETON-V2.0/trunk/program/source/skeletonCommon
③Build periodically:设置构建频率,设置跟Quartz CronTrigger设置雷同;
④Poll SCM:设置从SCM库中检查源代码是否更新:
备注:关于第三和第四两点,基本配置为
分钟小时天月星期
举例:每分钟进行集成* * * * *,每5分钟进行集成5 * * * *,每天12点和23整点进行集成0 12,23 * * *
9)Builds Triggers:设置构建触发器
①Build after other projects are built:设置构建的流水线,配置在设置的任务构建完成后自动构建此任务,进行设置后,可以在任务统揽中看到以下“下游项目说明”
②Trigger builds remotely (e.g., from scripts):设置远程触发进行任务构建;
eclipse jenkins二次开发例子
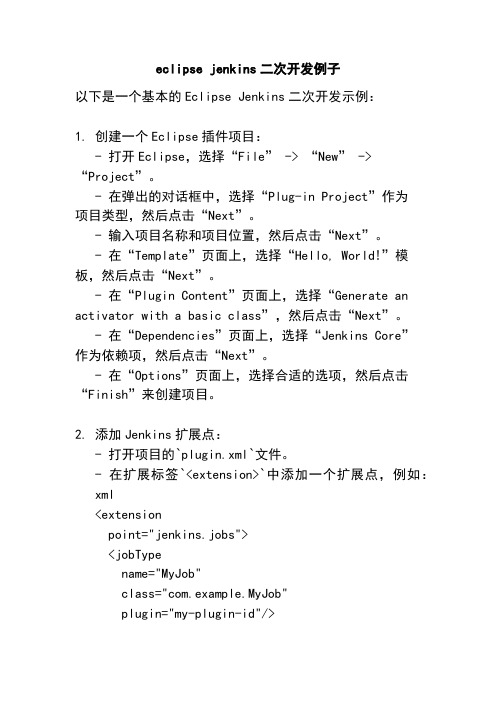
eclipse jenkins二次开发例子以下是一个基本的Eclipse Jenkins二次开发示例:1. 创建一个Eclipse插件项目:- 打开Eclipse,选择“File” -> “New” -> “Project”。
- 在弹出的对话框中,选择“Plug-in Project”作为项目类型,然后点击“Next”。
- 输入项目名称和项目位置,然后点击“Next”。
- 在“Template”页面上,选择“Hello, World!”模板,然后点击“Next”。
- 在“Plugin Content”页面上,选择“Generate an activator with a basic class”,然后点击“Next”。
- 在“Dependencies”页面上,选择“Jenkins Core”作为依赖项,然后点击“Next”。
- 在“Options”页面上,选择合适的选项,然后点击“Finish”来创建项目。
2. 添加Jenkins扩展点:- 打开项目的`plugin.xml`文件。
- 在扩展标签`<extension>`中添加一个扩展点,例如: xml<extensionpoint="jenkins.jobs"><jobTypename="MyJob"class="com.example.MyJob"plugin="my-plugin-id"/></extension>- 这将在Jenkins中注册一个名为“MyJob”的自定义作业类型。
3. 创建自定义作业类型:- 在项目中创建一个新的Java类,例如`com.example.MyJob`。
- 让该类继承`hudson.model.AbstractProject`,并实现必要的方法。
- 在类中添加必要的注解和逻辑,例如:java@Extensionpublic class MyJob extendsAbstractProject<FreeStyleProject, FreeStyleBuild> { // 添加必要的构造函数和其他方法@Overrideprotected Class<FreeStyleProject> getProjectClass() {return FreeStyleProject.class;}@Overridepublic FreeStyleBuild createExecutable() throws IOException {// 创建并返回一个可执行的构建对象}}- 可以根据需要添加其他自定义逻辑。
jenkins插件开发实例 -回复
jenkins插件开发实例-回复Jenkins插件开发实例Jenkins是一个用于自动化构建、测试和部署软件的开源工具,它的功能可以通过插件进行扩展。
本文将以Jenkins插件开发实例为主题,一步一步回答相关问题。
第一步:为什么要开发Jenkins插件?Jenkins的核心功能是通过任务的方式实现持续集成和自动化构建,但是有时候我们需要根据实际需求进行定制化,这就需要使用Jenkins插件来扩展其功能。
开发Jenkins插件可以帮助我们:1. 实现特定的构建、测试和部署逻辑。
2. 集成Jenkins和其他工具或服务。
3. 提高团队的工作效率和生产力。
第二步:插件开发环境准备在开始插件开发之前,我们需要准备以下开发环境:1. 安装Jenkins:从Jenkins官方网站下载并安装最新版本的Jenkins。
2. 安装Java开发工具包(JDK):插件开发需要Java编程环境。
3. 安装Maven:Maven是一款用于构建和管理Java项目的工具,插件开发中使用Maven进行依赖管理和构建。
第三步:创建一个简单的插件现在,让我们开始编写一个简单的Jenkins插件,实现一个自定义的构建步骤。
1. 在命令行中使用Maven命令创建一个新的Jenkins插件项目:mvn archetype:generate \-Dfilter=io.jenkins.archetypes:plugin这将创建一个基本的Jenkins插件项目结构。
2. 进入项目目录,并编辑`pom.xml`文件,添加插件的名称、版本和其他相关信息。
3. 创建一个Java类,实现`hudson.tasks.Builder`接口,并实现其中的`perform`方法。
这个方法将定义插件的行为,例如执行构建步骤时要执行的操作。
4. 编辑`src/main/resources/META-INF/extensions.xml`文件,将创建的Builder类注册为插件的扩展点。
HP Fortify Jenkins插件安装、配置和使用说明书
HP Fortify Jenkins PluginInstallation, Configuration, and UseThe HP Fortify Jenkins Plugin (Jenkins plugin) is used in conjunction with HP FortifySoftware Security Center (SSC), a collaborative system for reviewing and auditing security analysis results. If you use a Fortify plugin such as maven to scan your source code aftereach build, the Jenkins plugin automatically uploads the Fortify project results (in an FPR file) to an SSC server and enables you to view the details within Jenkins. It also provides metrics for each build and an overview of the results, without having to connect to SSC. This document provides instructions on how to prepare SSC to work with the Jenkins plugin, and how to install, configure, and use the plugin. For information about Jenkins, see the Jenkins web site ().Preparing Software Security Center to Work withthe Jenkins PluginTo prepare SSC to work with the Jenkins plugin, you create a new token type, and then use the fortifyclient utility to generate a token of that type. The following topics provide instructions on how to perform these two tasks.Creating a Jenkins Token TypeThe Jenkins plugin communicates with HP Fortify Software Security Center (SSC) in several ways. Since SSC web services are access-controlled, you must define a new authentication token type that authorizes the various web service requests that the plugin uses.To create this token type:1.From your Software Security Center installation directory, navigate to theCore/support/tomcatForSSC/webapps/ssc/WEBINF/internal directory, and then open the serviceContext.xml file in a text editor.2.Add the following block of text to the file:<bean id="jenkinsToken"class="com.fortify.manager.security.ws.AuthenticationTokenSpec"><property name="key" value="JenkinsToken"/><property name="maxDaysToLive" value="365"/><property name="actionPermitted"><list value-type="ng.String"><value>AddProjectRequest</value><value>AddProjectVersionRequest</value><value>AddProjectAndVersionRequest</value><value>GetAuthenticationTokenRequest</value><value>ProjectListRequest</value><value>ActiveProjectVersionListRequest</value><value>ProjectVersionListRequest</value><value>ProjectTemplateListRequest</value><value>FPRUploadRequest</value><value>AuditViewRequest</value><value>PerformAuditActionRequest</value><value>IssueListRequest</value><value>GetProjectVersionIdentifiersRequest</value><value>ProjectMetaDataDefinitionsListRequest</value><value>AddProjectMetaDataDefinitionRequest</value><value>UpdateProjectMetaDataDefinitionRequest</value><value>ProjectMetaDataValuesListRequest</value><value>ProjectMetaDataValueRequest</value><value>GetSingleUseFPRUploadTokenRequest</value><value>CreateAuditSessionRequest</value><value>InvalidateAuditSessionRequest</value><value>GroupingValuesRequest</value></list></property><property name="terminalActions"><list value-type="ng.String"><value>InvalidateTokenRequest</value></list></property></bean>3.Save and close the serviceContext.xml file.Generating an SSC Authorization TokenAfter you define a Jenkins token type, you must use the fortifyclient command-line utility to generate a token instance.To generate an SSC authorization token:1.From the <ssc_install>/Deployment/fortifyclient/bin directory, run thefollowing:fortifyclient token -gettoken JenkinsToken -daysToLive 365 -url<ssc_url>/ssc -user <user_with_appropriate_credentials>where JenkinsToken is the case-sensitive fortifyclient upload token specifier.Notes:∙The Software Security Center URL passed to fortifyclient must include both the port number and the context path /ssc/. The correct format for the SSC URL is as follows:http://nnn.nnn.nnn.nnn:8080/ssc/∙The ability of fortifyclient to use the token to read or write information to or from SSC depends on the account privileges of the SSC user account specified bythe -user parameter.The fortifyclient utility prompts for a password.2.Type the password for <account_name>.The fortifyclient utility returns a token of the general form cb79c492-0a78-44e3-b26c-65c14df52e86.3.Copy the returned token into a text file.For detailed information about the fortifyclient command-line utility, see the HP Fortify Software Security Center Installation and Configuration Guide.About Jenkins InstallationIf you do not have Jenkins installed, download version 1.4.30 or later from/war. The Jenkins plugin works with Jenkins 1.4.30 and later versions.For more information about how to install and start Jenkins, see the following web sites: https:///display/JENKINS/Installing+Jenkinshttps:///display/JENKINS/Starting+and+Accessing+JenkinsInstalling the Jenkins PluginTo install the Jenkins plugin, you must have Jenkins installed on your system.To install the Jenkins plugin:1.Open a browser window and navigate to http://<jenkins_server_url>:8080/. (Tostart Jenkins locally, run java -Xmx1024m -XX:MaxPermSize=512m -jar<jenkins.war_file_path>.)2.From the Jenkins user interface, select Manage Jenkins, and then select ManagePlugins.3.On the Plugin Manager page, click the Advanced tab.4.In the Upload Plugin section, click Browse, and then locate and select thefortifyJenkins.hpi file.5.Click Upload.6.Restart Jenkins. (If you started Jenkins locally, press CTRL + C in the command linewindow to restart it.)Verifying Plugin InstallationTo verify that the Jenkins plugin is installed:1.Open a browser window and navigate to http://<jenkins_server_url>:8080/.2.From the Jenkins user interface, select Manage Jenkins, and then select ManagePlugins.3.On the Plugin Manager page, click the Installed tab.4.Check to make sure that HP Fortify Jenkins Plugin version 1.4.30 is listed in the tableof installed plugins.For more information about how to install Jenkins plugins, see the Jenkins Plugin site (https:///display/JENKINS/Plugins#Plugins-Howtoinstallplugins).Configuring the Jenkins PluginTo configure the Jenkins plugin for use with SSC:1.Open a browser window and navigate to http://<jenkins_server_url>:8080/.2.From the Jenkins user interface, select Manage Jenkins, and then select ConfigureSystem.3.In the HP Fortify Assessment section, do the following:a.In the URL box, type the URL for the SSC server for which you configured theJenkins token type. (The correct format for the Software Security Center URL ishttp://nnn.nnn.nnn.nnn:8080/ssc/.)b.In the Authentication Token box, enter the authentication token generated for theSSC server.4.Click Advanced, and then click Test Connection.The Project Template list is now populated with available SSC project templates. SSC uses the selected project template when it creates new projects.New projects are always of the ‘Basic Remediation Projec t’ type. So, you must choose a project template. The project template optimizes the categorization, summarization, and reporting of the project version data.5.From the Project Template list, select the appropriate project template for yourproject.6.Click Save.Note: There is no need to specify a value in the Issue breakdown page size box at this time. You can always change this setting later. This setting controls the Issue Breakdown table view. The default is 50 issues per page.Configuring the Build Step to Use for the Jenkins PluginTo configure the build step to use Jenkins plugin:1.From the Jenkins user interface, select the job to view or create a new job.2.On the job page, select Configure.3.On the configuration page that opens for the job, in the Post-build Actions section,select the HP Fortify Assessment check box.4.In the HP Fortify Assessment section, provide or change values for the properties andactions listed in the following table.Note: To see a description of an action or property, click the help icon to its right.5.Click Save.Using the Jenkins Plugin with Continuous BuildsTo use the Jenkins plugin with continuous builds:1.Place the FPR resulting from a source code scan into the workspace directory for thejob. (On Windows systems, the default directory isC:\Users\<username>\.jenkins\jobs\<project_name>\workspace.)Note: Configure your build procedure to do this automatically. You can specify the path to your FPR file with the FPR Filename setting on the Job Configuration page, see Configuring the Build Step to Use for the Jenkins Plugin2.From the Jenkins user interface, select Build Now.3.To read progress messages from the Jenkins plugin, in the Build History box, select thebuild link, and then, on the <build_number> page, select Console Output.4.After the build is completed (after you see the “Finished: SUCCESS” message), returnto the project page.The project page displays the Normalized Vulnerability Score (NVS) graph. NVS is a normalized score that gives you a rough idea of how good (or how bad) yourapplication is. The plugin calculates the NVS using the following formula:NVS=((CFPO∗10)+(HFPO∗5)+(MFPO∗1)+(LFPO∗0.1))∗0.5+((P1∗2)+(P2∗4)+(P3∗16)+(PABOVE∗64))∗0.5ExecutableLOC1000where:CFPO= Number of critical vulnerabilities (unless marked as “Not an Issue”)HFPO= Number of high vulnerabilities (unless marked as “Not an Issue”)MFPO= Number of medium vulnerabilities (unless marked as “Not an Issue”) LFPO= Number of low vulnerabilities (unless marked as “Not an Issue”)And:PABOVE = ExploitableP3 = SuspiciousP2 = Bad practiceP1 = Reliability issueThe total issues count is not very useful. For example, if application A has 0 critical issues and 10 low issues, the total issues value is 10. If application B has fivecritical issues and no low issues, the total issues value is 5. These values maymislead you to think that application B is better than A, when it is not.The NVS calculated for the two applications present a different picture (simplified equation):application “A” NVS = 0*10 + 10*0.1 = 1application “B” NVS = 5*10 + 0*0.1 = 505.Select the HP Fortify Assessment link in the column of project options on the left. The interactive List of HP Fortify SSC issues page displays the Summary and Issue breakdown by Priority Order tables.The Summary table shows the difference in the number of issues in different categories between the two most recent builds. A blue arrow next to a value indicates that the number in that category has decreased, and a red arrow indicates that the number in that category has increased.The Issues breakdown by Priority Order table shows detailed information about the issues for the specified location and category in each priority folder. Please wait for the table to load. If the data load takes too long, you may need to refresh the browser window (F5). By default you will see the critical issues first. To see all issues, select the All tab.Note: The more issues a page shows, the longer it takes to load. Fortify recommends that you not use the All setting for large projects.Viewing IssuesTo see only those issues that were introduced in the latest build of your code, click the Show New Issues link at the top of the table.The first and the second columns show the file name and a line number of the finding and the full path to this file. The last column displays the category of each vulnerability.By default, issues are sorted by primary location. To organize them by category, click the Category column header.To see more details about or to audit a specific issue, click its file name in the first column. The link takes you directly to the details of that issue on the SSC server. If you are not logged in to SSC, you are prompted to log in.Configuring the Number of Issues Displayed on a PageThe page displays 50 findings by default. To navigate to all findings, use Next>> and<<Previous on the top and bottom of the table. To increase the number of issues to 100 per page, from the 50 | 100 | All section at the bottom of the page, select 100.To control the number of the issues shown on a page from the Configure System page:In the HP Fortify Assessment section, click Advanced, and then change the value in the Issue breakdown page size box.。
Jenkins使用说明
Jenkins使用说明Jenkins使用说明1.简介Jenkins是一个开源的持续集成工具,用于自动化构建、测试和部署软件项目。
本文档旨在提供详细说明,帮助用户了解和使用Jenkins。
2.安装2.1 系统要求确保您的系统满足Jenkins的最低要求,包括操作系统、硬件配置和软件依赖。
2.2 Jenkins从Jenkins官方网站最新的稳定版本,并根据操作系统进行安装。
2.3 配置根据安装方式,进行配置Jenkins,包括设置管理员账户、设置系统属性、插件管理等。
3.创建Jenkins任务3.1 新建任务登录Jenkins后台,“新建任务”,填写任务名称、选择任务类型等相关信息。
3.2 配置任务根据项目需求,配置任务的源码管理、构建触发方式、构建环境等设置。
3.3 构建步骤配置构建步骤,如编译代码、运行单元测试、文档等。
4.集成版本控制4.1 Git集成将Jenkins与Git整合,实现代码的自动拉取和触发构建。
4.2 SVN集成将Jenkins与SVN整合,实现代码的自动拉取和触发构建。
5.构建触发5.1 定时触发设置定时器,定时触发构建任务。
5.2 监听版本库通过监听版本库变更,触发构建任务。
5.3 Webhooks集成配置Webhooks,当代码仓库有变更时,自动通知Jenkins触发构建。
6.构建报告6.1 测试结果报告配置测试框架和测试报告插件,测试结果报告。
6.2 代码覆盖率报告配置代码覆盖率工具和插件,代码覆盖率报告。
7.部署7.1 自动化部署配置自动化部署工具,实现持续集成的自动部署。
7.2 脚本部署通过编写脚本,实现定制化的软件部署流程。
8.持续集成与测试8.1 并行构建配置Jenkins支持并行构建,提高构建效率。
8.2 多节点构建配置Jenkins在多个节点上同时执行构建任务,实现分布式构建。
9.性能监控与优化9.1 监控插件通过安装监控插件,实时监控Jenkins服务器的性能。
jenkins自动构建工具使用手册(svn+ant+jboss)
jenkins自动构建工具使用手册1.环境搭建a).JDK环境变量的设置:JAVA_HOME=D:\Program Files\Java\jdk1.7.0_67\PATH=%JAVA_HOME%\bin;%JAVA_HOME%\jre\binCLASSPATH=%JAVA_HOME%\lib\dt.jar;%JAVA_HOME%\lib\tools.jarb).antant的安装与配置下载地址:/ 解压后即可使用。
添加系统环境变量:ANT_HOME= D:\Program Files\apache-ant;PATH=%ANT_HOME%\bin;在cmd中输入ant-version即可查看是否安装成功。
图1.1:查看ant版本c) Jenkins方法一:在网站下载war包,然后放倒tomcat的webapp文件夹中,启动tomcat即可。
访问http://localhost:8080即可。
方法二:在网站下载war包,在dos下进入相应目录。
输入java -jar jenkins.war即可,在浏览器中输入http://localhost:8080即可。
图1.2:用命令行启动jenkins方法三:下载jenkins安装包,安装jenkins,然后在地址栏输入http://localhost:8080即可。
图1.3:jenkins搭建成功界面d) jbossjboss不用安装,下载后解压到一定目录下即可。
环境搭建阶段遇到的问题即解决办法:a).修改jenkins的端口的方法:1).jenkins.war 包形式的修改端口的方式,在命令行中输入java -jar jenkins.war --httpPort=8081即可将端口改为8081。
打开浏览器访问http://localhost:8081即可图1.4:jenkins修改端口2).修改安装包形式的jenkins端口的方法:找到jenkins的安装目录中的jenkins.xml文件E:/Program Files/Jenkins/jenkins.xml文件,修改<arguments>-Xrs -Xmx256m-Dhudson.lifecycle=hudson.lifecycle.WindowsServiceLifecycle -jar "%BASE%\jenkins.war" --httpPort=8081</arguments>后保存,启动jenkins服务。
- 1、下载文档前请自行甄别文档内容的完整性,平台不提供额外的编辑、内容补充、找答案等附加服务。
- 2、"仅部分预览"的文档,不可在线预览部分如存在完整性等问题,可反馈申请退款(可完整预览的文档不适用该条件!)。
- 3、如文档侵犯您的权益,请联系客服反馈,我们会尽快为您处理(人工客服工作时间:9:00-18:30)。
Jenkins插件开发搭建开发环境为了能开发插件,开发环境需要安装Maven和JDK 6.0以上版本。
1、安装JDK打开cmd,输入java –version如下图,说明安装完成。
图12、安装Maven1.下载Maven如下图:图2将安装包解压到任意地址,我的路径是D:\apache-maven-3.0.5 新建环境变量M2_HOME 指向D:\apache-maven-3.0.5在path添加路径%M2_HOME%\bin打开cmd 输入mvn –v,如下图:图3安装成功。
给eclipse安装插件m2eclipse。
1、打开eclipse2、Help-Install New Software出现下图:图43、点击Add图5在name输入m2e在Location输入4、确定后出现下图:图65、勾选Maven Integration for Eclipse6、然后一直下一步直到安装完毕7、检查是否安装成功(1)点击Help – about eclipse – installation details,看是否存在Maven Integrationfor Eclipse(Required),如下图:图7(2)再检查eclipse是否可以创建Maven项目了,File-New-Other图8到此Maven安装完成了。
3、安装jenkins下载jenkins将jenkins.war,拷贝到D:\jenkins下,打开cmd,转到D:\jenkins目录下然后运行java –jar jenkins.war最后出现jenkins is fully up an running。
说明安装成功。
访问图9插件开发流程1、设置环境由于是使用maven进行开发,需要对%USERPROFILE%\.m2\settings.xml(USERPROFILE 为用户名路径如C:\Documents and Settings下的用户)文件添加以下内容:<settings><pluginGroups><pluginGroup>org.jenkins-ci.tools</pluginGroup></pluginGroups><profiles><!-- Give access to Jenkins plugins --><profile><id>jenkins</id><activation><activeByDefault>true</activeByDefault><!-- change this to false, if you don't like to have it on per default --></activation><repositories><repository><id></id><url>/public/</url></repository></repositories><pluginRepositories><pluginRepository><id></id><url>/public/</url></pluginRepository></pluginRepositories></profile></profiles><mirrors><mirror><id></id><url>/public/</url><mirrorOf>m.g.o-public</mirrorOf></mirror></mirrors>这将可以使用缩短的命令来执行运行。
2、生成新的插件开发新的插件,执行以下命令:mvn –U hpi:create将会提示出现需要输入groupid和artifactid,如下:groupid:com.jysong.jenkinsartifactid: newplugin这样便生成了新的插件,会生成一个简单的例子,同时在当前目录下生成新的文件夹newplugin,然后再执行下面的命令。
cd newpluginmvn package使用这个命令将工程进行打包,不过由于版本的不同可能会出现错误。
如果出现错误参考下面的源代码部分进行修改。
在第一次执行命令时会下载很多的文件,需要耐心的等待。
3、编译插件mvn install运行此命令将会生成文件./target/newplugin.hpi。
可以把它加载到jenkins中。
并且将./target/newplugin.hpi、pom.xml、./target/newplugin.jar这几个文件安装到maven的本地仓库中,就可以被其他的工程调用了。
也可以使用mvn package,只是进行打包生成所需文件,并不安装到本地仓库中。
4、为IDE设置开发环境使用eclipse进行代码开发。
mvn -DdownloadSources=true -DdownloadJavadocs=true –DoutputDirectory= target/eclipse-classes eclipse:eclipse或者mvn eclipse:eclipse在此目录中生成eclipse工程,可以使用eclipse将工程进行导入。
如下图:图105、工作空间布局导入之后目录结构如下图:图11src/main/java :存放java源文件。
src/main/resources:jelly/Groovy视图文件。
src/main/webapp:静态资源文件,例如图片,HTML文件。
pom.xml:配置文件,Maven使用此文件编译插件。
6、源代码在src/main/java/com/jysong/jenkins目录下可能有个null文件夹,在文件夹下面有HelloWorldBuilder.java文件,将HelloWorldBuilder.java文件拷贝到jenkins文件夹下面,将null文件夹删除。
并且将HelloWorldBuilder.java文件中的第一行的package最后面的.null删除。
HelloWorldBuilder.java文件是一个开发插件的模板,包含了开发一个简单插件的所有内容。
后面将对这个文件代码进行详细分析。
在src/main/resources/com/jysong/jenkins目录下可能有个null文件夹,在文件夹下面有个HelloWorldBuilder文件夹,将HelloWorldBuilder文件夹拷贝到jenkins文件夹下面,将null文件夹删除。
在HelloWorldBuilder文件夹下面有global.jelly和config.jelly配置文件。
这两个文件是进行页面配置的文件。
7、调试插件在windows系统上,执行以下命令:set MAVEN_OPTS=-Xdebug -Xrunjdwp:transport=dt_socket, server=y, address=8000, suspend=nmvn hpi:run使用动了端口为8000的调试器,可以在这个端口开启一个调试会话。
如果8080的端口被占用,将会出现错误,不会运行jetty服务器。
可以更改端口使用以下命令:mvn hpi:run –Djetty.port=8090设置上下文路径mvn hpi:run –Dhpi.prefix=/Jenkins执行这个命令之后登录地址将变为http://localhost:8090/jenkins8、发布插件运行以下命令,生成你的插件的图片。
mvn package生成./target/*.hpi文件,其他使用者可以使用jenkins的web界面上传到jenkins。
9、安装插件在jenkins的web界面中由Manage Jenkins>Manage Plugins>Advanced图12点击Choose File,选择你的插件的target目录下的hpi文件。
选择之后点击Upload,插件就会配置到jenkins中。
到此一个简单的插件开发完成了,可以在此基础上进行更复杂的开发。
详细开发插件流程的地址https:///display/JENKINS/Plugin+tutorial源码分析1、java源代码在目录src/main/java/com/jysong/jenkins下有文件HelloWorldBuilder.java。
代码如下:public class HelloWorldBuilder extends Builder {private final String name;// Fields in config.jelly must match the parameter names in the "DataBoundConstructor"@DataBoundConstructorpublic HelloWorldBuilder(String name) { = name;}/*** We'll use this from the <tt>config.jelly</tt>.*/public String getName() {return name;}@Overridepublic boolean perform(AbstractBuild build, Launcher launcher, BuildListener listener) {// This is where you 'build' the project.// Since this is a dummy, we just say 'hello world' and call that a build.// This also shows how you can consult the global configuration of the builderif (getDescriptor().getUseFrench())listener.getLogger().println("Bonjour, "+name+"!");elselistener.getLogger().println("Hello, "+name+"!");return true;}// Overridden for better type safety.// If your plugin doesn't really define any property on Descriptor, // you don't have to do this.@Overridepublic DescriptorImpl getDescriptor() {return (DescriptorImpl)super.getDescriptor();}/*** Descriptor for {@link HelloWorldBuilder}. Used as a singleton.* The class is marked as public so that it can be accessed from views. ** <p>* See<tt>src/main/resources/hudson/plugins/hello_world/HelloWorldBuilder/* .jelly</tt>* for the actual HTML fragment for the configuration screen.*/@Extension// This indicates to Jenkins that this is an implementationof an extension point.public static final class DescriptorImpl extendsBuildStepDescriptor<Builder> {/*** To persist global configuration information,* simply store it in a field and call save().** <p>* If you don't want fields to be persisted, use <tt>transient</tt>. */private boolean useFrench;/*** Performs on-the-fly validation of the form field 'name'.** @param value* This parameter receives the value that the user has typed. * @return* Indicates the outcome of the validation. This is sent to the browser.*/public FormValidation doCheckName(@QueryParameter String value) throws IOException, ServletException {if (value.length() == 0)return FormValidation.error("Please set a name");if (value.length() < 4)return FormValidation.warning("Isn't the name too short?");return FormValidation.ok();}public boolean isApplicable(Class<? extends AbstractProject> aClass) {// Indicates that this builder can be used with all kinds of project typesreturn true;}/*** This human readable name is used in the configuration screen. */public String getDisplayName() {return"Say hello world";}@Overridepublic boolean configure(StaplerRequest req, JSONObject formData)throws FormException {// To persist global configuration information,// set that to properties and call save().useFrench = formData.getBoolean("useFrench");// ^Can also use req.bindJSON(this, formData);// (easier when there are many fields; need set* methods for this, like setUseFrench)save();return super.configure(req,formData);}/*** This method returns true if the global configuration says we should speak French.** The method name is bit awkward because global.jelly calls this method to determine* the initial state of the checkbox by the naming convention. */public boolean getUseFrench() {return useFrench;}}}这里主要使用了jenkins的Builder作为扩展点,Builder扩展点是编译时的功能。