
尾注添加
Word中用尾注方法添加参考文献以及同一位置多个参考文献格式编辑技巧
采用合适的编辑方法会方便地做到整齐,规范,自动排序和交叉引用。
1.以尾注的方式插入第一个参考文献。
将光标定位于word文档中将要插入参考文献的位置,按“插入/引用/脚注和尾注”。
出现一菜单,选择“尾注”,“文档结尾”,编号格式为“1,2,3”。
按“插入”按钮。
2.按要求的格式输入参考文献内容。
这时你会发现文本中的序号“1”字是上标格式的,这是你所希望的。
但尾注中的“1”也是上标格式的,这不是你希望的。
其余的格式也不合你愿,别急。
用鼠标在最左侧处选中尾注中的序号“1”,按快捷键“Ctrl+Shift+=”就可以使序号不再是上标,或用鼠标右击,出现一菜单,选择“字体”,在第二张菜单中去掉“效果”栏中“上标”前面的“√”。
3.说明:
序号周围有似隐似现的框,这表示所插入手稿的尾注是一种“域”,不必理会它。
插入第二个尾注的方法是同样的。
Word会根据所在位置的前后自动排序。
在第一个参考文献的前面有一条横线,你会发现无法删除。
它叫“尾注分隔符”。
4. 去除“尾注分隔符”
我们一般的编辑界面叫“页面视图” ,选择“视图/普通”进入普通视图。
按“视图/脚注”,此时编辑界面分为两个部分,下面的编辑框是尾注编辑框。
选择尾注编辑框中的“尾注”下拉框,选择“尾注分隔符”,出现一条横线,选择该横线,删除它,再选择“尾注延续分隔符”,也会出现一条横线(这是尾注分页时会出现的很长的横线),选择该横线,删除它。
关闭后,再按“视图/页面”切换回来。
5. 交叉引用
当你在文档中第N(N>=2)次引用前面文档曾经引用过的文献时,这时宜采用“交叉引用”。
方法:按“插入/引用/交叉引用”,出现一菜单,在引用类型中选择“尾注”,引用内容为“尾注编号”,这时在菜单中会出现你曾经编写过的所有尾注,选择你需要的,按“插入”按钮即完成交叉引用了。
(注:若你后来又在前面的文档中插入新的尾注,这时后继的尾注会自动更新编号,但交叉引用不会自动更新。
怎么办?按“Ctrl+A”选择所有内容后,按“F9”键就可以完成手动更新。
)
=============================================== ====================================
以上部分为转载,作者不详!
下边说下自己的经验(我使用的是Office 2007):
=============================================== ====================================
1、一般情况下参考文献需要用中括号括起来,操作步骤为:
按下:Ctrl+Shift+=
输入:[ ]
按下:左方向键(这是输入位置为中括号中间)
按下:Ctrl+Alt+D
输入参考文献内容
双击尾注编号返回文档编辑位置继续编辑
上边步骤就是插入一个参考文献的步骤。
重复的参考文献按上边转载内容第5条交叉引用操作就可以了。
2、同一位置插入多条参考文献方法:
按上述第一条操作挨个插图多条尾注,若参考文献编号为12,13,14,15,16,17,18输入后形式为”[12131415161718]“
选中“1314151617”,鼠标右击,选择“字体”,在菜单中“效果”栏中“隐藏”前打“√”,确定。
然后输入“-”,最终编辑效果为“[12-18]”
3、若编写的论文《参考文献》不在文章最后,如参考文献后还需增加作者论文发表情况。
这时可以在尾注部分前按两下“Ctrl+Shift+Enter”来增加两节:《参考文献》和《作者发表论文情况》
将尾注中的内同全部复制粘贴到记事本上,然后再从记事本上复制粘贴到新建的《参考文献》一节
利用项目编号为参考文献重新编号,按要求设置编号样式。
将尾注部分选中,鼠标右击,选择“字体”,在菜单中“效果”栏中“隐藏”前打“√”,确定!(这步应在最后打印前设置)
OK!Perfect!。
如何添加脚注和尾注

如何添加脚注和尾注脚注和尾注是学术写作中常用的引用和解释工具,能够为文章提供更多的背景和详细信息。
本文将介绍如何添加脚注和尾注,并提供相关的格式要求和使用技巧。
一、脚注的添加脚注一般用于对文章中的特定术语、概念或引用进行解释和补充。
下面是添加脚注的步骤:1. 在需要添加脚注的文字后面,用数字编号表示脚注的位置,如:“这是一段需要添加脚注的文字1。
”2. 在文末或页面底部创建一个注脚区(一般位于参考文献之前),用于显示脚注内容。
3. 在注脚区添加与编号对应的注释内容,一般采用小字号,并按照相应的引用格式标注来源。
脚注的使用要注意以下几点:1. 编号应按照出现顺序进行标注,避免重复或跳跃的编号。
2. 脚注内容应简洁明了,尽量避免过长的解释或注释。
3. 引用的文献或资料需要提供详细的引用信息,包括作者、标题、出版年份等。
二、尾注的添加尾注一般用于对整个文章或某个章节的总结或评述。
下面是添加尾注的步骤:1. 在文章结尾或某个章节结束后,用数字编号表示尾注的位置,如:“这是一段需要添加尾注的结论2。
”2. 在文末或章节后创建一个尾注区,用于显示尾注内容。
3. 在尾注区添加与编号对应的注释内容,一般采用小字号,并按照相应的格式进行排版。
尾注的使用要注意以下几点:1. 编号应按照出现顺序进行标注,避免重复或跳跃的编号。
2. 尾注内容应准确概括文章或章节的主要观点或结论。
3. 尽量避免过长的尾注内容,以保持整体文档的美观和易读性。
总结:通过添加脚注和尾注,可以有效地提供文章内容的补充和解释,同时使文章更专业和可信。
在使用脚注和尾注时,需要注意编号的顺序、注释内容的简洁性和引用格式的规范性。
希望本文对您在学术写作中添加脚注和尾注有所帮助。
如何在Word中插入脚注和尾注
如何在Word中插入脚注和尾注在使用Microsoft Word进行文档编辑时,经常会遇到需要插入脚注和尾注的情况。
脚注和尾注是用于补充或解释文本内容的附加信息,可以提供引用文献、注释、参考资料等,使文档更加准确和可信。
本文将介绍如何在Word中插入脚注和尾注。
一、脚注的插入脚注位于页面底部,用于给文本增加注释或解释。
在Word中插入脚注的步骤如下:1. 首先,选中需要添加脚注的文本区域。
2. 然后,在Word的菜单栏中找到“引用”选项卡,点击该选项卡后会弹出一个下拉菜单,选择“插入脚注”选项,弹出“脚注和尾注”对话框。
3. 在“脚注和尾注”对话框中,有多个选项可供选择。
首先选择“脚注”,然后选择“位置”为“底部”,可以选择“起始编号”为“每页重新编号”。
这样设置后,每个页面的脚注编号将会重新开始编号。
4. 点击“插入”按钮,即可在所选文本的页面底部插入脚注。
二、尾注的插入与脚注不同,尾注位于文档的末尾,适用于对整篇文档进行注释或解释。
插入尾注的步骤如下:1. 首先,将光标移动到文档的末尾处,或者选中需要添加尾注的文本。
2. 然后,点击Word菜单栏中的“引用”选项卡,选择“插入尾注”选项。
3. 在弹出的“脚注和尾注”对话框中,选择“尾注”,然后选择“位置”为“页面底部”,可以选择“起始编号”为“每节重新编号”。
这样设置后,每个节的尾注编号将会重新开始编号。
4. 点击“插入”按钮,即可在文档的底部插入尾注。
三、修改和删除脚注和尾注在文档编辑过程中,可能需要修改或删除已插入的脚注和尾注。
修改脚注和尾注的步骤如下:1. 首先,点击所需修改的脚注或尾注处的相应编号,光标将跳转到脚注或尾注的位置。
2. 然后,对脚注或尾注进行修改或删除操作。
四、脚注和尾注的格式设置在插入脚注和尾注后,可以对其进行格式设置,如字体、字号、对齐方式等。
设置脚注和尾注的步骤如下:1. 首先,选中所需修改的脚注或尾注文本。
2. 然后,通过Word的字体、段落等工具栏对脚注或尾注进行格式设置。
怎么利用尾注添加参考文献
怎么利用尾注添加参考文献1..以尾注的方式插入第一个参考文献。
将光标定位于word文档中将要插入参考文献的位置,按“插入/引用/脚注和尾注”。
出现一菜单,选择“尾注”,“文档结尾”,编号格式为“1,2,3”。
按“插入”按钮。
以后也按照这个方法,不管是在该参考文学的前面还是后面插入,word都会自动更新编号,你就不用再自己一个一个改编号了。
2.给插入的参考文献加中括号。
用word自动插入的参考文献是没有中括号的,参考文献全部写好后要是一个一个加中括号太麻烦。
用什么方法呢?按“编辑/查找",在查找栏中输入"^e",再替换为:"[^&]"。
(交叉引用时插入的第N(N>2)次上标并不能被替换,此时查找栏中应输入"^#"(代表“特殊格式”中的“任意数字”),另外,“格式”选项还应选择“字体-上标”)(上述查找方法只能查找到由“交叉引用”产生的上标,第一次插入的上标还是得用"^e"才能查找)这时不管是文章中还是尾注中的参考文献编号都加上了中括号。
我用过了!很好用。
3.给尾注中的参考文献编号去除上标标志你会发现正文和尾注中参考文献都是上标的形式,正文的上标是你想要的,但是尾注中不是你想要的。
修改方式和谱图word一样,选中编号,按快捷键"ctrl+shift+=”即可。
也可以选中,右击,字体,效果中上标项的勾去掉。
(新建“字符”样式即可)4. 去除“尾注分隔符”2003版:参考文献有几页,你会发现每页的参考文献前面都有一条横线,且无法删除。
它叫“尾注分隔符”。
怎么删除?进入普通视图。
按“视图/脚注”,此时编辑界面分为两个部分下面的编辑框是尾注编辑框选择尾注编辑框中的“尾注”下拉框,选择“尾注分隔符”,出现一条横线,选择该横线,删除它。
再选择“尾注延续分隔符”,也会出现一条横线(这是尾注分页时会出现的很长的横线),选择该横线,删除它。
Word 2010中利用尾注添加参考文献
添加参考文献的方法很多,最麻烦的估计就是一个一个地写编号,然后对应到参考文献页中写全了。
可能,最简单方法是用自动编号加上交叉引用。
在这里,介绍用尾注实现。
这种方法,相对于自动编号加交叉引用要麻烦一些,但有其优点,比如,当鼠标指到正文引用处会提示引用的文献。
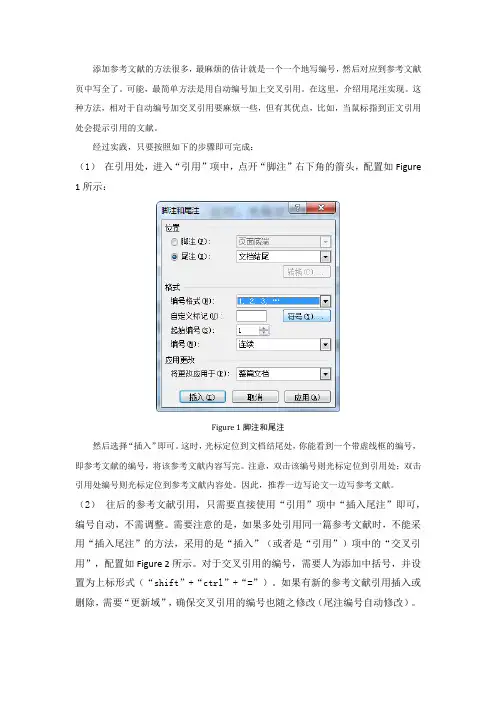
经过实践,只要按照如下的步骤即可完成:(1)在引用处,进入“引用”项中,点开“脚注”右下角的箭头,配置如Figure 1所示:Figure 1脚注和尾注然后选择“插入”即可。
这时,光标定位到文档结尾处,你能看到一个带虚线框的编号,即参考文献的编号,将该参考文献内容写完。
注意,双击该编号则光标定位到引用处;双击引用处编号则光标定位到参考文献内容处。
因此,推荐一边写论文一边写参考文献。
(2)往后的参考文献引用,只需要直接使用“引用”项中“插入尾注”即可,编号自动,不需调整。
需要注意的是,如果多处引用同一篇参考文献时,不能采用“插入尾注”的方法,采用的是“插入”(或者是“引用”)项中的“交叉引用”,配置如Figure 2所示。
对于交叉引用的编号,需要人为添加中括号,并设置为上标形式(“shift”+“ctrl”+“=”)。
如果有新的参考文献引用插入或删除,需要“更新域”,确保交叉引用的编号也随之修改(尾注编号自动修改)。
Figure 2交叉引用尾注(3)当整篇论文写完,参考文献引用也完成后,需要在编号上添加中括号,这将使用“开始”项中的“替换”功能。
对于尾注,将“^e”替换为“[^&]”(如果是脚注,则将“^f”替换为“[^&]”),但是替换时“不限定格式”要处于灰色状态。
如Figure 3所示。
替换时,最好将光标定位在文档最前,然后选择“全部替换”。
需要注意的是,如果后来有新的参考文献插入引用时,最好是先将光标定位到该插入的引用前,然后“查找下一处”,最后选择“替换”,切记不要直接“全部替换”!Figure 3替换和查找(4)到这里,你会发现,正文部分引用的编号及参考文献内容处的编号都是上标格式,当然,正文部分编号应该是上标格式的,但是参考文献处的编号不应该是上标格式,这一点可以通过格式刷改正。
Word中如何插入脚注和尾注

Word中如何插入脚注和尾注脚注和尾注是在论文、文章等文本中添加注释和参考资料的重要方式。
在Microsoft Word中,插入脚注和尾注非常简便。
本文将详细介绍如何在Word中插入脚注和尾注的步骤及注意事项。
一、添加脚注脚注位于页面底部,用于解释、补充、引用资料等内容。
1. 打开Word文档,在需要插入脚注的部分,光标定位于所需注释处。
2. 在顶部菜单栏中选择“引用”,然后点击“插入脚注”按钮。
3. 弹出的对话框中,选择脚注的位置,一般选择“在底部”。
4. 在“脚注文本”框中输入脚注的具体内容。
可以根据需要进行格式调整,如字体、字号等。
5. 点击“插入”按钮,即可将脚注插入到文档中。
二、添加尾注尾注位于文档末尾或章节末尾,用于提供详细的参考文献、引用来源等信息。
1. 打开Word文档,在需要插入尾注的部分,光标定位于所需注释处。
2. 在顶部菜单栏中选择“引用”,然后点击“插入尾注”按钮。
3. 弹出的对话框中,选择尾注的位置,一般选择“在末尾”。
4. 在“尾注文本”框中输入尾注的具体内容。
可以根据需要进行格式调整,如字体、字号等。
5. 点击“插入”按钮,即可将尾注插入到文档中。
三、调整脚注和尾注样式Word提供了丰富的样式选项,可以根据需求进行样式的调整,使得脚注和尾注与文本更加协调美观。
1. 在Word文档中,选择“引用”菜单中的“脚注和尾注”选项。
2. 在弹出的对话框中,可以通过选择不同的样式、布局、编号方式等来自定义脚注和尾注的外观。
3. 在样式选项中,可以设置脚注和尾注的字体、字号、颜色等格式。
4. 确定样式调整后,点击“应用”按钮,即可使样式设置生效。
四、编辑脚注和尾注在插入脚注和尾注后,有时需要进行编辑或删除。
以下是在Word中编辑脚注和尾注的方法:1. 在Word文档中,找到脚注或尾注所在的位置。
2. 双击脚注或尾注,即可进入编辑模式。
3. 在编辑模式下,可以对脚注和尾注的内容进行修改、删除等操作。
表格加尾注

在制作表格时,我们有时需要对某些数据或信息进行解释和说明,这时可以使用尾注功能。
尾注是一种注释方式,它可以将文本添加到表格的底部,以便在不干扰表格内容的情况下提供额外的信息。
以下是如何在Microsoft Word中为表格添加尾注的方法:1. 打开Microsoft Word文档,找到需要添加尾注的表格。
2. 将光标放在需要添加尾注的单元格中,或者在表格下方的空白处输入尾注内容。
3. 单击“引用”选项卡,然后单击“脚注”组中的“插入尾注”按钮。
这将在文档的底部插入一个带有数字编号的尾注。
4. 在尾注区域输入相应的注释内容。
例如,可以解释数据来源、提供数据单位等。
5. 重复步骤2-4,为其他单元格添加尾注。
6. 如果需要修改尾注编号的格式,可以单击“脚注”组中的“对话框启动器”按钮,打开“脚注和尾注”对话框。
在“位置”选项卡中,可以选择“尾注”单选按钮,然后设置编号格式、起始编号等选项。
7. 如果需要删除某个尾注,可以直接选中尾注编号,按“Delete”键删除。
如果需要删除所有尾注,可以单击“脚注”组中的“显示所有尾注”按钮,然后在弹出的尾注窗格中选中所有尾注编号,按“Delete”键删除。
8. 如果需要对尾注进行排序或重新编号,可以单击“脚注”组中的“管理脚注”按钮,打开“脚注和尾注”对话框。
在“排序”选项卡中,可以选择按照字母顺序或按照引用顺序对尾注进行排序。
在“重新编号”选项卡中,可以选择重新开始编号或继续当前编号。
9. 如果需要在文档的其他部分引用某个尾注,可以使用交叉引用功能。
将光标放在需要引用尾注的位置,然后单击“引用”选项卡中的“交叉引用”按钮。
在弹出的对话框中,选择“尾注”选项卡,然后选择对应的尾注编号和引用类型(如标题、作者等),最后单击“插入”按钮。
10. 如果需要将表格转换为图片格式(如PDF),并保留尾注信息,可以在转换为图片之前先插入尾注。
这样,在查看图片格式的文档时,仍然可以看到尾注信息。
如何在Word中添加脚注和尾注
如何在Word中添加脚注和尾注在Word文档中添加脚注和尾注是一种非常常见的需求。
脚注和尾注可以为文章提供额外的解释、注释或引用,使读者对某个特定术语、引用或者观点有更深入的了解。
下面将介绍如何在Word中添加脚注和尾注。
一、添加脚注要在Word文档中添加脚注,请按照以下步骤进行操作:1. 打开需要添加脚注的Word文档。
2. 将光标定位到你想要添加脚注的位置。
3. 点击Word菜单栏上的“参考文献”选项卡。
4. 在“参考文献”选项卡中,找到“脚注”组,在该组中点击“插入脚注”。
5. 弹出的“脚注和尾注”对话框中,选择“脚注”选项卡。
6. 在“脚注”选项卡中,选择适合你需求的脚注样式,比如“脚注”、“编号”或者“符号”。
7. 输入你想要添加的脚注内容。
8. 点击“插入”按钮,完成脚注的添加。
二、添加尾注要在Word文档中添加尾注,请按照以下步骤进行操作:1. 打开需要添加尾注的Word文档。
2. 将光标定位到你想要添加尾注的位置。
3. 点击Word菜单栏上的“参考文献”选项卡。
4. 在“参考文献”选项卡中,找到“脚注”组,在该组中点击“插入脚注”。
5. 弹出的“脚注和尾注”对话框中,选择“尾注”选项卡。
6. 在“尾注”选项卡中,选择适合你需求的尾注样式,比如“尾注”、“编号”或者“符号”。
7. 输入你想要添加的尾注内容。
8. 点击“插入”按钮,完成尾注的添加。
三、其他脚注和尾注功能除了添加脚注和尾注,Word还提供了其他一些脚注和尾注相关的功能,如脚注和尾注分别位于每页底部和文档末尾的选项,以及脚注和尾注的格式设置等等。
你可以根据自己的需求进行调整。
总结:通过以上步骤,你可以在Word文档中轻松地添加脚注和尾注,并根据需要进行设置。
脚注和尾注不仅能够丰富文章内容,还可以为读者提供更多的参考信息。
希望本篇文章能够帮助你更好地利用Word的脚注和尾注功能,提升你的文档编辑效率。
word添加参考文献、尾注(Addwordreferences,endnote)
word添加参考文献、尾注(Add word references, endnote)1. add referencesWhen writing whenever need to add a reference to the cursor in the reference number takes place, click "insert", "reference": "footnotes and endnotes", click "select" endnote "- the end of the document" continuous insertion: an application to "whole document"; as in Ref. at the end of the article sorted out, so generally choose endnote (insert footnote / endnote shortcut: Ctrl + Alt + f/d), click Insert, the cursor automatically jump to the end, you can input references, each can only insert a document.This text is the 1 superscript, but also endnote superscript, with the mouse in the left most selected endnote 1, press "ctrl+shift+=" to make the serial number in superscript (only not deleted); or from the set format. Double click the endnote number back to the original text, will find out more than a number, and the number is according to the position in the ascending order before and after. When the original order is exchanged or new documents are inserted in the middle of the article, the reference order of the text will change accordingly.Add 2. square brackets []The cursor in the text, according to the "Ctrl + H" to open "replace", in the search input "^e" (which represents the reference endnote character) in the advanced options will pay attention to the font in superscript, replacement type "[^&]" (representing replacement symbol), click "replace all". Atthis point, the text has square brackets, and then the cursor stays in the reference and performs the same operation. Then the reference mark also has square brackets.Or:(1) use the mouse or "Ctrl+Home" to return to the beginning of the document;(2) the menu "Edit", "replace", or "Ctrl+H" opens the find and Replace dialog box directly;(3) in the find what text box input "^e" (if the footnote forF), in the replace with text box input "[^&]" (footnote endnote, it is of course, can also be), then click on "replace all the following effects: (must distinguish English in full half, also suggested that the best reference after the completion of add square brackets, otherwise there will be a layer of square brackets)3. remove "endnote separator"In the first reference in front of a line, cannot be deleted, it is endnote separator. Our general editing interface is a page view, and click View "ordinary" to switch to the normal view. Click the view "footnote" to open the footnote window. In the endnotes menu "endnote separator", there is a horizontal line, select the line, delete it; then select endnote continuation separator ", delete the line (which will appear when the long endnote paging line). After closing, click the view "page" to switch back to the page view.4. cited the same document several timesWhen the need for multiple references to the same document, the cursor to reference, click "insert", "reference", "cross reference" in the menu "reference type" select "endnote", "quote" select "endnote number (with format)" (only choose "endnote number" can choose "endnote number format", or later cross reference plus bracket is not, you need to select the superscript format) quoted in the literature in the following menu, click "insert". But you need to manually add square brackets at this time.If later in front of the document into the new endnote, then subsequent endnote automatically updates the number, but the cross references are not automatically updated. Therefore, you need to press "Ctrl + A" to select all the contents, and press the "F9" button to manually update.Grade 5, Wen Zhonghe has added the endnote brackets, but with no cross reference part. Processing the cross reference number:(1) the menu tools, options, View tab, select domain code at the display section, or display the domain code directly using the shortcut key Alt F9,The part that you see cross references has become code;(2) the menu "Edit", "replace", or "Ctrl+H" opens the find and Replace dialog box directly;(3) in the find what text box input "^d NOTEREF", in the "replacement for" input "[^&]" text box and place the cursor in the text box, and then click the advanced button, then click the "format" button, select "style" in the pop-up menu, then will open the "find the style dialog box, select" endnote reference "style; (after the cancellation can again)(4) after completing the above work, the contents of the find and Replace dialog box are changed to the following figure, and note the "format" line below the "replace" text box;(5) click "replace all" in the menu "tools", "option", "the View tab, in the" display "part, deselect the" domain code ", or directly use the shortcut key" Alt F9 "to cancel the display field code.(6) because the front according to the Word reference or endnote is inserted at the end of the document, or in the "Festival" at the end, if there are other references behind the content, it must be further modified.The solution seems a bit awkward. First remove all numbers (in the text endnotes, we don't need it, because it's the wrong format), and then select all text endnotes (reference text), "and insert Bookmarks", named "reference text", added to the bookmark. This makes all references text bookmarks. After the text, create a new page with the title "reference" and set the format. Move the cursor to the title, select "insert, cross reference", "reference type" to "bookmark", "insert reference text", the text reproduced a reference. Select the text you just inserted, modify the font, font size, etc., and use the itemnumber for automatic numbering.Here, we are a little short of perfection. When you print a document, endnotes page will also print out, and this is what we don't need a few pages. Of course, you can print the last few pages by setting the page number range. Here's another way. If you want to learn more, please go on.All of the selected text "endnote, format, font", instead of "hidden text", switch to normal view, select "view, footnote, endnote" is all at this time appear in the window, in the "endnote drop-down list box select" endnote separator ", will be the default delete line. The same method to delete "endnote continuation separator" and "endnote continuation notice". Delete header and footer (including separator), select "view, header and footer, first delete the text, and then click on the header and footer Toolbar" page settings "button in the dialog box on the" border ", in the" page border tab, the border is set to "no", "the scope of application the festival"; "border border tab is set to" no "," the scope of application of paragraph". Switch to footer and delete page number. Select "tools and options" in the "print" tab in the confirmation does not print hidden text (Word default).6, the following work is how to modify the endnote format, by default the endnotes text style is not to appear in the styles and Formatting task pane, then you want to modify the format:(1) the text endnotes selected, in the "format", "the style and format of the document or the right of the" style and Formatting task pane inside the "selected text format" there will be a"endnote reference", click on the right side of the down button, select "modify", so that we can modify the "endnote reference" format;(2) how to make "endnote reference appears in the" style "style and Formatting task pane click to use the format of" inside? In the display drop-down list box in the lower right of the style and format task pane, select customize",The Format dialog box appears;(3) in the "visible" style "select endnote reference", or click "show all" button, and then determine the. This "endnotes text style appeared in the" select the format of the application ", modify the format of the method and method of modification of other styles of the same; (if you feel endnote digital symbol is small, can be converted to the text style or directly clear format)7, sometimes in the text of a location, you need to cite a number of documents, such as "document [1-5]", how to achieve such a format? In the same place with endnote to insert multiple references, such as [1][2][3][4] (with square brackets, and methods) will make it to [1-4], and do not change the order behind endnote. Methods four references into endnote, manually select the middle part not and font format chosen as hidden text, and then enter the "-". (comma similar to other symbols)。
word文档添加脚注的两种方法
本文整理于网络,仅供阅读参考
word文档添加脚注的两种方法
word文档添加脚注方法一:
步骤一:打开word文档,输入一篇古诗,如李白的《静夜思》。
步骤二:先找到脚注和尾注的位置,在引用中可以发现。
步骤三:光标指向要插入脚注的位置上,选择插入脚注。
步骤四:尾注也是一样的,光标指向要插入尾注的位置上,选择插入尾注。
步骤五:删除的方法很简单,只要把光标定在脚注或尾注上,然后按del删除就可以。
word文档添加脚注方法步骤二:
步骤一:打开要编辑的文档。
步骤二:点击引用。
步骤三:点击要添加脚注的地方,将光标移到此处。
步骤四:点击插入脚注。
步骤五:在光标处即可输入脚注。
步骤六:换个地方还可以继续添加。
脚注都标注在左下角。
步骤七:将光标放在脚注之后可以将脚注删除。
步骤八:将光标放在脚注之后可以将脚注删除。
看了“word文档添加脚注的两种方法”此文的人。
WPS尾注后面如何再添加正文,而不是尾注的继续?
WPS尾注后面如何再添加正文,而不是尾注的继续?
展开全文
这几天研究生学术会议论坛的论文让我排版,要打印论文集,其中有一篇论文加了尾注,之后问题就来了,再粘贴下一篇文章在WORD的时候就都变成尾注的内容了,而不是正文内容。
如果想在尾注后面再粘贴正文要用如下办法:(WPS)
1.把“文档结尾”改为“节的结尾”。
在尾注输入处点:引用---插入脚注/尾注---修改“文档结尾---节的结尾”----应用。
2.插入新页面。
在尾注线的上方一行正文结尾点:插入---空白页。
这样就会出现新的页面啦。
另外,有尾注的文章转pdf的时候,会比正常的文章占的页面多。
所以,这就会影响到有自动生成目录的文章的页码。
比实际页码整体会往后推。
这个还未找到解决办法,把那个捣鬼的文章变小一号,以保持正文页码与生成目录里的页码一致。