INFA安装配置手册Linux
Linux命令行使用技巧如何使用info命令查看命令的详细信息

Linux命令行使用技巧如何使用info命令查看命令的详细信息Linux命令行使用技巧:如何使用info命令查看命令的详细信息Linux作为一种开源操作系统,广泛应用于服务器和个人电脑等领域。
Linux命令行是Linux系统的核心,熟练掌握命令行的使用技巧对于Linux用户来说非常重要。
其中,info命令是一种查看命令详细信息的重要工具。
本文将介绍如何使用info命令来查看命令的详细信息。
一、简介info命令是Linux系统中的一个帮助工具,它可以用来查看命令的详细信息。
与man命令相比,info命令提供了更加全面和结构化的帮助文档。
在终端中输入info加上要查询的命令,即可打开该命令的详细信息页面。
下面将详细介绍如何使用info命令。
二、基本用法要使用info命令查看命令的详细信息,只需在终端中输入以下命令:```info 命令名称```其中,命令名称是你要查询的命令的名称。
例如,如果你想查看ls命令的详细信息,可以输入以下命令:```info ls```三、信息页面导航在info命令的详细信息页面中,你可以使用以下按键来进行导航:- 方向键:上下左右方向键用于在页面中上下左右移动。
- Enter键:按下Enter键可以向下滚动到下一行。
- 空格键:按下空格键可以向下滚动一页。
- b键:按下b键可以向上滚动一页。
- Tab键:按下Tab键可以在不同的链接之间切换。
- q键:按下q键可以退出info命令。
四、信息页面结构info命令的详细信息页面通常由多个节点组成,每个节点都包含了有关命令的不同方面的详细信息。
可以通过键盘按键快速浏览不同的节点。
以下是一些常用的键盘快捷键:- n键:按下n键会跳转到下一个节点。
- p键:按下p键会跳转到上一个节点。
- u键:按下u键会跳转到上级节点。
- l键:按下l键可以列出当前节点的所有子节点。
- s键:按下s键可以搜索指定关键字在当前节点中出现的位置。
五、搜索关键字在info命令的详细信息页面中,你可以使用搜索功能查找指定的关键字。
install-info__linux命令中文解释.html

REPORTING BUGS 报 告 错误
将错误报告发送到 bug-texinfo@,一般的问题和讨论则发送到 help-texinfo@。 Texinfo 主页: /software/texinfo/
COPYRIGHT
Copyright © 2003 Free Software Foundation, Inc. There is NO warranty. You may redistribute this software under the terms of the GNU General Public License. For more information about these matters, see the files named COPYING.
INSTALL -INFO INSTALLSection: User Commands (1) Updated: June 2003 Index Return to Main Contents
NAME
install-info - 更新 info/dir 项
SYNOPSIS 总览
install - info [OPTION]... [INFO-FILE [DIR-FILE]] install-
DESCRIPTION 描述
从 Info 目录文件 DIR-FILE 中的文件 INFO-FILE 中安装或删除 dir 目录项。
OPTIONS 选项
-- delete --delete 删除 DIR-FILE 中的 INFO-FILE 里已有的项;不插入任何新项。 -- dir - file NAME --dir file= dir指定 Info 目录文件的文件名。这等价于使用 DIR-FILE 参数。 -- entry TEXT --entry entry= 插入 TEXT,作为一个 Info 目录项。TEXT 的形式应当是一个 Info 目录项的一行,加上 0 个或多个 以空白开始的行。如果指定了超过一项,它们都将被添加。如果不指定任何项,就根据它们的 Info 文件中的信息来判断。 -- help --help 显示此帮助,然后退出。 -- info - file FILE --info file= info指定要安装到目录中的 Info 文件。这等价于使用 INFO-FILE 参数。 -- info - dir DIR --info dir= info与 -- dir - file DIR/dir 相同。 --dir file= dir-- item TEXT --item item= 与 -- entry TEXT 相同。一个 Info 目录项实际是一个菜单项。 --entry -- quiet --quiet 阻止发出警告。 -- remove --remove 与 -- delete 相同。 --delete -- section SEC --section section= 将文件中所有项添加到目录的 SEC 段。如果指定了超过一个段,所有项都被添加到每一个段当中。如 果不指定任何段,就根据它们的 Info 文件中的信息来判断。 -- version --version 显示版本信息,然后退出。
Linux安装指南说明书

Installing Linux on Power Systems serversVersion 1.0.1IBM®Quick Start Guide for installing Linux on Power Systems servers This guide helps you install Linux on a stand-alone Power Systems server that has a graphics card.OverviewUse this information to install Linux on a Power Systems server that has a graphics card installed. This installation assumes an unmanaged (stand-alone) system.1Step 1: Complete the prerequisitesBefore you install Linux on your system, ensure that you have the following items:•USB keyboard and mouse•Monitor•Power cords and outlet for your system. Depending on your configuration, your system might require 220 V. For instructions, see the IBM Knowledge Center and search for your Power hardware model: IBM Knowledge Center.•Distribution media2Step 2: Prepare to power onBefore you power on the system, follow these steps:•If your system belongs in a rack, install your system into that rack. For instructions, see the IBM Knowledge Center and search for your Power hardware model: IBM Knowledge Center.•Remove the shipping brackets from the power supplies. Ensure that the power supplies are fully seated in the system.•Connect the monitor, mouse, and keyboard•Connect the power cords to the system and plug them into the outlets.After you connect the power cords, your firmware boots. Wait for a few minutes for this process to complete. Look for the green power LED on the control panel to start flashing, indicating that it is ready to use, and for the prompt 01 N V=N to display in the control panel window.For information about accessing and using the control panel, see the Control panel topic at https:///BdYjwz.3Step 3: Power on the systemAfter the firmware boots, you can power on the system. Press and hold the white power-on button on the front of the control panel for 3 seconds to start the server.As the system powers up, you might notice the following:•System reference codes display on the control panel while the system is being started.•The power LED continues to flash and speeds up.•The system cooling fans are activated after approximately 30 seconds and begin to accelerate to operating speed.•The power LED on the control panel stops flashing and remains on, indicating that system power is on.Note: If you system fails to start, verify that the prompt 01 N V=N is displaying in the control panel and green power LED is flashing green.When the system is powered on, the monitor activates and the Boot selection window is displayed.Note: You can also connect to your system using the Advanced System Management Interface (ASMI). Forinstructions, see the IBM Knowledge Center and search for your Power hardware model: IBM Knowledge Center.4Step 4: Boot the installer kernelTo set up your server to boot the Linux installer kernel, follow these steps:a.At the Boot selection window, enter 1 to select the SMS Menu. Enter 1 before the firmware boot screen iscompletely shown on the display, because it will disappear when complete. If you miss the screen, reboot thesystem.b.At this time, you can insert the distribution media into the disk drive.c.Enter 2 to Continue to password entry on the Language selection menu. Enter admin.d.On the main SMS menu, enter 5 to select the Select Boot Options option.e.Enter 1 to select Install/Boot Device.f.Enter 7 to view all of the available boot devices.g.Enter the number corresponding to the device you want to use. If your device is not displayed, you can enter N todisplay more.h.Enter 2 to perform a Normal Mode Boot.i.Enter 1 to leave the SMS menu and to start the boot process.j.At the boot prompt from the installer, type linux when installing Red Hat Enterprise Linux or install when installing SUSE Linux Enterprise Server and press Enter. The kernel will begin loading.k.Follow the installer screens to install Linux.5Step 5: Install additional softwareAdditional software is available from the IBM Linux on PowerTools Repository. The IBM Tools Repository is alsocalled the Yum Repository. To install the IBM Tools Repository, follow these steps:a.Download the ibm-power-repo RPM package from https:///BdxnTB. Use the same package for Red HatEnterprise Linux and SUSE Enterprise Linux Server.b.Install the ibm-power-repo RPM package. Run the command: rpm -ivh ibm-power-repo versionnumberAfter you have installed the IBM Tools Repository, you can use it to install the following:•Service and Productivity tools:–For Red Hat Enterprise Linux: yum install ibm-power-nonmanaged-distro where distro is the distribution that you are installing.–For SUSE Linux Enterprise Server: yum install ibm-power-nonmanaged-distro where distro is the distribution that you are installing.•IBM Advance Toolchain for Linux on Power–On Red Hat Enterprise Linux: yum install advance-toolchain-at6* where advance-toolchain-at6 is the version of IBM Advance Toolchain for PowerLinux that you want to install.–On SUSE Linux Enterprise Server: zypper install advance-toolchain-at6* where advance-toolchain-at6 is the version of IBM Advance Toolchain for PowerLinux that you want to install.•IBM SDK for PowerLinux–On Red Hat Enterprise Linux: yum install ibm-sdk-lop.ppc64–On SUSE Linux Enterprise Server: zypper install ibm-sdk-lop.ppc64For more information about using the IBM Linux on Power Tools Repository, see https://ibm/biz.BdYjwG.6Step 6: TroubleshootCheck the control panel for any codes that might be displayed. For example, the code 11002613 indicates thatthere is a problem with power. Ensure that the power supplies are seated correctly and that you are using thecorrect power cords.You can look up any codes that are displayed in IBM Knowledge Center.More informationFor more information, see the following resources:•Linux information for IBM systems at https:///support/knowledgecenter/linuxonibm/liaaa/ic-homepage.htm•IBM Knowledge Center: https:///support/knowledgecenter/.•The Linux on Power developer portal at https:///linuxonpower/.© Copyright IBM® Corp. 2018. U.S. Government Users Restricted Rights - Use, duplication or disclosure restricted by GSA ADP Schedule Contract with IBM Corp.IBM, the IBM logo, and ® are trademarks or registered trademarks of International Business Machines Corp., registered in many jurisdictions worldwide. Other product and service names might be trademarks of IBM or other companies. A current list of IBM trademarks is available on the Web at "Copyright and trademark information" (/legal/copytrade.shtml).。
ToughRADIUS安装手册-Linux篇

T ough RADIUS 安装配置手册-Linux篇修订日期 - 2015年2月20日目录....................................................................................................................................目录 1 .....................................................................................................................1.系统介绍 32.安装环境准备 4.............................................................................................................................................................................................................3.ToughRADIUS版本 54.MySQL数据库安装 6.......................................................................................................................................................................................... 5.ToughRADIUS安装配置 8................................................................................ 6.ToughRADIUS系统服务配置 111.系统介绍ToughRADIUS是一个开源的Radius服务软件,基于BSD许可协议发布。
linux标准配置手册

linux标准配置手册Linux标准配置手册。
Linux操作系统作为一种开源的操作系统,广泛应用于服务器领域,同时也受到了越来越多个人用户的青睐。
对于新手来说,学习Linux系统的配置可能会感到有些困难,因此本手册将为您介绍Linux系统的标准配置方法,帮助您更好地了解和掌握Linux系统的使用。
首先,我们需要了解Linux系统的基本结构和文件目录。
Linux系统的根目录为"/",所有的文件和目录都从根目录开始。
在Linux系统中,一切皆文件,包括硬件设备、目录和普通文件等。
因此,了解Linux系统的文件结构对于进行系统配置至关重要。
其次,我们需要了解Linux系统的用户和权限管理。
在Linux系统中,每个用户都有自己的用户名和用户组,同时也有对文件和目录的访问权限。
通过chmod 命令可以修改文件和目录的权限,通过chown命令可以修改文件和目录的所有者和所属用户组。
合理的用户和权限管理对于系统的安全性和稳定性至关重要。
接着,我们需要了解Linux系统的网络配置。
在Linux系统中,可以通过ifconfig命令查看网络接口的信息,通过route命令查看和配置路由表,通过iptables命令配置防火墙规则等。
合理的网络配置可以保证系统的网络通信畅通无阻。
此外,我们还需要了解Linux系统的服务管理。
在Linux系统中,可以通过systemctl命令管理系统的服务,包括启动、停止、重启和查看服务状态等。
合理的服务管理可以保证系统的稳定运行。
最后,我们需要了解Linux系统的日志管理。
在Linux系统中,所有的系统和应用程序都会生成相应的日志文件,可以通过查看日志文件来了解系统的运行状态和故障原因。
合理的日志管理可以帮助我们及时发现和解决系统的问题。
总之,Linux系统的标准配置涉及到文件结构、用户和权限管理、网络配置、服务管理和日志管理等多个方面,需要我们综合考虑和合理配置。
通过本手册的介绍,相信您已经对Linux系统的配置有了更深入的了解,希望能够帮助您更好地使用和管理Linux系统。
linux6下informix 11.7安装配置手册

linux6下informix 11.7安装配置手册
linux6下informix-11.7安装配置手册
Informix在新的start Linux 6_11.7安装和配置手册下
本文仅适用于数据库挂载本地盘的情况。
本文中逻辑日志设置为19个,逻辑日志,物理日志以及tempdbs的大小设置为2g,rootdbs设置为5.1g,其他地区可根据局方划分虚拟空间的大小灵活调整。
建立Informix帐户
useraddcu500cg500cd/home/informixcs/bin/bashinformix
确认外壳类型
如果shell类型不是bash则修正informix账户shell类型
chshcs/bin/bashinformix
编辑Informix环境变量
informixdir=/home/informixinformixserver=hbcdr1
path=$path:$informixdir/bin
ld_library_path=$ld_library_path:$informixdir/lib:$informixdir/lib/esql
exportinformixdirinformixserverpath
解压informix_11.7安装包
解压文件
切换账户至root进行安装
直接进入
选1并回车
选择1以输入或直接按enter键
指定安装路径,并选y回车确认;我们常用/home/informix,如果不指定informix 默认安装到/opt/ibm/informix中。
linux info等帮助命令获取帮助的方法。 -回复

linux info等帮助命令获取帮助的方法。
-回复在Linux中,有很多有用的命令可用于获取系统和命令的帮助信息。
这些帮助命令是Linux中必不可少的部分,可以帮助用户理解命令的功能、使用方法和选项。
无论您是新手还是有经验的Linux用户,都应该熟悉如何使用这些命令来获得所需的帮助信息。
在本文中,我将向您介绍一些常用的Linux帮助命令,并说明如何使用它们来获取有关特定命令或主题的详细信息。
1. man命令:man(manual)命令是Linux中最常用的帮助命令之一。
它提供了对大多数系统命令、库函数和系统调用的详细文档。
要使用man命令,只需在终端中键入"man"后加上您要查看帮助信息的命令的名称。
例如,要查看"ls"命令的帮助信息,只需输入"man ls"。
man命令打开一个分页器,您可以使用上下箭头键在文档中滚动。
man 页面通常分为"NAME"、"SYNOPSIS"、"DESCRIPTION"、"OPTIONS"、"EXAMPLES"、"FILES"、"SEE ALSO"和"AUTHOR"等部分,以提供有关命令的详细信息。
2. info命令:info命令是另一个常用的帮助命令,它提供了比man命令更详细的帮助信息。
info命令的帮助文档以分层结构的方式组织,使您可以更容易地导航和查找所需的信息。
要使用info命令,只需在终端中键入"info"后加上您要查看帮助信息的命令的名称。
例如,要查看"ls"命令的帮助信息,只需输入"info ls"。
info 命令将打开一个Info浏览器,您可以使用光标键和回车键来导航和查看帮助文档。
tuxedo安装手册
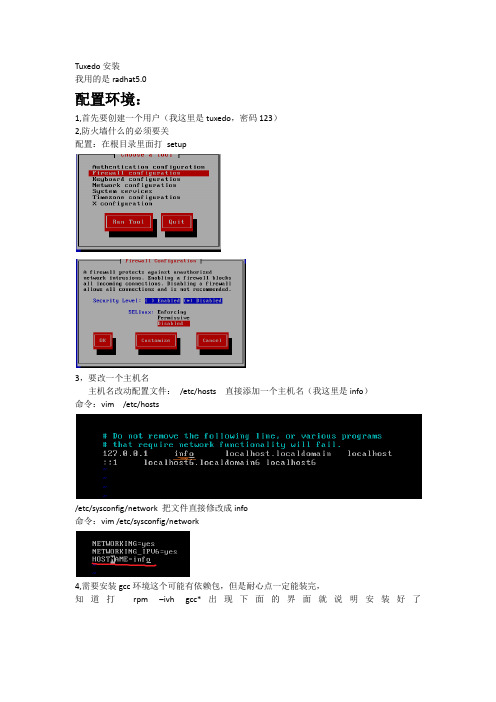
Tuxedo安装我用的是radhat5.0配置环境:1,首先要创建一个用户(我这里是tuxedo,密码123)2,防火墙什么的必须要关配置:在根目录里面打setup3,要改一个主机名主机名改动配置文件:/etc/hosts 直接添加一个主机名(我这里是info)命令:vim /etc/hosts/etc/sysconfig/network 把文件直接修改成info命令:vim /etc/sysconfig/network4,需要安装gcc环境这个可能有依赖包,但是耐心点一定能装完,知道打rpm –ivh gcc*出现下面的界面就说明安装好了5;把tuxedo111120_32_Linux_01_x86.bin 文件传到/home/tuxedo文件下记得改一下权限chmod 777 tuxedo111120_32_Linux_01_x86.bin传完之后reboot启动一下系统Tuxedo安装然后用tuxedo用户登录(这里必须用tuxedo用户安装这个文件)执行:./ tuxedo111120_32_Linux_01_x86.bin –i console第一项是选择语言:1这个是按enter继续按1选择完全安装,按1选择创建一个oracle目录下面是写路径/dev/tuxedo/tux -------------tux是我创建的这个文件夹名字这个选择2,确定选择创建的文件路径下面选择y,确认然后就开始安装了这个是为tuxedo创建密码我写的是tuxedo这个地方是说你的服务器是否要安装SSL,我们就不安装了选择2(NO)就可以了,如果你需要SSL 支持你可以选择,这里我就省略了。
这样tuxedo就算安装好了环境变量配置进入配置文件cd /home/tuxedo/tux/tuxedo11gR1下面我们为tuxedo成功启动做一个服务在/home/tuxedo/tux/tuxedo11gR1 目录下创建一个目录Mkdir Myserver将/home/tuxedo/tux/tuxedo11gR1/samples/atmi/simpapp中的所有文件拷贝到Myserver目录下cp samples/atmi/simpapp/* Myservercp ./tux.env ./Myserver/进入Myserver文件夹Cd Myserver编译vim tux.env添加行:TUXCONFIG=/home/tuxedo/tux/tuxedo11gR1/Myserver/tuxconfig ; export TUXCONFIG编译vim ubbsimple第一个是Ipckey 改成123456第二个就是路径了第三个就是主机名改写第四个就是修改vim /home/tuxedo/.bash_profile 文件里面加载一下TUXCONFIG=”/home/tuxedo/tux/tuxedo11gR1/Myserver/tuxconfig”现在reboot重新启动一下还是用tuxedo进入进入目录cd /home/tuxedo/tux/tuxedo11gR1/Myserver 下面先运行一下tux.env文件. ./tux.envbuildserver -o simpserv -f simpserv.c –s TOUPPER buildclient -o simpcl -f simpcl.c如果出现下面的情况就说明好了下面启动服务试试看加载ubbsimple文件tmloadcf –y ubbsimple 启动tuxedo程序tmboot –y这样的就成功了./simpcl Jianheng这就成功了进入管理界面Tmadminpsc查看服务运行状况psr查看服务程序运行状况这就是弄成了,你可以看一下效果。
- 1、下载文档前请自行甄别文档内容的完整性,平台不提供额外的编辑、内容补充、找答案等附加服务。
- 2、"仅部分预览"的文档,不可在线预览部分如存在完整性等问题,可反馈申请退款(可完整预览的文档不适用该条件!)。
- 3、如文档侵犯您的权益,请联系客服反馈,我们会尽快为您处理(人工客服工作时间:9:00-18:30)。
1 ETL服务器安装部署
本项目ETL安装部署主要是安装部署Informatica ETL软件,下面以LINUX 平台安装部署Informatica软件为例说明Informatica安装部署过程。
1.1 安装
1.1.1安装Informatica前准备工作
1.1.1.1 安装JDK1.7程序包
上传介质
1.1.1.2 配置JDK,Oracle、Sybase客户端和ODBC环境变量,参考下面
环境变量配置。
执行source .bash_profile使环境变量生效。
1.1.1.3 上传安装介质和KEY文件
FTP上传安装介质961_Server_Installer_linux-x64.tar和KEY文件
State_Grid_POC_8-6-2014_8-02-59_PM.key到infa用户下。
1.1.1.4 创建解压目录和安装目录
分别创建Informatica解压目录文件夹informatica961和安装目录文件夹
Infa961:
mkdir informatica961
mkdir Infa961
注:安装目录名Infa961一定要统一,下面的NFS文件共享系统需要配置这个
路径以便于调试和维护。
1.1.1.5 解压安装介质
解压Informatica安装介质到Informatica961目录下:
tar–xvf961_Server_Installer_linux-x64.tar /Informatica961
1.1.2Informatica安装
进入介质解压目录informatica961执行安装命令:
./install.sh
1.1.3选择安装选项
见下图,如果服务器上没有Informatica服务则选择1,其他选择2。
1.1.4运行系统检测工具
见下图,在安装之前运行系统检测工具以避免安装过程中出现问题:选择1
1.1.5创建系统信息
见下图,以下内容需要输入安装路径(绝对路径):/app/infa,资料库用户名:infa_domain,密码:infa_domain,ip:10,,端口号:1521,sid:sgywgl
1.1.6检查成功后推出并执行安装
然后退出当前系统检查环境,下面会提示是否继续安装Informatica服务,选择y继续安装
1.1.7不启用网络身份验证
安装过程中Informatica服务有网络身份验证功能,我们选择不启用网络身份验证:
1.1.8输入KEY文件
见下图,我们需要提供激活Informatica服务KEY文件,输入文件所在的绝对路径:/app/infa/Infa961/license.key:
1.1.9输入安装路径
见下图,输入Informatica服务需要安装目录的绝对路径:/app/infa/Infa961
1.1.10选择安全通信模式
见下图,选择1创建域,选择1不启用安全通信,选择2禁用HTTPS。
1.1.11配置域信息
见下图,配置域存储库信息,由于上面执行系统检查工具已经输入过数据库信息,这里可以选择默认值按回车即可。
1.1.12输入域加密字符信息
见下图,Informatica域加密服务,需要我们输入域加密密钥并且有字符要求如下面格式:Infa_961。
1.1.13输入域配置信息创建域
见下图,按照域信息所需的配置信息进行创建域(参考部署方案域命名原则)。
域密码:Administrator
1.2 创建节点2并加入域
节点2上执行
1.2.1节点2informatica安装并加域
节点2安装过程与节点1一致,在进行到选择安全通信模式时,选择2-加入域:
1.3 运行和配置
1.3.1配置Informatica环境变量。
vi .bash_profile
在原有的环境下面添加:
执行source .bash_profile使环境变量生效。
1.3.2运行Informatica服务。
1.3.
2.1 启动Informatica服务
在Informatica域创建完成之后,进入安装目录下/infa/Infa961/Server/tomcat/bin下面,执行./infaservice.sh startup 启动Informatica
1.3.
2.2 查看跟踪服务是否启动
用netstat–antp | grep 600 命令查看监听端口6005,6008是否启动以判断Informatica 服务正常与否。
1.3.3登陆Informatica控制台
见下图,Informatica服务启动后,在IE浏览器输入http:ip:6008进入控制台界面,输入创建域时的用户名和密码(Administrator/Administrator)进行登陆。
1.3.4配置存储库服务
1.3.4.1 创建存储库服务
见下图,红色字体1部分是已经创建好的,在左上方选择【操作】,新建存储库服务(黑色圈部分)。
1.3.4.2 输入存储库服务名称
在绿色框标记1部分输入存储库名称,在绿色框标记2部分下拉框选择许可证和主节点,然后单击【下一步】(标记3)。
1.3.4.3 输入存储库信息
配置存储库存放的用户名和密码,代码页选项要选择和黑色椭圆框标记部分一致即
简体中文代码页,然后单击【完成】。
1.3.4.4 更改存储库操作模式
创建完成存储库之后,单击存储库名称,右侧会更新存储库界面(见下图),单击
红色标记1部分编辑存储库属性,把操作模式由【独占】改为【普通】,这时会提
示存储库重启,选择确定(红色标记2部分)。
注意:存储库操作模式只有在【普通】模式才能创建下面的集成服务,这里一定要更改操作模式并且允许其自动重启存储库服务。
1.3.5配置集成服务
1.3.5.1 创建集成服务
见下图,红色字体2部分是已经创建好的集成服务,在左上方选择【操作】,新建
存储库服务(黑色圈部分)。
1.3.5.2 输入集成服务名称
见下图,参考部署方案命名规则输入名称,单击下拉框选择许可证和主节点。
1.3.5.3 输入集成服务信息
见下图,单击下拉框选择存储库名称(标记1),输入资料库用户名和密码(标记2),连接数据移动模式选择Unicode(标记3),单击【完成】。
1.3.5.4 启动集成服务
见下图,单击左侧集成服务名称,单击右侧【再次应用】按钮(标记1)启动集成
服务,启动之后会显示集成服务可用(标记2)。
1.4 配置NFS共享存储
1.4.1配置Linux NFS
共享存储以实现Informatica与Sybase数据文件共享,下面以Informatica所在服务器为服务端,Sybase服务器为客户端,参考以下实例:
首先在客户端创建共享路径:mkdir–p /infa/Infa961/Server/infa_shared/Tgtfiles并给予读写权限。
在服务端编辑vi /etc/exports,输入:
/infa/Infa961/Server/infa_shared/Tgtfiles ,sync)
重启portmap,nfs服务,输入:
serviceportmap restart;
servicenfs restart;
然后把服务端Informatica生成的数据文件路径挂载到客户端上,执行如下:
mount–
注意:上面IP是服务端IP。
在共享目录下创建文件并输入信息测试共享文件读写性能。
1.5 客户端安装
1.5.1客户端压缩包解压安装示意图
双击install.bat按照下面图示安装程序
安装目录根据自身情况设定.
1.5.2配置域
配置完成需要选中要连接的存储库
1.6 工作流导入导出
1.6.1工作流导入
按照以下图示进行工作流的导入
导出取个名子保存即可。
1.6.2工作流导入
按照以下图示进行工作流导入
导入先选中要导入的xml文件
选择对应的文件夹:
新建一个替换的规则,第一次导入可以跳过。
导入即可:
1.7 配置定时计划
按照以下图示配置工作流定时计划
此工作流2014-09-01早上9:30开始,每天早上8点调用一次。
永久有效。