唯赛思通摩托车行车记录仪C3(英文)使用说明书
行车记录仪产品使用说明书
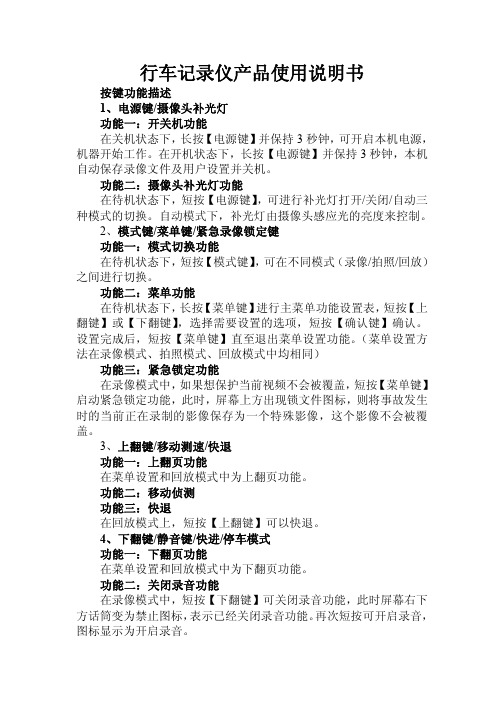
行车记录仪产品使用说明书按键功能描述1、电源键/摄像头补光灯功能一:开关机功能在关机状态下,长按【电源键】并保持3秒钟,可开启本机电源,机器开始工作。
在开机状态下,长按【电源键】并保持3秒钟,本机自动保存录像文件及用户设置并关机。
功能二:摄像头补光灯功能在待机状态下,短按【电源键】,可进行补光灯打开/关闭/自动三种模式的切换。
自动模式下,补光灯由摄像头感应光的亮度来控制。
2、模式键/菜单键/紧急录像锁定键功能一:模式切换功能在待机状态下,短按【模式键】,可在不同模式(录像/拍照/回放)之间进行切换。
功能二:菜单功能在待机状态下,长按【菜单键】进行主菜单功能设置表,短按【上翻键】或【下翻键】,选择需要设置的选项,短按【确认键】确认。
设置完成后,短按【菜单键】直至退出菜单设置功能。
(菜单设置方法在录像模式、拍照模式、回放模式中均相同)功能三:紧急锁定功能在录像模式中,如果想保护当前视频不会被覆盖,短按【菜单键】启动紧急锁定功能,此时,屏幕上方出现锁文件图标,则将事故发生时的当前正在录制的影像保存为一个特殊影像,这个影像不会被覆盖。
3、上翻键/移动测速/快退功能一:上翻页功能在菜单设置和回放模式中为上翻页功能。
功能二:移动侦测功能三:快退在回放模式上,短按【上翻键】可以快退。
4、下翻键/静音键/快进/停车模式功能一:下翻页功能在菜单设置和回放模式中为下翻页功能。
功能二:关闭录音功能在录像模式中,短按【下翻键】可关闭录音功能,此时屏幕右下方话筒变为禁止图标,表示已经关闭录音功能。
再次短按可开启录音,图标显示为开启录音。
功能三:快进在回放模式下,短按【下翻键】可以快进。
功能四:停车监控在待机模式下,长按【下翻键】可以打开或关闭停车模式功能,左下角图标会有相应的变化。
5、录像键/拍照键/确认键/屏幕背光灯开关键功能一:启动/关闭录像功能在录像模式下,短按【确认键】开始录像,再次短按【确认键】可停止录像。
功能二:拍照键在拍照模式下,短按【确认键】一下可拍摄一张照片。
行车记录仪用户手册(通用版)
文件编号:密级:无版本:V2.0《LH-16R型用户手册》通用版目录目录 (2)一、产品图片 (5)二、电气性能参数 (6)2.1、通信模块 (6)2.2、定位模块 (6)2.3、整机参数 (6)三、功能详细介绍 (7)3.1、查询功能 (7)3.1.1、位置查询 (7)3.1.2、查询车辆状态 (7)3.1.3、查询车辆参数 (7)3.2.5、查询定时监控 (7)3.1.4、查询终端版本 (7)3.2、设置 (7)3.2.1、ACC定时回传位置信息的时间间隔设置 (7)3.2.2、超速报警门阀设置 (8)3.2.3、停车超时报警门阀设置 (8)3.2.4、电子围栏设置 (8)3.2.5、IP及端口设置 (8)3.2.6、远程下载集团电话号码 (8)3.2.7、定时监控设置 (8)3.2.9、定距监控设置 (8)3.2.10、设置透传模式 (9)3.2.11、设置连接方式 (9)、设置车辆系传感系数 (9)3.2.11、疲劳驾驶设置 (9)3.3、控制 (9)3.3.1、远程重启 (9)3.3.2、远程控制油路 (9)3.3.3、收发调度信息 (9)3.3.4、远程监听 (9)3.3.5、支持远程软件升级 (10)3.3.6、远程控制自检设备 (10)3.4报警 (10)3.4.1、超速报警 (10)3.4.2、停车超时报警 (10)3.4.3、GPS天线开路短路报警 (10)3.4.4、终端主电源断电报警 (10)3.4.5、自定义报警(高低传感器报警) (11)3.4.6、抢劫/求助报警 (11)3.4.7、进出围栏报警 (11)3.5.外接串口、部分外接设备说明 (11)3.5.1、图像采集或计价器接口(RS232接口) (11)3.5.2、里程统计 (11)3.5.3、盲区补传 (11)3.5.4、透明传输接口(即图像采集接口和手柄接口) (11)3.5.5、读取事故疑点数据 (12)3.5.6、打印前上报 (12)3.5.7、行驶记录仪功能 (12)四、安装说明 (12)4.1、主机面板接口说明 (12)4.2、整机接线图 (13)4.3、接线图安装说明 (13)4.3.1、9PING母线接口 (13)4.3.2、12PING母线接口 (14)4.3.3、手柄/显示屏接口 (15)4.3.4、12V铅酸备用电池线 (15)4.3.5、图像控制接口 (16)4.3.6、免提喇叭控制接口 (16)4.3.7、扩展RS232串口控制接口 (16)五、安装调试步骤 (17)5.1终端接线图 (17)5.2、安装调试注意事项 (17)5.3、安装调试步骤 (17)5.3.1、设置本机号码(必设定项) (17)5.3.2、设置IP地址及端口(必设定项) (17)5.3.3、设置连接方式(必设定项) (18)5.3.4、设置APN参数(必设定项) (18)5.3.5、设置主中心号码 (18)5.3.6、设置用户关联号码 (18)5.3.7、功能调试 (18)5.4、整机复原 (19)六、常见故障分析 (19)七、配置说明 (20)7.1、终端标准配置 (20)7.2、选配件配置 (20)八、可接外接设备 (20)8.1、手柄或显示屏 (20)8.2、摄像头 (20)8.3、油耗 (21)8.3.1、通用油耗接线图 (21)8.3.2、手柄测试油耗参数 (22)8.4、温度传感器 (23)8.5、LED出租车广告屏 (23)8.6文字播报器 (23)8.7语音播报器 (24)九、车速传递系数 (24)9.1、1、车速传递系数 (24)9.1、2、车速传递系数的设定 (24)9.1、3、传感系数的查询 (25)十、打印机使用及USB说明 (25)一、产品图片二、电气性能参数2.1、通信模块1、通讯模块采用华为EM3102、工作频段EGSM900/GSM1800双频3、接收灵敏度<-106dBm4、温度范围:-20°-70°2.2、定位模块1、定位模块采用:SIRF III2、灵敏度 -159dBm3、启动时间热启动(开阔地带)<2s4、冷启动(开阔地带)<38s5、精度 <10M6、GPS通道: 20通道7、温度范围:-40°-85°2.3、整机参数1.体积: 100mm*86mm*35mm(长*宽*高)(宽不含天线接口)2.颜色: 黑色.3.重量: 600G4.输入电压范围: 10V~36V 直流5.工作电流: 50-80mA @12V DC6.工作环境: -20~+70℃7.后备电池使用时间: 1小时8.通讯方式:TCP、UDP三、功能详细介绍3.1、查询功能3.1.1、位置查询终端接收到位置查询指令后,返回车辆的当前位置信息。
车载摄像记录仪 说明书

车载摄像记录仪用户手册感谢您购买“车载摄像记录仪”系列产品,本产品将在提高行车安全性和快速处置事故、分清责任方面为您提供有效的帮助。
您还将在产品的扩展应用中获得更多的驾驶乐趣。
在您准备使用本产品之前,请仔细阅读本手册,我们相信正确的产品安装和详细了解产品的各项功能,将大大提高产品在实际应用中的效果。
第一章 产品组件及特别说明组件清单购买产品后请小心打开包装盒,核对包装盒里应该有以下配件:9主机一台9吸盘一只9点烟器电源线一条9USB连接线一条9TV连接线一条9说明书一张9产品保修卡一张特别说明1.如果发现组件有损坏或者缺失的现象,请在购买之日起3天内与当地的经销商联系。
2.请妥善保管好购买产品的票据和保修卡,作为产品维修或调换的依据。
3.凡因错用电源、操作不当或私自拆装等人为因素造成的损坏,不在保修范围之内。
第二章 概 述产品描述随着机动车数量的快速增加,各类交通事故有增无减。
发生事故时,现场可能由于种种原因无足够证据辨清双方责任,或是由于现场不小心被破坏而造成证据信息不准确,如果在无直接目击证人的情况下,时常会引起双方当事人的纠纷,也给交通、车辆管理部门的事故处理带来种种困难。
另外,一些轻微交通事故由于“证据记录”的问题,当事人不愿意及时撤离现场,正是造成城市交通拥堵的主要原因。
特别是在上下班高峰期间,严重的拥堵现象很容易引发二次交通事故,给正常的城市交通秩序带来困难。
因此,各地交通管理部门也纷纷提倡和设置了快速处置办法,缓解城市交通压力。
本系列产品就是根据目前市场对汽车安全行驶和事故快速处置的最新要求,通过直观的数字图像技术帮助您记录事故发生前后的动态画面,通过视频保存和回放的方式为您或有关部门在判断事故责任时提供证据,解决“辨析难、记录难、取证难”的问题。
产品主要特点1.车载摄像机采用的是循环覆盖的记录方式,每个视频片段约10分钟。
在记忆卡存满后将自动覆盖最早的10分钟视频画面并从新记录,因此可以长时间连续使用不必担心记忆卡的容量。
唯赛思通摩托车行车记录仪C3使用说明书
技术参数
液晶屏幕 镜头 语言选择
录像视频格式 卡存储
2.0 高清屏 120 度广角 英国/ 法国/ 德国/意大利/西班牙/葡萄牙 / 简体中文/ 繁体中文/ 俄 国/ 土耳其/韩国/日本 AVI(MJPG) TF 最大支持 32GB
5. 录像声音
开启: 录像时图像与声音同步 关闭: 录像时只有画面没有声音
6. 重力感应(G-SENSOR ) 设置重力感应的灵敏度,关/高/中/低
机器在录像过程中发生撞击时,将会把撞击文件保护,保护文件名为(EVE.XXXXX),与正常录像的文件 (REC.XXXXX)区分开,当覆盖删除文件时只是删除正常录像的文件
2.电脑操作系统:Windows 2000/XP/Vista/Windows 7
使用安装
通电测试
1)首次使用本机器,先用包装盒内附带的 USB 线接到普通的充电器(DC-5V 1A),然后接到机器的 USB 接口,进行开机录像测试
2)通电测试正常后,便可以安装使用了
电池充电
1) 点烟器充电,直接将车充连接在机器的USB 接口,关机/开机状态下也可以充电 2) USB 充电,使用USB 数据线连接在电脑上,关机/开机状态下也可以充电 3) USB 充电器,使用USB 数据线连接USB 充电器充电,关机/开机状态下也可以充电 4) 电池的电量指示请参考图示
7. Brightness
增加/减小镜头 1/镜头 2 的亮度
系统设置
在录像待机状态下,按 2 次“菜单”键,按上翻/下翻键选择要设置的选项,按“确认” 键进入菜单选 项设置:
1. 格式化
TF 卡格式化(选择“执行” 即可格式化)
Ai-Thinker ESP-C3-32S 产品说明书

ESP-C3-32S SpecificationVersion V1.0Copyright©2021Disclaimer and copyright noticeThe information in this article,including the URL address for reference,is subject to change without prior notice.The documentation is provided"as is"without any warranty,including any warranties of merchantability,fitness for a particular purpose,or non-infringement,and any warranties mentioned in the proposal,specification or sample.This document is not responsible for any infringement of any patent rights arising out of the use of the information in this document.No license,express or implied,by estoppel or otherwise,is hereby granted.The test data obtained in this paper are all obtained by Ai-Thinker laboratory,and the actual results may be slightly different.The Wi-Fi alliance membership mark is owned by the WiFi alliance.All trade mark names,trademarks and registered trademarks mentioned herein are the property of their respective owners and are hereby declared.The final interpretation right is owned by Shenzhen Ai-Thinker Technology Co.,Ltd.NoteThe contents of this manual may be changed due to the version upgrade of the product or other reasons. Shenzhen Ai-Thinker Technology Co.,Ltd.reserves the right to modify the contents of this manual without any notice.This manual is only used as a guide,and Shenzhen Ai-Thinker Technology Co.,Ltd.makes every effort to provide accurate information in this manual,but Shenzhen Ai-Thinker Technology Co.,Ltd.does not ensure that the contents of the manual are completely true,,All statements and information in this manual. and the recommendations do not constitute for any warranty,express or implied.Document development/revision/revocation resumeVision Data Revised content Edition Approve V1.02021.03.06First Edition Deng Chaomei Ning GuanCONTENT1Product Overview (5)1.1.Characteristics (6)1.2.Main parameters (7)2Electrical parameters (8)2.1Electrical characteristics (8)2.2WIFI RF performance (8)2.3.WIFI RF performance (9)2.4.Power Consumption (9)3Appearance dimensions (10)4Pin definition (11)5Schematic diagrams (15)6Design guidance (16)6.1.Note: (16)6.2.Antenna layout requirements (16)6.4.GPIO Interface (17)7Reflow soldering (18)8Packaging information (19)9Contact us (19)1Product OverviewESP-C3-32S is a Wi-Fi module developed by Ai-Thinker.This module core processor ESP32-C3is a Wi-Fi+BLE combination of system-level chips(SoC),designed for various applications such as internet of things(IoT),mobile devices,wearable electronics,smart home, etc.ESP32-C3with industry-leading low power and RF performance,supporting Wi-Fi IEEE802.11b/g/n agreements and BLE5.0.ESP32-C3chip is equipped with a RISC-V32-bit single-core processor,operating frequency up to160MHz.The chip is support to have secondary development without using other microcontrollers or processors.The chip has a built-in400KB SRAM,384KB ROM,8KB RTC SRAM.The chip also support external Flash while it built-in4Mbit Flash.ESP32-C3chip supports a variety of low-power consumption working states,which can meet the power consumption requirements of various application scenarios.The chip's unique features such as fine clock gating function,dynamic voltage clock frequency adjustment function,and RF output power adjustable function can achieve the best balance between communication distance,communication speed and power consumption.ESP-C3-32S module provides a wealth of peripheral interfaces,including UART,PWM,SPI,I2S,I2C,ADC,temperature sensor and there are21GPIOs.ESP-C3-32S has a variety of unique hardware safety mechanisms.The hardware encryption accelerator supports AES、SHA and RSA algorithm.Among them,RNG、HMAC and Digital Signature module provide more security features.Other security features include flash encryption and se-cure boot signature verification,etc.The perfect security mechanism enables the chip to be perfectly applied to various encryption products.ESP-C3-32S support low-power Bluetooth:Bluetooth5,Bluetooth mesh.Bluetooth rate support:125Kbps,500Kbps,1Mbps,2Mbps.Support broadcast extension,multi-broadcasting, channel selection.1.1.Characteristics⏹Complete Wi-Fi802.11b/g/n,1T1R mode data rate up to150Mbps⏹Support BLE5.0and rate support:125Kbps,500Kbps,1Mbps,2Mbps⏹32-bit RISC-V single-core processor,supports a clock frequency of up to160MHz,with400KB SRAM,384KB ROM,8KB RTC SRAM⏹Support UART/PWM/GPIO/ADC/I2C/I2S interface,temperature sensor,pulse counter⏹SMD-38package⏹Integrated Wi-Fi MAC/BB/RF/PA/LNA/BLE⏹Support multiple sleep modes,deep sleep electric current is less than5uA⏹UART rate up to5Mbps⏹Support STA/AP/STA+AP mode and mix mode⏹Support Smart Config(APP)/AirKiss(WeChat)of Android and IOS One-click networkconfiguration⏹Support UART port local upgrade and remote firmware upgrade(FOTA)⏹General AT commands can be better understand⏹Support secondary development,integrated Linux development environment⏹ESP-C3-32S module acquiesce in using the built-in4MByte Flash,meanwhile supportexternal Flash version1.2.Main parametersTable1main parameter descriptionsModel Name ESP-C3-32SPackage SMD-38Size25.5*18.0*3.1(±0.2)mmAntenna On-board PCB antenna/IPEXFrequencyRange2400~2483.5MHzOperatingTemperature-40℃~85℃StoreTemperature-40℃~125℃,<90%RHPower supplyrange Supply voltage:3.0V~3.6V,Supply current>500mASupportInterface UART/GPIO/ADC/PWM/I2C/I2SIO IO0,IO1,IO2,IO3,IO4,IO5,IO6,IO7,IO8,IO9,IO10,IO12,IO13,IO14,IO15, IO16,IO17,IO18,IO19,IO20,IO21UART Rate Support110~4608000bps,default115200bpsBluetooth BLE5.0Security WEP/WPA-PSK/WPA2-PSKSPI Flash Default4MByte,support2MByte version2Electrical parametersESP-C3-32S module is electrostatic sensitive devices and special precautions need to be taken when handling2.1Electrical characteristics2.2WIFI RF performanceDescriptionTypical values Unit Operating frequency2400-2483.5MHzOutput Power11n mode HT40,PA output power 15±2dBm 11n mode HT20,PA output power 15±2dBm 11g mode ,PA output power 16±2dBm 11b mode ,PA output power18±2dBmReceiving sensitivityCCK,1Mbps -96±2dBm CCK,11Mbps -88±2dBm 6Mbps (1/2BPSK)-92±2dBmParameters Conditions MinTypical values MaxUnit Supply voltageVDD 3.03.3 3.6V I/OV IL /V IH--0.3/0.75VDD -0.25VDD/VDD+0.3V V OL /V OH -N/0.8VIO -0.1VIO/N V I MAX---12mA54Mbps(3/464-QAM)-75±2dBm HT20(MCS7)-73±2dBm HT40(MCS7)-70±2dBm2.3.WIFI RF performanceDescription Typical values UnitOutput powerTransmit power0±2dBmReceiving sensitivity Low Energy consumption BLE:1M ****************%PER-96±2dBm2.4.Power ConsumptionThe following power consumption data are based on a3.3V power supply,25°C ambient temperature and measured using an internal voltage regulator.⏹All measurements were completed at the antenna interface without SAW filters⏹All emission data are based on a duty cycle of100%,measured in the mode ofcontinuous emission.Mode Min Typicalvalues Max Unit-350-mA Tx802.11b,CCK1Mbps,POUT=+20dBm-290-mA Tx802.11g,OFDM54Mbps,POUT=+18dBmTx802.11n,MCS7,POUT=+17dBm-280-mA Rx802.11b,1024bit-90-mA Rx802.11g,1024bit-90-mA Rx802.11n,1024bit-93-mA Modem-Sleep①-20-mA3Appearance dimensionsESP-C3-32S have two FLASH ,including external FLASH and build-in FLASH(The rendering is for reference only,the actual product shall prevail )External 2MByte FLASH:Build-in 4MByte FLASH:Light-Sleep ②-130-μA Deep-Sleep ③-5-μA Power Off-1-μA4Pin definitionESP-C3-32S Diagram of PinESP-C3-32S module is connected to38interfaces,refer to pin diagram,pin function definition table is interface definition.ESP-C3-32S Pin function definition Function1GND GND2VCC VCC3EN High level:chip enabled;Low level:chip shutdown;Pay attention not to leave the CHIP_PU pin floating;4NC NC5IO0GPIO0,ADC1_CH0,XTAL_32K_N6IO1GPIO1,ADC1_CH1,XTAL_32K_N7IO2GPIO2,ADC1_CH2,FSPIQ8IO3GPIO03,ADC1_CH39IO4GPIO04,ADC1_CH4,FSPIHD,MTMS10IO5GPIO05,ADC2_CH0,FSPIWP,MTDI11IO6GPIO6,FSPICLK,MTCK12IO7GPIO7,FSPID,MTDO13IO8GPIO814IO10GPIO10,FSPICSO15GND GND16NC NC17SPIHD SPIHD,GPIO1218SPIWP SPIWP,GPIO1319SPICS0SPICS0,GPIO1420SPICLK SPICLK,GPIO1521SPIQ SPIQ,GPIO1722SPID SPID,GPIO1623NC NC24NC NC25IO9GPIO926NC NC27NC NC28NC NC29NC NC30IO18GPIO1831IO19GPIO1932NC NC33NC NC34U0RXD RX0,GPIO2035U0TXD TX0,GPIO2136NC NC37NC NC38GND GNDTable Module Start-up Mode DescriptionSystem start-up modePin Default SPI Start up mode Download Start upMode IO8Non/1IO9Pull up10 Note:Some pins have been internally pulled up,please refer to the schematic5Schematic diagrams6Design guidance6.1.Note:(1)When GPIO20is used as U1RXD,a pull-up resistor needs to be added externally.6.2.Antenna layout requirements(1)For the installation position on the motherboard,the following two methods are recommended:Solution1:Put the module on the edge of the main board,and the antenna area extends out of the edge of the main board.Solution2:Put the module on the edge of the main board,and hollow out an area at the antenna position on the edge of the main board.(2)In order to meet the performance of the on-board antenna,metal parts are forbidden to be placed around the antenna,away from high frequency devices.6.3.Power supply(1)Recommend3.3V voltage,peak current above500mA(2)It is recommended to use LDO for power supply;if DC-DC is used,the ripple is recommended to be controlled within30mV.(3)DC-DC the power supply circuit,it is suggested to reserve the position of output ripple can be optimized when the load changes greatly.(4)It is recommended to add ESD devices to the3.3V power interface.6.4.GPIO Interface(1)The module periphery leads to some GPIO ports,such as the recommended resistance of 10-100Ohms in series on the IO port.This can suppress overshoot,to ensure both sides of the level more stable.helpful for both EMI and ESD.(2)For special IO,please refer to the specification,which will affect the starting configuration of the module.(3)The IO port of the module voltage is3.3V,if the main control does not match the IO level of the module,require to add the level conversion circuit.(4)When the IO port is connected directly to the peripheral interface,or the pin header andother terminals,it is recommended to reserve ESD device near the terminal.Table Electrical level conversion circuit7Reflow soldering8Packaging informationRefer to below image,ESP-C3-32S package is in Tape/Reel.9Contact usOfficial website:https://Development DOCS:https://Official Forum:Sample purchase:https:///Business cooperation:**********************Technical support:*********************Company Address:Room403,408-410,Block C,Huafeng Smart Innovation Port,Gushu2nd Road,Xixiang, Baoan District,Shenzhen.Tel:*************。
唯赛思通摩托车行车记录仪X1S(英文)使用说明书
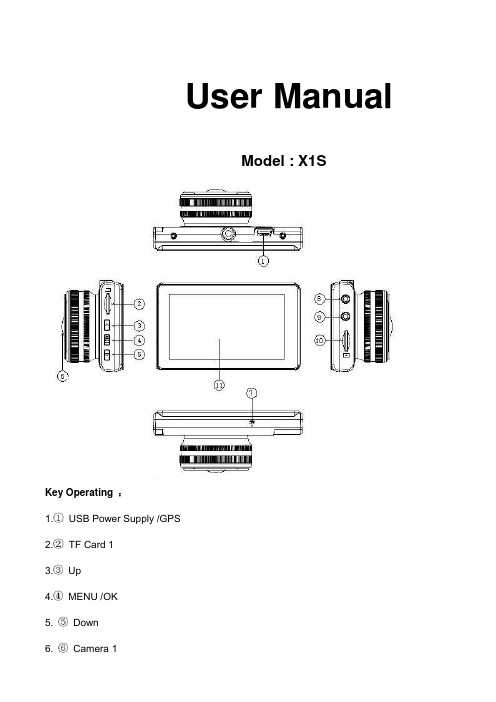
User ManualModel : X1SKey Operating :B Power Supply /GPS2.TF Card 13.Up4.MENU /OK5. Down6. Camera 17. Microphone8. Camera 29. Camera 310. TF Card 211. LCD ScreenMenu main interface and settingHow to Video recording and Menu settingVideo recordingWhen engine is started the Camera is turn on automatically, and then start to Video recording, Press “ OK ” button to stop recording ,the video file save to TF CardCamera built-in super capacitor When the Car suddenly flameout will auto save last video file to TF CardMenu Setting OptionPress Up/Down button to select setting icon Press “OK” enter Menu setting option ,and Press Up/Down button to select specific parameters Press “ OK ” button to confirm ,long Press Menu button to Exit1. Front Camera1080P 1920*1080P720P 1280*720480P 720*480VGA 640*4802. Side CameraVGA 640*480HD 1280*7203. Time StampOff No display date and timeDate Only Only display dateDate and Time Display date and Time4. Loop Recording1Min Video file 1 minute When the Card full will delete front file3Min Video file 3 minute When the Card full will delete front file5Min Video file 5 minute When the Card full will delete front fileOff Until the Card FullSystem Setting1. BeepOn Turn On operation button soundOff Turn off operation button sound2. Screen OffOff Camera LCD keep on1 Min No any operating the Camera after 1min enter screensaver3 Min No any operating the Camera after 3min enter screensaver5 Min No any operating the Camera after 5min enter screensaver(In the Screensaver status ,Press any button Can be restore)3. G-sensorSetting G-sensor sensitivity, Off/ High/Normal/LowWhen happen emergency, will auto Protect the file, and When Card full only delete Normal recording file4. Date FormatYY/MM/DDMM/DD/YYDD/MM/YY5. Date Input1)Press “Up”/Down button to setting number2)Press “OK ” button jump next setting3)Press “OK ” button confirm and Exit set6. Time Input1)Press “Up/Down ”button to setting number2)Press “OK ” button jump ne xt setting3)Press “OK ” button confirm and Exit set7. Time ZoneCancelSet Setting GPS Time zone8. Sys. ResetWhen Setup Error, Can setting this option restore factory setting9. Fw VersionCheck software version informationFormat TF Card 1 / Card 2In the Video recording Mode , long Press “Menu “ button enter Menu main interface ,Press Up/Downbutton to select format TF Card 1/ Card 2 Press “OK ” button enter setting interface Press “OK “ button finishLanguage SettingIn the Video recording Mode , long Press “Menu “ button enter Menu main interface ,Press Up/Downbutton to select Language iconEnglish/ French/ Deutsch/Italian/Spanish/Portuguese / T-Chinese/ S-Chinese/ Russian/Turkish/Korean/JapanPlayback ModeIn the Video recording Mode ,long Press “Menu “ button enter Menu main interface ,Press Up/Down button to select Playback icon Card 1 or Card 21. Press Up/Down button to select previous/next video file2. Press “OK” Play/Stop3. long Press “Menu” button Exit playback modeGPS FunctionConnect the GPS module to the GPS slot , then start to recording ,Camera start Search GPS Signal the GPS icon flashing after received GPS Signal the GPS icon light up and the date time will auto updatePlayback GPS fileOpen GPS Player ( Drplayer )Open iconClick button to select GPS file then Click “Play” button to playing as followCamera Change1) Front Camera In the other mode ,Press “ Up “ button Can be change the Front Camera to SideCamera2) Side Camera In the other mode ,Press “ Down “ button Can be change to Camera 2 or Camera 3 Parking ModeWhen the Car in the Park status, After 3 minute the Camera will auto change to parking mode, the LCD display” Parking Mode “ in the parking mode the video file is 1FPSPower Supply Mode1) OBD Cable Compatible with all the standard OBD interface in you Car the Camera willworking 24/7 days ,once your choose this power supply ( Low voltageprotection system is built in )2) Car charger Used Car charger connect to Car cigarette lighter socket, When engine isstarted the Camera is turn on automatically, and then start to Videorecording,TF Card Installment :1. Insert the TF Card in the TF Card slot according to the indicative direction ,until it softly clicks2. When removing the TF Card push in the TF Card and gently release to eject it.Notes:1. Make sure the TF Card are facing the right way ,if it is in the wrong direction ,it may damage theCamera and TF Card2. If the TF Card is incompatible with the Camera, please try to insert again ,change other TF Card3. Please use the high- speed TF Card.(The Card have CLAS S⑩icon)Technical SpecificationsNotice: Due the camera software update camera function has change, without prior notice。
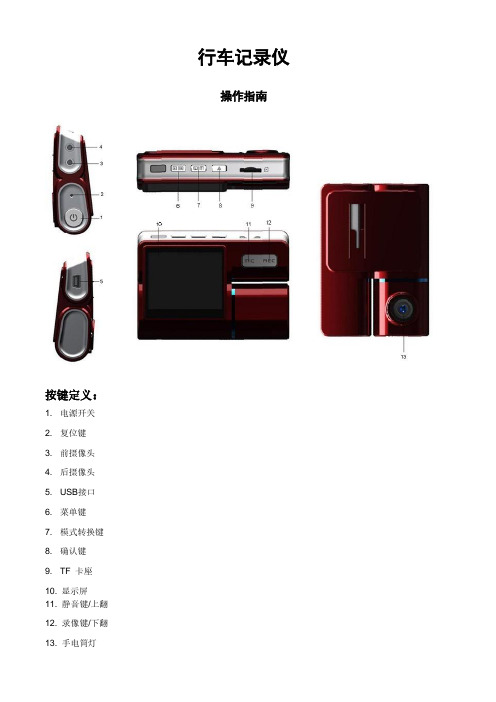
行车记录仪产品使用说明书.
行车记录仪产品使用说明书.功能键(五键)说明一(1)电源键/屏幕背光开关键(2)菜单键/模式键(3)UP键(4)DOWN键(5)OK键(6)摄像头(7)TF槽(8)AVIN接口(9)USB电源接口(10)LCD显示屏(11)复位孔一、功能简介1、使用行车录像功能启动汽车发动机,记录仪自动启动并开启录像功能,录像指示灯闪烁。
当图标显示为红色且时间走动时,按“OK键”暂停/开始录像功能。
关闭汽车发动机,记录仪自动保存录像内容并关机,录像的视频分段保存于TF卡上。
当TF卡存储满后记录仪将覆盖较早前录制的视频。
【注意】a.记录的时间段可自行在菜单中设置为1/2/3/5档,如果选择为“1/2/3/5”分钟这四个档中的任意一档时,当TF卡存储满后记录仪将覆盖较早前录制的影像。
b.前、后摄像头的录像文件和拍照文件分别保存于TF卡中的前录“VIDEOA”、后录“VIDEOB”。
2、使用拍照功能在录像界面按“M键”可进入拍照模式,点击0K键可拍摄一张照片。
如需返回主录像界面,短按“M键”两次返回。
在录像界面长按“M键”可进入“拍照设置”菜单,按“上下键”选择,按“0K 键”确认,可进行拍照功能设置。
3、视频回放在录像界面按“M键两次”进入回放模式。
按上/下键找到需要回放的视频和照片,按“0k”键进行视频回放。
4、一键锁定功能在录像中,短按M键加锁当前视频,已加锁的文件,加锁图标为“”,文件锁定后将不会被覆盖。
5、键静音功能在录像模式,按“下键”开启或关闭录音。
【提示】设置会自动保存,再次开机后无需设置静音功能。
6、摄像头画面切换功能在录像界面或拍照界面。
按“上键”进行前/后拉界面以及画中画进行切换。
7、时间/日期设定在记录仪界面长按“M键”进入功能设置界面,短按“M键”一次后按“下键”选择“日期/时间”,按“OK键”确认,“上下键”选择年月日后,按“M键”退出设置。
【注意】为了有效记录行车安全事故的取证的日期和时间,在使用本机前请先设置正确的时间。
行车记录仪说明书
说明书主机的防护等级是IP65,镜头的防护等级是IP67,线控开关的防护等级IP64。
请不要使用高压水枪等高压冲洗设备直接冲洗清洁行车记录仪的主机、镜头和线控开关等部件。
安装时务必请先确认PIN 脚数量和方向,再连接各线材的接口。
※ 因高压冲洗清洁行车记录仪的机器和镜头等部件导致内部进水故障,不在三包范围内。
※ 如没有确认pin 脚数量、对准标记并插入锁紧,否则导致PIN 脚被弯折,断裂和接触不良,不能正常工作的,不在三包范围内。
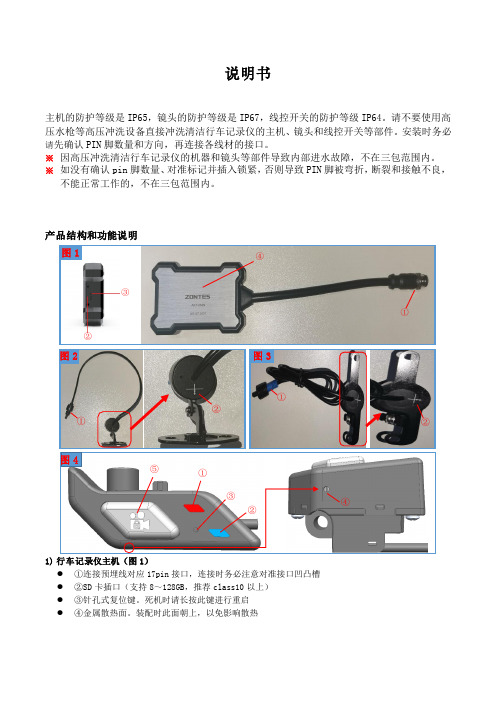
产品结构和功能说明1) 行车记录仪主机(图1) ● ①连接预埋线对应17pin 接口,连接时务必注意对准接口凹凸槽 ● ②SD 卡插口(支持8~128GB ,推荐class10以上) ● ③针孔式复位键。
死机时请长按此键进行重启 ●④金属散热面。
装配时此面朝上,以免影响散热①②③④图1①②图2 ①②图3①②③④⑤图42)前摄像头(图2)●①连接预埋线前摄像头接口(黑色)●②安装时注意箭头方向,箭头处于正上方时为标准画面方向。
如图所示3)后摄像头(图3)●①连接预埋线前摄像头接口(蓝色)●②注意检查箭头方向,如图所示4)线控开关(图4)●①红色LED灯表示工作状态●②蓝色LED灯表示WIFI状态●③录音降噪孔录音和降噪●④排水孔排水●※不接线控开关的时候,不能录音※严禁洗车时将高压水枪对准线控开关的录音降噪孔和排水孔直接冲洗,以免进水失效存储卡请不要使用支持以外的存储卡。
可能会导致数据破损和记录错误。
※请使用容量8~128GB的存储卡。
※请使用“Class10/UHS-1”以上速度的卡。
使用Class10以下的卡,可能会不能正常录像。
※行车记录仪要求储存卡格式为FAT32,如果新购买的128GB/64GB等存储卡不能使用,请在电脑上格式化为FAT32格式或通过手机APP格式化储存卡※一旦格式化卡,会删除掉所有记录文件,请提前备份。
※以防万一,发生事故后,为了防止记录了事故瞬间的文件被覆盖,请切断电源。
- 1、下载文档前请自行甄别文档内容的完整性,平台不提供额外的编辑、内容补充、找答案等附加服务。
- 2、"仅部分预览"的文档,不可在线预览部分如存在完整性等问题,可反馈申请退款(可完整预览的文档不适用该条件!)。
- 3、如文档侵犯您的权益,请联系客服反馈,我们会尽快为您处理(人工客服工作时间:9:00-18:30)。
Road Safety GuardOperation InstructionKey Operation :1. Power on/off2. Reset3. Camera 14. Camera 25. USB6. Menu7. Mode8. OK9. TF Card10. LCD Display screen11. MUTE/UP12. REC/DOWN13. FlashlightMenu operating instructionsVideo recording ModeIn the Video recording Mode,Press “Menu” button enter Setup interface.Press UP/Down button to select specific parameters, Press “OK” to confirm and Press “Menu”to Exit.1. Video ResolutionHD 1280*720D1 720*480VGA 640*4802. CameraSelect camera to recording, camera 1/camera 2/ camera 1+23. Time StampOff No display date and timeDate Only Only display dateDate and Time Display date and time4. Voice setupOn Turn on Voice PromptOff Turn off Voice Prompt5. REC SoundOff Video recording turn off the soundOn Video recording sound and image sync4. G-sensitivitySetting G-sensor sensitivity, Off/ high/Medium/LowWhen happen impact the video file will protect and the file name is (EVE.XXXXX) ,the card is full only delete normal recording file (REC.XXXXX).7. BrightnessSet camera 1/camera 2 brightnessSetting ModeIn the other Mode, Press “Menu” button twice enter Setup interface.Press UP/Down button to select specific parameters, Press “OK” to confirm and Press “Menu”to Exit.1. FormatFormat TF Card (S elect “Execute “format TF Card )2. ScreensaverOff Camera LCD keep on1 Min If no any operating the camera after 1min enter screensaver3 Min If no any operating the camera after 3min enter screensaver5 Min If no any operating the camera after 5min enter screensaver(Screensaver status ,Press any button to restore)3. BeepOn Turn On operation button soundOff Turn off operation button sound4. LanguageEnglish/ French/ Deutsch/Italian/Spanish/Portuguese / T-Chinese/ S-Chinese/ Russian/ Turkish/Korean5. Auto offOff Camera not auto power off1 Min If no any operating the camera after 1min auto power off3 Min If no any operating the camera after 3min auto power off5 Min If no any operating the camera after 5min auto power off6. Sys. ResetWhen Setup Error, can setting this option restore factory setting7. Light Frequency50HZ60HZ8. Date Input1)Press “Up”/Down button to setting number2)Press “Mode” button jump next setting3)Press “REC” button Exit set9. VersionCheck software version informationPlayback ModeP ress “Mode” button change to Playback mode (Press “OK” button to playback the video file)1. Press Up/Down button to select previous/next video /photo file2. Press “OK” Play/Stop1. DeleteSingle Delete single fileAll Delete all the file2. ProtectSingle Delete single fileAll Delete all the file3. Thumbnail /Execute4. File List /Execute5. VolumeAdjust volume 1~8Loop RecordingWhen TF Card is full ,the Camera will auto delete in front of the old files, When happen impact the video file will protect(EVE.XXXXX) ,the card is full only delete normal recording file (REC.XXXXX).Flashlight functionCamera in the power off or other mode, short Press power button to turn on flashlight, press again turn off .Parking ModeWhen the car in the stop status, after 3 minute will auto change to parking mode, in the parking mode the video file is 1FPSNote:1) According the need of customers, this function is options.2) In order to avoid the improper operation to install damage the camera , Please to auto service center to find a professional maintenance technicians to install, and use package accessory special cable (DC Input:12-24 V Output :5V-1.5A)Wired Controller FunctionCamera in the Video recording Standby mode or recording mode, Press any key on the wired Controller ,Camera will auto saved Video file name is (KEY-XXXX.AVI ) the same is (EVE.XXXX.AVI) When TF Card is full only delete Normal Video recording file (REC.XXXX.AVI)Connect Computer1. Connect the camcorder with computer by USB cable, [My computer] will occur removable disk, the file id stored at Removable Disk/DCIM/100DSCIM which can be downloaded to the computer.2. System support of the Computer: Windows 2000/XP/Vista/Windows 7Power on test1)First time use camera ,please use package accessory USB cable connect to charger(DC-5V 1A), then connect to USB slot, power on test normal recording and other function2)After power on test normal, can install and useCharging the battery1. Directly connect car cigarettes with the USB interface, to charge battery2. Use a USB cable to connect the computer with the USB interface, to charge battery3. Use the USB cable to connect charger the USB interface, to charge battery.4. The battery level display shows the remaining power of the battery as below:Low power Not fully charged fully chargedTF card installment :1. insert the TF card in the TF Card slot according to the indicative direction ,until it softly clicks2. When removing the TF card push in the TF card and gently release to eject it.Notes:1. Make sure the TF card are facing the right way ,if it is in the wrong direction ,it may damage thecamera and TF card2. If the TF card is incompatible with the camera, please try to insert again ,change other TF card3. Please use the high- speed TF card.(The card have CLAS S⑩icon)Notice:Suppose the camera is in dead halt due to the improper operation, you can press reset button to restore the camera will return to normalTechnical specificationsLCD screen 2.0 TFTCamera lens 120 degrees A+ level high resolution lensLanguage English/French/ German /Italian/Spanish/Portuguese / T-Chinese/S-Chinese/ Russian/ TurkishVideo format AVI (MJPG)Memory card TF Up to 32GBMicrophone Built–inFrequency 50Hz/60HzUSB interface USB2.0Battery Built-inG-SENSOR SupportNotice: Due the camera software update camera function has change, without prior notice。