Photoscan三维建模操作说明
PhotoScan初学者1.0.0版
PhotoScan初学者1.0.0版
教程(初级级):
基于Agisoft PhotoScan1.0.0版三维模型重建
PhotoScan 准备
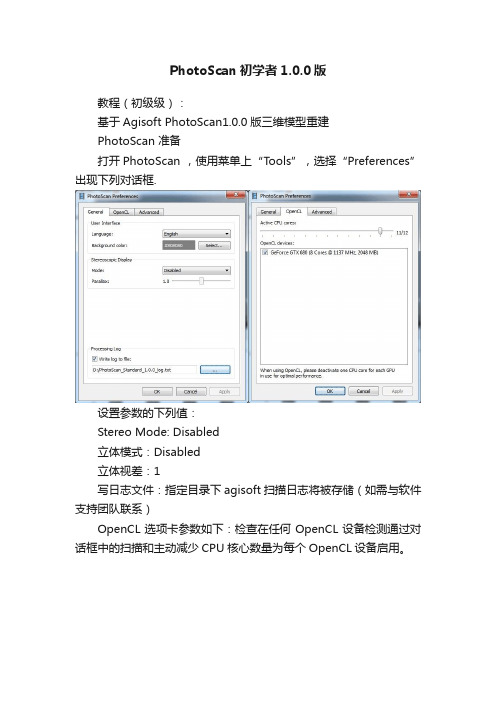
打开PhotoScan ,使用菜单上“Tools”,选择“Preferences”出现下列对话框.
设置参数的下列值:
Stereo Mode: Disabled
立体模式:Disabled
立体视差:1
写日志文件:指定目录下agisoft扫描日志将被存储(如需与软件支持团队联系)
OpenCL选项卡参数如下:检查在任何OpenCL设备检测通过对话框中的扫描和主动减少CPU核心数量为每个OpenCL设备启用。
设置高级选项卡中的参数的下列值:项目压缩级别: 6
保持深度图/存储图像的路径:disabled
绝对禁用程序启动时检查更新:Enabled
启用启用VBO支持:Disabled
无人机后期航片拼接软件PhotoScan详细使用教程

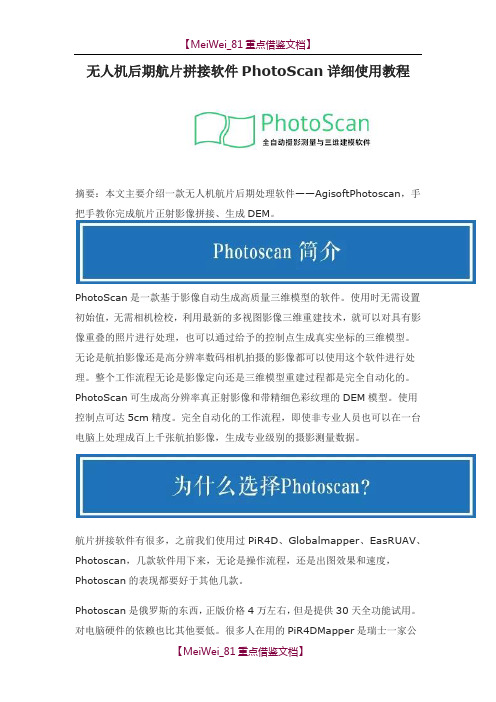
无人机后期航片拼接软件PhotoScan详细使用教程摘要:本文主要介绍一款无人机航片后期处理软件——Agisoft Photoscan,手把手教你完成航片正射影像拼接、生成DEM。
PhotoScan是一款基于影像自动生成高质量三维模型的软件。
使用时无需设置初始值,无需相机检校,利用最新的多视图影像三维重建技术,就可以对具有影像重叠的照片进行处理,也可以通过给予的控制点生成真实坐标的三维模型。
无论是航拍影像还是高分辨率数码相机拍摄的影像都可以使用这个软件进行处理。
整个工作流程无论是影像定向还是三维模型重建过程都是完全自动化的。
PhotoScan可生成高分辨率真正射影像和带精细色彩纹理的DEM模型。
使用控制点可达5cm精度。
完全自动化的工作流程,即使非专业人员也可以在一台电脑上处理成百上千张航拍影像,生成专业级别的摄影测量数据。
航片拼接软件有很多,之前我们使用过Pix4D、Global mapper、EasyUAV、Photoscan,几款软件用下来,无论是操作流程,还是出图效果和速度,Photoscan 的表现都要好于其他几款。
Photoscan是俄罗斯的东西,正版价格4万左右,但是提供30天全功能试用。
对电脑硬件的依赖也比其他要低。
很多人在用的Pix4DMapper是瑞士一家公司的产品,功能上和Photoscan大同小异,但是正版价格可以买2套Photoscan了,而且使用下来,感觉对电脑的要求比Photoscan高不少,16G内存的电脑频频弹窗警告。
PhotoScan优势盘点:支持倾斜影像、多源影像、多光谱影像的自动空三处理支持多航高、多分辨率影像等各类影像的自动空三处理具有影像掩模添加、畸变去除等功能能够顺利处理非常规的航线数据或包含航摄漏洞的数据支持多核、多线程CPU运算,支持CPU加速运算支持数据分块拆分处理,高效快速地处理大数据操作简单,容易掌握处理速度快不足:缺少正射影像编辑修改功能缺少点云环境下量测功能功能介绍:1.软件安装(安装大概15分钟)官网下载软件,安装。
Photoscan教程
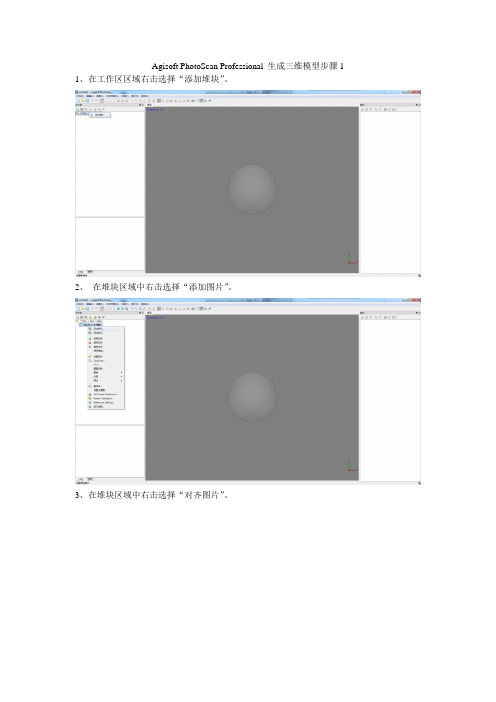
Agisoft PhotoScan Professional 生成三维模型步骤1 1、在工作区区域右击选择“添加堆块”。
2、在堆块区域中右击选择“添加图片”。
3、在堆块区域中右击选择“对齐图片”。
注意:成对预选必须选择已禁用
4、在堆块区域中右击选择“优化对齐方式”(可以不操作)。
建议:“拟合k4”打钩
5、在堆块区域中右击选择“生成密集点云”。
注意:在生成密集点云前,必须调整区域大小大于物体摸。
点击“调整区域大小”,可以进行区域调整,质量要求越高处理时间越长。
6、在堆块区域中右击选择“生成网络”。
注意:表面类型选任意,源数据选密集点云7、在堆块区域中右击选择“生成纹理”。
8、在文件菜单栏选择“导出模型”。
注意:模型输出格式为obj。
Photoscan三维建模操作说明
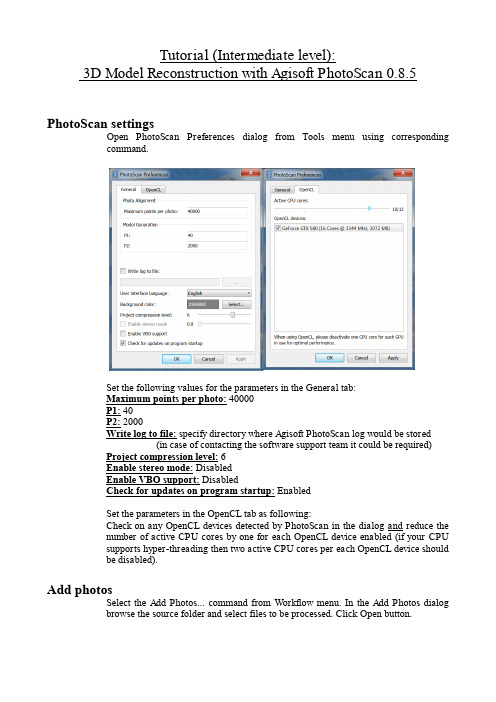
Tutorial (Intermediate level):3D Model Reconstruction with Agisoft PhotoScan 0.8.5 PhotoScan settingsOpen PhotoScan Preferences dialog from Tools menu using correspondingcommand.Set the following values for the parameters in the General tab:Maximum points per photo:40000P1:40P2:2000Write log to file:specify directory where Agisoft PhotoScan log would be stored(in case of contacting the software support team it could be required)Project compression level:6Enable stereo mode:DisabledEnable VBO support:DisabledCheck for updates on program startup:EnabledSet the parameters in the OpenCL tab as following:Check on any OpenCL devices detected by PhotoScan in the dialog and reduce thenumber of active CPU cores by one for each OpenCL device enabled (if your CPUsupports hyper-threading then two active CPU cores per each OpenCL device shouldbe disabled).Add photosSelect the Add Photos... command from Workflow menu. In the Add Photos dialogbrowse the source folder and select files to be processed. Click Open button.Mask photosTo achieve good reconstruction results it is necessary to mask all irrelevant elementson the source photos (background, turntable, accidental foreground, etc.).Open a photo with an irrelevant element in Photo View double-clicking on the photoin the Photo pane.Choose one of the selection tools from the Toolbar: Rectangular Selection forrectangular shape irrelevant elements; Intelligent Scissors–to select irregularshaped area in the photo; Intelligent Paint– to paint the selection with the mouse.To mask uniform background of the image use Magic Wand tool. First, click the Magic Wand button on the Toolbar, then click inside the area to be selected. To change the border of the automatically selected area click inside the area to be addedto the selection.Save the mask clicking Add Selection button from the Toolbar.To alter the current mask use other selection tools together with Add Selection / Substract Selection buttons on the Toolbar.Repeat the described procedure for every photo where background (irrelevantelements) should be masked.Align photosAt this stage PhotoScan refines the camera position for each photo and builds thepoint cloud model.Select Align Photos command from the Workflow menu.Set the following recommended values for the parameters in the Align Photos dialog:Accuracy:HighPair preselection:DisabledConstrain features by mask:EnabledClick OK button to start photo alignment.Select bounding boxThis step is optional since PhotoScan automatically calculates bounding boxdimensions and location. But it is recommended to check if any correction is needed,because geometry reconstruction step deals only with the point cloud inside thevolume.Adjust the Bounding box to the point cloud model using Resize Region and Rotate Region tools from the Toolbar. The whole model should be inside the Bounding box, while any outliers should be left outside the bounding box.Build geometry3D model reconstruction is a computationally intensive operation, it can take a longtime, depending on the quantity and resolution of loaded photos and selected targetquality.Select Build Geometry command from the Workflow menu.Set the following recommended values for the parameters in the Build Geometrydialog:Object type:ArbitraryTarget quality:MediumGeometry type:SmoothFace count:200000Filter threshold:0.1Hole threshold:0.5Click OK button to start building geometry.Build textureThis step could be skipped if untextured model is sufficient as the final result.Set the following recommended values for the parameters in the Build Texturedialog:Mapping mode:GenericBlending mode:AverageAtlas width and height:4096-8192Click OK button to start building texture.Export modelSelect Export Model... command from the File menu.In the Save As... dialog box select the folder for the model to be saved in, print in thefile name and choose preferred file type from the list (e.g. JPEG).Click Save button.In the Export Model dialog indicate the desired export parameters (e.g. Exporttexture). Note that the list of available exporting parameters depends on the selectedfile format.Note: Exported texture will be stored in the same folder as the 3D model with thesame file name (file type is selected by user).。
【9A文】无人机后期航片拼接软件PhotoScan详细使用教程
无人机后期航片拼接软件PhotoScan详细使用教程摘要:本文主要介绍一款无人机航片后期处理软件——AgisoftPhotoscan,手把手教你完成航片正射影像拼接、生成DEM。
PhotoScan是一款基于影像自动生成高质量三维模型的软件。
使用时无需设置初始值,无需相机检校,利用最新的多视图影像三维重建技术,就可以对具有影像重叠的照片进行处理,也可以通过给予的控制点生成真实坐标的三维模型。
无论是航拍影像还是高分辨率数码相机拍摄的影像都可以使用这个软件进行处理。
整个工作流程无论是影像定向还是三维模型重建过程都是完全自动化的。
PhotoScan可生成高分辨率真正射影像和带精细色彩纹理的DEM模型。
使用控制点可达5cm精度。
完全自动化的工作流程,即使非专业人员也可以在一台电脑上处理成百上千张航拍影像,生成专业级别的摄影测量数据。
航片拼接软件有很多,之前我们使用过PiR4D、Globalmapper、EasRUAV、Photoscan,几款软件用下来,无论是操作流程,还是出图效果和速度,Photoscan的表现都要好于其他几款。
Photoscan是俄罗斯的东西,正版价格4万左右,但是提供30天全功能试用。
对电脑硬件的依赖也比其他要低。
很多人在用的PiR4DMapper是瑞士一家公司的产品,功能上和Photoscan大同小异,但是正版价格可以买2套Photoscan 了,而且使用下来,感觉对电脑的要求比Photoscan高不少,16G内存的电脑频频弹窗警告。
PhotoScan优势盘点:支持倾斜影像、多源影像、多光谱影像的自动空三处理支持多航高、多分辨率影像等各类影像的自动空三处理具有影像掩模添加、畸变去除等功能能够顺利处理非常规的航线数据或包含航摄漏洞的数据支持多核、多线程CPU运算,支持CPU加速运算支持数据分块拆分处理,高效快速地处理大数据操作简单,容易掌握处理速度快不足:缺少正射影像编辑修改功能缺少点云环境下量测功能功能介绍:1.软件安装(安装大概15分钟)官网下载软件,安装。
使用photoscan进行三维重建
使用photoscan进行三维重建Photoscan是一款功能强大的三维重建软件,它可以使用一系列照片来创建高精度的三维模型。
在本文中,我们将介绍如何使用Photoscan进行三维重建,并提供一些有关优化和改善结果的技巧。
首先,你需要准备一组照片来创建三维模型。
建议使用高像素的相机或手机拍摄照片,并确保光线充足且清晰。
你可以选择一些角度和距离不同的照片,这样可以从不同的角度捕捉到对象的细节。
在照片加载完成后,你需要对照片进行对齐。
点击“对齐照片”按钮,这将使用特征点匹配算法来对齐照片。
这个过程可能需要一些时间,具体时间取决于照片的数量和分辨率。
在对齐完成后,你可以通过点击“建立密集云点”来生成密集的点云。
一旦生成了点云,你可以进行模型的创建。
点击“建立模型”按钮,这将使用点云数据创建三维模型。
你可以选择创建一个表面模型,也可以创建一个体积模型。
Surface模型将重建物体的外部表面,而Volume模型将创建一个包含内部空间的实体。
在模型创建完成后,你可以进一步优化和改善模型的质量。
你可以使用工具栏上的一些功能来平滑,裁剪和填充模型,并对纹理进行增强。
你还可以调整模型的分辨率和细节程度,以获得更高的精度和更好的质量。
Photoscan还提供了一些进一步的功能,例如生成数字地形模型和测量模型的尺寸。
你可以使用测量工具来测量物体的长度,面积和体积。
完成所有优化后,你可以导出三维模型并进行进一步的应用。
Photoscan支持多种文件格式,如OBJ,PLY和FBX等。
你可以选择最适合你的应用程序的格式,并导出模型以供后续使用。
总结起来,Photoscan是一款功能强大的三维重建软件,可以通过使用一系列照片来创建高精度的三维模型。
在使用过程中,你需要准备好照片,并对其进行对齐、生成点云、创建模型、优化和改进质量以及导出模型。
相信通过Photoscan这个工具,你可以轻松地进行三维重建,并获得令人满意的结果。
无人机后期航片拼接软件PhotoScan详细使用教程

无人机后期航片拼接软件PhotoScan详细使用教程无人机后期航片拼接软件PhotoScan详细使用教程摘要:本文主要介绍一款无人机航片后期处理软件——Agisoft Photoscan,手把手教你完成航片正射影像拼接、生成DEM。
PhotoScan是一款基于影像自动生成高质量三维模型的软件。
使用时无需设置初始值,无需相机检校,利用最新的多视图影像三维重建技术,就可以对具有影像重叠的照片进行处理,也可以通过给予的控制点生成真实坐标的三维模型。
无论是航拍影像还是高分辨率数码相机拍摄的影像都可以使用这个软件进行处理。
整个工作流程无论是影像定向还是三维模型重建过程都是完全自动化的。
PhotoScan可生成高分辨率真正射影像和带精细色彩纹理的DEM 模型。
使用控制点可达5cm精度。
完全自动化的工作流程,即使非专业人员也可以在一台电脑上处理成百上千张航拍影像,生成专业级别的摄影测量数据。
航片拼接软件有很多,之前我们使用过Pix4D、Global mapper、EasyUAV、Photoscan,几款软件用下来,无论是操作流程,还是出图效果和速度,Photoscan的表现都要好于其他几款。
Photoscan是俄罗斯的东西,正版价格4万左右,但是提供30天全功能试用。
对电脑硬件的依赖也比其他要低。
很多人在用的Pix4DMapper是瑞士一家公司的产品,功能上和Photoscan大同小异,但是正版价格可以买2套Photoscan了,而且使用下来,感觉对电脑的要求比Photoscan高不少,16G内存的电脑频频弹窗警告。
PhotoScan优势盘点:支持倾斜影像、多源影像、多光谱影像的自动空三处理支持多航高、多分辨率影像等各类影像的自动空三处理具有影像掩模添加、畸变去除等功能能够顺利处理非常规的航线数据或包含航摄漏洞的数据支持多核、多线程CPU运算,支持CPU加速运算支持数据分块拆分处理,高效快速地处理大数据操作简单,容易掌握处理速度快不足:缺少正射影像编辑修改功能缺少点云环境下量测功能功能介绍:1.软件安装(安装大概15分钟)官网下载软件,安装。
photoscan空三操作流程
photoscan空三操作流程
Photoscan是一款专业的三维建模软件,可以通过照片生成高质量的三维模型。
在进行Photoscan空三操作流程时,需要按照一定的步骤进行操作,下面将详细介绍Photoscan空三操作流程。
首先,打开Photoscan软件并导入照片。
在导入照片时,可以选择单张照片或者整个文件夹,Photoscan会自动识别照片中的特征点,并进行匹配。
接下来,进行对齐操作。
在对齐操作中,Photoscan会根据照片中的特征点自动对齐照片,生成一个初始的三维模型。
可以通过调整参数来优化对齐效果。
然后,进行建模操作。
在建模操作中,可以选择不同的建模算法和参数,生成不同精度的三维模型。
可以通过添加控制点和地面控制点来提高建模精度。
接着,进行纹理贴图操作。
在纹理贴图操作中,可以选择不同的纹理贴图算法和参数,生成高质量的纹理贴图。
可以调整纹理贴图的亮度、对比度和饱和度。
最后,进行导出操作。
在导出操作中,可以选择不同的文件格式和参数,导出三维模型和纹理贴图。
可以选择导出为OBJ、FBX、STL等格式,以便在其他软件中使用。
总的来说,Photoscan空三操作流程包括导入照片、对齐、建模、纹理贴图和导出五个步骤。
通过按照以上步骤进行操作,可以生成高质量的三维模型,并应用于不同领域的项目中。
Photoscan 的操作流程相对简单,但需要一定的技术和经验才能达到理想的效果。
希望以上介绍对您有所帮助。
- 1、下载文档前请自行甄别文档内容的完整性,平台不提供额外的编辑、内容补充、找答案等附加服务。
- 2、"仅部分预览"的文档,不可在线预览部分如存在完整性等问题,可反馈申请退款(可完整预览的文档不适用该条件!)。
- 3、如文档侵犯您的权益,请联系客服反馈,我们会尽快为您处理(人工客服工作时间:9:00-18:30)。
Tutorial (Intermediate level):3D Model Reconstruction with Agisoft PhotoScan 0.8.5 PhotoScan settingsOpen PhotoScan Preferences dialog from Tools menu using correspondingcommand.Set the following values for the parameters in the General tab:Maximum points per photo:40000P1:40P2:2000Write log to file:specify directory where Agisoft PhotoScan log would be stored(in case of contacting the software support team it could be required)Project compression level:6Enable stereo mode:DisabledEnable VBO support:DisabledCheck for updates on program startup:EnabledSet the parameters in the OpenCL tab as following:Check on any OpenCL devices detected by PhotoScan in the dialog and reduce thenumber of active CPU cores by one for each OpenCL device enabled (if your CPUsupports hyper-threading then two active CPU cores per each OpenCL device shouldbe disabled).Add photosSelect the Add Photos... command from Workflow menu. In the Add Photos dialogbrowse the source folder and select files to be processed. Click Open button.Mask photosTo achieve good reconstruction results it is necessary to mask all irrelevant elementson the source photos (background, turntable, accidental foreground, etc.).Open a photo with an irrelevant element in Photo View double-clicking on the photoin the Photo pane.Choose one of the selection tools from the Toolbar: Rectangular Selection forrectangular shape irrelevant elements; Intelligent Scissors–to select irregularshaped area in the photo; Intelligent Paint– to paint the selection with the mouse.To mask uniform background of the image use Magic Wand tool. First, click the Magic Wand button on the Toolbar, then click inside the area to be selected. To change the border of the automatically selected area click inside the area to be addedto the selection.Save the mask clicking Add Selection button from the Toolbar.To alter the current mask use other selection tools together with Add Selection / Substract Selection buttons on the Toolbar.Repeat the described procedure for every photo where background (irrelevantelements) should be masked.Align photosAt this stage PhotoScan refines the camera position for each photo and builds thepoint cloud model.Select Align Photos command from the Workflow menu.Set the following recommended values for the parameters in the Align Photos dialog:Accuracy:HighPair preselection:DisabledConstrain features by mask:EnabledClick OK button to start photo alignment.Select bounding boxThis step is optional since PhotoScan automatically calculates bounding boxdimensions and location. But it is recommended to check if any correction is needed,because geometry reconstruction step deals only with the point cloud inside thevolume.Adjust the Bounding box to the point cloud model using Resize Region and Rotate Region tools from the Toolbar. The whole model should be inside the Bounding box, while any outliers should be left outside the bounding box.Build geometry3D model reconstruction is a computationally intensive operation, it can take a longtime, depending on the quantity and resolution of loaded photos and selected targetquality.Select Build Geometry command from the Workflow menu.Set the following recommended values for the parameters in the Build Geometrydialog:Object type:ArbitraryTarget quality:MediumGeometry type:SmoothFace count:200000Filter threshold:0.1Hole threshold:0.5Click OK button to start building geometry.Build textureThis step could be skipped if untextured model is sufficient as the final result.Set the following recommended values for the parameters in the Build Texturedialog:Mapping mode:GenericBlending mode:AverageAtlas width and height:4096-8192Click OK button to start building texture.Export modelSelect Export Model... command from the File menu.In the Save As... dialog box select the folder for the model to be saved in, print in thefile name and choose preferred file type from the list (e.g. JPEG).Click Save button.In the Export Model dialog indicate the desired export parameters (e.g. Exporttexture). Note that the list of available exporting parameters depends on the selectedfile format.Note: Exported texture will be stored in the same folder as the 3D model with thesame file name (file type is selected by user).。