CTF JUKI飞达说明书
JUKI TL-2200QVP 锁边机说明书

Lockstitch machine with a long arm and a thread trimmer TL-2200QVP INSTRUCTION MANUALNOTE:Congratulations on your purchase of a JUKI sewing machine.Please be sure to read this Instruction Manual before operating the sewing machine to ensure safe operation. Please be sure to keep the Instruction Manual so that you can read it whenever necessary.“IMPORTANT SAFETY INSTRUCTIONS”When using an electrical appliance, basic safety precautions should always be followed, including the following: Read all instructions before using this sewing machine.“DANGER ____ To reduce the risk of electric shock:”1.The appliance should never be left unattended when plugged in.2.Always unplug this appliance from the electric outlet immediately after using and before cleaning.“WARNING ____ To reduce the risk of burns, fire, electric shock, or injury to persons:”1.Do not allow this appliance to be used as a toy. Close attention is necessary when this appliance is used by or nearchildren. This appliance can be used by children aged from 8 years and above and persons with reduced physical, sensory or mental capabilities or lack of experience and knowledge if they have been given supervision or instruction concerning use of the appliance in a safe way and understand the hazards involved. Children shall not play with the appliance. Cleaning and user maintenance shall not be made by children without supervision.e this appliance only for its intended use as described in this manual. Use only attachments recommended by themanufacturer as contained in this manual.3.Never operate this appliance if it has a damaged cord or plug, if it is not working properly, if it has been droppedor damaged, or dropped into water. Return the appliance to the nearest authorized dealer or service center for examination, repair, electrical or mechanical adjustment.4.Never operate the appliance with any air openings blocked. Keep ventilation openings of the sewing machine and footcontrol free from the accumulation of lint, dust, and loose cloth.5.Keep fingers away from all moving parts. Special care is required around the sewing machine needle.6.Always use the proper stitch plate. The wrong plate can cause the needle to break.7.Do not use bent needles.8.Do not pull or push fabric while stitching. It may deflect the needle causing it to break.9.Switch the sewing machine off “O” when making any adjustments in the needle area, such as threading needle,changing needle, threading bobbin, or changing presser foot.10.Always unplug the machine from the electrical outlet when removing covers, when lubricating or when making anyother user servicing adjustments mentioned in the instruction manual.11.Never drop or insert any object into any opening.12.Do not use outdoors.13.Do not operate where aerosol (spray) products are being used or where oxygen is being administered.14.To disconnect, turn all controls to the off “O” position, then remove plug from outlet.15.Do not unplug by pulling on cord. To unplug, grasp the plug, not the cord.16.Turn OFF the power switch before insertion/removal of any cord and any plugs.“SAVE THESE INSTRUCTIONS”“This sewing machine is intended for household use.”Congratulations on your purchase of a JUKI sewing machine.Please be sure to read safety precautions in “To use the sewing machine safely” in the Instruction Manual before use to fully understand the functions and operating procedures of the sewing machine so as to use the sewing machine for a long time.After you have read the Instruction Manual, please be sure to keep it together with the warranty so that you can read it whenever necessary.To use the sewing machine safelyMarks and pictographs included in the Instruction Manual and shown on the sewing machine are used so as to ensure safe operation of the sewing machine and to prevent possible risk of injury to the user and other people.Warning marks are used for different purposes as described below.WARNING Indicates that there is a possible risk of death or serious injury if this mark is ignored andthe sewing machine is used in a wrong manner.CAUTIONIndicates the operation, etc. which can cause a possible risk of personal injury and/orphysical damage if this mark is ignored and the sewing machine is used in a wrong manner.Pictographs mean the following:There is a riskof electricalshockThere is a risk of injury to hands, etc.Prohibited matterwhich is notspecified Disassembly/alteration is prohibited Generally requiredbehavior● Do not put the sewing machine under the directsunlight or in a humid place.● Be sure to use the sewing machine in the temperaturerange from 5ºC to 40ºC. If the temperature is excessively low, the machinecan fail to operate normally.* The operating temperature of the sewing machine is between 5ºC and 40ºC. Do not use the sewing machine under the direct sunlight, near the burning things such as a stove and candle, or in a humid place. By so doing, the temperature in the interior portion of the sewing machine can rise or the coating of the power cord can melt, causing fire or electrical shock.● Do not wipe the sewing machine with solvent such as thinner.● This sewing machine will stop due to safety mechanism to prevent the machine from overheating, when it sews slowly and for a long time.When the sewingmachine is soiled, put asmall quantity of neutraldetergent on a piece ofsoft cloth and carefullywipe off the sewingmachine with it.At this time, turn off thepower switch, after a whileplease be ON the powerswitch.Be aware that the following state can take place since the sewing machine incorporates semi-conductor electronic parts and precise electronic circuits.S t o p !WARNINGFor the combination of the material and the thread and needle, in particular, refer to the explanation table in “Replacement of the needle”.If the needle or thread does not match the material used such as in the case that an extra heavy-weight material (e.g., denim) is sewn with a thin needle (#11 or higher), the needle can break resulting in an unexpected personal injury.Other precautionsHow to carry the sewing machine■ How to take out the sewing machinePull out the sewing machine from the cutout of styrene foam by holdingthe main body of the arm.■ How to hold the sewing machineCarry the sewing machine while holding the machine arm with twopersons as shown in the figure.CAUTION Turn OFF the power switch. Always must be disconnected plug from socket-outlet.GROUNDING INSTRUCTIONSThis product must be grounded. In the event of malfunction or breakdown, grounding provides a path of least resistance for electric current to reduce the risk of electric shock. This product is equipped with a cord having an equipment-grounding conductor and a grounding plug. The plug must be plugged into an appropriate outlet that is properly installed and grounded in accordance with all local codes and ordinances.DANGER - Improper connection of the equipment-grounding conductor can result in a risk of electric shock.The conductor with insulation having an outer surface that is green with or without yellow stripes is the equipment-grounding conductor. If repair or replacement of the cord or plug is necessary, do not connect the equipment-grounding conductor to a live terminal.Check with a qualified electrician or serviceman if the grounding instructions are not completely understood, or if in doubt as to whether the product is properly grounded.Do not modify the plug provided with the product. if it will not fit the outlet, have a proper outlet installed by a qualifiedelectrician.Grounding pinFigure 1Grounding pin (D)(B)(A)(C)CONTENTSSafety regulations......................................................................................1-3 How to carry the sewing machine.. (4)GROUNDING INSTRUCTIONS (5)Specifications (7)Accessories (8)Setup and operation ................................................................................9-11 Principal Parts .. (12)Name and Function of each component................................................13-17 Winding the bobbin ................................................................................18-21 Threading the machine (needle thread) .. (22)Adjusting the thread tension (23)Tabulated relationship between material, thread and needle (24)Presser foot lifting lever (24)Attaching the needle (25)Maintenance (25)Maintenance and lubrication (26)Troubles and Corrective measures (27)12345678Accessories1.Power cord2.Exclusive screwdriver3.Screwdriver (small)4.Cleaning brush5.Bobbins (4pcs.)6.Oiler7.Needles (GB 134R #18)8.Spool cap9.Thread stand components(spool holder, thread stand thread guide, bobbin winder spool pin,bobbin winder seat, anti-vibration cone (2 pcs.), setscrew large,setscrews small (2 pcs.))10.Eye protection cover components(safety plate, safety plate mounting plate, washers (2 pcs.),setscrews large (2 pcs.), setscrews small (2 pcs.))11.Thread guide pin12.Masking seal■Basic Operating Procedures1)Insert the electric power cord plug into the85%15%60%85%<1. Stand-up type>1 Setting the Maximum Sewing SpeedYou can set the maximum sewing speed in 5% increments.2 Setting the Stitch Mode•Cruise Stitch ModeWhen you press the "start button" on the right handlebar, the machine will sew at the maximum sewing speed that has been set.When you move the sewing machine by the handles, the machine will sew automatically with a sewing speed so that the set "Stitch per Inch" (SPI) can be maintained.•Baste Stitch ModeWhen you press the "start button" on the right handlebar and move the sewing machine by the handles, it will sew with the stitch length that has been set.Setup and operation•Precise Stitch ModeThe sewing machine won’t sew, even if you press the"start button" on the right handlebar. When you movethe sewing machine by the handles, the machine willautomatically sew a constant stitch length according tothe distance moved.•Manual Stitch ModeWhen you press the "start button" on the right handlebar,the machine will sew at the maximum sewing speed thathas been set.3Trimming ThreadWhen you press this button, threads are trimmedautomatically.*Start sewing.In a "stand-up" setup, you can stitch by moving the machine.When you press the "start button" on the right handlebar, thesewing machine will start sewing according to your settings.When you press the "start button" again, the sewing machinewill stop sewing.Left Handlebar Right HandlebarLED Lights LED Lights3 Sewing and Manual Thread TrimmingWhen you press part A of the foot controller (pedal), the sewing machine will start sewing.The sewing machine sews at a faster speed according to the amount that part A is pressed.When you release your foot from part A, the machine will stop.When you press part B, the machine will trim the threads.2 Auto Thread Trimming FunctionThe sewing machine will trim the threads automatically when it stops.<2. Sit-down type>85%15%60%85%85%15%60%85%1 Setting the Maximum Sewing SpeedYou can set the maximum sewing speed in 5% increments.5647237811101694121314152120192423Principal Parts1.Thread trimmer retaining plate2.Bobbin winder guide3.Presser foot pressure regulator4.Thread tension dialmp (built-in type)6.Hand pulley7.Support rod8.Spool pin9.Anti vibration cone 10.Bobbin presser11.Bobbin thread winding shaft 12.Power switch13.Inlet of electric power cord 14.Presser foot lifting lever 15.Thread guide pin 16.Eye protection cover 17.Tension controller No. 118.Hand wheel19.Presser regulator cover 20.Stitch regulator connec t ion connector21.Panel junction cable connection connector 22.Hook cover23.Connecting plate (large)24.Connecting plate (small)1.Screw in the presser foot2.Presser foot3.Throat plate4.Needle clamp5.Needle bar thread hook6.Needle7.Needle bar thread guideName and Function of each component■Power cordInsert the electric power cord plug into the corresponding inlet.■Power switchTurn ON the machine, set the power switch to “I”.Turn OFF the machine, set the power switch to “O”.ONOFF2653789121.Insert bobbin winder spool pin 2 into spool holder 1. Fix the former with setscrew 3.2.Set bobbin winder seat 4 and two anti-vibration cones 5 on spool holder 1.3.Set thread stand thread guide 6 on the top of bobbin winder spool pin 2.4.Install thread stand 7 on frame 9 with two setscrews 8.■Installing the thread stand13241 Remove two setscrews from the presser regulator cover.Remove the presser regulator cover.2 Place the panel cord as illustrated in the figure.It is necessary to place the panel cord at a position where the cord does not come in contact with the mechanical parts.3 Align the notch in the cover with the panel cord.4 Fix the presser regulator cover with the setscrews.■Panel cord binding procedure5123461 231.Place eye protection cover 2 and washer 3 in the written orderon eye protection cover mounting plate 1 and fix them withsetscrew 4.2.Install eye protection cover mounting plate 1 on frame 6 withtwo setscrews 5.■Installing the eye protection coverMinimum clearance between the throat plate and the presser foot: 0.5 mm (at the time of shipment)Decrease Increase321112A BC■HandwheelKeep hand away from the handwheel while the sewing machine is running.1 Push and turn the hand pulley to turn the main shaft.2 Turn on the power switch. White marker dot (A ) on the handwheelis brought to the right front as observed from just beside.White marker dot (A ) is in the front side: The thread take-up levercomes up to its upper end.Green marker dot (B ) is in the front side: Not usedRed marker dot (C ) is in the front side: It is used as the markerdot at the time of lubricating.■Adjusting the presser foot strokeIt is possible to adjust the presser foot stroke.Remove presser regulator cover.Loosen nut 1. Shift block 2 upward to increase the stroke, or downward to decrease it.To increase the stroke more, change the position of setscrew 3 of the link arm to the lower position (stroke: 3to 5 mm). The setscrew has been factory-set at the upper position (stroke: 1 to 3 mm) at the time of shipment.After the completion of theadjustment, install the presser regulator cover which you have removed before the adjustment.Stoke is increasedStroke is decreasedUpper position: Stroke is 1 to 3 mmLower position: Stroke is 3 to 5 mm52134Winding the bobbinBobbin winder guidePositioning latchesBobbin presserBobbin thread winding shaftThread trimmer retaining plate1Installing the thread guide.1 Raise the support rod fully, turning slightly until the positioning latches engage.2 Set the large spool over the anti vibration cone.3 Set the household-type thread onto the spool pin and then insert a spool cap in place.4 To set a large-diameter spool, set the anti vibration cone upside down to stabilize the spool.5 Pass the thread coming from the spool on the thread guide pin (rod) just above the spool.Turn OFF the power switch.3423■Take out the bobbin case.Bring up the needle. Open the hook cover. Take out the bobbin case.■Upon completion of winding the bobbin.Return the bobbin presser to its home position. Take out the bobbin.Trim the thread with the thread cutting knife.■Set the bobbin in the sewing machine.Insert the bobbin case fully into the hook, and close the bobbin case latch.Close the hook cover.Thread tension10cmThe bobbin should run clockwise.LoosensTightens1112345678923456782a11Thread take-up■Pass the thread through the thread guide 1.■Pass the thread through the thread guides 9 and 0.Thread the needle a .■Thread the machine head in numerical order, 2 to 8.Thread tension diskAs a measure of the thread tension applied by the bobbin case, when a bobbin (Cotton TEX40) is loaded in the bobbin case, the bobbin should slowly drop by its own weight as illustrated in the figure.* Adjust the needle thread tension in accordance with the bobbin thread tension.* The bobbin case for the TL-2200QVP is an exclusive JUKI part. Please consult the JUKI dealers when you purchase it.·Adjusting the bobbin case·Proper thread tensionImproperly adjusted thread tension may cause puckering on materials, inferior stitches, or thread breakage.The needle thread tension is too highTensionadjusting screw IncreaseDecreaseBobbin threadmaterial1AB■Tension controller No. 1When tension nut No. 1 1 is turned to the right A , the remaining length of thread after thread trimming is shortened. When it is turned to the left B , the remaining length of thread is lengthened.*Be sure to carry out back tacking by several stitches at the beginning of sewing.1 2312Lubricating the machineBring the red marker dot to the right front.The sewing machine can be lubricated in two different methods. Select one of the two methods for lubrication.●Use the machine oil (New Defrix Oil No.1 or similar) supplied with the machine.●After the lubrication, turn the handwheel by hand to allow the oil to spread in the whole hook.●For daily use, lubricate the sewing machine once a day.●After unpacking or after the sewing machine remained unused for an extended period of time, apply a larger quantity of oil (five to seven drops) than usual. If the quantity of oil is excessive, oil can drop on the material. Take care not to apply an excessive quantity of oil to the needle bar and the hook section.●After the lubrication, carry out trial stitching without exceptions.121.Lubricate the machine after removing the bobbin case.2.Turn the handwheel so that its red marker dot comes to the right front as viewed from just beside the sewing machine.3.Apply one or two drops of oil to the hole indicated by the arrow.1.Lubricate the machine after removing the bobbin case.2.Apply one or two drops of oil to the arrowed sections shown in the figure.Troubles and Corrective MeasuresIf sewing difficulties occur, make sure the instructions are correctly followed. If a problem still exists, the reminders below help to solve it.。
JUKI高速贴片机操作手册

ponent direction error
元件尺寸錯誤
Error: Component direction error 現象描述: 元件尺寸錯誤 處理方法: 1:檢查元件尺寸是否與實物一致. 2:Laser是否清洁,元件尺寸檢測是否打開.
3:使用OCC檢查吸取坐標有無偏移.Feeder供料
1.如遇到不會處理的報警時,請不要只敲回車鍵,需保 留報警畫面,待技術員處理.2.在處理報警后需檢查 Feeder上蓋有無翹起、是否上好.方可開机.
JUKI高速贴片机操作手冊
JUKI贴片机 工作原理镭射识别,机构简单,更稳定,后 期维护费用低,磨砺造就的高速度高精度技术,通过采用 高效率新型线性伺服马达,贴装头组件的轻量化和高刚性 化,以及优化贴装程序,实现了0.040秒/芯片 (90,000CPH)(最佳条件)的贴装速度。
Error: Feeder sensor detected 現象描述:供料器之感應器被擋到. 處理方法:檢查Feeder前蓋.料帶是否浮起,Sensor間是否有 其它異物,確認好后讓机器歸零再進行補打,若机 器沒有記憶貼片步驟,需知會技術人員處理.
8.BOC mark recog error (Mark識別錯誤)
Error:Pwb Conveying Error 現象描述:基板傳送錯誤 處理方法:按” ”鍵,確認基板卡住的位置,檢查軌道寬度 調試是否合理,輸送帶是否磨破,板子是否變形.感 應器是否老化 及感應位置和感應時間是否正確.
7.Feeder sensoቤተ መጻሕፍቲ ባይዱ detected (供料器之感應器被擋到)
操作安全
1.站立機臺時,勿靠近機臺,以免碰到EMERGENCY STOP按鈕. 2:機器運轉時,不可將頭,手及身體部位伸進機臺中, 以免造成傷害.處理机器報警時需打開安全蓋操作. 3:操作機器時應特別小心,不可將工具及其他物品 遺留在機臺內部. 4:機臺運轉時禁止上.下供料器<做此操作時須停下 機器> 5:在按下<START>開關前務必確認裝置內部無人 方可進行.
juki操作说明

检认照査作成开机操作顺序一、开机程序:1.打开电源开关,使开关处于ON状态。
2.确认气压表是否处于0.5Mpa状态.3.待5分钟左右,出现“Will returm to home position”画面按“ENTER”进行归零4.用跟踪球控制光标选“File”→“OPEN”,选择当日所生产程式名称。
5.确认网板是否已装好网板为尺寸(650X550)选择“prod”敲回车键,按绿色“START”.二. 手动擦拭网板操作步骤:主电源开关 气压指示表 副电源开关原点归零图示 1.准备擦拭纸拈少许酒精操作盘介绍 2.按下STOP红色键,打开机盖3.擦拭网板如有堵孔,必要时可以用气枪吹开网板定位气缸开关 4.如上述操作已确认无误后打下机盖按“START”绿色键恢复印刷。
三、关机程序:1.待最后一块PCB丝印完流出后,按绿色“CYCLE”循环停止键后按“STOP”键。
2.按黄色“ORG”键确认进行归零动作.3.按键盘上OPEN,选EXTE键,出现The machine is ready to be turned off关掉机器电源。
4.关闭电源OFF。
键盘ENTER确认键四、注意事项:1.在丝印时机器运作前必须检查机器内有无异物或印刷移动之部件有无存在潜在安全问题。
2.机器生产印刷时,严禁将身体任何部位伸入机器内部。
3.及时注意加锡膏,以免发生未刷上锡的情况,加锡膏时应按STOP键停止后进行操作。
关机操作顺序操作选项可以安全关机显示电源开关4.加锡膏时,一定要自检是否加的钧匀,每四小时换一次。
5.注意节约锡膏不要有浪费的情况。
6.严禁二人以上同时操作同一台机器。
7.严禁突然切断电源。
五.安全:1.如发生故障应该及时叫技术人员来解决,以避免造成伤害事故。
2.遇紧急情况时,立即按下紧急停止开关。
全部基板机械名适用基板名作 业 順 序图示JUKI 1700/1710 修改履历:李波作 业 指 导 书管理番号: JUKI-001作成日:2009/01/10紧急停SINGLE CYCLE STOP ORIGIN ON LINE START SERVO FREE。
ED035 JUKI KE系贴片机操作规程(A-3)

文件名称:JUKI KE、FX系贴片机操作规程(公司资产,严禁私自复印)
版次
A/3
制定人
柳木华
日期
2011-9-18
页次
3of 3
核准人
日期
文件编号
UE-SOP-ED035
发行部门
受控状态
5、维护及保养:
5.1一级维护保养:5.1.1每天生产操作员确认及完成以下:
5.1.1.1检查确认气压0.5±0.05MPA
3.5.2调整好轨道的宽度
3.5.3进入维护/空运模式…选择确认就可开始过板
3.6关机:
3.6.1生产数量安成后或按了停止生产键后会退出生产画面
3.6.2点中显示窗口的“X”,系统退出Windows操作系统
3.6.3当出现“现在可关闭电源”或“now it is safe to shut down your computer”时就可关掉主机总电源
按键5、PAUSE、STOP(暂停/停止):用于暂停或停止正在进行的操作用
按键6、SINGLE CYCLE(单循环):用于在生产中完成正在进行的一周期动作后自动停止
按键7、EMERGENCY(紧急停止):用于设备异常及对人体危险时即用,按下时驱动部分停止工作,按箭头方向旋转可弹出解除作用
3、操作说明:
石龙富华电子有限公司
SHILONG FUHUA ELECTRONIC CO.,LTD.
操作规程
文件名称:JUKI KE、FX系贴片机操作规程(公司资产,严禁私自复印)
版次
A/3
制定人
柳木华
日期
2011-9-18
页次
1 of 3
核准人
日期
文件编号
UE-SOP-ED035
JUKI操作手顺书
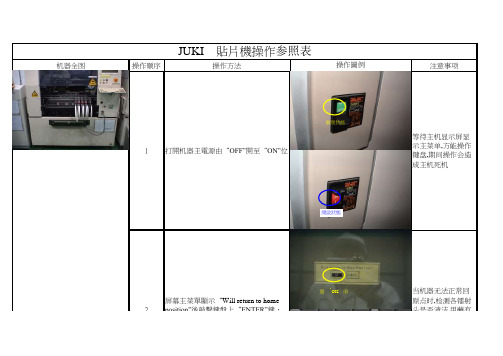
机器全图操作顺序操作方法注意事项JUKI 貼片機操作参照表操作圖例等待主机显示屏显示主菜单,方能操作键盘,期间操作会造成主机死机当机器无法正常回原点时,检测各镭射头是否清洁,用蘸有酒精的棉花棒轻轻擦拭镭射头镜面屏幕主菜單顯示“Will return to home position”後敲擊鍵盤上“ENTER”鍵,機器回原點21打開机器主電源由“OFF”開至“ON”位關閉狀態開啟狀態選‘OK’項3調出當前所需生產的程序文件名程序名按照生产需要分成红胶板(GLUE),锡膏板(SOLDER),双面板(DOUBLE)选择好程序后,進入“DATA INPUT”菜單,選擇“Pick data”項,用Camera 調節FEEDER 的中心坐標4原点时,检测各镭射头是否清洁,用蘸有酒精的棉花棒轻轻擦拭镭射头镜面Will return to home position”後敲擊鍵盤上“ENTER”鍵,機器回原點2将Camera 十字中心对准编带孔中心按此键選擇程序名選擇‘OK’選擇‘Pack使用小键盘上的左右键调节"X"轴坐标,上子键调节"Y"轴坐标,使元件十字中心在PCB 板上与其对应的PAD 的中心点上按过回流焊的实际状况对元件坐标进行微调选择好程序后,進入“DATA INPUT”菜單,選擇“Pick data”項,用Camera 調節FEEDER 的中心坐標46技術員根據檢驗員所反饋的信息適當調節元件坐標進入“PROD”菜單,選擇“Prod.mode”中“Trial”選項,試生產1片調節元件坐標5对准编带孔中心選擇‘Trial’調整元件坐標7調試好後,量產在量产前做好首检检查,并标识按过回流焊的实际状况对元件坐标进行微调6調節元件坐標END 左右上下。
JUKI使用说明书
3-1. 机器规格................................................................................................................................... 3-1 3-2. 原点粗调整 ............................................................................................................................... 3-2 3-3. 附属装置(选项) ......................................................................................................................... 3-3 3-4. 动作规格................................................................................................................................... 3-4 3-5. 注释 .......................................................................................................................................... 3-9
JUKI贴片机的使用教程
贴片机的介绍与使用目录一:贴片技术与贴片机关系讲解二:贴片机的编程循序三:贴片机的保养目的贴片技术与贴片机关系讲解(一)X-Y 与Z轴X-Y 定位系统是评价贴片机精度的主要指标,它包括传动机构和伺服系统;贴片速度的提高意味着X-Y 传动机构运行速度的提高而发热,而滚珠丝杆是主要的热源,其热量的变化会影响贴装精度,最新研制的X-Y 传动系统在导轨内设有冷却系统;在高速机中采用无磨擦线性马达和空气轴承导轨传动,运行速度做得更快。
西门子贴片机是采用同步带-直线轴承驱动,该系统运行噪声低,工作环境好。
X-Y 伺服系统(定位控制系统)由交流伺服电机驱动,并在传感器及控制系统指挥下实现精确定位,因此传感器的精度起关键作用。
位移传感器有园光栅编码器、磁栅尺和光栅尺。
1.园光栅编码器园光栅编码器的转动部位上装有两片园光栅,园光栅由玻璃片或透明塑料制成,并在片上镀有明暗相间的放射状铬线,相邻的明暗间距称为一个栅节,整个园周总栅节数为编码器的线脉冲数。
铬线的多少也表示精度的高低。
其中一片光栅固定在转动部位作指标光栅,另一片则随转动轴同眇运动并用来计数,因此指标光栅与转动光栅组成一对扫描系统,相当于计数传感器。
园光栅编码器装在伺服电机中,它可测出转动件的位置、角度及角加速度,它可以将这些物理量转换为电信号舆给控制系统。
编码器能记录丝杆的放置数并将信息反馈给比较器,直至符合被线性量。
该系统抗干扰性强,测量精度取决于编码器中光栅盘上的光栅数及溢珠丝杆导轨的精度。
2.磁栅尺由磁栅尺和磁头检测电路组成,利用电磁特性和录磁原理对位移进行测量。
磁栅尺是在非导磁性标尺基础上采用化学涂覆或电镀工艺在非磁性标尺上沉积一层磁性膜(一般10~20um)在磁性膜上录制代表一定年度具有一定波长的方波或正弦波磁轨迹信号。
磁头在磁栅尺上移动和读取磁恪,并转变成电信号输入到控制电路,最终控制AC伺服电机的运行。
磁栅尺的优点是制造简单、安装方便、稳定性高、量程范围大,测量精度高达1~5um,贴片精度一般在0.02mm。
JUKI 培训资料1
JUKI SMT生产线培训资料(深圳福好运)目录一、培训计划二、培训内容1.安全生产2.操作规程3.工艺规程注意:本资料仅供参考,详细内容以JUKI公司提供的设备说明书为准。
SMT生产线培训计划1. SMT生产线的组成:KL205上板机KS1700印刷机KE750贴片机KE760通用贴片机KZ115检测段KR310N回流焊KU205下板机2. 培训的主要内容:2.1设备的操作规程包括安全注意事项、设备按钮的功能说明、操作步骤、设备的日常维护、重要的注意事项(简要)2.2 SMT工艺流程包括各工艺的工艺规程安全生产一、人身安全实际使用贴片机和附属装臵的操作人员以及保养、维修人员为了避免发生人身伤害事故,须注意以下事项:1.为了防止触电事故,在打开电源的情况下请不要打开电器箱。
2.为了防止人身伤害,请不要在卸掉安全外罩、装臵等情况下运转机器。
3.为了防止人身伤害,请不要把头发、衣服等卷进传送带链条中。
4.工作中不要戴手套。
5.为了防止人身伤害,维修时(加油、调整、日常维修)请关掉电源。
6.为了防止人身伤害,请在供电电路上安装漏电断路器。
7.机器运转时,注意手不要碰到驱动部分。
8.为了防止炎症,皮肤皱裂,如果眼睛或身体上沾到润滑油请立即清洗。
9.为了防止突然启动造成事故,维修之前请卸掉空气供给源的管子,排放出内部的空气后再进行维修。
10.为了防止人身伤害,进行修理、调整、更换零件的作业后,请一定确认螺丝、螺母是否拧紧。
11.拔掉电源时,请手拿插头,不要拿电线拔。
12.机器运转时,请不要将身体探入机器内。
二、设备安全1.发生异常、故障或停电时,请立即关掉电源。
2.机器抬起或移动时,请注意不要让机器翻倒或倒下。
3.为了避免机器在工作中移动发生事故,请把脚轮固定锁紧。
4.设备应水平放臵。
5.为了防止触电、漏电、火灾事故,机器工作中请不要对电缆施加力量。
6.为了防止因不熟练造成的事故,请由熟悉机器的维修人员来修理、调整机器。
JUKI程序制作作业指导书2
数据种类内容
基板数据包括基板的外形尺寸和BOC 标记的坐标
位置等有关基板整体的数据。
贴片数据包括贴片点的坐标和贴片元件名称等。
元件数据包括元件的尺寸、包装方式等定心时所需的数据
吸取数据包括带状送料器及管状送料器等元件供应位置的数据。
图像数据包括QFP、BGA 等图像识别所需的数据。
注意事项:
3】基板数据
基板数据由
路设置
A 基本设置:
B 尺寸设置:
本设置”中的指定改变显示项目。
C 电路配置:
仅当“基本设置”中已设置“多电路非矩阵”时,方可选择。
4】基本设置
基本设置中有
操作过程中选择符合生产基板的相应的项目。
切换基本设置
排)
切换基板数据
厦门技师学院现代制造工程系编号: REV. 注意事项:
厦门技师学院现代制造工程系编号: REV.
图一
厦门技师学院现代制造工程系编号: REV.
图三
图一
图二
厦门技师学院现代制造工程系编号: REV.
图一图二
图二
厦门技师学院现代制造工程系编号: REV. 厦门技师学院现代制造工程系编号: REV.
厦门技师学院现代制造工程系编号: REV.
(专业文档资料素材和资料部分来自网络,供参考。
可复制、编制,期待你的好评与关注)。
JUKI贴片机控制卡的作用
JUKI贴片机控制卡的作用(深圳福好运)基板和JHRMB基板)一起动作,是伺服马达和步进马达的控制基板.XMP基板最多可以控制19轴的马达!(1)从RMB基板输出16BIT的串行指今信号.控制XY轴ZQ轴的AC伺服马达.XY轴:用马达的旋转变换器控制速度.计数电磁标尺控制定位.zQ轴:用马达的旋转变换器控制位置(2)从RMB基板输出脉冲指令.控制中心马达.后备马达.自动宽度调马达的步进马达.(3)检测紧急开关的开放.既时停止XY轴.ZQ轴.(4)进行各轴原点和限制传感器的检测!(5)伺服启动,电磁标尺的警报检测!(6)安装有XY轴。
ZQ轴以及后备马达R轴的位置管理用计数器。
三。
SYNONET连接基板。
SYNONET连接基板是JGRMB基板。
SAFETY基板。
CARRY连接基板以及各马达妪动器。
电磁标尺。
限制传感器间的信号连接基板。
(1)中转ZY4轴妪动器和XMP基板的信号。
其中警报信号由被绝缘处理的图象探头向SAFETY基板输出。
(2)中转电磁标尺和XMP基板的信号。
(3)XY轴的限制信号赂JGRMB基板和SAFETY基板输出。
(4)中转中心马达。
后备马达。
自动宽度调整马达的妪动器和XMP基板的信号(经CARRY中转基板)四。
接口桥基板。
接口桥基板与CPCI接口和VME接口连接。
是从CPCI向VME存取的基板。
CPCI接口连接的基板:CPU基板。
XMP基板。
VME接口连接的基板:SAFETY,LIGHTCTRL,BASE-FEEDER,I/O CTRL,IP-X3,MCM(L),MCM(R)基板。
五。
MCM基板本基板是元件中心用传感器(MNLA或FMLA)的控制和演算基板。
(1)说明嘛。
略了吧。
这个不难。
不懂到我QQ:151255653上聊聊吧!六。
SAFETY基板。
(1)检测紧急开关,限制传感器,X-SLOW传感器,遮断伺服电源。
(2)检测护罩开关,X-SLO传感器,通知XMP基板。
(3)通过CARRY中转基板的I/F电路,进行基板传送传感器,电磁阀,ATC传感器,电磁阀的信号作业。
- 1、下载文档前请自行甄别文档内容的完整性,平台不提供额外的编辑、内容补充、找答案等附加服务。
- 2、"仅部分预览"的文档,不可在线预览部分如存在完整性等问题,可反馈申请退款(可完整预览的文档不适用该条件!)。
- 3、如文档侵犯您的权益,请联系客服反馈,我们会尽快为您处理(人工客服工作时间:9:00-18:30)。
带式供料器(CTF8mm型)使用说明书感谢您购买本公司的产品。
注意为了能让您安全地使用供料器,在您使用前,请一定仔细阅读本说明书。
阅读完本书之后,请妥善保管,以便能随时查阅。
本说明书仅就带式供料器的有关功能进行说明。
Rev. 01a注意事项(1) 严禁复写、复制本书的全部或部分内容。
(也包括软件和程序)(2) 有关本书的内容,由于机种规格变更,会与内容有不一样的地方,恕不通知说明。
(3) 本书的内容虽然进行了认真的查对,万一有不符之处,或错误,望您与购买机器设备的代理商社或直接与本公司联系。
(4) 对于不符合操作规程等的操作造成的损害,除(3)项的原因以外,一概不负任何责任,敬请了解。
注意为了让您安全地使用机器请实际使用贴片机及其附属装置(以下简称机器)的操作人员和维修人员应仔细阅读以下的有关安全的注意事项,以免在使用时发生受伤事故。
在本使用说明书中的「有关安全的注意事项」中所写的内容有可能一部分不属于用户您购买的商品规格。
另外,为了让您能充分理解本使用说明书和产品的警告标牌内容,我们把警告显示分为以下几类进行说明。
请充分理解这些内容,并遵照有关指示进行操作。
1)注意等级危险操作、维修保养机器时,由于当事人、第三者的操作错误,或不避免该情况的话,就会发生死亡或重伤的危险。
警告操作、维修保养机器时,由于当事人、第三者的操作错误,或不避免该情况的话,就有可能发生死亡或重伤的潜在性危险。
注意操作、维修保养机器时,由于当事人、第三者的操作错误,或不避免该情况的话,就会发生中度或轻度故障的危险。
2)警告标记、禁止标记以及指示标记警告、禁止、指示的内容用下列标记表示。
警告标记有发生手或衣服被卷入的危险有接触运动部发生负伤的危险有发生因接触驱动部而发生负伤的危险触摸高压电有造成触电的危险有接触高温部发生烫伤的危险放置重物或手按压的话、有造成损坏的危险指示标记指示连接地线 指示正常的转动方向有关安全的注意事项目录1. 产品概要 (1)2. 产品规格 (1)3. 特点 (1)4. 各部的名称 (2)5. 使用方法 (4)5-1 带盘的安装方法 (4)5-2 护带的拆卸方法 (5)5-3 带架的安装方法 (7)5-4 装置的手持拿动方法 (8)5-5 元件的传送方法(呈可以吸附的状态) (8)5-6大直径带盘对应机 (9)5-6-1 各部的名称 (9)5-6-2 带盘的安装方法 (9)5-6-3 带盘架 (9)6. 往贴片机上的安装 (11)6-1 往贴片机上装卸装置 (11)7. 日常检查 (12)8. 详细说明 (13)8-1 日常检查 (13)8-1-1 供料器主体的清扫 (13)8-1-2 安装基准面(底面)的伤痕,异物沾附 (14)8-1-3 定位基准销的磨损和变形 (14)8-1-4 锁定架和柱塞本的伤痕和变形 (15)8-2 确认.调整 (16)8-2-1 确认各部动作 (16)8-2-2 确认上护罩.遮挡器有无变形 (17)8-2-3 上护罩的更换和调整方法 (18)8-2-4 间隔位置的调整 (19)9. 定期更换零部件一览表 (19)10.选购品 (20)1. 条码标签 (20)2. 轧花垫片 (20)3. 支撑拉条 (21)1. 产品概要本装置是为了高速和高精度地使用本公司高速FLEX贴片机KE-2050/2060而改进的8mm带式供料器(CTF)。
这是用带子把需要供料的元件,整齐地排列到元件吸附位置进行供料的元件供料装置。
过去生产的KE-2010/2020/2030/2040、KE-750/760也可以使用。
2. 产品规格注意请使用适应元件的带式供料器。
因为是根据元件尺寸专门设计的,如果使用了不适应的元件,就不能正确动作,有损坏的危险。
3. 特点1)因为是用装在贴片机上的带式供料器驱动用空气气缸(驱动气缸)来驱动的,不需要空气和电气,容易操作使用。
2)利用「遮挡机构」稳定地提供元件。
3)利用「触发夹机构」提高了吸附位置精度。
4. 各部的名称注意没有供料器检查夹具时,请不要分解各零部件。
分解的话,有可能不能再回复原来的安装状态。
5. 使用方法5-1 带盘的安装方法程序a) 向左右方向按上护罩钩,解除钩。
b) 向上抬起上护罩,准备安装带。
c) 向左右方向按压带盘制动器,把带安装到带盘支架轴上,再装到带盘架上。
带盘制动器注意安装完带盘制动器后,请确认带盘的四周边缘部和带盘制动器应相接触。
如果带盘安装得不正确,就不能发挥正常得功能。
d) 把传送带穿过供料器主体的带槽,从上护罩的下面拉出,把护带穿过上护罩的剥离剥离狭缝,装好。
剥离狭缝部确认请确认上护罩装好后,棘轮盘的传送牙应正好进入传送带的孔里。
e) 把护带挂到带架的护带钩上。
注意※(为了防止从护带的钩部脱开,请卷绕半圈以上。
)f) 用活动环手动传送,让元件来到上罩开口部。
护罩带钩确认手动传送时,请确认护带从剥离狭缝是否向前侧送入。
确认传送带安装好一后,确认带的前端是否堵塞(折皱,折断)。
如果发生堵塞,有可能传送带不能正常地传送。
5-2 护带的拆卸方法本装置的带架(护罩带卷绕部)式拆卸式,其拆卸方法如下所示。
程序a) 压住带架里侧的板,使带不能转动。
b) 让带架向反时针转动之后,连同卷绕的护带一起,前侧板被卸下的状态。
c) 把护带从护带钩上卸下。
d) 把护带向被卷绕的带侧拉,把它卸下来。
5-3 带架的安装方法本装置的带架卷绕机构上,采用装卸时变化卷绕直径,容易拆卸卷绕的护带的机构。
程序a) 把里侧的板孔和带架的安装孔对齐。
位置调整孔确认带架钩的前端凸出时,请不要安装。
否则容易发生损坏,故障。
b) 在按压里侧板的状态,顺时针方向转动安装上带架。
安装方向确认安装带架时的位置,应为让其转动到确实安装的位置。
带架钩凸出得不够的话,使用中途有可能发生脱落。
5-4 装置的手持拿动方法(1) 手持拿动时带供料器的手持拿动时应按下图所示的样子拿。
注意手持拿动带供料器时,应充分注意不能让装置掉落。
注意手持拿动时,请注意不要让带供料器碰到其他东西。
万一受到冲击,必须确认是否没有异常。
5-5 元件的传送方法(呈可以吸附的状态)a) 把带供料器弄成水平状态,让手动传送或推推杆,传送带子。
间隔位置 手动传送杆确认请确认间隔位置的元件是否有脱落,位置是否没有偏斜。
注意到间隔位置为止的元件传送,请在贴片机没有动作时进行传送。
5-6 大直径带盘对应机5-6-1 各部的名称① 带盘架 ② 带盘制动器 ③ 带盘轴④带盘架钩图5-6-1.右侧面图5-6-2 带盘的安装方法<程序>1)向上抬起带盘架的带盘制动器,把带盘装到带盘轴上。
※带盘轴位置的变更方法请参阅→5-6-3的内容。
2)请确认带盘制动器的带盘侧面压紧部分应在带盘的外侧。
3) 以后请参照5-1的内容。
图5-6-25-6-3 带盘架1) 有关带盘架的带盘直径的对应本机的带盘架对应带盘直径φ180~φ380mm。
带盘直径不同,支撑带盘的芯轴(带盘轴)的位置需要变更。
带盘轴的位置合适应带盘直径如下表所示。
带盘钩的位置 适应带盘直径 A φ 180 B φ 250 C φ 330 Dφ 380图5-6-3-12)带盘轴位置的变更方法把2mm 的六角扳手等插进带盘轴侧面的孔里,从背面用十字螺丝刀拧送固定的M3平头螺丝,把带盘轴卸下来。
然后移动到带盘轴的变更位置,用十字螺丝刀拧紧固定M3平头螺丝。
图5-6-3-23) 带盘架的的松开功能带盘装到主机的状态下仅拉动带子,可以确认条码的识别或各元件名称。
<程序>①向上抬起拨杆,松开带盘架钩。
②把带盘拉到前侧。
②把带盘拉到前侧。
从松开位置返回到锁定位置时,不需要操作带盘架钩的拨杆。
带盘架钩自动地被锁定。
注意从松开位置返回到锁定位置时,带盘有可能发生松驰。
请转动带盘把带子卷紧后再使用。
6. 往贴片机上的安装 6-1 往贴片机上装卸装置程序a) 请确认带式供料器d固定面、贴片机的料库上面、是否没有元件等异物。
b) 用手抓住附属板,用另外一只手托着带导向器。
c) 把带式供料器的固定面放到供料器料库上。
d) 向跟前拉锁定接触拨杆。
e) 向安装带式供料的方向滑动,让X 轴基准销A 顶到料库的固定板定位孔置,让固定销顶到固定板B 的料库U 槽,让柱塞板顶到锁定轴V 槽上的锁定架。
f) 按压锁定分离杆,固定装置。
请进行下列的确认,确认供料器是否确实地固定到贴片机上。
i)确实地固定到贴片机上。
ii)没有确实地固定到贴片机上。
*把供料器从贴片机取下来,然后重新装上。
(供料器取下)(供料器固定)拨杆斜着安装。
g) 拆卸时,请向跟前拉锁定分离杆,然后抓住附属板,把装置向卸下的方向拉。
固定板的定位孔 固定板固定板B 的U 槽取下锁定轴V 槽安装贴片机(料库)固定注意请确认供料器下面和上面是否没有元件内夹住。
7. 日常检查为了能稳定地供给元件,请定期地进行下列检查。
如果有异常,就会发生吸附失误或损坏零部件。
详细的号码表示本说明书的项目。
维修时期No. 日常检查项目检查方法1日1次更换零件处置故障现象详细内容1 确认上护罩的剥离狭缝上是否粘有带屑。
用眼确认○进行清洗。
护带不能卷绕。
8-1-12 确认带行走部和上护罩下面是否没有伤痕。
用眼确认○有损伤或破损,请与本公司联系。
不能正常地传送。
8-1-13 确认带行走部是否没有油脂等。
用眼确认○请进行清洗。
元件脏污8-1-14 遮挡器动作部,棘轮盘部,上护罩钩部下侧是否没有元件被卡住。
(8-1-1.C部) 用眼确认○请取下元件。
带不能传送。
8-1-15 确认各部的弹簧有没有脱落,损坏。
用眼确认○请安装到正常的位置。
供料器不动作。
8-1-16 检查遮挡器的动作(用手动作)用眼确认○确认遮挡器长槽部,遮挡器下面有没有进入异物,排除动作不良的原因。
带不能传送。
8-1-17 确认供料器安装基准面(底面)的状态。
用眼确认○每次供料器装卸时请确认供料器下面和料库上面有没有卡住元件等。
拨杆不夹。
8-1-2注意请不要掉落和粗暴地操作。
有可能影响带式供料器的功能。
8. 详细说明8-1 日常检查8-1-1 供料器主体的清扫※ 请确认各部有没有粘异物,如果有时,请除掉。
※剥离狭缝部的脏污或带屑等不能除掉时,请用布上护罩钩部遮挡器长槽部上护罩剥离部带行走部棘轮盘锁定架锁定带盘拨杆注意用吹风机吹时,请注意不要让机器上沾上油雾(吹风机上吹除的油雾),以免造成脏污元件或造成护带卷绕不良的故障。
8-1-2 安装基准面(底面)的伤痕,异物沾附〈确认部位〉安装基准面应没有伤痕或异物沾附〈对策〉a) 请除去异物。
b) 异物被卡住时,或发生了凸凹伤痕时,请立即与本公司联系处理。
8-1-3 定位基准销的磨损和变形〈确认方法〉基准销A基准销B应没有磨损或变形※ 定位销的磨损或变形时,需要更换零部件和重新调整吸附位置。