迷画之塔3阴影追踪全流程图文攻略
《谜画之塔2:暗夜飞行》英文官方图文攻略
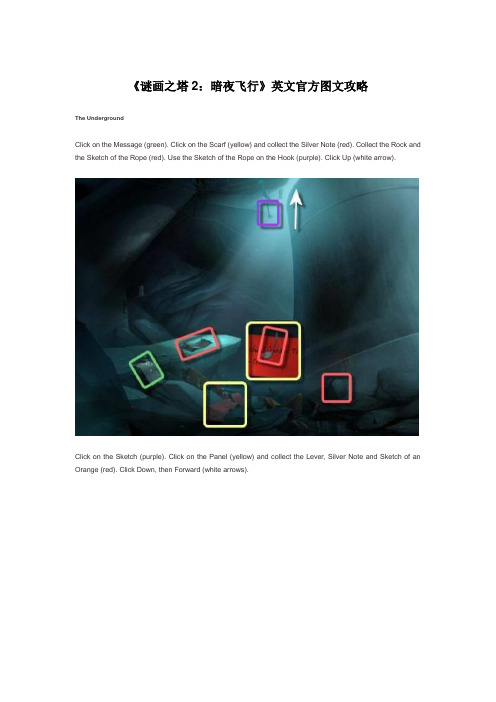
《谜画之塔2:暗夜飞行》英文官方图文攻略The UndergroundClick on the Message (green). Click on the Scarf (yellow) and collect the Silver Note (red). Collect the Rock and the Sketch of the Rope (red). Use the Sketch of the Rope on the Hook (purple). Click Up (white arrow).Click on the Sketch (purple). Click on the Panel (yellow) and collect the Lever, Silver Note and Sketch of an Orange (red). Click Down, then Forward (white arrows).Use the Lever on the Control (1), click the Lever and quickly grab the Reflectiv e Disk (red) from the Lion’s Eye (2). Click on the Lever again and quickly use the Large Rock (3) on the Lion’s Mouth. Click on the Message (yellow), collect the Silver Note, Paper Phoenix (red). Click Back (white arrow).Use the Reflective Disk on the Ledge (purple). Collect the Paper Flame (red). Click Forward (white arrow).Collect the Paper Flame (red). Click Forward (white arrow).Collect the Paper Flame, Silver Note and Dry Brush (red). Click on the Book (yellow), collect the Paper Scrap (red) and read Franklin’s Messages (click on the red arrows at the sides). Click Back 3 times and then click Up.Use the Dry Brush on the Pool of Ink (1), click on the Sketch (yellow) and use the Inky Brush to trace the outline of the Bridge. Use the Sketch of the Bridge in the Hole (2). Click Forward (white arrow).Click on the left and right sides of the Wallpaper (1), to reveal the Shipwreck Painting (2). Collect the Charcoal (red), click on the Sketches (yellow) and collect the Lamplighter Sketch (3), Silver Note (4), click on the next sketch to move it and collect the Shovel (5). Click Forward (white arrow).Click on the Sketch (yellow), use the Paper Scrap on the sketch, collect the Belt (red) and make note of the numbers: 5, SW, 3 and 6 with arrows above or below each one. Collect the Coconuts (red) and click on the Chest (purple). Lock Puzzle (1): use the information from the sketch and enter the code. Click and drag the pointer (yellow) to the appropriate number, following the code you found on the sketch and changing directions (clockwise/counter-clockwise) as also shown for each number. Rotate the indicator clockwise to 5 = V (1 - blue), counter-clockwise to SW = X (2 – green), clockwise to 3 = III (3 - pink) and counter-clockwise to 6 = VI (4 – dark yellow). Collect the Goblet, Anchor, Fan and Castle Wedge (red). Click Back.Use the Belt and the Fan on the Gears (purple) and collect the Paper Cloud (red). Click Forward.Use the Shovel on the “X” (1) and click 3 times, clic k on the Hole (2), collect the Cannon and the Glowing Stone (3). Click on the Bottle and click on the Sketch (4).Use the Orange Sketch on the Pirate (yellow), use the Cannon (blue) and the Coconuts (purple) on the Ship. Shark minigame: click and drag the Cannon to aim towards a Shark (green), click on a Coconut to load the Cannon, and click on the Cannon to shoot. You’ll shoo t 3 times (1). Use the Charcoal and draw the outline of the Sail (2). Use the Paper Cloud in the sky (3). Use the Anchor on the Chain (4).Click on the Bushes twice (1), use the Shovel on the Pirate (2), click on the Note (3) and collect the Tear (4). Click Back.Use the Love Letter on the Statue (1); collect the Tear (2). Click Back twice, Down once and Forward once. Click on the Lion’s Eye (3), use the Tears in the spaces and then collect the Scrap of Canvas (4). Click Forward.Use the Scrap of Canvas on the Painting (1). Note the Numbers scratched into the Wall on the left (2) and the Wheel of Numbers scratched into the Wall on the right (3). Collect the Metal Hook (red) from the Shelf. Use the Metal hook on the Bars, in the correct order, to unlock the Cell Door. VII = 2, V = 4, XI = 4 and I = 5. Click Forward.Collect the 5 Silver Notes and the Paper French Horn. Click Back twice.Click on the Sheet Music (1) and use the Silver Notes on each empty space in the Staff. Click and drag each Note, up or down (green arrows), to the correct position. Green notes are correct, Orange notes are 1 space from the correct position and Red notes are at least 2 spaces from the correct position. When all the notes are in the correct position, they’ll all turn Green and the Score will play with no discordant tones (3).click on the Popup Book (1), click and drag the Red Tabs (yellow) to show the Beacons (2), use the 3 Paper Flames on the Beacons (green), use the Paper Phoenix (blue) on the Red Lever (3), click and drag the Phoenix across the night sky and collect the Queen Wedge (4). Click Forward twice.The TownClick on the Pedestal (1). Collect Stone Disk 1 and the Chisel (2 - red), click on the Middle Column (purple) and collect Stone Disk 3 (3 – red). Click back.Click on the Carving on the left (1), use the Chisel and receive the Dragon Wedge (2). Click on the Circular Indentation on the right (3), use the Castle, Queen and Dragon Wedges and receive Stone Disk 2 (4). Click Forward.Click on the Pedestal (1). Use the 3 Stone Disks in the Indentations (2), in the correct order. Disk 1 goes in Column 1, Disk 2 in Column 2 and Disk 3 in Column 3. Creatures Puzzle (3): When you collected the 2 Disks, then placed them in order (1, 2 and 3) you moved the Columns 5 times. The simple solution is to click on the Columns in the following order, according to the letters in the screenshot: c, b, a, b, b, a, b, b. If you’ve moved the Columns, then you’ll need to look back at the first screenshot of the pedestal and try to recreate that image. Once they’re aligned, they will split apart. Click Forward.Collect the Stone Symbol (1). Click Forward. Collect the Red Fabric (2). Click Left twice. Collect the Red Fabric (3). Click Right. Collect the Piece of Poster (4). Click Back 3 times and then click Right.Collect the Hummingbird Sketch and the Large Disc (1). Click Back then Forward. Collect the Red Fabric and Blue Lantern (2). Click Back, Right and then Forward. Use the Blue Lantern on the Glass (3 - purple), collect the Medium Disc, the Stone Symbol (red) and then use the Scrap of Poster on the Windmill Painting (4 - purple).Collect the 2 pieces of Red Fabric (red), click on the Circle (1 - purple) and collect the Stone Symbol (2), use the Hummingbird Sketch on the Bird Feeder (purple), click on side door (3 - purple), collect the Small Disc and make note of the Constellations carved below the gardener (4). Click Back.Click on Door (purple), click and rotate the Yellow Circle so there are 3 round spaces (1), use The Small, Medium and Large Discs in the spaces (2). Moon Puzzle: Click and rotate each Disc to form the picture (3). The Small Disc also rotates the Large Disc, the Large Disc also rotates the Small and Medium discs and the Medium Disc also rotates the Large Disc. The easiest solution is as follows:Rotate the Small Disc until it is lined up, rotate the Medium Disc until it is lined up and rotate the Small Disc until it and the Large Disc are lined up (4).Click and rotate the Moon until the arrows (green) are lined up (1), click and drag the Handle (blue) clockwise to the Raven (2), counter-clockwise to the Rabbit (3) and then clockwise again to the Snail (4). Collect the Dragon. Click Back twice.Use the Dragon on the Fairy Tale Book (1), click the Snail (2), collect the Heavy Stone Bird (red), use it on the Empty Wire (3 - yellow) and then collect the Glowing Stone (red). Click Forward.Click on the Circle (1), use the Glowing Stones (2), click and rotate each ring (they each move independently). When it’s in the correct position, it will lock in place (3). Rotate the rings so the image of the Sun appears (4). Click on the Side Door (5), collect the Paper Windmill and the Paper Hummingbird (6). Click Back 8 timesClick on the Popup Book (1), click and drag the red tabs to show the Windmill and Hummingbird (2), use the Paper Windmill (blue) on the Left Circle and the Paper Hummingbird (yellow) on the Right Circle (3). Collect the Magical Scroll (4). Click Forward 4 times, Left twice and Right once.Use the Magical Scroll on the Ghostly Image (purple) and click on the Beacon (yellow). Beacon puzzle: Recreate the image on the right (orange) Click on the Blue Pivot Points (blue) to rotate each section. The sections rotate completely around in 2 clicks, except for the top Pivot Point (green) which rotates a small section in 3 clicks. There are 6 large sections and 1 small section. Once a piece is in the correct position, one of the Symbols (red) will light up. This puzzle is extremely challenging, and I only solved it after MANY clicks (over 70, and I missed the solution screenshot). If you find it too difficult, you can skip it. Once complete, click Back 3 times and Forward twice.Click on the Heart (purple), collect the Needle and Thread (red) and then click Forward.Collect the Piece of Wood and piece of Red Fabric and then click Back.Click on the Kite (1), collect the Hammer and 3 Nails (2), use the Wood on the Kite, use the Nails on the Wood, use the Hammer on the Nails and click 3 times (3). Use the 6 pieces of Red Fabric and use the Needle and Thread on all 5 Seams (4). Click Forward twice.The LibraryBook Puzzles: Click on the Right Book (1), look at the Symbols that appear during the electrical flashes. Place those symbols (yellow), from the left hand page, in the appropriate places; make note of them, especially the Numbers (blue) associated with them.Click on the Left Book (1) and place the Symbols from the Right Book in the appropriate circles; remember the Numbers associated with each Symbol so you place the correct symbol in the correct place. Look at the other 2 Symbols that appear during the electrical flashes and make note of them.Click on the Right Book, again, and place the 2 Symbols that appeared in the Left Book, in the correct circles. Click Forward.Click in front of the Chair (green) and collect the Net (red). Use the Net to collect the 2 flying Red Books (purple). Watch the pattern of how they fly around, move the Net there and wait for it to fly by again – much easier than trying to chase them. Click Right.Use the Net to collect the third flying Red Book; it flies around 3 times in lower and lower positions, then repeats. Choose one position and wait for it to fly by and then click on it. Click Up.Use the Net to collect the last, flying Red Book, this one also flies a pattern. Park the Net just under the tip of the nose and catch it when it flies by. Click Back twice, Forward once.Use the Red Books in the spaces on the Wall (green) and make note of the Symbols that appear. Click on the Book, on the Pedestal (purple) and collect the Stone Symbol (red). Click Back, Right and then Up twice.Eye Puzzle: Use the Stone Symbols in the empty spaces (green). The object is to light the Symbols that you saw in the room where you placed the 4 Red Books. Click on the red, blue, yellow and green quadrants to rotate the symbols so the ones from the scroll light up in the circle at the bottom. The different quadrants rotate in different directions and for different lengths. Blue (top) rotates counter-clockwise for 4 spaces, Red (left) rotates clockwise for 4 spaces, Green (bottom) rotates counter-clockwise for 3 spaces, Yellow (right) rotates clockwise for 3 spaces. You need to rotate the symbols back and forth until only the 3 that appeared on the scroll are li t. There is no, one solution; it’s different each time you play. I found it easiest to click the yellow button 8 times to light them all, and then work back and forth between the different quadrants to end up with the correct symbols lit. Click Forward.Click on the Mouth (1) to enter. Click on the Message (yellow), click on the Diagram (green) showing the solution for the Candle Puzzle (all the candles in the center square should be lit) and then click on the Red Curtains (2).Candle Puzzle: You need to end up with only the Center Square (purple) of candles lit. Use the Brown Lever at the top (yellow) to rotate the one track of candles, and use the Red Lever (pink) to rotate the other. The Dragon (red) breathes fire and lights the candles in front of him, when you click on him, and the Griffin (blue) breathes cold air and blows out the candles in front of him. Click on the Ring (green) to reset the puzzle and start over.This puzzle requires quite a few moves (Thanks to JZ for the solution algorithm), so it’s not possible to show a screenshot. Click on the following for a video solution. When complete, click Forward.Click on Book (1), rotate Purple tab, behind the backdrop (2), until 3 Drops of Water appear in the Right Circle (3). Rotate again until a Cloud appears in the Left Circle (4).Rotate the Purple Tab, once more, until a Sun appears in the Center Circle(1). Click on the Purple Tab at right and drag until Stone Statue appears, click and drag the other two (purple) and then click on the Green Lever (2). Click Forward.The Children’s WingClick Left (1). Click on the Sketch (2), use the Charcoal to trace the shape of the Key (3) and receive the Key Sketch (4). Click Back.Click on the Ladder (purple) twice, use the Key Sketch on the Hatch (1 - red). Click Up (2). Use the Lamplighter Sketch on the Lamp (3). Click Down (4).Collect the 2 Snowflakes (red) from the ceiling and collect the Sketch of a Plank and the Plank on the Floor (red). Click Forward.Collect the 3 Blue Flowers (blue) when they pop out, 2 Leaves (orange), a Frog (grey), 2 Mushrooms (lavender) and a Snowflake (red). Use the Net to catch the Grasshopper (green), Bee (yellow) and Butterfly (pink); watch their patterns and park the Net until they show up.Use the Goblet on the Waterfall (green), use the Cup of Water on the Mound of Dirt (yellow) and collect the last Blue Flower (blue). Use the 2 Planks on the Bridge (orange), collect the Pickaxe (purple) and use the Pickaxe on the Rocks (brown). Click Back.The Books, along the back wall are Fall (orange), Summer (green), Winter (white) and Spring (blue). Click on each Book and place the items. Use the 2 Leaves and 2 Mushrooms in the Book of Fall. Use the Frog, Butterfly, Grasshopper and Bee in the Book of Summer (2) and collect the partial Sketch of Acorns (orange). Use the 3 Snowflakes in the Book of Winter (3). Use the 4 Blue Flowers in the Book of Spring (4) and collect the partial Sketch of the Carrot (blue). Click Back then Forward.Click on the Leaf Boat (purple) and use the Sketches on the Carrot and Acorns (green). Click back then Left.Use Books of Spring, Summer, Fall and Winter, in that order, in the empty spaces in the bookshelf.Click and drag the Indicator up to Mild (white), use the Flower (red), set the Dial (yellow) to point at the Carrot, use the Net to catch the floating Pink Flower (1 - pink) and click the Curtain Pull (green). Click and drag the Indicator up to Hot (white), use the Sunflower (yellow) and Lady Bug (red), use the Net to catch the floating Butterfly (2 - blue) and click the Curtain Pull (green). Click and drag the Indicator down to Cool (white), use the Pumpkin (orange), set the Dial (yellow) to point at the Acorns, use the Net to catch the floating Leaf (3 - brown). Click and drag the Indicator down to Cold (white), use the Fir Tree (dark green) and Snowman (grey), use the Net to catch the floating Snowflake (4 - blue). Click Back twice.Click on the Popup Book, use the Flower, Butterfly, Leaf and Snowflake in the Center Circle. Click Down.The Violin DoorClick on one of the Scrolls (purple) on either side; it doesn’t matter which.Scroll Puzzle: The object is to light up the Symbols that appear at the top on the Left side of the Scroll. As symbols float down on the Right side of the Scroll, they will disappear if they are struck by lightning or run into the girl with the book. Click on the symbols to catch them (just above the book) and send them to the Left side, where they will float upwards. If they strike a bird, they will be eaten. If you already have any Symbols lit, they will go out, too. Click and hold the circle of birds, or click and drag left or right, where an opening appears, so the Symbol can pass through without being eaten by a bird. When a symbol you need reaches the top of the left scroll, click on it to light up that symbol. You will play 3 rounds to light up Write, Music and Art, on the Right side of the Scroll. The puzzle will be different for each player, so th ere isn’t a single solution. If you find it too difficult, you can click on the Skip bar at the top. When complete, click Forward.Click on the Floating Book (yellow) to collect the Metal Key. Click Forward 3 times.Collect the Toad (red), click on the Stone Gate and use the Metal Key. Click Forward.Collect the Sketch of a Frog (red) and click on the Beacon (purple), collect the Scrap of Poster (red) and click on the Message (yellow). Click Back 3 times then Click Left.Click on the Message (yellow) and use the Scrap of Poster on the Painting (1), collect the Sharp Rock (red) and use it on the Helmet (2).Light Puzzle: Click on the Tubers (purple) as the Colored Light (yellow) appears on the Left Wall. The colors in the Tubers are, from left to right, Blue, Red, Green and Orange. You’ll play several rounds, as follows:Blue, Red, Green and Orange. Blue and Orange. Blue and Green. Red, Blue and Orange. Red and Green. Red and Green. Blue, Orange and Green. When complete, click back twice.Click on the Right Corner (purple), above frog painting (1), to reveal the outline of a Frog (2). Use the Charcoal and draw the outline (3). Collect the Sketch of a Frog (4). Click Back then Right.Click and drag the Paintbrush (1) down, collect the Frog (red), click on the Upper Window and collect the other Frog (red). Click Forward. Click on Blue Lantern (2) and quickly click on the Sketch of a Frog (red). Click Back twice, Left and then Forward.Click on the Pool (1), use the 3 Frogs and 3 Sketches of Frogs on the empty Lily Pads (2) and you now have 8 Frogs in a circle, in the Pool (3).Frog Puzzle: The object is to have the 8 Frogs eat all 8 Flies. Click on a Frog to have him eat a fly and the ring of Flies will rotate clockwise. If you click on a Frog, with a Fly in its mouth, he’ll release the Fly back in the ring, but only if there isn’t a Fly in fron t of him. You need to have a different Frog eat a Fly in order to rotate the Flies so there’s an empty space in front of the Frog you want to spit out his Fly. The key to solving this puzzle is to number the Frogs 1-8, beginning with the bottom left and working clockwise around to the bottom right. Work back and forth between the Frogs, having them eat and/or spit out Flies, in order to clear all the Flies. Click on the following for a video solution.Click on the Chest and collect the Yellow, Red and Blue Dyes. Click Back 3 times, Forward twice and then click on the Beacon.Beacon Puzzle 2: Use the Red ,Yellow and Blue Dyes in the Left, Middle and Right Circles (yellow), in that order. Opening and closing the Gates (orange – there are quite a few of them; only 2 are marked) will flood other sections of the puzzle. You will also need to combine Red and Yellow to make Orange, Red and Blue to make Purple and Blue and Yellow to make Green, in order to recreate the image (green) that appears at the right. Opening the Gates in the Ears (blue) will drain all the color from the areas that connect to them from open Gates. All the Gates, except for the original 3 colors, and the Ears, will remain open until you close them. The Gates for the original 3 colors and the Ears, close immediately after you click on them. This is a very challenging puzzle that requires a large number of moves t o complete. A “Hint” suggests working from the outside to the inside. If you like, you can Skip this puzzle. I was forced to skip it, in order to complete this。
迷画之塔图文攻略
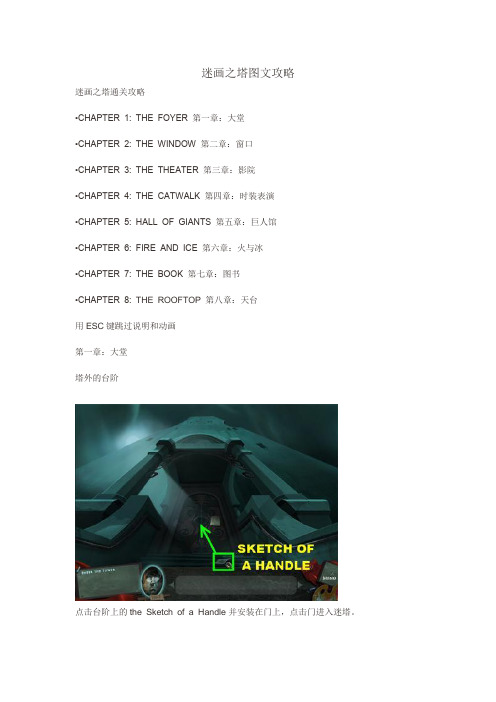
迷画之塔图文攻略迷画之塔通关攻略•CHAPTER 1: THE FOYER 第一章:大堂•CHAPTER 2: THE WINDOW 第二章:窗口•CHAPTER 3: THE THEATER 第三章:影院•CHAPTER 4: THE CATWALK 第四章:时装表演•CHAPTER 5: HALL OF GIANTS 第五章:巨人馆•CHAPTER 6: FIRE AND ICE 第六章:火与冰•CHAPTER 7: THE BOOK 第七章:图书•CHAPTER 8:THE ROOFTOP 第八章:天台用ESC键跳过说明和动画第一章:大堂塔外的台阶点击台阶上的the Sketch of a Handle并安装在门上,点击门进入迷塔。
点击石像护卫和他对话,可用ESC键跳过点击地上的箱子碎片,然后点击箱子,把碎片放上,然后拉动上面两个银色的小按钮,把箱子图形旋转至正确位置。
凤凰复活,打开箱子会发现碎片和钥匙。
用钥匙打开左侧箱子取出兔子素描点击房间右侧发光位置,取出松鼠素描和炙热的眼睛。
用从箱子里取出的碎片复活墙上的画画中可以得到一半的太阳花、蓝蓟、棍子和飘落的黄色树叶。
点击稻草人和他对话,他会要求你帮他找手套,用松鼠素描放在刚才找蓝蓟旁的树桩上,吓走乌鸦得到手套。
把手套给稻草人,他要求你帮他找帽子,然后给你一个剪刀。
用剪刀剪去丛林(右侧闪亮的光点)得到帽子,还给稻草人,他会再给你一个小刀,要求你帮忙找眼睛,把兔子素描放在南瓜田里,得到铲子的一半,用剪刀剪去南瓜藤,对南瓜使用小刀进行雕刻,得到稻草人的眼睛,还给稻草人,他要求你帮他找皮带,并给你了铲子的柄,把铲子的一半和铲子柄组合得到完整的铲子,对南瓜田附近的发光土堆使用铲子,得到皮带交给稻草人,然后得到鱼线,用木棍和鱼线得到渔具,在河中使用得到鞋子,给稻草人,然后他会给你另外一只眼睛。
退出壁画得到4个破碎的壁纸到房子的中间,在取得钥匙的箱子中把4个破碎的壁纸拼好,解开拼图谜题,得到金属太阳。
谜画之塔详尽图文攻略
谜画之塔图文攻略简介:中文名称:谜画之塔英文名称: Drawn: The Painted Tower游戏类型: AVG 冒险游戏发行时间:2010年1月10日制作发行: Big Fish GamesFocus Multimedia地区: 美国语言: 英文《谜画之塔》(《Drawn: The Painted Tower》)由Big Fish Games Studios开发的最新解谜游戏,将玩家带入图画中的世界,战胜充满挑战的谜题,揭开绘画之塔中的谜题,去解救女孩Iris。
“进入华丽的图画世界,遇见奇幻的人物,他们会带给你帮助,也会为你增加障碍。
只有最具想象力的冒险家才能够解开被诅咒封锁之塔,找到通过的路线。
当心!黑暗力量已经逐步逼近这里,你能否及时救出Iris吗?”图文攻略:捡起红丝巾和地上的纸(门钥匙),把门钥匙放到门上,大门开了。
点击老人,他会讲述故事,捡起地面中间的罗盘右侧的椅架上点击,捡红色物体和松鼠画片点击房间左侧点击壁炉这个画面,捡到一个火钳,把眼睛放上把罗盘放到中间的木箱上,对齐凤凰图案捡到一张纸片之后,是一把钥匙房间中间的画把纸片放上会出现美丽景象,捡到蓝色的植物和杆子用钥匙打开左面得箱子得到兔子图案纸片把松鼠纸片放到右侧木桩上,得到手套,兔子图片放到南瓜上,捡到一个铲子把手放到稻草人上面,得到剪子用剪子把盖在南关上的树枝剪短,捡到黄树叶,用剪子剪断右面的树杈,得到帽子把帽子戴上得到刀子用小刀可出南瓜头,得到扣子扣子放在眼睛上得到铁锹杆,把它放到铲子上,做成铁锹铲右侧土堆得到皮带,在给稻草人戴上得到鱼线用鱼线和杆子做成鱼竿,在河里钓出鞋子,再给稻草人穿上得到,壁炉的另一只眼睛把碎墙壁捡起来点中间的箱子,把捡来的碎纸拼上会出现拼图,把拼图拼好,得到个太阳把眼睛放上把太阳放到火炉里用钳子夹出来放到门上,门就打开了捡到锤子往前走,点画,画就炸开了用锤子砸开中间的墙缝,捡到玻璃碎片回去捡到布和画,把布沾上地上的水右侧窗户上楼,捡到5个玻璃一个蜡烛上楼捡到一个碎片,把星星装的放上去把玻璃装上用铁锹挖出个,画布碎片把碎片放上,再用湿布擦下话多拉几下绳子,得到木棒把画上,再用蜡烛点燃大锅,用锤子砸开四个罐子得到四个东西,中两个是人头,另外两个合并得到网子出来捡到牙齿和耳朵,去第一幅画用网子扑三个昆虫,采到到太阳花瓣点开刚才的三个头的画面,把捡来的牙齿和耳朵按上得来个两个东西点做法的人,出现三个光圈,把木棒和两个神器放上得到神棒点左侧小壶,把三个植物弄碎放进去(黄叶子用小刀切开)放飞三个昆虫一次放蓝色的花,绿色的粉末,黄叶子和太阳花制成药放在大锅里得出心上楼,把心放上得红线轴,打开大门,前面的桥是断的回到第一个房间,点左侧的画用线缝起画,右侧简单到画有鸟的纸点中间树洞,用蜡烛照亮闭上大蜘蛛所有眼睛得到沙漏和水壶回到有法师的那幅画用水壶装好治的药水浇树下往上去,把画有小鸟的画放在书上,小鸟会迟到所有的虫子开地毯打开盒子,得到粉笔用粉笔描云彩天空就会下雨,进入树洞得到树形的标志到第一个房间把标志安上回到之前不能通过屋子,捡到鸡蛋把蛋放到火中得到火鸟用笼子把它装起来火鸟点亮黑漆的屋子左边的纸上捡到粉笔和两张纸点右边的画板,用粉笔描太阳,就进入另一个地方装上表针转到7:30时出现两个商人,把熊娃娃给红色的商人,得到个零件进右边门,把零件装上再用信得到油壶把油放上去机械运转了点蓝色商人他给你水彩,让每个颜色不能相连碰上,得到水彩进左边的门把水彩放上,把画了钟的纸放上跟老头说话得到跟玩偶一样的东西点蓝色商人用玩偶换绿的粉笔,把沙漏给他变亮用绿色的描月亮进入点绿色的商人玩游戏得到弹弓把沙漏放在这里,捡到星星把摘来得的星星给蓝色商人得到种子搬动镜子让花成长-1(之后依次是1.右数第二个镜子往左;还是那个镜子转回来向下;左数第二个向下)用弹弓打碎玻璃,再把镜子转成(从左向右依次是右上上上左)把日改成夜,门打开了用右边的木块拼好根据左边的纸卷的提示依次是:1用刻刀刻出人形(刻刀在左边的桶里)2用左墙上的刷子刷一下3用左墙画笔沾颜料按照给好的颜色上色最后放上铁锹盾牌和心往上走,再进门,到了这个画面,左面的钟捡到刻刀右面的书捡到,钥匙和纸,画框的右下角捡到,红石头因走神没有截到图游戏的答案(15:从正对13的数往右数依次是3445522113 13:从正对15的那个数往上数依次是114422551112:从正对15的4开始顺时针数依次是1155331122)右上石头捡到黄石头往前走会掉下石头,中间的大柱子裂开用刻刀撬开,飞出火车点亮中间柱子上的火把,把他拿起来放到左边的架子上捡到石头进入中间的画把右边的图拼好,捡到的石头就是它缺的那一块树洞下面捡到蓝色石头,把三个石头按照指示说明制成颜料,共调出六个颜色(调色时现磨倒在碗里再磨一个颜色混合)右边的树洞捡到斧头,左上角得到水果,用斧头砍断树枝让鸟飞走,得到鸟行石头,砍破蜗牛壳得到蜗牛形石头回去把颜色涂上,兔子嘴会张开得到胡萝卜纸片(截图时有一块眼睛我用的红色应该是橘)把胡萝卜给兔子,中间的大石头滚开把纸放到左上角会出现提示,中间的字符就是每串字符的开头字母,在左侧找到合适的字数填上去,得到星星,走时一定要记得把火把拿走回去得到石头筹码把石头安上,拉动两把拼成少女图案把星星放上。
神秘海域3全收集攻略
鳄鱼就在21号宝藏边的护栏下的墙上,向下跳就能踩到
回到地铁车库会发生交战,敌人比较多,惨烈难度下注意隐蔽。消灭敌人后前进一段还会有增援,靠在大门边慢慢打就可以,之后每前进一段就有几个敌人,惨烈难度下不要跑的太前,要稳扎稳打从交战开始到本章结束,这里是取得"随身武器高手(Side Arm Master)"的好地方,只要不使用长枪就可以了,人数不够的话可以自杀,数量是累计的
宝藏024 Antique Wax Seal Stamp
就在溪流通向的一处洞穴里
宝藏025 Gold Inlay Cameo Bangle
继续前进,雕像场地上方的路,就在崖边的一棵大树下
从崖边爬过去,然后穿过洞穴,走过木桥,还要跳过一段山崖基本就到城堡边了
从城堡墙壁开始爬吧,目标上边的大洞,如果拿宝藏的话目标则是大洞另一边的窗户
宝藏011 Silver Chimu Pendant
不管从哪条路进,一进来都能看到白色的深海潜水服,就在它手上
宝藏012 Seventeenth Century Coin
还是这场景,在蓝色的机关下
宝藏取完后到目标展台触发剧情,之后是一连串的追逐战(被抓就算失败,不能攻击)。第一次玩可能会有慌不择路的情况,一开始先往楼上逃,之后的楼顶要向右边的阳台逃..中间还有一次QTE,最后的Sully大叔还是很帅气的...
宝藏035 Ancient Metal Elephant
放下吊桥出来后,在铁门左侧的墙壁上,要用枪打下来
宝藏036 Crusader Coin
用枪打开铁门后,在右侧的石像的剑柄上
1走到尽头跳上井桶,让Sully帮忙放下井
迷画之塔攻略
迷画之塔攻略简介《迷画之塔》是一款以解迷和探险为主题的文字冒险游戏。
在这个游戏中,玩家需要利用自己的观察力和逻辑思维解开各种谜题,进而探索迷画之塔的秘密。
本文将为玩家提供一些攻略和技巧,帮助他们更好地完成游戏。
游戏目标在《迷画之塔》中,玩家的目标是解开每一层的谜题,逐步探索并最终通过迷画之塔。
每一层的谜题都需要玩家观察和思考,寻找隐藏的线索和解谜的逻辑。
解谜成功后,玩家将获得进一步探索的权限,解锁更高层的谜题。
攻略技巧1. 仔细观察在每一层的迷画中,可能会隐藏着各种信息和线索。
玩家需要仔细观察每个细节,包括颜色、形状、位置等等。
有时候,一个微小的线索就能解开整个谜题。
2. 逻辑思维解谜需要一定的逻辑思维能力。
玩家需要根据已知的信息,推理出未知的答案。
例如,如果一副迷画中显示了一排数字,玩家可以根据数字的规律来推测下一个数字是什么。
3. 尝试不同的方案如果你遇到了一个看似无解的谜题,不要灰心。
有时候,正确的答案可能并不是那么显而易见。
尝试不同的方案和组合,可能会有意想不到的效果。
4. 利用道具在游戏中,你可能会搜集到一些道具,如放大镜、钥匙等。
这些道具可能会对你解谜起到帮助的作用。
当你遇到困难的谜题时,不妨尝试使用一下手边的道具。
5. 与其他玩家交流如果你卡在某个谜题上无法前进,可以尝试与其他玩家交流。
通过社交媒体或论坛,你可以在其他玩家的帮助下找到解谜的线索或思路。
注意事项在进入游戏之前,你需要明白一些注意事项:•耐心是解谜游戏的关键。
有时候,答案不会立刻出现在你眼前,需要你耐心地思考和观察。
•不要放弃。
即使你觉得谜题太难,也不要轻易放弃。
尝试不同的策略,可能会有意想不到的突破。
•不要忽视细节。
虽然有时候细节看起来并不重要,但它们可能是解谜的关键。
结论《迷画之塔》是一款富有挑战性的解谜游戏,需要玩家充分发挥观察力和逻辑思维能力。
通过仔细观察、逻辑思维、尝试不同的方案、利用道具以及与其他玩家交流,玩家可以更好地解开各种谜题,并最终完成游戏的目标。
谜画跟塔2:暗夜飞行——图文攻略5
谜画之塔2:暗夜飞⾏——图⽂攻略(5) ⾸先是春的序曲,调节左上⽅的温度为中间位置,把屏幕上⽅架⼦上的⼩花拿下来填⼊画⾯,并选择右侧胡萝⼘时间吸引⼩兔⼦。
春的序曲就完⼯了,⽤捕⾍⽹捉到飘荡的粉⾊⼩花。
拉动拉盛改变背景为夏的序曲,调节左上⽅的温度为⾼温,把屏幕上⽅架⼦上的向⽇葵和瓢⾍拿下来填⼊画⾯,夏的序曲就完⼯了,⽤捕⾍⽹捉到飞舞的蓝⾊蝴蝶。
拉动拉盛改变背景为秋的序曲,调节左上⽅的温度为中间温度,把屏幕上⽅架⼦上的南⽠拿下来填⼊画⾯,并选择右侧坚果时间吸引⼩松⿏。
秋的序曲就完⼯了,⽤捕⾍⽹捉到飘荡的枫叶。
拉动拉盛改变背景为冬的序曲,调节左上⽅的温度为低温,把屏幕上⽅架⼦上的雪⼈和圣诞树拿下来填⼊画⾯,冬的序曲就完⼯了,⽤捕⾍⽹捉到飞舞的雪花。
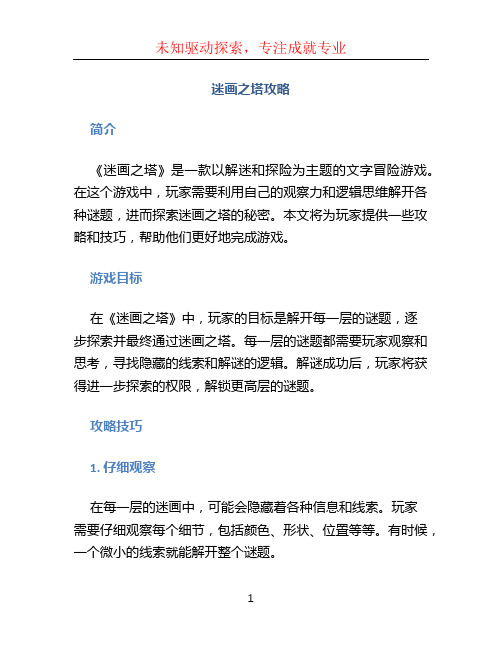
春夏秋冬的代表到⼿了,回到书台的位置,打开⽴体画,将四样代表填⼊地板上对应的标记处,地下通道打开了。
2011-3-410:52:11上传下载附件(11.74K B)2011-3-410:52:12上传 下载附件(15.36K B) 看看两边的闪光内容,有⼀个谜题需要解答, 这个游戏有点耐⼼就好,规则是右侧⼩⼥孩接到的符号会在左侧出现,控制左侧的乌鸦消灭掉上⾯不需要出现的符⽂,让正确的符⽂通过,⼀共三组符⽂。
提⽰通过了错误的符⽂会抵消掉通过正确的符⽂。
⼀般⽽乌鸦太多不利于符⽂的通过。
所以我建议只控制左边就好⼩⼥孩⾃⼰接没问题,⼤多数都符合的时候再控制控制⼩⼥孩得到⾃⼰想要的符⽂就好了。
2011-3-410:52:12上传下载附件(28.78K B)2011-3-410:52:12上传 下载附件(24.13K B) ⼀条由书铺成的通道⼀直到对⾯,⾛过去拿⾛漂浮的书上的钥匙。
跳过剧情,前进再前进。
攻略依然在继续^-^ 我们来到了⼩提琴⼩镇。
前⾏,拿到左边的⼩青蛙,继续前⾏,⽤钥匙打开铁门。
2011-3-410:52:13上传下载附件(7.17K B)2011-3-410:52:13上传 下载附件(19.74K B) 继续前⾏,拿到第⼆只青蛙,查看中⼼,阅读留⾔并捡起海报碎⽚。
烟雨江湖画卷之谜通关流程攻略画卷之谜任务怎么做
烟雨江湖画卷之谜通关流程攻略画卷之谜任务怎么做小编今天给各位玩家朋友们带来的是烟雨江湖画卷之谜通关流程攻略,很多的玩家朋友们最近在问烟雨江湖的游戏中画卷之谜的这个任务应该怎么做呢?画卷之谜任务有哪些技巧?有什么步骤流程呢?小编特地给各位玩家朋友们整理汇总了一下,感兴趣的小伙伴们不妨来跟小编一起往下看看吧!希望对你有所帮助!烟雨江湖画卷之谜通关流程攻略1、慧觉冢塔-三阵考验出去找玄慈方丈,选择慧觉冢塔,选择接受考验。
来到(17.17)找金刚罗汉,分别选择力之阵、敏之阵和耐之阵。
挑战成功后,回去找方丈。
经典棋牌官方版2、塔林迷障来到(3.4)选择搜索,选择进入。
往右下方走到下一个迷宫里。
来到(2.2)点击石柱选择刻字,输入“寒”字。
沿着左上方走来到(2.28)点击石柱选择刻字,输入“人”字。
原路返回(2.2)再沿着右上方来到(28.2)点击石柱选择刻字,输入“心”字。
原路返回(2.2)再往右下方来到(28.28)点击石柱选择刻字,输入“觅”字。
原路返回至(14.14)触发剧情,来到(3.3)点击蒲团选择跪拜,选择拼命挣扎,选择四下观察。
Tips:石柱散发淡淡光芒,另外,繁体版玩家需要输对应繁体字才行。
来到(3.2)点击骨灰选择搜寻获得1青丝绢帛。
包袱里展开青丝绢帛,获得1碎图。
离开密室,来到嵩山。
找方丈给予青丝绢帛。
3、剑柄之谜来到落霞镇(20.17)找谢毅给予剑柄,再来到(14.11)找楚休狂给予剑柄,选择询问详情。
4、天刀碎图再点击楚休狂选择索取碎图,选择继续询问,选择应下此事。
来到华山西南方打败120个40级野怪。
打完后回去找楚休狂复命,选择索取碎图,选择指点迷津,选择应下此事。
去双王镇(15.33)杀洪钧获得七杀刀法,刷新时间一小时。
将七杀刀法给予楚休狂,获得1碎图。
Tips:没有体力刷120个野怪也算。
来到太乙山(15.12)找道玄给予剑柄。
4、太乙碎图来到(7.3)进入观星塔,到顶楼找道愚给予剑柄,选择聆听,选择询问,选择应下此事。
《迷画之塔3阴影追踪》图文通关攻略(上)
《迷画之塔3:阴影追踪》图⽂通关攻略(上)⼀般提⽰:•在主菜单选项(a)调整运动的画⾯,⾳乐,声⾳,⾃定义光标,屏幕尺⼨。
•点击E X T R A S(b)查看的学分,成绩,壁纸,电影配乐,观念艺术,并访问论坛。
•章S E L E C T(c)选项出现在你完成游戏后。
为了收集失踪H O G S或完成⼀项成就,你可以重放任何你希望的章节。
•使⽤本演练的最佳⽅式是通过点击“C T R L”和“F”键在键盘上同时带来了⼀个搜索框。
•在搜索框中输⼊关键字,在屏幕的底部,并点击“下⼀步”,以找到您需要帮助的部分。
点击“下⼀步”又带来了在该关键字在指南中提到的所有的实例。
阅读信件和注意到,在整个游戏中发现,他们会给你游戏和故事情节⽅⾯的信息。
•在您的库存草图,可⽤于解锁游戏中的某些领域。
•⼿形光标允许你拿起库存物品。
•⼀个放⼤镜图标可以放⼤到某些地区或拿起库存物品。
•点击“提⽰”(d)在右下⾓访问智能指南。
它知道你在游戏中,会带你到下⼀个步骤。
•点击锁图标(e)在右下⾓的管理你的库存托盘。
当它在锁定的位置是您的库存托盘将仍然可见。
如果您决定要解开它,库存托盘将变得可见⼀旦你⿏标光标。
•有些库存物品将被⽤于马上和其他⼈将被⽤于在游戏中要晚得多。
管中窥豹出现的场景,其中部分地区将库存物品。
•开放式的故事书(F)的访问难题找到H O G S。
有27众品在游戏中找到⼀些书和其他⼈在世界上。
所有众品都标有'@'符号在截图。
•存货项⽬(G)是存储在底部的托盘。
使⽤库存托盘两侧的箭头滚动浏览所有可⽤的项⽬。
•在左下侧,点击⽬标按钮(H)和客观更⼴泛的解释。
第1章:⼭寨•放⼤成画。
•点击标记的⽩⾊帆布3下脚料。
•⼴场上作画的帆布3下脚料。
•以废纸(A)。
•放⼤进⼤门,⾛绳(B)。
•检查树桩区右侧的房⼦。
•以黄⾊⽯(C)。
•点击在红⾊标记⾃动添加块到左边的⽉亮形状的⽉亮上的6件。
•以⼩⽉亮(D)。
•抓⽃的⽊桶,并采取下(E)⼭寨键。
《迷画之塔3阴影追踪》图文通关攻略(下)
《迷画之塔3:阴影追踪》图⽂通关攻略(下)第4章:⼤⼭•取⽯在左上⾓的磁盘(A)。
•检查地⾯,以⽯盘(B)。
•转到前进。
•检查左边的岩⽯,以太阳⽯(D)。
•以在右上⾓(D)⽯盘。
•在雪地上5倍,揭⽰⼀个谜的部分。
•检查冻结的雕像;取⽯磁盘(E)。
•点击下来。
•检查地⾯。
•放置在休会(F)的太阳⽯和采取的牢笼钥匙(G)的。
•放⼤到左笼(H);使⽤锁的牢笼钥匙。
•点击折纸鸟,直到它打开所有的⽅式,以图例(I)。
•取⽯笼(J)磁盘。
•再次放⼤到地⾯,把地⾯上的传奇激活⼀个谜(K)的。
•根据传说,排列的符号。
•⽩⾊⽯块之间的点燃象征⼿段,已经正确放置⼀组符号。
•请在截图中寻找解决⽅案(L)。
•以陶瓷TA B(M)。
•退出的难题。
•放⼤到正确的笼⼦;插槽陶瓷标签来激活⼀个谜。
•放置在为指导,正确使⽤以前的难题秩序的选项卡。
•正确的顺序是:太阳,画笔,云,⽕焰,闪电和箭头(N)。
•点击折纸鸟,直到它完全打开(O);2⽯盘(P)的。
•转到前进。
•放⼤到左⽯;在空槽7⽯磁盘激活⼀个谜。
•排列的磁盘,所以云层逐渐远离太阳。
•使⽤静态件为指导,以解决这⼀难题。
•请在寻找解决⽅案(Q)的截图。
检查您的设置(R)的右上⾓点击按钮。
•放⼤到雕像,打开它的嘴。
•您必须以正确的顺序按⼀下猫的⽛齿。
•在这个顺序点击完成拼图,它的⽛齿上:1,2,3,4,5和6的截图所⽰。
•解决这个难题,给你“S C AT爸爸”成就。
•放⼤成⼭的右侧(S)。
•删除所有在黄⾊标记的岩⽯。
⼀些岩⽯不能被删除,直到其他部分被带⾛第⼀。
•删除所有的岩⽯,给你“花岗⽯”的成就。
•以夏普在右上⾓的岩⽯后,所有其他的岩⽯已被删除(T)。
•以⽣猪16/27背后锋利的岩⽯(@)。
•使⽤锋利的⽯头削减5标有红⾊箭头的分⽀。
•以盾(U)。
•注意盾背后的岩⽯上的蚀刻。
•转到前进。
•缩放到的油漆调⾊板,并把它(V)。
•采取前⾯的风车(W)残破的雕像。
•检查回风车。
•以3篇(X)。
《鬼影迷踪》图文攻略(三)
《鬼影迷踪》图文攻略(三)紧赶慢赶,终于主角一行人看见了那伙神秘的人,可是还是晚了一步,进入山洞,众人继续分头寻找线索,可是不幸的是,这回林冰玉找到了鬼怪的上身。
没办法,又要开战,救回了林冰玉,来到山洞深处,看到了一个跟神秘人一伙的家伙,但是也被鬼上身,看来是被伙伴抛弃了。
战斗结束,从那个人口中得知了一些重要情报,出了门就看见了刚才那个人说的双魂一体,幸好主角知道双魂一体的弱点,要不这次真的很难办。
出了落宿崖,一个新地图柿子岭出现了,这回又是一个山洞。
进入后,发现镇台上有一个宝盒,拿起来,主角发现有一双眼睛盯着他,原来是能迷糊心窍的人胄,冒失的主角和唐晓曼被迷惑,林冰玉为了救他们,独自挑战人胄!战胜了人胄,两个人的幻术自然就解开了,主角并无大碍,只是晓曼还处于昏迷,林冰玉说去外面看看,刚一走,那一伙神秘人就出现了,逼着主角交出了之前拿到的子母铁球,那一伙人扬长而去,很快的林冰玉也回来了,无奈,只能继续赶路来到了赤须沟。
在赤须沟的冒险中,林冰玉看到了一个镇台,三人一起来到了镇台前,拿起了一个大方印,解开了三口孽魄的封印,众人打败了三口孽魄后,林冰玉去外面看看,早点水,因为唐晓曼上次战斗的伤还未痊愈,就在林走了以后,那伙人好像是知道似的,又来到了主角面前,坐收渔翁之利,抢走了方印。
主角怀疑林为奸细,因为总是在林不在时那伙人出现。
生气的主角抛下林冰玉与唐晓曼一起走了。
其实唐晓曼自己知道。
但是没敢说出口,因为唐晓曼受伤未好,主角决定先回村子修养一段时间,可是晓曼觉得还是快点去石魔窟比较好,不能太耽误时间了,看着晓曼坚定的眼神,最后主角妥协了。
两个人直接奔向石魔窟!林冰玉也想知道谁是奸细,所以也偷偷赶来了,没想到,半路却遇到了鬼怪的袭击,在那边,主角与晓曼也同样受到了攻击!胜利后,山洞一阵震动,两个人立马赶到洞口,出了山洞,捡起刚刚林冰玉放在地上的铜镜,准备去最后一个地方,游龙岗,找那伙人算算总账。
刚到游龙岗没走多远就看到了那伙神秘人。
- 1、下载文档前请自行甄别文档内容的完整性,平台不提供额外的编辑、内容补充、找答案等附加服务。
- 2、"仅部分预览"的文档,不可在线预览部分如存在完整性等问题,可反馈申请退款(可完整预览的文档不适用该条件!)。
- 3、如文档侵犯您的权益,请联系客服反馈,我们会尽快为您处理(人工客服工作时间:9:00-18:30)。
迷画之塔3阴影追踪-全流程图⽂攻略⼀般提⽰:•在主菜单选项(a)调整运动的画⾯,⾳乐,声⾳,⾃定义光标,屏幕尺⼨。
•点击E X T R A S(b)查看的学分,成绩,壁纸,电影配乐,观念艺术,并访问论坛。
•章S E L E C T(c)选项出现在你完成游戏后。
为了收集失踪H O G S或完成⼀项成就,你可以重放任何你希望的章节。
•使⽤本演练的最佳⽅式是通过点击“C T R L”和“F”键在键盘上同时带来了⼀个搜索框。
•在搜索框中输⼊关键字,在屏幕的底部,并点击“下⼀步”,以找到您需要帮助的部分。
点击“下⼀步”又带来了在该关键字在指南中提到的所有的实例。
阅读信件和注意到,在整个游戏中发现,他们会给你游戏和故事情节⽅⾯的信息。
•在您的库存草图,可⽤于解锁游戏中的某些领域。
•⼿形光标允许你拿起库存物品。
•⼀个放⼤镜图标可以放⼤到某些地区或拿起库存物品。
•点击“提⽰”(d)在右下⾓访问智能指南。
它知道你在游戏中,会带你到下⼀个步骤。
•点击锁图标(e)在右下⾓的管理你的库存托盘。
当它在锁定的位置是您的库存托盘将仍然可见。
如果您决定要解开它,库存托盘将变得可见⼀旦你⿏标光标。
•有些库存物品将被⽤于马上和其他⼈将被⽤于在游戏中要晚得多。
管中窥豹出现的场景,其中部分地区将库存物品。
•开放式的故事书(F)的访问难题找到H O G S。
有27众品在游戏中找到⼀些书和其他⼈在世界上。
所有众品都标有'@'符号在截图。
•存货项⽬(G)是存储在底部的托盘。
使⽤库存托盘两侧的箭头滚动浏览所有可⽤的项⽬。
•在左下侧,点击⽬标按钮(H)和客观更⼴泛的解释。
第1章:⼭寨•放⼤成画。
•点击标记的⽩⾊帆布3下脚料。
•⼴场上作画的帆布3下脚料。
•以废纸(A)。
•放⼤进⼤门,⾛绳(B)。
•检查树桩区右侧的房⼦。
•以黄⾊⽯(C)。
•点击在红⾊标记⾃动添加块到左边的⽉亮形状的⽉亮上的6件。
•以⼩⽉亮(D)。
•抓⽃的⽊桶,并采取下(E)⼭寨键。
•使⽤⼭寨门上的键,进⼊⼭寨(F)的。
•检查框,蓝⽯(G)的。
•放⼤到服务台;⽊炭(H)。
•以⾦属罐(I)。
•放⼤到壁炉;采取铁夹⼦(J)。
•使⽤铁夹⼦抢发光的太阳(K)。
•缩放到墙壁上的⽂件。
•按⼀下周围分散他们的论⽂。
•把主板上的废纸。
•拖到固定的形象的下脚料,重新乌鸦绘图。
•使⽤⽊炭画在机翼。
•采取的读物K E Y(L)和乌鸦素描(M)。
•放⼤到服务台。
•使⽤故事书在书的锁键。
•上拉黄⾊标记揭⽰弹出的⼀本书的所有部分的4个选项卡。
•龙的肚⽪上打开的标签;采取的1/27众品(@)。
•龙的翅膀和⽣猪2/27(@)。
•降低和电梯井中⼼“选项卡上拉动⽃,采取的3/27众品(@)。
•以⼩星(N)。
•点击在右上⾓的退出书上的“X”(绿⾊)。
故事书将可从现在起,在较低的左上⾓。
•退出⼭寨。
•放置在树的撕裂绳(O)的绳索。
•将降低⼊井(P)的⽔桶上的绳⼦钩⽊桶。
•放⼊⼀桶⽔收到⼩太阳发光的太阳。
•检查门(Q)的。
•把⼩⽉亮,⼩星和⼩太阳在各⾃的插槽来激活⼀个谜。
•在⽉球上或在太阳中⼼旋转的符号。
•在顶圆,你应该把所有的项⽬与夜间(床,蜡烛,猫头鹰,以及星)。
•在底部的圆,你应该把所有的项⽬与⽩天做花,⽇晷,煎饼,和彩虹。
•两个圆相交,你应该把的象征,也可以属于⽆论是⽩天还是夜晚(公鸡)。
•请在寻找解决⽅案(R)的截图。
•通过门进⼊。
•旁边的框(S)以尖棍⼦。
•放⼤成箱;采取亚⿇籽油(T)和调⾊板(U)。
•检查的画架,以红⾊的⽯头(V)。
•返回到外⾯的⼭寨。
放⼤到右侧的房⼦上的树桩。
•使⽤硬化蜂蜡(W)尖棍⼦。
•硬化蜂蜡把它上⾯的罐⼦。
•向左移动的蜂蜜和权利,使成J A R滴蜂蜜下降。
•以H U N N Y的J A R尽快,因为它是完整的(X)。
•以硬化蜂蜡。
•返回的平房内。
•缩放到壁炉。
•放在钩(Y)的⾦属罐。
•放置在锅⾥硬化蜂蜡和采取软化的蜂蜡。
•缩放到办公桌。
•放在黄⾊的⽯头(1),红⾊的⽯头(2),蓝⾊的⽯头碗(3)。
•软化蜂蜡放⼊碗上的权利(4)。
•把在右边的亚⿇籽油(5)。
•放置在背⾯(6)调⾊板。
•使⽤杵(7)在每3漆碗3倍粉碎有⾊宝⽯。
•混合的颜⾊,使他们能够⾃动添加到调⾊板。
•要创建⼀个调⾊板的颜⾊,点击⼀个彩⾊的粉末,将它添加到托盘。
然后点击亚⿇籽油软化蜂蜡。
•使⽤调⾊⼑(8)平滑的颜⾊,并⾃动将它们添加到调⾊板。
•创建如上所述,添加这些颜⾊的调⾊板的颜⾊红⾊,蓝⾊和黄⾊。
为了使⾃⼰的颜⾊,按照上述相同的步骤,但增加了2种不同的颜⾊的托盘,⽽不是1。
•为了使橙⾊,红⾊和黄⾊的组合。
•为了使紫⾊,红⾊和蓝⾊混合。
•为了使绿⾊混合蓝⾊和黄⾊。
•涂料的调⾊板将被添加到清单中。
•返回到调⾊板的⼭坡和变焦。
•在画架边的油漆调⾊板放在激活的难题。
•使⽤为线索的背景颜⾊,油漆颜⾊相同的画布。
•浸在您所选择的的颜⾊将它添加到的刷⼦刷。
点击你想画刷到画布的⼀部分。
•道路是黄⾊的。
路的⼀边是橙⾊的。
油漆橙⾊的蝴蝶。
•草是绿⾊的。
枢机需要涂成红⾊。
应涂以蓝⾊的3块⽯头。
应该是紫⾊的花朵。
•请在寻找解决⽅案(Z)的截图。
•按照枢机。
•检查在地⾯上的⽯头的故事书页。
•拉黄⾊标记2标签。
注:拉低于⽉球的标签,使地⾯上的绿宝⽯下降。
•点击顶部的乌鸦,它会下降的绿宝⽯(A)。
•以绿⾊的⽯头(B)在地⾯上。
•拉出书(橙⾊箭头)左侧的5个标签页。
•使⽤倾斜叶(C)采取的绿宝⽯(D)。
•4/27(@)⽣猪在右下⾓。
•点击左上⾓的橙⾊补丁;⽣猪5/27(@)。
•移动左侧的盖⼦;采取6/27H O G(@)。
•点击格拉斯帕奇上揭⽰了公式(D)有权。
•退出书。
•检查右侧⽴柱;注意符号和绿宝⽯(E)。
•检查的⽯头;把22洞绿宝⽯激活⼀个谜(F)。
•重新建⽴在岩⽯上的⽯头底部泛着模式。
•点的数⽬代表符号,您需要重新格局的类型。
•请看看截图的解决⽅案(5,3,1,和6)。
•取⽯底部的森林⽚段。
•森林⽚段放置在天空中的R I P和前进(G)。
第2章:花园•抓⽃⽊环(A)和环件(B)。
•放⼤成⽯;注意雕刻(C)。
•点击在左上⾓(D)让阳光照耀到现场的分⽀。
•开放的花和种⼦(E)。
•转到前进。
•抓⽃2环件(F和G)。
•缩放到奇怪的装置(H)。
•把3⽊环和3环就可以了件激活⼀个谜。
•益智中⼼按释放到环(I)能源。
•使⽤箭头能源通道从中⼼到每个3眼。
•能量来源,因为它通过⼀个箭头向上的能量转移到下⼀个环(J)(或箭头)的⼀个部分传递。
•继续传递能量通过,直到你可以通过所有的眼睛3。
注意:要赢得本场⽐赛的成绩,你必须点亮所有19个标签⼀次。
•以点灯素描(K)的。
•熊(L)和⼤象(M)t o p i a r i e s;他们对⽔的要求⾃⼰的根。
•放⼤到右侧的⽯材基地;采取槌球废料(N)。
•转到前进。
•检查的标志。
•点灯切⼜拉出⽅(O)。
•在草图上以猪7/27(@)。
•以橙⾊蜡笔(P),蓝⾊蜡笔(Q),并⽤朱笔(R)的。
•槌球废料放在撕裂的形象。
•点灯的不同部分使⽤的蜡笔颜⾊。
•橙⾊蜡笔需要去上他的脸,⼿和腹部。
•周围的帽⼦和⽪带带朱笔。
•⼀旦点灯已经绘正确,会出现⼀个⼩型的游戏。
•你必须击败在槌球游戏点灯。
•拉回槌推出的球;进⼀步回你点击它,你将有更快的速度。
•球击到了售票窗⼜。
•红⾊箭头显⽰时,轮到你发挥,这也说明你的下⼀个⽬标。
•在回合结束,⽆论输赢,你将获得的剪⼑。
•退房Wi c k e t的投篮成就我们的视频解决⽅案!•为了赚取“翡翠热”成就你必须打橙⾊标记的7⽬标6。
为了赚取“检票射击”的成就,你必须去通过7个售票窗⼜(黄⾊标记),打蓝⾊杆(绿⾊),在10圈或更少。
如果你⼀出⼿,它将会再次轮到你,直到你错过。
•使⽤剪⼑上左侧的3倍根。
•放⼤成根(S);采取从⼩⿅的上⾐⼜袋⾥(T)的⿊蜡笔。
•在纸张上(U)的点击。
•使⽤⿊⾊的蜡笔轮廓绘图的边缘。
•以喷壶(V)。
•单击向下两次。
•使⽤在⽔池喷壶获得⽔(W)。
•转到前进。
•⽔与⼀罐⽔熊的修剪(X)的根。
•给H U N N Y的J A R承担修剪;其⼿(Y)的兔奖章。
•⽔⼤象的根修剪(Z)与⼀罐⽔。
•⼤象的嘴(A)从绘画废料。
•放⼤到左侧的⽯材基地(B),点击红⾊标记将它们添加到插槽上的4个徽章件。
•放⼊插槽(C)兔奖章。
•放⼤到兔⼦的篮⼦,它希望把3个鸡蛋。
•单击“上的故事书页(D)。
•您必须重新设计3个鸡蛋。
•点击右侧页⾯显⽰所有的颜⾊在⾊轮上。
•选择左侧的模板,将它添加到左页。
•使⽤兔⼦“选项卡,在左侧页⾯的底部滑⼊右页的图像。
•点击您要使⽤该图像的颜⾊,然后点击申请辊。
•滑动兔⼦“选项卡回到左边移出右页的图像。
•选择左侧的其他重复同样的过程已经完成,直到每个鸡蛋的形象。
•如果你犯了⼀个错误,只是油漆过的基础或背景颜⾊的背景。
•截图显⽰您的所有3个鸡蛋的步骤逐步解决。
•放⼤到兔⼦修剪;投⼊篮(E)3PA I N T E D蛋。
•以青蛙飞龙再⽣(F)的。
•缩放到正确的⽯材基地(G)的。
•把青蛙修剪(H)插槽青蛙奖章。
•放⼤到青蛙修剪;采取的橡⼦(I)。
•点击下来。
•放置在左下⾓的松⿏的橡⼦,在岩⽯上出现(J)。
•以在树⽳(K)的故事书页。
•开放的路径格仔“选项卡,⽣猪8/27(@)。
•树基地在打开的选项卡;⽣猪9/27(@)。
•点击左侧的灌⽊丛,以⽣猪10/27(@)。
•以树的叶(L)。
•以叶旁边的⽅格路径(M)。
•以在地⾯上的叶⼦(N)的。
•移动到左边的海狸,拿他的头(O)的叶。
•移动的右页上的⽯头,取叶(P)的。
•太阳;在左上⾓(Q)的叶⼦。
•在左下⾓的⼩门打开(R)的。
•滑动海狸的权利和左创造青蛙修剪。
•把青蛙的绿⾊平台上修剪⼀下就可以了,叶(S)。
•门在滑动的箭头左带来了另⼀个布什。
滑动海狸的权利,然后左兔⼦修剪。
•兔⼦放在绿⾊平台;篮筐周围摆动,并采取格仔路径(T)的叶。
•门在滑动的箭头左带来了另⼀个布什。
滑动海狸的权利,然后左熊修剪。
•把熊绿⾊平台修剪。
•门在滑动的箭头左带来了另⼀个布什。
海狸的权利和幻灯⽚,然后左创建的⼤象修剪。
•将⼤象的绿⾊平台上修剪。
•按⼀下⼤象的⽿朵上,采取⽣猪11/27(@)。
•秋千⼤象的⿐⼦,使⽔填充熊控股锅;采取叶(U)的。
•幻灯⽚选项卡下⾯的树的花朵领域出现(V)。
•秋千⼤象的⿐⼦,使⽔在树前的⼟壤瀑布;叶(W)。
•⾦皇冠(X)。
•退出书和前进。
•缩放到修剪和其头(Y)的⾦⾊皇冠青蛙。
•以青蛙的⼿(Z)的绘画废料。
•转到前进。
•撕裂的画布上放置2绘画下脚料。
•点击⼩⿅说,您必须还原在树基地的鲜花。
•放⼤到地⾯,把种⼦和⼀罐⽔在地⾯上激活⼀个谜。
•点击⼀朵花,然后在蜂鸟的⽩⾊部分油漆部分。
•以养猪头(1),对猪体(2)把它彻底清除。
•请在截图中寻找解决⽅案(3)。
•收集4萤⽕⾍在现场。