Gesipa气动拉铆枪Taurus系列产品手册
北极工具-Ultra-Tow XTP系列自动锁定A框拖车耦合器说明书
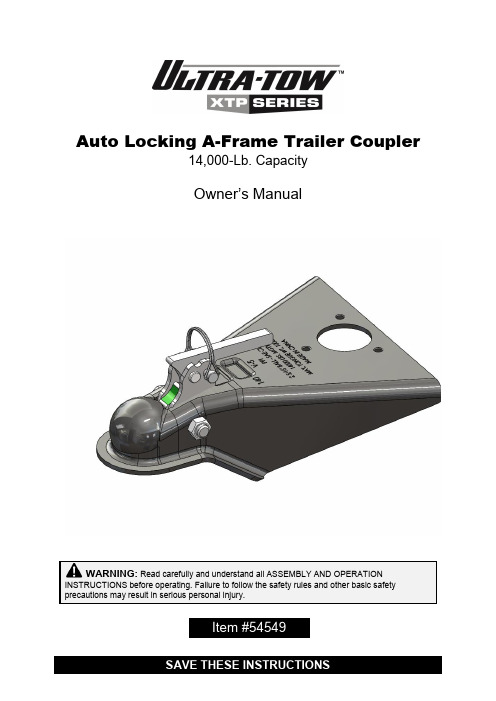
Auto Locking A-Frame Trailer Coupler14,000-Lb. CapacityOwner’s ManualWARNING: Read carefully and understand all ASSEMBLY AND OPERATION INSTRUCTIONS before operating. Failure to follow the safety rules and other basic safety precautions may result in serious personal injury.Item #54549Thank you very much for choosing an Ultra-Tow XTP Series™ product! For future reference, please complete the owner’s record below:Serial Number/Lot Date Code: ________________________________ Purchase Date: ____________________________________________ Save the receipt, warranty, and this manual. It is important that you read the entire manual to become familiar with this product before you begin using it.This coupler is designed for certain applications only. Northern Tool and Equipment is not responsible for issues arising from modification or improper use of this product such as an application for which it was not designed. We strongly recommend that this product not be modifiedand/or used for any application other than that for which it was designed. For technical questions, please call 1-800-222-5381.Intended Use (4)Technical Specifications (4)Important Safety Information (4)Specific Operation Warnings (5)Towing (6)Installation Instructions (6)Before Each Use (6)Operating Instructions (7)After Each Use (9)Maintenance (9)Troubleshooting (10)Parts Diagram (11)Parts List (12)Replacement Parts (12)Limited Warranty (13)The Ultra-Tow XTP Series Auto Locking A-Frame Trailer Coupler features an auto-locking system with a steel lock assembly. The secondary lock has a safety clip with a hole designed to fit an off-the-shelf padlock without an adaptor. This coupler can be used with any 2 5/16" ball having a capacity rating equal to or higher than the coupler.Weld LocationsWeld the coupler to the front of the trailer tongue. Care must be taken to get good penetration without undercutting the coupler or the tongue. See the illustration below for weld locations.Auto Lock FunctionSecondary LockPrimary LockSafety ClipUnlocked PositionThe illustration shown is in the unlocked position. When the Primary Lock shows no green, the coupler is open.Hitching Up1. Before hitching up, inspect for proper operation and for worn, damaged, or missing parts.2. Unlock the coupler by removing the Safety Clip and insuring that the Primary Lock shows no green, indicating the coupler is open.3. Back the vehicle up to the trailer until 2 5/16" of the ball is located under the coupler (shown above).4. As you lower the coupler onto the ball, the Primary Lock andSecondary Lock will end up in the locked position, as shown.Green means LOCKEDLocked PositionThe illustration shown to the right is in the locked position,with the Safety Clip installed. Be sure the lock assembly is in theunlock position before hook-up.Un-Hitching1. Unlock by removing the Safety Clip. Top Hole Secondary Lock2. Flip the Secondary Lock forward until it is pointing up.Hold this while raising the jack.3. If both hands are needed, the Secondary Lock can beheld by inserting the Safety Clip in the Top Hole whileraising the jack.4. Jack up the coupler until it clears the hitch ball and pull out the Safety Clip. The coupler is now back to the unlock position, as shown in the first illustration.Maintain the coupler hitch by adopting a program of conscientious repair and maintenance in accordance with the following recommended procedures. It is recommended that the general condition of any tool be examined before it is used. Keep your tool in good repair. Keep handles dry, clean, and free from oil and grease. The following chart is based on a normal operation schedule.Use the table below to troubleshoot problems before contacting service personnel or your local dealer. If the problem continues after troubleshooting, call your local dealer for assistance.∙For replacement parts and technical questions, please call Customer Service at 1-800-222-5381. ∙Not all product components are available for replacement. The illustrations provided are a convenient reference to the location and position of parts in the assembly sequence.∙When ordering parts, the following information will be required: item description, item model number, item serial number/item lot date code, and the replacement part reference number.∙The distributor reserves the rights to make design changes and improvements to product lines and manuals without notice.Northern Tool and Equipment Company, Inc. ("We'' or "Us'') warrants to the original purchaser only ("You'' or "Your") that the Ultra-Tow product purchased will be free from material defects in both materials and workmanship, normal wear and tear excepted, for a period of three years from date of purchase. The foregoing warranty is valid only if the installation and use of the product is strictly in accordance with product instructions. There are no other warranties, express or implied, including the warranty of merchantability or fitness for a particular purpose. If the product does not comply with this limited warranty, Your sole and exclusive remedy is that We will, at our sole option and within a commercially reasonable time, either replace the product or product component without charge to You or refund the purchase price (less shipping). This limited warranty is not transferable.Limitations on the WarrantyThis limited warranty does not cover: (a) normal wear and tear; (b) damage through abuse, neglect, misuse, or as a result of any accident or in any other manner; (c) damage from misapplication, overloading, or improper installation; (d) improper maintenance and repair; and (e) product alteration in any manner by anyone other than Us, with the sole exception of alterations made pursuant to product instructions and in a workmanlike manner.Obligations of PurchaserYou must retain Your product purchase receipt to verify date of purchase and that You are the original purchaser. To make a warranty claim, contact Us at 1-800-222-5381, identify the product by make and model number, and follow the claim instructions that will be provided. The product and the purchase receipt must be provided to Us in order to process Your warranty claim. Any returned product that is replaced or refunded by Us becomes our property. You will be responsible for return shipping costs or costs related to Your return visit to a retail store.Remedy LimitsProduct replacement or a refund of the purchase price is Your sole remedy under this limited warranty or any other warranty related to the product. We shall not be liable for: service or labor charges or damage to Your property incurred in removing or replacing the product; any damages, including, without limitation, damages to tangible personal property or personal injury, related to Your improper use, installation, or maintenance of the product or product component; or any indirect, incidental or consequential damages of any kind for any reason.Assumption of RiskYou acknowledge and agree that any use of the product for any purpose other than the specifieduse(s) stated in the product instructions is at Your own risk.Governing LawThis limited warranty gives You specific legal rights, and You also may have other rights which vary from state to state. Some states do not allow limitations or exclusions on implied warranties or incidental or consequential damages, so the above limitations may not apply to You. This limited warranty is governed by the laws of the State of Minnesota, without regard to rules pertaining to conflicts of law. The state courts located in Dakota County, Minnesota shall have exclusive jurisdiction for any disputes relating to this warranty.Distributed by:Northern Tool & Equipment Company, Inc.Burnsville, Minnesota 55306Made in China。
GE ADTS 530 气动测试设备说明书

GESensingADTS 530ADTS 530 is a Druck product.Druck has joined other GE high–technology sensing businesses under a newname—GE Industrial, Sensing.gFeatures•Low cost RVSM compliant tester •Integral electric pumps •Programmable safety limits •Leak test mode•Menu driven operation interface •12 month recalibration periodThe ADTS 530 is a compact and portable air data test set ideal for flightline use. This rugged solid state instrument features vibrating element transducer technology,providing high performance with a 12 month recalibration interval.Druck Air Data Test SetHoused in a fiberglass case, the ADTS 530 contains all essential elements required of a rugged pitot static tester:high accuracy sensors, microprocessor drivenelectronics, clear LCD readout, operator driven valving for parameter setting and an efficient electric pressure/vacuum pump system.The simplified LCD readout provides both parameter displays and menu driven operator instructions forsetting up protective limits. Altitudes/airspeeds are simply generated by hand-controlled fine adjustment valves,with internal electric pumps capable of altitudes <55,000 ft (<16,764 m), rates of climb <6,000ft/min(<1828 m/min), airspeeds <650 knots, for a wide range of aircraft types.The ADTS 530 is AC powered, operated from most single-phase national supplies and aircraft power. Itenables accurate, efficient testing without compromising rigorous flightline safety standards./Druck-GE-Sensing-ADTS-530-Air-Data-Test-Set.aspxTo buy, sell, rent or trade-in this product please click on the link below:GeneralScaling Factors •Altitude: ft, meters •Airspeed: knots, km/Hr•Mach Rate of Climb: ft/min, m/min •Others: mbar, inHg, psigLeak Rate TestingDisplayed in ft/min/min and kts/min and km/hr/min Overpressure•Negligible calibration change with up to 2 x full scale (FS) overpressure applied.•Compliant with 97/23/EC (category SEP).Temperature Range•Calibrated: 32°F to 122°F (0°C to 50°C)•Operational: 32°F to 122°F (0°C to 50°C)•Storage: -4°F to 158°F (-20°C to 70°C)Conformity•EN61010 for electrical and mechanical safety •EMC Specification EN 61326-1. CE marked•89/336/EEC as amended by 92/31/EEC and 93/68/EEC Power Supply•115 V to 230 VAC •47 to 400 HzPhysical•Case Dimensions (w x h x d) 9.7 in x 15.4 in x 14.9 in (248 mm x 391 mm x 378 mm)•Weight 35 lb (16 kg) nominalCaseRugged fiberglass with removable lid and storage for accessories.Pneumatic Connections Ps and Pt _AN4 MaleADTS 530SpecificationsPneumatic SuppliesInternal pressure/vacuum pump to 55,000 ft/650 kts (16764 m/650 kts @ 6000 ft/min (1828.8 m/min)AccessoriesPitot static hoses 25 ft (8 m) long with AN4 mating fitting to one end. Universal probe adaptor for Ps and Pt, AC power cable. Operators manual and calibration certificate also supplied as standard.Calibration StandardsInstruments manufactured by GE are calibrated against precision equipment traceable to International Standards.Ordering InformationPlease state the following:1) Model type ADTS 530Parameter Operating Range Resolution Accuracy Repeatability Altitude -15,000 ft to 1 ft±3 ft (±0.91 m)±2 ft 55,000 ft (0.30 m)@ sea level (±0.60 m)(-4572 m to ±7 ft (±2.13 m)±2 ft 16764 m)@ 29,000 ft (±0.60 m)(8840 m)±9 ft ±19 ft (±5.79 m)(±2.74 m)@ 50,000 ft (15,240 m)Static 1.30 to 0.00014 psi ±0.0014 psi 0.00072 psi Sensor18.70 psia (0.01 mbar)(±0.1 mbar)(0.05 mbar)(90 to0.001 inHg ±0.003 inHg 0.0015 inHg 1290 mbar)(2.7 to 38 inHg)Airspeed 20 to 650 kts 0.1 kts ±1.0 kts @ 50±0.5 kts ±0.3 kts @ 200±0.15 kts ±0.1 kts @ 500±0.1 ktsPitot 1.30 psi to ±0.00014 psi ±0.0029 psi ±0.00072 psi Sensor37.70 psi (±0.01 mbar)(±0.2 mbar)rising to (90 mbar to 0.001 inHg±0.007 inHg0.0021 psi 2600 mbar)(±0.05 mbar (2.7 to 77 inHg)rising to 0.15 mbar)±0.015 inHg rising to ±0.005 inHg Timed 100 to1 ft/min ±1% of value±0.5% of valueRate of 20000 ft/min (0.30 m/min)Climb (30.48 to 6096 m/min)Mach 0.1 to 4.670.001*********±0.001falling to *********Engine 1 to 50.001RSS of Ps ±1 countPressure andPt sensor Ratio accuracy(E.P.R)g©2006 GE. All rights reserved.920-299BAll specifications are subject to change for product improvement without notice.GE ®is a registered trademark of General Electric Co. Other company or product names mentioned in this document may be trademarks or registered trademarks of their respective companies, which are not affiliated with GE.GESensing。
ESCO Pro Series 气体盔腿 气力搬运设备 说明书
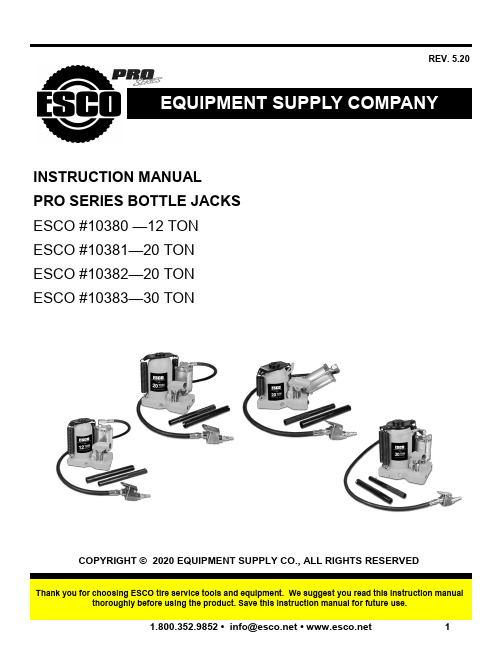
REV. 5.20COPYRIGHT © 2020 EQUIPMENT SUPPLY CO., ALL RIGHTS RESERVEDThank you for choosing ESCO tire service tools and equipment. We suggest you read this instruction manualthoroughly before using the product. Save this instruction manual for future use.INSTRUCTION MANUALPRO SERIES BOTTLE JACKS ESCO #10380 —12 TON ESCO #10381—20 TON ESCO #10382—20 TON ESCO #10383—30 TONTABLE OF CONTENTS• Introduction (2)• Specifications (2)• General Safety Rules (3)• Operating Instructions (4)• Troubleshooting (5)• Parts Breakdown .................................................................................................. 6-9• Model Number 10380. (6)• Model Number 10381 (7)• Model Number 10382 (8)• Model Number 10383 (9)• Parts and Repair Service (10)• Warranty (11)The ESCO Pro Series Air Hydraulic Lifting Equipment is designed with the heavy duty tire service market in mind. With lifting capacities from 12 Ton and up to 30 Tons, There is a Jack that will fit any service technician’s needs. Each jack is designed uniquely for specific application including: Commercial truck, Bus, Tractor & Farm Equipment, and much more.• Use a qualified person to maintain the jack in good condition. Keep it clean for best and safest perfor-mance.• DO NOT exceed this rated capacity.• Use this jack for lifting purpose only. DO NOT use it for any other purpose it is not designed to per-form.• Keep children and unauthorized persons away from the work area.• Remove ill fitting clothing. Remove ties, watches, rings and other loose jewelry, and contain long hair.• Wear ANSI approved safety goggles when operating the jack.• Keep proper balance and footing, do not overreach and wear nonslip footwear.• Only use this jack on a surface that is stable, level, dry and not slippery, and capable of sustaining the load.• Keep the surface clean, tidy and free from unrelated materials and ensure that there is adequate lighting.• When lifting a vehicle, apply the emergency brake and block all wheels.• Immediately after lifting, support the load with appropriate supporting equipment such as jack stands of adequate capacity! DO NOT work under a load which is supported only by a jack.• Before lowering load ensure that there are no obstructions underneath and that all persons are stand-ing clear.• DO NOT attempt to move the load while on the jack. The jack must only be used in a static position for lifting and lowering loads. Ensure that the load remains stable at all times.• DO NOT use the jack if damaged, any suspect parts are noted or it has been subjected to a shock load.• DO NOT operate the jack when you are tired or under the influence of alcohol, drugs or any intoxicat-ing medication.• DO NOT allow untrained persons to operate the jack.DO NOT make any modifications to the jack.• DO NOT use brake fluid or any other improper fluid and avoid mixing different types of oil when add-ing hydraulic oil. Only a good quality hydraulic jack oil can be used.• DO NOT expose the jack to rain or any other kind of bad weather.• If the jack need repairing and/or there are any parts that need to be replaced, have it repaired by au-thorized technicians and only use the replacement parts supplied by the manufacturer.• WARNING: the warnings, cautions and instructions discussed in this instruction manual cannot cover all possible conditions and situations that may occur. It must be understood by the operator that com-mon sense and caution are factors which cannot be built into this product, but must be supplied by the operator.• Always visually inspect the product before use for damage. Do not use product if damaged, altered, or in poor condition. Contact our technical service department with any questions or product issues by calling 800-352-9852.•Before first use of this product, pour a teaspoon of good quality air tool lubricant into the hose quick coupler -male of the air quick coupler -female, then connect it to air source and turn on the air valve and work for 3 seconds to evenly distribute lubricant.•Use the slotted end of the handle to turn the release valve(17) clockwise until it is firmly closed.•Apply the emergency brake and use wheel chocks to block all wheels to prevent any movement of the vehicle being lifted.•Place the jack into position and adjust the extension screw on part(7) as needed.NOTE: Check in your vehicle owner's manual for the location of recommended lift point.•Connect the air quick coupler -male into the shop air supply hose quick coupler -female, then turn on the air valve.•Raise the load to desired height, turn off the air valve and immediately USE JACK STANDS with adequate capacity to support the load.•When air source is not available, insert the big end of the handle into the handle bracket, pump it manually to raise the load to desired height. Then immediately transfer the load to appropriate support devices such as jack stands.WARNING! Be sure all tools and personnel are clear before lowering load.•When work is done, raise load enough to carefully remove the jack stands. Then SLOWLY and CAREFULLY lower the load by turning the release valve counter-clockwise (use the slotted end of the handle) in extremely small increments, then lower the extension screw by turning it clockwise as needed and remove the jack.WARNING! Dangerous dynamic shock loads are created by quick open-ing and closing the release valve when the load is being lowered. The re-sulting overload may cause hydraulic system failure which could cause severe personal injury and/or property damage.WARNING! Ensure that you read, understand and apply the safety in-structions and warnings before use.WARNING! Ensure that you have familiarized yourself thoroughly with the product and the hazards associated with its improper use.• Clean the outside of the jack with dry, clean and soft cloth and periodically lubricate the joints, extension screw and all moving parts with a light oil as needed.• When not in use, store the jack in a dry location with ram and extension screw fully lowered.• Purge the hydraulic system to eliminate any air in the system if jack efficiency drops or jack doesn’t work: A. If manual operation performs poorly, use the slotted end of the handle to turn the release valve 1-1/2 turns counterclockwise and remove the oil filler plug by gently pulling, in-sert the handle into the handle bracket and pump it 10 to 15 times, then replace the filler plug. B.If air operation performs poorly, connect the air inlet fitting to air source, use the slotted end of the handle to turn the release valve 1-1/2 turns counterclockwise and remove the oil filler plug by gently pulling, turn on the air valve to let the pump work for one minute, then replace the filler plug.• Check the hydraulic oil: place the jack in an upright position, completely lower the ram and re-move the filler plug, if it is not adequate, fill with high quality hydraulic jack oil to the lower rim of the fill hole, purge away air from the hydraulic system, top off with more hydraulic oil, then re-place the filler plug.• For best performance and longest life, replace the complete jack oil at least once per year: With the ram fully lowered, remove the oil filler plug, lay the jack on its side and drain the oil into a suitable container, then fill with high quality hydraulic jack oil, reinstall the filler plug.• NOTE: Dispose of hydraulic oil in accordance with local regulations.• It is recommended that an annual inspection be done by qualified technicians.FOR MODEL 10380:FOR MODEL 10381:FOR MODEL 10382:FOR MODEL 10383:• ESCO will pick up product for repair/warranty at your loca-tion.• ESCO will guarantee Repair/Service for 30 days. • ESCO has rental tools available• ESCO repairs IMT, FEC, Stellar, Blackhawk, OTC, PowerTeam, Ame Int., & Enerpac hydraulic pumps, bead breaker, and cylinders.• Authorized ESCO Repair & Warranty Centers Locatedthrough the US & Canada. For more information contact your ESCO sales representative.• Technical Support Over the Phone Available by Calling 1-800-352-9852GUARANTEED 1-Day Turnaround Service.Received by ESCO - Repaired in 24 Hours - Returned to you!Prompt, reliable service after the sale is very important to ESCO. ESCO maintains an in -house repair facility in Brooksville, Florida. To insure that our customers have as little down -time as possible, we offer a 1 day turna-round service. Our factory repair service is equipped with all the tools and machinery needed to repair your equipment quickly and affordably. Our trained technicians are the best in the industry. Not only do we service our own products, but we also service our competitors ’ products.In addition to ESCO ’s 30 years of providing quality repair service, ESCO has reached out and partnered with more than 50+ hydraulic repair facilities across the US & Canada, to deliver quality repair and timely return of products. Visit or call 1.800.352.9852 to hear more about the newly added “Authorized ESCO Warranty & Repair Facilities ” across the US.If you have a bead breaker, ram, or hydraulic pump that needs repair, ESCO fixes your product with factory parts and guarantees the repair. In addition to servicing ESCO brand products, we also re -pair CP, IMT, Elrick, Branick, Goodyear, FEC, AME Int., and Haltec lines of hydraulic bead breakers, rams, pumps, jacks, and many other hydraulic tire service equipment.Products sold by Equipment Supply Company (ESCO) are warranted to be free from de-fects in material and workmanship under proper use, application, and maintenance in ac-cordance with ESCO's written recommendations, instructions, and specifications for a pe-riod of 1 year (365 days) from the date of shipment to the end user, unless otherwise noted. ESCO's obligation under this warranty is limited to, and the sole remedy for any such de-fect shall be the repair or replacement (at ESCO's discretion) of unaltered parts returned to ESCO, freight prepaid, and proven to have such defect, provided such defect occurs within the 90-day warranty period (or otherwise noted) and is reported within 14 days of occur-rence.This is the only authorized ESCO warranty and is in lieu of all other express or implied war-ranties or representations, including any implied warranties of merchantability or fitness. Warranty claims must be submitted and be processed in accordance with ESCO's estab-lished warranty claim procedure. In no event will ESCO be liable for business interruptions,REV. 5.20COPYRIGHT © 2020 EQUIPMENT SUPPLY CO., ALL RIGHTS RESERVEDThank you for choosing ESCO tire service tools and equipment. We suggest you read this instruction manualthoroughly before using the product. Save this instruction manual for future use.-*************Stay Connected with ESCO ….。
亚特兰蒂斯·克彭高速紧固工具说明书
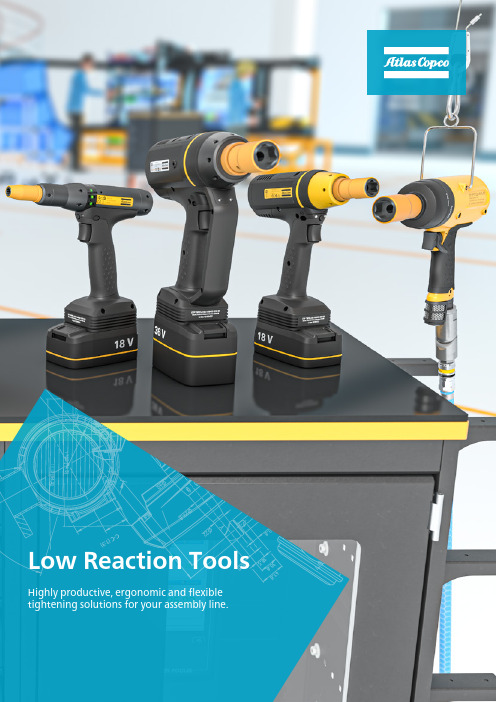
High-speed tightening – with low reaction toolsWhat is important in your tightening processes?Atlas Copco's low reaction tools close to eliminate the reaction force in assembly applications, delivering high-speed quality tightening while taking great care of the operator.Atlas Copco’s line-up of battery powered low reaction tools are designed to improve operator ergonomics. Not only will you increase productivity and optimize your factory up-time, you will also have less costs and time lost on operator injuries and fatigue.Choosing the right tool is the first – and most important – step towards a perfect operation. Regardless of which tool within our LRT range you choose, you will have a well balanced high quality tool. And choosing the right one will make the whole world of a difference.If you need a small and reliable workhorse that promises accuracy and speed, the pneumatic ErgoPulse PTI is an excellent solution.For maximum flexibility, high torque and the lowest vibration on the market – a cordless and powerful Atlas Copco TBP Pulse Tool is your choice.For reliable and accurate low reaction tightenings with lower torque, the cordless Tensor SRB offers an error-proof production.ErgoPulse PTI – your productive workhorseThe pneumatic, low weight ErgoPulse PTI is an excellent addition to the Atlas Copco LRT line-up. Increasing tool uptime with up to five times longer service intervals.With a durable and robust design the ErgoPulse PTI is faster and more accurate than ever and will improve the production quality and throughput. The ergonomic design of the tool takes care of your operators wellbeing, all while lowering the Total Cost of Ownership of your pulse tools. With fewer tool installations you can also enjoy lower set-up costs.The ErgoPulse PTI reduces the need formaintenance and is a proven and importantpart of this fleet. Our DuraPulse® technologymeans longer time between services with upto 5 x longer service intervals. With the rightstartup and maintenance you will have optimalperformance throughout the lifetime of the tool.With Torque Boost® the torque build-up is even faster, giving you reduced hoursper production unit. Quality is improved with a more robust and stable shut-offmechanism that increases accuracy and lowers the mean shift.Faster productionwith improved qualityQuality critical tightening and high productivity with the TBP-SThe all new cordless and slender TBP-S for one-handed operations, will ensure that your joint is tightened properly and trace the job done. Perfect for a reliable and quality critical tightening.With the same hardware as the TBP but with aslimmer software version suited for quality criticaltightenings, the TBP-S battery pulse tool is a robustyet slender solution for the middle segment. With amix of productivity, ergonomics and error-proofingthe TBP-S is proven to offer less maintenance andless down-time in production.Our DuraPulse® technology – also featured in theTBP – will ensure a robustness making the TBP-S areliable pulse tool that keeps on delivering.Low vibration and long service intervalsJust like the TBP, the TBP-S shows the lowestvibration levels in the market. This means operatorcomfort and safety, reducing work related costscaused by fatigue and injuries.The patented technology and design gives youlonger service intervals than with traditional pulsetools. With TorqueBoost®, the TBP-S has activecooling and advanced motor steering, so thetorque build up is fast and gives reduced hours perproduction unit.If you need morefunctionality in yourTBP-S you can easilyupgrade it to a fullyfunctional TBP withour upgrade kit.Future ProofSafety critical tightening and full traceability with the TBPSince launch, the TBP has been redefining what a low reaction pulse tool can do. Enjoy the benefits of a cordless tool for one-handed operations, enabling error-proof production.The Atlas Copco TBP is a reliable and powerful pulsetool, offering high torque tightening with very littlereaction. Giving you speed, accuracy, traceabilityand flexibility – with cordless freedom. With a TBPyou will have direct and accurate feedback of thejoint behavior.Anything is possible. Bring Error-Proofing to thenext level with our Barcode reader (EHMI) and alocation system like the ILT. Customize your toolwith accessories to fit your specific needs.Thanks to the patented technology and design,you will have longer service intervals than witha traditional pulse tools. Reduced oil leakage,separation of air and oil, and a cooler tool –meaning higher performance and uptime.Offering better protectionBV from injuries andincreasing the lifespan of your tools, results in hugesavings.Error-proof production with the cordless Tensor SRBThe Atlas Copco Tensor SRB delivers multipletightening technologies with accuracy, traceability, flexibility – and low reaction. It offers both traditional strategies like 2 steps and Quick Step, but also more advanced strategies such as TurboTight and TensorPulse. With a slim design it allows for easy access in cramped spaces.The Tensor SRB has low weight and great balance – with a slim design – ergonomically designed to prevent operator fatigue. New electronics and an improved motor will boost your productivity. Choose between 18v or 36v battery withoutcompromising the performance of speed or torque.Total Flexibility, Direct Drive, TurboTight™ and TensorPulseThe productive and cordless Tensor SRB will change the way you plan your assembly stations. Experience low reaction, one-handed operations with a strategy that fits your needs.DHD EEENTQSOORRLJJJKKKBBBBPFFCCAAGA B C D E F G H J K L NO PQ RSpacked with smart and innovative solutions. All to support our promise of delivering exactly the tool you need.A complete offerA flexible offer – Choose the functionality you needEach specific assembly has its own unique needs when it comes to functionalitylevel. With our flexible offer it is easy to find just the tool to get the job done, andfit it into your existing fleet. This, in combination with a common controller andvirtual stations, will lead to the best set up for your specific needs.Virtual stations: One controller – any toolIn a traditional assembly environment you willhave a vast range of reporting and non-reportingtools with different functionality, communicatingto a large number of controllers. Severalcontrollers, each controlling just the one tool.With Atlas Copco Virtual Stations you have onecontroller for multiple tools and reporting levels.Guided Rotaction socketsOur Rotaction concept promotes the increasing demands regarding operators safety and non-marking tools.The combination of free rotating sleeves and toolcovers for the connections "tool-to-socket" and socket covers for "extension-to-socket" improve operators safety significantly. This also eliminates user influence on the tightening.Thanks to extra stability from the elongated sleeve the socket delivers correct torque to the joint.Ergonomically this stability also protect operators from injury such as "white finger syndrome"Paired together we call it "Guided Rotaction".It protects your operators and maintains accuracy in your tightenings.Taking good care of your operators safety while maintaining joint accuracyBesides a wide range of standard products, customized solutions such as sockets, tool covers, multiples and much more can be realized with our team in Tierp, SwedenThe Rotaction range covers:¥Numerous sockets, bit sockets, bits and nut setters with freely rotating protection sleeves ¥Tool covers to bridge gaps between tool and socket ¥Socket covers to bridge gaps between extension and socket ¥Various extensions with rotating protection sleevesGuided socketWith Guided Rotaction the socket extends past the square drive A to give extra stability. The socket is held stable and eliminates wobbling thus maintaining force and improving operator comfort. This design is also found on our guided rotaction extensions.Rotaction covered socketsThe yellow sleeve B protects the user while the socket rotates on the inside. This provides a safer operation andminimized risk of scratches and marks on painted surfaces. It also eliminates any operator influence on the tightening. A tool cover C closes the gap between tool and socket protecting the operator from glove entanglement .BCAGuided Rotaction Sockets:¥Ergonomic¥Minimizes risk for injuries¥Eliminates user influence on the tightening ¥Gives extra stability ¥No scratching¥Delivers correct torque to the jointTake care of your investmentsEvery production line and industrial site is unique and has its own challenges. With that in mind, our service solutions are designed to help you get the most out of your industrial equipment. We combine analyses of production data with know-how and expertise in order to enhance your productivity and quality; while keeping you cost efficiency maintenance under control.Easystart – Right the First TimeNo two installations are the same. With Easystart it is easy to customize accordingto the customer needs per station. A trouble-free and efficient start of operationsfor your tightening system. Through a globally standardized and certified processfor every step, from programming to training, you will get it right the first time,saving time and money.ToolCover Maintenance Solutions help you optimize performance and gainefficiencies in your production while minimizing your tool costs and productionrisks. With a modular set of products, ToolCover is designed to meet your specificneeds and tool usage.Based on your needs, you can choose between Protect, Stability, Uptime.PreventiveMaintenanceOnce per tool and year Optimization based on historicproduction dataOptimization based on real-timeproduction dataKPI Monitoringand analysisYearly direct cost tracking Bi-annual direct and indirect costtracking per toolCustomized real-time monitoring andmonthly optimization analysis per tool Warranty Extended 3 month warranty aftermaintenanceFull contract lifetime warranty Full contract lifetime warrantyAtlas Copcoprofessional supportAnnual feedback meetings Bi-annual feedback andoptimization consultancyDedicated on-site Atlas Copco personnelRepairs Not included - but possible tocouple with RapidRepair contractYes - priority on workshop repairsand spare parts includedYes - included on-site supportRead more about our service offers at Take care of yourinvestmentsIncreasing valueIncreasing use ofproduction dataOptimize your tools –minimize your costsGuard your tools – maximizeyour productivityUptimeQualityCost eff.ModelBolt size mm Square drive in Torque range 1Free speed 2 r/min Weight Length mm CS dist mm Airconsumption under load Rec. hose size mm Air inlet thread in Ordering No.Nm ft lb kg lb l/s cfm High Pressure 3EP5PTI19 HR10-MT M63/88-196-1473000.9216823 6.51481/48431 0381 30 EP5PTI17 HR42-MT M61/4⁵7-175-1373000.9216823 6.51481/48431 0381 32EP6PTI32 HR10-MT M6-M83/816-3212-2390000.921682361381/48431 0381 40EP6PTI28 HR42-MT M6-M81/4⁵15-2811-2195000.921682361381/48431 0381 42EP7PTI55 HR10-MT M8-M103/830-5522-407000 1.2 2.517927919101/48431 0381 50EP8PTI70 HR10-MT M103/840-7029-517100 1.3 2.8179271021101/48431 0381 55EP9PTI80 HR13-MT M101/250-8037-595200 1.5 3.3191311328101/48431 0381 60EP11PTI100 HR13-MT M121/270-10052-744200 1.7 3.7201311430101/48431 0381 65EP13PTI150 HR13-MT M12-M141/285-15063-1105300 2.35201361532133/88431 0381 70Low pressure4EP5PTI15 HR10-MT-L M53/87-155-1169000.9216823 6.31381/48431 0382 30EP5PTI13 HR42-MT-L M4-M51/4⁵6-134-1069000.9216823 6.31381/48431 0382 32EP6PTI25 HR10-MT-L M63/813-259-1882000.921682361381/48431 0382 40EP6PTI25 HR42-MT-L M51/4⁵11-228-1682000.921682361381/48431 0382 42EP7PTI35 HR10-MT-L M63/823-3517-266200 1.2 2.517927615101/48431 0382 50EP8PTI45 HR10-MT-L M6-M83/833-4524-336300 1.3 2.817927817101/48431 0382 55EP9PTI65 HR13-MT-L M101/243-6532-484500 1.5 3.3191319.520101/48431 0382 60EP11PTI80 HR13-MT-L M10-M121/250-8037-593600 1.7 3.7201311328101/48431 0382 65EP13PTI110 HR13-MT-LM12-M141/263-11046-8140002.35201361634133/88431 0382 70Accessories Ordering No.Oil filling kit4250 3220 90Protective cover EP5/6PTI 4250 3209 00Protective cover EP7/8PTI 4250 3206 00Protective cover EP9PTI 4250 3216 00Protective cover EP11PTI 4250 3218 00Protective cover EP13PTI 4250 3214 00Quick Change Chuck4250 3218 00ErgoPulse PTIProtective cover is included for every tool1To be used as a guide only, final torque depends on type of joint, accessories used and air pressure.² In full speed mode³ Air pressure 6.3 bar / 91 psi ⁴ Air pressure 4 bar / 58 psi ⁵ Female Hexagon drive, Quick Change ChuckModelSquare Drive Guide Socket Torque range Nm ft lb ETP SRB31-25-103/8135-25 3.7-18.4ETP SRB31-25-I061/41135-25 3.7-18.4ETP SRB31-25-10-BD 3/8135-25 3.7-18.4ETP SRB31-25-I06-BD1/41135-25 3.7-18.4ETP SRB31-20-103/8125-20 3.7-14.75ETP SRB31-20-I061/41125-20 3.7-14.75ETP SRB31-20-10-BD 3/8125-20 3.7-14.75ETP SRB31-20-I06-BD 1/41125-20 3.7-14.75ETP TBP61-32-103/81312-358.9-25.8ETP TBP61-32-10-BD 3/81312-358.9-25.8ETP TBP61-32-421/411312-358.9-25.8ETP TBP61-32-42-BD 1/411312-358.9-25.8ETP TBP81-55-103/81320-5514.8-40.6ETP TBP81-55-10-BD 3/81320-5514.8-40.6ETP TBP91-80-131/21840-8029.5-59.0ETP TBP91-80-13-BD 1/21840-8029.5-59.0ETP TBP131-150-131/21855-15059-110ETP TBP131-150-13-BD 1/21855-15059-110ETP TBPS61-32-103/81312-359-26ETP TBPS61-32-421/411312-359-26ETP TBPS81-55-103/81320-5515-41ETP TBPS91-80-131/21830-8022-59ETP TBPS131-150-131/21855-15041-111ModelMax TorqueTensorPulse Nm ft lb Nm ETP SRB 31-20-102014.7516ETP SRB 31-25-102518.425Model Square Drive Input d mmLength mm Ordering No.Extension 1003/8251004027 1234 72Extension 1503/8251504027 1234 74Extension 2503/8252504027 1234 77Reference Code Square Drive Input d mmLength mm Ordering No.C223/8227.54027 1297 90C253/8257.54027 1297 91Model Length mm Square Drive Input d mmSocket Cover Ref.Ordering No.Socket 88503/822C224027 1292 08Socket 1010503/822C224027 1292 10Socket 1212503/822C224027 1292 12Socket 1313503/825C254027 1292 13Socket 1616503/825C254027 1292 16Socket 1717503/825C254027 1292 17ModelSquare Drive Guide socket Input d mm Length mmOrdering No.ETP TBP61-32-10ETP TBP61-32-10-BD ETP TBPS61-32-103/81322 & 259.54027 1297 30Batteries Ordering No.Ugrade kit TBP-S64211 5645 30Ugrade kit TBP-S84211 5645 31Ugrade kit TBP-S94211 5645 32Ugrade kit TBP-S134211 5645 33AccessoriesOrdering No.Protective cover TBP6 & TBP84250 3135 60Protective cover TBP94250 3135 62Protective cover TBP134250 3135 63SRB/TBP Tool Holder 4220 3584 86 Protective cover SRB 4220 2744 07 AccessoriesFoot protective cover Protective cover 18V Protective cover 36V STB Battery Charger Adapter4211 6083 87Tensor SRB Torque RangesLow Reaction Battery ToolsGuided Rotaction Extensions 13 Socket covers, Rotaction Guided Rotaction Sockets 13 Tool cover for Guided Rotaction Sockets TBP-S Upgrade kit Accessories 25 mm22 mmLdTool covers, Guided Rotaction sockets and others that aren't listed here can be special requested from our Competence Center Sockets & Bits1 0 9 0 123 3 8 9。
气动单铆钉枪+安装操作维护手册+中文

不要使用可能超过 200 p.s.i.g. 的气源,因 为工具可能爆裂并造成伤害。
! 警告
不要在其他铆钉上打铆钉。
! 警告
始终使用带钢制导块的工具。
! 警告
严禁以导致带扣指向工作区中的用户和他人 的方式使用此工具。
—9—
气动单铆钉枪
一般安全守则
! 警告
不要将此工具当做锤子使用。
! 注意
始终拿工具的把手位置。严禁拿工具的空气 软管。
气动单铆钉枪
订购编号:pneudrive1 安全、操作和维护手册
警告
如果未能正确使用本工具,可能会造成严重的人身伤害! 本手册包含重要的产品功能与安全 信息。在操作本工具之前,务必认真阅读并理解本手册内容。应确保本工具的其他用户和所 有者可以随时翻阅本手册。请将此手册存放于安全的地方。
工具规格
公制螺钉和螺母
工具空气接头
工具使用一个 3/8" N.P.T.外螺纹插头。气流直径应为 .275" (7 mm) 或更大。从气源断开时,接头必须能够 排放工具气压。
工作压力
45 至 95 p.s.i./3-6.5 巴 选择此范围中的工作压力以获得最佳紧固性能。 不要超过推荐的工作压力。
空气消耗
—3—
气动单铆钉枪
系统部件
Pneudrive 1
气动单铆钉枪
O 型环
带垫圈的铆钉
护目镜 —4—
气动单铆钉枪
系统部件
Pneudrive 1(标准设备)
调节器组件 1. 气压旋钮 2. 流量旋钮 3. Parker 编号 24-5 BP 接头
3/8":Push-lok 软管 4. 注油器 5. 过滤器 6. Parker 编号 H2E 3/8" 外
GunVault MV550-19和MV1050-19微型枪匣说明书

MicroVaultMV550-19 MicroVault XLMV1050-19FASTER. SAFE. TOUGH.3Product Features(For MicroVault and MicroVault XL)Always hold the battery connection cap while disconnecting or attaching a new battery. Do not pull on the power cables as this could cause the power supply to become disconnected from the lock. STEP 1 - Open the unit using the backup keys provided. STEP 2 - Locate the battery compartment in the interiorpanel. Connect the recommended 9V alkaline battery following the Positive (+) and Negative (-) guides on the connecting cap.STEP 3 - When the battery is connected you will hear a single beep signaling that the unit is powered.STEP 4 - After you have connected the battery to the cable, place the battery into the compartment and secure the cover.*GunVault recommends the use of either a Duracell or Energizer 9V alkaline battery with an expiration date of 5 years into the future.Battery InstallationSTEP 1 - Open the unit by using provided backup keys or factory default code. The factory default code is a single sequential press of each button moving from the left to right.STEP 2 - Locate the Learn button on the interior panel of the unit.STEP 3 - Press and hold the Learn button. A beep will sound and the keypad back lighting will turn green and remain illuminated. This will indicate the enrollment procedure has been initiated.STEP 4 - The keypad back lighting will remain activated as you enter a new access code. The code can be a minimum of three entries or maximum of six entries. STEP 5 - Press and hold the Learn button a second time. A beep will sound , and the keypad backlighting will turn red and remain illuminated.STEP 6 - Enter your new access code a second time. During this step , the red keypad back lighting will remain illuminated.STEP 7 - Press the Learn button a third time. The keypad back lighting will flash green and the unit will beep six times confirming that the new code has been accepted. If the keypad back lighting illuminates in red and the unit beeps six times, an error has occurred and you will need to repeat steps 3-7.STEP 8 -Test your access code to confirm that your unit has been properly programed.STEP 9 - Your safe is now ready for use.ProgrammingAn access code is a series of entries on the keypad. An entry is a single press of one or more buttons at the same time. Leave the unit door open while you program your safe.Backup Keys High-Strength Steel Security Cable Battery Compartment Learn Button Mute Button Elastic Strap(MV1050-19 Only)Keyport Backlit Keypad12345678354168724STEP 1 - Open the unit by using either your backup keys or current access code and locate the Learn button, which can be found on the interior panel of the unit.STEP 2 - Use steps 3-7 in the Programming section to change your current combination.STEP 3 - Now you have successfully reprogrammed your safe. Test your access code to confirm that your unit has been properly programmed.STEP 4 - Your safe is now ready for use.Safety FeaturesEntering an invalid access code triggers the Tamper Detect Feature.STEP 1 - Press and hold down buttons 2 and 3 for five seconds to initiate the tamper detect indicator.STEP 2 - If tampering has been detected, the indicatorlight will remain red until buttons 2 and 3 are released.STEP 3 - If tampering was not detected, the indicator light will remain green until buttons 2 and 3 are released.Tamper DetectionThis feature turns audio for unit on and off.STEP 1 - Open the unit and locate the Mute button on the interior panel of the unit.STEP 2 - Press and hold the Mute button for three seconds. The keypad back lighting will remain red while the mute button is held down. Once the keypad back lighting flashes green and the unit beeps three times , you should release the button.STEP 3 - Now you have successfully activated/deactivat-ed the mute feature.Audio ControlHigh-strength steel security cable. It should only be used to securely tether the product around a sturdy object.STEP 1 - Loop the cable around a sturdy object.STEP 2 - Find the end of the cable with the metal tip and run it through the eye of the other end and pull tight around the sturdy object.STEP 3 - Place the metal end of the security cable through the fitted slot on the top left side of the unit and close the lid to secure the cable.Security CableSTEP 1 - Open the unit by using either your backup keysor current access code.STEP 2 - Once opened, locate the metal slot on both sides of the interior roof of the unit.STEP 3 - Take the metal portion of the elastic strap and insert into metal slot on either side.STEP 4 - Repeat previous step to install on other side.STEP 5 - Now you have installed your elastic strap.Installing Elastic StrapSTEP 1 - When you enter the correct combination and the battery is low , the keypad back lighting will flash red and beep six times. Depending on how low the battery is , the unit may sound when releasing the lock. If the battery is completely depleted you will only hear a light humming sound.STEP 2 - Replace your battery by using steps in section labeled “Battery Installation”.*The low battery indicator only operates when you are in the process of opening your unit.Low Battery Warning Indicator•After six incorrect entries , the Security Sleep Mode feature will be triggered and will lockout any new keypad entries for two minutes. When Security Sleep Mode is active and a button is pressed , the keypad back lighting flashes red and the unit will beep three times.• To verify that the Security Sleep Mode is deactiva-ted , wait two minutes and then test your unit by slowly typing in your combination. If the keypad back lighting flashes green , your combination has been accepted and the unit will open. If the keypad back lightingflashes red , your combination is incorrect and you will need to try again. If you have forgotten or lost your combination , please follow the instructions on Programming. Your backup key will be required if reprogramming is needed.Security Sleep ModeResetting PasscodeMicroVault XL Unit Only5Assembly and Maintenance:•••••••Never store a loaded firearm in this unit.Always handle firearms as if they are loaded and ready to fire.Never grab your firearm by the trigger when removing or placing into safe.Always keep your firearm safety mechanism on while stored inside the safe.Never drink alcohol or use drugs while operating this safe or any firearm.Always follow the firearm safety rules set out by the firearm’s manufacturer.The manufacturer of this product does not recommend, suggest, advise, promote or otherwise condone the ownership or use of firearms. We at GunVault believe the decision to own or use a firearm is a serious decision that should only be made by an adult who has carefully considered the risks and benefits of such a decision.••••Important notes about your new GunVault productBackup Keys:Do not store backup keys inside of safe.Keep a record of your key number and serial number in a secure place separate from your safe.The backup key is for emergency use only in the event of forgotten passcode or battery failure.For Key Replacement visit the /product/key-replacement to complete the online keyreplacement form. In order to receive a replacement key , you will need to know the key number associated with your unit. You can find this information on the unit engraved on the keyport.Do not try to remove the key while in the turned position. This may cause damage to the unit or key.•••••Do not mount any GunVault product with the door facing down. The contents may fall out when the door is opened. Always hold the battery connection cap while disconnecting or attaching a new battery. Do not pull on the power cables as this could cause the power supply to become disconnected from the lock.Replace the batteries once a year regardless of whether or not the low battery indication is triggered.GunVault highly recommends the use of either a Duracell or Energizer 9V alkaline battery with an expiration date of 5 years in the future.You can register for battery reminder texts by visiting /battery-reminder-signupGunVault recommends that you lightly coat the door hinge spring and door latch-loop with quality oil at least once a year.Never spray anything into the latch mechanism as it can cause damage to the safe.Customer Service:GunVault products delivered without a pre-arranged Return Authorization number may be returned to sender unopened, at owner expense. Fees may accrue.WARNING : To avoid danger of suffocation, keep the plastic bag your safe arrived in away from babies and children. Do not use the bag in cribs, beds, carriages or play pens. The bag is not a toy and should be disposed of immediately upon removal. Contact your local waste management service for proper disposal or recycling of the plastic bag and other original packaging materials.WARNING : Keep you safe locked and closed at all times when not in use.WARNING: After closing the lid, always confirm it has properly latched in place.WARNING : Keep backup keys and access code combinations in a secure place away from children.WARNING : Keep high-strength steel security cable in a secure place away from children.WARNING : Children should not play with or around safe at any time.WARNING : This safe or any other firearm storage device cannot take the place of other safety procedures, including advising children of the dangers of firearms.WARNING : To enjoy maximum security benefits of this safe, it must be mounted in place.WARNING : This product can expose you to chemicals including Di (2-ethylhexyl) phthalate (DEHP) which is known to the State of California to cause cancer and birth defects or other reproductive harm. For more information go to Firearm Safety and your GunVault productGunVault recommends that you obtain as much information as possible on firearm safety.••••6Please visit for Replacement Promise details*1.GunVault (the “Company”) warrants to the original consumer (the “Purchaser”) of any GunVault safe (the “GunVault safe”) purchased after January 1, 2014 against any damage caused by fire, burglary or attempted burglary for a period of five (5) years from the date of purchase.2.The Company warrants to the purchaser that the GunVault safe will be free from defects in workmanship and materials for a period of one (1) year from the date of purchase.3. These warranties are not assignable or transferable to any other person.4. Any damage to the GunVault safe as a result of misuse, tampering, abuse, neglect, accident, improper installation, modification, unauthorized service, destruction, or the alteration of the serial number, or use in violation of the instructions furnished by the Company will void this warranty.5.The sole responsibility of the Company shall be limited to the repair or replacement (in its sole discretion) of any component of the GunVault safe which fails to conform to this warranty at no cost to the purchaser for the period of the warranty.6.Contact the Company directly to obtain service under this warranty. If it becomes applicable to send a defective product to the Company, a Return Authorization Number must first be obtained from the company. In order to obtain service under this warranty, purchaser must provide the Company with the following items (a) proof of purchase, (b) police or fire department report, (c) photographs of damaged safe, and (d) written testimonial.7.Products shipped without prior Return Authorization and Return Authorization Number may not be accepted, and the Company will not be responsible for their disposition and/or cost of return to the owner.8.The Company will not assume any responsibility for any loss or damage incurred in shipping. All return authorized products should include a copy of the original invoice in order for this warranty to be honored.9.This warranty is not an insurance policy. The Company is not responsible for any manner of damage to or theft of the Purchaser’s GunVault safe or its contents.10.We recommend that the warranty registration be completed online in order to validate this warranty.11. Any implied warranties that the purchaser may have are limited to the duration of the warranties described above. There are no further warranties that extend or apply beyond the face hereof, and the company expressly disclaims and excludes any and all warranties of merchant ability or fitness for a particular purpose. Some states do not allow limitations on how long an implied warranty lasts, so the above limitation may not apply to you.12. Repair or replacement shall be the sole remedy for the purchaser under this warranty. The company shall not be liable for any direct, indirect, incidental or consequential damages, losses or expense arising from the use or misuse of the GunVault safe. Some states do not allow the exclusion or limitations of incidental or consequential damages, so the limitation may not apply to you.13. This warranty gives you specific legal rights and you may also have other rights which vary from state to state.14. This warranty is only valid in the United States. If outside of the U.S., we encourage you to contact your point of purchase for further warranty help.GunVault Exclusive 5 Year WarrantyGUNVAULT PRODUCTTo submit your warranty registrationor call our Customer Service Department at (800) 222 - 1055.For key replacement visit the /product/key-replacement to complete the online key replacement form. In order to receive a replacement key you will need to know the key number associated with your unit. You can find this information on the unit engraved on the keyport.© 2019 ALPHA GUARDIANHenderson, NV 89014• Digital Safes • Biometric SafesSAFES• Security Cable • Mag VaultACCESSORIES• Download-able Manuals • How-to Video Tutorials • Warranty Registration• Frequently Asked Questions • And MOREVITAL INFORMATIONSafes, Acces s ories and MoreLoving your new GunVault safe and wanting to purchase more?Check out our website for special promotions, product information and more.。
阿特拉斯装配工具

无论您从事何种行业, 我们都能为您带来增值
作为全球技术领先企业,阿特拉斯·科普柯为全世界制造行业提供 真正的解决之道。在我们现有的产品系列内,您可以找到应用了未 来技术的高科技工具、装配系统和工艺软件。从应用于工程机械车 辆装配的大螺栓紧固技术,到应用于电子工业微小紧固件的“微 扭”工具。阿特拉斯·科普柯都能提供您所需的解决方案,使您保 持行业领先。
您的需要我们会用心聆听
对我们而言,倾听至关重要。无论是制 造车辆、飞机、仪器设备或电子产品, 您所提供的及时反馈能让我们深入了解 您所从事的行业以及您在保持竞争力方 面所面临的挑战。我们的答复?答复将 是一系列持续不断的革新,助您提高生 产效率。
我们领先,别人追赶
阿特拉斯·科普柯在高科技、便于操作 人员使用的工具以及为工具提供辅助的 先进工艺控制和质量保证软件方面世界 领先。我不断地推出创新的新产品。
本目录中给出的数值为测长度32808ft04536kg22046lb扭矩98067nmftlb13558nm扭矩01130nm01020kpm07376ftlb压力100kpa980665kpa68948kpa00101972kpcm101972kpms13410hp流量21189cfm气动装配工具内容页数介绍12螺丝刀14手枪式20弯头式22冲击扳手25手枪式28油压脉冲拧紧扳手30ergopulse手枪式35带监测功能的脉冲拧紧扳手39pulsor40拧紧扳手42弯头式58手枪式6312气动装配工具冲击扳手lms冲击扳手拥有其他工具难以匹敌的速度和功率重量比特性这使得它成为诸如拆卸操作时的理想之选
2
精益生产
在汽车和其它行业,我们的高性能手持 式及固定式装配工具以及广博的技术知 识对精益生产作出了重要贡献。在西 方,每三部轿车中就有一部是采用我们 卓越的紧固解决方案制造的。
004拉铆枪安全操作规程技术交底

拉铆枪安全操作规程技术交底1、使用拉铆枪时应符合下列要求:⑴被铆接物体上的铆钉孔应与铆钉滑配合,并不得过盈量太大。
⑵铆接时,当铆钉轴未拉断时,可重复扣动扳机,直到拉断为止,不得强行扭断或撬断。
⑶作业中,接铆头子或并帽若有松动,应立即拧紧。
2、作业前的检查应符合下列要求:⑴外壳、手柄不出现裂缝、破损;⑵电缆软线及插头等完好无损,开关动作正常。
保护接零连接正确、牢固可靠;⑶各部防护罩齐全牢固,电气保护装置可靠。
3、严禁超载使用。
作业中应注意音响及温升,发现异常应立即停机检查,在作业时间过长,机具温升超过60℃时,应停机,自然冷却后再行作业。
美文欣赏1、走过春的田野,趟过夏的激流,来到秋天就是安静祥和的世界。
秋天,虽没有玫瑰的芳香,却有秋菊的淡雅,没有繁花似锦,却有硕果累累。
秋天,没有夏日的激情,却有浪漫的温情,没有春的奔放,却有收获的喜悦。
清风落叶舞秋韵,枝头硕果醉秋容。
秋天是甘美的酒,秋天是壮丽的诗,秋天是动人的歌。
2、人的一生就是一个储蓄的过程,在奋斗的时候储存了希望;在耕耘的时候储存了一粒种子;在旅行的时候储存了风景;在微笑的时候储存了快乐。
聪明的人善于储蓄,在漫长而短暂的人生旅途中,学会储蓄每一个闪光的瞬间,然后用它们酿成一杯美好的回忆,在四季的变幻与交替之间,散发浓香,珍藏一生!3、春天来了,我要把心灵放回萦绕柔肠的远方。
让心灵长出北归大雁的翅膀,乘着吹动彩云的熏风,捧着湿润江南的霡霂,唱着荡漾晨舟的渔歌,沾着充盈夜窗的芬芳,回到久别的家乡。
我翻开解冻的泥土,挖出埋藏在这里的梦,让她沐浴灿烂的阳光,期待她慢慢长出枝蔓,结下向往已久的真爱的果实。
4、好好享受生活吧,每个人都是幸福的。
人生山一程,水一程,轻握一份懂得,将牵挂折叠,将幸福尽收,带着明媚,温暖前行,只要心是温润的,再遥远的路也会走的安然,回眸处,愿阳光时时明媚,愿生活处处晴好。
5、漂然月色,时光随风远逝,悄然又到雨季,花,依旧美;心,依旧静。