cisco,思科,网络工程师,实验 (308)
cisco,思科,网络工程师,实验 (372)

CCNA Discovery家庭和小型企业网络实验 8.4.2 配置访问策略和 DMZ 设置目标•登录多功能设备并查看安全设置。
•根据 IP 地址和应用程序设置 Internet 访问策略。
•为具有静态 IP 地址的开放访问服务器设置非军事区 (DMZ)。
•设置端口转发以将端口访问限制于 HTTP。
•使用 Linksys WRT300N 的帮助功能。
背景/准备工作本实验说明如何为 Linksys WRT300N 配置安全设置。
Linksys 提供基于软件的防火墙来保护内部的本地网络客户端免受外部主机攻击。
它会依照 IP 地址、目的网站和应用程序对内部主机与外部目的地的连接进行过滤。
还可将 Linksys 配置为创建一个非军事区 (DMZ),以控制外部主机对服务器的访问。
本实验两人一组进行,可以两组合作,互相测试对方的访问限制和 DMZ 运作情况。
本实验分为两个部分:•第 1 部分-配置访问策略•第 2 部分-配置 DMZ 设置本实验需要以下资源:• Linksys WRT300N 或其它使用默认配置的多功能设备• Linksys 设备的用户 ID 和密码(若与默认值不同)•运行 Windows XP Professional 的计算机,用于访问 Linksys GUI•安装了 HTTP 和 Telnet 服务器的内部 PC,用作 DMZ 中的服务器(预配置或 Discovery Live CD 服务器)•运行预配置的 DHCP、HTTP 和 Telnet 服务的外部服务器,用于代表 ISP 和 Internet。
(安装了这些服务的物理服务器或 Discovery Live CD 服务器。
)•用来连接 PC 主机、Linksys WRT300N 或多功能设备和交换机的电缆第 1 部分-配置访问策略步骤 1:构建网络和配置主机a. 将主机计算机连接到多功能设备上的交换机端口,如拓扑图所示。
主机 A 是控制台,用于访问 LinksysGUI。
cisco,思科,网络工程师,实验 (359)

CCNA Discovery家庭和小型企业网络实验 6.2.4 配置电子邮件客户端目标•设置电子邮件客户端。
•通过邮件服务器发送和接收邮件。
•添加电子邮件帐户或更改现有帐户。
背景/准备工作借助电子邮件应用程序,用户能够向位于同一个本地网络或 Internet 中的其他用户发送消息,也能接收来自该用户的消息。
消息由发送客户端发送并存储于电子邮件服务器中。
然后,在该服务器中拥有信箱的其它电子邮件客户端可随时访问服务器,接收以该客户端为目的地的存储消息。
需要的资源如下:•基于 Windows 并连接到 Internet 的计算机• Microsoft Outlook 或其它电子邮件客户端软件第 1 步:打开 Microsoft Outlooka. 从开始菜单中选择所有程序。
找到 Microsoft Office 软件。
b. 选择 Microsoft Office Outlook 作为电子邮件程序。
如果您的计算机上没有 Microsoft Office 软件,Internet 上有许多免费的电子邮件软件包可供使用。
请搜索 Internet,查找可以在您的计算机上安装的免费电子邮件客户端程序。
以下步骤说明可能因您使用的电子邮件客户端程序而有所差异。
第 2 步:设置电子邮件帐户a. 首次启动 Microsoft Outlook 时,显示的屏幕中提供了电子邮件升级选项。
您可选择从另一个帐户导入电子邮件消息或通讯簿。
由于这是您的第一个电子邮件帐户,因此请选择不升级按钮。
b. 下一个屏幕是电子邮件帐户屏幕,会询问您是否要配置电子邮件帐户。
请单击是。
c. 如果此前已经安装了 Outlook 并完成了电子邮件设置,您可以启动 Outlook 应用程序并单击工具、电子邮件帐户,然后选择查看或更改现有电子邮件帐户以便查看现有帐户的设置。
第 3 步:输入 POP3 电子邮件帐户信息a. 下一个屏幕需要新帐户的用户填写信息。
cisco,思科,网络工程师,实验 (343)

CCNA DiscoveryNetworking for Home and Small Businesses Lab 7.2.6 Configuring a Wireless ClientObjective•Install and configure a driver for a wireless USB NIC for a wireless client computer. • Determine the version of the driver installed and check the Internet for updates.Background / PreparationIn this lab you will install a driver for a wireless USB NIC in a computer. The driver is a type of software that controls the wireless NIC. The driver comes on a CD with the NIC or can be downloaded from the Internet. Many manufacturers require that the driver is installed before the adapter is connected. The procedure described in this lab is for a Linksys USB 802.11g wireless NIC, but is similar to others. You should always follow the procedure recommended by the wireless NIC manufacturer.The following resources are required:•Windows XP-based computer with an available USB port •Wireless USB NIC and associated driver •Administrator rights to install the driver • Linksys WRT300N with wireless access configured from previous labStep 1: Install the wireless NIC drivera. Insert the CD that contains the wireless NIC driver into the CD/DVD drive and install the driveraccording to the manufacturer recommendations. Most USB devices require that the driver beinstalled before the device is physically attached. Note that you may do part of the installation processnow and part of it after the wireless NIC is installed.b. Who is the manufacturer of the wireless NIC? ______________________________________c. Describe how you installed the wireless NIC driver. _______________________________________________________________________________________________________________ Step 2: Install the wireless NICa. When prompted, connect the USB NIC cable to an available USB port. Click Next to continue.Step 3: Attach to the wireless networka. Most wireless NIC adapters have client software to control the NIC. The software shows any wirelessnetworks that are discovered. Select the SSID of the wireless network that you configured on the APin a previous lab.b. Which SSID are you using? ________________________________________________c. If the wireless NIC did not connect to the wireless network, perform the appropriate troubleshooting.d. What is the signal strength for the wireless NIC? _________________________________e. Did the wireless NIC see any other wireless networks in the area? _______ Why or why not?____________________________________________________________________________f. Show your active wireless connection to a fellow student or the lab assistant.g. What is another name for a wireless host? __________________________________________h. Is it better to use the client software from the wireless NIC manufacturer or let Windows XP controlthe wireless NIC? _____________________________________________________________ Step 4: Determine the NIC driver versiona. Hardware manufacturers continually update drivers. The driver that ships with a NIC or other piece ofhardware is frequently not the most current.b. To check the driver version for the NIC you installed, click Start, select Control Panel and thenNetwork Connections. Right-click on the wireless connection and select Properties. Click theConfigure button for the NIC and then the Driver tab. What is the name and version of the driver youinstalled? ___________________________________________________________________Step 5: Determine if the NIC driver is the most currenta. Search the NIC manufacturer web site for drivers that support the wireless NIC you installed. Arethere more current ones available? _______________________________________________b. What is the most current one listed? ______________________________________________c. If there is a more current driver, how would you apply it? __________________________________________________________________________________________________________Step 6: Verify connectivitya. Once you have installed the NIC, it is time to verify connectivity with the Linksys WRT300N.b. Open a web browser such as Windows Internet Explorer or Mozilla Firefox.c. In the address line type http://192.168.1.1, which is the default setting on the AP.d. In the Connect to 192.168.1.1 dialog box, leave the username text box empty, and type admin in thepassword text box. Leave the Remember my password checkbox unchecked. Click OK.e. If you receive the Linksys Setup screen, you have established connectivity with the AP. If you do notestablish connectivity, you will have to troubleshoot the connection by checking to ensure the devicesare turned on and the IP addresses on all devices are correct. Which IP address should beconfigured on the wireless NIC?____________________________________________________________________________ Step 7: Reflectiona. Do you think the process of setting up a wireless network at a food store or book store is any differentfrom what you just did? _________________ Why or why not?____________________________________________________________________________________________________________________________________________________________________________________________________________________________________b. Do you think the AP model that you are using would be sufficient for the food store in yourneighborhood? Why or why not? ______________________________________________________________________________________________________________________________。
cisco,思科,网络工程师,实验 (314)

CCNA Discovery计算机网络设计和支持实验 9.1.2 编辑和整理现有信息目标•收集信息并将其整理成网络建议书。
预期结果和成功标准开始本实验前,请仔细阅读所要执行的任务。
您预计在执行完这些任务后会有什么样的结果?______________________________________________________________________________________ ______________________________________________________________________________________ ______________________________________________________________________________________ 系统全面地记录和收集信息对于项目建议书的准备工作有何好处?______________________________________________________________________________________ ______________________________________________________________________________________ ______________________________________________________________________________________背景/准备工作您已经使用原型测试了提议的网络设计,现在需要从第 2 章的 RFP 和前期的 PPDIOO 实验中收集信息,用于制作网络建议书。
本实验需要制作 FilmCompany 网络升级建议书的大纲。
为此,您要根据前期实验保存在文件夹中的信息将建议书的各部分汇编到一起。
步骤 1:收集和整理信息a. 收集前期实验中创建的所有项目文档并仔细阅读。
《计算机网络》 实验二 CISCO交换机的基本操作 实验报告

千里之行,始于足下。
计算机网络》实验二 CISCO交换机的基本操作实验报告计算机网络》实验二 CISCO交换机的基本操作实验报告摘要:计算机网络的使用已经变得日常化,而交换机作为网络中常见的设备,对网络的稳定运行起着重要的作用。
本实验旨在通过对CISCO交换机的基本操作进行实践,加深对交换机工作原理的理解,掌握交换机的基本配置和网络故障排除等技能。
本文将详细介绍实验过程及结果,并对实验中所遇到的问题和解决方法进行讨论。
一、引言计算机网络是现代社会中信息传输的基础设施,其中交换机作为实现计算机之间进行数据传输和通信的关键设备,对网络的稳定运行起着重要的作用。
本实验通过对CISCO交换机的基本操作进行实践,旨在加深对交换机工作原理的理解,并掌握交换机的基本配置和故障排除等技能。
二、实验目的1. 掌握CISCO交换机的基本使用方法和操作步骤;2. 理解交换机的工作原理和基本配置;3. 能够进行交换机的基本配置和故障排除。
三、实验步骤及结果1. 实验环境准备(1) 操作系统:Windows 10;(2) 软件:PuTTY、CISCO交换机模拟器。
第1页/共3页锲而不舍,金石可镂。
2. 实验步骤(1) 打开PuTTY,通过SSH协议连接到CISCO交换机模拟器;(2) 输入用户名和密码以登录交换机;(3) 配置交换机的基本信息,如主机名、IP地址、子网掩码等;(4) 配置交换机的端口 VLAN 和端口模式;(5) 配置交换机的端口速率和双工模式;(6) 进行网络连通性测试,检查配置是否成功。
3. 实验结果及分析经过实验操作,成功登录CISCO交换机,并按照实验指导书要求进行了基本配置。
通过网络连通性测试,确认配置生效,并能正常进行数据传输和通信。
实验结果表明,基本操作步骤能够顺利实现,并取得了预期的实验效果。
四、问题与解决1. 问题1:无法连接到CISCO交换机。
解决方法:检查网络连接是否正常,重新配置PuTTY连接参数。
cisco,思科,网络工程师,实验 (368)
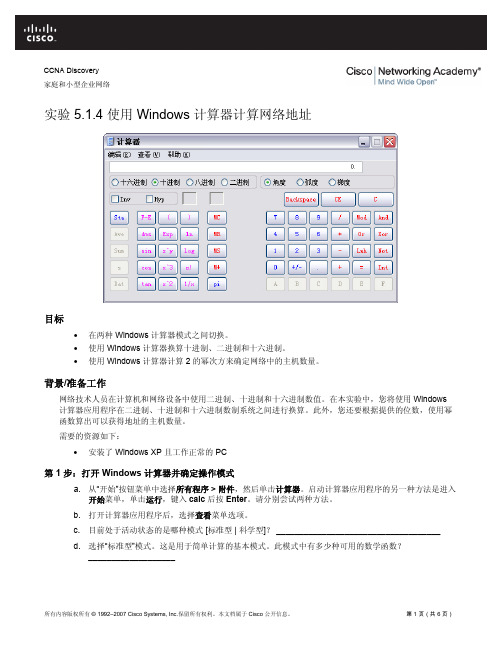
CCNA Discovery家庭和小型企业网络实验 5.1.4 使用 Windows 计算器计算网络地址目标•在两种 Windows 计算器模式之间切换。
•使用 Windows 计算器换算十进制、二进制和十六进制。
•使用 Windows 计算器计算 2 的幂次方来确定网络中的主机数量。
背景/准备工作网络技术人员在计算机和网络设备中使用二进制、十进制和十六进制数值。
在本实验中,您将使用 Windows 计算器应用程序在二进制、十进制和十六进制数制系统之间进行换算。
此外,您还要根据提供的位数,使用幂函数算出可以获得地址的主机数量。
需要的资源如下:•安装了 Windows XP 且工作正常的 PC第 1 步:打开 Windows 计算器并确定操作模式a. 从“开始”按钮菜单中选择所有程序 > 附件,然后单击计算器。
启动计算器应用程序的另一种方法是进入开始菜单,单击运行,键入calc后按Enter。
请分别尝试两种方法。
b. 打开计算器应用程序后,选择查看菜单选项。
c. 目前处于活动状态的是哪种模式 [标准型 | 科学型]? ____________________________________d. 选择“标准型”模式。
这是用于简单计算的基本模式。
此模式中有多少种可用的数学函数?___________________e. 选择“查看”菜单选项中的“科学型”计算器模式。
f. 此模式中有多少种可用的数学函数? ___________________________________________________ 第 2 步:在数制系统间转换a. 进入科学型模式。
请注意可用的数制系统模式 — 十六进制、十进制、八进制和二进制。
b. 目前处于活动状态的是哪个数制系统?_____________c. 在十进制模式下,数字键区中有哪些数字处于活动状态?__________________d. 单击二进制模式单选按钮。
cisco,思科,网络工程师,实验 (330)
Lab 1.3.3 Determining the Screen Resolution of a ComputerObjectives•Determine the current screen resolution of a PC monitor. •Determine the maximum resolution for the highest color quality. •Calculate the number of pixels needed for resolution settings. • Identify the type of monitor and graphics card installed.Background / PreparationThe resolution of a monitor determines the quality of the screen display. The resolution is determined by the number of horizontal and vertical picture elements (pixels) that are used to produce the image on the monitor. The number of pixels is typically predefined by the manufacturers of graphics cards and PC monitors. The highest number of pixels that a monitor and graphics card can support is referred to as maximum resolution. An example of maximum resolution is 1280 x1024, which means the display is composed of 1280 horizontal pixels and 1024 vertical pixels. The higher the resolution is set, the sharper the display image. The maximum resolution of a PC monitor and the number of colors the monitor can display are determined by two factors:•Capability of the monitor •Capability of the graphics card, especially the amount of onboard memory The following resources are required:• Computer with Windows XP installed Step 1: Determine the current screen resolutiona. To view the current screen resolution and color quality settings, right-click on any empty space on thedesktop and select Properties from the context menu. In the Display Properties window, select the Settings tab.You can also access Display Properties by opening the Control Panel and clicking the Displayicon.CCNA DiscoveryNetworking for Home and Small Businesses v4.0: Personal Computer Hardwareb. Use the Display Properties Settings tab to record the current settings on your PC:The screen resolution is (H by V) ______________________________________________The horizontal resolution is: __________________________________________________The vertical resolution is: ____________________________________________________The color quality value is: ____________________________________________________Step 2: Determine the maximum resolution for the highest color qualityThe slide bar under Screen resolution is used to configure the desired resolution.a. Move the slide bar to see the range of screen resolutions that are available on your PC. (The range isdetermined by the operating system when it identifies the display card and the monitor.)b. Use the Display Properties Settings tab to fill out the following table for the current settings on yourPC:Minimum screen resolutionMaximum screen resolutionAvailable color quality settingsStep 3: Calculate the pixels for current and maximum resolution settingsThe display on the screen consists of rows of pixels. The number of pixels in each row is the horizontal resolution. The number of rows is the vertical resolution. To determine the total number of pixels in a screen resolution, you multiply the horizontal resolution by the vertical resolution. For example, if the currentresolution is 1280 x 1024, the total number of pixels is 1280 times 1024, or 1,310,720.a. Calculate the total number of pixels for the lowest resolution: ___________________________b. Calculate the total number of pixels for the maximum resolution: ________________________ Step 4: Identify the type of graphics card installedYou can get detailed information about the graphics card (also called the display adapter) in the Display Properties screen.a. In the Display Properties screen, click the Advanced button.b. Select the Adapter tab.c. Use the information found in the Adapter tab to complete the following table:Graphics card manufacturer and model(Adapter Type)Graphics memory on card(Memory Size)Step 5: Identify the type of monitor and available refresh ratesYou can get detailed information about the monitor in the Display Properties screen. The screen refresh rate determines the number of times per second the screen is illuminated or redrawn. A refresh rate of 60 hertz means the screen is illuminated 60 times per second. Higher refresh rates provide less screen flicker, which reduces eye strain, but may adversely affect the monitor. You should set the refresh rate to the highest level the monitor can safely support.a. Click on the Monitor tab to see the monitor type and current refresh rate.b. Use the information found in the Monitor tab to complete the following table:Monitor typeSupported refresh ratesc. What can occur if you select a refresh rate that is higher than what the monitor can safely display?____________________________________________________________________________。
cisco,思科,网络工程师,实验 (353)
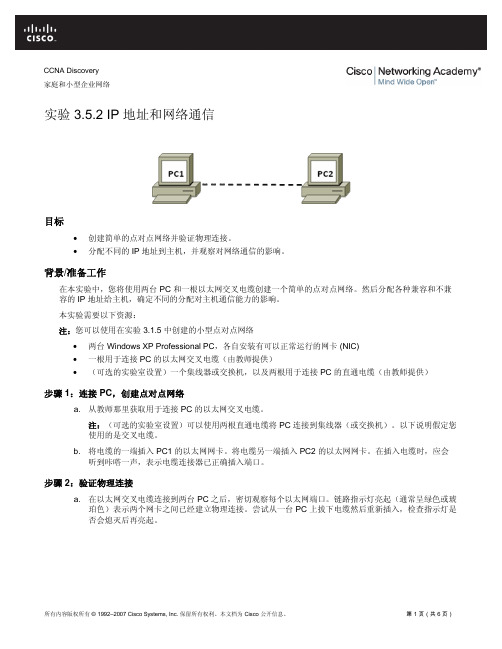
CCNA Discovery家庭和小型企业网络实验 3.5.2 IP 地址和网络通信目标•创建简单的点对点网络并验证物理连接。
•分配不同的 IP 地址到主机,并观察对网络通信的影响。
背景/准备工作在本实验中,您将使用两台 PC 和一根以太网交叉电缆创建一个简单的点对点网络。
然后分配各种兼容和不兼容的 IP 地址给主机,确定不同的分配对主机通信能力的影响。
本实验需要以下资源:注:您可以使用在实验 3.1.5 中创建的小型点对点网络•两台 Windows XP Professional PC,各自安装有可以正常运行的网卡 (NIC)•一根用于连接 PC 的以太网交叉电缆(由教师提供)•(可选的实验室设置)一个集线器或交换机,以及两根用于连接 PC 的直通电缆(由教师提供)步骤 1:连接 PC,创建点对点网络a. 从教师那里获取用于连接 PC 的以太网交叉电缆。
注:(可选的实验室设置)可以使用两根直通电缆将 PC 连接到集线器(或交换机)。
以下说明假定您使用的是交叉电缆。
b. 将电缆的一端插入 PC1 的以太网网卡。
将电缆另一端插入 PC2 的以太网网卡。
在插入电缆时,应会听到咔嗒一声,表示电缆连接器已正确插入端口。
步骤 2:验证物理连接a. 在以太网交叉电缆连接到两台 PC 之后,密切观察每个以太网端口。
链路指示灯亮起(通常呈绿色或琥珀色)表示两个网卡之间已经建立物理连接。
尝试从一台 PC 上拔下电缆然后重新插入,检查指示灯是否会熄灭后再亮起。
b. 转到控制面板,双击网络连接图标,确认本地区域连接已经建立。
下图所示为活动的本地区域连接。
如果物理连接有问题,Local Area Connection 图标上将会显示红色的X,并且显示文字网络电缆没有插好。
c. 如果 Local Area Connection 指示没有连接上,请重复步骤 1 和 2 进行故障排除,可能还需要向教师确认您使用的是以太网交叉电缆。
- 1、下载文档前请自行甄别文档内容的完整性,平台不提供额外的编辑、内容补充、找答案等附加服务。
- 2、"仅部分预览"的文档,不可在线预览部分如存在完整性等问题,可反馈申请退款(可完整预览的文档不适用该条件!)。
- 3、如文档侵犯您的权益,请联系客服反馈,我们会尽快为您处理(人工客服工作时间:9:00-18:30)。
CCNA Discovery计算机网络设计和支持实验 7.2.5 测试 FilmCompany 网络目标•使用测试计划测试 LAN 的设计。
640-802 CCNA 考试目标本实验包含与下列 CCNA 考试目标相关的技能:•解释网络图。
•确定网络中两台主机之间的路径。
•选择满足网络规格所需的组件。
•选择适当的介质、电缆、端口和连接器将交换机连接到其它网络设备和主机。
•执行并检验初始的交换机配置任务,包括远程访问管理。
•使用基本实用程序(包括 ping、traceroute、telnet、SSH、arp、ipconfig)以及show和debug命令检查网络状态和交换机运作。
•说明先进的交换技术(包括:VTP、RSTP、VLAN、PVSTP 和 802.1q)。
•描述 VLAN 如何创建逻辑上独立的网络以及在这些网络间路由的需要。
•配置、检验 VLAN 并排查其问题。
•在 Cisco 交换机上配置、检验中继并排查其问题。
•配置、检验 VLAN 间路由并排查其问题。
•为 LAN 环境中的主机实施静态和动态寻址服务。
•选择适当的介质、电缆、端口和连接器将路由器连接到其它网络设备和主机。
•访问路由器并用其设置基本参数,包括 CLI/SDM。
•连接、配置设备接口并检查其工作状态。
•使用 ping、traceroute、Telnet、SSH 或其它实用程序检验设备配置和网络连通性。
•根据特定的路由要求对静态路由或默认路由执行路由配置任务并进行检验。
预期结果和成功标准开始本实验前,请仔细阅读所要执行的任务。
您预计在执行完这些任务后会有什么样的结果?______________________________________________________________________________________ ______________________________________________________________________________________ ______________________________________________________________________________________ 您认为测试计划对于使用原型测试网络设计有什么帮助?______________________________________________________________________________________ ______________________________________________________________________________________ ______________________________________________________________________________________背景/准备工作网络设计师通过建立和测试网络原型来确保其设计中包含的要素达到预期效果并实现客户的目标。
使用测试计划是合理安排测试并确保以适当方式测试所有设计要素的方法之一。
您需要使用实验 7.2.2 中完成的测试计划执行下列测试:测试 1:基本连通性测试•检验网络原型中设备之间的物理连通性和 IP 连通性。
•记录操作结果。
测试 2:VLAN 配置测试•演示多个 VLAN、vty 和端口安全。
•确保同一个 VLAN 的成员可以成功通信而不同 VLAN 的成员无法成功通信。
•演示设备之间的 802.1q 中继链路。
•通过检验 STP 确保 S1 成为根桥。
•记录操作结果。
测试 3:VLAN 路由测试•在没有限制条件的情况下演示不同 VLAN 间通信的路由。
•在限制条件下演示不同 VLAN 间通信的路由。
•记录操作结果。
任务 1:执行测试 1:基本连通性测试步骤 1:建立网络原型a. 按照测试计划“设备”部分的规定选择必需的设备和电缆。
请教师帮助确定适用的设备。
b. 使用测试计划“设计和拓扑图”部分中包括的拓扑图和 IP 地址规划,连接并配置网络原型。
c. 遵循“测试 1:步骤”部分中的步骤,通过控制台连接登录一台设备并检查是否能 ping 通所有其它设备的地址。
如果操作失败,请检查每台设备的配置。
重新执行连通性测试。
d. 使用记事本或字处理程序将设备初始配置复制并粘贴到文档中。
保存或打印该文档并将其添加到已经完成的测试计划中。
步骤 2:检验网络原型的功能a. 遵循“测试 1:步骤”中的步骤,执行各种命令并记录测试结果。
b. 使用记事本或字处理程序将各种命令的输出复制并粘贴到文档中。
保存或打印该文档并将其添加到已经完成的测试计划中。
步骤 3:在测试计划的“结果和结论”部分中记录测试结果a. 将您在测试期间观测到的结果与“测试 1:预期结果和成功标准”部分中列出的预期结果相比较。
b. 确定测试是否表明网络符合成功标准。
如果符合,则表示测试获得了成功。
任务 2:执行测试 2:VLAN 配置测试步骤 1:配置网络原型a. 遵循测试计划“测试 2:步骤”部分中制定的步骤配置网络原型中的 VLAN。
b. 使用测试计划“设计和拓扑图”部分中指定的 VLAN 规划,使用相应的 VLAN 配置交换机。
c. 将交换机之间的链路配置为中继链路并允许中继链路上的所有 VLAN。
d. 将一台交换机配置为根桥。
e. 在连接到两台计算机的端口上,将端口安全配置为仅接受一个 MAC 地址。
f. 使用记事本或字处理程序将设备初始配置复制并粘贴到文档中。
保存或打印该文档并将其添加到已经完成的测试计划中。
步骤 2:检验 VLAN 配置设计a. 配置端口,使连接到 PC1 的端口位于一个 VLAN 中而连接到 PC2 的端口位于不同的 VLAN 中。
b. 遵循“测试 2:步骤”中的步骤,使用测试计划“设计和拓扑图”部分 IP 地址规划中的 IP 地址,为每台计算机配置与其指定 VLAN 相符的 IP 地址。
c. 执行各种show命令,检查 VLAN 和 STP 的运行情况是否符合预期。
使用记事本或字处理程序将命令的结果复制并粘贴到文档中。
保存或打印该文档并将其添加到已经完成的测试计划中。
d. 尝试从 PC1 ping PC2,检查 VLAN 能否成功隔离两台计算机之间的流量。
e. 在测试计划的“测试 2:结果和结论”部分中记录测试结果。
步骤 3:在测试计划的结果和结论摂部分中记录测试结果a. 将您在测试期间观测到的结果与“测试 2:预期结果和成功标准”部分中列出的预期结果相比较。
b. 确定测试是否表明网络符合成功标准。
如果符合,则表示测试获得了成功。
任务 3:执行测试 3:VLAN 路由测试步骤 1:配置网络原型a. 遵循测试计划“测试 3:步骤”部分中制定的步骤将路由器配置为在 VLAN 间路由。
b. 使用测试计划“设计和拓扑图”部分中显示的拓扑图,配置相应的路由器在任务 2 中创建的 VLAN 间路由。
c. 遵循“测试 3:步骤”部分中列出的步骤,通过控制台连接登录直接连接到路由器的交换机。
将该交换机和路由器之间的链路配置为 802.1q 中继链路并允许该中继链路上的所有 VLAN。
d. 通过控制台连接登录路由器,并为直接连接到交换机的路由器接口配置 802.1q 封装。
e. 用各 VLAN 的适当 IP 地址配置路由器。
检查路由表中显示的路由是否正确。
f. 使用记事本或字处理程序将设备初始配置复制并粘贴到文档中。
保存或打印该文档并将其添加到已经完成的测试计划中。
步骤 2:检验 VLAN 路由设计a. 检查计算机是否已配置为属于不同的 VLAN 以及计算机的 IP 地址配置是否正确。
将步骤 1e 中分配给路由器的 IP 地址配置为计算机的默认网关地址。
检查默认网关地址是否与分配给计算机的地址位于同一个网络中。
b. 遵循“测试 3:步骤”中的步骤,从 PC1 ping PC2。
使用记事本或字处理程序将结果复制并粘贴到文档中。
保存或打印该文档并将其添加到已经完成的测试计划中。
c. 执行各种show命令,检查路由是否正确。
d. 在测试计划的“测试 3:结果和结论”部分中记录测试结果。
步骤 3:在测试计划的结果和结论摂部分中记录测试结果a. 将您在测试期间观测到的结果与“测试 3:预期结果和成功标准”部分中列出的预期结果相比较。
b. 确定测试是否表明网络符合成功标准。
如果符合,则表示测试获得了成功。
步骤 4:思考题FilmCompany LAN 设计的原型测试是否成功?根据测试计划来工作是否有助于合理安排测试?______________________________________________________________________________________ ______________________________________________________________________________________ ______________________________________________________________________________________ ______________________________________________________________________________________ ______________________________________________________________________________________。