玻璃门饮料展示柜产品说明
创利风冷展柜说明书
创利风冷展柜说明书
摘要:
1.创利风冷展柜概述
2.创利风冷展柜的安装与使用
3.创利风冷展柜的维护与保养
4.安全注意事项
5.创利风冷展柜的规格与参数
6.联系我们
正文:
一、创利风冷展柜概述
创利风冷展柜是一款具有卓越性能和稳定运行的展示设备,采用高效制冷系统,保证食品的保鲜和展示效果。
它广泛应用于超市、便利店、餐饮店等场所,为商家提供优质的商品展示和销售解决方案。
二、创利风冷展柜的安装与使用
1.安装展柜前,请确保场地平整、干燥,并确保电源线已接入。
2.展柜需水平放置,并确保四个脚轮均已拧紧。
3.插上电源,打开开关,检查各功能是否正常运行。
4.将需展示的食品放入展柜,并关好柜门。
三、创利风冷展柜的维护与保养
1.定期清洁展柜内外,确保卫生。
2.检查制冷系统运行是否正常,如有异常声音、温度异常等现象,请及时
关闭电源并联系售后服务。
3.检查电源线是否损坏,如有损坏请及时更换。
4.保持展柜周围空气流通,避免阳光直射。
四、安全注意事项
1.使用展柜时,请勿触及展柜顶部,以免触电。
2.请勿将展柜放入水中或浸泡,以免损坏设备。
3.请勿在展柜上放置重物,以免损坏展柜。
4.如发现展柜异常运行,请立即关闭电源,并联系售后服务。
GLASS DOOR 免费冻器 商品说明书

Commercial Freezer ServiceManualGLASS DOOR FREEZERSMG23FPlease read this manual completely before attempting to install or operate this equipment.TABLE OF CONTENTS1. FEATURE CHART1-1. OUTSIDE DRAWING AND MEASUREMENT FOR SMG23F2. WIRING DIAGRAM2-1. FREEZER (1 DOOR): SMG23F3. PARTS DETAILS3-1. BOTTOM PANEL3-2. REFRIGERATION COMPARTMENT3-3. DOOR3-4. COOLING COMPARTMENT4. MAIN COMPONENTS4-1. COMPRESSOR4-2. COMPRESSOR RELAY4-3. CONDENSER DRYER4-4. CAPACITOR4-5. EVAPORATOR FAN MOTOR4-6. CONDENSER FAN MOTOR4-7. EVAPORATOR DEFROST HEATER4-8. LAMP4-9. THERMOSTAT5. ELECTRONIC CONTROLLER INSTRUCTION5-1. FREEZER CONTROLLER5-1-1. DIXELL PARAMETER FOR FREEZER5-1-2. HOW TO USE THE CONTROLLER6. REPLACEMENT OF MAIN COMPONENTS6-1. BOTTOM PANEL PARTS6-2. REFRIGERATION COMPARTMENT PARTS6-3. CONDENSING UNIT1. FEATURE CHART1-1. OUTSIDE DRAWING OF SMG23F2. WIRING DIAGRAM2-1. SMG23F3. PARTS DETAILS 3-1. FRONT PANELTHERMOSTATMAIN SWITCH3-2. REFRIGERATION COMPARTMENT CYCLE ASSEMBLYCONDENSER FILTER DRIER CONDENSER FAN MOTOR WATER PAN COMPRESSORDRAIN PANCONDENSER FAN MOTOR ASSEMBLYFAN COVER CONDENSER FAN MOTOR BLADE CONDENSER FAN MOTOR3-3. DOORGASKETMagnetic gasket can be replaced without any tools.3-4. COOLING COMPARTMENTCIRCLE FAN COVERCircle Fan Cover CIRCLE FANEvaporator Fan Motor Blade Evaporator Fan Motor Fan CoverEvaporator Defrost Heating ElementEvaporator Fan Fan Support4. MAIN COMPONENTS5. ELECTRONIC CONTROLLER INSTRUCTION5-1-1.DIXELL XR60C PARAMETER FOR FREEZER5-1-2.T o display target set point. In programming mode it selects a parameter or confirms an operation.T o start a manual defrostT o view the last alarm occurrence. In programming mode, it browses the parametercodes or increases the display valueT o view the last alarm occurrence. In programming mode, it browses the parametercodes or decreases the display valueKEY COMBINATIONT o lock & unlock the keyboardT o enter in programming modeT o return to the room temperature display1.1 Function of LEDS2.1 HOW TO VIEW THE SET POINT1. Push and immediately release the SET key. The display will show the set point value.2. Push and immediately release the SET key or wait for 5 seconds to display thesensor value again.2.2 HOW TO CHANGE THE SET POINT1. Push the SET key for more than 2 seconds to change the set point value.2. The value of the set point will be displayed and the LED starts blinking.3. To change the set value, push the or key within 10s.4. To set new point value, push the SET key again or wait 10s.2.3 HOW TO START A MANUAL DEFROSTPush the key for more than 2 seconds and a manual defrost will start2.4 HOW TO LOCK THE KEYBOARD1. Hold the and keys for more than 3s.2. The “POF”message will be displayed and the keyboard will be locked. At this point, it will bepossible only to see the set point or the MAX or Min temperature stored.3. If a key is pressed more than 3s the ”POF” message will be displayed.2.5 HOW TO UNLOCK THE KEYBOARDHold the and keys together for more than 3s until the “P OF” message is displayed.3.HOW TO VIEW THE ALARM AND RESET THE RECORDED ALARM1. Hold the or key to display the alarm signals.2. When the signal is displayed, hold the SET key until the “rst” message is displayed. Push the SET key again. The “rst” message will start blinking and the normal temperature will be displayed again.6. REPLACEMENT OF MAIN COMPONENTS6-1. FRONT PANEL PARTS6-1-1. UNSCREW THE FRONT PANEL.TAKE OFF THE BOTTOM PANEL.6-1-2. UNSCREW THE JUNCTION BOX. THE MAIN SWITCH, LIGHT SWITCH AND THERMOSTAT CAN BE CHANGED.6-2. REFRIGERATION COMPARTMENT PARTS6-2-1. UNSCREW THE SENSOR CLIP .TAKE THE SENSOR OUT FROM THE CLIP.6-2-2. Unscrew the circle fan cover.6-2-3. PULL DOWN THE CIRCLE FAN COVER.6-2-4. UNSCREW THE FAN SUPPORT.6-2-5. CHANGE THE DEFROST HEATING ELEMENT.A. UNHOOK THE EVAPORATOR FROM ITS CASING.B. TAKE OFF THE ELEMENT AND CHANGE IT.6-3. CONDENSING UNIT6-3-1. TAKE OFF THE BOTTOM PANEL OF THE UNIT.6-3-2. UNSCREW THE UNIT BOARD. YOU CAN PULL THE UNIT BOARD OUT FOR ANY REPAIR OR CLEANING.CAUTION:BE CAREFUL OF ELECTRIC SHOCKCAUTION: MAKE SURE THE POWER SUPPLY IS CUT OFF BEFORE ANY SERVICE IS PERFORMED.CAUTION: CONDENSING UNIT MAY BE VERY HOT. BE SURE IT IS COOL BEFORE ANY SERVICE IS PERFORMED.。
青岛凯创商用展示柜使用说明书

青岛凯创商用展示柜使用说明书随着商业的发展,展示柜成为了商场、超市、餐厅等商业场所中必不可少的展示工具。
青岛凯创商用展示柜作为一款优秀的商用设备,具备出色的功能和设计,能够满足各类商业场所对于展示需求的要求。
为了帮助用户更好地使用这款展示柜,以下是详细的使用说明。
一、快速了解凯创商用展示柜凯创商用展示柜是由青岛凯创公司研发生产的一款商用设备,主要用于展示和陈列食品、饮料、糕点和其他商品。
该展示柜采用先进的制冷技术,能够保持展示物品的新鲜和温度,并且具备出色的外观和展示效果,能够吸引消费者的目光。
同时,凯创商用展示柜的结构稳固,使用操作简单方便,可以满足不同商业场所的需求。
二、凯创商用展示柜的基本操作1. 开启电源:将展示柜插头插入电源插座,然后按下电源开关,展示柜即可开始运行。
2. 调节温度:在展示柜上部的温控面板上选择所需的温度,根据展示物品的要求进行调节。
通常情况下,食品和饮料的冷藏温度为2-8摄氏度,糕点的冷藏温度为10-18摄氏度。
3. 使用展示柜内部空间:凯创商用展示柜内部空间设计合理,可以根据展示的商品种类和大小进行调整。
使用时,将商品摆放整齐,确保每个商品都能够被顾客看到。
4. 维护和清洁:定期清洗展示柜内部和外部,在清洗过程中务必断开电源。
清洁时可以使用中性清洁剂和湿布擦拭,避免使用含有酸性或碱性成分的清洁剂,以防损坏展示柜的表面。
三、凯创商用展示柜的常见问题解决1. 无法正常启动:检查电源插头是否插入电源插座,确保电源供给正常。
同时检查电源开关是否打开。
2. 温度无法调节:检查温控面板上是否显示正常温度,如未显示温度,可能是面板故障,需要联系售后人员检修。
3. 出现异味:检查展示柜内部是否有食品残渣或污渍,及时清洁展示柜。
4. 制冷效果不佳:检查展示柜周围是否有遮挡,避免影响空气流通。
同时检查制冷系统是否正常运行,如出现异常,需要联系售后人员进行维修。
四、注意事项及安全提示1. 安装展示柜时,务必保证周围空间的通风良好,保持一定距离避免与其他设备接触。
精品雪柜参数(威廉士)
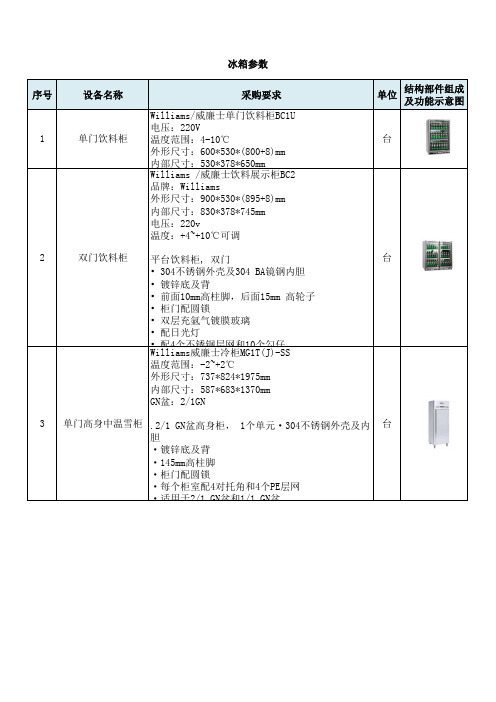
型号:LG2T(J)SEA
电压:220v
压缩机功率:0.643kw
外围尺寸:1400*815*1975mm
内围尺寸:1250*683*1370mm
使用雪种:R404a
容量:1272L
制冷方式:风冷
10 四门高身低温雪柜 温度范围:-18~-22℃
台
数字温控 原产地:英国 可置2/1GN份数盘 WILLLIAMS高身雪柜 产品特征: 无氟、无臭氧破坏式绝缘 智能化控制面板 无需冷凝排水 可改为全门、双通门 高温可改为玻璃门
Williams威廉士冷柜LG1T(J)-SS 温度范围:-22~-18℃ 外形尺寸:737*824*1975mm 内部尺寸:587*683*1370mm GN盆:2/1GN
4 单门高身低温雪柜 .2/1 GN盆高身柜, 1个单元
台
·304不锈钢外壳及内胆
·镀锌底及背
·145mm高柱脚
·柜门配圆锁
·柜门配圆锁
·每个柜室配2对托角和2个PE层网(仅限柜门式)
·适用于1/1 GN盆
·220V/50HZ/1PH
Williams威廉士四门平台中温雪柜MO4U(J)-XDDDD 品牌:Williams/威廉士 型号: HO4U(J)-XDDDD 温度范围:-2~+2℃ 电压:220V 外形尺寸:2300*670*850mm GN盆:1/1GN
外形尺寸:1370*670*850mm
内部尺寸:855*560*570mm
12
双门平台雪柜 1/1 GN盆平台柜, 2个单元
台
·304不锈钢外壳及内胆
·镀锌底及背
·1.5mm厚不锈钢台面
·150mm高柱脚
·柜门配圆锁
·每个柜室配2对托角和2个PE层网(仅限柜门式)
立式透明门冷藏箱简介

澳柯玛商用冷柜整理编辑
立式透明门冷藏箱简介
立式透明门冷藏箱也叫冷藏展示柜,一般用来对饮料、鲜奶、水果等食品的冷藏展示,大多用于商超、蛋糕店、冷饮店、便利店等,采用玻璃门可以提升展示效果,吸引消费者的眼球,从而促成消费,给商家带来源源不断的利润。
立式透明门冷藏柜通常采用:效率高、噪音低,且性能稳定,制冷能力强,速度快的压缩机来保证制冷效果。
由于商业冷藏箱和普通的家用冰箱不一样,需要适应各种恶劣的用电环境、频繁开启、运行时间长的实际情况,故障率低于千分之二,只有采用名牌压缩机才能保证冷藏柜顺利运行,减少故障,不会因为冷藏箱出问题而影响做生意。
立式透明门冷藏箱的核心部件还有温度控制器,箱内温度0-10℃可调节,是强劲制冷系统的保证;目前采用全无氟R600a低温制冷剂是很多企业的选择,因为它不会污染环境,达到环保标准。
采用制冷产品发泡工艺,使得冷柜的保温效果更好,性能更稳定。
除此之外就是产品的细节化设计了,比如:外观、容量设计;采用玻璃门防凝露设计双层中空玻璃,不仅可以增强隔热效果,还可以让箱内商品醒目了然,还有这种玻璃门可以有效吸收水汽,确保了玻璃门体干燥无凝露,满足储藏冷饮、冰饮清爽的需求。
设置箱内照明灯,展示效果更好,节能效果好,凸显了品牌形象。
此外,立式玻璃门冷藏柜在搁架任意可调、门锁设计、双宽设计等方面也是企业注重人性化设计的一面。
德可斯冰柜ACWD4-780ZD说明书

德可斯冰柜ACWD4-780ZD说明书一、使用须知1、各食品保鲜冷藏温度参考:饮料:2℃-10℃蔬果:5℃-10℃日配品\乳制品:0℃-5℃鲜鱼,精肉类:-2℃-2℃2、长途运输的冷柜应放置2小时后方可通电使用,以防止系统压力过高而损坏。
第一次使用应当先让空柜运行1小时,当箱内温度下降后再放物品。
3、物品放入时应隔开适当间隙,挤得太紧会影响冷气循环。
4、展示柜周围应不靠近热源,避免阳光直射而影响制冷效果。
5、展示柜在自动除霜过程中,短时间柜内温度会有所上升。
柜外热空气与表面冷的食品相遇食品表面会凝露。
除霜过程结束,开机制冷时,大多数的露被除去,少量的露任然留在食品上,属正常现象。
6、展示柜蒸发器上的针型阀用于系统测试和制冷剂加注,平时不要打开以防止制冷剂泄漏。
7、所有吸气管路应当隔热,以减少能量损失和凝结水,在制冷管路静茹展示柜的地方进行密封,以防止水凝结进入展示柜的底部。
8、展示柜不得存放易燃、易爆、易挥发的液体和气体。
9、展示柜的搁架结构美平方米可承受不大于50kg的重量(需均匀分布),过多会损坏搁架,小熟食柜除外。
10、地面不应有沉降并保持水平,否则会影响排水,排水不畅会影响正常制冷,损坏风机等。
二、主要性能说明1、展示柜蒸发风机线路蒸发风机与主线路电源直接相接,在整个设备运行中不会停止运转。
2、照明展示柜顶部或中梁、门边、搁架上一般装有日光灯,其开、关有单独的开关控制。
建议您在光线较暗事开启照明,增强展示效果,在光线充足或非营业时间内,您可以关闭照明,以减少能耗。
展示柜的照明均采用标准照明件,在照明件出现故障后,您可自行更换,更换时,请先切断电源,有需要可致电我司安排专业人员进行操作。
3、化霜展示柜结霜后会降低制冷能力,每隔一段时间后需进行除霜。
天翔便利店冷柜系列采用自动除霜,其化霜频率一般设置为6次/24h,化霜时间为10分钟。
超市系列冷柜则采取电加热除霜方式,其化霜频率一般设置为6次/24h,化霜时间约为15分钟。
麦当劳专用杯子展示柜说明书

1P/N 1012031 Rev. D 05/18 McDonald’sPlace this manual in the Toaster sectionof your Equipment Manual.Manufactured exclusively forMcDONALD’S ®BY ANTUNES 180 KEHOE BLVD.CAROL STREAM, ILLINOIS 60188, U.S.A.PHONE: +1-630-784-1000 TOLL FREE: +1-877-392-7854FAX: +1-630-784-1650TABLE OF CONTENTSThis manual is for the exclusive use of licensees and employees of McDonald’s Systems, Inc..© McDonald’s Corporation All Rights ReservedOwner Information .....................................................2General ......................................................................2Service/Technical Assistance ....................................2Warranty Information .................................................2Specifications . (3)Installation ...................................................................4Unpacking ..................................................................4Installing the Shelves (model DC-14) ........................4Installing the Shelves (model DC-22) ........................4Location .....................................................................4Daily Cleaning .............................................................5DC-14 Replacement Parts..........................................6DC-22 Replacement Parts..........................................7Wiring Diagram ...........................................................8Notes. (9)LIMITED WARRANTYThe Antunes Food Service Equipment Division of A.J. Antunes & Co. provides the following limited warranty to the original purchaser of all McDonald’s Equipment. All components are warranted against defects in the material and workmanship for a period of two (2) years from date of original installation.If any part becomes defective during the period of this Warranty, Antunes Food Service will pay labor costs to an Authorized Service Agent to replace the part plus travel expenses.Antunes Food Service reserves the right to make changes in design or add improvements on any products. The right is always reserved to modify Equipment because of factors beyond our control and government regulation. Changes to Equipment do not constitute a warranty charge.This warranty is exclusive and is in lieu of all other warranties, expressed or implied, including any implied warranty of merchantability or fitness for a particular purpose, each of which is expressly disclaimed. The remedies described above are exclusive, and in no event shall A.J. Antunes & Co. or any of its Divisions be liable for special consequential or incidental damages for the breach or delay in the performance of this warranty.WARRANTY EXCLUSIONS • The cost of Installation.• Equipment that has been damaged due to shipment. Purchaser should make damage claim directly upon carrier.• Alteration, misuse, abuse.• Improper storage or handling.• Improper maintenance.• Failure to follow proper Installation instructions, including electrical connection.• Improper or unauthorized repairs.• Scheduled Maintenance procedures as outlined in your MRC Card.• This Warranty does not cover Consumable items.•Water pressure problems or contamination problems such as foreign material in water lines or inside solenoid valves due to an incoming water source.• Freight, foreign, excise, municipal or other sales or use taxes.• Consequential damages such as loss of profit, loss of time, the cost of repair-ing or replacing other property which is damaged, or any other incidental damage of any kind.Scan with mobile device or enter URL for product and service information.Display Case/aja-DCDC-14 AND DC-22 DISPLAY CASES2P/N 1012031 Rev D 05/18McDonald’sIMPORTANT! Keep these instructions for future reference. If the unit changes ownership, be sure this manual accompanies the equipment.Warranty InformationPlease read the full text of the Limited Warranty in this manual.If the unit arrives damaged, contact the carrier imme-diately and file a damage claim with them. Save all packing materials when filing a claim. Freight damage claims are the responsibility of the purchaser and are not covered under warranty.The warranty does NOT extend to: • Damages caused in shipment or damage as result of improper use. • Installation of electrical service.• Normal maintenance as outlined in this manual. • Malfunction resulting from improper maintenance. • Damage caused by abuse or careless handling. • Damage from moisture into electrical components.• Damage from tampering with, removal of, or changing any preset control or safety device.GeneralRead this manual before installing or operating the dis-play case. It provides the necessary safety, installation, and operating procedures.This dsiplay case is manufactured from the finest mate-rials available and assembled to our strict quality stan-dards. This unit has been tested at the factory to ensure dependable, trouble-free operation.Service/Technical AssistanceIf you experience any problems with the installation or operation of your unit, contact Antunes Technical Service at +1-877-392-7854 (toll free).DC-14 AND DC-22 DISPLAY CASES3P/N 1012031 Rev. D 05/18 McDonald’sDC-14 AND DC-22 DISPLAY CASES4P/N 1012031 Rev D 05/18McDonald’sUnpackingT he large box contains: z The display case z Two shelves (DC-14)Four shelf pieces, two front and two rear (DC-22) z The owner’s manual2. Remove the foam inserts from the box.3. Carefully remove the display case.4. U npack the shelves.NOTE: If any parts are missing or damaged, con-tact Antunes Customer Service IMMEDIATELY at +1-877-392-7856 (toll free).4. Perform the daily cleaning steps found in publica-tion PR 80, Bakery Cases (P/N 1012042).Installing the Shelves (model DC-14)1. Gently slide one shelf into the bottom shelf sup-port. The lip at the front edge of the shelf will extend over the shelf support. (The shelf support will not be visible when viewed from the front of the cabinet.)2. Repeat for the upper shelf.Installing the Shelves (model DC-22)1. Gently slide one shelf front into the bottom shelfsupport. The lip at the front edge will extend over the shelf support. (The shelf support will not be visible when viewed from the front of the cabinet.)2. Gently slide the rear half of the shelf into the shelfsupport until it rests snugly against the shelf front.3. Repeat for the upper shelf.LocationWhen placing the display case into service, observe these guidelines: • Do NOT block or cover any openings on the unit.• Keep away from heated surfaces.1. Place the display case in the position designatedby McDonald’s. 2. Load product into the display case.3. Insert the appropriate card into the display cardholder. 4. Connect the power supply to an appropriate outlet. 5. To turn on the display case lights, press the rockerswitch to the on position.DC-14 AND DC-22 DISPLAY CASES5P/N 1012031 Rev. D 05/18 McDonald’s1. Remove all food from the cabinet.2. Remove the food trays and product label tags andtake them to the back sink. Remove the holding time labels from the food trays before cleaning.3. Wash, rinse, and sanitize the trays and label tags inthe three-compartment sink or Warewash machine. Allow them to air dry.4. Wipe and discard crumbs from inside the cabinetwith a clean, sanitizer-soaked towel. Discard the towel in the soiled towel bucket after use.5. Remove the shelves.6. Spray a clean paper towel with one or two sprays ofKAY Peroxide Multi-Surface Cleaner & Disinfectant Solution. Wipe the glass, cabinet door, and door knobs until completely dry. Repeat until all glass areas (exterior and interior) are clean. Discard the paper towels in a trash receptacle. 7. Wash the shelving in the 3-compartment sink withKAY® All Purpose Super Concentrate Solution and a clean, sanitizer-soaked towel. Discard the towel in the soiled towel bucket immediately after use. If necessary, use a KAY® NO-SCRATCH™ Pad toremove hardened soils.CautionDo not use an abrasive pad on the shelves. It will scratch and dull the surfaces.8. Rinse the shelves with water then sanitize themwith KAY® SolidSense Sanitizer for 1 minute.9. Remove the shelves from the sanitizer solution andallow them to air dry. Discard the towel in the soiled towel bucket immediately after use.10. Replace the shelves in the cabinet.11. Replace the food trays.DC-14 AND DC-22 DISPLAY CASES6P/N 1012031 Rev D 05/18McDonald’sDC-14 AND DC-22 DISPLAY CASES7P/N 1012031 Rev. D 05/18 McDonald’s1 0024077 Support, outer BKT-LH12 325P193* Screw, hex head, 1/4-20 X 1.375” 123 0024012 Tube, Support LH 34 7001878 Side glass kit 15 0024943 Top glass support 16 7001879 Corner bracket kit 27 7001886 Top glass kit 18 7001887 Front glass kit 19 7001891 Light assembly kit 310 7001890 Front shelf kit 211 7001888 Top shelf rear kit 212 7001889 Bottom shelf rear kit 113 0024038 Upper shelf support 114 0024026 Lower shelf support 115 0024079 Support, outer BKT-RH1Item Part No.DescriptionQty.16 0024011 Tube, Support RH 317 0024010 Main housing118 7001885 Left door hinge kit 219 7001892 Left door kit 120 7001893 Right door kit 121 7001580 Power switch kit 122 7001880 Power supply kit123 0700463 Power cord, 14/3 5-15P 124 0400251 Strain relief, cord con 125 7001896 Right door hinge kit226 310P162* Screw, mach. #10-24 X 3/8” 1627 308P157* Screw, tap 8-32 X 3/8” LG 828 0508515Hinge plate4* Available in packages of tenItem Part No.Description Qty.DC-14 AND DC-22 DISPLAY CASES8P/N 1012031 Rev D 05/18McDonald’sDC-14 AND DC-22 DISPLAY CASES9P/N 1012031 Rev. D 05/18 McDonald’s+1 (630) 784-1000+1 (800) 253-2991 +1 (630) 784-1650+86-512-6841-3907 +86-512-6841-3637。
爱德信商用饮料柜操作手册

爱德信商用饮料柜操作手册(实用版)目录1.爱德信商用饮料柜简介2.操作手册的目的和适用对象3.饮料柜的安装和调试4.饮料柜的操作和使用5.饮料柜的维护和清洁6.安全注意事项7.故障排除与售后服务正文【爱德信商用饮料柜简介】爱德信商用饮料柜是一款集冷藏、保温、展示于一体的多功能饮料存放设备,适用于超市、便利店、餐饮店等商业场所。
该饮料柜采用智能温控系统,能够确保饮料在最佳温度下保存,同时具有节能环保、美观大方等特点。
【操作手册的目的和适用对象】本操作手册旨在为爱德信商用饮料柜的使用者提供详细的操作指南,帮助用户更好地使用和管理饮料柜,提高工作效率。
本手册适用于饮料柜的安装、调试、操作、维护、清洁及故障排除等各个环节。
【饮料柜的安装和调试】1.饮料柜安装前,请确保场地平整、干燥,并确保电源线已接入。
2.饮料柜安装时,请按照说明书的要求,将饮料柜放置在指定位置,并确保柜体与墙面保持一定距离。
3.接通电源,检查饮料柜的指示灯、风扇等是否正常工作。
4.调整饮料柜的温控器,使其在合适的温度范围内工作。
【饮料柜的操作和使用】1.开启饮料柜:将钥匙插入锁孔,转动钥匙至“ON”位置,开启饮料柜。
2.调整温度:根据饮料的保存要求,调节温控器至合适的温度。
3.存放饮料:将饮料放入饮料柜的相关区域,确保饮料摆放整齐,便于顾客选购。
4.关闭饮料柜:营业结束后,将钥匙转动至“OFF”位置,关闭饮料柜。
【饮料柜的维护和清洁】1.定期检查饮料柜的各项功能是否正常,如发现异常,请及时排除故障。
2.保持饮料柜清洁卫生,定期用湿布擦拭柜体,避免使用有腐蚀性的清洁剂。
3.确保饮料柜的通风口畅通,避免杂物堵塞。
【安全注意事项】1.请勿将饮料柜放置在易燃、易爆物品附近。
2.请勿将饮料柜浸泡在水中或淋雨。
3.请勿在饮料柜上放置重物,以免损坏柜体。
4.请勿私自拆卸、维修饮料柜,如有需要,请联系售后服务人员。
【故障排除与售后服务】如遇饮料柜故障,请参照本手册的故障排除指南进行处理。
- 1、下载文档前请自行甄别文档内容的完整性,平台不提供额外的编辑、内容补充、找答案等附加服务。
- 2、"仅部分预览"的文档,不可在线预览部分如存在完整性等问题,可反馈申请退款(可完整预览的文档不适用该条件!)。
- 3、如文档侵犯您的权益,请联系客服反馈,我们会尽快为您处理(人工客服工作时间:9:00-18:30)。
超市,酒吧,KTV,便利店,生鲜超市,酒店,宾馆,自助餐,茶叶店,商超,自选超市,商场,火锅店
水果,饮料,茶叶,雪碧,可口可乐,啤酒,酒水,饮品,水果蔬菜,绿茶,鲜奶,牛奶,奶,乳制品,低温奶,农副产品,食品,生鲜食品,冷饮
单门陈列柜,双门陈列柜,三门陈列柜,1.2米,1.8米
冷藏陈列柜,立式冷藏柜,超市保鲜柜,冷藏柜,超市专用展示柜,直冷柜,厂家直销,定做
不锈钢,全铜钢管,节能,省电,名牌压缩机,品牌
知名,高档,豪华,优质,精美,无噪音
玻璃门展示柜,商用保鲜柜,玻璃门柜,玻璃门展柜保鲜展示柜双门冷藏柜玻璃门展示柜超市专用展示柜
饮料展示柜玻璃门冷柜广州展示柜超市冷柜超市便利店展示冷柜
四门|不锈钢|玻璃门展示柜|商用保鲜柜|冷藏柜
玻璃门展示柜产品说明
产品特点:
内藏板式蒸发器,换热效率高。
全铜钢管,采用35钢材。
双门采用1.0不锈钢,且把手采用不锈钢把手,非一般塑料把手可比拟。
另外,上部采用0.8不锈钢,侧面采用0.7不锈钢,坚固稳定。
采用名牌压缩机,性能稳定,制冷效果好。
聚氨酯高压整体发泡,箱体更稳定,保温性能好。
微电脑温度显示器,便于监控。
采用万向静音轮,移动噪音小。
内置LED节能灯管,更省电。
可根据客户需求定做3门、4门玻璃门展示柜。
性能参数:
产品名称:玻璃门展示柜
产品类型:立式冷柜
品牌:佳伯商用制冷设备
型号:JB-ZSG-A1
制冷方式:直冷
尺寸:1200*700*1900(280W),1800*700*1900(380W),2400*700*1900(480W)
压缩机:霓虹万盛
额定电压:220V
温度:2-8度,冷藏型
款式:不锈钢
颜色:不锈钢
产品类型:立式冷柜
品牌:佳伯商用制冷设备
型号:JB-ZSG-A1
产品名
称
尺寸(mm)功率(W)压缩机电压(V)温度(℃)制冷方式颜色
玻璃门展示柜1200*700*1900 280W
万盛220V 2~8℃直冷不锈钢1800*700*1900
2400*700*1900
380W
480W
产品用途:
主要用于超市,酒店,宾馆,饭店,食堂,快餐等行业,能给予商品最完美的烘托与展示,并能对食品起到保鲜作用。
物流包装:本公司产品全部采用薄膜包裹,泡沫保护,外打木架,全方位保护,确保货物运输安全
售后服务:冰柜类产品默认全行业保修一年,但是本公司承诺保修15个月,并且售后服务无盲区,全国联保
定做蛋糕柜,超市保鲜风幕柜,熟食柜,鲜肉柜,商用制冰机,
豪华冰淇淋展示柜,玻璃门鲜花柜,小菜冰箱,不锈钢厨房冷柜,自动门保鲜工作台,超市节能组合直冷岛柜,海鲜冰台,保温、常温售饭台,环形岛柜,冰粥柜
淘宝店铺:中国商用冷柜工厂
安徽博特电器有限公司是一家集研发、设计、生产、销售于一体的商用电器设备专业制造企业,主要生产“佳伯”制冷设备:风幕柜、熟食柜、鲜肉柜、点菜柜、鲜花保鲜柜、岛柜、蛋糕柜,海鲜柜,冰淇淋展示柜;商用厨房设备:蒸饭柜、中餐灶、煲仔炉;消毒设备及酒店不锈钢设备等系列超市酒店设备。
安徽博特电器有限公司拥有一批中、高级设计人员,公司以质量求生存,以科技创新求发展,秉承“绿色、节能”的企业精神,提高人民生活质量为宗旨,已通过ISO9001:2014年国际质量管理体系认证、ISO14001:2014年国际管理体系认证。
以打造国际知名品牌为目标,全力进军商用电器领域。
安徽博特电器以“客户至上,员工至亲”为经营理念,以“科技创新,与时俱进;科学管理,真诚服务”为质量方针,产品质量和技术工艺在全国冷柜及厨房设备行业中处于先进地位,在国内外市场上享有很高的口碑。
以优秀的质量和一流的服务占领了全国广大的消费市场,已在浙江、福建广东、湖南、湖北、浙江、江西、安徽、江苏、上海、河南、河北、陕西、北京、辽宁、黑龙江等26个省
市建立了自己的营销网络及售后服务网络。
安徽博特电器有限公司拥有现代化的生产厂房,年产10000台/套,拥有先进的生产设备以及冷冻冷藏陈列柜及厨房设备生产线,压缩机组装,配套线,热交换器〔蒸发器及冷凝器〕生产线,机械化的发泡车间,静电喷涂生产线和检漏设备齐全的产品检验室,现代化的生产工艺,其产品的技术精良、外观豪华美观和良好的信誉而著称。
严格的质量控制体系和管理方式,目前已具备了从产品设计、生产、质量检验到工程安装及售后服务的综合能力,确保产品的高质量。