Cacti-0.8.8b详细安装及配置步骤
Debian 8.2 安装 Cacti 0.8.8f 并支持中文显示
Debian 8.2 安装 Cacti 0.8.8f并支持中文显示Debian 8.2 默认安装的是 Cacti8.8.b,现在需要安装Cacit 0.8.8f 加入 Stretch 源vi /etc/apt/sources.list或者使用你喜欢的编辑器。
把主要来源复制一份然后把发行版改为stretch。
例如:deb /debian/ jessie maindeb /debian/ stretch main设定发行版的优先级vi /etc/apt/preferences写入Package: *Pin: release a=stablePin-Priority: 900Package: *Pin: release o=DebianPin-Priority: -10这样可以保证,除非明确指定发行版,否则只安装 Jessie 版本的包。
首先安装mysql数据库apt-get updateapt-get install mysql-server修改mysql的默认字符串修改mysql的配置文件vi /etc/mysql/f在 [mysqld] 处增加character-set-server = utf8保存重启mysqlservice mysql restart登陆mysql查看编码mysql -pmysql>SHOW VARIABLES LIKE 'character%';+--------------------------+----------------------------+ | Variable_name | Value |+--------------------------+----------------------------+ | character_set_client | utf8 || character_set_connection | utf8 || character_set_database | utf8 || character_set_filesystem | binary || character_set_results | utf8 || character_set_server | utf8 || character_set_system | utf8 || character_sets_dir | /usr/share/mysql/charsets/ | +--------------------------+----------------------------+ 8 rows in set (0.00 sec)mysql>SHOW VARIABLES LIKE 'collation_%';+----------------------+-----------------+| Variable_name | Value |+----------------------+-----------------+| collation_connection | utf8_general_ci || collation_database | utf8_general_ci || collation_server | utf8_general_ci |+----------------------+-----------------+3 rows in set (0.00 sec)mysql>安装 Cacti 0.88b更新列表并安装新版本的 Cactiapt-get install cacti-spine注:只需要安装cacti-spine,Cacti及所依赖的环境都会一起安装。
Linux下Cacti安装与配置
Linux下Cacti安装与配置原文链接:/Linux/2011-11/46712.htm这个是linux下安装配置Nagios和Cacti的第一个步骤,即配置一个web的环境,这里采用的是lamp的架构!这里采用的linux平台是RHEL 5.4的版本首先是mysql的编译安装(GCC和MAKE都要安装上,其他的套件按需安装)免费下载地址在/用户名与密码都是[root@localhost httpd]# useradd mysql[root@localhost ~]# ll mysql-5.1.59.tar.gz-rw-r--r-- 1 root root 24325443 Oct 14 22:38 mysql-5.1.59.tar.gz[root@localhost ~]# tar zxvf mysql-5.1.59.tar.gz[root@localhost mysql-5.1.59]# ./configure --prefix=/usr/local/mysql --enable-local-infile --with-charset=gbk --with-extra-charsets=all --with-low-memory --with-mysqld-user=mysql --enable-thread-safe-client[root@localhost mysql-5.1.59]#make && make install[root@localhost mysql-5.1.59]# cd /usr/local/mysql/[root@localhost mysql]# chown -R mysql.mysql .[root@localhost mysql]# ./bin/mysql_install_db --user=mysql[root@localhost mysql]# chown -R root .[root@localhost mysql]# chown -R mysql /var/[root@localhost mysql]# ./bin/mysqld_safe --user=mysql &[root@localhost mysql]# netstat -tulnp|grep 3306tcp00 0.0.0.0:33060.0.0.0:* LISTEN20438/mysqld[root@localhost mysql]# cd ~(这部分是制作mysql的开机启动项)[root@localhost ~]# echo "/usr/local/mysql/lib/mysql" >> /etc/ld.so.conf[root@localhost ~]# ldconfig -v[root@localhost ~]# ln -s /usr/local/mysql/bin/mysql /usr/local/bin/mysql[root@localhost ~]# cp mysql-5.1.59/support-files/mysql.server /etc/init.d/mysqld[root@localhost ~]# chmod 775 /etc/init.d/mysqld[root@localhost ~]# cp mysql-5.1.59/support-files/f /etc/my-cnf[root@localhost ~]# chkconfig --add mysqld[root@localhost ~]# chkconfig mysqld on[root@localhost ~]# chkconfig --list|grep mysqldmysqld0:off 1:off 2:on3:on4:on5:on6:of接着是apache的编译安装[root@localhost ~]# ll httpd-2.2.6.tar.gz-rw-r--r-- 1 root root 6028951 Sep62007 httpd-2.2.6.tar.gz[root@localhost ~]# tar zxvf httpd-2.2.6.tar.gz[root@localhost ~]# cd httpd-2.2.6[root@localhost httpd-2.2.6]# ./configure --prefix=/usr/local/httpd --enable-so--enable-rewrite --enable-ssl --with-ssl=/usr/local/openssl--with-zlib --enable-mods-shared=all --enable-track-vars --with-mysql=/usr/local/mysql[root@localhost httpd-2.2.6]# make && make install[root@localhost httpd-2.2.6]# echo "/usr/local/httpd/bin/apachectl start" >> /etc/rc.local[root@localhost httpd-2.2.6]# /usr/local/httpd/bin/apachectl start[root@localhost httpd-2.2.6]# netstat -tulnp|grep 80tcp00 :::80 :::*LISTEN19055/httpd接着添加php的支持[root@localhost ~]# cd /usr/local/httpd/conf/[root@localhost conf]# cp httpd.conf httpd.conf.bak[root@localhost conf]# vi httpd.conf (红色字体为修改部分)DocumentRoot "/var/www"<Directory />Options FollowSymLinksAllowOverride NoneOrder deny,allowAllow from all</Directory>AddType application/x-httpd-php .phpAddType application/x-httpd-php-source .phps最后是php的编译安装[root@localhost ~]# ll php-5.2.5.tar.gz-rw-r--r-- 1 root root 9972372 Jan32008 php-5.2.5.tar.gz[root@localhost ~]# tar zxvf php-5.2.5.tar.gz[root@localhost php-5.2.5]# ./configure --prefix=/usr/local/php \> --with-config-file-path=/etc \> --with-apxs2=/usr/local/httpd/bin/apxs \> --enable-fastcgi --enable-safe-mode \> --with-zlib --with-bz2 \> --with-freetype-dir \> --enable-mbstring \> --with-mysql=/usr/local/mysql \> --with-mysqli=/usr/local/mysql/bin/mysql_config\> --with-gd --with-libxml-dir \> --with-png-dir --with-jepg-dir --enable-sockets[root@localhost php-5.2.5]# make && make install如果本机已经rpm方式安装php,那么进行下边红色字体的动作[root@localhost php-5.2.5]# yum -y remove php*[root@localhost php-5.2.5]# cp php.ini-dist /etc/php.ini最后测试的部分[root@localhost ~]# cd /var/www/[root@localhost www]# vi info.php<?phpinfo();?>[root@localhost www]# cp /usr/local/httpd/htdocs/index.html .重启的服务就可以出来php那个经典的页面,表示成功!总结,这个实验是为了搭建Nagios和Cacti需要的web环境,接下来的实验就进入Nagios和Cacti的部分!这个实验是Nagios和Cacti安装与配置的第二个步骤之Cacti安装与配置,采用的实验环境是之前搭建的l amp的环境,这步需要安装很多的辅助套件,Cacti就是通过net-snmp进行数据的采集,通过Mysql进行模板、主机信息、以及rra信息的存储,通过RRdtool进行数据的存储和绘图,Cacti是直接与管理员交互的平台。
Cacti安装配置实战
Cacti安装配置实战1.1Cacti介绍Cacti是通过snmpget来获取数据,使用RRDtool绘画图形,而且你完全可以不需要了解RRDtool复杂的参数。
它提供了非常强大的数据和用户管理功能,可以指定每一个用户能查看树状结构、host以及任何一张图,还可以与LDAP结合进行用户验证,同时也能自己增加模板,功能非常强大完善。
界面友好。
软件Cacti 的发展是基于让RRDTool 使用者更方便使用该软件,除了基本的Snmp 流量跟系统资讯监控外,Cacti 也可外挂Scripts 及加上Templates 来作出各式各样的监控图。
cacti是用php语言实现的一个软件,它的主要功能是用snmp服务获取数据,然后用rrdtool 储存和更新数据,当用户需要查看数据的时候用rrdtool生成图表呈现给用户。
因此,snmp 和rrdtool是cacti的关键。
Snmp关系着数据的收集,rrdtool关系着数据存储和图表的生成。
Mysql配合PHP程序存储一些变量数据并对变量数据进行调用,如:主机名、主机ip、snmp 团体名、端口号、模板信息等变量。
snmp抓到数据不是存储在mysql中,而是存在rrdtool生成的rrd文件中(在cacti根目录的rra文件夹下)。
rrdtool对数据的更新和存储就是对rrd文件的处理,rrd文件是大小固定的档案文件(Round Robin Archive),它能够存储的数据笔数在创建时就已经定义。
关于RRDTool的知识请参阅RRDTool教学。
2.1操作系统环境[root@xuexi ~]# cat /etc/redhat-releaseCentOS release 6.5 (Final)[root@xuexi ~]# uname -r2.6.32-431.el6.x86_64[root@xuexi ~]# uname -mx86_642.1.1软件选择安装包准备除了这两个软件包其余的用yum 安装如yum install net-snmp* -y3.1开始安装3.1.1安装SNMP简单网络管理协议(SNMP),由一组网络管理的标准组成,包含一个应用层协议(application layer protocol)、数据库模型(database schema)和一组资源对象。
Cacti安装详细步骤

Cacti安装详细步骤Cacti安装详细步骤前提LNMP或LAMP架构已搭建完成⼀、cacti概述1. cacti是⽤php语⾔实现的⼀个软件,它的主要功能是⽤snmp服务获取数据,然后⽤rrdtool储存和更新数据,当⽤户需要查看数据的时候⽤rrdtool⽣成图表呈现给⽤户。
因此,snmp和rrdtool是cacti的关键。
Snmp关系着数据的收集,rrdtool关系着数据存储和图表的⽣成。
2. Mysql配合PHP程序存储⼀些变量数据并对变量数据进⾏调⽤,如:主机名、主机ip、snmp团体名、端⼝号、模板信息等变量。
3. snmp抓到数据不是存储在mysql中,⽽是存在rrdtool⽣成的rrd⽂件中(在cacti根⽬录的rra⽂件夹下)。
rrdtool对数据的更新和存储就是对rrd⽂件的处理,rrd⽂件是⼤⼩固定的档案⽂件(Round Robin Archive),它能够存储的数据笔数在创建时就已经定义。
⼆、安装rrdtool先试试这个:yum install rrdtool rrdtool-perl -y如果不⾏,可能是在主监控机上安装rrdtool,rrdtool依赖的包过多,所以选择增加源,然后⽤yum安装,试试下边的:[root@localhost /]# vi /etc/yum.repos.d/dag.repo[dag]name=Dag RPM Repository for Red Hat Enterprise Linuxbaseurl=http://apt.sw.be/redhat/el$releasever/en/$basearch/daggpgcheck=1gpgkey=/rpm/packages/RPM-GPG-KEY.dag.txtenabled=1然后yum安装:三、安装配置net-snmp3.1、安装net-snmpyum install net-snmp net-snmp-libs net-snmp-utils3.2、配置net-snmpvim /etc/snmp/snmpd.conf41⾏ 1将default 改为监控服务器ip;2将public 改成复杂些的识别的字符串com2sec notConfigUser 127.0.0.1 public62⾏ 1将systemview 改为all,供所有snmp 访问权限access notConfigGroup "" any noauth exact all none none85⾏将#注释符号去掉view all included .1803.3、测试net-snmp# service snmpd startsnmpd 使⽤ tcp/udp 161 端⼝,验证snmpd 服务使⽤snmpwalk 命令验证snmpwalk -v 2c -c public 127.0.0.1-v是指版本,-c 是指密钥,获取到系统信息则正常!如果cacti搭建好后很久还是没出图,⽤这个命令试试看能否获取到数据。
最新Cacti中文版安装手册及功能展示资料
简介:Cacti是一款优秀的开源监控软件,使用php实现,它的主要特点是使用snmp服务获取数据,然后用rrdtool存储和更新数据,当用户查看数据的时候,rrdtool生成图表呈现给用户。
mysql数据库用于存储变量并进行调用。
mysql数据库并不存储snmp 捕获到的数据,snmp捕获到的数据,存在于rrdtool生成的rrd文件中,这些文件位于cacti目录下的rra目录中。
下面我们介绍安装步骤和功能展示,非安装人员可以略过安装步骤直接看功能。
一、安装环境:系统:CentOS-6.6-x86_64软件:Cacti-0.8.7e-cn-utf8、mysql、snmp等二、安装步骤:1、准备CentOS-6.6-x86_64操作系统环境。
2、安装rpm包:#yum install httpd mysql-server php php-mysql gd net-snmp php-snmpnet-snmp-utils net-snmp-devel mysql-devel openssl-devel rrdtool3、设置开机自启动#chkconfig httpd on#chkconfig mysqld on#chkconfig snmpd on4、对Mysql数据库进行配置启动并初始化mysql数据库#service mysqld start为root用户设置密码(以”123456”为例),并更改登录权限,默认密码为空#mysql –u root –p 回车后输入密码(空)mysql>use mysql;mysql>update user set password=password(“123456”) where user=”root”;mysql>grant all privileges on *.* to root@localhost identified by “123456” with grant option;mysql>flush privileges;添加cacti库和cacti用户,并为其设置权限mysql>create database cacti default character set utf8; //数据库字符集设置utf8,否则乱码mysql>grant all privileges on cacti.* to cacti@localhost identified by “123456” with grant option;mysql>flush privileges;5安装cacti假设下载目录为/opt/soft#cd /opt/soft#tar zxvf cacti-0.8.7e-cn-utf8.tar.gz#mv cacti-0.8.7e-cn-utf8 /var/www/cacti修改配置文件#vi /var/www/cacti/include/config.php修改内容如下$database_type = "mysql";$database_default = "cacti";$database_hostname = "localhost";$database_username = "cacti";$database_password = "123456";创建并编辑apache的cacti配置文件#vi /etc/httpd/conf.d/cacti.conf内容如下:Alias /cacti /var/www/cacti<Directory /var/www/cacti>DirectoryIndex index.phpAllowOverride allorder deny,allowallow from allphp_flag magic_quotes_gpc onphp_flag track_vars on</Directory>导入数据库#mysql –u root –p cacti < /var/www/cacti/cacti.sql启动服务#service mysqld start#service httpd start#service snmpd start然后通过浏览器访问http://ip/cacti开始安装cacti直接下一步,选择”全新安装”,来到下面的一个界面,如图1请确认所有路径都已找到,并选择SNMP应用程序版本为5.x,RRDTool版本为1.3.x。
Centos7安装Cacti详细过程(含配图)

CentOS 7 安装Cacti文档整理制作:度度北京系统环境:Linux : CentOS 71、安装httpd、MySQL、PHP、PHP-SNMP、rrdtool[root~]# yum install httpd httpd-devel #安装httpd[root~]# yum install mariadb-server #安装mariadb数据库(Mysql开源)[root~]# yum install php-mysql php-pear php-common php-gd php-devel phpphp-mbstring php-cli#安装PHP及相关支持插件[root~]# yum install php-snmp #安装PHP-SNMP[root~]# yum install net-snmp-utils net-snmp-libs#安装net-snmp[root~]# yum install rrdtool 安装rrdtool2、配置httpd、mysql、snmpd、开机启动[root~]# systemctl start httpd.service #启动httpd[root~]# systemctl start mariadb.service #启动mysql[root~]# systemctl start snmpd.service #启动snmp[root~]# systemctl enable httpd.service #设置httpd开机启动[root~]# systemctl enable mariadb.service #设置mysql开机启动[root~]# systemctl enable snmpd.service #设置snmp开机启动3、设置LINUX服务器IP地址:[root~]# /etc/sysconfig/network-scripts/ifcfg-eno167779844、安装Cacti使用软件:FileZilla Client将已经下载好的cacti-0.8.8h.tar.gz,上传至Linux服务器[root~]# tar -xvzf cacti-0.8.8h.tar.gz #解压cacti[root~]# mv cacti-0.8.8c/ cacti #改目录名[root~]# cd cacti/[root~]# vi include/config.php #更改cacti配置文件$database_username = "cacti";#配置数据库用户名$database_password = "test"; #配置数据库密码date_default_timezone_set('Asia/shanghai');#添加cacti时间[root~]# useradd cacti -d /var/www/html/cacti/ #添加用户并对/cacti目录控制(会提示出错,忽略)[root~]# chown -R cacti /var/www/html/cacti/ #改变拥有者为cacti[root~]# chgrp -R cacti /var/www/html/cacti #改变目录属性为cacti[root~]# chmod -R 755 /var/www/html/cacti/ #设置cacti目录权限4、配置Mysql[root~]# mysqladmin -u root password 密码#设置mysql密码[root~]# mysql -u root –p #登录mysqlMariaDB >create database cacti;#建cacti库MariaDB >GRANT ALL ON cacti.* TO cacti@localhost IDENTIFIED BY 'test';#建cacti用户对cacti库的完全访问,test为密码MariaDB >FLUSH privileges;#刷新mysqlMariaDB >quit;#退出[root~]# mysql -u cacti -p cacti < /usr/local/cacti/cacti.sql#导入库(输入test密码后,成功不会有任何提示直接返回命令行)5、开启http端口[root~]# firewall-cmd --permanent --zone=public --add-service=http #防火墙开启HTTP[root~]# firewall-cmd --reload #刷新防火墙策略6、配置cacti[root~]# vi /etc/httpd/conf.d/cacti.conf #新建cacti的http配置文件Alias /cacti /var/www/html/cacti<Directory /var/www/html/cacti/><IfModule mod_authz_core.c># httpd 2.4Require all granted</IfModule><IfModule !mod_authz_core.c># httpd 2.2Order deny,allowDeny from allAllow from all</IfModule></Directory>[root~]# systemctl restart httpd.service #重启httpd[root~]# vi /etc/cron.d/cacti #新建配置cron.d*/5 * * * * cacti /usr/bin/php /var/www/html/cacti/poller.php > /dev/null 2>&1 # */5 * * * * cacti /usr/bin/php /var/www/html/cacti/poller.php > /dev/null 2>&1 [root~]# systemctl restart httpd.service #重启httpdDONE!使用IE登录http://192.168.96.69/cacti/点击:Finish,进入WEB页面,配置模版,增加监控设备。
中文cacti安装参考版
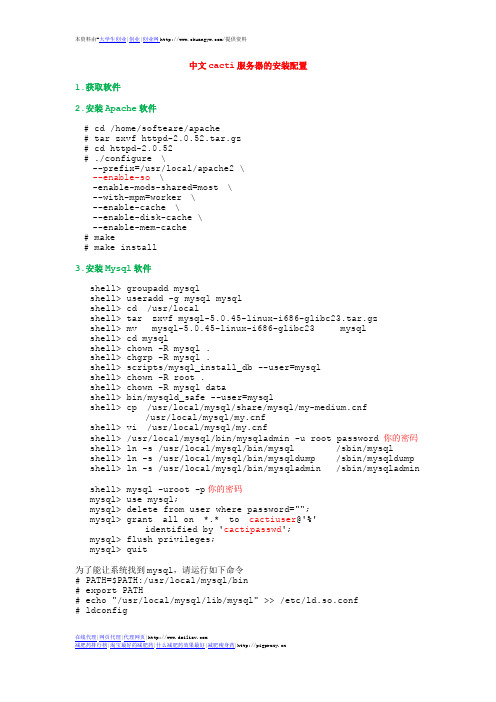
中文cacti服务器的安装配置1.获取软件2.安装Apache软件# cd /home/softeare/apache# tar zxvf httpd-2.0.52.tar.gz# cd httpd-2.0.52# ./configure \--prefix=/usr/local/apache2 \--enable-so \-enable-mods-shared=most \--with-mpm=worker \--enable-cache \--enable-disk-cache \--enable-mem-cache# make# make install3.安装Mysql软件shell> groupadd mysqlshell> useradd -g mysql mysqlshell> cd /usr/localshell> tar zxvf mysql-5.0.45-linux-i686-glibc23.tar.gzshell> mv mysql-5.0.45-linux-i686-glibc23 mysqlshell> cd mysqlshell> chown -R mysql .shell> chgrp -R mysql .shell> scripts/mysql_install_db --user=mysqlshell> chown -R root .shell> chown -R mysql datashell> bin/mysqld_safe --user=mysqlshell> cp /usr/local/mysql/share/mysql/f/usr/local/mysql/fshell> vi /usr/local/mysql/fshell> /usr/local/mysql/bin/mysqladmin -u root password 你的密码 shell> ln -s /usr/local/mysql/bin/mysql /sbin/mysqlshell> ln -s /usr/local/mysql/bin/mysqldump /sbin/mysqldump shell> ln -s /usr/local/mysql/bin/mysqladmin /sbin/mysqladmin shell> mysql -uroot -p你的密码mysql> use mysql;mysql> delete from user where password="";mysql> grant all on *.* to cactiuser@'%'identified by 'cactipasswd';mysql> flush privileges;mysql> quit为了能让系统找到mysql,请运行如下命令# PATH=$PATH:/usr/local/mysql/bin# export PATH# echo "/usr/local/mysql/lib/mysql" >> /etc/ld.so.conf# ldconfig4.安装PHP软件安装 jpeg6建立目录# mkdir /usr/local/jpeg6# mkdir /usr/local/jpeg6/bin# mkdir /usr/local/jpeg6/lib# mkdir /usr/local/jpeg6/include# mkdir /usr/local/jpeg6/man# mkdir /usr/local/jpeg6/man/man1# cd /root/soft# tar -zxf jpegsrc.v6b.tar.gz# cd jpeg-6b#./configure \--prefix=/usr/local/jpeg6/ \--enable-shared \--enable-static# make; make install安装libpng# cd /root/soft# tar -zxf libpng-1.2.8.tar.gz# cd libpng-1.2.8# cp scripts/makefile.std makefile# make; make install安装 freetype# cd /root/soft# tar -zxf freetype-2.1.10.tar.gz# cd freetype-2.1.10# ./configure --prefix=/usr/local/freetype # make;make install安装 zlib# cd /root/soft# tar -zxf zlib-1.2.3.tar.gz# cd zlib-1.2.3# ./configure --prefix=/usr/local/zlib# make;make install安装最新的GD库# cd /root/soft# tar -zxf gd-2.0.33.tar.gz# cd gd-2.0.33# ./configure \--prefix=/usr/local/gd2 \--with-jpeg=/usr/local/jpeg6/ \--with-png \--with-zlib=/usr/local/zlib \--with-freetype=/usr/local/freetype/# make; make install由于php5需libxml2的支持, 所以先安装libxml2 # cd /root/soft# tar -zxf libxml2-2.6.19.tar.gz# cd libxml2-2.6.19# ./configure --prefix=/usr/local/libxml2# make; make install安装 libxslt# cd /root/soft# tar -zxf libxslt-1.1.15.tar.gz# cd libxslt-1.1.15#./configure \--prefix=/usr/local/libxslt--with-libxml-prefix=/usr/local/libxml2# make; make install安装PHP# ./configure--prefix=/usr/local/php--with-apxs2=/usr/local/apache2/bin/apxs--with-mysql=/usr/local/mysql--with-gd=/usr/local/gd2--enable-gd-native-ttf--with-ttf--with-freetype-dir=/usr/local/freetype--with-jpeg-dir=/usr/local/libjpeg--with-png--with-zlib=/usr/local/zlib--with-iconv--enable-mbstring--enable-xml--enable-sockets# make# make install#cp php.ini-dist /usr/local/php/lib/php.ini#vi /usr/local/lib/php.ini将register_globals = Off改为register_globals = On 5.修改Apache配置文件寻找Add Type application/x-gzip .gz .tgz 在下面添加Add Type application/x-tar .tgzAddType application/x-httpd-php .phpAddType application/x-httpd-php-source .phps AddType image/x-icon .icoDirectoryIndex index.php index.html index.html.var 6.rrd 安装安装cgilib# cd /root/soft# tar -zxvf cgilib-0.5.tar.gz# cd cgilib-0.5# make CC=gcc CFLAGS=”-O3 –fPIC –I .”# mkdir –p /usr/local/cgilib/include# cp *.h /usr/local/cgilib/include# mkdir –p /usr/local/cgilib/lib# cp libcgi* /usr/local/cgilib/lib安装libart_lgpl# cd /root/soft# tar -zxvf libart_lgpl-2.3.17.tar.gz# cd libart_lgpl-2.3.17.# ./configure –disable-shared –prefix=/usr/local/libart_lgpl# make; make install编辑/etc/ld.so.conf添加一下几行到文件中/usr/local/zlib/lib/usr/local/freetype/lib/usr/local/libjpeg/lib/usr/local/cgilib/lib/usr/local/libart_lgpl/lib执行ldconfig命令,使用动态装入器装载到共享库。
centos6.5amd64bit cacti安装配置教程

Centos6.5x86_64下Cacti安装配置安装好centos系统之后登陆命令控制界面进行系统更新和软件更新。
#yum update#yumupgrade1.关闭 selinux#vi /etc/sysconfig/selinux /*命修改selinux文件如下# This file controls the state of SELinux on the system.# SELINUX= can take one of these three values:# enforcing - SELinux security policy is enforced.# permissive - SELinux prints warnings instead of enforcing.# disabled - No SELinux policy is loaded.#SELINUX=enforcing 把此行注释SELINUX=disabled /*添加此行# SELINUXTYPE= can take one of these two values:# targeted - Targeted processes are protected,# mls - Multi Level Security protection.SELINUXTYPE=targeted# setenforce 0 /*使用 setenforce 0 命令关闭正在运行的selinux2.关闭防火墙# service iptables stop# service ip6tables stop# chkconfig iptables off# chkconfig ip6tables off以上4行为彻底关闭防火墙# service iptables statusiptables: Firewall is not running.# service ip6tables statusip6tables: Firewall is not running.以上4行为验证是否关闭成功,如果出现红色字体所示的提示,则说明关闭成功3.设置时间因为系统是刚安装的,可能系统时间与实际时间不符,需要改动。
- 1、下载文档前请自行甄别文档内容的完整性,平台不提供额外的编辑、内容补充、找答案等附加服务。
- 2、"仅部分预览"的文档,不可在线预览部分如存在完整性等问题,可反馈申请退款(可完整预览的文档不适用该条件!)。
- 3、如文档侵犯您的权益,请联系客服反馈,我们会尽快为您处理(人工客服工作时间:9:00-18:30)。
1.Cacti环境安装1.1安装LAMP环境安装LAMP环境,当然,如果你有兴趣可以采用编译,我线上Mysql是编译的,其余是yum安装的。
在这次实验采用yum安装。
关闭iptables与selinux,如果有需要,后面再开启。
配置好yum源,开始安装。
yum -y install httpd http-devel httpd-manual mysql mysql-devel mysql-server php php-devel php-mysql php-common php-pdo php-gd lm_sensors net-snmp php-snmp net-snmp-utilschkconfig mysqld onchkconfig httpd onchkconfig snmpd onservice mysqld startservice httpd startservice snmpd start在浏览器中输入http://serverip,查看测试页有没有出现。
1.2配置snmpvim /etc/snmp/snmd.conf#/etc/init.d/snmpd restart验证snmp配置是否正确,# snmpwalk -v 2c -c public 127.0.0.1 if 表示正确IF-MIB::ifIndex.1 = INTEGER: 1IF-MIB::ifIndex.2 = INTEGER: 2IF-MIB::ifDescr.1 = STRING: lo如果提示Timeout: No Response from 127.0.0.1则配置不对。
1.3创建数据库存储cacti的数据# mysqladmin -u root password 'sky123'# mysql -u root -p:输入密码mysql> create database cacti;Query OK, 1 row affected (0.00 sec)mysql> grant all on cacti.* to cactiuser@localhost identified by 'cactiuser';Query OK, 0 rows affected (0.01 sec)mysql> flush privileges;Query OK, 0 rows affected (0.00 sec)mysql> exitTip:创建cacti数据库与cactiuser,可以省略在cacti配置文件中修改。
当然也可以创建别的名字,只是在cacti的配置文件需要多做两步。
1.4安装cacti1.4.1安装rrdtool需要的软件包yum -y install cairo-devel libxml2-devel pango pango-devel perl-CPAN1.4.2安装rrdtooltar zxf rrdtool-1.4.8.tar.gzcd rrdtool-1.4.8./configure --prefix=/usr/local/rrdtool;make;make install1.4.3安装cacti-0.8.8btar zxf cacti-0.8.8b.tar.gz -C /var/www/html/cd /var/www/html/mv cacti-0.8.8b cactichown -R apache:apache /var/www/html/cacti/cd /var/www/html/cacti/patch -p1 -N < /opt/security.patchTip:当我们打开浏览后,是apache用户来访问cacti,如果是编译的http,则不是apache用户,在http.conf有定义useradd cactiuserchown -R cactiuser:cactiuser cacti/{rra,log}1.4.4导入数据库mysql -ucactiuser -p cacti < cacti/cacti.sqlEnter password:1.4.5改配置文件,如下:vim cacti/include/global.phpvim include/config.php修改下面的数据库连接信息,基于不用修改。
$database_type = "mysql";$database_default = "cacti";$database_hostname = "localhost";$database_username = "cactiuser";$database_password = "cactiuser";$database_port = "3306";$database_ssl = false;1.4.6添加计划任务#echo "*/5 * * * * /usr/bin/php /var/www/html/cacti/poller.php &>/dev/null" >/var/spool/cron/cactiuser#/etc/init.d/crond restartTip:以cactiuser的身份定时执行这个脚本。
1.4.7初始化cacti将/usr/local/bin/rrdtool修改成正确的路径/usr/local/rrdtool/bin/rrdtool,点完成输入用户和密码都是admin,输入之后会要求强制修改密码。
打开http://192.168.187.110/cacti 打开Console-->setting-->Genernal--->修改下面两项RRDTool Utility Version选择RRDTOOL 1.4.x,SNMP Version选择version 2手动执行一次php /var/www/html/cacti/poller.php会提示下警告PHP Warning: date(): It is not safe to rely on the system's timezone settings. You are *required* to use the date.timezone setting or the date_default_timezone_set() function. In case you used any of those methods and you are still getting this warning, you most likely misspelled the timezone identifier. We selected 'America/New_York' for 'EST/-5.0/no DST' instead in /var/www/html/cacti/lib/functions.php on line 486#vim /etc/php.ini 启用下面并修改。
date.timezone = Asia/Chongqing/etc/init.d/httpd restart,再执行行php /var/www/html/cacti/poller.php没警告了,这下应该正常了。
等几钟应该会出图最后得到的结果如下所示。
Tip:1.初始化出现这种FATAL: Cannot connect to MySQL server on ‘localhost’. Please makesure you have specified a valid MySQL database name in ‘include/config.php’,则用cactiuser连接数据库,是否有权限完全控制cacti库。
2.如果不是cactiuser导致的,但是mysql是编译的,由于/var/www/html/cacti/poller.php使用的/var/lib/mysql/mysql.sock,因为编译的mysql的sock文件在tmp下,因此做一个软件链接ln -s /tmp/mysql.sock /var/lib/mysql/mysql.sock3. 初始化时,点击finished后又弹回初始化界面,则检查数据库配置文件是否有read-only=1,有则删除,并重启Mysql4. cacti图片显示的字体是方框,则需要安装字体,yum -y install dejavu-*,安装完后,刷新cacti界面就行。
5. 在Console--->Devices中显示localhost的状态为unknow,在rrd目录中没有生成文件,查看rra,log目录的权限是否正确,并手动执行php /var/www/html/cacti/poller.php。
注意调整时间,系统有两个时间,一个硬件时间和系统时间。
在虚拟机中往往要注意。
1.5安装spinetar zxf cacti-spine-0.8.8b.tar.gzcd cacti-spine-0.8.8b./configure --prefix=/usr/local/cacti-spineconfigure: error: Cannot find SNMP headers. Use --with-snmp= to specify non-default path.#yum -y net-snmp-devel#./configure --prefix=/usr/local/cacti-spine#Make && make install#cd /usr/local/cacti-spine/etc/#cp spine.conf.dist spine.conf#vim spine.confDB_Host localhostDB_Database cactiDB_User cactiuserDB_Pass cactiuserDB_Port 3306DB_PreG 0#/usr/local/cacti-spine/bin/spine --conf=/usr/local/cacti-spine/etc/spine.conf 测试spine安装是否正确,输出下面信息表示安装成功SPINE: Using spine config file [/usr/local/cacti-spine/etc/spine.conf]SPINE: Version 0.8.8a startingSPINE: Time: 0.1251 s, Threads: 5, Hosts: 2打开catcti网页。