nginx入门教程
Nginx开发和配置教程

Nginx开发和配置教程一、Nginx的开发1. Nginx模块开发-编写模块的配置指令:模块的配置指令决定了模块如何被配置和使用。
-实现模块的处理函数:处理函数负责处理来自客户端的请求并返回响应。
- 注册模块:将模块注册到Nginx的配置中。
2. Nginx的事件驱动模型-事件模块:负责监听和接收客户端请求。
-连接池:管理与客户端的连接。
-请求处理:负责处理客户端的请求并返回响应。
二、Nginx的配置1. Nginx配置文件2. Nginx的基本配置指令- worker_processes:指定Nginx的工作进程数,用于处理并发请求。
- pid:指定Nginx的进程ID文件路径。
- error_log:指定错误日志文件的路径。
- access_log:指定访问日志文件的路径。
- events:指定Nginx的事件模块配置。
3. Nginx的虚拟主机配置- server:定义一个虚拟主机。
- listen:指定虚拟主机监听的端口。
- server_name:指定虚拟主机的域名。
- root:指定虚拟主机的根目录。
4. Nginx的负载均衡配置- upstream:定义一个负载均衡服务器组。
- server:定义一个后端服务器。
- weight:指定后端服务器的权重,用于分配请求。
- ip_hash:根据客户端IP地址进行负载均衡。
总结:本文介绍了Nginx的开发和配置教程。
在Nginx的开发方面,我们了解了Nginx的模块开发和事件驱动模型。
在Nginx的配置方面,我们了解了Nginx的配置文件,基本配置指令,虚拟主机配置和负载均衡配置。
希望这些内容能帮助您更好地开发和配置Nginx服务器。
nginx入门教程

Nginx入门教程题目Nginx入门教程作者杨新彦状态创建完成时间 2012 年 7 月2 日1 Nginx概述Nginx ("engine x") 是一个高性能的 HTTP 和反向代理服务器,也是一个 IMAP/POP3/SMTP 代理服务器。
Nginx作为负载均衡服务器:Nginx 既可以在内部直接支持 Rails 和 PHP 程序对外进行服务,也可以支持作为 HTTP代理服务器对外进行服务。
Nginx采用C进行编写,不论是系统资源开销还是CPU使用效率都比 Perlbal 要好很多。
作为邮件代理服务器:Nginx 同时也是一个非常优秀的邮件代理服务器。
(更多介绍参照百科,更多使用参照GOOGLE,广而告之)2 Nginx安装2.1 Nginx下载地址本文以windows平台下nginx/Windows-1.3.2安装为例,其下载地址为/en/download.html;2.2 安装下载后解压缩放到D:\tools目录下,如下图2-1所示图2-1进入dos命令行界面,通过命令start nginx启动服务器,如下图2-2所示图2-2启动瞬间感觉到屏幕一闪而过,看一下logs目录下是不是多一个nginx.pid文件,cmd窗口输入D:\tools\nginx-1.3.2>tasklist /fi "imagename eq nginx.exe";结果如下图2-3所示:图2-3说明nginx已经成功启动,有两个进程,按照官方解释,nginx是守护进程,其中一个是一直等待处理时间当中,当有事件被触发时,就启动另外一个进程处理相关请求。
Nginx默认端口号为80,可以访问http://localhost ,如下图2-4所示图2-42.3 ngnix常见命令3 配置测试3.1反向代理反向代理(Reverse Proxy)方式是指以代理服务器来接受internet上的连接请求,然后将请求转发给内部网络上的服务器,并将从服务器上得到的结果返回给internet上请求连接的客户端此时代理服务器对外就表现为一个服务器。
nginx 教程
nginx 教程nginx 是一个高性能的 HTTP 和反向代理服务器,它是一个轻量级的 Web 服务器,也可以作为反向代理服务器、负载平衡器、HTTP缓存等使用。
以下是一些常见的 Nginx 配置和用法:1. 安装 Nginx:在 Ubuntu 上使用以下命令安装 Nginx:```sudo apt updatesudo apt install nginx```在 CentOS 上使用以下命令安装 Nginx:```sudo yum install epel-releasesudo yum install nginx```2. 配置 Nginx:Nginx 的配置文件位于`/etc/nginx/nginx.conf`。
你可以使用任何文本编辑器打开该文件进行配置。
在配置文件中,你可以添加和修改以下内容:- 修改监听端口:默认监听端口为 80,你可以根据需要修改为其他端口。
- 添加虚拟主机配置:你可以在配置文件中添加多个 server 块,每个 server 块对应一个虚拟主机配置。
- 配置反向代理:你可以使用 Nginx 作为反向代理服务器,将请求转发给不同的后端服务器。
- 配置负载均衡:你可以配置 Nginx 实现负载均衡,将请求分发给多个后端服务器,提高系统的性能和可靠性。
- 配置HTTP缓存:你可以使用 Nginx 缓存静态内容,减少动态生成内容的负载。
3. 启动和停止 Nginx 服务:在 Ubuntu 上使用以下命令启动 Nginx:```sudo systemctl start nginx```在 CentOS 上使用以下命令启动 Nginx:```sudo systemctl start nginx```停止 Nginx 使用以下命令:```sudo systemctl stop nginx```4. 检查 Nginx 配置文件语法:在修改 Nginx 配置文件后,可以使用以下命令检查配置文件的语法是否正确:```sudo nginx -t```如果配置文件语法正确,则会显示 "syntax is ok",否则会显示错误信息,需根据错误信息进行调整。
Nginx 中文手册-从入门到精通 文档
host
GET
/uri HTTP/1.0 nginx http0.9 1.0 1.1 nginx ngx_http_process_request_headers ngx_http_read_request_header ngx_http_request_t HTTP ngx_http_headers_in hash :Host nginx ngx_http_process_request ngx_http_request_handler ngx_http_handler ngx_http_request_handler ngx_http_request_t write_event_handler body write_event_handler read_event_handler ngx_http_core_run_phases ngx_http_handler ngx_http_process_host handler host
ngx_http_core_run_phases
filter
header filter
ngx_http_header_filter nginx ( body ) nginx client_header_buffer_size buffer large_buffer
buffer buffer buffer 4 8k buffer
nginx ./nginx -s stop
listen
socket
listenfd
accept_mutex worker worker nginx
master bug worker
worker
worker
nginx nginx nginx apache apache worker worker
Nginx之基础入门
Nginx之基础⼊门 ⼀、Nginxi简介 Nginx是什么?它是⼀个开源、⾼性能的WEB服务器软件和代理服务器软件,由俄罗斯⼈Igor Sysoev 开发实现。
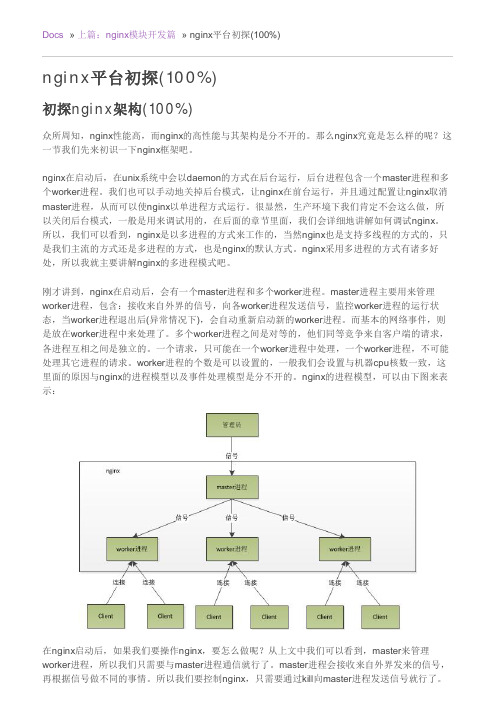
它的功能主要分三类,第⼀是它作为⼀个WEB服务软件使⽤;第⼆它可作为⼀个反向代理服务器使⽤,邮件代理服务(通常邮件代理⽤的⾮常少);第三它可以基于upstream 或stream模块实现负载均衡,这种负载均衡是基于前⾯的反向代理增加的功能,它可以基于http协议进⾏应⽤层代理,也可以基于tcp协议进⾏伪四层代理(它不是真正意义上的四层代理,因为它⼯作在应⽤层); ⼆、Nginx的程序架构 Nginx是master/worker架构,由⼀个master主控进程和⼀个或多个worker进程组成;master进程主要功能是负责加载和分析配置⽂件、管理worker进程、平滑升级;worker 进程主要负责处理并响应客户端的请求。
每个worker进程依靠各种模块以流⽔线的形式实现各种功能处理;⾯向客户端⽹络IO连接请求,nginx的worker进程是基于事件驱动模型使⽤epoll机制来实现⼀个worker进程可以处理响应多路请求,如果是BSD系统,它可以使⽤kevent事件驱动模型实现⼀个worker进程处理并响应多路请求,从⽽实现⾼并发请求处理;⾯向本地磁盘IO连接请求,它是基于⾼级IO的sendfile机制,AIO异步机制和mmap内存映射机制,内核直接构建响应报⽂来完成磁盘IO的⾼级特性;⾯向⽹络IO它不是真正意义上的实现⼀个纯异步的功能,对于⽹络IO的第⼀阶段(数据从磁盘到内核内存)是⾮阻塞,异步模式,第⼆阶段(内核内存到进程内存)依然是阻塞的,所以从某种意义上讲它在⽹络IO上不是⼀个真正意义上的异步机制,对于磁盘IO它是⼀个纯异步机制;当客户端发送⼀个请求到Nginx服务器时,由⼀个worker进程接收请求,⾸先它会基于某种策略(根据配置⽂件中配置),来确定⽤户请求是否查询本地缓存,如果配置⽂件中定义的有某某资源需要查询缓存,那么它就会去本地磁盘去查询缓存,如果有,就直接把缓存内容响应给客户端,如果本地缓存⾥没有客户端请求的资源,那么它会通过代理向后端发送请求,并将后端服务器返回的结果在本地缓存⼀份,然后再发送给客户端;这样⼀来当客户端或者其他客户端再来访问同⼀资源时,它就可以直接从本地缓存中响应客户端;这就是nginx缓存⼯作逻辑;除此之外,它还可以基于各种协议去代理后端服务器,前端客户端请求到达nginx服务器,它会根据配置⽂件中定义的规则,把客户端请求代理到后端服务器,从⽽实现反向代理服务器响应客户端请求; 三、Nginx的安装配置 1、编译安装 ⾸先准备编译环境[root@www ~]# yum groupinstall "development tools" "server platform development"Loaded plugins: fastestmirrorThere is no installed groups file.Maybe run: yum groups mark convert (see man yum)Loading mirror speeds from cached hostfile* base: * extras: * updates: Warning: group server platform development does not exist.Resolving Dependencies--> Running transaction check---> Package autoconf.noarch 0:2.69-11.el7 will be installed--> Processing Dependency: m4 >= 1.4.14 for package: autoconf-2.69-11.el7.noarch---> Package automake.noarch 0:1.13.4-3.el7 will be installed--> Processing Dependency: perl(Thread::Queue) for package: automake-1.13.4-3.el7.noarch……省略部分内容Installed:autoconf.noarch 0:2.69-11.el7 automake.noarch 0:1.13.4-3.el7 bison.x86_64 0:3.0.4-2.el7 byacc.x86_64 0:1.9.20130304-3.el7cscope.x86_64 0:15.8-10.el7 ctags.x86_64 0:5.8-13.el7 diffstat.x86_64 0:1.57-4.el7 doxygen.x86_64 1:1.8.5-3.el7elfutils.x86_64 0:0.176-2.el7 flex.x86_64 0:2.5.37-6.el7 gcc.x86_64 0:4.8.5-39.el7 gcc-c++.x86_64 0:4.8.5-39.el7gcc-gfortran.x86_64 0:4.8.5-39.el7 git.x86_64 0:1.8.3.1-21.el7_7 indent.x86_64 0:2.2.11-13.el7 intltool.noarch 0:0.50.2-7.el7libtool.x86_64 0:2.4.2-22.el7_3 patch.x86_64 0:2.7.1-12.el7_7 patchutils.x86_64 0:0.3.3-4.el7 rcs.x86_64 0:5.9.0-5.el7redhat-rpm-config.noarch 0:9.1.0-88.el7.centos rpm-build.x86_64 0:4.11.3-40.el7 rpm-sign.x86_64 0:4.11.3-40.el7 subversion.x86_64 0:1.7.14-14.el7swig.x86_64 0:2.0.10-5.el7 systemtap.x86_64 0:4.0-10.el7_7Dependency Installed:apr.x86_64 0:1.4.8-5.el7 apr-util.x86_64 0:1.5.2-6.el7 avahi-libs.x86_64 0:0.6.31-19.el7boost-date-time.x86_64 0:1.53.0-27.el7 boost-system.x86_64 0:1.53.0-27.el7 boost-thread.x86_64 0:1.53.0-27.el7bzip2.x86_64 0:1.0.6-13.el7 cpp.x86_64 0:4.8.5-39.el7 dwz.x86_64 0:0.11-3.el7dyninst.x86_64 0:9.3.1-3.el7 efivar-libs.x86_64 0:36-12.el7 emacs-filesystem.noarch 1:24.3-22.el7gdb.x86_64 0:7.6.1-115.el7 gettext-common-devel.noarch 0:0.19.8.1-2.el7 gettext-devel.x86_64 0:0.19.8.1-2.el7glibc-devel.x86_64 0:2.17-292.el7 glibc-headers.x86_64 0:2.17-292.el7 gnutls.x86_64 0:3.3.29-9.el7_6json-c.x86_64 0:0.11-4.el7_0 kernel-debug-devel.x86_64 0:3.10.0-1062.12.1.el7 kernel-headers.x86_64 0:3.10.0-1062.12.1.el7libdwarf.x86_64 0:20130207-4.el7 libgfortran.x86_64 0:4.8.5-39.el7 libmodman.x86_64 0:2.0.1-8.el7libmpc.x86_64 0:1.0.1-3.el7 libproxy.x86_64 0:0.4.11-11.el7 libquadmath.x86_64 0:4.8.5-39.el7libquadmath-devel.x86_64 0:4.8.5-39.el7 libstdc++-devel.x86_64 0:4.8.5-39.el7 m4.x86_64 0:1.4.16-10.el7mokutil.x86_64 0:15-2.el7.centos mpfr.x86_64 0:3.1.1-4.el7 neon.x86_64 0:0.30.0-4.el7nettle.x86_64 0:2.7.1-8.el7 pakchois.x86_64 0:0.4-10.el7 perl-Error.noarch 1:0.17020-2.el7perl-Git.noarch 0:1.8.3.1-21.el7_7 perl-TermReadKey.x86_64 0:2.30-20.el7 perl-Test-Harness.noarch 0:3.28-3.el7perl-Thread-Queue.noarch 0:3.02-2.el7 perl-XML-Parser.x86_64 0:2.41-10.el7 perl-srpm-macros.noarch 0:1-8.el7python-srpm-macros.noarch 0:3-32.el7 rsync.x86_64 0:3.1.2-6.el7_6.1 subversion-libs.x86_64 0:1.7.14-14.el7systemtap-client.x86_64 0:4.0-10.el7_7 systemtap-devel.x86_64 0:4.0-10.el7_7 systemtap-runtime.x86_64 0:4.0-10.el7_7trousers.x86_64 0:0.3.14-2.el7 unzip.x86_64 0:6.0-20.el7 zip.x86_64 0:3.0-11.el7Dependency Updated:elfutils-libelf.x86_64 0:0.176-2.el7 elfutils-libs.x86_64 0:0.176-2.el7 glibc.x86_64 0:2.17-292.el7 glibc-common.x86_64 0:2.17-292.el7libgcc.x86_64 0:4.8.5-39.el7 libgomp.x86_64 0:4.8.5-39.el7 libstdc++.x86_64 0:4.8.5-39.el7 rpm.x86_64 0:4.11.3-40.el7rpm-build-libs.x86_64 0:4.11.3-40.el7 rpm-libs.x86_64 0:4.11.3-40.el7 rpm-python.x86_64 0:4.11.3-40.el7Complete![root@www ~]# 提⽰:基础的编译环境基本搭建完,接下来再装⼏个nginx依赖的包[root@www ~]# yum install pcre-devel openssl-devel zlib-devel -yLoaded plugins: fastestmirrorLoading mirror speeds from cached hostfile* base: * extras: * updates: Resolving Dependencies--> Running transaction check---> Package openssl-devel.x86_64 1:1.0.2k-19.el7 will be installed--> Processing Dependency: openssl-libs(x86-64) = 1:1.0.2k-19.el7 for package: 1:openssl-devel-1.0.2k-19.el7.x86_64--> Processing Dependency: krb5-devel(x86-64) for package: 1:openssl-devel-1.0.2k-19.el7.x86_64---> Package pcre-devel.x86_64 0:8.32-17.el7 will be installed……省略部分内容Installed:openssl-devel.x86_64 1:1.0.2k-19.el7 pcre-devel.x86_64 0:8.32-17.el7 zlib-devel.x86_64 0:1.2.7-18.el7Dependency Installed:keyutils-libs-devel.x86_64 0:1.5.8-3.el7 krb5-devel.x86_64 0:1.15.1-37.el7_7.2 libcom_err-devel.x86_64 0:1.42.9-16.el7 libkadm5.x86_64 0:1.15.1-37.el7_7.2libselinux-devel.x86_64 0:2.5-14.1.el7 libsepol-devel.x86_64 0:2.5-10.el7 libverto-devel.x86_64 0:0.2.5-4.el7Dependency Updated:e2fsprogs.x86_64 0:1.42.9-16.el7 e2fsprogs-libs.x86_64 0:1.42.9-16.el7 krb5-libs.x86_64 0:1.15.1-37.el7_7.2 libcom_err.x86_64 0:1.42.9-16.el7libselinux.x86_64 0:2.5-14.1.el7 libselinux-python.x86_64 0:2.5-14.1.el7 libselinux-utils.x86_64 0:2.5-14.1.el7 libsepol.x86_64 0:2.5-10.el7libss.x86_64 0:1.42.9-16.el7 openssl.x86_64 1:1.0.2k-19.el7 openssl-libs.x86_64 1:1.0.2k-19.el7 zlib.x86_64 0:1.2.7-18.el7Complete![root@www ~]# 提⽰:环境准备好了后我们就开始准备源码包和创建nginx⽤户 先创建⽤户吧[root@www ~]# useradd -r -s /sbin/nologin -c "web server for nginx" -d /var/lib/nginx nginx[root@www ~]# getent passwd nginxnginx:x:997:995:web server for nginx:/var/lib/nginx:/sbin/nologin[root@www ~]# 提⽰:⼀般这个⽤户⽤于运⾏nginx,所以通常都创建成shell类型为/sbin/nologin 下载源码包,并解压源码包[root@www ~]# ls[root@www ~]# wget /download/nginx-1.10.3.tar.gz--2020-02-14 04:45:51-- /download/nginx-1.10.3.tar.gzResolving ()... 95.211.80.227, 62.210.92.35, 2001:1af8:4060:a004:21::e3Connecting to ()|95.211.80.227|:80... connected.HTTP request sent, awaiting response... 200 OKLength: 911509 (890K) [application/octet-stream]Saving to: ‘nginx-1.10.3.tar.gz’100%[=================================================================================================================================>] 911,509 4.73KB/s in 1m 53s 2020-02-14 04:47:45 (7.87 KB/s) - ‘nginx-1.10.3.tar.gz’ saved [911509/911509][root@www ~]# lsnginx-1.10.3.tar.gz[root@www ~]# tar xf nginx-1.10.3.tar.gz[root@www ~]# cd nginx-1.10.3[root@www nginx-1.10.3]# lsauto CHANGES CHANGES.ru conf configure contrib html LICENSE man README src[root@www nginx-1.10.3]# 提⽰:接下来我们需要指定编译选项,编译选项说明可通过./configure --help查看[root@www nginx-1.10.3]# ./configure --help--help print this message--prefix=PATH set installation prefix--sbin-path=PATH set nginx binary pathname--modules-path=PATH set modules path--conf-path=PATH set nginx.conf pathname--error-log-path=PATH set error log pathname--pid-path=PATH set nginx.pid pathname--lock-path=PATH set nginx.lock pathname--user=USER set non-privileged user forworker processes--group=GROUP set non-privileged group forworker processes--build=NAME set build name--builddir=DIR set build directory--with-select_module enable select module--without-select_module disable select module--with-poll_module enable poll module--without-poll_module disable poll module--with-threads enable thread pool support--with-file-aio enable file AIO support--with-ipv6 enable IPv6 support--with-http_ssl_module enable ngx_http_ssl_module--with-http_v2_module enable ngx_http_v2_module--with-http_realip_module enable ngx_http_realip_module--with-http_addition_module enable ngx_http_addition_module--with-http_xslt_module enable ngx_http_xslt_module--with-http_xslt_module=dynamic enable dynamic ngx_http_xslt_module--with-http_image_filter_module enable ngx_http_image_filter_module--with-http_image_filter_module=dynamicenable dynamic ngx_http_image_filter_module--with-http_geoip_module enable ngx_http_geoip_module--with-http_geoip_module=dynamic enable dynamic ngx_http_geoip_module--with-http_sub_module enable ngx_http_sub_module--with-http_dav_module enable ngx_http_dav_module--with-http_flv_module enable ngx_http_flv_module--with-http_mp4_module enable ngx_http_mp4_module--with-http_gunzip_module enable ngx_http_gunzip_module--with-http_gzip_static_module enable ngx_http_gzip_static_module--with-http_auth_request_module enable ngx_http_auth_request_module--with-http_random_index_module enable ngx_http_random_index_module--with-http_secure_link_module enable ngx_http_secure_link_module--with-http_degradation_module enable ngx_http_degradation_module--with-http_slice_module enable ngx_http_slice_module--with-http_stub_status_module enable ngx_http_stub_status_module--without-http_charset_module disable ngx_http_charset_module--without-http_gzip_module disable ngx_http_gzip_module--without-http_ssi_module disable ngx_http_ssi_module--without-http_userid_module disable ngx_http_userid_module--without-http_access_module disable ngx_http_access_module--without-http_auth_basic_module disable ngx_http_auth_basic_module--without-http_autoindex_module disable ngx_http_autoindex_module--without-http_geo_module disable ngx_http_geo_module--without-http_map_module disable ngx_http_map_module--without-http_split_clients_module disable ngx_http_split_clients_module--without-http_referer_module disable ngx_http_referer_module--without-http_rewrite_module disable ngx_http_rewrite_module--without-http_proxy_module disable ngx_http_proxy_module--without-http_fastcgi_module disable ngx_http_fastcgi_module--without-http_uwsgi_module disable ngx_http_uwsgi_module--without-http_scgi_module disable ngx_http_scgi_module--without-http_memcached_module disable ngx_http_memcached_module--without-http_limit_conn_module disable ngx_http_limit_conn_module--without-http_limit_req_module disable ngx_http_limit_req_module--without-http_empty_gif_module disable ngx_http_empty_gif_module--without-http_browser_module disable ngx_http_browser_module--without-http_upstream_hash_moduledisable ngx_http_upstream_hash_module--without-http_upstream_ip_hash_moduledisable ngx_http_upstream_ip_hash_module--without-http_upstream_least_conn_moduledisable ngx_http_upstream_least_conn_module--without-http_upstream_keepalive_moduledisable ngx_http_upstream_keepalive_module--without-http_upstream_zone_moduledisable ngx_http_upstream_zone_module--with-http_perl_module enable ngx_http_perl_module--with-http_perl_module=dynamic enable dynamic ngx_http_perl_module--with-perl_modules_path=PATH set Perl modules path--with-perl=PATH set perl binary pathname--http-log-path=PATH set http access log pathname--http-client-body-temp-path=PATH set path to storehttp client request body temporary files--http-proxy-temp-path=PATH set path to storehttp proxy temporary files--http-fastcgi-temp-path=PATH set path to storehttp fastcgi temporary files--http-uwsgi-temp-path=PATH set path to storehttp uwsgi temporary files--http-scgi-temp-path=PATH set path to storehttp scgi temporary files--without-http disable HTTP server--without-http-cache disable HTTP cache--with-mail enable POP3/IMAP4/SMTP proxy module--with-mail=dynamic enable dynamic POP3/IMAP4/SMTP proxy module--with-mail_ssl_module enable ngx_mail_ssl_module--without-mail_pop3_module disable ngx_mail_pop3_module--without-mail_imap_module disable ngx_mail_imap_module--without-mail_smtp_module disable ngx_mail_smtp_module--with-stream enable TCP/UDP proxy module--with-stream=dynamic enable dynamic TCP/UDP proxy module--with-stream_ssl_module enable ngx_stream_ssl_module--without-stream_limit_conn_module disable ngx_stream_limit_conn_module--without-stream_access_module disable ngx_stream_access_module--without-stream_upstream_hash_moduledisable ngx_stream_upstream_hash_module--without-stream_upstream_least_conn_moduledisable ngx_stream_upstream_least_conn_module--without-stream_upstream_zone_moduledisable ngx_stream_upstream_zone_module--with-google_perftools_module enable ngx_google_perftools_module--with-cpp_test_module enable ngx_cpp_test_module--add-module=PATH enable external module--add-dynamic-module=PATH enable dynamic external module--with-cc=PATH set C compiler pathname--with-cpp=PATH set C preprocessor pathname--with-cc-opt=OPTIONS set additional C compiler options--with-ld-opt=OPTIONS set additional linker options--with-cpu-opt=CPU build for the specified CPU, valid values:pentium, pentiumpro, pentium3, pentium4,athlon, opteron, sparc32, sparc64, ppc64--without-pcre disable PCRE library usage--with-pcre force PCRE library usage--with-pcre=DIR set path to PCRE library sources--with-pcre-opt=OPTIONS set additional build options for PCRE--with-pcre-jit build PCRE with JIT compilation support--with-md5=DIR set path to md5 library sources--with-md5-opt=OPTIONS set additional build options for md5--with-md5-asm use md5 assembler sources--with-sha1=DIR set path to sha1 library sources--with-sha1-opt=OPTIONS set additional build options for sha1--with-sha1-asm use sha1 assembler sources--with-zlib=DIR set path to zlib library sources--with-zlib-opt=OPTIONS set additional build options for zlib--with-zlib-asm=CPU use zlib assembler sources optimizedfor the specified CPU, valid values:pentium, pentiumpro--with-libatomic force libatomic_ops library usage--with-libatomic=DIR set path to libatomic_ops library sources--with-openssl=DIR set path to OpenSSL library sources--with-openssl-opt=OPTIONS set additional build options for OpenSSL--with-debug enable debug logging[root@www nginx-1.10.3]# 提⽰:nginx的编译选项⼤致可以划分三类,⼀般以--with开头表⽰默认不装载的模块或功能,我们如果需要使⽤需要⼿动指定,其次是--without开头的表⽰默认我们不指定就有点功能或模块,如果我们不需要该功能或模块,可⼿动指定;最后就是添加第三⽅模块可以使⽤ --add-module来加载第三⽅模块,第三⽅模块动态加载,在1.9.11版本后才⽀持,可以使⽤--add-dynamic-module来加载,其他选项⼏乎同其他编译软件类似; 指定编译选项,检查编译环境[root@www nginx-1.10.3]# ./configure --prefix=/usr/share/nginx \> --sbin-path=/usr/sbin/nginx \> --modules-path=/usr/lib64/nginx/modules \> --conf-path=/etc/nginx/nginx.conf \> --error-log-path=/var/log/nginx/error.log \> --http-log-path=/var/log/nginx/access.log \> --http-client-body-temp-path=/var/lib/nginx/tmp/client_body \> --http-proxy-temp-path=/var/lib/nginx/tmp/proxy \> --http-fastcgi-temp-path=/var/lib/nginx/tmp/fastcgi \> --http-uwsgi-temp-path=/var/lib/nginx/tmp/uwsgi \> --http-scgi-temp-path=/var/lib/nginx/tmp/scgi \> --pid-path=/var/run/nginx.pid \> --lock-path=/var/lock/subsys/nginx \> --user=nginx \> --group=nginx \> --with-file-aio \> --with-ipv6 \> --with-http_ssl_module \> --with-http_v2_module \> --with-http_realip_module \> --with-http_addition_module \> --with-http_xslt_module=dynamic \> --with-http_image_filter_module=dynamic \> --with-http_geoip_module=dynamic \> --with-http_sub_module \> --with-http_dav_module \> --with-http_flv_module \> --with-http_mp4_module \> --with-http_gunzip_module \> --with-http_gzip_static_module \> --with-http_random_index_module \> --with-http_secure_link_module \> --with-http_degradation_module \> --with-http_slice_module \> --with-http_stub_status_module \> --with-http_perl_module=dynamic \> --with-mail=dynamic \> --with-mail_ssl_module \> --with-pcre \> --with-pcre-jit \> --with-stream=dynamic \> --with-stream_ssl_module --with-debug \> --with-cc-opt='-O2 -g -pipe -Wall -Wp,-D_FORTIFY_SOURCE=2 -fexceptions -fstack-protector --param=ssp-buffer-size=4 -m64 -mtune=generic' \> --with-ld-opt=' -Wl,-E' 提⽰:以上是yum安装的nginx编译时指定的选项,我们就拿这个⽤吧,如果有特别的功能添加,可以指定即可checking for libxslt in /usr/local/ ... not foundchecking for libxslt in /usr/pkg/ ... not foundchecking for libxslt in /opt/local/ ... not found./configure: error: the HTTP XSLT module requires the libxml2/libxsltlibraries. You can either do not enable the module or install the libraries.[root@www nginx-1.10.3]# 提⽰:在预编译检查环境时报错,说我们缺少libxm12或者是libxslt这个包,我们可以选择安装这两个包,或者把--with-http_xslt_module=dynamic这个选项给去掉也⾏;通常情况下我们安装缺少包的devel包即可[root@www nginx-1.10.3]# yum install libxml2-devel libxslt-devel -yLoaded plugins: fastestmirrorLoading mirror speeds from cached hostfile* base: * extras: * updates: Resolving Dependencies--> Running transaction check---> Package libxml2-devel.x86_64 0:2.9.1-6.el7_2.3 will be installed--> Processing Dependency: xz-devel for package: libxml2-devel-2.9.1-6.el7_2.3.x86_64---> Package libxslt-devel.x86_64 0:1.1.28-5.el7 will be installed--> Processing Dependency: libxslt = 1.1.28-5.el7 for package: libxslt-devel-1.1.28-5.el7.x86_64--> Processing Dependency: libgcrypt-devel for package: libxslt-devel-1.1.28-5.el7.x86_64--> Processing Dependency: libxslt.so.1()(64bit) for package: libxslt-devel-1.1.28-5.el7.x86_64--> Processing Dependency: libexslt.so.0()(64bit) for package: libxslt-devel-1.1.28-5.el7.x86_64--> Running transaction check---> Package libgcrypt-devel.x86_64 0:1.5.3-14.el7 will be installed--> Processing Dependency: libgpg-error-devel for package: libgcrypt-devel-1.5.3-14.el7.x86_64---> Package libxslt.x86_64 0:1.1.28-5.el7 will be installed---> Package xz-devel.x86_64 0:5.2.2-1.el7 will be installed--> Running transaction check---> Package libgpg-error-devel.x86_64 0:1.12-3.el7 will be installed--> Finished Dependency ResolutionDependencies Resolved=========================================================================================================================================================================== Package Arch Version Repository Size=========================================================================================================================================================================== Installing:libxml2-devel x86_64 2.9.1-6.el7_2.3 base 1.0 Mlibxslt-devel x86_64 1.1.28-5.el7 base 309 kInstalling for dependencies:libgcrypt-devel x86_64 1.5.3-14.el7 base 129 klibgpg-error-devel x86_64 1.12-3.el7 base 16 klibxslt x86_64 1.1.28-5.el7 base 242 kxz-devel x86_64 5.2.2-1.el7 base 46 kTransaction Summary=========================================================================================================================================================================== Install 2 Packages (+4 Dependent packages)Total download size: 1.8 MInstalled size: 12 MDownloading packages:(1/6): libgpg-error-devel-1.12-3.el7.x86_64.rpm | 16 kB 00:00:00(2/6): libxslt-1.1.28-5.el7.x86_64.rpm | 242 kB 00:00:00(3/6): xz-devel-5.2.2-1.el7.x86_64.rpm | 46 kB 00:00:00(4/6): libxml2-devel-2.9.1-6.el7_2.3.x86_64.rpm | 1.0 MB 00:00:02(5/6): libxslt-devel-1.1.28-5.el7.x86_64.rpm | 309 kB 00:00:06(6/6): libgcrypt-devel-1.5.3-14.el7.x86_64.rpm | 129 kB 00:00:10---------------------------------------------------------------------------------------------------------------------------------------------------------------------------Total 163 kB/s | 1.8 MB 00:00:11Running transaction checkRunning transaction testTransaction test succeededRunning transactionInstalling : libgpg-error-devel-1.12-3.el7.x86_64 1/6Installing : libgcrypt-devel-1.5.3-14.el7.x86_64 2/6Installing : libxslt-1.1.28-5.el7.x86_64 3/6Installing : xz-devel-5.2.2-1.el7.x86_64 4/6Installing : libxml2-devel-2.9.1-6.el7_2.3.x86_64 5/6Installing : libxslt-devel-1.1.28-5.el7.x86_64 6/6Verifying : xz-devel-5.2.2-1.el7.x86_64 1/6Verifying : libxml2-devel-2.9.1-6.el7_2.3.x86_64 2/6Verifying : libxslt-devel-1.1.28-5.el7.x86_64 3/6Verifying : libxslt-1.1.28-5.el7.x86_64 4/6Verifying : libgpg-error-devel-1.12-3.el7.x86_64 5/6Verifying : libgcrypt-devel-1.5.3-14.el7.x86_64 6/6Installed:libxml2-devel.x86_64 0:2.9.1-6.el7_2.3 libxslt-devel.x86_64 0:1.1.28-5.el7Dependency Installed:libgcrypt-devel.x86_64 0:1.5.3-14.el7 libgpg-error-devel.x86_64 0:1.12-3.el7 libxslt.x86_64 0:1.1.28-5.el7 xz-devel.x86_64 0:5.2.2-1.el7Complete![root@www nginx-1.10.3]# 提⽰:安装了这两个包后,我们重新运⾏./configure 加指定的选项,再检查环境checking for GD library ... not foundchecking for GD library in /usr/local/ ... not foundchecking for GD library in /usr/pkg/ ... not foundchecking for GD library in /opt/local/ ... not found./configure: error: the HTTP image filter module requires the GD library.You can either do not enable the module or install the libraries.[root@www nginx-1.10.3]# 提⽰:重新运⾏,⼜报缺少GD库,遇到这种缺包的情况,我们就想上⾯那样,⽤yum去安装对应的包和devel包[root@www nginx-1.10.3]# yum install gd-develLoaded plugins: fastestmirrorLoading mirror speeds from cached hostfile* base: * extras: * updates: Resolving Dependencies--> Running transaction check---> Package gd-devel.x86_64 0:2.0.35-26.el7 will be installed--> Processing Dependency: gd = 2.0.35-26.el7 for package: gd-devel-2.0.35-26.el7.x86_64--> Processing Dependency: libpng-devel for package: gd-devel-2.0.35-26.el7.x86_64--> Processing Dependency: libjpeg-devel for package: gd-devel-2.0.35-26.el7.x86_64--> Processing Dependency: libXpm-devel for package: gd-devel-2.0.35-26.el7.x86_64……省略部分内容Installed:gd.x86_64 0:2.0.35-26.el7 gd-devel.x86_64 0:2.0.35-26.el7Dependency Installed:dejavu-fonts-common.noarch 0:2.33-6.el7 dejavu-sans-fonts.noarch 0:2.33-6.el7 expat-devel.x86_64 0:2.1.0-10.el7_3fontconfig.x86_64 0:2.13.0-4.3.el7 fontconfig-devel.x86_64 0:2.13.0-4.3.el7 fontpackages-filesystem.noarch 0:1.44-8.el7freetype-devel.x86_64 0:2.8-14.el7 libICE.x86_64 0:1.0.9-9.el7 libSM.x86_64 0:1.2.2-2.el7libX11.x86_64 0:1.6.7-2.el7 libX11-common.noarch 0:1.6.7-2.el7 libX11-devel.x86_64 0:1.6.7-2.el7libXau.x86_64 0:1.0.8-2.1.el7 libXau-devel.x86_64 0:1.0.8-2.1.el7 libXext.x86_64 0:1.3.3-3.el7libXpm.x86_64 0:3.5.12-1.el7 libXpm-devel.x86_64 0:3.5.12-1.el7 libXt.x86_64 0:1.1.5-3.el7libjpeg-turbo.x86_64 0:1.2.90-8.el7 libjpeg-turbo-devel.x86_64 0:1.2.90-8.el7 libpng.x86_64 2:1.5.13-7.el7_2libpng-devel.x86_64 2:1.5.13-7.el7_2 libsmartcols.x86_64 0:2.23.2-61.el7_7.1 libuuid-devel.x86_64 0:2.23.2-61.el7_7.1libxcb.x86_64 0:1.13-1.el7 libxcb-devel.x86_64 0:1.13-1.el7 xorg-x11-proto-devel.noarch 0:2018.4-1.el7Dependency Updated:freetype.x86_64 0:2.8-14.el7 libblkid.x86_64 0:2.23.2-61.el7_7.1 libmount.x86_64 0:2.23.2-61.el7_7.1 libuuid.x86_64 0:2.23.2-61.el7_7.1util-linux.x86_64 0:2.23.2-61.el7_7.1Complete![root@www nginx-1.10.3]# 提⽰:在搭建编译环境时,有的包可能来源epel源,所以前期准备⼯作需要准备好epel源checking for perl+ perl version: This is perl 5, version 16, subversion 3 (v5.16.3) built for x86_64-linux-thread-multiCan't locate ExtUtils/Embed.pm in @INC (@INC contains: /usr/local/lib64/perl5 /usr/local/share/perl5 /usr/lib64/perl5/vendor_perl /usr/share/perl5/vendor_perl /usr/lib64/perl5 /usr/share/perl5 .).BEGIN failed--compilation aborted../configure: error: perl module ExtUtils::Embed is required 提⽰:重新检查环境报perl-ExtUtils-Embed没有,我们perl-devel和perl-Extutils-Embed这个包即可[root@www nginx-1.10.3]# yum install perl-devel perl-ExtUtils-EmbedLoaded plugins: fastestmirrorLoading mirror speeds from cached hostfile* base: * extras: * updates: Resolving Dependencies--> Running transaction check---> Package perl-ExtUtils-Embed.noarch 0:1.30-294.el7_6 will be installed……省略部分内容Installed:perl-ExtUtils-Embed.noarch 0:1.30-294.el7_6 perl-devel.x86_64 4:5.16.3-294.el7_6Dependency Installed:gdbm-devel.x86_64 0:1.10-8.el7 libdb-devel.x86_64 0:5.3.21-25.el7 perl-ExtUtils-Install.noarch 0:1.58-294.el7_6perl-ExtUtils-MakeMaker.noarch 0:6.68-3.el7 perl-ExtUtils-Manifest.noarch 0:1.61-244.el7 perl-ExtUtils-ParseXS.noarch 1:3.18-3.el7pyparsing.noarch 0:1.5.6-9.el7 systemtap-sdt-devel.x86_64 0:4.0-10.el7_7Dependency Updated:libdb.x86_64 0:5.3.21-25.el7 libdb-utils.x86_64 0:5.3.21-25.el7Complete![root@www nginx-1.10.3]# 提⽰:安装了包后继续进⾏预编译检查环境,直到不报错为⽌,不报错表⽰编译环境是可⽤的checking for GeoIP library ... not foundchecking for GeoIP library in /usr/local/ ... not foundchecking for GeoIP library in /usr/pkg/ ... not foundchecking for GeoIP library in /opt/local/ ... not found./configure: error: the GeoIP module requires the GeoIP library.You can either do not enable the module or install the library.[root@www nginx-1.10.3]# 提⽰:解决办法yum install -y geoip geoip-develchecking for GeoIP IPv6 support ... foundcreating objs/MakefileConfiguration summary+ using system PCRE library+ using system OpenSSL library+ md5: using OpenSSL library+ sha1: using OpenSSL library+ using system zlib librarynginx path prefix: "/usr/share/nginx"nginx binary file: "/usr/sbin/nginx"nginx modules path: "/usr/lib64/nginx/modules"nginx configuration prefix: "/etc/nginx"nginx configuration file: "/etc/nginx/nginx.conf"nginx pid file: "/var/run/nginx.pid"nginx error log file: "/var/log/nginx/error.log"nginx http access log file: "/var/log/nginx/access.log"nginx http client request body temporary files: "/var/lib/nginx/tmp/client_body"nginx http proxy temporary files: "/var/lib/nginx/tmp/proxy"nginx http fastcgi temporary files: "/var/lib/nginx/tmp/fastcgi"nginx http uwsgi temporary files: "/var/lib/nginx/tmp/uwsgi"nginx http scgi temporary files: "/var/lib/nginx/tmp/scgi"[root@www nginx-1.10.3]# 提⽰:能看到以上信息表⽰预编译环境检查没有问题,接下来我们就可以进⾏编译了[root@www nginx-1.10.3]# make -j 4 && make installmake -f objs/Makefilemake[1]: Entering directory `/root/nginx-1.10.3'cc -c -pipe -O -W -Wall -Wpointer-arith -Wno-unused-parameter -Werror -g -O2 -g -pipe -Wall -Wp,-D_FORTIFY_SOURCE=2 -fexceptions -fstack-protector --param=ssp-buffer-size=4 -m64 -mtune=generic -I src/core -I src/event -I src/event/modul -o objs/src/core/nginx.o \src/core/nginx.ccc -c -pipe -O -W -Wall -Wpointer-arith -Wno-unused-parameter -Werror -g -O2 -g -pipe -Wall -Wp,-D_FORTIFY_SOURCE=2 -fexceptions -fstack-protector --param=ssp-buffer-size=4 -m64 -mtune=generic -I src/core -I src/event -I src/event/modul -o objs/src/core/ngx_log.o \src/core/ngx_log.ccc -c -pipe -O -W -Wall -Wpointer-arith -Wno-unused-parameter -Werror -g -O2 -g -pipe -Wall -Wp,-D_FORTIFY_SOURCE=2 -fexceptions -fstack-protector --param=ssp-buffer-size=4 -m64 -mtune=generic -I src/core -I src/event -I src/event/modul -o objs/src/core/ngx_palloc.o \……省略部分信息make[1]: Leaving directory `/root/nginx-1.10.3'make -f objs/Makefile installmake[1]: Entering directory `/root/nginx-1.10.3'cd objs/src/http/modules/perl && make installmake[2]: Entering directory `/root/nginx-1.10.3/objs/src/http/modules/perl'Files found in blib/arch: installing files in blib/lib into architecture dependent library treeInstalling /usr/local/lib64/perl5/auto/nginx/nginx.bsInstalling /usr/local/lib64/perl5/auto/nginx/nginx.so。
nginx 菜鸟教程
nginx 菜鸟教程nginx是一款开源的Web服务器软件。
它具有高并发、高性能和低内存消耗等特点,适用于构建稳定可靠的大型网站和分布式应用。
nginx的安装及配置非常简单。
可以通过以下步骤来完成安装:1. 打开终端,使用以下命令安装nginx:```sudo apt-get updatesudo apt-get install nginx```2. 安装完成后,可以通过以下命令启动nginx:```sudo service nginx start```3. 默认情况下,nginx会监听80端口。
可以通过在浏览器中输入服务器的IP地址来访问nginx的欢迎页面,确认nginx是否正常工作。
nginx的配置文件位于/etc/nginx/nginx.conf。
可以使用任何文本编辑器打开该文件,对nginx进行配置。
在修改配置文件之前,建议先备份原始的配置文件。
除了nginx.conf之外,nginx还有一些辅助的配置文件和目录。
其中,sites-available目录中存放的是各个网站的配置文件,而sites-enabled目录中存放的是启用的网站配置文件的符号链接。
在配置nginx时,需要注意以下几点:1. 虚拟主机配置:可以为每个网站创建一个独立的虚拟主机配置文件,并使用server指令将其与特定域名或IP地址绑定。
2. 日志配置:可以配置nginx生成的访问日志和错误日志的路径和格式。
3. 反向代理配置:可以使用nginx作为反向代理服务器,将客户端请求转发给后端的应用服务器。
总的来说,nginx是一款功能强大且灵活的Web服务器软件,可以用于构建高性能的网站和应用。
通过合理配置nginx的各项参数和功能,可以满足不同场景下的需求。
Nginx入门教学

Nginx入门教学第一章:什么是NginxNginx是一个高性能的开源Web服务器软件,也可以用作反向代理服务器、负载均衡器和HTTP缓存。
它具有轻量级、高并发、低消耗资源等特点,被广泛应用于各种规模的网站和服务器架构。
第二章:Nginx的安装1. 下载Nginx的安装包:从官方网站或其他可靠渠道下载Nginx的安装包,选择适合您操作系统的版本。
2. 安装Nginx:解压安装包,运行安装命令,根据指示完成安装过程。
在Windows上,双击安装程序即可;在Linux上,使用命令行安装。
第三章:Nginx的基本配置1. 主要配置文件:Nginx的主要配置文件是nginx.conf,通过编辑该文件可以进行各种配置。
2. 服务器块:使用server指令创建服务器块,在每个服务器块中指定域名或IP地址和监听端口,以便Nginx可以处理这些请求。
3. 虚拟主机:通过server_name指令指定虚拟主机的域名,允许在同一台服务器上托管多个网站。
4. 反向代理:使用proxy_pass指令将客户端请求反向代理到后端的真实服务器,实现负载均衡和高可用性。
第四章:Nginx的性能优化1. 进程模型:Nginx采用多进程模型,每个进程可以处理多个并发请求,提高了并发处理能力。
2. Keepalive连接:通过配置keepalive_timeout参数,使得客户端和服务器之间的连接可以复用,减少连接建立和断开的开销。
3. 缓存配置:Nginx可以使用HTTP缓存来缓存静态资源,减少对后端服务器的请求并加快响应速度。
4. Gzip压缩:配置gzip参数启用压缩,减小传输数据量,提高性能。
第五章:Nginx的高可用性架构1. 主备模式:使用两台Nginx服务器,一台为主服务器,另一台为备服务器,当主服务器故障时,备服务器接管请求。
2. 反向代理集群:通过配置多个Nginx服务器作为反向代理服务器,可实现负载均衡和故障转移。
nginx快速入门:Nginx的基础架构

nginx快速入门:Nginx的基础架构nginx是一款自由的、开源的、高性能的HTTP服务器和反向代理服务器;同时也是一个IMAP、POP3、SMTP代理服务器;nginx可以作为一个HTTP服务器进行网站的发布处理,另外nginx可以作为反向代理进行负载均衡的实现。
一、Web服务器设计中的关键约束Nginx是一个功能堪比Apache的Web服务器。
然而,在设计时,为了使其能够适应互联网用户的高速增长及其带来的多样化需求,在基本的功能需求之外,还有许多设计约束。
Nginx作为Web服务器受制于Web传输协议本身的约束,另外,下面将说明的7个关注点也是Nginx架构设计中的关键约束。
1、性能性能是Nginx的根本,如果性能无法超越Apache,那么它也就没有存在的意义了。
这里所说的性能主题是Web服务器,因此,性能这个概念主要是从网络角度出发的,它包含以下三个概念(1)网络性能这里的网络性能,不是针对一个用户而言的,而是针对Nginx服务而言的。
网络性能是指,在不同负载下,Web服务在网络通信上的吞吐量。
而带宽这个概念,就是指在特定的网络链接上,可以达到的最大吞吐量。
因此,网络性能肯定会受制于带宽,当然更多的是受制于Web服务的软件架构。
在大多数场景下,随着服务器上并发连接数的增加,网络性能都会有所下降。
目前,我们在谈网络性能时,更多的是对应于高并发场景。
例如,在几万或者几十万并发连接下,要求我们的服务器仍然可以保持较高的网络吞吐量,而不是当并发连接数达到一定数量时,服务器的CPU等资源大都浪费在进程间切换、休眠、等待等其他活动上,导致吞吐量大幅下降。
(2)单次请求的延迟性单次请求的延迟性与上面说的网络性能的差别很明显,这里只是针对一个用户而言的。
对于Web服务器,延迟性就是指服务器初次接收到一个用户请求直到返回响应结果之间持续的时间。
服务器在低并发和高并发连接数量下,单个请求的平均延迟时间肯定是不同的。
- 1、下载文档前请自行甄别文档内容的完整性,平台不提供额外的编辑、内容补充、找答案等附加服务。
- 2、"仅部分预览"的文档,不可在线预览部分如存在完整性等问题,可反馈申请退款(可完整预览的文档不适用该条件!)。
- 3、如文档侵犯您的权益,请联系客服反馈,我们会尽快为您处理(人工客服工作时间:9:00-18:30)。
nginx入门教程:启动,停止及命令参数详解详细介绍一下nginx基础命令及其参数的含义。
说明:我的nginx命令的操作环境是Windows
nginx命令:启动nginx
在Windows上安装好nginx后,我们需要启动nginx服务,启动nginx服务的命令行操作主要有两种方式,即
1
C:\nginx-0.8.53>nginx.exe
或者
1
C:\nginx-0.8.53>start nginx
启动nginx命令说明:需要注意,由于nginx默认端口也是80端口,如果此时你的机器上开启了Apache或者IIS服务,切忌在启动nginx之前务必关闭IIS或Apache服务,否则nginx启动命令不会成功。
nginx命令:停止nginx
停止nginx的命令主要有两种,即
1
C:\nginx-0.8.53>nginx -s stop
或者
1
C:\nginx-0.8.53>nginx -s quit
nginx停止命令stop与quit参数的区别在于stop是快速停止nginx,可能并不保存相关信息,quit是完整有序的停止nginx,并保存相关信息。
nginx启动与停止命令的效果都可以通过Windows任务管理器中的进程选项卡观察。
其他nginx命令参数详解
1
nginx -c </path/to/config>
此命令参数指定一个新的nginx配置文件来替换默认的nginx配置文件,如果你不确定新的nginx配置文件语法是否正确,你可以通过nginx命令-t参数来测试,-t参数代表不运行配置文件,而仅仅只是测试配置文件,即
1
nginx -t -c </path/to/config>
nginx命令参数v与V的区别
nginx -v命令只是简单显示nginx的版本信息(nginx version),而nginx -V 不但显示nginx的版本信息,而且还显示nginx的配置参数信息。
重载nginx命令
1
nginx -s reload
当你改变了nginx配置信息并需要重新载入这些配置时可以使用此命令重载nginx
重新打开日志文件命令
1
nginx -s reopen
至此,启动、停止nginx,查看、测试nginx配置文件等这些最基础的nginx 命令就介绍完了。
更多关于nginx的问题,访问:/weihu。