源代码 全新BMW X5
2014宝马X5(F15)配置单
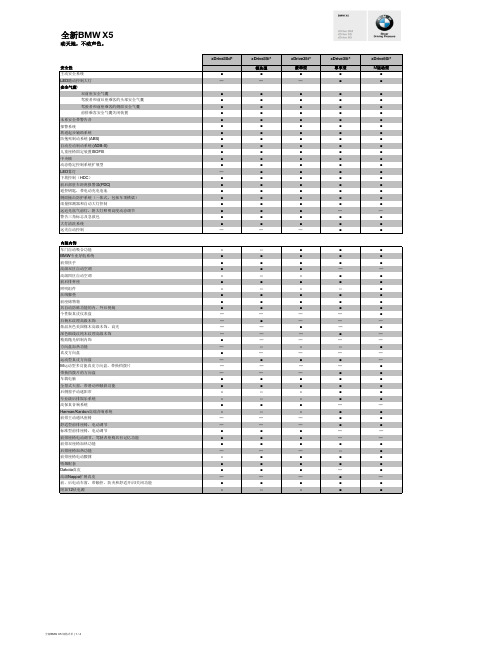
xDrive35i*
豪华型 ■ —
■ ■ ■ ■ ■ ■ ■ ■ ■ ■ ■ ■ ■ ■ ■ ■ ■ ■ ■ ■ ■ —
■ ■ ■ ■ □ ■ □ ■ ■ ■ — — ■ — — □ — ■ — — ■ ■ □ □ ■ □ — — ■ ■ ■ — ■ ■ ■ — ■ □
□ ¥0 □ ¥0
■ ■ □ ¥14,000 □ ¥34,000 ■ ■ ■ □ ¥0 ■ □ ¥4,100 ■ □ ¥13,000 ■ □ ¥32,000 ■ □ ¥4,600 □ ¥0
xDrive50i* M运动型 ■ ■ ■ ■ □ ■ — — ■ — — — ■ ■
— — — —
■
■ ■ ■ —
— — □ ¥7,000 □ ¥2,700 ■ □ ¥0 □ ¥5,100 □ ¥4,100 □ ¥400 □ ¥13,000 □ ¥6,500 □ ¥38,000 □ ¥27,000 — □ ¥0
Байду номын сангаас
xDrive35i* 豪华型 ■ ■ ■ ■ □ ■ — ■ — ■ ■ — — ■
— □ ■ □
—
■ ■ ■ —
■ ■ ■ ■ ■ ■ ■ ■ ■ ■ ■ ■ ■ ■ ■ ■ ■ ■ — ■ ■ ■
■ ■ ■ — ■ ■ ■ ■ ■ ■ ■ — ■ — — ■ — — ■ ■ ■ ■ ■ ■ — ■ ■ ■ — — ■ ■ ■ ■ ■ — ■ ■
全新BMW X5 规格详单 | 1 / 4
外部
分体式尾门
与车身同色的保险杠(上部)和外部后视镜
宝马X5X6_E70E71_打开隐藏功能的教程(3)

宝马X5/X6_E70/E71_打开隐藏功能的详细教程声明:本教程只供车友自己折腾使用,不得用于商业目的;车友折腾本教程,产生的一切后果自负,与本人无关!====================================================================先到淘宝上买一根K+Dcan线,大约130元.然后到群共享下载软件到你的笔记本电脑:(注意,最好是用XP系统,Win7的话,64位不支持,32位未知)。
解压到C盘(注意,一定要C盘根目录,不能其他的盘!)1.把NCSEXPER.RAR三个目录。
解压后,我们就能看到ED IABAS,IN PA和NCS EXPERT如图所示:2.进入C:\I NPA\BI N目录,鼠标右击INPA LO AD.e xe,创建快捷方式,并把这个快捷方式拷贝到桌面。
目录,鼠标右击work目录,创建快捷方式,并把这个快捷方式拷贝到桌面。
3.进入C:\N CSEXPERT目录,鼠标右击NC SE XPER.EXE,创建快捷方式,并把这个快捷方式拷贝到桌面。
4.进入C:\N CS EXPERT\BIN5. 直接运行压缩包:Driver_D_CAN_USB\D-CAN.exe,安装到电脑,然后将K+DCAN线连接车车和电脑,弹出找到硬件,然后按提示自动安装KD线的驱动程序.6.进入C:\Ediabas\hardware\OBD,运行 OBDsetup.exe. 然后屏幕应该会出现以下的样子,然后关了这屏幕,重启电脑!7、8回到桌面,右击我的电脑,进入属性,选中“高级”标签,点击下方的“环境变量”,在“系统变量”下方点击“新建“,变量名填path,变量值填C:\ediabas\bin。
(这一步一定要做!如果不设变量的话,你后面运行NCS会出现提示api.dll找不到之类的问题!另外,我简化了英语教程里的6、7、8步,我把这三个数字全部写在一起,这是为了和那份英语教程对应起来,以防后面步骤的数字混乱,)9. 右击我的电脑,进入属性,再进入“设备管理器”,双击“端口(COM和LPT),双击“通信端口COM1”->端口设置->高级,注意:COM口一定要设在COM:1上,不能使用3!数据延迟latency也要设为1。
【宝马BMW】中文版宝马编程
最后更新(2012年2月21日星期二)申明:这份宝马行车电脑编程的中文版教程是根据E90post论坛上那份NCS.DIY的PDF文件改编的,非我原创,如果觉得我的表达有些不太清楚,请直接查阅那份英语原版教程。
和我直接联系也可以,我的是151684673。
你英语还行的话,也可以直接去这两个论坛提问:e90post/forums/forumdisplay.php?f=368:bmwcoding/forumdisplay.php?1-Vehicle-Coding上面的老外都非常友好。
由于玩宝马编程的国人寥如晨星,大部分都是老外,几乎所有资源都在国外的网盘上,国内下载很困难,所以我已经把所有编程需要的文档和软件上传到115网盘。
具体下载地址:英文原版pdf教程(:115/file/dpid3hsg#NCS_DIY.pdf)编程需要的软件(:115/file/anjizwr2#NCSEXPER.rar)具体模块可供修改的值的列表(:115/file/c2zujgjb#BMW_E9x_Code_List_v1edit.xls)请在编程前先把这三个东东下载到你的笔记本电脑上。
(如果你的车是豪华型的,就是有idrive的那种,请再下载网盘里的EDIABAS__7.2.0.504以及cicdaten这两个文件,放着以后备用)宝马行车电脑编程的意义:原厂的行车电脑因为批次、版本、年代、各国不同的法规等等的不同,所以有些功能可能被隐藏了,所以编程的意义就是把隐藏的功能开通出来。
比如我的车是2010年的325时尚,无法在BC键里调出日行灯功能,而通过编程就能实现;大部分中规的3系,无长按钥匙键折叠后视镜功能,通过编程也能调出来。
另外,还可以调出很多有意思甚至罕见的功能,比如仪表板实时显示数字车速、遇到下雨自动关天窗、打开远光时雾灯自动点亮、天使眼1调节亮度、取消车内各类报警音,车内定时开启通风功能等等。
有关于这个编程,车友常问的问题:1.使用这个软件适合编程的车型:目前网盘里提供的数据库,可以供1系(旧版,不是F系列),X1,3系(E90,E92,E93)来进行编程,当然有些车型可能不一定所有功能都可以开通,比如小改款前的E90,无法用天使眼作为日行灯、硬顶折叠的E93,无法使用遥控钥匙来折叠后视镜或者关顶棚。
新5系使用E-SYS编程步骤

Convert EU Fxx N53 production code MT11 to MY51using E-Sys to flash the DME & EGS modulesObjectiveThe mod is conversion of a EU Fxx 523i to a 528i. It is valid for cars of production period where both models were delivered with the same N53 motor, albeit the 523i being detuned in HP & Torque.The mod requires a software change to the DME & EGS modules of the car, and a replacement of the Single-step intake manifold with a 3-Step intake manifold equipped by DISA valves.This document details the software change segment of the mod.Module software used is the same as the original delivered by BMW in MY51 N53 equipped cars.PrefaceFlashing ECU's with E-sys is not a technically complicated process and the risks involved are less of technical nature and more of integration & configuration mistakes. Successfully passing the flashing process itself needs some precautions & guidelines which are general to any eeprom style programming:∙Maintain constant power supply to the programming & target devices∙Allow sufficient time for processing to complete∙Stop in case of errors and analyze/troubleshoot the reasons before proceeding∙Use the programming tool built-in controls to assure proper processingThe E-Sys tool itself has powerful controls to avoid flashing mistakes when it comes to compatibility between the software to be flashed & the target ECU. The ECU's themselves being of automotive grade are by nature of robust fail-safe design, especially those related to engine, transmission, car security & passenger safety.E-Sys also provides the integration support by managing the Master Security Module (MSM) of the car to maintain security & compatibility in programming.The controls in the hands of the user however, do allow for a lot of manual manipulation which can lead to failed, incorrect flashing and a non-functioning car.The risk therefore in this process, is mitigated mostly by keeping strict planning & control, understanding the integration of the change within the car-wide computerized network, being vigilant in troubleshooting unexpected failures before making new attempts and finally making sure that the E-Sys settings and functions are carefully and correctly set.Good luck to all who use this procedure. Anyone reading this is welcome to visit us at – BMW Coding and Programming Forum.This document is written & tested by forum members @maisav & @miotooSuccess may vary, we take no responsibility for any damage that may occur in relation to this document and the risk is entirely taken by those attempting to perform itMandatory Prerequisites:∙Confirm current ECU part numbers and target ECU part numbers are identical based on realoem / ETK. Here we were ok with the DME, but had difference in EGS module. Posted question to BMW technical staff who confirmed the difference is for support/replacement related reasons. Units are identical.∙No exchange of modules. Units are functional and in-sync with car network. No faults registered in the fault or Information memories.∙Know your Shipment & Current I-Step. Refer to basic coding guide to read I-Step from VCM.∙Car network is running a unique I-level across modules.∙PSdZdata for current I-level available and imported into Esys.∙FA in car is in shipment status ie. Zeitkriterium not modified.∙Car hooked up to battery charger or maintainer.Phase 1: Connection1.Prepare PC. Make sure wifi & bluetooth are disabled and no application is running.2.Connect ENET cable to OBD port then to RJ45 port on PC.3.Car ignition on, engine off.4.Start-up E-Sys. After up to 30 seconds the car and your PC are on the same IP subnet.5.Click on the 'Connect' button.6.In the 'Open Connection' window which appears, select the appropriate TargetSelector.7.Project is the Fxx I-Step of PSdZdata you loaded into Esys, VehicleInfo is your car Fxx withoutDIRECT at the end.8.In the Interface section, select 'Connection via VIN'.9.In the Vehicle-specific parameter section, select 'Read parameters from VCM'.10.Click Connect.11.A pop-up window will appear. Confirm what you see is your known Shipment I-step & click OK. Phase 2: Confirm current FA and SVT Actual state match to PSdZdata1.Go to Comfort mode - TAL-Calculating. Top-left 'Vehicle Order', select 'Read'.After VO is read, Open the FAList tree to FAList/FA/FZAuftrag/Type and confirm the‘Zeitkriterium’ entry is your shipme nt (mmyy format) & the ‘Typschlüssel’ entry is yourproduction code MT11. Click save and provide a clearly identifiable name eg.FA_ORG_MT11_yyyymmddRight click on the 'FA' folder and select 'Activate FA'.2.On the right, in 'SVT Actual' section, select 'Read SVT'.When done, The SVT ECU tree will appear on the left. All entries will be BLUE in color.Click save and provide a clearly identifiable name eg. SVT_ACTUAL_MT11_yyyymmdd3.On the right, in 'KIS/SVT Target section, perform the following:In 'Calculation Strategy' select 'Complete Flash'.In I-Step (shipm.) select your I-Step Shipment as verified by connection phase step 11.In I-Step target should be only one entry, matching to the Target selected in connection phase step 7.Click 'Calculate' and wait.When done, The SVT ECU tree entries on the left will change color.The entire tree with all entries must be BLACK with exception of SWUP, ENTD & NAVD entries in the CMB_ECALL/CMB_MEDIA/HU_CIC modules which may remain BLUE.Phase 3: Edit & write FA to car1.Modify production code from MT11 to MY51 by editing the ‘Typschlüssel’ to Production codeMY51.2.Save and provide a clearly identifiable name eg. FA_TARGET_MY51_yyyymmdd3.Write FA to VCM.Refer to basic coding guide for editing and writing FA to VCM.Phase 4: SVT Target calculation for modified FA1.Go to Comfort mode - TAL-Calculating. Top-left 'Vehicle Order', select 'Load'.Open your modified VO file (eg. FA_TARGET_MY51_yyyymmdd).Right click on the 'FA' folder and select 'Activate FA'.2.On the right, in 'SVT Actual' section, select 'Load'.Select your SVT Actual created in Phase 2 (eg. SVT_ACTUAL_MT11_yyyymmdd).The SVT ECU tree will appear on the left.3.On the right, in 'KIS/SVT Target section, perform the following:In 'Calculation Strategy' select 'Complete Flash'.In I-Step (shipm.) select your I-Step Shipment as verified by connection phase step 11.In I-Step target should be only one entry, matching to the Target selected in connection phase step 7.Click 'Calculate' and wait.When done, The SVT ECU tree entries on the left will change color.4.Click save and provide a clearly identifiable name eg. SVT_TARGET_MY51_yyyymmdd.The entire tree with all entries must be BLACK with the following exceptions:1.SWUP, ENTD & NAVD entries in the CMB_ECALL/CMB_MEDIA/HU_CIC modules which mayremain BLUE.2.Entries for the DME & EGS modules may appear RED.Phase 5: SVT target validationThis is one of the two most important steps in the process. We visually validate the SVT Tree for the changes we want to do and verify that all our prerequisites are in order.The validation assumptions & expected results are as follows:∙Only the DME & EGS modules should have a mix of BLUE & RED entries. All entries on all other modules must be either BLACK or BLUE.∙On both DME & EGS, the ONLY entries ALLOWED to be RED are BTLDx, SWFLx & CAFDx.∙All entries starting with HWxx MUST be BLACK.∙There may be one or multiple SWFL changes for each module. That is ok.∙There may or may not be a BTLD change for a module. That is ok.∙There may or may not be a CAFD change for a module. That is ok.Here is an example snapshot from the SVT tree with Actual & Target calculation. I-step F010-12-11-503. DME:EGS:The changes we expect are as follows:∙DME SWFL – current firmware with ID 888 will be replaced with SWFL firmware ID 5C3, from the same Main, Sub & Patch versions.∙EGS BTLD – current bootloader with ID C7C be upgraded to other Subversion & Patchversion branch. ∙EGS SWFL – current firmware with ID A81 will be upgraded to other Subversion & Patchversion branch.∙EGS SWFL – current firmware with ID A9A will be replaced with SWFL firmware ID A9D, from other Main, Sub & Patch versions.Once we are satisfied with all validation assumptions, we can proceed with the next step.Phase 6: TAL calculation1.In the Tal-Calculation window, on the right, in the 'TAL' section, make sure nothing is checked.Click 'Calculation' and wait.2.When finished, click save and provide a clearly identifiable name eg.TAL_TARGET_MY51_yyyymmddVerify Esys settingsGo to Options-Settings menu.On the Settings windows, select ‘Options’ tab and confirm all entries are checked.The relevant and extremely important entries for this process are ‘Update VCM after TAL execution & ‘Update MSM after TAL execution’.Phase 7: TAL processing DME & EGS1.Go to Expert mode – TAL Processing.2.As TAL – select your TAL_TARGET_MY51_yyyymmdd3.As SVT – select your SVT_TARGET_MY51_yyyymmdd4.As FA – select your FA_TARGET_MY51_yyyymmdd5.Click ‘Check software availability’ & get positive response that all is available.6.Log tab – select ‘Events’ and keep Type ALL.7.Parameters tab – all options selected, option 4 on Merge with existing InstalledECUList, both‘Switch gateways’ selected & empty.8.ECU tab – should list 2 lines for DME & EGS only.9.UNCHECK the top-left ALL box to REMOVE all selections.10.ONLY on DME line, Select ONLY ‘blFlash’ & ‘swDeploy’ & ‘cdDeploy’11.Visually confirm AGAIN that nothing is selected except the ‘blFlash’ & ‘swDeploy’ & ‘cdDeploy’on the DME line.12.Click START and wait.13.A window will pop up to confirm the three I-Step levels in the VCM. Do not change it & Click OK.14.Once processing starts, the E-Sys window will be non-responsive for a few seconds eg. if youwant to browse at the log. Just give it a few seconds, and the log tab will appear and showprogress. The flashing process only takes a couple of minutes, you will notice the percentagehang a while at 0% then it will start to increase. This is normal.15.There is no ‘processing ended’ or any pop up that indicates the job is done. Wait until you seeon the log window the message that confirms VCM Update: finished.Once done, disconnect E-sys from car and power off the ignition.Disconnect the battery charger/maintainer from the car and attempt to start the car.If the car starts, the DME flash was successful and can proceed to flashing the EGS module.It is highly recommended to restart E-Sys for the EGS flash.Following a successful connection, repeat Phase 7 above with one difference steps 10 & 11:10.ONLY on EGS line, select ONLY ‘blFlash’ & ‘swDeploy’ & ‘cdDeploy’.11.Visually confirm AGAIN that nothing is selected except the ‘blFlash’ & ‘swDeploy’ & ‘cdDeploy’on the EGS line.Once the EGS flash is completed, the procedure is over, and your car DME & EGS modules have been converted to Production Code MY51.TroubleshootingIf there were no errors logged during DME flash but the car does not start after DME flashing, it likely means that the alternative SWFL ID used does not match the installed hardware.If this happens, it is recommended to attempt reverting back to the original DME SWFL ID by loading and activating the ORIGINAL FA_ORG_ MT11, reading the current SVT from the car, calculating a temporary SVT_TARGET & a new TAL. If the calculations are correct, the TAL will have only one line in the flashing window – for DME. Execution of this TAL should revert the car to its original state.The revert flashing procedure is essentially the same as listed earlier in Phase 7, albeit using the newly generated files above.Other observationsIt was identified that multiple fault errors are registered in the car Fault memory during flashing.During the TAL processing, the KOMBI & HU_CIC showed multiple system errors related to DSC, degraded braking system, Restraint system, SOS calling and various others.Faults were registered in other modules that are linked to the DME & EGS via the MOST network.ISTA/D was able to clear all the faults. Users can use ISTA/D, INPA & Tool32 to clear them too.This conversion is only useful in conjunction with replacing the intake manifold with the 3-stage manifold delivered on Production code MY51 cars.Until the new manifold is installed, new faults will continue to register and the CEL light will be on.In case of failures, difficulties or unexpected results, please contact the forum members for assistance.Also, please consider that E-Sys does not provide:∙Initialization procedures that may be required to run following software change.∙Fault errors display that may be registered in the ECU fault memory during or after TAL processing. ∙The necessary tools for performing required follow-up procedures or fault clearing.We have not observed any initialization or normalization procedures needed after flashing the DME & EGS.E-Sys version used: 3.22.5. It is recommended to use this version.No token or patch is needed for any steps in this guide.。
宝马隐藏代码大全

HU_CIC或者HU_NBT模块下1、上锁解锁声音确认(锁车、开锁有BB声提示,解锁两声,锁车一声,去idriver里面设置里面打勾激活一下才有效)HU_CIC 3000ACOUSTICAL_LOCK_CONFIRM nicht_aktiv改为aktiv2、行车中可以操作导航菜单包括看DVDHU_CIC SPEEDLOCK_X_KMH_MIN00或03改为FFHU_CIC SPEEDLOCK_X_KMH_MAX0A或03改为FFNBT主机的反映刷后可以行车中看DVD但是无法看USB视频,320li时尚小主机无法看DVD3、解除拉起手刹可以看视频,放下手刹不能看视频功能的开关默认开启HU CIC 3000VIDEO_NUR_MIT_HANDBREMSE active改not active5系HU_NBT VIDEO_HANDBRAKE active改not active4、取消大屏幕开机延时确认界面HU_CIC 3001LEGAL_DISCLAIMER_TIME ld_mit_timeout改kein_ld5、取消倒车影像警告声明HU_CIC 3001MACRO_CAM_LEGALDISCLAIMER改kein_id6、取消夜视警告申明〔仅在F10上有效〕HU_CIC 3001MACRO_NIVICAM_LDISCLAIMER改kein_id7、开启cic菜单版本查看功能,在屏幕里面选设置,然后向右拨动idriver按钮调到头,即可看cic版本HU_CIC 3000ENTWICKLER_MENUE nicht aktiv=00修改为aktiv=018、Cic版本亚洲版HU_cic ENTWICKLER_MENUE_ASIEN nicht_aktiv改为aktiv9、2013款中央扶手带USB口激活U盘播放视频〔需nbt主机〕HU_NBT >API_USB_VIDEO> none改为bothHU_NBT >ENT_CODEC_XVID> nicht_aktiv改为aktivHU_NBT >ENT_CODEC_VCD> nicht_aktiv改为aktivHU_NBT>ENT_MC_VIDEO_SUPPORT> aktiv。
宝马汽车钥匙编程器说明书

S4.4 CarProg BMW key programmer manualSystem description:BMW Key programmer is CarProg software designed for BMW immobilizers EWS1, EWS2 and EWS3 programming and transponder key generating using EWS data.Immobiliser EWS installed on the BMW cars since 1996. EWS are used on BMW E38 (7xx),E39 (5xx), E36 and E46 (3xx), E53 (X5), Z4 also on others car made with BMW cooperation - Mini Cooper, Rover 75, Range Rover.Supported systems:Supports all immobilizers modifications EWS1, EWS2, EWS3, EWS3+Functions:•Reading and writing EWS1, EWS2, EWS3, EWS3+ using CarProg Motorola cable; •Automatic identification EWS version of dump;•Adding new keys;•Restoring original lost key synchronization;•The blocking and unblocking key access to the car if car key is lost; •Reading and changing data coding (for the vehicle);•Changing parameters EWS (product number, date of manufacture, etc.); •Change VIN number stored in EWS;•Change VIN numbers in the key (stored in key after 1998);•Changing mileage in EWS (in EWS after 1998);•Changing mileage in the key;Works with empty PCF7935 and with original BMW keys (EMU – emulator)How to connect CarProg to EWS:S4.4.1.EWS2 older immobilizer: Old immobiliser type with Motorola processor in DIP package and 27C256 EPROM. Usually this immobiliser is fitted to E36 cars. Use A10 adapter and connect immobiliser like in picture:Select in CarProg BMW immobiliser Menu EWS2 old immobiliser system and read EWS data. Now you can see how many key is programmed and perform action you won. To program key just set empty PCF7935 transponder in to CarProg antenna adapter A3, select key number to program and perform key programming action.Also see in this manual how to:•Restore old keys (in case if old key stop to work);•Delete lost transponder key;•Change EWS settings;•Check key;Some EWS2 problems you can solve by soldering all EWS board connections.S4.4.2EWS2 immobiliser: usually used in BMW cars up to year 1996, with yellow or violet connector (white or black plastic box). Use A10 adapter and connect immobiliser like in picture:Select in CarProg BMW immobiliser Menu EWS2 immobiliser system and read EWS data. EWS 2 have several different software versions – after reading check if SW on CarProg screen is the same like on EWS box, if no – select EWS1 and read again.Now you can see how many key is programmed and perform action you won. To program key just set empty PCF7935 transponder in to CarProg antenna adapter A3, select key number to program and perform key programming action.EWS2 with processor mask 2D47J in some case can by erased while reading in the car year 1997.Also see in this manual how to:•Restore old keys (in case if old key stop to work);•Delete lost transponder key;•Change EWS settings;•Check key;S4.4.2EWS3 immobiliser: used in BMW, Mini and Rover cars year 1997-2004, with black connector (white or black plastic box). Use A10 adapter and connect immobiliser like in picture:Select in CarProg BMW immobiliser Menu EWS3 immobiliser system and read EWS data. Now you can see how many key is programmed and perform action you won. To program key just set empty PCF7935 transponder in to CarProg antenna adapter A3, select key number to program and perform key programming action.EWS3 with processor mask 2D47J can by erased while reading. This processor type is used in EWS3 software versions SW5, SW4 and SW3. Tested, that SW3HW1 EWS3 memory will be lost while reading. For recover lost EWS3 data send**********************************************.Most common problem in EWS3 immobilizers is bad ELMOS circuit. Check if this IC temperature in working state is normal. If ELMOS is very hot – replace it first. Also see in this manual how to:•Restore old keys (in case if old key stop to work);•Delete lost transponder key;•Change EWS settings;•Check key;S4.4.3EWS3 immobiliser key programming by K-Line: used in BMW, Mini and Rover cars year 1997-2004, with black connector (white or black plastic box). Use A11 adapter, connectA11 cable to immobiliser black connector. Connect external +12V power supply to CarProg. Follow CarProg instructions and for few seconds short 0D46J MPU pins 22 and 23 like in picture:Now you can see how many key is programmed and perform action you won. To program key just set empty PCF7935 transponder in to CarProg antenna adapter A3, select key number to program and perform key programming action.EWS3 with processor mask 2D47J can by erased while reading. This processor type is used in EWS3 software versions SW5, SW4 and SW3. Tested, that SW3HW1 EWS3 memory will be lost while reading. Recover lost EWS3 data is impossible with our equipment.Most common problem in EWS3 immobilizers is bad ELMOS circuit. Check if this IC temperature in working state is normal. If ELMOS is very hot – replace it first. Also see in this manual how to:•Restore old keys (in case if old key stop to work);•Delete lost transponder key;•Change EWS settings;•Check key;EWS Key programmer Additional functions:•Restore old keys: in older BMW cars equipped with EWS2 immobiliser most common problem is key variable part synchronization loosing. This happen whenbattery is old and bad charged. Original transponder key remote control work, but car starter relay is not operated. Remove EWS from car, connect it to CarProg like inpictures and read EWS data. Now insert not working key in CarProg antenna andCheck Key. CarProg will show key number. Just deselect this key Used box andperform EWS write operation. If you don’t have car key, is possible to restore all carkeys - deselect Used box for all used key.•Delete lost transponder key: in key data write all FFFF and perform Write EWS operation. Key will by disabled.•Change EWS settings: you can change EWS VIN number, mileage and perform EWS write operation. This data will by overwritten in all car keys after first engine start – in case if key is working. Also you can change EWS password, key data, EWS GM, VN, SA car coding – but be careful and not use this function if you not advanced user – you can damage car.•Check key: insert key in to CarProg antenna adapter and Check key validity toEWS and key number.。
宝马控制电脑编号与设码编程
宝马控制电脑编号与设码编程第一节宝马控制电脑缩写说明第二节设码与编程一、名词解释设码:指新电脑装入后,电脑内Eprom程序与车上元件激活或其它电脑匹配。
编程:指装入新电脑后,Eprom空白需重新用仪器编写程序。
二、BMW车需设码电脑1、设码ZCS车身/底盘程序。
进行如下选择:◇将DIS/MoDIC与车辆相连◇打开点火开关◇选择“设码ZCS”◇选择车型系列(例如“E39”)◇选择“1-重新设码”◇选择系统(例如“安全气囊”)◇开始自动设码(用“Y”确认)◇注意操作引导信息2、重新设码一览表。
根据不同的车型系列会列出下列控制单元。
这些控制单元在更换后必须进行设码。
3、电脑重新设置一览表。
自98年9月起生产的车辆E38、E39(99年款)、E46、E52和E53的特殊设置基本应通过车辆和钥匙记忆功能进行。
进行机械改装时(例如“安全气囊功能抑制”—)可继续使用设码路径“改装”。
工作步骤:◇连接DIS至车辆;◇打开点火开关;◇选择“设码ZCS”;◇选择车型系列(例如“E36”);◇选择“4-改装”;◇选择系统(例如“4-IHKA”);◇选择功能(例如“1-温度C/F”);◇开始自动设码(用“Y”确认);◇注意操作引导信息。
改装时不改变中央主密码(例外情况参见脚注),以便在重新设码时相关控制单元可以重新设置为基本状态。
以下是根据车型系统划分的与设码有关的改装列表:脚注:(a)防盗报警系统:选项“1通过遥控器或车门锁”只有在无选择装备“取消混合操作”(SA877)的车辆上才有显示。
(b)执行程序在输入代码后才能进行,此时必须根据国家规格设置激活功能/抑制工能的权限。
工作步骤参照SI 65 09 96(122)。
(c)IHKA:风扇转速提高的改变只能在使用软件37之后版本的IHKA才可以(投入使用:自1995年9月起)。
(d)改变语言:对于右座驾驶型和美规车辆不能选择德语。
中央主密码会被更改(同样适用于带导航系统的车辆)。
宝马新X5
宝马新X5拥有更硬朗的外观和良好的公路操控性能测试地点:中国·北京文/卫东@S 卫东 摄影/崔凯@崔凯是我宝马新X5NEW BMW X5我开着这辆宝马新X 5在街头有很高的回头率,说明新X 5在设计上的提升还是很成功的。
基于CLAR 平台打造的新X 5在外形上确实比上一代有了质的飞跃,新车车身尺寸长/宽/高/轴距都分别增加,达到了4930/2004/1776/2975mm 。
再看看奔驰GLE 的尺寸,长/宽/高/轴距分别是4941/2018/1782/2995mm 。
X 5车身长度比GLE 短了11mm ,轴距短了20mm ,在车身尺寸上可以说两款车是短兵相接。
宝马X 5车身三围的增加,再加上车身造型设计得更加方正、硬朗,直接带来的好处是更显得威武了,尤其是从后方看,那种更方正的范儿比以前的造型不知要强多少倍,开着它去越野绝对不会让人怀疑它的本领。
而当你看到新X 5的宣传画时,也是充斥着X 5越野的热血镜头,更加让你对新X 5的野性充满了期待。
在别人的大嘴变得越来越大的情况下,宝马的双肾进气格栅也是紧跟形势,将尺寸变大,同时还让它拥有高科技含量,格栅在平时是封闭的,需要时才打开。
激光大灯加蓝色眼神,带来了当初宝马开创天使眼一样的效应。
功能上,激光远光灯远大于LED 光源照射距离。
威猛的前脸再加上车身侧面线条,更加突出SUV 的霸气。
内饰上两个12.3寸的大屏很显档次,也带来了良好的视觉效果。
宝马新一代水晶挡把带来了艺术气息。
前排座椅做工和品质都很显档次,而第二排座椅也很显艺术范儿,只是增加的42mm 轴距还不够多,使新X 5的后排空间还是不如奔驰GLC 300L 的大。
后备厢上下对开的尾门依然是亮点,而且下面尾门也是电动的,更人性的是下部尾门上还有车身高度降低键,一键让车身高度下降,对于女性用户来说非常便于装卸行李。
新平台下的X 5引入高强度钢材,铝材和碳纤维来增加结构的稳定性,同时减少重量,带来更为出色的驾乘表现。
2014款宝马X5车型讲解解析
2014款宝马X5
内饰方面,全新一代宝马X5依旧使用了和在售车型类似的横贯式造型, 只是在细节设计上存在细微的不同,并加入了Dakota和Nappa两种不 同材质的真皮内饰。而针对不同消费者的需求,在不同的车型上还有 多达6种不同的配色方案可供选择。 Dakota真皮适用于 xDrive 30d xDrive35i领先型 xDrive35i豪华型 xDrive50iM运动型 LCWS-黑色 LCBB-棕色 LCMY-摩卡色 LCCY-米色 LCEW-象牙白色 GMAT-Alcantara(仅M运动型) Nappa真皮(越野/卓越风格套件) 标配于xDrive35i尊贵 xDrive35i豪华可选 NAMY-摩卡色 (越野内饰风格套件) NAEX-象牙白色 (卓越内饰风格套件)
2014款宝马X5
外观方面,全新一代宝马X5相比现款车型进行了一些调整,遵循最新的家族式设计 理念,包含了“开眼角”式的前大灯、更具冲击力的前保险杠、雾灯,以及标志性 的L造型全LED车尾灯等细节。另据了解,在宝马X5的开发上,还采用了诸多的轻 量化技术,相比现有同配置车型,全新一代X5要轻了90kg左右。
2014款宝马X5
新车介绍及配置讲解
2014款宝马X5
2014款宝马X5
产品背景
现款介绍
技术亮点
美规选配
2014款宝马X5
第一代BMW X5,1999年上市,开创豪华SAV级别,引领市场风潮。 第二代BMW X5,2007年登陆中国,截止2013年11月,两代BMW X5全球销售超130万台,在同级别豪华品牌中,位列全球销量第一。 第三代BMW X5,于2013年9月揭幕仅2个月后,便接连获得权威奖项: 2013年金方向盘大奖 德国权威汽车杂志《Auto Bild》和《Bild am Sonntag》 2013年度汽车大奖 德国权威汽车杂志《Auto Zeitung》 2014沃德全球十佳发动机: N57 TwinPower Turbo 柴油发动机装 配于BMW X5 30d车型 全新BMW X5对“纯粹驾驶乐趣”进行了独特的解读, 最新一代车 型再次为该细分市场中的动态表现设立了新基准: 陆上王者 征程再启 王者风范 —— 全新外观设计,豪华内饰氛围 王者力量 —— 同级最优的动力和驾驶表现 王者气度 —— 同级最优的高效动力,进一步降低油耗 王者内涵 —— 领先行业的科技创新和先进配置
宝马X5 2022款车机软件升级说明书
Information about versionDate30March2022Summary更新车载用户手册安装开始定时器有关此升级的特别提示(请在升级前确认并移除非官方加装改装)现在也可以自动向前驶入和驶离横向车位面向混合动力汽车的特殊提示腾讯小场景2.0: BMW车载数字化生活再升级使用 my BMW 应用程序进行数据传输超车后驶回自身车道时,减少警告系统干预控制单元编程(DME)对控制单元编程(天窗)对控制单元编程(远程控制单元)质量改进: 优化的 IconicSounds Sport 识别质量改进: 优化发动机控制质量改进: 优化 Hill Descent Control功能更新和质量改进远程软件升级和版本说明的有效性有关以前版本的信息Control Criteria currentILevel: "S18A-21-07-800"targetILevel: "S18A-21-11-800"market: "China"country: "CN"更新车载用户手册通过此远程软件升级,车载用户手册将获得最新信息。
安装开始定时器由于技术原因,定时器功能在您所在的市场中暂时不可用。
我们正在寻找通过 Remote Software Upgrade 实现的及时解决方案。
Market ∈ {"Australia", "China", "Japan", "Korea", "USA"}Country ∈ {"AU", "CN", "JP", "KR", "US"}有关此升级的特别提示(请在升级前确认并移除非官方加装改装)重要提示: 请在启动和升级期间移除所有您使用过的 OBD 诊断系统(行车日志、全球定位系统跟踪器)。