PRC VCF Sales kit_SC_0622event_170614_for VMware
vcftools常用命令

vcftools常用命令
Vcftools是一款用于处理VCF文件的工具,它提供了许多用于VCF文件分析和处理的命令和功能。
以下是Vcftools的一些常用命令:
1.vcf-merge:用于合并多个VCF文件。
可以同时处理多个VCF文
件,并将它们合并成一个新的VCF文件。
2.vcf-subset:用于提取VCF文件中的特定样本或位点。
通过指定样本
名或位点范围,可以从VCF文件中提取感兴趣的样本或位点信息。
3.vcf-stats:用于统计VCF文件中的变异信息。
该命令可以计算VCF
文件中的突变个数、突变类型的个数、转换和颠换的个数等统计信
息。
4.vcf-isec:用于在多个VCF文件之间进行交集、差集、并集等操作。
可以比较多个VCF文件中的变异信息,并找出不同文件之间的差异。
5.vcf-plot-stats:用于可视化VCF文件的统计信息。
该命令可以将
vcf-stats的输出结果进行可视化处理,生成各种统计图表。
这些命令只是Vcftools的一部分功能,它还提供了许多其他用于VCF文件处理和分析的命令和功能。
可以根据实际需求选择适合的命令来处理和分析VCF文件。
需要注意的是,Vcftools的使用需要一定的生物信息学基础和编程经验,特别是在处理大规模的VCF文件时,需要注意数据质量和处理效率的问题。
同时,在使用Vcftools之前,建议先仔细阅读官方文档和教程,以便更好地理解和使用该工具。
MA5612配置脚本

[eponnni]
<eponnni-0/0/0>
interface eponnni 0/0/0
#
[platform-config]
<platform-config>
autosave interval on
#
[bbs-config]
<bbs-config>
service-port 0 vlan 1055 eth 0/4/0 multi-service user-vlan untagged rx-cttr 6 tx-cttr 6
1
2
3 H831ASNB Normal
4 H831EPFB Normal
-------------------------------------------------------------------------
alarm alarmlevel 0x0a11a105 warning
alarm alarmlevel 0x0a11a106 warning
alarm alarmlevel 0x0a11a107 warning
alarm alarmlevel 0x0a11a109 warning
alarm alarmlevel 0x0a310112 warning
ip address signaling 10.29.245.80
#
[h248]
<h248-0>
interface h248 0
digitmap-timer duration 4000
digitmap-timer long 5
digitmap-timer short 3
listcompr包的说明文档说明书

Package‘listcompr’October13,2022Version0.4.0Date2021-10-02Title List Comprehension for RAuthor Patrick Roocks<****************>Maintainer Patrick Roocks<****************>Description Syntactic shortcuts for creating synthetic lists,vectors,data frames,and matrices using list comprehension.URL https:///patrickroocks/listcomprDepends R(>=3.1.2)License GPL(>=2)Suggests testthat,rmarkdown,knitr,dplyr(>=1.0.0)Collate'listcompr.r''gen-list.r''eval.r''expand.r'VignetteBuilder knitrRoxygenNote7.1.1Encoding UTF-8NeedsCompilation noRepository CRANDate/Publication2021-10-0215:50:02UTCR topics documented:gen.list (2)gen.list.expr (5)gen.logical.and (6)d.list (7)listcompr (8)Index101gen.list Generate Lists,Vectors,Data Frames and Matrices with List Compre-hensionDescriptionFunctions to transform a base expression containing free variables into a list,a vector,a data frame, or a matrix based on variable ranges and additional conditions.Usagegen.list(.expr,...)gen.vector(.expr,...)gen.data.frame(.expr,...,byrow=FALSE)gen.matrix(.expr,...,byrow=FALSE)Arguments.expr A base expression containing free variables which is evaluated for all combina-tions of variables,where the combinations of variables are given by the rangesand conditions(see...parameters).Expected structure of.expr:•For gen.list it may have arbitrary structure(including a list).•For gen.vector a value(i.e.,a vector of length1)is expected.•For gen.data.frame a(named)vector or list is expected which describesexactly one row of the data e list(name=val)if val is a non-fundamental type like difftime.•For gen.matrix either a(named)vector/list(like gen.data.frame)or ascalar is expected.In thefirst case,we expect the same as for gen.data.frame.In the latter case we expect exactly two variables(inducing rows and columnswhere the order depends on byrow)within the...arguments.Within.expr it is allowed to use functions and predefined constants from theparent environment....Arbitrary many variable ranges and conditions.For all free variables occurringin.expr a range must be assigned,e.g.,x=1:3,y=1:5for an expression x+y.At least one variable range is required.The ranges may depend on each other,e.g.,x=1:3,y=x:3or a substitution like x=1:3,y=2*x is allowed.Thegenerated values can be further restricted by conditions like x<=y.byrow Logical.If FALSE(the default),the elements of a vector within.expr are takenas columns.Otherwise,they are taken as rows.ValueThe result of gen.list is a list(a vector for gen.vector)containing an entry for each combination of the free variables(i.e.,the Cartesian product),where all the free variables in.expr are substi-tuted.The function gen.vector returns a vector while gen.list may contain also more complex substructures(like vectors or lists).The output of gen.data.frame is a data frame where each substituted.expr entry is one row.The base expression.expr should contain a(named)vector or list,such that each entry of this vector becomes a column of the returned data frame.If the vector contains a single literal without a name,this is taken as column name.For instance,gen.data.frame(a,a=1:5)returns the same as gen.data.frame(c(a=a),a=1:5).Default names’V1’,’V2’,...are used,if no names are given and names can’t be automatically detected.The result of gen.matrix:•It’s similar to gen.data.frame,if.expr evaluates to a vector of length>1,or row/column names are given.Each substituted.expr entry is one row of the matrix.In contrast to gen.data.frame,column names are not auto-generated,e.g.,gen.matrix(c(a_1,a_2),a_ =1:2)is an unnamed matrix.If the.expr argument has explicit names(e.g.,c(a_1=a_1, a_2=a_2)),these column names are assigned to the resulting matrix.•It’s a matrix where the rows and columns are induced by the two variables within (i).expr is a scalar,and no names or conditions are given.If byrow is FALSE,the second variable(i.e.,the inner loop)refers to the columns,otherwise it refers to the rows.For in-stance,gen.matrix(i+j,i=1:3,j=1:2)is a matrix with3rows and2columns.For gen.matrix(i+j,i=1:3,j=1:2,byrow=TRUE)we get2rows and3columns.All expressions and conditions are applied to each combination of the free variables separately,i.e., they are applied row-wise and not vector-wise.For instance,the term sum(x,y)(within.expr or a condition)is equivalent to x+y.Indices for variablesA range for a variable ending with an underscore(like x_)defines a set of ranges affecting allvariables named{varname}_{index},e.g.x_1.For instance,in gen.vector(x_1+x_2+x_3, x_=1:5)the variables x_1,x_2,x_3are all ranging in1:5.This can be overwritten for each single x_i,e.g.,an additional argument x_3=1:3assigns the range1:3to x_3while x_1and x_2 keep the range1:5.A group of indexed variables is kept always sorted according to the position of the main variable{varname}_.For instance,the two following statements produce the same results:•gen.vector(x_1+x_2+a,x_=1:5,a=1:2,x_1=1:2)•gen.vector(x_1+x_2+a,x_1=1:2,x_2=1:5,a=1:2)Folded expressionsExpressions and conditions support a...-notation which works as follows:•A vector like c(x_1,...,x_4)is a shortcut for c(x_1,x_2,x_3,x_4).•A named vector like c(a_1=x_1,...,a_3=x_3)is a shortcut for c(a_1=x_1,a_2=x_2, a_3=x_3).•A n-ary function argument like sum(x_1,...,x_4)is a shortcut for sum(x_1,x_2,x_3,x_4).•Repeated expressions of binary operators can be abbreviated with the...expressions as fol-lows:x_1+...+x_4is a shortcut for x_1+x_2+x_3+x_4.Note that,due to operatorprecedence,1+x_1+...+x_4will not work,but1+(x_1+...+x_4)works as expected.•For non-commutative operators,x_1-...-x_4is a shortcut for x_1-x_2-x_3-x_4which is evaluated as((x_1-x_2)-x_3)-x_4.The conditions may contain itself list comprehension expressions,e.g.,gen.logical.and to com-pose and-connected logical expressions.Character patternsIn expression there may occur characters with{}-placeholders.The content of these placeholders is evaluated like any other part of an expression and converted to a character.For example,"a{x}"is transformed into"a1"for x=1.Double brackets are transformed into a single bracket without evaluating the inner expression.For instance,"var{x+1}_{{a}}"is transformed into"var2_{a}"for x=1.See Alsod.list to generate named structures,gen.list.expr to generate expressions to be eval-uated later,gen.logical.and to generate logical and/or conditions,and listcompr for an overview of all list comprehension functions.Examples#Sum of1:xgen.vector(sum(1:x),x=1:10)#Same as above,but return as textgen.list("sum of1to{x}is{sum(1:x)}",x=1:5)#A list containing vectors[1],[1,2],[1,2,3],...gen.list(gen.vector(i,i=1:n),n=1:10)#A data frame of tuples(x_1,x_2,x_3)summing up to10gen.data.frame(c(x_1,...,x_3),x_=1:10,x_1+...+x_3==10)#Same as above,but restrict to ascending tuples with x_i<=x_(i+1)gen.data.frame(c(x_1,...,x_3),x_1=1:10,x_2=x_1:10,x_3=x_2:10,x_1+...+x_3==10)#A data frame containing the numbers in2:20,the sum of their divisors#and a flag if they are"perfect"(sum of divisors equals the number)gen.data.frame(list(n,sumdiv,perfect=(n==sumdiv)),n=2:20,sumdiv=sum(gen.vector(x,x=1:(n-1),n%%x==0)))#A diagonal matrix with(1,...,5)on the diagonalgen.matrix(if(i==j)i else0,i=1:5,j=1:5)gen.list.expr5 gen.list.expr Generate List and Vector Expressions with List ComprehensionDescriptionFunctions to transform a base expression containing free variables into a list or a vector of expres-sions,based on variable ranges and additional conditions.Usagegen.list.expr(.expr,...)gen.vector.expr(.expr,...)d.list.expr(.str,.expr,...)d.vector.expr(.str,.expr,...)Arguments.expr A base expression which is partially evaluated for all combinations of variables.It may still contain free variables....Arbitrary many variable ranges and conditions..str A character pattern,containing expressions to be evaluated in{}-brackets.DetailsSee gen.list for more details on the.expr and...parameters.See d.list for more details on the.str parameter.For variables with underscores additionally the evaluation of indices in()-brackets is supported.For example,an expression x_(i+1)is evaluated as x_3for i=2.ValueReturns an expression containing a list or a vector which might be evaluated later.The argument .expr is partially evaluated,where all free variables are substituted for which a range is given.The other variables remain untouched.See Alsogen.list to generate lists,d.list to generate named lists,and listcompr for an overview of all list comprehension functions.6gen.logical.and Examples#An expression which is partially evaluatedgen.list.expr(a_i+2*i,i=1:4)#Generate an expression with placeholders a_i,#generate data for a_1,...,a_4and finally evaluate itexpr<-gen.vector.expr(a_i+a_(j+1),i=1:3,j=1:3,i!=j)data<-gen.data.frame(c(a_1=a_1,...,a_4=a_4),a_=1:2)eval(expr,data)gen.logical.and Generate Logical Conditions with List ComprehensionDescriptionFunctions to compose and-/or-connected logical conditions,based on variable ranges and additional conditions.Usagegen.logical.and(.expr,...)gen.logical.or(.expr,...)Arguments.expr A base expression which is partially evaluated for all combinations of variables.It may still contain free variables....Arbitrary many variable ranges and conditions.DetailsSee gen.list for more details on the.expr and...parameters.For variables with underscores additionally the evaluation of indices in()-brackets is supported.For example,an expression x_(i+1)is evaluated as x_3for i=2.ValueReturns an expression expr_1&...&expr_n or expr_1|...|expr_n where expr_i is gener-ated from.expr,where all free variables are substituted for which a range is given.The other variables remain untouched.The generated condition may be used within the the conditions of gen.list and similar functions from this package.d.list7See Alsogen.list to generate lists and thereby make use of the generated logical conditions,and listcompr for an overview of all list comprehension functions.Examples#Returns a_1==1&a_2==2&a_3==3gen.logical.and(a_i==i,i=1:3)#A data frame of tuples(x_1,x_2,x_3,x_4)summing up to10with x_i<=x_(i+1)gen.data.frame(c(x_1,...,x_4),x_=1:10,x_1+...+x_4==10,gen.logical.and(x_i<=x_(i+1),i=1:3))#Get all permutations of1:4gen.data.frame(c(a_1,...,a_4),a_=1:4,gen.logical.and(a_i!=a_j,i=1:4,j=(i+1):4))#Get again the permutations of1:4,using filter from dplyrdf<-gen.data.frame(c(a_1,...,a_4),a_=1:4)dplyr::filter(df,!!gen.logical.and(a_i!=a_j,i=1:3,j=(i+1):4))d.list Generate Named Lists,Vectors,Data Frames,and Matrices with ListComprehensionDescriptionFunctions to transform patterns with placeholders into characters or into names of lists,vectors, data frames or matrices,based on variable ranges and additional conditions.Usaged.list(.str,.expr,...)d.vector(.str,.expr,...)d.data.frame(.str,.expr,...,byrow=FALSE)d.matrix(.str,.expr,...,byrow=FALSE)Arguments.str A character,containing expressions to be evaluated in{}-brackets,e.g.,"a{x}"is transformed into"a1"for x=1.Double brackets are transformed into a sin-gle bracket without evaluating the inner expression.For instance,"var{x+1}_{{a}}"is transformed into"var2_{a}"for x=1..expr A base expression containing free variables which is evaluated for all combina-tions of variables....Arbitrary many variable ranges and conditions.byrow Logical.If FALSE(the default),the elements of an.expr vector are taken as columns.Otherwise,they are taken as rows.DetailsThe free variables in the inner expressions(i.e.,the content of the{}-brackets)of.expr are evalu-ated in the same way as expressions in gen.list.See gen.list for more details on the.expr and...parameters.ValueThese functions return lists,vectors,data frames,and matrices.They work very similar to their counterparts without".named".Additionally the vector of characters,induced by.str,serves as a vector of names for the generated structures.In case of lists or vectors,the result is a named list ora named vector.For data frames and matrices,the names are taken as row names.See Alsogen.list for explanations on list and vector comprehension,and listcompr for an overview of all list comprehension functions.Examples#sum up1:i for i in1:5d.list("sum_to_{x}",sum(1:x),x=1:5)#matrix with named columns and rowsd.matrix("row{i}",d.vector("col{j}",i+j,j=1:3),i=1:3)#a matrix where the expression refers to the rows and not the columnsd.matrix("col{i}",c(row1=i,row2=10*i,row3=100*i),i=1:10,byrow=TRUE)listcompr Summary of the listcompr PackageDescriptionThe listcompr package offers some syntactic shortcuts to create lists,vectors and data frames con-taining values within a given range with given conditions.It is a light-weight package written in base R without any compiled code or dependencies to other packages.Functions•The main functionality of listcompr:generate lists,vectors,and data frames:gen.list •Generate named lists,vectors,and data frames:d.list•Generate expressions containing lists and vectors:gen.list.expr•Generate conditions to be used in other functions of listcompr:gen.logical.and VignettesTo learn the basics of listcompr,start with the vignette:vignette("introduction",package="listcompr")ContactTo submit bugs,feature requests or other comments,feel free to write a mail to me.Author(s)Patrick Roocks,<****************>Indexgen.data.frame(gen.list),2gen.list,2,5–9gen.list.expr,4,5,9gen.logical.and,4,6,9gen.logical.or(gen.logical.and),6gen.matrix(gen.list),2d.data.frame(d.list),7 d.list,4,5,7,9d.list.expr(gen.list.expr),5d.matrix(d.list),7d.vector(d.list),7d.vector.expr(gen.list.expr),5 gen.vector(gen.list),2gen.vector.expr(gen.list.expr),5 listcompr,4,5,7,8,810。
Motorola 3.5 kHz 产品说明书

RVN4126 3.59100-386-9100-386/T DEVICERVN41772-CD2-3.5MCS/MTSRVN41821-CD2-3.5XTS3000/SABER PORTABLE YES RKN4046KHVN9085 3.51-20 R NO HLN9359 PROG. STAND RVN4057 3.532 X 8 CODEPLUG NO3080385B23 & 5880385B30 MDVN4965 3.59100-WS/T CONFIG KITRVN4053 3.5ASTRO DIGITAL INTERFACE NO3080385B23RVN41842-CD RKN4046A (Portable) 2-3.5ASTRO PORTABLE /MOBILE YES3080369B73 or0180300B10 (Mobile) RVN41831-CD3080369B732-3.5ASTRO SPECTRA MOBILE YES(Low / Mid Power)0180300B10 (High Power) RVN4185CD ASTRO SPECTRA PLUS MOBILE NO MANY OPTIONS; SEESERVICE BRIEF#SB-MO-0101RVN4186CD ASTRO SPECTRA PLUS MANY OPTIONS;MOBILE/PORTABLE COMB SEE SERVICE BRIEF#SB-MO-0101RVN4154 3.5ASTROTAC 3000 COMPAR.3080385B23RVN5003 3.5ASTROTAC COMPARATORS NO3080399E31 Adpt.5880385B34RVN4083 3.5BSC II NO FKN5836ARVN4171 3.5C200RVN4029 3.5CENTRACOM SERIES II NO VARIOUS-SEE MANUAL6881121E49RVN4112 3.5COMMAND PLUS NORVN4149 3.5COMTEGRA YES3082056X02HVN6053CD CT250, 450, 450LS YES AAPMKN4004RVN4079 3.5DESKTRAC CONVENTIONAL YES3080070N01RVN4093 3.5DESKTRAC TRUNKED YES3080070N01RVN4091 3.5DGT 9000 DESKSET YES0180358A22RVN4114 3.5GLOBAL POSITIONING SYS.NO RKN4021AHVN8177 3.5GM/GR300/GR500/GR400M10/M120/130YES3080070N01RVN4159 3.5GP60 SERIES YES PMLN4074AHVN9128 3.5GP300 & GP350RVN4152 3.5GP350 AVSRVN4150 3.5GTX YES HKN9857 (Portable)3080070N01(Mobile) HVN9025CD HT CDM/MTX/EX SERIES YES AARKN4083/AARKN4081RiblessAARKN4075RIBLESS NON-USA RKN4074RVN4098H 3.5HT1000/JT1000-VISAR YES3080371E46(VISAR CONV)RVN4151 3.5HT1000 AVSRVN4098 3.5HT1000/ VISAR CONV’L.YES RKN4035B (HT1000) HVN9084 3.5i750YES HLN-9102ARVN4156 3.5LCS/LTS 2000YES HKN9857(Portable)3080070N01(Mobile) RVN4087 3.5LORAN C LOC. RECV’R.NO RKN4021ARVN4135 3.5M100/M200,M110,M400,R100 includesHVN9173,9177,9646,9774YES3080070N01RVN4023 3.5MARATRAC YES3080070N01RVN4019 3.5MAXTRAC CONVENTIONAL YES3080070N01RVN4139 3.5MAXTRAC LS YES3080070N01RVN4043 3.5MAXTRAC TRK DUPLEX YES3080070N01RVN4178CD MC SERIES, MC2000/2500DDN6124AW/DB25 CONNECTORDDN6367AW/DB9 CONNECTOR RVN41751-CD Rib to MIC connector 1-3.5MCS2000 RKN4062BRVN41131-3.5MCS2000RVN4011 3.5MCX1000YES3000056M01RVN4063 3.5MCX1000 MARINE YES3000056M01RVN4117 3.5MDC/RDLAP DEVICESRVN4105 3.5MOBILE PROG. TOOLRVN4119 3.5MOBITEX DEVICESRVN4128 3.5MPT1327-1200 SERIES YES SEE MANUALRVN4025 3.5MSF5000/PURC/ANALOG YES0180355A30RVN4077 3.5MSF5000/10000FLD YES0180355A30RVN4017K 3.5MT 1000YES RTK4205CRVN4148 3.5MTR 2000YES3082056X02RVN4140 3.5MTRI 2000NORVN41761-CD MTS2000, MT2000*, MTX8000, MTX90001-3.5*programmed by DOS which is included in the RVN4176RVN4131 3.5MTVA CODE PLUG FIXRVN4142 3.5MTVA DOCTOR YES3080070N01RVN4131 3.5MTVA3.EXERVN4013 3.5MTX800 & MTX800S YES RTK4205CRVN4097 1-CD MTX8000/MTX9000,MTS2000,MT2000*,* programmed by DOS which is included in the RVN4176HVN9067CD MTX850/MTX8250MTX950,MTX925RVN4138 3.5MTX-LS YES RKN4035DRVN4035 3.5MX 1000YES RTK4203CRVN4073 3.5MX 800YES RKN4006BHVN9395 P100, P200 LB, P50+, P210, P500, PR3000RVN4134 3.5P100 (HVN9175)P200 LB (HVN9794)P50+ (HVN9395)P210 (HVN9763)P500 (HVN9941)PR3000 (HVN9586)YES RTK4205HVN9852 3.5P110YES HKN9755A/REX1143 HVN9262 3.5P200 UHF/VHF YES RTK4205RVN4129 3.5PDT220YVN4051 3.5PORTABLE REPEATER Portable rptr.P1820/P1821AXRVN4061C 3.5PP 1000/500NO3080385B23 & 5880385B30 RVN5002 3.5QUANTAR/QUANTRO NO3O80369E31RVN4135 3.5R100 (HVN9177)M100/M200/M110/M400YES0180358A52RVN4146 3.5RPM500/660RVN4002 3.5SABER YES RTK4203CRVN4131 3.5SETTLET.EXEHVN9007 3.5SM50 & SM120YESRVN4039 3.5SMART STATUS YES FKN5825AHVN9054 3.5SOFTWARE R03.2 P1225YES3080070N01HVN9001 3.5SOFTWARE R05.00.00 1225LS YES HLN9359AHVN9012 3.5SP50RVN4001N 3.5SPECTRA YES3080369B73 (STANDARD)0180300B10 (HIGH POWER) RVN4099 3.5SPECTRA RAILROAD YES3080369B73RVN4110 3.5STATION ACCESS MODULE NO3080369E31RVN4089A 3.5STX TRANSIT YES0180357A54RVN4051 3.5SYSTEMS SABER YES RTK4203BRVN4075 3.5T5600/T5620 SERIES NO3080385B23HVN9060CD TC3000, TS3000, TR3000RVN4123 3.5VISAR PRIVACY PLUS YES3080371E46FVN4333 3.5VRM 100 TOOLBOX FKN4486A CABLE &ADAPTORRVN4133 3.5VRM 500/600/650/850NORVN4181CD XTS 2500/5000 PORTABLES RKN4105A/RKN4106A RVN41002- 3.5XTS3000 ASTRO PORTABLE/MOBILERVN4170 3.5XTS3500YES RKN4035DRIB SET UPRLN4008E RADIO INTERFACE BOX (RIB)0180357A57RIB AC POWER PACK 120V0180358A56RIB AC POWER PACK 220V3080369B71IBM TO RIB CABLE (25 PIN) (USE WITH XT & PS2)3080369B72IBM TO RIB CABLE (9 PIN)RLN443825 PIN (F) TO 9 PIN (M) ADAPTOR (USE W/3080369B72 FOR AT APPLICATION) 5880385B308 PIN MODULAR TO 25 PIN ”D” ADAPTOR (FOR T5600 ONLY)0180359A29DUPLEX ADAPTOR (MOSTAR/TRAXAR TRNK’D ONLY)Item Disk Radio RIB Cable Number Size Product Required Number Item Disk Radio RIB Cable Number Size Product Required NumberUtilizing your personal computer, Radio Service Software (RSS)/Customer Programming Software (CPS)/CustomerConfiguration Software (CCS) enables you to add or reprogram features/parameters as your requirements change. RSS/CPS/CCS is compatible with IBM XT, AT, PS/2 models 30, 50, 60 and 80.Requires 640K RAM. DOS 3.1 or later. Consult the RSS users guide for the computer configuration and DOS requirements. (ForHT1000, MT/MTS2000, MTX838/8000/9000, Visar and some newer products —IBM model 386, 4 MEG RAM and DOS 5.0 or higher are recommended.) A Radio Interface Box (RIB) may be required as well as the appropriate cables. The RIB and cables must be ordered separately.Licensing:A license is required before a software (RVN) order is placed. The software license is site specific (customer number and ultimate destination tag). All sites/locations must purchase their own software.Be sure to place subsequent orders using the original customer number and ship-to-tag or other licensed sites; ordering software without a licensed customer number and ultimate tag may result in unnecessary delays. To obtain a no charge license agreement kit, order RPX4719. To place an order in the U.S. call 1-800-422-4210. Outside the U.S., FAX 847-576-3023.Subscription Program:The purchase of Radio ServiceSoftware/Customer Programming/Customer ConfigurationSoftware (RVN & HVN kits) entitles the buyer/subscriber to three years of free upgrades. At the end of these three years, the sub-scriber must purchase the same Radio Service Software kit to receive an additional three years of free upgrades. If the sub-scriber does not elect to purchase the same Radio Service Software kit, no upgrades will be sent. Annually a subscription status report is mailed to inform subscribers of the RSS/CPS/CCS items on our database and their expiration dates.Notes:1)A subscription service is offered on “RVN”-Radio Service Software/Customer Programming/Customer Configuration Software kits only.2)“RVN” software must only be procured through Radio Products and Services Division (RPSD). Software not procured through the RPSD will not be recorded on the subscription database; upgrades will not be mailed.3)Upgrades are mailed to the original buyer (customer number & ultimate tag).4)SP software is available through the radio product groups.The Motorola General Radio Service Software Agreement is now available on Motorola Online. If you need assistance please feel free to submit a “Contact Us” or call 800-422-4210.SMART RIB SET UPRLN1015D SMART RIB0180302E27 AC POWER PACK 120V 2580373E86 AC POWER PACK 220V3080390B49SMARTRIB CABLE (9 PIN (F) TO 9 PIN (M) (USE WITH AT)3080390B48SMARTRIB CABLE (25 PIN (F) TO 9 PIN (M) (USE WITH XT)RLN4488ASMART RIB BATTERY PACKWIRELESS DATA GROUP PRODUTS SOFTWARERVN4126 3.59100-386/9100T DEVICES MDVN4965 3.59100-WS/T CONFIG’TN RVN41173.5MDC/RDLAP DEVICESPAGING PRODUCTS MANUALS6881011B54 3.5ADVISOR6881029B90 3.5ADVISOR ELITE 6881023B20 3.5ADVISOR GOLD 6881020B35 3.5ADVISOR PRO FLX 6881032B30 3.5BR8506881032B30 3.5LS3506881032B30 3.5LS5506881032B30 3.5LS7506881033B10 3.5LS9506881035B20 3.5MINITOR III8262947A15 3.5PAGEWRITER 20008262947A15 3.5PAGEWRITER 2000X 6881028B10 3.5TALKABOUT T3406881029B35 3.5TIMEPORT P7308262947A15 3.5TIMEPORT P930NLN3548BUNIVERSAL INTERFACE KITItem Disk Radio NumberSize Product。
IR RECEIVER MODULE说明书
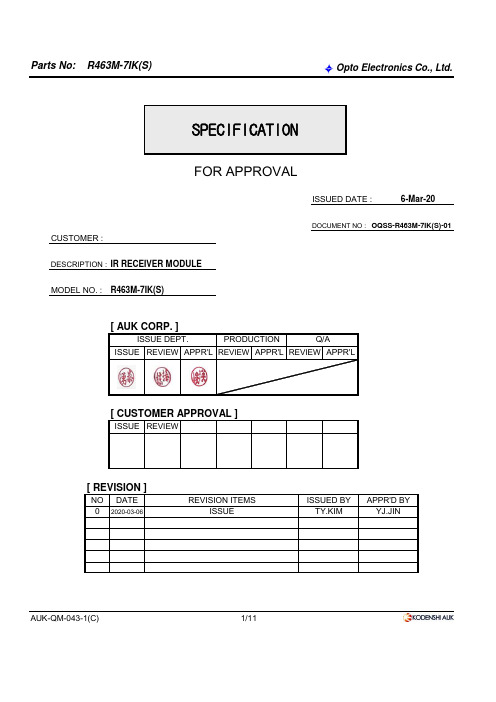
ISSUED DATE :CUSTOMER :IR RECEIVER MODULEMODEL NO. : R463M-7IK(S)[ AUK CORP. ][ CUSTOMER APPROVAL ][ REVISION ]AUK-QM-043-1(C)1/11DESCRIPTION :0NO PRODUCTIONREVIEW APPR'L DATEISSUE REVIEWQ/AYJ.JINISSUE DEPT.APPR'L2020-03-06ISSUE TY.KIM ISSUE REVIEW APPR'L REVIEW APPR'D BY ISSUED BY REVISION ITEMS6-Mar-20FOR APPROVALOQSS-R463M-7IK(S)-01DOCUMENT NO : SPECIFICATIONThis specification sheets include the contents under the copyright of AUK CORP.("AUK"). Please keep them with reasonable care as important information.Please don't reproduce or cause anyone reproduce them without AUK's consent.AUK takes no responsibility for damage caused by improper use of the devices which does not meet the conditions and absolute maximum ratings to be used specifiedin the relevant specification sheet.Please obey the instructions mentioned below for actual use of this device.① This device is designed for general electronic equipment.Main use of this device are as follows;* Computer * OA equipment * Telecommunication equipmet(Terminal)* Measuring instrument * Machine tool *Industrial robot* AV equipment * Home appliance,etc.② Please take proper steps in order to maintain reliability and safety, in case this device is used for the uses mentioned below which require high reliability.* Unit concerning control and safety of a vehicle (air plane,train,automobile etc.)* Traffic signal * Gas leak detection breaker* Fire box and burglar alarm box * Other safety equipment,etc.③ Please don't use for the uses mentioned below which require extremely high reliability.* Space equipment * Telecommunication equipment(Trunk)* Nuclear control equipment * Medical equipment(relating to any fatal element),etc. AUK-QM-043-2(C)2/111. DescriptionTheconsist of a PIN Photodiode of high speed and a preamplifier IC in the package as anreceiver for Infrared remote control systems2. Features◆ 2.7 ~ 5.5Volt supply voltage, low power consumption◆ Shielded against electrical field disturbance ◆ High immunity against ambient light ◆ Easy interface with the main board ◆ TTL and CMOS compatibility ◆ One mold package ◆ RoHS CompliancePinning:1 = GND,2 = Vcc,3 = Out3. Applications◆ TV, VTR, Audio, Air Conditioners, Car Stereo Units, Computers, Interior controlling appliances, and appliances that require remote controlling4. Package OutlinesSee the attached Drawing No.RM-R46□□-ASY-015. Absolute Maximum Ratings [Ta = 25℃ ]6. Reliability Test AUK-QM-043-2(C)3/11R463M-7IK(S)ParameterSymbolRatingT opr.260(Max 10 sec)T sol.Note : Storage Temperature T stg. Soldering TemperatureHeat Cycle *1 Dropping *2Supply Voltage / Output Voltage V cc 6 Supply Current / Output Current I out 2.5 Operating Temperature ℃Reflow Soldering Temperature (Pb Free)T sol.℃ Low Temperature *1 Moisture Sensitivity LevelsHigh Temperature / High Humidity *1Ta=+85℃, 85%RH, Vcc=5V t=240H Ta=-30℃, Vcc=5V t=240H Unit㎃℃-20℃∼80℃-25℃∼85℃℃hard wooden board from a 75㎝ height position(excepting deforms of terminals)V 260(Max 5 sec)ParameterHigh Temperature *1RatingTa=+80℃, Vcc=5V t=240H *1. Electro-optical Characteristics shall be satisfied after leaving 2hours in the normal temperature*2. Electro-optical Characteristics shall be satisfied and no deforms and destructions of appearance.Level 4 ( ≤30℃ / 60% RH 72hours )-25℃(0.5H) ∼+85℃(0.5H) 20cycleTest devices shall be dropped 3 time naturally onto 1237. Electro-optical Characteristics[ Ta= 25℃, Vcc=5.0V ]: 100 Ω ~ 470 Ω : 47 ㎌ ~ 100 ㎌: Optional (when using 10㏀ or more )When Rp is lower than 10㏀, Micom can't reply by a VoL rise.: Optional (when using 100 ㎊ less than)AUK-QM-043-2(C)4/11-: Indoor without extreme reflection of light400㎲under the conditions below against the standard transmitter Low Level Output Pulse Width *3-8000.5㎲400V OL -0.2Vcc-0.5Vcc-0.3High Level Output Pulse Width *3Note : *3. It specifies the maximum distance between emitter and detector that the output waveform satisfies the standard(8-2,3)T WLHigh Level Output Voltage *3-1) Measuring place 2) Ambient light source : Detecting surface illumination shall be irradiate 200±50Lux under ordinary white■ Cp1(Vcc-GND terminal series Condenser)■ Cp2(Vout-GND terminal pararllel Condenser)■ Rs (Vcc input series resistor)■ Rp (Vcc-Vout terminal Pullup resistor)4) Application Circuit : Recommend to design a circuit without using Rp & Cp2.fluorescence lamp without high frequency lightning3) Standard transmitter 1.6Vp-p under the measuring circuit specified in drawing(8-2,3) 200Lux0 ˚-I cc No InputSignalV cc =5V V cc =3VParameterSymbol 0.3λp Arrival Distance *3Peak Wavelength *3 Supply Voltage Range Unit- Current Consumption B.P.F Center Frequency f o ㎃㎚-37.9-㎑0.350.55V Min.Typ.Max.V cc 2.7 5.5ConditionsActive Low OutputV OH Low Level Output Voltage *3-800- Output FormBurst Wave = 600㎲Period = 1.2㎳V V T WH -±30 ˚m 32-m -4030cm over the ray axis : Burst wave indicated in drawing(8-1) of standard transmitter shall be arranged toL -940Receiver VccGNDVccGNDVout Cp1RsModuleMicomCp2TransmitterRp8. Measure Method8-1. Output Pulse Width8-2. Standard Transmitter+3.3V8-3. Test Condition of Transmission DistanceAUK-QM-043-2(C)5/11Transmitter output Carrier Frequency(fo)Duty50%Remocon output pulseT WLT WH600us 600usV OHV OL25Cm10㏀10㎌Vout10㏀TransmitterStandard TransmitterTransmission Distance : LVoutGND VCCOSC: Indicates horizontal and vertical directionsStandard θθθ9. Inspection CriteriaIn electro-optical characteristics, total quantity shall be inspected as below.- Front distance between emitter and detector - Current consumption - High level output voltage - Low level output voltage10. Customer must check below clauses before using10-1. When this infrared remote control detecting unit shall be adopted for wireless remote control, please keep the following standards.1) Data word length = Max. 100msec ●●●2) tpause = Min. 25msec ●××3) Duty(Σtburst /T ) = Max. 30%●×●4) tBurst = Min. 225usec ●×●5) tGap = Min. 330usec6) above (1)~(5) should be all meet and all remote control button should be operated properly.10-2. We recommand minimum 30cm distance between RC-M and transmitter for normal operating.If the distance between RC-M and Transmitter is too near, it might not respond. 10-3. If your condition doesn't meet the above statement, it might not operate properly.11. Caution(When use and storage of this device)AUK-QM-043-2(C)6/11RC5 / RC6SONY 15bit Mitsubishi Code Toshiba Micom CodeSONY 20bit Zenith Code 11-1. Store and use where there is no force causing transformation or change in quality11-2. Reflow maximum temperatuer is 250+0/-5℃ within max 10seconds within 72 hours From 30℃/60% humidity. during 96 hours which are a temperatre where has not become the damage of reel packing.11-3. From 30℃/60% humidity there is not the reflowing problem within 72 hours, but when the temperature11-4. Do not wash this device. Wipe the stains of diode side with a soft cloth.11-5. The shield case shall be grounded on the PCB pattern. There are two cases, one is that shield case If the receiver modules of shield case is not becoming ground connection, there is a possibility of being weakMatsushita Code in the EMI(Electronic Microwave Interperence) condition.Sharp CodeRCMMJVC CodeContinuous Data communication don't support. (tpause = 0ms)Suitable data format : ●Not recommend data format : xNEC CODE SONY 12bit condition is higher or 72 hours lapse after opening, product guideline is encouraged to dry from 60℃+5℃, ≤5% RHup to M.M 200V , HBM 2KV12. Period of Guarantee and Extent of Guarantee12-1. Period of Guarantee1 year after designated place.13. OthersAUK-QM-043-2(C)7/1111-10. This device has to control of static electricityObject : mercury, lead, cadmium, hexavalent chromium, polybrominated biphenyls and polybrominated diphenyl othersM.M = MACHINE MODEL(Resistance: 0KΩ Capacitor: 200pF)HBM = HUMAN BODY MODEL( Resistance: 1.5kΩ Capacitor: 100pF)In case where any trouble or questions arise, both parties agree to make full discussion covering the said problem11-7. Put decoupling device between Vcc and GND for reduce the noise from power supply line.11-8. The decrease in distance, the output noise, the malfunction, etc. might occur because of a surrounding 11-9. To prevent static electricity damage to the Pre-AMP make sure that the human body, the soldering iron is11-6. Solder pad within the condition of ratings. after soldering do not add extrorse force.connected to ground before usingrecommand Vcc-GND 47㎌ and Vcc- 100Ω. Decoupling device should be near receiver modules.R463M-7IK(S)12-2. Extent of GuaranteeKODENSHI AUK Corp. Shall supply the replacements against defects that will caused from KODENSHI AUK Corp. fault.12-3. This product complies with RoHS directive. electromagnetic environment.11-11. This device is not design to endure radiate rays and heavily charged particles.KODENSHIAUK Corp. guarantees a Receiver ModulesSOURCERC14. Reflow14-1. Regarding preheat and main heating, please set the temperature according to the reflow temperature profile as below.14-2. Even it is within the temperature profile condition as below, the disconnection of wire in the package might be caused by the stress join the package due to the PCB's curving and bending.Please take care about the condition of reflow machine when use.Recommended lead free reflow soldering temperature profile.14-3. Set the fumace temperatures for per-heating and heating in accorance with the reflow temperature profile as shown in the diagram.Exercise extreme care to keep the maximum temperature below 260℃.The temperature shown in the profile means the temperature at the device surface.Since there is a temperature difference between the component and the circuit board. It should be verified that the temperature of the device is accurately being measured.14-4. Please do not pile something on the product at reflow soldering because the transformation of the package resin may caused.14-5. When you do the reflow soldering twice, please process second reflow soldering within 8 hours after finish the first soldering14-6. Handing after reflow should be done only after the work surface has been cooled off.15. Manual Soldering15-1. Use a soldering iron of 25W or less. Adjust the temperature of the soldering iron below 350℃.15-2. Finish sodering within three seconds.15-3. Handle products only after the temperature has cooled off.15-4. To avoid the product is transformed and breakdown, it needs to take care that the power should not join to the product at soldering or immediately after soldering.AUK-QM-043-2(C)8/1116. DIMENSIONAUK-QM-043-2(C)9/1117. TAPING17-1. Taping specification・dimensions・product unsertion17-2. Reel specification・dimensionsMaterial : PS Conductivity The minimum packing quantity : 2,600pcs/reel AUK-QM-043-2(C)10/11Parts No : R463M-7IK(S)18. PACKINGAUK-QM-043-2(C)11/11Out Box Cardboard 450 x 450 x 36031,200 pcsITEM Size (W x L x H ㎜)Quantity MaterialsPlastic Reel 13" x 16Polystyren (Antistatic)2,600 pcs A.L Shieldng Bag400 x 450 x 0.2t Aluminum 2,600 pcs Opto Electronics Co., Ltd.IR Recevier_1pcs13Inch Reel = 2,600pcsLabelA.L Shielding BagLabelDry-Pack 50g*1eaMoisture-Sensitive DevicesLevel "4"Humidity Indication CardA.L Shielding Bag x 12ea(max)Out Box_OB-87Buffer Box_IB-87Buffer Box_IB-87Out Box_OB-87 =A.L Shielding Bag x 12ea + Buffer Box x 2eaA.L Shielding Bag x 12ea (max)TapingOut Box_OB-87 = 31,200pcsLabelxxxx-xxxxxxDG92xxxx-xxxxxxxxxxxxPART NO : .SPECIFICATION : R.MODULE[XX] LOT NO : 2A01-A1101 QTY : 31200VENDOR P/N : R463M-7IK(S) VENDOR/CODE : OEC / DG922012-01-11MSL 4RoHS。
ECMWF数据接口与CDS数据接口R包说明说明书

Package‘ecmwfr’January19,2023Title Interface to'ECMWF'and'CDS'Data Web ServicesVersion1.5.0Description Programmatic interface to the European Centre for Medium-RangeWeather Forecasts dataset web services(ECMWF;<https://www.ecmwf.int/>)and Copernicus's Climate Data Store(CDS;<https://cds.climate.copernicus.eu>).Allows for easy downloads of weatherforecasts and climate reanalysis data in R.URL https:///bluegreen-labs/ecmwfrBugReports https:///bluegreen-labs/ecmwfr/issuesDepends R(>=3.6)Imports httr,keyring,memoise,getPass,curl,R6,uuidLicense AGPL-3ByteCompile trueRoxygenNote7.2.1Suggests rmarkdown,covr,testthat,terra,maps,ncdf4,knitr,rlang,rstudioapi,jsonliteVignetteBuilder knitrNeedsCompilation noAuthor Koen Hufkens[aut,cre](<https:///0000-0002-5070-8109>), Reto Stauffer[ctb](<https:///0000-0002-3798-5507>),Elio Campitelli[ctb](<https:///0000-0002-7742-9230>),BlueGreen Labs[cph,fnd]Maintainer Koen Hufkens<**********************>Repository CRANDate/Publication2023-01-1913:00:02UTCR topics documented:wf_archetype (2)wf_check_request (3)12wf_archetype wf_datasets (4)wf_delete (5)wf_get_key (6)wf_product_info (7)wf_request (8)wf_services (10)wf_set_key (11)wf_transfer (12)wf_user_info (13)Index14 wf_archetype Creates an archetype functionDescriptionCreates a universal MARS/CDS formatting function,in ways similar to wf_modify_request() but the added advantage that you could code for the use of dynamic changes in the parameters provided to the resulting custom function.Usagewf_archetype(request,dynamic_fields)Argumentsrequest a MARS or CDS request as an R list object.dynamic_fields character vector offields that could be changed.DetailsContrary to a simple replacement as in wf_modify_request()the generated functions are consid-ered custom user written.Given the potential for complex formulations and formatting commands NO SUPPORT for the resulting functions can be provided.Only the generation of a valid function will be guaranteed and tested for.Valuea function that takes‘dynamic_fields‘as arguments and returns a request as an R list object.Examples##Not run:#format an archetype functionERAI<-wf_archetype(request=list(stream="oper",levtype="sfc",param="165.128/166.128/167.128",wf_check_request3 dataset="interim",step="0",grid="0.75/0.75",time="00/06/12/18",date="2014-07-01/to/2014-07-31",type="an",class="ei",area="73.5/-27/33/45",format="netcdf",target="tmp.nc"),dynamic_fields=c("date","time"))#print output of the function with below parametersstr(ERA_interim("20100101",3,200))##End(Not run)wf_check_request check ECMWF/CDS data requestsDescriptionCheck the validaty of a data request,and login credentials.Usagewf_check_request(user,request)Argumentsuser user(email address)used to sign up for the ECMWF data service,used to re-trieve the token set by wf_set_keyrequest nested list with query parameters following the layout as specified on the ECMWF API pageValuea data frame with the determined service and url service endpointAuthor(s)Koen HufkensSee Alsowf_set_key wf_transfer,wf_request4wf_datasets wf_datasets ECMWF dataset listDescriptionReturns a list of datasetsUsagewf_datasets(user,service="webapi",simplify=TRUE)Argumentsuser user(email address)used to sign up for the ECMWF data service,used to re-trieve the token set by wf_set_keyservice which service to use,one of webapi,cds or ads(default=webapi)simplify simplify the output,logical(default=TRUE)Valuereturns a nested list or data frame with the ECMWF datasetsAuthor(s)Koen HufkensSee Alsowf_set_key wf_transfer wf_requestExamples##Not run:#set keywf_set_key(email="*************",key="123")#get a list of serviceswf_services("*************")#get a list of datasetswf_datasets("*************")##End(Not run)wf_delete5 wf_delete delete ECMWF requestDescriptionDeletes a staged download from the queueUsagewf_delete(url,user,service="webapi",verbose=TRUE)Argumentsurl url to queryuser user(email address)used to sign up for the ECMWF data service,used to re-trieve the token set by wf_set_keyservice which service to use,one of webapi,cds or ads(default=webapi)verbose show feedback on processingAuthor(s)Koen HufkensSee Alsowf_set_key wf_transfer wf_requestExamples##Not run:#set keywf_set_key(email="*************",key="123")#get keywf_get_key(email="*************")##End(Not run)6wf_get_key wf_get_key Get secret ECMWF/CDS tokenDescriptionReturns you token set by wf_set_keyUsagewf_get_key(user,service="webapi")Argumentsuser user(email address)used to sign up for the ECMWF data serviceservice which service to use,one of webapi,cds or ads(default=webapi)Valuethe key set using wf_set_key saved in the keychainAuthor(s)Koen KufkensSee Alsowf_set_keyExamples##Not run:#set keywf_set_key(user="*************",key="123")#get keywf_get_key(user="*************")##End(Not run)wf_product_info7 wf_product_info Renders product lists for a given dataset and data serviceDescriptionShows and returns detailed product information about a specific data set(see wf_datasets).Usagewf_product_info(dataset,user,service="webapi",simplify=TRUE)Argumentsdataset character,name of the data set for which the product information should be loaded.user string,user ID used to sign up for the CDS/ADS data service,used to retrieve the token set by wf_set_key.service which service to use,one of webapi,cds or ads(default=webapi)simplify boolean,default TRUE.If TRUE the description will be returned as tidy data in-stead of a nested list.ValueDownloads a tidy data frame with product descriptions from CDS.If simplify=FALSE a list with product details will be returned.Author(s)Reto Stauffer,Koen HufkensSee Alsowf_datasets.Examples##Not run:#Open description in browserwf_product_info(NULL,"reanalysis-era5-single-levels")#Return informationinfo<-wf_product_info(NULL,"reanalysis-era5-single-levels",show=FALSE)names(info)##End(Not run)wf_request ECMWF data request and downloadDescriptionStage a data request,and optionally download the data to disk.Alternatively you can only stage requests,logging the request URLs to submit download queries later on using wf_transfer.Note that the function will do some basic checks on the request input to identify possible problems. Usagewf_request(request,user,transfer=TRUE,path=tempdir(),time_out=3600,job_name,verbose=TRUE)wf_request_batch(request_list,workers=2,user,path=tempdir(),time_out=3600,total_timeout=length(request_list)*time_out/workers)Argumentsrequest nested list with query parameters following the layout as specified on the ECMWF APIs pageuser user(email address)used to sign up for the ECMWF data service,used to re-trieve the token set by wf_set_keytransfer logical,download data TRUE or FALSE(default=TRUE)path path were to store the downloaded datatime_out how long to wait on a download to start(default=3*3600seconds).job_name optional name to use as an RStudio job and as output variable name.It has to bea syntactically valid name.verbose show feedback on processingrequest_list a list of requests that will be processed in parallel.workers maximum number of simultaneous request that will be submitted to the service.Most ECMWF services are limited to20concurrent requests(default=2).total_timeout overall timeout limit for all the requests in seconds.DetailsTwo sorts of requests are accepted,a simple data request based upon the available data in the(raw)CDS repository,and a workflow request which forwards an anonymous python function to the CDSservers and returns its results.The latter advanced use case is non-trivial,as both python and R code is required.However,itallows you to offload costly data operations/aggregation to the ECMWF servers,therefore limitingthe amount of data that needs to be transferred.A detailed summary of the use of the python API underpinning the CDS Toolbox(Editor)these op-erations is beyond the scope of this package.We refer to the[CDS Toolbox manual](https://cds.climate.copernicus.eu/toolbox and the small example included in the[vignettes](https://bluegreen-labs.github.io/ecmwfr/articles/cds_workflow_vignette.htm Valuethe path of the downloaded(requestedfile)or the an R6object with download/transfer informationAuthor(s)Koen HufkensSee Alsowf_set_key wf_transferExamples##Not run:#set keywf_set_key(user="*************",key="123")request<-list(stream="oper",levtype="sfc",param="167.128",dataset="interim",step="0",grid="0.75/0.75",time="00",date="2014-07-01/to/2014-07-02",type="an",class="ei",area="50/10/51/11",format="netcdf",target="tmp.nc")#demo querywf_request(request=request,user="*************")#Run as an RStudio Job.When finished,will create a#variable named"test"in your environment with the path to#the downloaded file.10wf_services wf_request(request=request,user="*************",job_name="test")##End(Not run)wf_services ECMWF services listDescriptionReturns a list of servicesUsagewf_services(user,simplify=TRUE)Argumentsuser user(email address)used to sign up for the ECMWF data service,used to re-trieve the token set by wf_set_keysimplify simplify the output,logical(default=TRUE)Valuereturns a nested list or data frame with the ECMWF servicesSee Alsowf_set_key wf_transfer wf_requestExamples##Not run:#set keywf_set_key(user="*************",key="123")#get a list of serviceswf_services("*************")#get a list of datasetswf_services("*************")##End(Not run)wf_set_key11wf_set_key Set secret ECMWF tokenDescriptionSaves the token to your local keychain under a service called"ecmwfr".Usagewf_set_key(user,key,service)Argumentsuser user(email address)used to sign up for the ECMWF data servicekey token provided by ECMWFservice which service to use,one of webapi,cds or adsDetailsIn systems without keychain management set the option keyring_backend to‘file‘(i.e.options(keyring_backend ="file"))in order to write the keychain entry to an encryptedfile.This mostly pertains to headlessLinux systems.The keychainfiles can be found in~/.config/r-keyring.ValueIt invisibly returns the user.Author(s)Koen HufkensSee Alsowf_get_keyExamples##Not run:#set keywf_set_key(user="*************",key="123")#get keywf_get_key(user="*************")#leave user and key empty to open a browser window to the service s website#and type the key interactivelywf_get_key()12wf_transfer ##End(Not run)wf_transfer ECMWF data transfer functionDescriptionReturns the contents of the requested url as a NetCDFfile downloaded to disk or the current status of the requested transfer.Usagewf_transfer(url,user,service="webapi",path=tempdir(),filename=tempfile("ecmwfr_",tmpdir=""),verbose=TRUE)Argumentsurl R6wf_request)query outputuser user(email address)used to sign up for the ECMWF data service,used to re-trieve the token set by wf_set_key.service which service to use,one of webapi,cds or ads(default=webapi)path path were to store the downloaded datafilenamefilename to use for the downloaded dataverbose show feedback on data transfersValuea netCDF of data on disk as specified by a wf_requestAuthor(s)Koen HufkensSee Alsowf_set_key wf_requestwf_user_info13 Examples##Not run:#set keywf_set_key(user="*************",key="123")#request data and grab url and try a transferr<-wf_request(request,"**************",transfer=FALSE)#check transfer,will download if availablewf_transfer(r$get_url(),"**************")##End(Not run)wf_user_info ECMWF WebAPI user info queryDescriptionReturns user info for the ECMWF WebAPIUsagewf_user_info(user)Argumentsuser user(email address)used to sign up for the ECMWF data service,used to re-trieve the token set by wf_set_keyValuereturns a data frame with user infoSee Alsowf_set_key wf_services wf_datasetsExamples##Not run:#set keywf_set_key(user="*************",key="123")#get user infowf_user_info("*************")##End(Not run)Indexwf_archetype,2wf_check_request,3wf_datasets,4,7,13wf_delete,5wf_get_key,6,11wf_product_info,7wf_request,3–5,8,10,12wf_request_batch(wf_request),8wf_services,10,13wf_set_key,3–10,11,12,13wf_transfer,3–5,8–10,12wf_user_info,1314。
Carrier Transicold PrimeLINE 微型服务工具操作指南说明书

Title: Micro-Link® 3 Service Tool operationINSTRUCTIONSPart Number : 07-00572-00Part Name : Micro-Link® 3 Service Tool “MST”It is important to read the instructions prior and perform each step:Step 1 - Software Downloading to PC:Step 2 - USB Stick Preparation:Step 3 - Loading Software on USB stick from the PCStep 4 - Service Tool Initialization and UpdatesStep 5 - Uploading operational software or Downloading data(Optional) Step 6 - Utility softwareStep 1 - Software Downloading to PC:The following software needs to be downloaded to your PC from the Carrier Container TransCentral Information Center at . Access to the site requires an ID / password. To access the latest version of software after signing into TransCentral, navigate to Service / View Container Info / Software.1.scrl53XX.ml3 (Software to be uploaded)2.recp51XX.ml3 (Software to be uploaded)3.co2_57XX.ml3 (Software to be uploaded)4.cfXXXXXX.CF3 (latest model Configuration required)5.menuXXXX.ml3 (latest Menu required)6.read0513.ml3 or newer (latest Databank required)Title: Micro-Link® 3 Service Tool operationINSTRUCTIONSStep 2 - USB Stick Preparation:To prepare the USB stick:1. A USB2.0 stick is required, for software upload and for data download.Functionality of a 3.0 stick is not recommended or guaranteed.2.Plug the USB stick into computer USB port.3.Open Windows Explorer4.Right click on Removable Disk (USB stick) and then click on Properties5.Verify File system is FAT or FAT32. (see Figure 1)Figure 1 - File system Figure 2 – Format the USB Stick to FAT Note: If file system is not FAT or FAT32, reformat the USB stick to FAT or FAT32.To format a USB Stick to a FAT or FAT32 File system:-Open Windows Explorer;-Right click on Removable Disk (USB stick), and then click on Format;-Verify File system is FAT or FAT32 (Default);-Click on Start (see Figure 2);-After formatting the USB stick, close all windows.Title: Micro-Link® 3 Service Tool operationINSTRUCTIONSStep 3 - Loading Software on USB stick from the PCTo load the USB stick:1.Create main folder named “CARRIER”. (Not case sensitive)2.Create all subfolders under “CARRIER”. These subfolders are named “Upload”, “Read”,“Firmware”, and “Utility”. (Not case sensitive.) The “D ownload” subfolder is createdautomatically after downloading data.Note: A dedicated download or upload service tool can be initialized by creating only one of the two subfolders (“Upload” or “Read”) on the USB stick.3.Load the following files from the PC to the USB stick under “Upload” for software upload:Required Files:∙menuXXXX.ml3 (latest Menu required)∙cfXXXXXX.CF3 (latest Configuration required)Selectable files:∙scrl53XX.ml3 (Software to be uploaded)∙recp51XX.ml3 (Software to be uploaded)∙co2_57XX.ml3 (Software to be uploaded)Note: The total size of stored files in the “Upload” subfolder cannot exceed 4MB.4.Load the “read0513.ml3” or newer file from the PC to the USB stick under “Read” for datadownload.Note:The “read0515.ml3” (or newer) is recommended when using the service tool.5.Optional sub folders: “Utility” (see Step 6 “Utility software”) / “Firmware” (see Step 4 “ServiceTool Initialization and Updates”).Title: Micro-Link® 3 Service Tool operationINSTRUCTIONSStep 4 - Service Tool Initialization and UpdatesTo initialize the service tool and load operational software onto the service tool (from USB stick):1.Power unit OFF.2.Inspect the PCMCIA pins of the programming port, using a flashlight, to verify if the pinsare not bent.Note: If there are bent pins do not insert the service tool.3.Insert the service tool into the programming slot of the controller.4.Insert a preloaded USB stick into the service tool (see Step 3 “Loading Software on USB”).5.Power the unit ON with the service tool installed.Note: If there is newer firmware stored on the USB stick (in the “F irmware” subfolder), the service tool will automatically update to the newer firmware. During thefirmware upload a percentage counter is shown on the right side of the display.Wait for the status LED to stop blinking. Do not turn off the unit.Figure 3 - Position Status LED6.At start-up “USb LOAd” is shown on the display. Wait un til “dnLd dAtA” is shown.Scroll through the menu to select the desired action using the UP/DOWN keys on thekeypad and confirm by pressing the ENTER key.Note: At first start-up or if there is newer software stored on the USB stick (in the“U pload” or “U tility” subfolder), the service tool will update the on-boardoperational software. During upload of the newer software onto the service tool apercentage counter is shown on the right side of the display.7.After initialization of the service tool, the following needs to be taken in account:-If a download is required, a USB stick must be inserted into the service tool.-If only an upload is required, the insertion of a USB stick is optional.Note: The service tool can be used to upload Operational Software for the ML3 without having a USB stick inserted after initialization.Note: To initialize a dedicated download or upload service tool, see Step 3 “LoadingSoftware on USB”.Title: Micro-Link® 3 Service Tool operationINSTRUCTIONSTo update the service tool:1.Prepare the USB stick by creating the subfolder named “Firmware” under “CARRIER”.Note: The firmware file needs to be downloaded to your PC from the Carrier Container TransCentral Information Center at .2.Load the newest firmware file in the subfolder “Firmware”.3.Power unit OFF.4.Insert the service tool into the programming slot of the controller.5.Insert the preloaded USB stick (with firmware) into the service tool.6.Power the unit ON with the service tool installed.7.The new firmware will now be automatically loaded. A percentage counteris shown on the right side of the display to show the progress.8.Wait for “LoAd done” to be shown on the display.9.The service tool is finished upgrading when ”dnLd dAtA” is shown on the display.Note: To check the current firmware version on the service tool in the main menu, pressthe “Alt. Mode” key on the keypad. The version number will be shown on the display as“YYYY-MM-DD” (year, month, day)..Service Tool Menu StructureTitle: Micro-Link® 3 Service Tool operationINSTRUCTIONSStep 5 - Uploading operational software or Downloading dataWith software loaded on the USB stick, and the service tool initialized, a selection can be made between downloading data or uploading operational software. When having selected to download, or to upload, the standard operation is the same as DataBANK for download and software uploads using an SRAM Card.Uploading operational software:1.Power unit OFF, and insert the service tool into the programming slot of the controller.2.Power unit ON using the start/stop switch. Using the keypad, choose “LOAd SoFt” in the Pre-menu. “InIt” will be shown during initialization.Note: Screen will go blank for a short period (few seconds) after initialization is done.Do not turn off the unit.3.“SE t UP” will be shown on the display after initialization. Load software by selecting thecorrect software version using the keypad and press ENTER. Press ENTER again to confirm.4.When the controller displays “Pro donE” AND the service tool’s status LED is solid blue, youcan power unit OFF and remove the service tool.Downloading data:1.Power unit OFF, and insert the service tool into the programming slot of the controller.2.Power unit ON using the start/stop switch. Using the keypad, choose “dnLd dAtA” in the Pre-menu. “InIt” will be shown during initialization.Note: Screen will go blank for a short period (few seconds) after initialization is done.Do not turn off the unit.3.“dnLd ALL” will be displayed and confirm by pressing ENTER on the keypad. If anotherdownload type is preferred, select the preferred data download type using the keypad.4.When the controller displays “dnLd donE” AND service tool’s status LED is solid blue, powerunit OFF and remove the service tool.Note:if “read0513.ml3” is used, please wait a few seconds after “dnLd donE” is shown on the display AND wait until the service tool’s status LED is solid blue.5.Download can now be transferred from the USB stick to your PC for data evaluation usingDataLINE.Title: Micro-Link® 3 Service Tool operationINSTRUCTIONS(Optional) Step 6 - Utility softwareThe utility software needs to be downloaded to your PC from the Carrier Container TransCentral Information Center (see Step 1 “Software Downloading to PC”).To use the utility software, read the available instruction procedures posted on the TransCentral website or contact your local field service manager for assistance.Loading Utility software on USB stick from the PC:1.The software file needs to be stored on the USB stick, within the “Utility”subfolder in the “CARRIER” folder.Note: Only one utility software file may be placed within the “Utility” subfolder. The utility files are not selectable.2.After the USB stick is loaded with the utility software file, the USB stick is readyto load the software onto the service tool.3.Make sure the power of the controller is off.4.Insert the service tool into the programming slot of the controller.5.Insert the preloaded USB stick into the USB slot of the service tool.6.Power the unit ON with the service tool installed.7.At start-up “USb LOAd” is shown on the display. Wait until “dnLd dAtA” isshown. A percentage counter is shown on the right side of the display to showthe progress.8.After initialization of the service tool, the utility software is ready to be used.Note: The service tool can only be utilized for service in combination with thecontroller after initialization.Note: The service utility software will be stored on the service tool for futureuse. If a different service utility is required, repeat process at step 1.Title: Micro-Link® 3 Service Tool operationINSTRUCTIONSStatus LED Reference ChartUSB status is visible through the on-board status LED patterns.Keypad FeaturesTitle: Micro-Link® 3 Service Tool operationINSTRUCTIONSTroubleshootingService tool does not start.Make sure the power of the unit/controller is OFF and check if the tool is fully inserted.When the tool is inserted, power up the unit/controller, and check the status LED for activity (see status LED reference chart).“USb” ”LOAd” (alternating) message is shown on display.USB is in use and/or the service tool is updating software onto the service tool. Loading the service tool can take a few minutes. (see Step 4 "Service Tool Initialization and Updates")“USb LOAd” (not alternating) message is shown on display.The service tool is starting up for use. This can take up to a few seconds.Note: If th e “USb LOAd” message persists, replace the service tool.“nO FILE” “USb Err” (alternating) message is shown on display.USB stick is not present or DataBANK file is not found on the USB stick. Make sure the USB stick is inserted into service tool with the DataBANK file present (see Step 3 “Loading Software on USB stick from the PC”).“InIt Err” message is shown on display.Toggle the power of the unit/controller OFF > ON, and the service tool should recover.“PrOG FAIL” message is shown on display when loading software.Please repeat the initialization procedure (see Step 4 "Service Tool Initialization and Updates").Note: If th e “PrOG FAIL” message persists, replace the service tool.“bA d CA rd” message is shown on display.Toggle the power of the unit/controller OFF > ON, and the service tool should recover.Note: If th e “bAd CArd” message persists, replace the service tool.“Err2” message is shown on display.Toggle the power of the unit/controller OFF > ON, and the service tool should recover.Note: If th e “Err2” message persists without the service tool installed, use the ERR2 correction software (see Step 6 “Utility software”).If th e “Err2” message persists with the service tool installed, replace the service tool.Utility software file is present on the USB stick, but the wrong utility is executed.Check if there is only one file loaded onto the USB stick in the “Utility” subfolder. If t here is more than one software file present, remove the other software files (see Step 6 “Utility software”).Title: Micro-Link® 3 Service Tool operationINSTRUCTIONSFrequently Asked QuestionsQ: How do I position the service tool into the programming port?A: The enclosure has an orientation arrow located underneath the dust cap. This arrow should be pointed up.Q: Which Micro-Link controllers can be serviced using the service tool?A: The service tool is designed to operate with both the yellow and green ML3 controllers.Q: Is it required to always have the USB stick inserted?A: No. After initialization the USB is not required for uploading operational software or utility software for the controller.Q: What files are required on the USB stick for the service tool to operate?A: Only the Carrier original software files are required (see Step 1 “Software Downloading to PC”). Q: Is it possible to have a service tool dedicated to either only upload or download?A: Yes. If the “D ownload” subfolder is removed, the service tool will function as a dedicated upload tool. If the “U pload” subfolder is removed, the service tool will function as a dedicated download tool.Download service tool: Upload service tool:Q: What is the maximum file size capacity of the service tool for (multiple) operational software files? A: 4MB. (This is enough to store all current unit type operational software files).Q: How many downloads can be made?A: This depends on the storage capacity of the USB stick inserted.Q: What USB stick types are preferred?A: The service tool is designed to operate with a USB 2.0 interface.Q: Where are the downloaded data files located on my USB stick?A: This is stored within the “D ownload” subfolder located in the “C ARRIER” folder. This subfolder will be automatically created when downloading is completed.Q: Can the firmware of the service tool be upgraded?A: Yes, see Step 4 “USB Service Tool Initialization and Updates”Q: Can I check the current version of the service tool firmware?A: This can be checked by pressing the “ALT. MODE” key on the keypad while in the menu. The version number will be shown on the display as “YYYY-”“MM-DD”.Q: How many software files may be stored in the “Utility” subfolder?A: Only one file may be present in the “Utility” subfolder.。
ATmega128A-STK600 硬件和软件入门教程说明书

APPLICATION NOTEHardware and Software Getting StartedATmega128A-STK600 IntroductionAn easy and fast way to start developing and evaluating the ATmegaS128 device is to use the ATmega128A industrial version with the STK600 starter-kit.This document guides you step by step to setup the hardware and software, to program and run your first code with the ATmega128A device. RequirementsTo use this “Getting Started” document you need to gather the following materials:- One STK600 evaluation kit (ATSTK600)- One STK600-RC064M-9 Routing board (ATSTK600-RC09)- One STK600-TQFP64 Socket Board with a ZIF socket. (ATSTK600-SC02) - One ATmega128A in TQFP64 package- Atmel Studio available from : /Microsite/atmel-studio- “ATmegaS128_led_chaser.zip” software FileObjectiveThe aim is prepare the hardware, program and run a short demo based on the “led chaser” software.1 Hardware Configuration1.1 Step 1.Unpack the STK600 kit and install the RC064M-9 routing board as shown on the figure below.ATmega128A-STK600 [APPLICATION NOTE] Atmel-41074B-Aero-Hardware and Software Getting Started-05/20162ATmega128A-STK600 [APPLICATION NOTE]Atmel-41074B-Aero-Hardware and Software Getting Started-05/20163Install the STK600-TQFP64 socket board as shown on the figure below.Connect an USB cable between your workstation and the STK600 board and connect an 8-wires flat cable between the ports A(0-7) and LED(0-7) as shown in the figure below. Before connecting the USB cable, set the power switch to “Off” position. Those two cables are supplied in the STK600 kit.ATmega128A-STK600 [APPLICATION NOTE] Atmel-41074B-Aero-Hardware and Software Getting Started-05/20164ATmega128A-STK600 [APPLICATION NOTE]Atmel-41074B-Aero-Hardware and Software Getting Started-05/20165Install the ATmega128A device into the TQFP64 socket being careful to insert it in the right direction by matching together the indexes of the package and the device as shown in the figure below.1.5Step 5.Verify that the jumpers and the switch are configured as shown on the figure below. The jumpers VTARGET, RESET, AREF0, AREF1 must be set and the clock switch must be set to “INT” position.Connect a 10-wires flat cable on the JTAG connector as shown on the figure below. The cable is supplied in the STK600 kit.Move the power switch to “ON” position. The hardware configuration is now complete. The next step will consist to run the application software.ATmega128A-STK600 [APPLICATION NOTE] Atmel-41074B-Aero-Hardware and Software Getting Started-05/20166ATmega128A-STK600 [APPLICATION NOTE]Atmel-41074B-Aero-Hardware and Software Getting Started-05/201672 Software ConfigurationThis section guides you in few steps to prepare your workstation to program and run the “led chaser” demo.Prerequisite 1.: download Atmel Studio from the URL /Microsite/atmel-studio and install it on your workstation.Prerequisite 2.: unzip the “led chaser” demo file.2.1 Step 7.Double click on the file “Led_Chaser.atsln”. It makes run Atmel Studio (if a window requesting an update appears, you can close it).2.2 Step 8.Click on the programming Icon as shown on the figure below.ATmega128A-STK600 [APPLICATION NOTE] Atmel-41074B-Aero-Hardware and Software Getting Started-05/20168 A window should pop as shown on the figure below.Select STK600 as tools, ATmega128A as device and JTAG as Interface then click on the “Apply” button. In return, the system should display the information shown on the figure below, meaning that the hardware configuration has been recognized by the system.ATmega128A-STK600 [APPLICATION NOTE]Atmel-41074B-Aero-Hardware and Software Getting Started-05/20169Click on the “Read” button to get the signature bytes of the ATmega128A.The voltage supply of the ATmega128A device can be adjusted from your workstation. If the voltage level is close to zero, it is not possible to read the signature bytes. Therefore the voltage supply must be tuned. You should read the value 0x1E9702 meaning that the system is able to communicate with the ATmega128A device. If an error message comes up, check the device voltage by clicking on the “Read” button. If it is not possible, click on the “board settings” option from the left menu.Note : The ATmegaS128 is a 3.3V device while the ATmega128A is a 2.7-5.5V device. Therefore, theATmega128A lets you the choice between 3.3V or 5V. The pictures of this document are provided with the 5V option.Adjust the voltage level by means of the cursor as shown on the figure below then click on the “Write” button. Verify the target voltage and the availability of the signature bytes (0x1E9702).ATmega128A-STK600 [APPLICATION NOTE] Atmel-41074B-Aero-Hardware and Software Getting Started-05/201610ATmega128A-STK600 [APPLICATION NOTE]Atmel-41074B-Aero-Hardware and Software Getting Started-05/201611 Configuring the fuse bytes of the ATmega128A. Click on the “Fuses” option from the left menu.Those fuse bytes enable to configure several device hardware parameters.Verify that the M103C fuse is unselected, that the JTAGEN and SPIEN ones are selected, then click on the “Program” button.Programming the code. Click on the “Memories” option from the left menu then click on “Erase now” button to erase the device. Find the file “Led_Chaser.elf” on your worstation from the path\led_chaser\GccBoardProject2\Debug, then click on the “Program” button.The demo should start after few seconds.Congratulations. You have now completely set up your hardware and software environment and programmed your first AVR based demo. Enjoy by changing the source code and reprogramming the chip.ATmega128A-STK600 [APPLICATION NOTE] Atmel-41074B-Aero-Hardware and Software Getting Started-05/2016123 Revision HistoryA 10/2015 Initial document release.B 05/2016 Page 1 : corrected errors on the ordering numbers of the STK600-RC064M-9 routing card and the STK600-TQFP64 socket cardATmega128A-STK600 [APPLICATION NOTE]Atmel-41074B-Aero-Hardware and Software Getting Started-05/201613。
- 1、下载文档前请自行甄别文档内容的完整性,平台不提供额外的编辑、内容补充、找答案等附加服务。
- 2、"仅部分预览"的文档,不可在线预览部分如存在完整性等问题,可反馈申请退款(可完整预览的文档不适用该条件!)。
- 3、如文档侵犯您的权益,请联系客服反馈,我们会尽快为您处理(人工客服工作时间:9:00-18:30)。
vVSMphwearree®VMware ClVovMSuAdwNaF™roeundation™VMNSwXa®re
Compute
QCTS硬tor件ag平e 台
Network
Private cloud
Public cloud
基础架构由服务 供货商管理
• 部署在云端 • 订阅公有云服务 • 虚拟机、应用程序由公司IT人
使用单一联络窗口进行生命周期管理, 包含验证、认证、终端部署与后续维护
生命周期管理
TCO的节省 2
SDDC软件完善的功能与云达科技(QCT) 高成本效益的硬件平台的结合将为企业
显着地降低营运成本与资本支出
提供多样的规格以有效满足客户需求 性能的优化
预先安装与配置的效能优化机柜解决方案
-最大数量: 32 节点 -最小订购量: 4 节点 -最多可扩建至8个机柜
QCT与VMware 合作推出QxStack powered by VMware Cloud Foundation™ 加强私有云与公有云的键结
基础架构由公司IT 人员管理
• 部署在地端 • 使用认证的QCT硬件平
台 • 虚拟机、应用程序与基
础架构皆由公司IT人员 管理
1
硬件
Sof软tw件are
VMware Cloud Foundation™
提供可靠的硬件质量
QCT产品线包含服务器、储存装置、网络交换器 、整合式机柜系统与云端解决方案。在超过20年 生产硬件的经验当中,我们求新求变,产品质量 有目共睹
於全球的展示中心进行测试
QCT目前在台湾、美国与德国均提供展示中心拱 与客户参观与远程测试的机会。中国的据点也预 计在2017年开幕
4
需要)
3
选择QCT QxStack Powered by VMware Cloud Foundation™
取得与VMware合作的先机
QCT从2014年起,即提供硬件与VMware进行 Cloud Foundation™的测试,是第一家与VMware 在Cloud Foundation™上进行合作的公司
n
Uplinks
Cisco Nexus 9372PX/93180YC
交换器用来链接数据,(连接 每个交换器与数据中心LAN
至4 x 40GE uplink)
QuantaMesh BMS-LB9 Management交换器 负责做频外连结
Cisco Nexus 9332 PQ Spine交换器负责跨柜连 接与管理 (仅有第一柜
与VMware一同支持客户测试/展示
QCT在美国与欧洲与VMware合作,提供3个实场测 试地点展示解决方案,并供与客户做PoC
一站式购物体验优化客户经验
QCT与多家软件厂商合作,提供客户多样的解 决方案,让云端科技的采用更加方便,并优化 客户一站式购物的体验
采用市场上最新的技术
QCT关注市场趋势,在产品设计中采用市场上最新 的技术。例如:QCT为Intel Purley platform early shipment program(ESP)的第一个合作
预安装网络线与机柜 Server
预规划的电源提供 服务
10 GE ToR switch
预先配置的网络与 上行线路
1 GE Management switch
可配置的 CPU, 内存与 储存装置
32 x 40GE Spine switch
Quanta Grid-D51B 1U
Bu6i4lt0-in处理器D核ro心ps ,For 12PToBwe内r 存(384PGowB e/r台&) Distr5ib0u0tTioB原始N存et储work
员管理 • 基础架构由第三方服务
供货商管理
QxStack Powered by VMware Cloud Foundation™ 的效益
简易性 弹性
透过VMware SDDC Manager™简化SDDC 部署、资源分配、与维运管理
随着需求增长进行弹性扩充与组态设定 ,以满足企业动态的成长
可靠性
提供经过预先验证与测试的的SDDC一 站式解决方案,以确保软硬件兼容性与 可靠性